How to Integrate Kubernetes Clusters using Contrail Networking into Google Cloud Anthos
This topic covers Contrail Networking in Kubernetes-orchestrated environments that are using Contrail Networking Release 20-based releases.
Starting in Release 22.1, Contrail Networking evolved into Cloud-Native Contrail Networking. Cloud-Native Contrail Networking offers significant enhancements to optimize networking performance in Kubernetes-orchestrated environments. We recommend using Cloud-Native Contrail for networking for most use cases in Kubernetes-orchestrated environments.
For general information about Cloud-Native Contrail, see the Cloud-Native Contrail Networking Techlibrary homepage.
Anthos is an application management platform developed by Google that provides a consistent development and operations experience for users working in cloud networking clusters that were created in Google Cloud or on third-party cloud platforms. For additional information on Anthos, see theAnthos Overview from Google Cloud.
The purpose of this document is to illustrate how cloud environments using Kubernetes for orchestration and Contrail Networking for networking can be integrated into the Anthos management platform. This document shows how to create clusters in three separate cloud environments—a private on-premises cloud, a cloud created using the Elastic Kubernetes Service (EKS) in Amazon Web Services (AWS), and a cloud created using the Google Kubernetes Engine (GKE) in the Google Cloud Platform—and add those clusters into Anthos.
This document also provides instructions on introductory configuration and usage tasks after the clouds have been integrated into Anthos. It includes a section on Anthos Configuration management and a section showing how to load applications from the Google Marketplace into third-party cloud environments.
This document covers the following topics:
Prerequisites
The procedures in this document make the following assumptions about your environment:
All Environments
The following CLI tools have been downloaded:
kubectl. See Install and Set Up kubectl.
(Recommend for management) kubectx and kubens. See kubectx + kubens: Power tools for kubectl in Github.
Google Cloud Platform
The GCP CLI tools from the Cloud SDK package are operational. See Getting Started with Cloud SDK from Google.
Amazon Web Services
This procedure assumes that you have an active AWS account with operating credentials and that the AWS CLI is working on your system. See the Configuring the AWS CLI document from AWS.
The eksctl CLI tool is running. See eksctl from the eksctl website.
Creating Kubernetes Clusters
This sections shows how to create the following Kubernetes clusters:
- On-Premises: Creating the Private Kubernetes Cluster
- Amazon Web Services (AWS): Install Contrail Networking in an Elastic Kubernetes Service (EKS) Environment
- Google Cloud Platform (GCP): Creating a Kubernetes Cluster in Google Kubernetes Engine (GKE)
On-Premises: Creating the Private Kubernetes Cluster
Create an on-premises Kubernetes cluster that includes Contrail Networking. See Installing Kubernetes with Contrail.
The procedure used in this document installs Kubernetes 1.18.9 on a server node running Ubuntu 18.04.5:
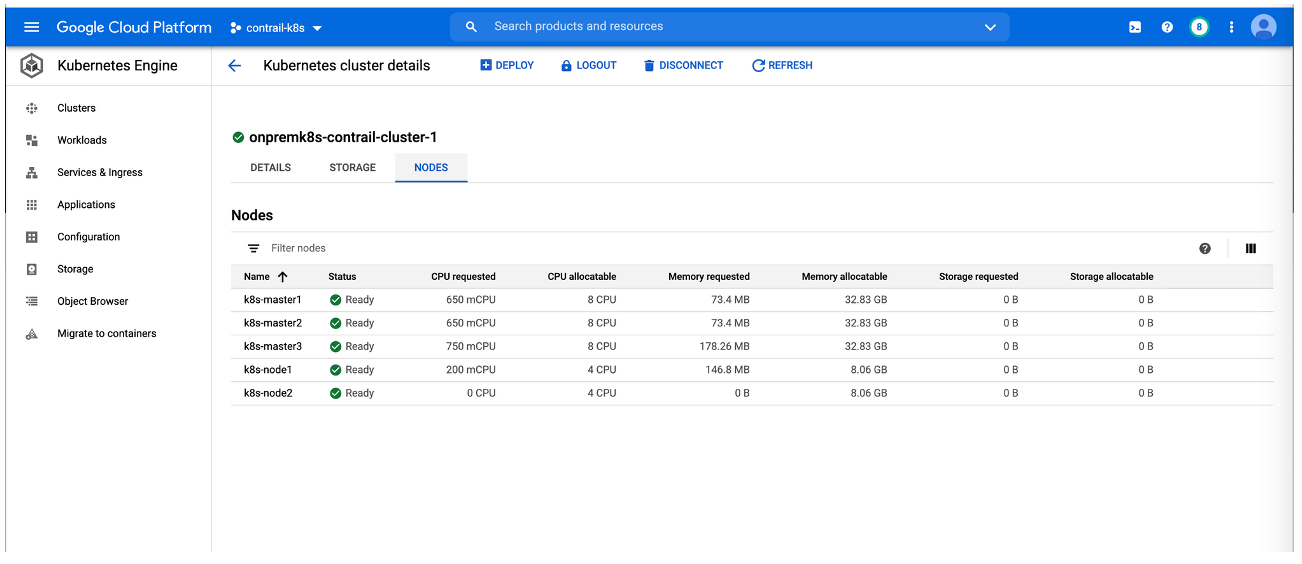
$ kubectl get nodes -o wide
NAME         STATUS  ROLES   VERSION  OS-IMAGE            KERNEL-VERSION
k8s-master1  Ready   master  v1.18.9  Ubuntu 18.04.5 LTS  4.15.0-118-generic
k8s-master2  Ready   master  v1.18.9  Ubuntu 18.04.5 LTS  4.15.0-118-generic
k8s-master3  Ready   master  v1.18.9  Ubuntu 18.04.5 LTS  4.15.0-118-generic
k8s-node1    Ready   <none>  v1.18.9  Ubuntu 18.04.5 LTS  4.15.0-112-generic
k8s-node2    Ready   <none>  v1.18.9  Ubuntu 18.04.5 LTS  4.15.0-112-generic
Some output fields removed for readability.
After deploying the Kubernetes cluster, Contrail is installed using a single YAML file.
$ kubectl get po -n kube-system
NAME                                  READY   STATUS    RESTARTS   AGE
config-zookeeper-4klts                1/1     Running   0          19h
config-zookeeper-cs2fk                1/1     Running   0          19h
config-zookeeper-wgrtb                1/1     Running   0          19h
contrail-agent-ch8kv                  3/3     Running   2          19h
contrail-agent-kh9cf                  3/3     Running   1          19h
contrail-agent-kqtmz                  3/3     Running   0          19h
contrail-agent-m6nrz                  3/3     Running   1          19h
contrail-agent-qgzxt                  3/3     Running   3          19h
contrail-analytics-6666s              4/4     Running   1          19h
contrail-analytics-jrl5x              4/4     Running   4          19h
contrail-analytics-x756g              4/4     Running   4          19h
contrail-configdb-2h7kd               3/3     Running   4          19h
contrail-configdb-d57tb               3/3     Running   4          19h
contrail-configdb-zpmsq               3/3     Running   4          19h
contrail-controller-config-c2226      6/6     Running   9          19h
contrail-controller-config-pbbmz      6/6     Running   5          19h
contrail-controller-config-zqkm6      6/6     Running   4          19h
contrail-controller-control-2kz4c     5/5     Running   2          19h
contrail-controller-control-k522d     5/5     Running   0          19h
contrail-controller-control-nr54m     5/5     Running   2          19h
contrail-controller-webui-5vxl7       2/2     Running   0          19h
contrail-controller-webui-mzpdv       2/2     Running   1          19h
contrail-controller-webui-p8rc2       2/2     Running   1          19h
contrail-kube-manager-88c4f           1/1     Running   0          19h
contrail-kube-manager-fsz2z           1/1     Running   0          19h
contrail-kube-manager-qc27b           1/1     Running   0          19h
coredns-684f7f6cb4-4mmgc              1/1     Running   0          93m
coredns-684f7f6cb4-dvpjk              1/1     Running   0          107m
coredns-684f7f6cb4-m6sj7              1/1     Running   0          84m
coredns-684f7f6cb4-nfkfh              1/1     Running   0          84m
coredns-684f7f6cb4-tk48d              1/1     Running   0          86m
etcd-k8s-master1                      1/1     Running   0          94m
etcd-k8s-master2                      1/1     Running   0          95m
etcd-k8s-master3                      1/1     Running   0          92m
kube-apiserver-k8s-master1            1/1     Running   0          94m
kube-apiserver-k8s-master2            1/1     Running   0          95m
kube-apiserver-k8s-master3            1/1     Running   0          92m
kube-controller-manager-k8s-master1   1/1     Running   0          94m
kube-controller-manager-k8s-master2   1/1     Running   0          95m
kube-controller-manager-k8s-master3   1/1     Running   0          92m
kube-proxy-975tn                      1/1     Running   0          108m
kube-proxy-9qzc9                      1/1     Running   0          108m
kube-proxy-fgwqt                      1/1     Running   0          109m
kube-proxy-n6nnq                      1/1     Running   0          109m
kube-proxy-wf289                      1/1     Running   0          108m
kube-scheduler-k8s-master1            1/1     Running   0          94m
kube-scheduler-k8s-master2            1/1     Running   0          95m
kube-scheduler-k8s-master3            1/1     Running   0          90m
rabbitmq-82lmk                        1/1     Running   0          19h
rabbitmq-b2lz8                        1/1     Running   0          19h
rabbitmq-f2nfc                        1/1     Running   0          19h
redis-42tkr                           1/1     Running   0          19h
redis-bj76v                           1/1     Running   0          19h
redis-ctzhg                           1/1     Running   0          19h
You should also configure user roles using role-based access control (RBAC). This example shows you how to grant the customer-admin RBAC role to all Kubernetes namespaces:
$ kubectl create clusterrolebinding permissive-binding \
  --clusterrole=cluster-admin \
  --user=admin \
  --user=kubelet \
  --group=system:serviceaccounts

kubectl auth can-i '*' '*' --all-namespaces
Amazon Web Services (AWS): Install Contrail Networking in an Elastic Kubernetes Service (EKS) Environment
To create a Kubernetes cluster within the Elastic Kubernetes Service (EKS) in AWS, perform following procedure using the eksctl CLI tool :
Google Cloud Platform (GCP): Creating a Kubernetes Cluster in Google Kubernetes Engine (GKE)
To create a Kubernetes cluster in Google Cloud using the Google Kubernetes Engine (GKE):
Preparing Your Clusters for Anthos
This section describes how to prepare your Google Cloud Platform account and your clusters for Anthos.
It includes the following sections:
- Configure Your Google Cloud Platform Account for Anthos
- How to Register an External Kubernetes Cluster to Google Connect
Configure Your Google Cloud Platform Account for Anthos
You need to create a service account in GCP and provision a JSON file with the Google Cloud service account credentials for external clusters—in this example, the external clusters are the on-premises cloud and the AWS cloud networks—before you can connect the clusters created by third-party providers into Google Anthos.
To configure your Google Cloud Platform for Anthos:
How to Register an External Kubernetes Cluster to Google Connect
The Google Connect feature is part of Anthos and it allows you to connect your Kubernetes clusters—including clusters created outside Google Cloud—into Google Cloud. This support within Google Connect provides the external Kubernetes clusters with the ability to use many cluster and workload management features from Google Cloud, including the Cloud Console unified user interface. See Connect Agent Overview from Google for additional information on Google Connect and Cloud Console from Google for additional information on Google Cloud Console.
To register external Kubernetes clusters into Google connect:
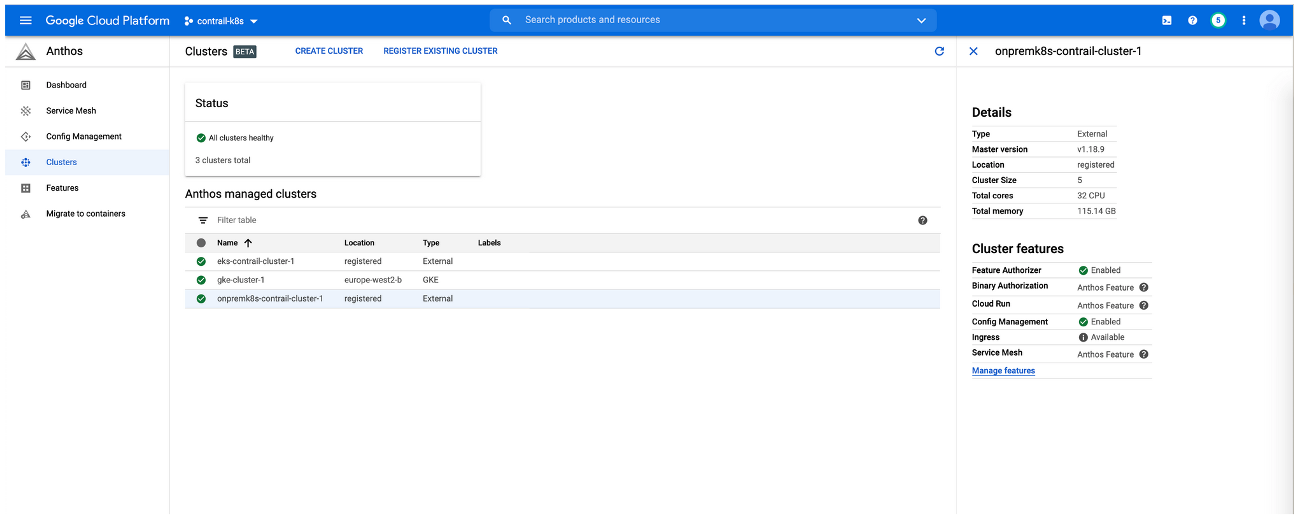
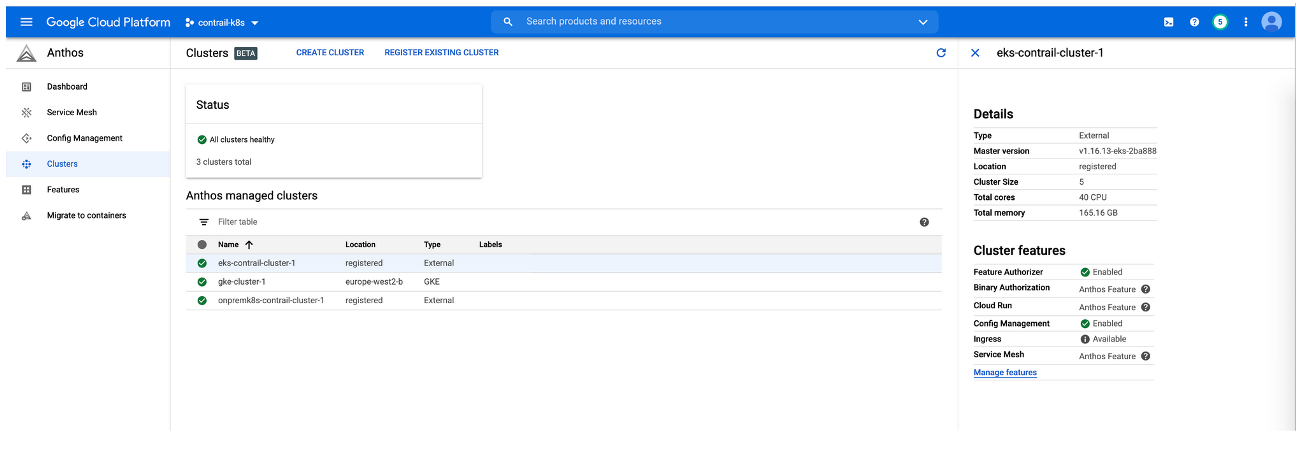
- Verify the clusters.
- Verify that the clusters are visible in Anthos:
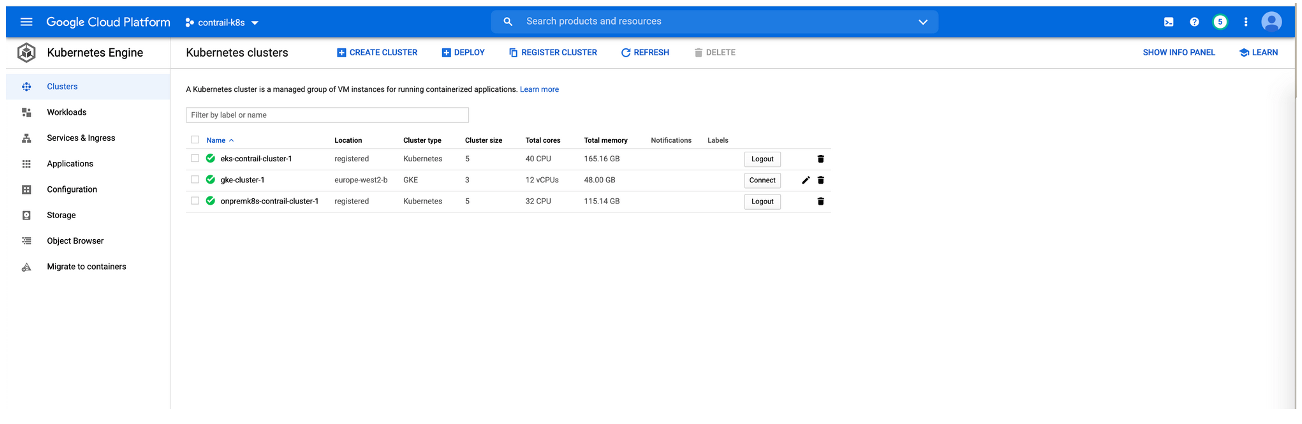
- Verify that cluster details are visible from the Kubernetes
Engine tab:

- Verify that the clusters are visible in Anthos:
Deploying GCP Applications into Third Party Clusters That are Integrated Into Anthos
This section shows how to deploy an application from Google Marketplace onto clusters created outside GCP and integrated into Anthos.
It includes the following sections:
- On-premises Kubernetes cluster: How to Deploy Applications from the GCP Marketplace Onto an On-premises Cloud
- AWS Elastic Kubernetes Service Cluster: How to Deploy an Application from Google Marketplace
On-premises Kubernetes cluster: How to Deploy Applications from the GCP Marketplace Onto an On-premises Cloud
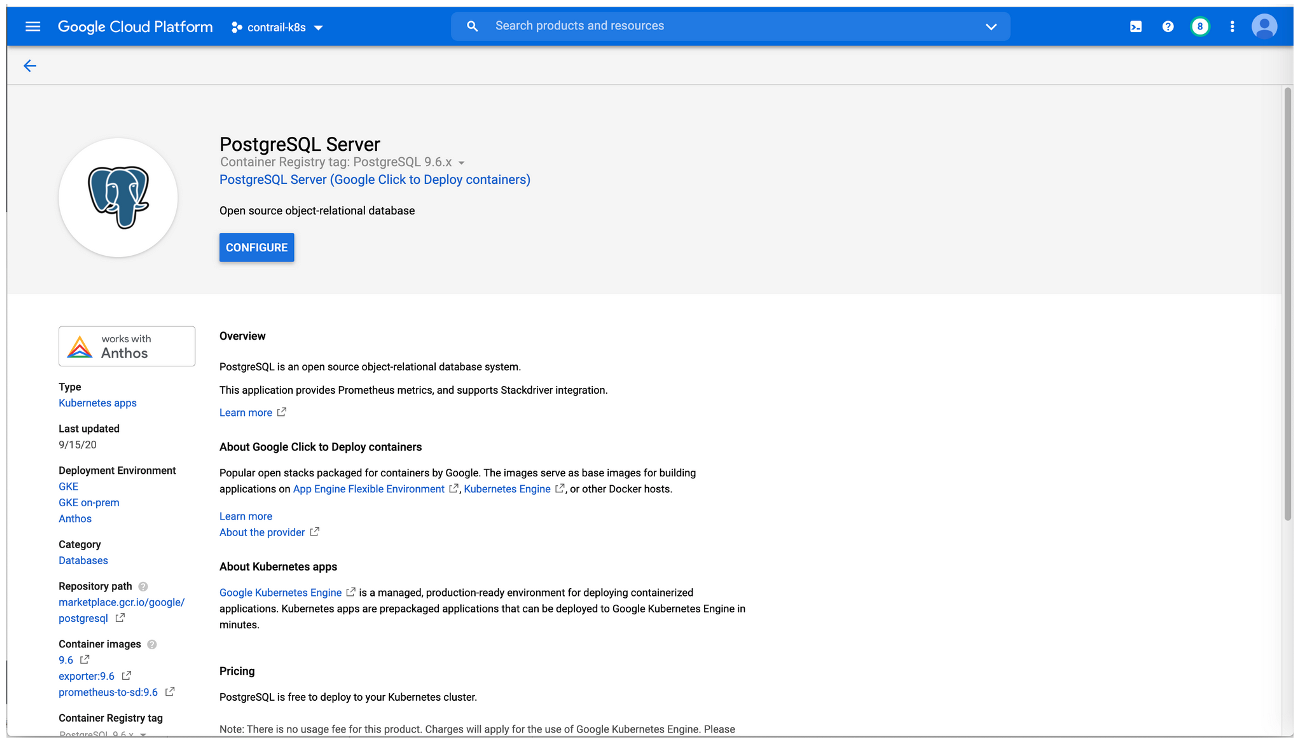
This procedure shows how to add an application—illustrated using the PostgreSQL application—from the Google Cloud Marketplace into an on-premises cluster that was built outside of Google Cloud and integrated into Anthos.
Perform the following steps to deploy the application:
- Choose the app—in this case, PostgresSQL Server—from
GCP Marketplace and click on Configure to start the deployment procedure.
- Choose the contrail-cluster-1 external
cluster from the Cluster drop-down menu:
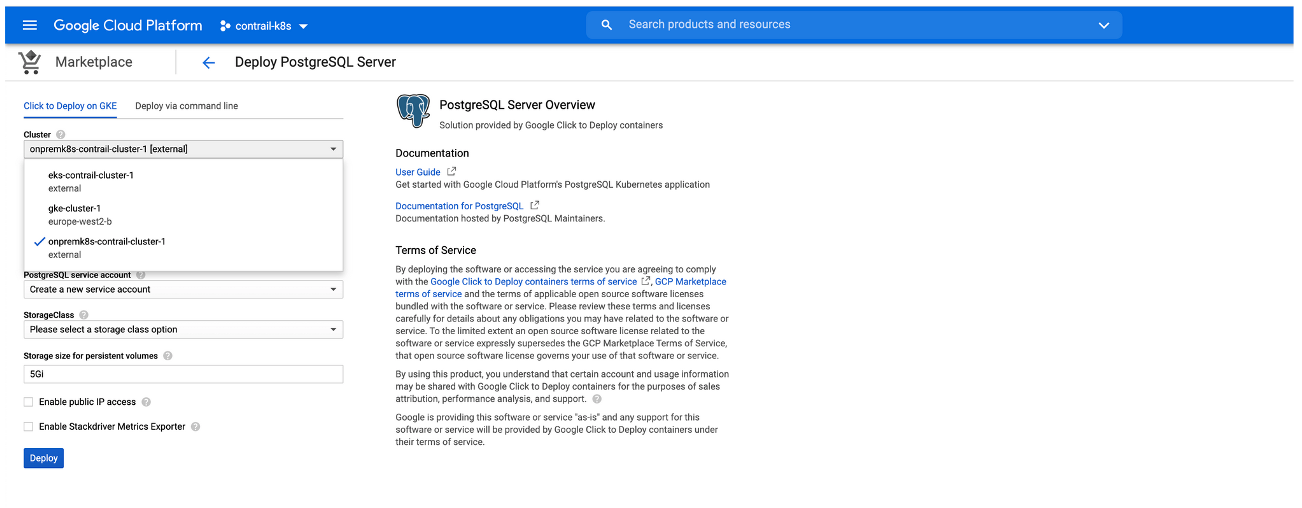
- Select the namespace that you previously created from
the Namespace drop-down menu and set the StorageClass as standard.
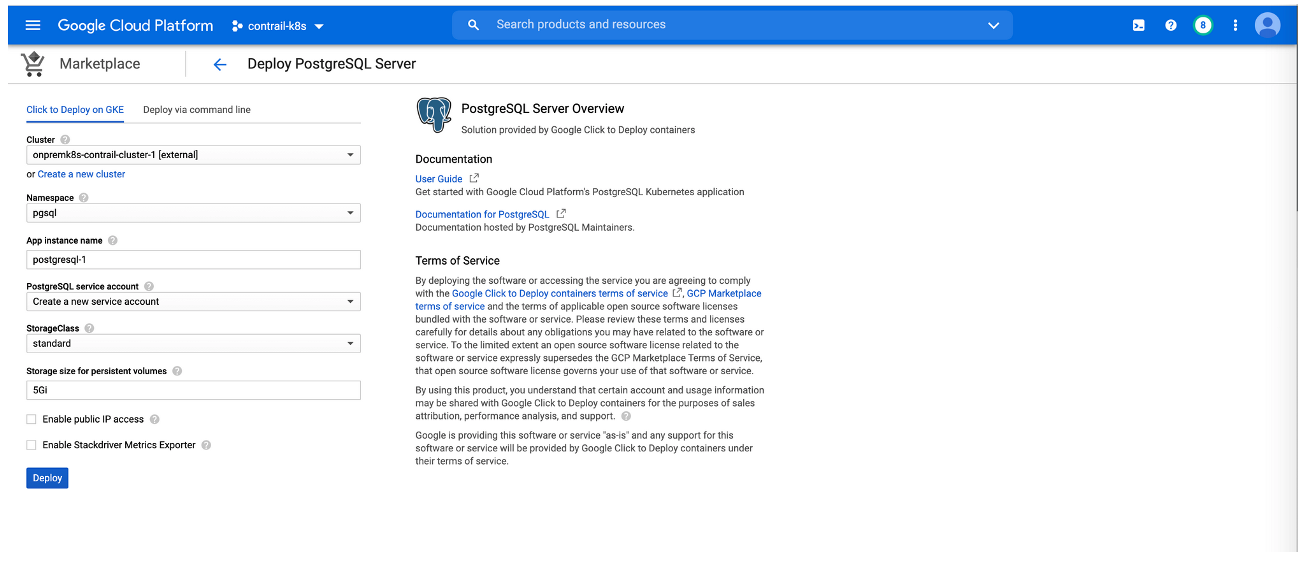
Click Deploy. Wait a couple of minutes.
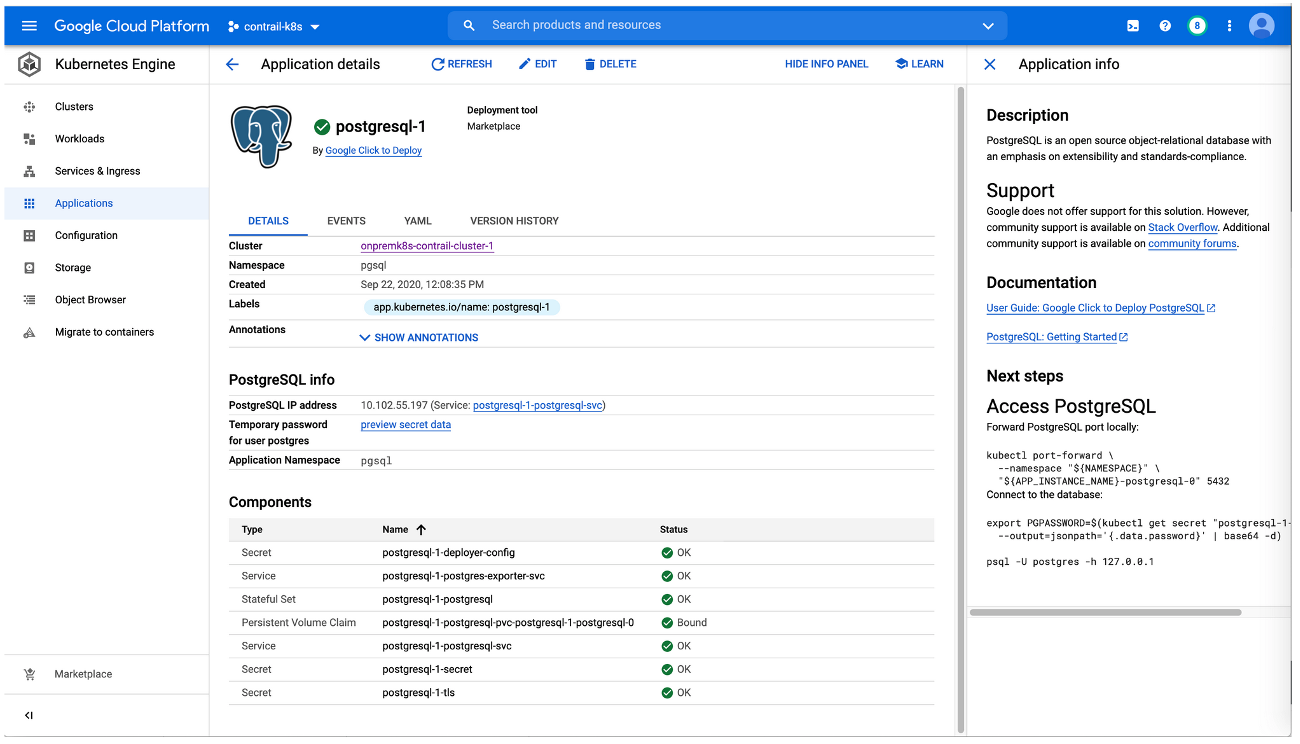
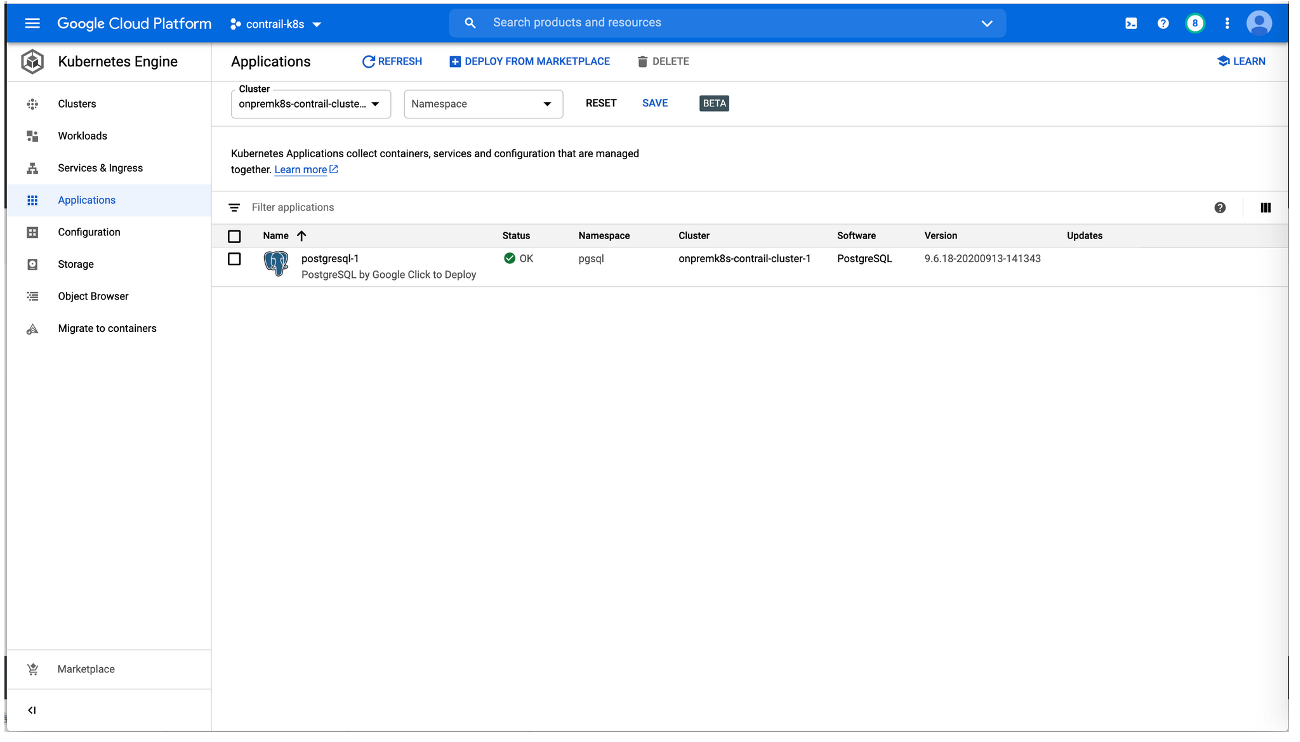
The Application details screen appears.
Review the Status row in the Components table to confirm that all components successfully deployed.
You can also verify that the app is running from the CLI:
$ kubectl get po -n pgsql
NAME                          READY   STATUS      RESTARTS   AGE
postgresql-1-deployer-nzpfn   0/1     Completed   0          91s
postgresql-1-postgresql-0     2/2     Running     0          46s

$ kubectl get pvc
NAME                                                    STATUS   VOLUME              CAPACITY   ACCESS MODES   STORAGECLASS   AGE
postgresql-1-postgresql-pvc-postgresql-1-postgresql-0   Bound    local-pv-e00b14f6   62Gi       RWO            standard       91s
- Use filtering within the GKE Console to see the applications
deployed in the on-premises cluster.
AWS Elastic Kubernetes Service Cluster: How to Deploy an Application from Google Marketplace
You can deploy an application from the Google Marketplace into an EKS cluster that is using Contrail Networking in AWS after the cluster is enabled in Anthos. This procedure will illustrate this process by deploying Prometheus and Grafana from Google Marketplace
Perform the following steps to deploy an application from Google Marketplace onto an EKS cluster in AWS that is using Contrail Networking.
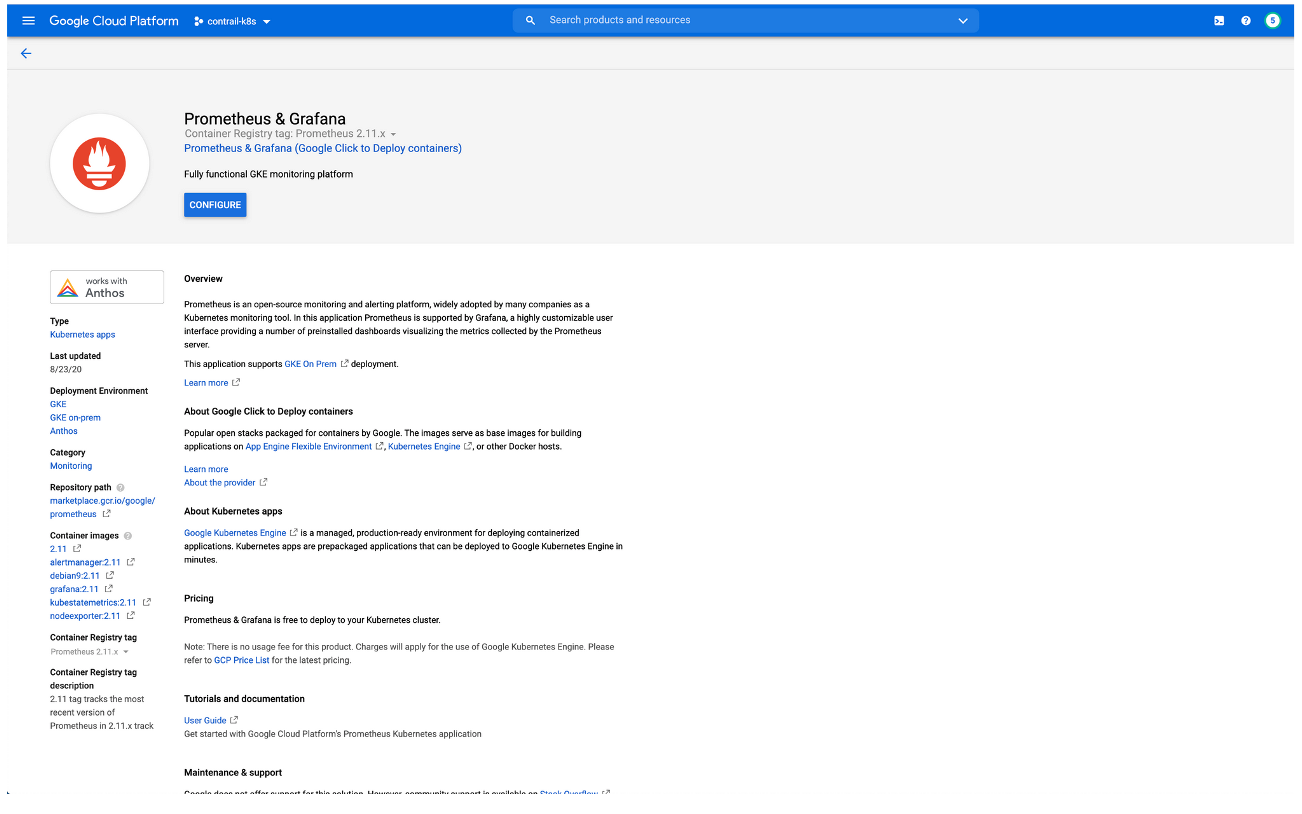
- Choose Prometheus and Grafana from GCP Marketplace. Click
the Configure button to start the deployment
procedure.
- Choose the EKS cluster from the cluster drop-down menu.

- Select the namespace and storage class. Click Deploy.
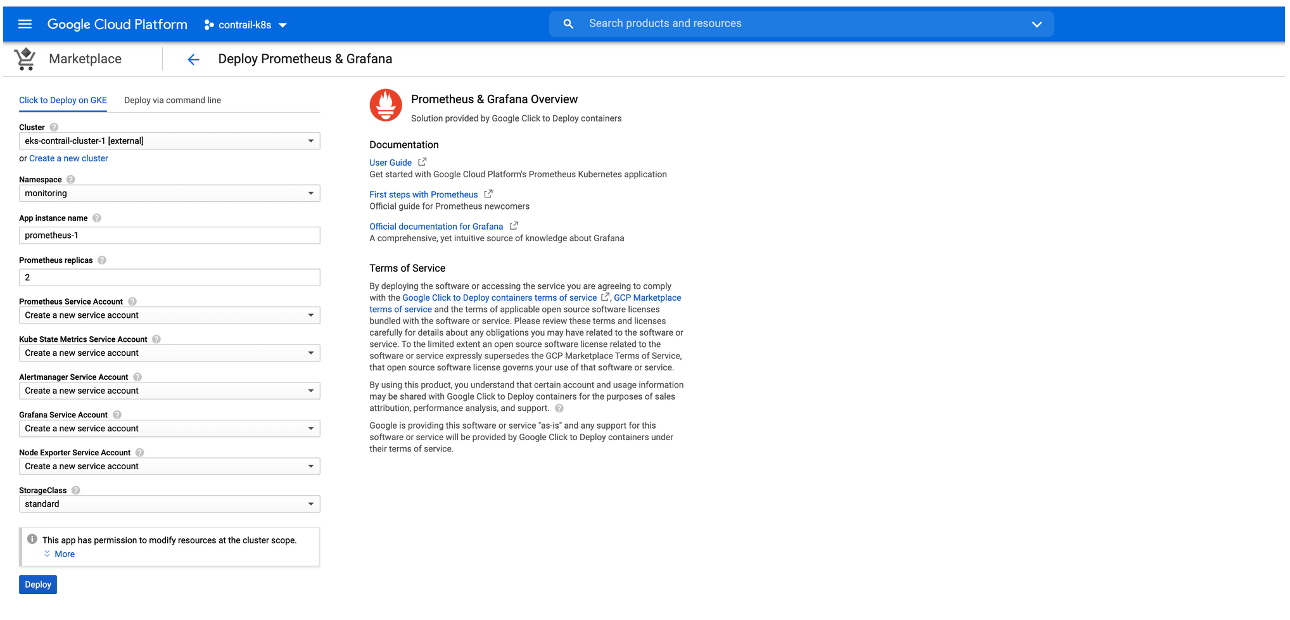
Wait several minutes for the application to deploy.
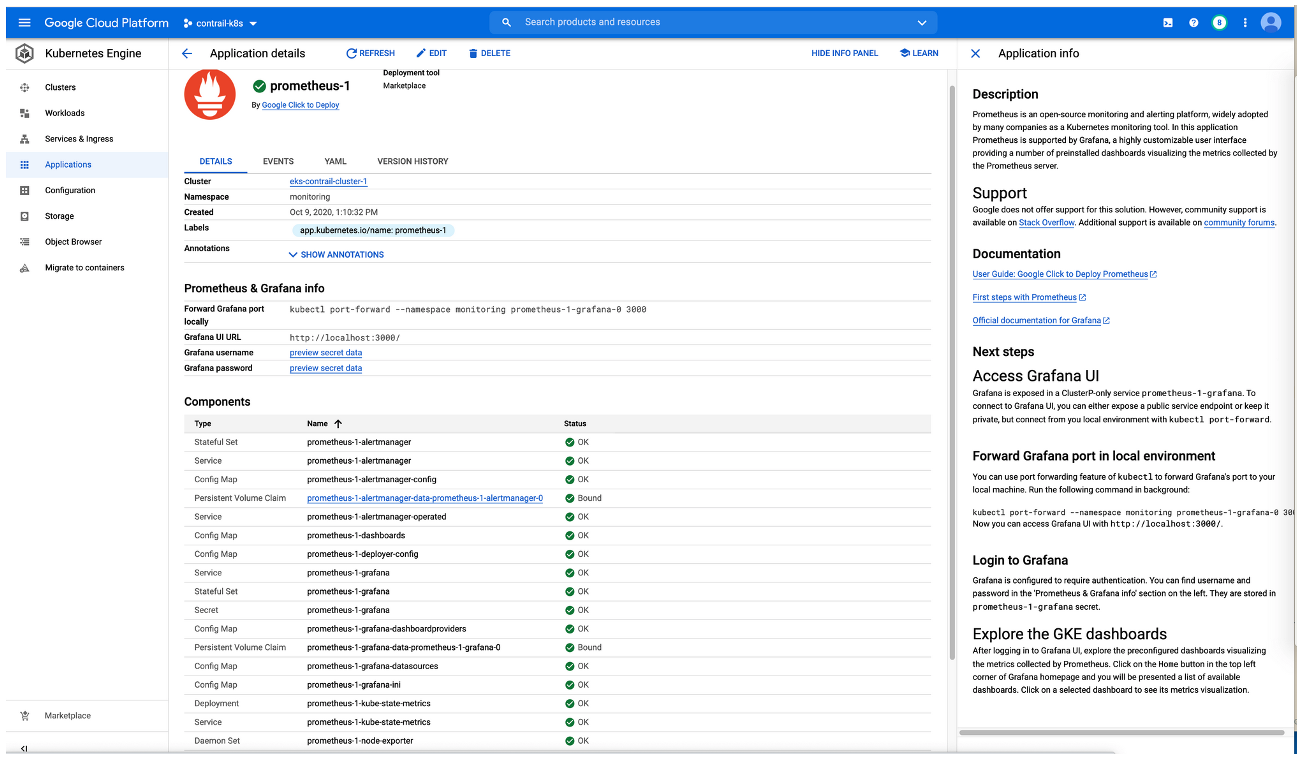
You can also verify that the application has deployed using the CLI:
$ kubectl get pods -n monitoring
NAME                                               READY   STATUS      RESTARTS   AGE
prometheus-1-alertmanager-0                        1/1     Running     0          2m36s
prometheus-1-alertmanager-1                        1/1     Running     0          88s
prometheus-1-deployer-blm5f                        0/1     Completed   0          3m20s
prometheus-1-grafana-0                             1/1     Running     0          2m36s
prometheus-1-kube-state-metrics-6f64b67684-shtdg   2/2     Running     0          2m37s
prometheus-1-node-exporter-5scf4                   1/1     Running     0          2m36s
prometheus-1-node-exporter-gdp77                   1/1     Running     0          2m36s
prometheus-1-node-exporter-k8vfn                   1/1     Running     0          2m36s
prometheus-1-node-exporter-v6w7g                   1/1     Running     0          2m36s
prometheus-1-node-exporter-zffs9                   1/1     Running     0          2m36s
prometheus-1-prometheus-0                          1/1     Running     0          2m36s
prometheus-1-prometheus-1                          1/1     Running     0          2m36s
Configuration Management in Anthos
This section covers Configuration Management in Anthos.
It includes the following sections:
- Overview: Anthos Configuration Management
- Installing the Configuration Management Operator
- Configuring the Clusters for Anthos Configuration Management
- Using Nomos to Manage the Anthos Configuration Manager
Overview: Anthos Configuration Management
Google Cloud uses a tool called Config Sync that acts as the bridge between an external source code repository and the Kubernetes API server. See Config Sync Overview from Google Cloud for additional information.
Anthos Configuration Management (ACM) uses Config Sync to extend configuration to non-GCP clusters that are connected using Anthos.
In the following sections, a GitHub repository is used as a single source for deployments and configuration. An ACM component is installed onto each of the clusters that are included with Anthos to monitor the external repositories for changes and synchronizing them across Anthos.
GitOps-style deployments are used in the following procedures to push workloads across all registered clusters through Anthos Config Management. GitOps provides a method of performing Kubernetes cluster management and application delivery. It works by using Git as a single source of truth for declarative infrastructure and applications and using the YAML or JSON files used in Kubernetes to combine with Anthos for code.
Installing the Configuration Management Operator
The Configuration Management Operator is a controller that manages installation of the Anthos Configuration Manager. The operator will be installed on all three clusters using these instructions.
To install the Configuration Management Operator:
Configuring the Clusters for Anthos Configuration Management
To configure the clusters for Anthos Configuration Management:
- Verify that the pods are running on each cluster.
To verify in the CLI:
$ kubectl get pods -n config-management-system
NAME                            READY   STATUS    RESTARTS   AGE
git-importer-584bd49676-46bjq   3/3     Running   0          4m23s
monitor-c8c68d5ff-bdhzl         1/1     Running   0          4m25s
syncer-7dbbc8868c-gtp8d         1/1     Running   0          4m25s
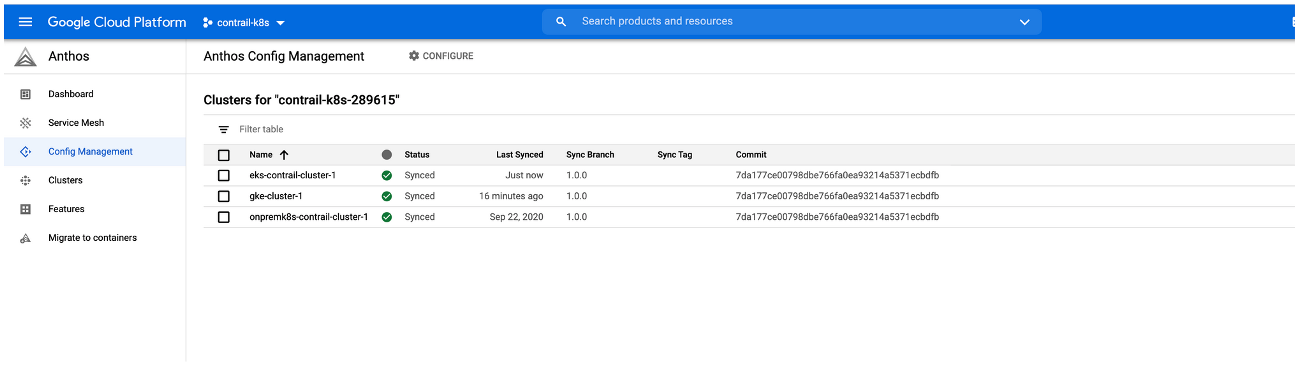
To verify on the Anthos dashboard:
Using Nomos to Manage the Anthos Configuration Manager
The Google Cloud Platform offers a utility called Nomos which can be used to manage the Anthos Configuration Manager (ACM). See Using the nomos command from Google Cloud for more information on Nomos.
To enable Nomos: