Create an Isolated Namespace
SUMMARY This topic shows you how to create an isolated namespace in Cloud-Native Contrail® Networking™. Juniper Networks supports isolated namespaces using Contrail Networking Release 22.1 or later in a Kubernetes-orchestrated environment.
Namespace Overview
In this document, we use the term "isolated" and "non-isolated" in the context of Contrail networking only.
Non-isolated Namespaces
Namespaces, or non-isolated namespaces, provide a mechanism for isolating a group of resources within a single cluster. By default, namespaces are not isolated.
Non-isolated namespaces are intended for use in environments with many users spread across multiple teams, or projects. Non-isolated namespaces enable each team to exist in their own virtual cluster without impacting each other's work. Let's say you created all your resources in the default namespace that Kubernetes provides. If you have a complex application with multiple deployments, the default namespace can be hard to maintain. An easier way to manage this deployment is to group all your resources into different namespaces within the cluster. For example, the cluster can contain separate namespaces, such as a database namespace or a monitoring database. Names of resources must be unique within a namespace, but not across namespaces.
Pods in a non-isolated namespace exhibit the following network behavior:
-
Pods in non-isolated namespaces can communicate with other pods in the cluster without using NAT.
-
Pods and services in non-isolated namespaces share the same
default-podnetworkanddefault-servicenetwork.
Isolated Namespaces
An isolated namespace enables you to run customer-specific applications that you want to keep private. You can create an isolated namespace to isolate a pod from other pods, without explicitly configuring a network policy.
Isolated namespaces are similar to non-isolated namespaces, except that each isolated namespace has its own pod network and service network. This means that pods in isolated namespaces cannot reach pods or services in other isolated or non isolated namespaces.
Pods in isolated namespace can only communicate with pods in the same namespace. The
only exception is when a pod in an isolated namespace needs access to a Kubernetes
service, such as Core DNS. In this case, the pod uses the cluster's
default-servicenetwork to access the services.
Pods in an isolated namespace exhibit the following network behavior:
-
Pods in isolated namespaces can only communicate with pods in the same namespace.
-
Pods in isolated namespaces can reach services in non-isolated namespaces.
-
The IP addresses and service IP addresses of pods in isolated namespaces are allocated from the same subnet as the cluster's pod and service subnet.
-
Pods in an isolated namespace can access the underlay network, or IP fabric network, though IP fabric forwarding and fabric source NAT.
Example: Isolated Namespace Configuration
This sample configuration demonstrates an isolated namespace configuration in Cloud-Native Contrail Networking.
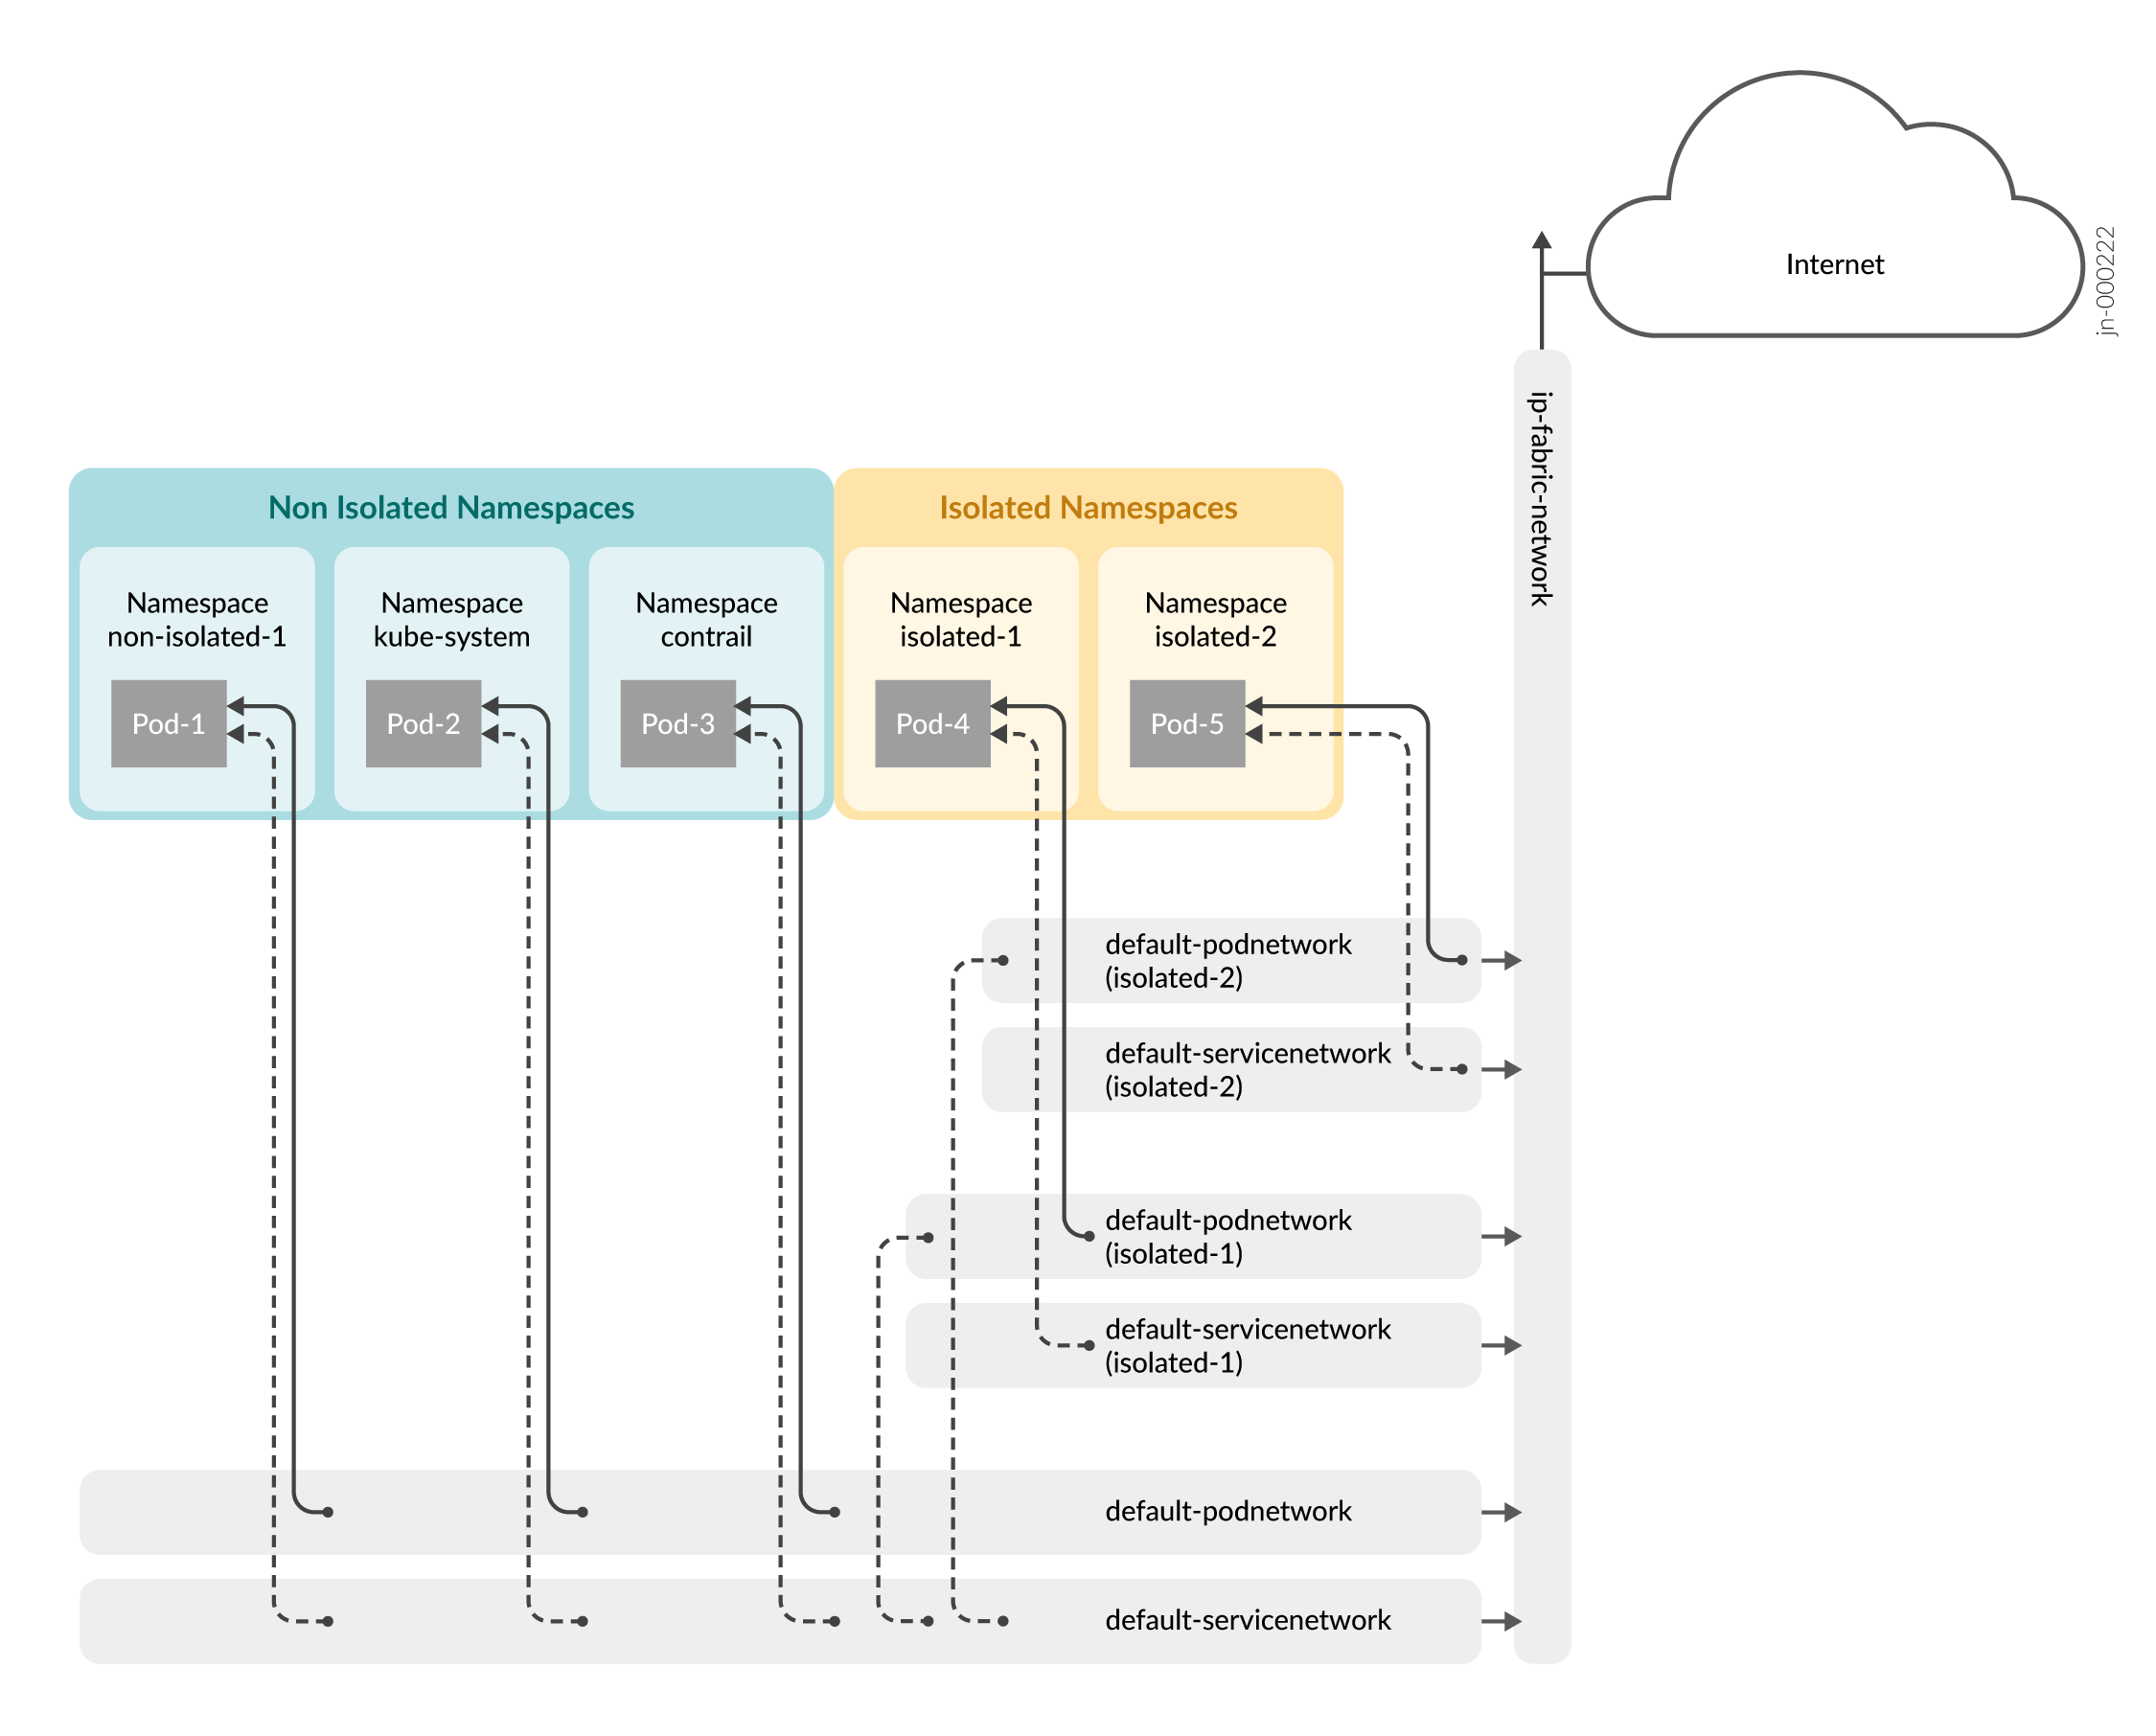
In this isolated namespace configuration:
-
Pod-1 (non-isolated-1) is in a non-isolated namespace created by the user.
-
Pod-2 (kube-system) and Pod-3 (contrail) are in non-isolated namespaces created by the controller.
-
Pod-4 (isolated-1) and Pod-5 (isolated-2) are in isolated namespaces created by the user.
-
The interfaces for Pod-1, Pod-2, Pod-3 are created from the cluster's
default-podnetworkanddefault-servicenetwork. -
The interfaces for Pod-4 and Pod-5 are created on the
default-podnetworkanddefault-servicenetworkin their own isolated namespaces. Both Pod-4 and Pod-5 interfaces share the same subnet as the cluster’sdefault-podnetworkanddefault-servicenetwork. -
Pods in isolated namespaces cannot communicate with pods in non-isolated namespaces. In this example, Pod-4 and Pod-5 in isolated namespaces cannot communicate with Pod-1, Pod-2, Pod-3 in non-isolated namespaces.
-
Pods in isolated namespaces (Pod-4, Pod 5) can access any service through the cluster's
default-servicenetwork. -
Pods in all namespaces (non-isolated and isolated) are able to connect to the fabric through the cluster's
ip-fabric-network.
Notes
-
Isolated namespaces affect only the pod's default interface. This is because the default interface of pods in an isolated namespace are created on the
default-podnetworkof the isolated namespace. However, interfaces from user-definedVirtualNetworksbehave the same way in both isolated and non-isolated namespaces. -
You can create network policies on isolated namespaces to fine-tune the isolation of pods. The network policy behaves the same for both isolated and non-isolated namespaces.
-
Two or more isolated namespaces can be interconnected through the
VirtualNetworkRouter(VNR). See VirtualNetworkRouter Overview.
Here is an example of a VNR configuration used to interconnect the
default-podnetworks of two isolated namespaces
(ns-isolated-1 and ns-isolated-2). In this
configuration, the VirtualNetworkRouter connects to ns-isolated-1
and ns-isolated-2, so pods in these isolated namespaces can communicate with each
other.
apiVersion: core.contrail.juniper.net/v1alpha1
kind: VirtualNetworkRouter
metadata:
  namespace: ns-isolated-1
  name: vnr-1
  annotations:
    core.juniper.net/display-name: vnr-1
  labels:
      vnr: vnr-1
spec:
  type: mesh
  virtualNetworkSelector:
    matchExpressions:
    - key: core.juniper.net/virtualnetwork
      operator: In
      values:
      - isolated-namespace-pod-virtualnetwork
  import:
    virtualNetworkRouters:
      - virtualNetworkRouterSelector:
          matchLabels:
            vnr: vnr-2
        namespaceSelector:
          matchLabels:
            kubernetes.io/metadata.name: ns-isolated-2
---
apiVersion: core.contrail.juniper.net/v1alpha1
kind: VirtualNetworkRouter
metadata:
  namespace: ns-isolated-2
  name: vnr-2
  annotations:
    core.juniper.net/display-name: vnr-2
  labels:
      vnr: vnr-2
spec:
  type: mesh
  virtualNetworkSelector:
    matchExpressions:
    - key: core.juniper.net/virtualnetwork
      operator: In
      values:
      - isolated-namespace-pod-virtualnetwork
  import:
    virtualNetworkRouters:
      - virtualNetworkRouterSelector:
          matchLabels:
            vnr: vnr-1
        namespaceSelector:
          matchLabels:
            kubernetes.io/metadata.name: ns-isolated-1
Isolated Namespace Objects
This table describes the namespace objects (API resources) the controller creates when you create an isolated namespace.
| Isolated Namespace Object | Description |
|---|---|
default-podnetwork (VirtualNetwork) |
The default interfaces of pods in an isolated namespace are
created in this default-podnetwork, instead of the
cluster's default-network. |
default-servicenetwork (VirtualNetwork) |
The cluster IP of services in isolated namespaces are created in
this default-servicenetwork, instead of the
cluster's default-servicenetwork. |
IsolatedNamespacePodServiceNetwork
(VirtualNetworkRouter) |
This object establishes connectivity between the isolated
namespace's default-podnetwork and
default-servicenetwork. |
IsolatedNamespaceIPFabricNetwork
(VirtualNetworkRouter) |
This object establishes connectivity between the isolated
namespace's default-podnetwork and
default-servicenetworkto the cluster's
ip-fabricnetwork. |
IsolatedNamespacePodToDefaultService
(VirtualNetworkRouter) |
This object establishes connectivity between the isolated
namespace's default-podnetwork to the cluster’s
default-servicenetwork. |
Create an Isolated Namespace
Follow these steps to create an isolated namespace:
Optional Configuration: IP Fabric Forwarding and Fabric Source NAT
Optionally, you can enable IP fabric forwarding and fabric source NAT on an isolated namespace.
IP fabric forwarding enables virtual networks to be created as part of the underlay network and eliminates the need for encapsulation and decapsulation of data. Fabric source NAT allows pods in the overlay to reach the Internet without floating IPs or a logical router.
When you create an isolated namespace, two virtual networks are created, a
default-podnetwork and a
default-servicenetwork. By default, IP fabric forwarding
and fabric source NAT in these two virtual networks are disabled. You enable IP
fabric forwarding or fabric source NAT in the virtual networks by adding
“forwarding-mode” annotations for each feature in your isolated namespace YAML
file.
Here is an example of the default-podnetwork for an isolated
namespace with forwarding-mode set to fabricSNAT.
apiVersion: core.contrail.juniper.net/v1alpha1
kind: VirtualNetwork
metadata:
  annotations:
    core.juniper.net/description: Default Pod Network for IsolatedNamespace (ns-isolated)
    core.juniper.net/display-name: default-podnetwork
    ...
spec:
    ...
    fabricSNAT: true
    ...
Enable IP Fabric Forwarding
Follow these steps to enable IP fabric forwarding on an isolated namespace:
Enable Fabric Source NAT
You can only enable fabric source NAT on the
default-podnetwork.
Follow these steps to enable fabric source NAT on an isolated namespace: