ON THIS PAGE
Contrail Custom Scheduler Implementation in Cloud-Native Contrail Networking
Deploy the Kubernetes Scheduling Framework as a Secondary Scheduluer
Create a Vanilla Deployment with Proper Volume Mounts and Flags for Your Scheduler Configurations
Verify the Pod(s) That You Want the Custom Scheduler to Schedule
Control Pod Scheduling on DPDK Nodes
SUMMARY Cloud-Native Contrail Networking release 22.2 supports a custom plugin that schedules pods based on node interface capacity. This plugin is comprised of several APIs that filter and select optimal DPDK nodes for pod assignment.
Pod Scheduling in Kubernetes
In Kubernetes, a scheduler monitors newly-created pods for pods with no node assignment. The scheduler attempts to assign these pods to suitable nodes using a filtering phase and a scoring phase. Potential nodes are filtered based on attributes like the resource requirements of a pod. If a node doesn't have the available resources for a pod, that node is filtered out. If more than one node passes the filtering phase, Kubernetes scores and ranks the remaining nodes based on their suitability for a given pod. The scheduler assigns a pod to the node with the highest ranking. If two nodes have the same score, the scheduler picks a node at random.
Kubernetes Scheduling Framework Overview
The Kubernetes Scheduling Framework adds new scheduling APIs to the default cluster scheduler for extended scheduling functionality. The framework performs a scheduling cycle and a binding cycle for each pod. The scheduling cycle selects an optimal node for a pod, and the binding cycle applies that decision to the cluster. The scheduling and binding cycles expose several extension points during the course of their individual cycles. Plugins are registered to be called at various extension points. For example, during the scheduling cycle, one of the exposed extension points is called Filter. When the scheduling cycling reaches the Filter extension point, Filter plugins are called to perform filtering tasks.
Contrail Custom Scheduler Overview
Cloud-Native Contrail Networking supports the deployment of DPDK nodes for high-throughput
applications. DPDK nodes have a 32 VMI (Virtual Machine Interface) limit by default. This
means that a DPDK node hosts a maximum of 32 pods. The Kubernetes default scheduler doesn't
currently support a mechanism for recognizing DPDK node requirements and limitations. As a
result, Cloud-Native Contrail Networking provides a custom scheduler built on top of the
Kubernetes Scheduling Framework that implements a VMICapacity plugin to
support pod scheduling on DPDK nodes.
Contrail Custom Scheduler Implementation in Cloud-Native Contrail Networking
Cloud-Native Contrail Networking Custom Scheduler supports a VMICapacity
plugin which implements Filter, Score, and NormalizeScore extension points
in the scheduler framework. See the sections below for more information about these
extension points.
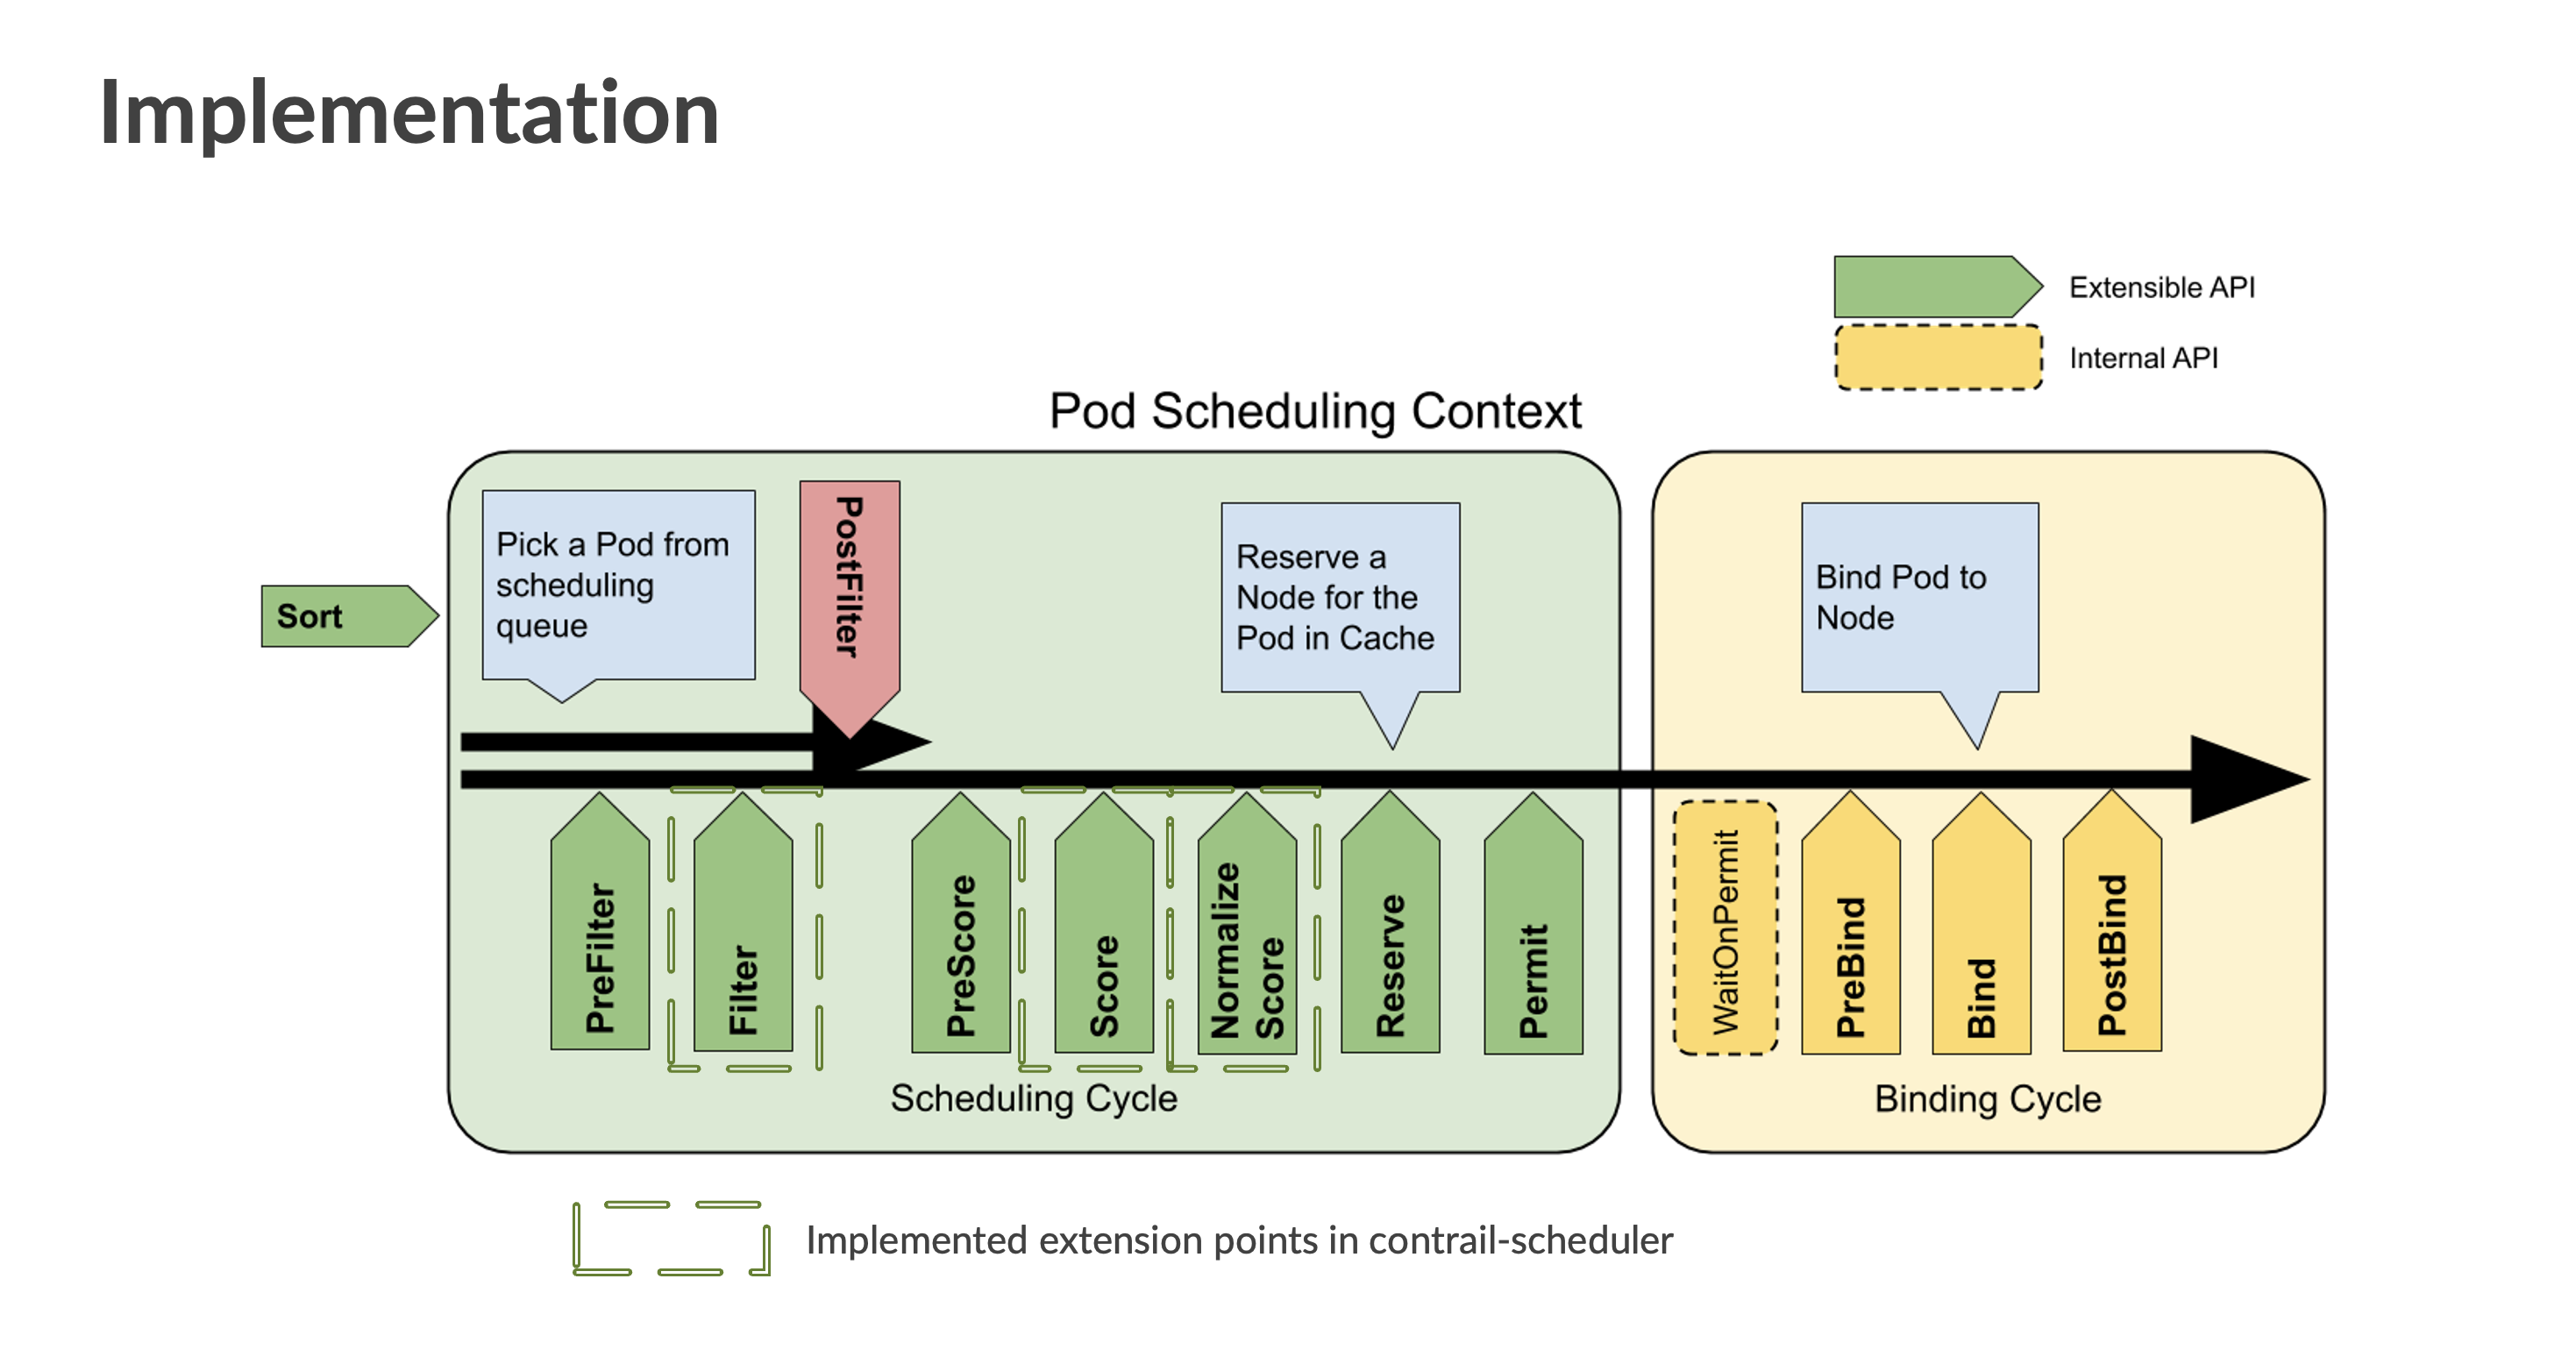
Filter
These plugins filter out nodes that cannot run the pod. Nodes are filtered based on VMI
capacity. If a node has the maximum amount of allocated pods, that node is filtered out and
the scheduler marks the pod as unusable on that node. Non-DPDK nodes are also filtered out
in this phase based on user-configured nodeLabels that identify DPDK
nodes.
Score
These plugins rank nodes that passed the filtering phase. The scheduler calls a series of
scoring plugins for each node. In Cloud-Native Contrail Networking, a node's score is based
on the number of VMIs currently active in the node. If only one node passes the Filter
stage, the Score and NormalizeScore extension points are skipped and the
scheduler assigns the pod to that node.
NormalizeScore
These plugins modify node scores before the scheduler computes a final ranking of nodes.
The number of active VMIs on a node determines that node's score. The higher the number of
active VMIs, the lower the score, and vice versa. The score is normalised in the range of
0-100. After the NormalizeScore phase, the scheduler combines node scores
for all plugins according to the configured plugin weights defined in the scheduler
configuration.
Deploy the Kubernetes Scheduling Framework as a Secondary Scheduluer
Follow these high-level steps to deploy the Contrail Custom Scheduler as a secondary scheduler that runs alongside your default Kubernetes scheduler:
- Create configuration files for your custom scheduler.
- Create a vanilla deployment with proper volume mounts and flags for your scheduler configurations.
- Verify the pod(s) that you want the custom scheduler to schedule.
See the sections below for more information.
Create Configuration Files for Your Custom Scheduler
The custom scheduler requires a kubeconfig and a scheduler configuration
file. Consider the following sample scheduler configuration file:
apiVersion: kubescheduler.config.k8s.io/v1beta3
clientConnection:
  acceptContentTypes: ""
  burst: 100
  contentType: application/vnd.kubernetes.protobuf
  kubeconfig: /tmp/config/kubeconfig
  qps: 50
enableContentionProfiling: true
enableProfiling: true
kind: KubeSchedulerConfiguration
leaderElection:
  leaderElect: false
profiles:
- pluginConfig:
  - args:
      apiVersion: kubescheduler.config.k8s.io/v1beta3
      kind: VMICapacityArgs
      maxVMICount: 32
      nodeLabels:
        agent-mode: dpdk
    name: VMICapacity
  plugins:
    filter:
      enabled:
      - name: VMICapacity
        weight: 0
    score:
      enabled:
      - name: VMICapacity
        weight: 0
  schedulerName: contrail-scheduler
Note the following fields:
schedulerName: The name of the custom scheduler. This name must be unique to a cluster. You must define this field if you want a pod to be scheduled using this scheduler.kubeconfig: The path to thekubeconfigfile mounted on the pod's filesystem.maxVMICount: The maximum number of VMIs a DPDK node accommodates.nodeLabels: A set of labels identifying a group of DPDK nodes.VMICapacity: The name of the plugin that enables Kubernetes to determine VMI capacity for DPDK nodes.
Create a Vanilla Deployment with Proper Volume Mounts and Flags for Your Scheduler Configurations
Ensure that you don’t have more than one instance of a scheduler deployment running on a single node as this results in a port conflict. Use node affinity rules or a DaemonSet in order to run multiple instances of a scheduler on separate node in case of high availability (HA) requirements. Modify the scheduler configuration as needed in order to enable leader election. For more information about leader election, see the "Enable leader election section" of the following Kubernetes article: Configure Multiple Schedulers.
The following YAML file shows an example of a scheduler deployment:
You must create a namespace for the scheduler before launching a scheduler deployment YAML. The scheduler operates under the namespace that your create.
apiVersion: v1
kind: ServiceAccount
metadata:
  name: contrail-scheduler
  namespace: scheduler
---
apiVersion: rbac.authorization.k8s.io/v1
kind: ClusterRoleBinding
metadata:
  name: contrail -scheduler
subjects:
- kind: ServiceAccount
  name: contrail -scheduler
  namespace: scheduler
roleRef:
  kind: ClusterRole
  name: system:kube-scheduler
  apiGroup: rbac.authorization.k8s.io
---
apiVersion: apps/v1
kind: Deployment
metadata:
  name: contrail-scheduler
  namespace: scheduler
  labels:
    app: scheduler
spec:
  replicas: 1
  selector:
    matchLabels:
      app: scheduler
  template:
    metadata:
      labels:
        app: scheduler
    spec:
      serviceAccountName: contrail-scheduler
      securityContext:
        fsGroup: 2000
        runAsGroup: 3000
        runAsNonRoot: true
        runAsUser: 1000
      containers:
      - name: contrail-scheduler
        image: <scheduler-image>
        command:
        - /contrail-scheduler
        - --kubeconfig=/tmp/config/kubeconfig
        - --authentication-kubeconfig=/tmp/config/kubeconfig
        - --authorization-kubeconfig=/tmp/config/kubeconfig
        - --config=/tmp/scheduler/scheduler-config
        - --secure-port=<metrics-port; defaults to 10259>
        livenessProbe:
          failureThreshold: 8
          httpGet:
            path: /healthz
            port: <secure-port>
            scheme: HTTPS
          initialDelaySeconds: 10
          periodSeconds: 10
          timeoutSeconds: 15
        resources:
          requests:
            cpu: 100m
        readinessProbe:
          failureThreshold: 8
          httpGet:
            path: /healthz
            port: <secure-port>
            scheme: HTTPS
          initialDelaySeconds: 10
          periodSeconds: 10
          timeoutSeconds: 15
        volumeMounts:
        - mountPath: /tmp/config
          name: kubeconfig
          readOnly: true
        - mountPath: /tmp/scheduler
          name: scheduler-config
          readOnly: true
      hostNetwork: false
      hostPID: false
      volumes:
      - name: kubeconfig
        <volume for kubeconfig file>
      - name: scheduler-config
        <volume for scheduler configuration file>
Verify the Pod(s) That You Want the Custom Scheduler to Schedule
The following pod manifest shows an example of a pod deployment using the secondary scheduler:
apiVersion: v1
kind: Pod
metadata:
  name: test-pod
spec:
  schedulerName: contrail-scheduler
  containers:
  - name: test
    image: busybox:latest
    command: ["/bin/sh","-c", "while true; do echo hello; sleep 10;done"]
Note the schedulerName. This field tells Kubernetes which scheduler to use
when deploying a pod. You must define this field in each pod's manifest that you want
deployed this way. A pod's deployment state remains pending if the specified scheduler is
not present in the cluster.