
Deploying Service Chain (cSRX) with Cloud-Native Router
Read this section to learn how to customize and deploy a security services instance (cSRX) with the Cloud-Native Router.
You can integrate the Juniper Cloud-Native Router with Juniper's containerized SRX (cSRX) platform to provide security services such as IPsec. Using host-based service chaining, the cloud-native router is chained with a security service instance (cSRX) in the same Kubernetes cluster. The cSRX instance runs as a pod service in L3 mode. The cSRX instance is customized and deployed via a Helm chart.
You have the option of deploying Juniper cSRX when you're installing Cloud-Native Router or after you've installed JCNR. See Cloud-Native Router Software Download Packages for a description of the available packages.
cSRX is supported on all Cloud-Native Router platforms:
| Platform | cSRX |
|---|---|
| Bare Metal | Yes |
| Red Hat OpenShift | Yes |
| Amazon EKS | Yes |
| Google Cloud Platform | Yes |
| Wind River Cloud Platform | Yes |
| Microsoft Azure | Yes |
| VMWare Tanzu | Yes |
Deployment Patterns
Cloud-Native Router supports three deployment patterns for IPSec tunnels with cSRX service chaining. Each pattern addresses different scale and isolation requirements.
Single-Tenant, Multiple Tunnels
A single customer establishes multiple IPSec tunnels to different destinations using one cSRX instance. All tunnels share the same trust and untrust VRF pair on JCNR. For example, an enterprise with multiple branch offices can establish separate tunnels from each branch to a central site.
One trust VRF and one untrust VRF on JCNR
Two interfaces between JCNR and cSRX (
ge-0/0/0for untrust,ge-0/0/1for trust)Multiple IPSec tunnels share the same source IP address
Multi-Tenant, Multiple Tunnels
Multiple customers share the same 5G gateway infrastructure, with each customer receiving dedicated trust and untrust VRF pairs for traffic isolation. A single cSRX instance serves all tenants. For example, a telecommunications provider hosts IPSec services for multiple enterprise customers on shared gateway infrastructure.
Dedicated trust VRF per tenant (required for isolation)
Untrust VRFs may be shared or dedicated per tenant
Each tenant uses dedicated interfaces between JCNR and cSRX
Multiple cSRX Instances
For large-scale deployments requiring additional IPSec tunnel capacity, you can deploy multiple cSRX instances on a single JCNR. Each cSRX instance is deployed in a separate Kubernetes namespace with dedicated VRFs to ensure complete traffic isolation between instances.
Each cSRX instance deploys in a separate Kubernetes namespace with dedicated VRFs
Each cSRX instance requires minimum 2 vCPUs and appropriate memory resources
No hard limit on number of instances; limited only by available cluster resources
Choosing a Configuration Method
Cloud-Native Router supports two methods for configuring IPSec tunnels:
Helm-Based Configuration
Helm-based configuration (enableUserConfig: false):
All IPSec tunnel configuration happens at installation time
Configuration is defined in the
ipSecTunnelConfigssection ofvalues.yamlRecommended for single-tunnel deployments
cSRX automatically generates and applies the configuration during installation
User-Based Configuration
User-based configuration (enableUserConfig: true):
Interface configuration happens at installation time via Helm
Allows you to apply IPSec tunnel configuration post-deployment using a configlet or CLI
Recommended for multi-tenant and multiple cSRX instance deployments
Enables dynamic configuration changes without redeploying cSRX
Supports additional IPSec parameters not available in Helm
Install cSRX on an Existing Cloud-Native Router Installation
Follow this procedure to install a cSRX instance on an existing Cloud-Native Router installation. Ensure all Cloud-Native Router components are up and running before you start this procedure.
Install cSRX During Cloud-Native Router Installation
Apply the cSRX License and Configure cSRX
Follow this procedure to apply your cSRX license and configure Juniper cSRX.
The following steps assume you're in the Juniper_Cloud_Native_Router_CSRX_<release> directory if installing cSRX and Cloud-Native Router together, or in the junos_csrx_<release> directory if installing cSRX on an existing Cloud-Native Router installation.
Customize cSRX Helm Chart
The cSRX service chaining instance is deployed via a Helm chart, either a standalone Helm chart or a combined Helm chart with JCNR. The deployment consists of two essential components:
-
csrx-init: This is an init container that prepares the configuration for the main cSRX application. It extracts the necessary information from the values.yaml file, processes it, and generates the configuration data for cSRX. This ensures that the main cSRX application starts with a valid, up-to-date configuration.
-
csrx: The csrx is the main application container and the core component of the cSRX deployment. It relies on the configuration provided by the
csrx-initcontainer to function correctly.
You can customize the cSRX deployment by specifying a range of configuration parameters in the values.yaml file. Key configuration options include:
-
kubeConfigPath: This is the path to the cluster kubeconfig file on the node(s) where you're installing Cloud-Native Router and cSRX. You copied the cluster kubeconfig to this file location on this node(s) in step 1 in Apply the cSRX License and Configure cSRX. If this parameter is commented out, then the cluster kubeconfig is assumed to be at /etc/kubernetes/kubelet.conf.
-
interfaceType: This is the type of interface on the cSRX to connect to JCNR. Must be set to
vhostonly. -
interfaceConfigs: This is an array defining the interface IP address, gateway address and optionally routes. The interface IP must match the
localAddresselement in theipSecTunnelConfigsarray. The routes should contain prefixes to steer decrypted traffic to Cloud-Native Router and reachability route for IPSec gateway. -
enableUserConfig:
-
Set to
falseif you want cSRX to create your IPSec tunnels now during installation. Define your IPSec tunnels in theipSecTunnelConfigssection of this Helm chart. cSRX will automatically create a configlet based on that configuration and apply it for you during cSRX installation. -
Set to
trueif you want to create your IPSec tunnels on your own later. In this case, you don't define youripSecTunnelConfigsin this Helm chart. Instead, you'll define your IPSec configuration directly in a configlet and explicitly apply it anytime after cSRX is installed.
-
-
ipSecTunnelConfigs: This is an array defining the IPsec configuration details such as ike-phase1, proposal, policy and gateway configuration. Traffic selector should contain traffic that is expected to be encrypted. This section is only applicable if
enableUserConfigis set tofalse. -
jcnr_config: This is an array defining the routes to be configured in Cloud-Native Router to steer traffic from Cloud-Native Router to cSRX and to steer IPsec traffic from the remote IPsec gateway to the cSRX to apply the security service chain.
-
telemetry: Enable or disable telemetry.
Here is the default values.yaml for standalone cSRX deployment:
# Default values for cSRX.
# This is a YAML-formatted file.
# Declare variables to be passed into your templates.

# Set to true if IPsec tunnels will be configured by user at a later stage
enableUserConfig: false  # enable /disable user configuration

common:
  registry: enterprise-hub.juniper.net/
  repository: jcnr-container-prod/

  csrxInit:
    repository:
    image: csrx-init
    tag: 25.2.0.92
    imagePullPolicy: IfNotPresent
    resources:
      #limits:
      #  memory: 1Gi
      #  cpu: 1
      #requests:
      #  memory: 1Gi
      #  cpu: 1

  csrx:
    repository:
    image: csrx
    tag: 25.2R1.9
    imagePullPolicy: IfNotPresent
    resources:
      limits:
        hugepages-1Gi: 4Gi
        memory: 4Gi
      requests:
        hugepages-1Gi: 4Gi
        memory: 4Gi

  csrxTelemetry:
    repository:
    image: contrail-telemetry-exporter
    tag: 25.2.0.92
    imagePullPolicy: IfNotPresent
    resources:

# uncomment below if you are using a private registry that needs authentication
# registryCredentials - Base64 representation of your Docker registry credentials
# secretName - Name of the Secret object that will be created
#imagePullSecret:
  #registryCredentials:  <base64-encoded-credential>
  #secretName: regcred

# nodeAffinity: Can be used to inject nodeAffinity for cSRX
# you may label the nodes where we wish to deploy cSRX and inject affinity accordingly
#nodeAffinity:
#- key: node-role.kubernetes.io/worker
#  operator: Exists
#- key: node-role.kubernetes.io/master
#  operator: DoesNotExist
#- key: kubernetes.io/hostname
#  operator: In
#  values:
#  - example-host-1

# Toleration allows the cSRX related pods to tolerate nodes with specific taints
#tolerations:
#- key: "csrx"
#  operator: "Equal"
#  value: "yes"
#  effect: "NoSchedule"


enableSecurityALg: false  # enable /disable security alg
replicas: 1

interfaceType: "vhost"

interfaceConfigs:
  #- name: ge-0/0/0
  #  ip: 181.1.1.1/30          # should match ipSecTunnelConfigs localAddress if configured
  #  gateway: 181.1.1.2        # gateway configuration
  #  ip6: 181:1:1::1/64        # optional
  #  ip6Gateway: 181:1:1::2    # optional
  #  routes:                   # this field is optional
  #  - "191.1.1.0/24"
  #  - "200.1.1.0/24"
  #  instance_parameters:
  #    name: "untrust"
  #    type: "vrf"             # options include virtual-router or vrf
  #    vrfTarget: 10:10        # this option is valid only for vrf
  #- name: ge-0/0/1
  #  ip: 1.21.1.1/30           # should match ipSecTunnelConfigs localAddress if configured
  #  gateway: 1.21.1.2         # gateway configuration
  #  ip6: 181:2:1::1/64                     # optional
  #  ip6Gateway: 181:2:1::2               # optional
  #  routes:                   # this field is optional
  #  - "111.1.1.0/24"
  #  - "192.1.1.0/24"
  #  instance_parameters:
  #    name: "trust"
  #    type: "vrf"             # options include virtual-router or vrf
  #    vrfTarget: 11:11        # this option is valid only for vrf

ipSecTunnelConfigs:       # untrust
  #Tunnel 1 config
  #- interface: ge-0/0/0       ## section ike-phase1, proposal, policy, gateway
  #  gateway: 181.1.1.1
  #  localAddress: 171.1.1.1
  #  localIdentificationHostname:  jcnr-csrx3.com     #Optional
  #  remoteIdentificationHostname:  jcnr-csrx1.com    #Optional
  #  authenticationAlgorithm: sha-256
  #  encryptionAlgorithm: aes-256-cbc
  #  preSharedKey: "$9$zt3l3AuIRhev8FnNVsYoaApu0RcSyev8XO1NVYoDj.P5F9AyrKv8X"
  #  trafficSelector:
  #  - name: ts1
  #    localIP: 222.1.1.0/24 ## IP cannot be 0.0.0.0/0
  #    remoteIP: 111.1.1.0/24 ## IP cannot be 0.0.0.0/0
  #Tunnel 2 config
  #- interface: ge-0/0/0       ## section ike-phase1, proposal, policy, gateway
  #  gateway: 191.1.1.1
  #  localAddress: 171.1.1.1
  #  localIdentificationHostname:  jcnr-csrx3.com     #Optional
  #  remoteIdentificationHostname:  jcnr-csrx1.com    #Optional
  #  authenticationAlgorithm: sha-256
  #  encryptionAlgorithm: aes-256-cbc
  #  preSharedKey: "$9$zt3l3AuIRhev8FnNVsYoaApu0RcSyev8XO1NVYoDj.P5F9AyrKv8X"
  #  trafficSelector:
  #  - name: ts2
  #    localIP: 100.1.1.0/24 ## IP cannot be 0.0.0.0/0
  #    remoteIP: 200.1.1.0/24 ## IP cannot be 0.0.0.0/0

jcnr_config:
  #- name: ge-0/0/0
  #  routes:
  #    - "121.1.1.0/24"

#csrx_flavor: specify the csrx deployment model. Corresponding values for csrx control and data
#must be provided based on the flavor mentioned below. Following are possible options:
# CSRX-2CPU-4G
# CSRX-4CPU-8G
# CSRX-6CPU-12G
# CSRX-8CPU-16G
# CSRX-16CPU-32G
# CSRX-20CPU-48G
csrx_flavor: CSRX-2CPU-4G

csrx_ctrl_cpu: "0x01"

csrx_data_cpu: "0x02"

telemetry:
  enable: false
  gnmi: true
  service:
    type: ClusterIP

    labels: {}
    annotations: {}
    clusterIP: ""

    # List of IP addresses at which the cSRX telemetry service is available
    # Ref: https://kubernetes.io/docs/user-guide/services/#external-ips
    externalIPs: []

    # Only use if service.type is "LoadBalancer"
    loadBalancerIP: ""

    # Ports to expose on each node
    # Only used if service.type is "NodePort"
    nodePort:
      prometheus: 30073
      gnmi: 30077

contrail_k8s_applier:
  image: contrail-k8s-applier
  tag: 25.2.0.92
  pullPolicy: IfNotPresent

csrx_log_path: "/var/log/csrx/"
Configuring cSRX via Helm Chart
The cSRX configurations are required to bring up its containers and pods at the time
of installation. The IPSec tunnel configuration can be defined at the time of
installation or later using a configlet. The enableUserConfig flag
in the cSRX Helm chart when set to true enables IPSec tunnel configuration via
configlet.
By default the enableUserConfig flag is set to false in
values.yaml and therefore requires
ipSecTunnelConfigs to be configured at the time of
installation. You can configure multiple tunnels in a cSRX instance for both
single-tenancy and multi-tenancy deployment.
- Single-Tenancy, Multiple Tunnel Deployment
- Multi-tenancy, Multiple Tunnel Deployment
- Multiple cSRX Instances Deployment
Single-Tenancy, Multiple Tunnel Deployment
A sample interface and tunnel configuration for single-tenancy, multiple tunnels is provided below:
enableUserConfig: false  # enable /disable user configuration

interfaceType: "vhost"

interfaceConfigs:
    - name: ge-0/0/0
      ip: 172.16.10.1/30          # should match ipSecTunnelConfigs localAddress if configured
      gateway: 172.16.10.2        # gateway configuration
      ip6: 2001:db8:172:16:10::1/64        # optional
      ip6Gateway: 2001:db8:172:16:10::2    # optional
      routes:                   # this field is optional
      - "172.17.10.0/24"
      - "172.18.10.0/24"
      instance_parameters:
        name: "untrust"
        type: "vrf"        # options include virtual-router or vrf
        vrfTarget: 10:10
    - name: ge-0/0/1
      ip: 192.168.1.1/30           # should match ipSecTunnelConfigs localAddress if configured
      gateway: 192.168.1.2         # gateway configuration
      ip6: 2001:db8:192:168:1::1/64                     # optional
      ip6Gateway: 2001:db8:192:168:1::2               # optional
      routes:                   # this field is optional
      - "10.111.1.0/24"
      - "10.112.1.0/24"
      instance_parameters:
        name: "trust"
        type: "vrf"        # options include virtual-router or vrf
        vrfTarget: 11:11

  ipSecTunnelConfigs:        # untrust
    #Tunnel 1 config
    - interface: ge-0/0/0       ## section ike-phase1, proposal, policy, gateway
      gateway: 172.17.10.2
      localAddress: 172.16.10.1
      authenticationAlgorithm: sha-256
      encryptionAlgorithm: aes-256-cbc
      preSharedKey: "$9$zt3l3AuIRhev8FnNVsYoaApu0RcSyev8XO1NVYoDj.P5F9AyrKv8X"
      trafficSelector:
      - name: ts1
        localIP: 10.111.1.0/24 ## IP cannot be 0.0.0.0/0
        remoteIP: 10.221.1.0/24 ## IP cannot be 0.0.0.0/0
    #Tunnel 2 config
    - interface: ge-0/0/0       ## section ike-phase1, proposal, policy, gateway
      gateway: 172.18.10.2
      localAddress: 172.16.10.1
      authenticationAlgorithm: sha-256
      encryptionAlgorithm: aes-256-cbc
      preSharedKey: "$9$zt3l3AuIRhev8FnNVsYoaApu0RcSyev8XO1NVYoDj.P5F9AyrKv8X"
      trafficSelector:
      - name: ts2
        localIP: 10.112.1.0/24 ## IP cannot be 0.0.0.0/0
        remoteIP: 10.222.1.0/24 ## IP cannot be 0.0.0.0/0

  jcnr_config:
    - name: ge-0/0/1
      routes:
        - "10.221.1.0/24"
        - "10.222.1.0/24"
Multi-tenancy, Multiple Tunnel Deployment
For customers sharing the same 5G gateways, Cloud-Native Router supports a single cSRX service-chained instance, with dedicated trust and untrust interfaces and VRFs per tenant. The untrust interfaces and VRFs may be shared between customers, however the trust interfaces and VRFs must be dedicated per tenant. A sample interface and tunnel configuration for multi-tenancy, multiple tunnels is provided below:
enableUserConfig: false  # enable /disable user configuration

interfaceType: "vhost"

 interfaceConfigs:
    - name: ge-0/0/0
      ip: 181.1.1.1/30          # should match ipSecTunnelConfigs localAddress if configured
      gateway: 181.1.1.2        # gateway configuration
      ip6: 181:1:1::1/64        # optional
      ip6Gateway: 181:1:1::2    # optional
      routes:                   # this field is optional
      - "191.1.1.0/24"
      instance_parameters:
        name: "untrust1"
        type: "vrf"             # options include virtual-router or vrf
        vrfTarget: 10:10        # this option is valid only for vrf
    - name: ge-0/0/1
      ip: 1.21.1.1/30           # should match ipSecTunnelConfigs localAddress if configured
      gateway: 1.21.1.2         # gateway configuration
      ip6: 181:21:1::1/64                     # optional
      ip6Gateway: 181:21:1::2               # optional
      routes:                   # this field is optional
      - "121.1.1.0/24"
      instance_parameters:
        name: "trust1"
        type: "vrf"             # options include virtual-router or vrf
        vrfTarget: 11:11        # this option is valid only for vrf
    - name: ge-0/0/2
      ip: 171.1.1.1/30          # should match ipSecTunnelConfigs localAddress if configured
      gateway: 171.1.1.2        # gateway configuration
      ip6: 171:1:1::1/64        # optional
      ip6Gateway: 171:1:1::2    # optional
      routes:                   # this field is optional
      - "161.1.1.0/24"
      instance_parameters:
        name: "untrust2"
        type: "vrf"             # options include virtual-router or vrf
        vrfTarget: 12:12        # this option is valid only for vrf
    - name: ge-0/0/3
      ip: 1.22.1.1/30           # should match ipSecTunnelConfigs localAddress if configured
      gateway: 1.22.1.2         # gateway configuration
      ip6: 181:22:1::1/64                     # optional
      ip6Gateway: 181:22:1::2               # optional
      routes:                   # this field is optional
      - "122.1.1.0/24"
      instance_parameters:
        name: "trust2"
        type: "vrf"             # options include virtual-router or vrf
        vrfTarget: 13:13        # this option is valid only for vrf

  ipSecTunnelConfigs:       # untrust
    #Tunnel 1 config
    - interface: ge-0/0/0       ## section ike-phase1, proposal, policy, gateway
      gateway: 191.1.1.1
      localAddress: 181.1.1.1
      authenticationAlgorithm: sha-256
      encryptionAlgorithm: aes-256-cbc
      preSharedKey: "$9$zt3l3AuIRhev8FnNVsYoaApu0RcSyev8XO1NVYoDj.P5F9AyrKv8X"
      trafficSelector:
      - name: ts1
        localIP: 121.1.1.0/24 ## IP cannot be 0.0.0.0/0
        remoteIP: 121.10.1.0/24 ## IP cannot be 0.0.0.0/0
    #Tunnel 2 config
    - interface: ge-0/0/2       ## section ike-phase1, proposal, policy, gateway
      gateway: 161.1.1.1
      localAddress: 171.1.1.1
      authenticationAlgorithm: sha-256
      encryptionAlgorithm: aes-256-cbc
      preSharedKey: "$9$zt3l3AuIRhev8FnNVsYoaApu0RcSyev8XO1NVYoDj.P5F9AyrKv8X"
      trafficSelector:
      - name: ts2
        localIP: 122.1.1.0/24 ## IP cannot be 0.0.0.0/0
        remoteIP: 122.10.1.0/24 ## IP cannot be 0.0.0.0/0

  jcnr_config:
    - name: ge-0/0/1
      routes:
        - "121.10.1.0/24"
    - name: ge-0/0/3
      routes:
        - "122.10.1.0/24"
Multiple cSRX Instances Deployment
For large-scale deployments requiring more IPSec tunnels than a single cSRX instance supports, deploy multiple cSRX instances on a single JCNR. Each cSRX instance is deployed in a separate Kubernetes namespace with dedicated VRFs.
A sample interface and tunnel configuration for the first cSRX instance in the
jcnr namespace is provided below:
enableUserConfig: false  # enable /disable user configuration

interfaceType: "vhost"

interfaceConfigs:
  - name: ge-0/0/0
    ip: 181.1.1.1/30          # should match ipSecTunnelConfigs localAddress if configured
    gateway: 181.1.1.2        # gateway configuration
    ip6: 181:1:1::1/64        # optional
    ip6Gateway: 181:1:1::2    # optional
    routes:                   # this field is optional
    - "171.1.1.0/24"
    instance_parameters:
      name: "untrust"
      type: "vrf"             # options include virtual-router or vrf
      vrfTarget: 10:10        # this option is valid only for vrf
  - name: ge-0/0/1
    ip: 1.21.1.1/30           # should match ipSecTunnelConfigs localAddress if configured
    gateway: 1.21.1.2         # gateway configuration
    ip6: 121:1:1::1/64                     # optional
    ip6Gateway: 121:1:1::2               # optional
    routes:                   # this field is optional
    - "200.1.1.0/24"
    instance_parameters:
      name: "trust"
      type: "vrf"             # options include virtual-router or vrf
      vrfTarget: 11:11        # this option is valid only for vrf

ipSecTunnelConfigs:       # untrust
  #Tunnel 1 config
  - interface: ge-0/0/0       ## section ike-phase1, proposal, policy, gateway
    gateway: 171.1.1.1
    localAddress: 181.1.1.1
    authenticationAlgorithm: sha-256
    encryptionAlgorithm: aes-256-cbc
    preSharedKey: "$9$zt3l3AuIRhev8FnNVsYoaApu0RcSyev8XO1NVYoDj.P5F9AyrKv8X"
    trafficSelector:
    - name: ts1
      localIP: 200.1.1.0/24 ## IP cannot be 0.0.0.0/0
      remoteIP: 100.1.1.0/24 ## IP cannot be 0.0.0.0/0

jcnr_config:
  - name: ge-0/0/1
    routes:
    - "100.1.1.0/24"
For the second cSRX instance, use a separate namespace and VRF targets. A sample configuration for the second instance is provided below:
enableUserConfig: false  # enable /disable user configuration

interfaceType: "vhost"

interfaceConfigs:
  - name: ge-0/0/0
    ip: 161.1.1.1/30          # Different IP range from first instance
    gateway: 161.1.1.2        # gateway configuration
    ip6: 161:1:1::1/64        # optional
    ip6Gateway: 161:1:1::2    # optional
    routes:                   # this field is optional
    - "191.1.1.0/24"
    instance_parameters:
      name: "untrust-1"
      type: "vrf"             # options include virtual-router or vrf
      vrfTarget: 20:10        # Different VRF target from first instance
  - name: ge-0/0/1
    ip: 1.22.1.1/30           # Different IP range from first instance
    gateway: 1.22.1.2         # gateway configuration
    ip6: 121:2:1::1/64                     # optional
    ip6Gateway: 121:2:1::2               # optional
    routes:                   # this field is optional
    - "210.1.1.0/24"
    instance_parameters:
      name: "trust-1"
      type: "vrf"             # options include virtual-router or vrf
      vrfTarget: 21:21        # Different VRF target from first instance

ipSecTunnelConfigs:       # untrust
  #Tunnel 1 config
  - interface: ge-0/0/0       ## section ike-phase1, proposal, policy, gateway
    gateway: 191.1.1.1
    localAddress: 161.1.1.1
    authenticationAlgorithm: sha-256
    encryptionAlgorithm: aes-256-cbc
    preSharedKey: "$9$zt3l3AuIRhev8FnNVsYoaApu0RcSyev8XO1NVYoDj.P5F9AyrKv8X"
    trafficSelector:
    - name: ts2
      localIP: 210.1.1.0/24 ## IP cannot be 0.0.0.0/0
      remoteIP: 110.1.1.0/24 ## IP cannot be 0.0.0.0/0

jcnr_config:
  - name: ge-0/0/1
    routes:
    - "110.1.1.0/24"
Configuring cSRX IPSec Tunnel Configuration via Configlets
You can configure the IPSec tunnels after cSRX has been deployed using a configlet.
The installation Helm chart must have enableUserConfig flag value
set to true. The ipSecTunnelConfigs configuration snippet must not
be defined. Sample Helm charts are provided in the installer bundle—
/csrx_examples/values-user-config-csrx.yaml for cSRX only
installation and
/charts/junos-csrx/csrx_examples/values-user-config-unified.yaml
for unified JCNR and cSRX installation. Both single-tenancy and multi-tenancy
deployments are supported.
- Single-Tenancy, Multiple-Tunnel Deployment
- Multi-tenancy, Multiple-Tunnel Deployment
- Multiple cSRX Instances Deployment
Single-Tenancy, Multiple-Tunnel Deployment
An example Helm chart for single-tenancy, multiple-tunnel deployment is provided below:
enableUserConfig: true  # enable /disable user configuration

interfaceType: "vhost"

interfaceConfigs:
    - name: ge-0/0/0
      ip: 172.16.10.1/30          # should match ipSecTunnelConfigs localAddress if configured
      gateway: 172.16.10.2        # gateway configuration
      ip6: 2001:db8:172:16:10::1/64        # optional
      ip6Gateway: 2001:db8:172:16:10::2    # optional
      routes:                   # this field is optional
      - "172.17.10.0/24"
      - "172.18.10.0/24"
      instance_parameters:
        name: "untrust"
        type: "vrf"        # options include virtual-router or vrf
        vrfTarget: 10:10
    - name: ge-0/0/1
      ip: 192.168.1.1/30           # should match ipSecTunnelConfigs localAddress if configured
      gateway: 192.168.1.2         # gateway configuration
      ip6: 2001:db8:192:168:1::1/64                     # optional
      ip6Gateway: 2001:db8:192:168:1::2               # optional
      routes:                   # this field is optional
      - "10.111.1.0/24"
      - "10.112.1.0/24"
      instance_parameters:
        name: "trust"
        type: "vrf"        # options include virtual-router or vrf
        vrfTarget: 11:11

  jcnr_config:
    - name: ge-0/0/1
      routes:
        - "10.221.1.0/24"
        - "10.222.1.0/24"
You can create IPSec tunnels or modify tunnel configuration after deployment
using a configlet. A sample configlet has been provided in the installer
bundle—/csrx_examples/ipsec-tunnel-config-cr.yaml for cSRX
only installation and
/charts/junos-csrx/csrx_examples/ipsec-tunnel-config-cr.yaml
for unified JCNR and cSRX installation. An example configlet is provided
below:
# Example configlet CR to configure an IPsec tunnel on a CSRX
apiVersion: configplane.juniper.net/v1
kind: Configlet
metadata:
  name: example-csrx-cr
  namespace: jcnr
  labels:
    app: csrx
  annotations:
    juniper.net/device: csrx
spec:
  config: |-
    set security ike proposal ike-phase-171-1-1-1-0-proposal dh-group group5
    set security ike proposal ike-phase-171-1-1-1-0-proposal encryption-algorithm aes-256-cbc
    set security ike proposal ike-phase-171-1-1-1-0-proposal authentication-algorithm sha-256
    set security ike proposal ike-phase-171-1-1-1-0-proposal authentication-method pre-shared-keys
    set security ike proposal ike-phase-171-1-1-1-0-proposal lifetime-seconds 3600
    set security ike policy ike-phase-171-1-1-1-0-policy proposals ike-phase-171-1-1-1-0-proposal
    set security ike policy ike-phase-171-1-1-1-0-policy pre-shared-key ascii-text "$9$zt3l3AuIRhev8FnNVsYoaApu0RcSyev8XO1NVYoDj.P5F9AyrKv8X"
    set security ike gateway remote-171-1-1-1-0 ike-policy ike-phase-171-1-1-1-0-policy
    set security ike gateway remote-171-1-1-1-0 address 181.1.1.1
    set security ike gateway remote-171-1-1-1-0 external-interface ge-0/0/0.0
    set security ike gateway remote-171-1-1-1-0 local-address 171.1.1.1
    set security ike gateway remote-171-1-1-1-0 version v2-only
    set security ipsec proposal ipsec-171-1-1-1-0-proposal protocol esp
    set security ipsec proposal ipsec-171-1-1-1-0-proposal encryption-algorithm aes-256-cbc
    set security ipsec proposal ipsec-171-1-1-1-0-proposal authentication-algorithm hmac-sha-256-128
    set security ipsec proposal ipsec-171-1-1-1-0-proposal lifetime-seconds 18000
    set security ipsec policy ipsec-171-1-1-1-0-policy perfect-forward-secrecy keys group5
    set security ipsec policy ipsec-171-1-1-1-0-policy proposals ipsec-171-1-1-1-0-proposal
    set security ipsec vpn ipsec-remote-171-1-1-1-0 bind-interface st0.0
    set security ipsec vpn ipsec-remote-171-1-1-1-0 ike gateway remote-171-1-1-1-0
    set security ipsec vpn ipsec-remote-171-1-1-1-0 ike ipsec-policy ipsec-171-1-1-1-0-policy
    set security ipsec vpn ipsec-remote-171-1-1-1-0 establish-tunnels immediately
    set security ipsec vpn ipsec-remote-171-1-1-1-0 traffic-selector ts1 local-ip 100.1.1.0/24
    set security ipsec vpn ipsec-remote-171-1-1-1-0 traffic-selector ts1 remote-ip 200.1.1.0/24
    set security zones security-zone untrust host-inbound-traffic system-services all
    set security zones security-zone untrust host-inbound-traffic protocols all
Multi-tenancy, Multiple-Tunnel Deployment
For customers sharing the 5G gateways, you can configure cSRX in a multi-tenancy, multiple-tunnel deployment mode. An example Helm chart is provided below:
enableUserConfig: true  # enable /disable user configuration

interfaceType: "vhost"

interfaceConfigs:
  - name: ge-0/0/0
    ip: 181.1.1.1/30          # should match ipSecTunnelConfigs localAddress if configured
    gateway: 181.1.1.2        # gateway configuration
    ip6: 181:1:1::1/64        # optional
    ip6Gateway: 181:1:1::2    # optional
    routes:                   # this field is optional
    - "171.1.1.0/24"
    instance_parameters:
      name: "untrust1"
      type: "vrf"             # options include virtual-router or vrf
      vrfTarget: 10:10        # this option is valid only for vrf
  - name: ge-0/0/1
    ip: 1.21.1.1/30           # should match ipSecTunnelConfigs localAddress if configured
    gateway: 1.21.1.2         # gateway configuration
    ip6: 121:1:1::1/64                     # optional
    ip6Gateway: 121:1:1::2               # optional
    routes:                   # this field is optional
    - "200.1.1.0/24"
    instance_parameters:
      name: "trust1"
      type: "vrf"             # options include virtual-router or vrf
      vrfTarget: 11:11        # this option is valid only for vrf
  - name: ge-0/0/2
    ip: 161.1.1.1/30          # should match ipSecTunnelConfigs localAddress if configured
    gateway: 161.1.1.2        # gateway configuration
    ip6: 161:1:1::1/64        # optional
    ip6Gateway: 161:1:1::2    # optional
    routes:                   # this field is optional
    - "191.1.1.0/24"
    instance_parameters:
      name: "untrust2"
      type: "vrf"             # options include virtual-router or vrf
      vrfTarget: 20:10        # this option is valid only for vrf
  - name: ge-0/0/3
    ip: 1.22.1.1/30           # should match ipSecTunnelConfigs localAddress if configured
    gateway: 1.22.1.2         # gateway configuration
    ip6: 121:2:1::1/64                     # optional
    ip6Gateway: 121:2:1::2               # optional
    routes:                   # this field is optional
    - "210.1.1.0/24"
    instance_parameters:
      name: "trust2"
      type: "vrf"             # options include virtual-router or vrf
      vrfTarget: 21:21        # this option is valid only for vrf

jcnr_config:
    - name: ge-0/0/1
      routes:
      - "100.1.1.0/24"
    - name: ge-0/0/3
      routes:
      - "200.1.1.0/24"
Sample configlet for multi-tenancy deployment is provided below:
apiVersion: configplane.juniper.net/v1
kind: Configlet
metadata:
  name: csrx-node
  namespace: jcnr
  labels:
    app: csrx
  annotations:
    juniper.net/device: csrx
spec:
  config: |-
    set security ike proposal ike-phase-181-1-1-1-0-proposal authentication-method pre-shared-keys
    set security ike proposal ike-phase-181-1-1-1-0-proposal dh-group group5
    set security ike proposal ike-phase-181-1-1-1-0-proposal authentication-algorithm sha-256
    set security ike proposal ike-phase-181-1-1-1-0-proposal encryption-algorithm aes-256-cbc
    set security ike proposal ike-phase-181-1-1-1-0-proposal lifetime-seconds 3600
    set security ike proposal ike-phase-161-1-1-1-1-proposal authentication-method pre-shared-keys
    set security ike proposal ike-phase-161-1-1-1-1-proposal dh-group group5
    set security ike proposal ike-phase-161-1-1-1-1-proposal authentication-algorithm sha-256
    set security ike proposal ike-phase-161-1-1-1-1-proposal encryption-algorithm aes-256-cbc
    set security ike proposal ike-phase-161-1-1-1-1-proposal lifetime-seconds 3600
    set security ike policy ike-phase-181-1-1-1-0-policy proposals ike-phase-181-1-1-1-0-proposal
    set security ike policy ike-phase-181-1-1-1-0-policy pre-shared-key ascii-text "$9$zt3l3AuIRhev8FnNVsYoaApu0RcSyev8XO1NVYoDj.P5F9AyrKv8X"
    set security ike policy ike-phase-161-1-1-1-1-policy proposals ike-phase-161-1-1-1-1-proposal
    set security ike policy ike-phase-161-1-1-1-1-policy pre-shared-key ascii-text "$9$zt3l3AuIRhev8FnNVsYoaApu0RcSyev8XO1NVYoDj.P5F9AyrKv8X"
    set security ike gateway remote-181-1-1-1-0 ike-policy ike-phase-181-1-1-1-0-policy
    set security ike gateway remote-181-1-1-1-0 address 171.1.1.1
    set security ike gateway remote-181-1-1-1-0 external-interface ge-0/0/0.0
    set security ike gateway remote-181-1-1-1-0 local-address 181.1.1.1
    set security ike gateway remote-181-1-1-1-0 version v2-only
    set security ike gateway remote-161-1-1-1-1 ike-policy ike-phase-161-1-1-1-1-policy
    set security ike gateway remote-161-1-1-1-1 address 191.1.1.1
    set security ike gateway remote-161-1-1-1-1 external-interface ge-0/0/2.0
    set security ike gateway remote-161-1-1-1-1 local-address 161.1.1.1
    set security ike gateway remote-161-1-1-1-1 version v2-only
    set security ipsec proposal ipsec-181-1-1-1-0-proposal protocol esp
    set security ipsec proposal ipsec-181-1-1-1-0-proposal authentication-algorithm hmac-sha-256-128
    set security ipsec proposal ipsec-181-1-1-1-0-proposal encryption-algorithm aes-256-cbc
    set security ipsec proposal ipsec-181-1-1-1-0-proposal lifetime-seconds 18000
    set security ipsec proposal ipsec-161-1-1-1-1-proposal protocol esp
    set security ipsec proposal ipsec-161-1-1-1-1-proposal authentication-algorithm hmac-sha-256-128
    set security ipsec proposal ipsec-161-1-1-1-1-proposal encryption-algorithm aes-256-cbc
    set security ipsec proposal ipsec-161-1-1-1-1-proposal lifetime-seconds 18000
    set security ipsec policy ipsec-181-1-1-1-0-policy perfect-forward-secrecy keys group5
    set security ipsec policy ipsec-181-1-1-1-0-policy proposals ipsec-181-1-1-1-0-proposal
    set security ipsec policy ipsec-161-1-1-1-1-policy perfect-forward-secrecy keys group5
    set security ipsec policy ipsec-161-1-1-1-1-policy proposals ipsec-161-1-1-1-1-proposal
    set security ipsec vpn ipsec-remote-181-1-1-1-0 bind-interface st0.0
    set security ipsec vpn ipsec-remote-181-1-1-1-0 ike gateway remote-181-1-1-1-0
    set security ipsec vpn ipsec-remote-181-1-1-1-0 ike ipsec-policy ipsec-181-1-1-1-0-policy
    set security ipsec vpn ipsec-remote-181-1-1-1-0 traffic-selector ts1 local-ip 200.1.1.0/24
    set security ipsec vpn ipsec-remote-181-1-1-1-0 traffic-selector ts1 remote-ip 100.1.1.0/24
    set security ipsec vpn ipsec-remote-181-1-1-1-0 establish-tunnels immediately
    set security ipsec vpn ipsec-remote-161-1-1-1-1 bind-interface st0.1
    set security ipsec vpn ipsec-remote-161-1-1-1-1 ike gateway remote-161-1-1-1-1
    set security ipsec vpn ipsec-remote-161-1-1-1-1 ike ipsec-policy ipsec-161-1-1-1-1-policy
    set security ipsec vpn ipsec-remote-161-1-1-1-1 traffic-selector ts2 local-ip 210.1.1.0/24
    set security ipsec vpn ipsec-remote-161-1-1-1-1 traffic-selector ts2 remote-ip 110.1.1.0/24
    set security ipsec vpn ipsec-remote-161-1-1-1-1 establish-tunnels immediately
Multiple cSRX Instances Deployment
For large-scale deployments requiring more IPSec tunnels than a single cSRX instance supports, deploy multiple cSRX instances with configlet-based IPSec configuration. Each cSRX instance is deployed in a separate Kubernetes namespace with dedicated VRFs.
An example Helm chart for the first cSRX instance in the jcnr
namespace is provided below:
enableUserConfig: true  # enable /disable user configuration

interfaceType: "vhost"

interfaceConfigs:
  - name: ge-0/0/0
    ip: 181.1.1.1/30          # should match ipSecTunnelConfigs localAddress if configured
    gateway: 181.1.1.2        # gateway configuration
    ip6: 181:1:1::1/64        # optional
    ip6Gateway: 181:1:1::2    # optional
    routes:                   # this field is optional
    - "171.1.1.0/24"
    instance_parameters:
      name: "untrust"
      type: "vrf"             # options include virtual-router or vrf
      vrfTarget: 10:10        # this option is valid only for vrf
  - name: ge-0/0/1
    ip: 1.21.1.1/30           # should match ipSecTunnelConfigs localAddress if configured
    gateway: 1.21.1.2         # gateway configuration
    ip6: 121:1:1::1/64                     # optional
    ip6Gateway: 121:1:1::2               # optional
    routes:                   # this field is optional
    - "200.1.1.0/24"
    instance_parameters:
      name: "trust"
      type: "vrf"             # options include virtual-router or vrf
      vrfTarget: 11:11        # this option is valid only for vrf

jcnr_config:
  - name: ge-0/0/1
    routes:
    - "100.1.1.0/24"
Sample configlet for applying IPSec tunnel configuration to the first instance in
the jcnr namespace:
apiVersion: configplane.juniper.net/v1
kind: Configlet
metadata:
  name: csrx-node1
  namespace: jcnr
  labels:
    app: csrx
  annotations:
    juniper.net/device: csrx
spec:
  config: |-
    set security ike proposal ike-phase-171-1-1-1-0-proposal authentication-method pre-shared-keys
    set security ike proposal ike-phase-171-1-1-1-0-proposal dh-group group5
    set security ike proposal ike-phase-171-1-1-1-0-proposal authentication-algorithm sha-256
    set security ike proposal ike-phase-171-1-1-1-0-proposal encryption-algorithm aes-256-cbc
    set security ike proposal ike-phase-171-1-1-1-0-proposal lifetime-seconds 3600
    set security ike policy ike-phase-171-1-1-1-0-policy proposals ike-phase-171-1-1-1-0-proposal
    set security ike policy ike-phase-171-1-1-1-0-policy pre-shared-key ascii-text "$9$zt3l3AuIRhev8FnNVsYoaApu0RcSyev8XO1NVYoDj.P5F9AyrKv8X"
    set security ike gateway remote-171-1-1-1-0 ike-policy ike-phase-171-1-1-1-0-policy
    set security ike gateway remote-171-1-1-1-0 address 181.1.1.1
    set security ike gateway remote-171-1-1-1-0 external-interface ge-0/0/0.0
    set security ike gateway remote-171-1-1-1-0 local-address 171.1.1.1
    set security ike gateway remote-171-1-1-1-0 version v2-only
    set security ipsec proposal ipsec-171-1-1-1-0-proposal protocol esp
    set security ipsec proposal ipsec-171-1-1-1-0-proposal authentication-algorithm hmac-sha-256-128
    set security ipsec proposal ipsec-171-1-1-1-0-proposal encryption-algorithm aes-256-cbc
    set security ipsec proposal ipsec-171-1-1-1-0-proposal lifetime-seconds 18000
    set security ipsec policy ipsec-171-1-1-1-0-policy perfect-forward-secrecy keys group5
    set security ipsec policy ipsec-171-1-1-1-0-policy proposals ipsec-171-1-1-1-0-proposal
    set security ipsec vpn ipsec-remote-171-1-1-1-0 bind-interface st0.0
    set security ipsec vpn ipsec-remote-171-1-1-1-0 ike gateway remote-171-1-1-1-0
    set security ipsec vpn ipsec-remote-171-1-1-1-0 ike ipsec-policy ipsec-171-1-1-1-0-policy
    set security ipsec vpn ipsec-remote-171-1-1-1-0 traffic-selector ts1 local-ip 100.1.1.0/24
    set security ipsec vpn ipsec-remote-171-1-1-1-0 traffic-selector ts1 remote-ip 200.1.1.0/24
    set security ipsec vpn ipsec-remote-171-1-1-1-0 establish-tunnels immediately
For the second cSRX instance, use a separate namespace and VRF targets. An example Helm chart for the second instance is provided below:
enableUserConfig: true  # enable /disable user configuration

interfaceType: "vhost"

interfaceConfigs:
  - name: ge-0/0/0
    ip: 161.1.1.1/30          # Different IP range from first instance
    gateway: 161.1.1.2        # gateway configuration
    ip6: 161:1:1::1/64        # optional
    ip6Gateway: 161:1:1::2    # optional
    routes:                   # this field is optional
    - "191.1.1.0/24"
    instance_parameters:
      name: "untrust-1"
      type: "vrf"             # options include virtual-router or vrf
      vrfTarget: 20:10        # Different VRF target from first instance
  - name: ge-0/0/1
    ip: 1.22.1.1/30           # Different IP range from first instance
    gateway: 1.22.1.2         # gateway configuration
    ip6: 121:2:1::1/64                     # optional
    ip6Gateway: 121:2:1::2               # optional
    routes:                   # this field is optional
    - "210.1.1.0/24"
    instance_parameters:
      name: "trust-1"
      type: "vrf"             # options include virtual-router or vrf
      vrfTarget: 21:21        # Different VRF target from first instance

jcnr_config:
  - name: ge-0/0/1
    routes:
    - "110.1.1.0/24"
Sample configlet for the second instance in the jcnr2 namespace.
Note the namespace specification in the metadata:
apiVersion: configplane.juniper.net/v1
kind: Configlet
metadata:
  name: csrx-node2
  namespace: jcnr2
  labels:
    app: csrx
  annotations:
    juniper.net/device: csrx
spec:
  config: |-
    set security ike proposal ike-phase-181-1-1-1-0-proposal authentication-method pre-shared-keys
    set security ike proposal ike-phase-181-1-1-1-0-proposal dh-group group5
    set security ike proposal ike-phase-181-1-1-1-0-proposal authentication-algorithm sha-256
    set security ike proposal ike-phase-181-1-1-1-0-proposal encryption-algorithm aes-256-cbc
    set security ike proposal ike-phase-181-1-1-1-0-proposal lifetime-seconds 3600
    set security ike proposal ike-phase-161-1-1-1-1-proposal authentication-method pre-shared-keys
    set security ike proposal ike-phase-161-1-1-1-1-proposal dh-group group5
    set security ike proposal ike-phase-161-1-1-1-1-proposal authentication-algorithm sha-256
    set security ike proposal ike-phase-161-1-1-1-1-proposal encryption-algorithm aes-256-cbc
    set security ike proposal ike-phase-161-1-1-1-1-proposal lifetime-seconds 3600
    set security ike policy ike-phase-181-1-1-1-0-policy proposals ike-phase-181-1-1-1-0-proposal
    set security ike policy ike-phase-181-1-1-1-0-policy pre-shared-key ascii-text "$9$zt3l3AuIRhev8FnNVsYoaApu0RcSyev8XO1NVYoDj.P5F9AyrKv8X"
    set security ike policy ike-phase-161-1-1-1-1-policy proposals ike-phase-161-1-1-1-1-proposal
    set security ike policy ike-phase-161-1-1-1-1-policy pre-shared-key ascii-text "$9$zt3l3AuIRhev8FnNVsYoaApu0RcSyev8XO1NVYoDj.P5F9AyrKv8X"
    set security ike gateway remote-181-1-1-1-0 ike-policy ike-phase-181-1-1-1-0-policy
    set security ike gateway remote-181-1-1-1-0 address 171.1.1.1
    set security ike gateway remote-181-1-1-1-0 external-interface ge-0/0/0.0
    set security ike gateway remote-181-1-1-1-0 local-address 181.1.1.1
    set security ike gateway remote-181-1-1-1-0 version v2-only
    set security ike gateway remote-161-1-1-1-1 ike-policy ike-phase-161-1-1-1-1-policy
    set security ike gateway remote-161-1-1-1-1 address 191.1.1.1
    set security ike gateway remote-161-1-1-1-1 external-interface ge-0/0/2.0
    set security ike gateway remote-161-1-1-1-1 local-address 161.1.1.1
    set security ike gateway remote-161-1-1-1-1 version v2-only
    set security ipsec proposal ipsec-181-1-1-1-0-proposal protocol esp
    set security ipsec proposal ipsec-181-1-1-1-0-proposal authentication-algorithm hmac-sha-256-128
    set security ipsec proposal ipsec-181-1-1-1-0-proposal encryption-algorithm aes-256-cbc
    set security ipsec proposal ipsec-181-1-1-1-0-proposal lifetime-seconds 18000
    set security ipsec proposal ipsec-161-1-1-1-1-proposal protocol esp
    set security ipsec proposal ipsec-161-1-1-1-1-proposal authentication-algorithm hmac-sha-256-128
    set security ipsec proposal ipsec-161-1-1-1-1-proposal encryption-algorithm aes-256-cbc
    set security ipsec proposal ipsec-161-1-1-1-1-proposal lifetime-seconds 18000
    set security ipsec policy ipsec-181-1-1-1-0-policy perfect-forward-secrecy keys group5
    set security ipsec policy ipsec-181-1-1-1-0-policy proposals ipsec-181-1-1-1-0-proposal
    set security ipsec policy ipsec-161-1-1-1-1-policy perfect-forward-secrecy keys group5
    set security ipsec policy ipsec-161-1-1-1-1-policy proposals ipsec-161-1-1-1-1-proposal
    set security ipsec vpn ipsec-remote-181-1-1-1-0 bind-interface st0.0
    set security ipsec vpn ipsec-remote-181-1-1-1-0 ike gateway remote-181-1-1-1-0
    set security ipsec vpn ipsec-remote-181-1-1-1-0 ike ipsec-policy ipsec-181-1-1-1-0-policy
    set security ipsec vpn ipsec-remote-181-1-1-1-0 traffic-selector ts1 local-ip 200.1.1.0/24
    set security ipsec vpn ipsec-remote-181-1-1-1-0 traffic-selector ts1 remote-ip 100.1.1.0/24
    set security ipsec vpn ipsec-remote-181-1-1-1-0 establish-tunnels immediately
    set security ipsec vpn ipsec-remote-161-1-1-1-1 bind-interface st0.1
    set security ipsec vpn ipsec-remote-161-1-1-1-1 ike gateway remote-161-1-1-1-1
    set security ipsec vpn ipsec-remote-161-1-1-1-1 ike ipsec-policy ipsec-161-1-1-1-1-policy
    set security ipsec vpn ipsec-remote-161-1-1-1-1 traffic-selector ts2 local-ip 210.1.1.0/24
    set security ipsec vpn ipsec-remote-161-1-1-1-1 traffic-selector ts2 remote-ip 110.1.1.0/24
    set security ipsec vpn ipsec-remote-161-1-1-1-1 establish-tunnels immediately
Configuration Examples
Single cSRX Instance Deployment
Let us look at a configuration example for Cloud-Native Router with security
services. Consider the following network topology: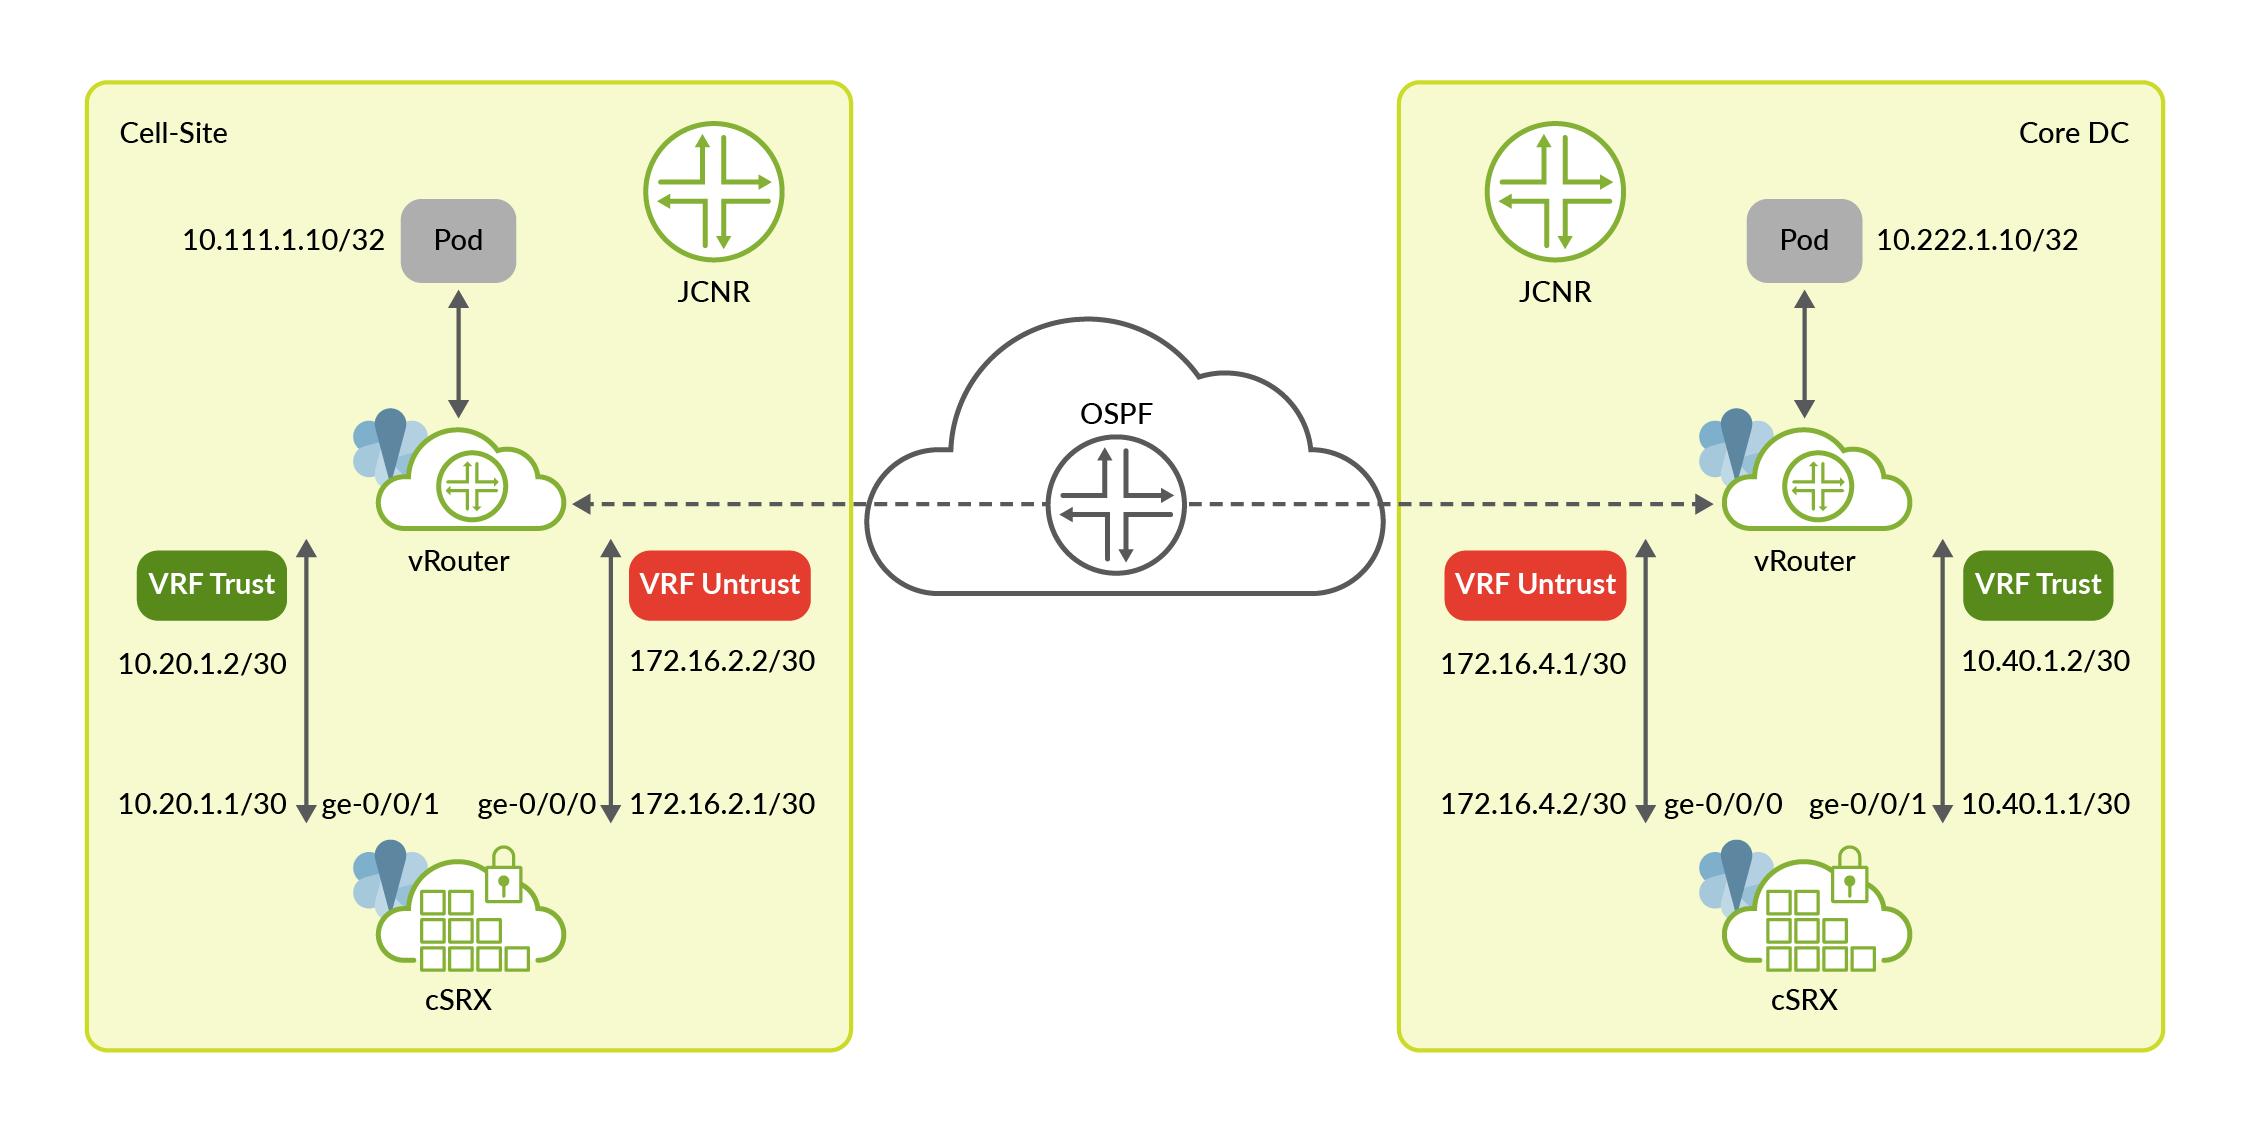
The topology consists of a Cloud-Native Router on the cell-site and a
Cloud-Native Router in the core data center. Both Cloud-Native Routers are
service chained with cSRX. The core data center can also have any other physical
or virtual firewall function as the tunnel endpoint. The traffic between pods
10.111.1.10 and 10.222.1.10 must be
encrypted through an IPsec tunnel. The IP addresses and gateway addresses for
the cSRX-Cloud-Native Router interface are also illustrated.
cSRX connects with Cloud-Native Router's forwarding plane (vRouter) using two interfaces:
ge-0/0/1interface is used to send traffic from Cloud-Native Router to security services for IPsec encryption and from security services to Cloud-Native Router after IPsec decryption. This interface is a part of the trust zone in cSRX and trust VRF in Cloud-Native Router.ge-0/0/0interface is used to send traffic from security services to Cloud-Native Router after IPsec encryption and from Cloud-Native Router to security services for IPsec decryption. This interface is part of the untrust zone in cSRX and untrust VRF in Cloud-Native Router.
Let us look at the configuration steps:
-
Configure the cSRX Helm chart with correct
interfaceConfigs,ipSecTunnelConfigsandjcnr_configfor the topology.-
Helm chart configuration for cell-site Cloud-Native Router:
junos-csrx: # Default values for cSRX. # This is a YAML-formatted file. # Declare variables to be passed into your templates. common: registry: enterprise-hub.juniper.net/ repository: jcnr-container-prod/ csrxInit: repository: image: csrx-init tag: R25.1-25 imagePullPolicy: IfNotPresent resources: #limits: # memory: 1Gi # cpu: 1 #requests: # memory: 1Gi # cpu: 1 csrx: repository: image: csrx tag: 25.1R1.8 imagePullPolicy: IfNotPresent resources: limits: hugepages-1Gi: 6Gi memory: 4Gi requests: hugepages-1Gi: 6Gi memory: 4Gi csrxTelemetry: repository: image: contrail-telemetry-exporter tag: 25.1.0.25 imagePullPolicy: IfNotPresent resources: # kubeconfigpath: path to the kubeconfig file (to override the default path /etc/kubernetes/kubelet.conf) # kubeConfigPath: /path/to/kubeconfig # nodeAffinity: Can be used to inject nodeAffinity for cSRX # you may label the nodes where we wish to deploy cSRX and inject affinity accordingly nodeAffinity: #- key: node-role.kubernetes.io/worker # operator: Exists #- key: node-role.kubernetes.io/master # operator: DoesNotExist - key: kubernetes.io/hostname operator: In values: - node2 replicas: 1 interfaceType: "vhost" interfaceConfigs: - name: ge-0/0/0 ip: 172.16.2.1/30 # --> Interface IP in Untrust VRF, should match ipSecTunnelConfigs localAddress if configured gateway: 172.16.2.2 # --> gateway configuration ip6: 2001:172:16:2::1/126 # optional ip6Gateway: 2001:172:16:2::2 # optional routes: # --> Route to remote tunnel endpoint - "172.16.4.0/24" instance_parameters: name: "untrust" type: "vrf" # options include virtual-router or vrf vrfTarget: 10:10 - name: ge-0/0/1 ip: 10.20.1.1/30 # --> Interface IP in the Trust VRF gateway: 10.20.1.2 # --> gateway configuration ip6: 2001:10:20:1::1/126 # optional ip6Gateway: 2001:10:20:1::2 # optional routes: # --> Route to local application subnet - "10.111.1.0/24" instance_parameters: name: "trust" type: "vrf" # options include virtual-router or vrf vrfTarget: 11:11 ipSecTunnelConfigs: # untrust - interface: ge-0/0/0 ## section ike-phase1, proposal, policy, gateway gateway: 172.16.4.1 # --> Remote tunnel endpoint localAddress: 172.16.2.1 # --> Local Untrust Interface IP authenticationAlgorithm: sha-256 encryptionAlgorithm: aes-256-cbc preSharedKey: "$9$zt3l3AuIRhev8FnNVsYoaApu0RcSyev8XO1NVYoDj.P5F9AyrKv8X" trafficSelector: - name: ts1 localIP: 10.111.1.0/24 # --> Traffic selector based on local application subnet remoteIP: 10.222.1.0/24 # --> Traffic selector based on remote application subnet jcnr_config: - name: ge-0/0/1 routes: - "10.222.1.0/24" # --> cRPD route to remote application subnet via trust interface #csrx_flavor: specify the csrx deployment model. Corresponding values for csrx control and data cpus #must be provided based on the flavor mentioned below. Following are possible options: # CSRX-2CPU-4G # CSRX-4CPU-8G # CSRX-6CPU-12G # CSRX-8CPU-16G # CSRX-16CPU-32G # CSRX-20CPU-48G csrx_flavor: CSRX-2CPU-4G csrx_ctrl_cpu: "0x01" csrx_data_cpu: "0x02" -
Helm chart configuration for remote Cloud-Native Router:
# Default values for cSRX.
# This is a YAML-formatted file.
# Declare variables to be passed into your templates.

common:
  registry: enterprise-hub.juniper.net/
  repository: jcnr-container-prod/

  csrxInit:
    image: csrx-init
    tag: f4tgt33
    imagePullPolicy: IfNotPresent
    resources:
      #limits:
      #  memory: 1Gi
      #  cpu: 1
      #requests:
      #  memory: 1Gi
      #  cpu: 1

  csrx:
    image: csrx
    tag: 24.2R1.14
    imagePullPolicy: IfNotPresent
    resources:
      limits:
        hugepages-1Gi: 4Gi
        memory: 4Gi
      requests:
        hugepages-1Gi: 4Gi
        memory: 4Gi

# uncomment below if you are using a private registry that needs authentication
# registryCredentials - Base64 representation of your Docker registry credentials
# secretName - Name of the Secret object that will be created
#imagePullSecret:
  #registryCredentials:  <base64-encoded-credential>
  #secretName: regcred

# nodeAffinity: Can be used to inject nodeAffinity for cSRX
# you may label the nodes where we wish to deploy cSRX and inject affinity accordingly
# nodeAffinity:
#- key: node-role.kubernetes.io/worker
#  operator: Exists
#- key: node-role.kubernetes.io/master
#  operator: DoesNotExist

replicas: 1

interfaceType: "vhost"

interfaceConfigs:
  - name: ge-0/0/0
    ip: 172.16.4.1/30          # --> Interface IP in Untrust VRF, should match ipSecTunnelConfigs localAddress if configured
    gateway: 172.16.4.2        # --> gateway configuration
    ip6: 2001:172:16:4::1/126        # optional
    ip6Gateway: 2001:172.16.4::2    # optional
    routes:                   # --> Route to remote tunnel endpoint
    - "172.16.2.0/24"
    instance_parameters:
        name: "untrust"
        type: "vrf"        # options include virtual-router or vrf
        vrfTarget: 10:10
  - name: ge-0/0/1
    ip: 10.40.1.1/30           # --> Interface IP in the Trust VRF
    gateway: 10.40.1.2         # --> gateway configuration
    ip6: 2001:10:40:1::1/126           # optional
    ip6Gateway: 2001:10:40:1::2        # optional
    routes:                   # --> Route to local application subnet
    - "10.222.1.0/24"
    instance_parameters:
       name: "trust"
       type: "vrf"        # options include virtual-router or vrf
       vrfTarget: 11:11

ipSecTunnelConfigs:       # untrust
  - interface: ge-0/0/0       ## section ike-phase1, proposal, policy, gateway
    gateway: 172.16.2.1   # --> Remote tunnel endpoint
    localAddress: 172.16.4.1  # --> Local Untrust Interface IP
    authenticationAlgorithm: sha-256
    encryptionAlgorithm: aes-256-cbc
    preSharedKey: "$9$zt3l3AuIRhev8FnNVsYoaApu0RcSyev8XO1NVYoDj.P5F9AyrKv8X"
    trafficSelector:
    - name: ts1
      localIP: 10.222.1.0/24  # --> Traffic selector based on local application subnet
      remoteIP: 10.111.1.0/24 # --> Traffic selector based on remote application subnet

jcnr_config:
  - name: ge-0/0/0
    routes:
      - "10.222.1.0/24"      # --> cRPD route to local application subnet via untrust interface
  - name: ge-0/0/1
    routes:
      - "10.111.1.0/24"     # --> cRPD route to remote application subnet via trust interface

#csrx_flavor: specify the csrx deployment model. Corresponding values for csrx control and data cpus
#must be provided based on the flavor mentioned below. Following are possible options:
# CSRX-2CPU-4G
# CSRX-4CPU-8G
# CSRX-6CPU-12G
# CSRX-8CPU-16G
# CSRX-16CPU-32G
# CSRX-20CPU-48G
csrx_flavor: CSRX-2CPU-4G

csrx_ctrl_cpu: "0x01"

csrx_data_cpu: "0x02"
Once you have configured the Helm chart, you must deploy cSRX. See Install cSRX on an Existing Cloud-Native Router Installation for details on how to deploy cSRX for service chaining with Cloud-Native Router.
-
-
Configure the Cloud-Native Router fabric interface (
ens192) to participate in the IGP running in the core. The configuration is performed in the untrust VRF.-
Example configlet for OSPF on the cell-site Cloud-Native Router:
apiVersion: configplane.juniper.net/v1 kind: Configlet metadata: name: configlet-ipsec-ospf # <-- Configlet resource name namespace: jcnr spec: config: |- set policy-options policy-statement export_static_ospf from protocol local set policy-options policy-statement export_static_ospf from protocol static set policy-options policy-statement export_static_ospf then accept set routing-instances untrust protocols ospf export export_static_ospf set routing-instances untrust protocols ospf area 0 interface ens192 set interfaces ens192 unit 0 family inet address 172.16.0.11/24 set routing-instances untrust interface ens192 crpdSelector: matchLabels: node: worker -
Example configlet for OSPF on the remote Cloud-Native Router:
apiVersion: configplane.juniper.net/v1
kind: Configlet
metadata:
  name: configlet-ipsec-ospf             # <-- Configlet resource name
  namespace: jcnr
spec:
  config: |-
    set policy-options policy-statement export_static_ospf from protocol local
    set policy-options policy-statement export_static_ospf from protocol static
    set policy-options policy-statement export_static_ospf then accept
    set routing-instances untrust protocols ospf export export_static_ospf
    set routing-instances untrust protocols ospf area 0 interface ens192
    set interfaces ens192 unit 0 family inet address 172.16.0.12/24
    set routing-instances untrust interface ens192
  crpdSelector:
    matchLabels:
        node: worker
-
-
Deploy the application pods with an interface attached to the trust VRF in Cloud-Native Router.
-
Application pod on the cell-site:
apiVersion: "k8s.cni.cncf.io/v1" kind: NetworkAttachmentDefinition metadata: name: net-trust spec: config: '{ "cniVersion":"0.4.0", "name": "net-trust", "plugins": [ { "type": "jcnr", # --> CNI plugin is jcnr "args": { "vrfName": "trust", # --> VRF name is trust "vrfTarget": "10:10" }, "kubeConfig":"/etc/kubernetes/kubelet.conf" } ] }' --- apiVersion: v1 kind: Pod metadata: name: pktgen-ce1 labels: app: pktgen-odu annotations: k8s.v1.cni.cncf.io/networks: | [ { "name": "net-trust", "interface":"net1", "cni-args": { "interfaceType":"veth", "mac":"aa:bb:cc:dd:50:11", "ipConfig":{ "ipv4":{ "address":"10.111.1.10/24", # --> IP address of the pod "gateway":"10.111.1.1", "routes":[ "10.222.1.0/24"] }, "ipv6":{ "address":"2001:0db8:10:111:1::10/126", "gateway":"2001:0db8:10:111:1::10", "routes":["2001:0db8:10:222:1::0/126"] } } } } ] spec: affinity: <trimmed...> -
Application pod on the remote site:
apiVersion: "k8s.cni.cncf.io/v1"
kind: NetworkAttachmentDefinition
metadata:
  name: net-trust
spec:
  config: '{
    "cniVersion":"0.4.0",
    "name": "net-trust",
    "plugins": [
      {
        "type": "jcnr",               # --> CNI plugin is jcnr
        "args": {
          "vrfName": "trust",         # --> VRF name is trust
          "vrfTarget": "10:10"
        },
        "kubeConfig":"/etc/kubernetes/kubelet.conf"
      }
    ]
  }'
---
apiVersion: v1
kind: Pod
metadata:
  name: pktgen-ce1
  labels:
     app: pktgen-odu
  annotations:
    k8s.v1.cni.cncf.io/networks: |
      [
        {
          "name": "net-trust",
          "interface":"net1",
          "cni-args": {
            "interfaceType":"veth",
            "mac":"aa:bb:cc:dd:50:22",
            "ipConfig":{
              "ipv4":{
                "address":"10.222.1.10/24",      # --> IP address of the pod
                "gateway":"10.222.1.1",
                "routes":[ "10.111.1.0/24"]
              },
              "ipv6":{
                      "address":"2001:0db8:10:222:1::10/126",
                      "gateway":"2001:0db8:10:222:1::10",
                      "routes":["2001:0db8:10:111:1::0/126"]
              }
            }
          }
        }
      ]
spec:
  affinity:
<trimmed...>
-
Multiple cSRX Instances Deployment
This example demonstrates deploying two cSRX instances on a single JCNR to support additional IPSec tunnels beyond the capacity of a single cSRX instance. Each cSRX instance is deployed in a separate Kubernetes namespace with dedicated VRFs and independent IPSec tunnel configurations.
Let us look at the configuration steps:
-
Deploy the first cSRX instance in the default
jcnrnamespace. Configure the Helm chart withenableUserConfig: trueto enable configlet-based IPSec configuration.enableUserConfig: true # enable /disable user configuration interfaceType: "vhost" interfaceConfigs: - name: ge-0/0/0 ip: 181.1.1.1/30 # should match ipSecTunnelConfigs localAddress if configured gateway: 181.1.1.2 # gateway configuration ip6: 181:1:1::1/64 # optional ip6Gateway: 181:1:1::2 # optional routes: # this field is optional - "171.1.1.0/24" instance_parameters: name: "untrust" type: "vrf" # options include virtual-router or vrf vrfTarget: 10:10 # this option is valid only for vrf - name: ge-0/0/1 ip: 1.21.1.1/30 # should match ipSecTunnelConfigs localAddress if configured gateway: 1.21.1.2 # gateway configuration ip6: 121:1:1::1/64 # optional ip6Gateway: 121:1:1::2 # optional routes: # this field is optional - "200.1.1.0/24" instance_parameters: name: "trust" type: "vrf" # options include virtual-router or vrf vrfTarget: 11:11 # this option is valid only for vrf jcnr_config: - name: ge-0/0/1 routes: - "100.1.1.0/24"Deploy the first cSRX instance:
helm install csrx <path-to-helm-chart> -f values-user-defined-cfg.yaml
-
Apply the IPSec tunnel configuration for the first cSRX instance via configlet in the
jcnrnamespace:apiVersion: configplane.juniper.net/v1 kind: Configlet metadata: name: csrx-node1 namespace: jcnr labels: app: csrx annotations: juniper.net/device: csrx spec: config: |- set security ike proposal ike-phase-171-1-1-1-0-proposal authentication-method pre-shared-keys set security ike proposal ike-phase-171-1-1-1-0-proposal dh-group group5 set security ike proposal ike-phase-171-1-1-1-0-proposal authentication-algorithm sha-256 set security ike proposal ike-phase-171-1-1-1-0-proposal encryption-algorithm aes-256-cbc set security ike proposal ike-phase-171-1-1-1-0-proposal lifetime-seconds 3600 set security ike policy ike-phase-171-1-1-1-0-policy proposals ike-phase-171-1-1-1-0-proposal set security ike policy ike-phase-171-1-1-1-0-policy pre-shared-key ascii-text "$9$zt3l3AuIRhev8FnNVsYoaApu0RcSyev8XO1NVYoDj.P5F9AyrKv8X" set security ike gateway remote-171-1-1-1-0 ike-policy ike-phase-171-1-1-1-0-policy set security ike gateway remote-171-1-1-1-0 address 181.1.1.1 set security ike gateway remote-171-1-1-1-0 external-interface ge-0/0/0.0 set security ike gateway remote-171-1-1-1-0 local-address 171.1.1.1 set security ike gateway remote-171-1-1-1-0 version v2-only set security ipsec proposal ipsec-171-1-1-1-0-proposal protocol esp set security ipsec proposal ipsec-171-1-1-1-0-proposal authentication-algorithm hmac-sha-256-128 set security ipsec proposal ipsec-171-1-1-1-0-proposal encryption-algorithm aes-256-cbc set security ipsec proposal ipsec-171-1-1-1-0-proposal lifetime-seconds 18000 set security ipsec policy ipsec-171-1-1-1-0-policy perfect-forward-secrecy keys group5 set security ipsec policy ipsec-171-1-1-1-0-policy proposals ipsec-171-1-1-1-0-proposal set security ipsec vpn ipsec-remote-171-1-1-1-0 bind-interface st0.0 set security ipsec vpn ipsec-remote-171-1-1-1-0 ike gateway remote-171-1-1-1-0 set security ipsec vpn ipsec-remote-171-1-1-1-0 ike ipsec-policy ipsec-171-1-1-1-0-policy set security ipsec vpn ipsec-remote-171-1-1-1-0 traffic-selector ts1 local-ip 100.1.1.0/24 set security ipsec vpn ipsec-remote-171-1-1-1-0 traffic-selector ts1 remote-ip 200.1.1.0/24 set security ipsec vpn ipsec-remote-171-1-1-1-0 establish-tunnels immediately -
Create a namespace for the second cSRX instance by running the following command:
kubectl create namespace jcnr2
-
Create and apply the secret to the
jcnr2namespace by running the following command:cat <<EOF | kubectl apply -f - apiVersion: v1 kind: Secret metadata: name: service-chain-instance namespace: jcnr2 data: csrx_license: | RGVtb0xhYkpV...hiZDYgeQo= csrx_root_password: amr...yM== EOF -
For the second cSRX instance, configure the Helm chart with different VRFs and IP ranges:
enableUserConfig: true  # enable /disable user configuration

interfaceType: "vhost"

interfaceConfigs:
  - name: ge-0/0/0
    ip: 161.1.1.1/30          # Different IP range from first instance
    gateway: 161.1.1.2        # gateway configuration
    ip6: 161:1:1::1/64        # optional
    ip6Gateway: 161:1:1::2    # optional
    routes:                   # this field is optional
    - "191.1.1.0/24"
    instance_parameters:
      name: "untrust-1"
      type: "vrf"             # options include virtual-router or vrf
      vrfTarget: 20:10        # Different VRF target from first instance
  - name: ge-0/0/1
    ip: 1.22.1.1/30           # Different IP range from first instance
    gateway: 1.22.1.2         # gateway configuration
    ip6: 121:2:1::1/64                     # optional
    ip6Gateway: 121:2:1::2               # optional
    routes:                   # this field is optional
    - "210.1.1.0/24"
    instance_parameters:
      name: "trust-1"
      type: "vrf"             # options include virtual-router or vrf
      vrfTarget: 21:21        # Different VRF target from first instance

jcnr_config:
  - name: ge-0/0/1
    routes:
    - "110.1.1.0/24"
Deploy the second cSRX instance in the
jcnr2namespace:helm install csrx2 <path-to-helm-chart> -f values-user-defined-cfg-instance2.yaml -n jcnr2
-
Apply the IPSec tunnel configuration for the second cSRX instance via configlet in the
jcnr2namespace:apiVersion: configplane.juniper.net/v1 kind: Configlet metadata: name: csrx-node2 namespace: jcnr2 labels: app: csrx annotations: juniper.net/device: csrx spec: config: |- set security ike proposal ike-phase-181-1-1-1-0-proposal authentication-method pre-shared-keys set security ike proposal ike-phase-181-1-1-1-0-proposal dh-group group5 set security ike proposal ike-phase-181-1-1-1-0-proposal authentication-algorithm sha-256 set security ike proposal ike-phase-181-1-1-1-0-proposal encryption-algorithm aes-256-cbc set security ike proposal ike-phase-181-1-1-1-0-proposal lifetime-seconds 3600 set security ike proposal ike-phase-161-1-1-1-1-proposal authentication-method pre-shared-keys set security ike proposal ike-phase-161-1-1-1-1-proposal dh-group group5 set security ike proposal ike-phase-161-1-1-1-1-proposal authentication-algorithm sha-256 set security ike proposal ike-phase-161-1-1-1-1-proposal encryption-algorithm aes-256-cbc set security ike proposal ike-phase-161-1-1-1-1-proposal lifetime-seconds 3600 set security ike policy ike-phase-181-1-1-1-0-policy proposals ike-phase-181-1-1-1-0-proposal set security ike policy ike-phase-181-1-1-1-0-policy pre-shared-key ascii-text "$9$zt3l3AuIRhev8FnNVsYoaApu0RcSyev8XO1NVYoDj.P5F9AyrKv8X" set security ike policy ike-phase-161-1-1-1-1-policy proposals ike-phase-161-1-1-1-1-proposal set security ike policy ike-phase-161-1-1-1-1-policy pre-shared-key ascii-text "$9$zt3l3AuIRhev8FnNVsYoaApu0RcSyev8XO1NVYoDj.P5F9AyrKv8X" set security ike gateway remote-181-1-1-1-0 ike-policy ike-phase-181-1-1-1-0-policy set security ike gateway remote-181-1-1-1-0 address 171.1.1.1 set security ike gateway remote-181-1-1-1-0 external-interface ge-0/0/0.0 set security ike gateway remote-181-1-1-1-0 local-address 181.1.1.1 set security ike gateway remote-181-1-1-1-0 version v2-only set security ike gateway remote-161-1-1-1-1 ike-policy ike-phase-161-1-1-1-1-policy set security ike gateway remote-161-1-1-1-1 address 191.1.1.1 set security ike gateway remote-161-1-1-1-1 external-interface ge-0/0/2.0 set security ike gateway remote-161-1-1-1-1 local-address 161.1.1.1 set security ike gateway remote-161-1-1-1-1 version v2-only set security ipsec proposal ipsec-181-1-1-1-0-proposal protocol esp set security ipsec proposal ipsec-181-1-1-1-0-proposal authentication-algorithm hmac-sha-256-128 set security ipsec proposal ipsec-181-1-1-1-0-proposal encryption-algorithm aes-256-cbc set security ipsec proposal ipsec-181-1-1-1-0-proposal lifetime-seconds 18000 set security ipsec proposal ipsec-161-1-1-1-1-proposal protocol esp set security ipsec proposal ipsec-161-1-1-1-1-proposal authentication-algorithm hmac-sha-256-128 set security ipsec proposal ipsec-161-1-1-1-1-proposal encryption-algorithm aes-256-cbc set security ipsec proposal ipsec-161-1-1-1-1-proposal lifetime-seconds 18000 set security ipsec policy ipsec-181-1-1-1-0-policy perfect-forward-secrecy keys group5 set security ipsec policy ipsec-181-1-1-1-0-policy proposals ipsec-181-1-1-1-0-proposal set security ipsec policy ipsec-161-1-1-1-1-policy perfect-forward-secrecy keys group5 set security ipsec policy ipsec-161-1-1-1-1-policy proposals ipsec-161-1-1-1-1-proposal set security ipsec vpn ipsec-remote-181-1-1-1-0 bind-interface st0.0 set security ipsec vpn ipsec-remote-181-1-1-1-0 ike gateway remote-181-1-1-1-0 set security ipsec vpn ipsec-remote-181-1-1-1-0 ike ipsec-policy ipsec-181-1-1-1-0-policy set security ipsec vpn ipsec-remote-181-1-1-1-0 traffic-selector ts1 local-ip 200.1.1.0/24 set security ipsec vpn ipsec-remote-181-1-1-1-0 traffic-selector ts1 remote-ip 100.1.1.0/24 set security ipsec vpn ipsec-remote-181-1-1-1-0 establish-tunnels immediately set security ipsec vpn ipsec-remote-161-1-1-1-1 bind-interface st0.1 set security ipsec vpn ipsec-remote-161-1-1-1-1 ike gateway remote-161-1-1-1-1 set security ipsec vpn ipsec-remote-161-1-1-1-1 ike ipsec-policy ipsec-161-1-1-1-1-policy set security ipsec vpn ipsec-remote-161-1-1-1-1 traffic-selector ts2 local-ip 210.1.1.0/24 set security ipsec vpn ipsec-remote-161-1-1-1-1 traffic-selector ts2 remote-ip 110.1.1.0/24 set security ipsec vpn ipsec-remote-161-1-1-1-1 establish-tunnels immediately -
Deploy the application pod for the first cSRX instance with an interface attached to the
trustVRF:apiVersion: "k8s.cni.cncf.io/v1" kind: NetworkAttachmentDefinition metadata: name: net-trust spec: config: '{ "cniVersion":"0.4.0", "name": "net-trust", "plugins": [ { "type": "jcnr", "args": { "vrfName": "trust", "vrfTarget": "11:11" }, "kubeConfig":"/etc/kubernetes/kubelet.conf" } ] }' --- apiVersion: v1 kind: Pod metadata: name: app-instance1 annotations: k8s.v1.cni.cncf.io/networks: | [ { "name": "net-trust", "interface":"net1", "cni-args": { "interfaceType":"veth", "ipConfig":{ "ipv4":{ "address":"200.1.1.10/24", "gateway":"200.1.1.1", "routes":[ "100.1.1.0/24"] } } } } ] spec: affinity: <trimmed...> -
Deploy the application pod for the second cSRX instance with an interface attached to the
trust-1VRF:apiVersion: "k8s.cni.cncf.io/v1" kind: NetworkAttachmentDefinition metadata: name: net-trust-1 spec: config: '{ "cniVersion":"0.4.0", "name": "net-trust-1", "plugins": [ { "type": "jcnr", "args": { "vrfName": "trust-1", "vrfTarget": "21:21" }, "kubeConfig":"/etc/kubernetes/kubelet.conf" } ] }' --- apiVersion: v1 kind: Pod metadata: name: app-instance2 annotations: k8s.v1.cni.cncf.io/networks: | [ { "name": "net-trust-1", "interface":"net1", "cni-args": { "interfaceType":"veth", "ipConfig":{ "ipv4":{ "address":"210.1.1.10/24", "gateway":"210.1.1.1", "routes":[ "110.1.1.0/24"] } } } } ] spec: affinity: <trimmed...> -
To uninstall the cSRX instances, run the following commands:
First instance:
helm uninstall csrxSecond instance:
helm uninstall csrx2 -n
                                        jcnr2
Verify Configuration
Single cSRX Instance Verification
You can verify the configuration and traffic flows in cRPD, cSRX and vRouter.
-
Verify cRPD configuration for trust and untrust VRFs via the cRPD shell. The configuration is available under the cni configuration group.
user@host > show configuration groups cni | display set
set groups cni apply-flags omit
set groups cni apply-macro ht jcnr
set groups cni routing-instances untrust instance-type vrf
set groups cni routing-instances untrust routing-options rib untrust.inet6.0 static route 2001:db8:172:16:10::1/128 qualified-next-hop 2001:db8:172:16:10::1 interface vhostge-0_0_0-90aca656-8b86-4d1d-a8
set groups cni routing-instances untrust routing-options static route 172.16.10.1/32 qualified-next-hop 172.16.10.1 interface vhostge-0_0_0-90aca656-8b86-4d1d-a8
set groups cni routing-instances untrust interface vhostge-0_0_0-90aca656-8b86-4d1d-a8
set groups cni routing-instances untrust route-distinguisher 10:10
set groups cni routing-instances untrust vrf-target target:10:10
set groups cni routing-instances trust instance-type vrf
set groups cni routing-instances trust routing-options rib trust.inet6.0 static route 2001:db8:10:20:1::1/128 qualified-next-hop 2001:db8:10:20:1::1 interface vhostge-0_0_1-90aca656-8b86-4d1d-a8
set groups cni routing-instances trust routing-options static route 10:20:1.1/32 qualified-next-hop 10:20:1.1 interface vhostge-0_0_1-90aca656-8b86-4d1d-a8
set groups cni routing-instances trust routing-options static route 10.222.1.0/24 qualified-next-hop 10.20.1.1 interface vhostge-0_0_1-90aca656-8b86-4d1d-a8
set groups cni routing-instances trust interface vhostge-0_0_1-90aca656-8b86-4d1d-a8
set groups cni routing-instances trust route-distinguisher 11:11
set groups cni routing-instances trust vrf-target target:11:11
-
Verify the cRPD Routing Tables:
user@host > show route table trust.inet.0 trust.inet.0: 5 destinations, 5 routes (5 active, 0 holddown, 0 hidden) + = Active Route, - = Last Active, * = Both 10.20.1.1/32 *[Static/5] 03:59:00 > via vhostge-0_0_1-a6c764da-a46d-4832-b5 10.20.1.2/32 *[Local/0] 03:59:00 Local via vhostge-0_0_1-a6c764da-a46d-4832-b5 10.111.1.1/32 *[Local/0] 03:59:00 Local via jvknet1-88e1126 10.111.1.10/32 *[Static/5] 03:59:00 > via jvknet1-88e1126 10.222.1.0/24 *[Static/5] 03:59:00 > via vhostge-0_0_1-a6c764da-a46d-4832-b5user@host > show route table untrust.inet.0 untrust.inet.0: 9 destinations, 9 routes (9 active, 0 holddown, 0 hidden) + = Active Route, - = Last Active, * = Both 10.111.1.0/24 *[Static/5] 04:00:31 > via vhostge-0_0_0-a6c764da-a46d-4832-b5 10.222.1.0/24 *[OSPF/150] 03:56:03, metric 0, tag 0 > to 172.16.0.12 via ens192 172.16.0.0/24 *[Direct/0] 04:00:31 > via ens192 172.16.0.11/32 *[Local/0] 04:00:31 Local via ens192 172.16.1.0/24 *[OSPF/10] 03:56:03, metric 2 > to 172.16.0.12 via ens192 172.16.2.1/32 *[Static/5] 04:00:31 > via vhostge-0_0_0-a6c764da-a46d-4832-b5 172.16.2.2/32 *[Local/0] 04:00:31 Local via vhostge-0_0_0-a6c764da-a46d-4832-b5 172.16.4.1/32 *[OSPF/150] 03:56:03, metric 0, tag 0 > to 172.16.0.12 via ens192 -
Login to the cSRX shell using the
kubectl exec -it csrx_pod_name -n jcnr -- bashcommand. Typeclito navigate to the CLI mode. Verify the cSRX configuration, security associations and flows:user@host> show configuration ## Last commit: 2024-10-01 10:25:50 UTC by root version 20240621.103832_builder.r1429411; system { root-authentication { encrypted-password *disabled*; ## SECRET-DATA } services { ssh { root-login allow; } } } interfaces { ge-0/0/0 { unit 0 { family inet { address 172.16.2.1/30; } } } ge-0/0/1 { unit 0 { family inet { address 10.20.1.1/30; } } } st0 { unit 0 { family inet; } } } routing-options { static { route 172.16.4.0/24 next-hop 172.16.2.2/32; route 10.111.1.0/24 next-hop 10.20.1.2/32; } } security { ike { proposal ike-phase-172-16-2-1-proposal { authentication-method pre-shared-keys; dh-group group5; authentication-algorithm sha-256; encryption-algorithm aes-256-cbc; lifetime-seconds 3600; } policy ike-phase-172-16-2-1-policy { proposals ike-phase-172-16-2-1-proposal; pre-shared-key ascii-text "$9$zt3l3AuIRhev8FnNVsYoaApu0RcSyev8XO1NVYoDj.P5F9AyrKv8X"; ## SECRET-DATA } gateway remote-172-16-2-1 { ike-policy ike-phase-172-16-2-1-policy; address 172.16.4.1; external-interface ge-0/0/0.0; local-address 172.16.2.1; version v2-only; } } ipsec { proposal ipsec-172-16-2-1-proposal { protocol esp; } policy ipsec-172-16-2-1-policy { perfect-forward-secrecy { keys group5; } proposals ipsec-172-16-2-1-proposal; } vpn ipsec-remote-172-16-2-1 { bind-interface st0.0; ike { gateway remote-172-16-2-1; ipsec-policy ipsec-172-16-2-1-policy; } traffic-selector ts1 { local-ip 10.111.1.0/24; remote-ip 10.222.1.0/24; } establish-tunnels immediately; } } policies { default-policy { permit-all; } } zones { security-zone untrust { host-inbound-traffic { system-services { all; } protocols { all; } } interfaces { ge-0/0/0.0; st0.0; } } security-zone trust { host-inbound-traffic { system-services { all; } protocols { all; } } interfaces { ge-0/0/1.0; } } } }user@host> show security ike security-associations Index State Initiator cookie Responder cookie Mode Remote Address 73 UP 6895337b7ae4b449 2bdca7788a896e50 IKEv2 172.16.4.1
user@host> show security ipsec security-associations
  Total active tunnels: 1     Total IPsec sas: 1
  ID      Algorithm       SPI      Life:sec/kb  Mon lsys Port  Gateway
  <500002 ESP:3des/sha1   0x0283e69b 2132/ unlim -  root 500   172.16.4.1
  >500002 ESP:3des/sha1   0xbdd5cc1e 2132/ unlim -  root 500   172.16.4.1
user@host> show security ipsec statistics
ESP Statistics:
  Encrypted bytes:          2878576
  Decrypted bytes:          1739472
  Encrypted packets:          21166
  Decrypted packets:          20708
AH Statistics:
  Input bytes:                    0
  Output bytes:                   0
  Input packets:                  0
  Output packets:                 0
Errors:
  AH authentication failures: 0, Replay errors: 0
  ESP authentication failures: 0, ESP decryption failures: 0
  Bad headers: 0, Bad trailers: 0
  Invalid SPI: 0, TS check fail: 0
  Exceeds tunnel MTU: 0
  Discarded: 0
user@host> show security flow session
Session ID: 2, Policy name: N/A, Timeout: N/A, Session State: Valid
  In: 172.16.4.1/0 --> 172.16.2.1/0;esp, Conn Tag: 0x0, If: ge-0/0/0.0, Pkts: 0, Bytes: 0,

Session ID: 2696, Policy name: N/A, Timeout: N/A, Session State: Valid
  In: 172.16.4.1/20915 --> 172.16.2.1/10740;esp, Conn Tag: 0x0, If: ge-0/0/0.0, Pkts: 7, Bytes: 952,
Total sessions: 2
-
You can also verify the flow in the vRouter CLI:
# flow -l
Flow table(size 161218560, entries 629760)
…
    Index                Source:Port/Destination:Port                      Proto(V)
-----------------------------------------------------------------------------------
    58256<=>206532       172.16.4.1:0                                       50 (1)
                         172.16.2.1:0
(Gen: 53, K(nh):1, Action:F, Flags:, QOS:-1, S(nh):26,  Stats:14479/1969144,
 SPort 63031, TTL 0, Sinfo 0.0.0.0)

   202824<=>382336       10.111.1.10:67                                      1 (2)
                         10.222.1.10:0
(Gen: 5, K(nh):2, Action:F, Flags:, QOS:-1, S(nh):18,  Stats:14754/1445892,
 SPort 51876, TTL 0, Sinfo 8.0.0.0)

   206532<=>58256        172.16.2.1:0                                       50 (1)
                         172.16.4.1:0
(Gen: 53, K(nh):1, Action:F, Flags:, QOS:-1, S(nh):27,  Stats:14494/2174100,
 SPort 55303, TTL 0, Sinfo 6.0.0.0)

   382336<=>202824       10.222.1.10:67                                      1 (2)
                         10.111.1.10:0
(Gen: 5, K(nh):2, Action:F, Flags:, QOS:-1, S(nh):14,  Stats:14479/1418942,
 …
Multiple cSRX Instances Verification
When deploying multiple cSRX instances, verify that each instance is running correctly, IPSec tunnels are established in their respective namespaces, and end-to-end traffic flows through the correct paths.
-
Verify both cSRX instances are running in their respective namespaces:
# Verify first instance in jcnr namespace
kubectl get pods -n jcnr | grep csrx

# Verify second instance in jcnr2 namespace
kubectl get pods -n jcnr2 | grep csrx

# Expected output: Both pods show status "Running"
-
Verify namespace isolation by checking configlets are applied to the correct instances:
# List configlets in jcnr namespace
kubectl get configlets -n jcnr

# List configlets in jcnr2 namespace
kubectl get configlets -n jcnr2

# Expected output: Each namespace shows its own configlets
-
Verify cRPD configuration for trust and untrust VRFs via the cRPD shell. The configuration is available under the cni configuration group.
user@host > show configuration groups cni | display set
set groups cni apply-flags omit
set groups cni apply-macro ht jcnr
set groups cni routing-instances trust instance-type virtual-router
set groups cni routing-instances trust routing-options rib trust.inet6.0 static route abcd:100:1:1::2/128 qualified-next-hop abcd:100:1:1::2 interface jvknet-5-af6b1e
set groups cni routing-instances trust routing-options rib trust.inet6.0 static route 121:2:1::1/128 qualified-next-hop 121:2:1::1 interface vhostge-0_0_1-1fcc3f4a-ae37-4da
set groups cni routing-instances trust routing-options static route 100.1.1.2/32 qualified-next-hop 100.1.1.2 interface jvknet-5-af6b1e
set groups cni routing-instances trust routing-options static route 1.21.1.1/32 qualified-next-hop 1.21.1.1 interface vhostge-0_0_1-1fcc3f4a-ae37-4da
set groups cni routing-instances trust routing-options static route 200.1.1.0/24 qualified-next-hop 1.21.1.1 interface vhostge-0_0_1-1fcc3f4a-ae37-4da
set groups cni routing-instances trust interface jvknet-5-af6b1e
set groups cni routing-instances trust interface vhostge-0_0_1-1fcc3f4a-ae37-4da
set groups cni routing-instances untrust instance-type virtual-router
set groups cni routing-instances untrust routing-options rib untrust.inet6.0 static route 171:1:1::1/128 qualified-next-hop 171:1:1::1 interface vhostge-0_0_0-1fcc3f4a-ae37-4da
set groups cni routing-instances untrust routing-options static route 171.1.1.1/32 qualified-next-hop 171.1.1.1 interface vhostge-0_0_0-1fcc3f4a-ae37-4da
set groups cni routing-instances untrust interface vhostge-0_0_0-1fcc3f4a-ae37-4da
set groups cni routing-instances untrust-1 instance-type vrf
set groups cni routing-instances untrust-1 routing-options rib untrust-1.inet6.0 static route 181:1:1::1/128 qualified-next-hop 181:1:1::1 interface vhostge-0_0_0-6691b5cb-9310-4a4
set groups cni routing-instances untrust-1 routing-options static route 181.1.1.1/32 qualified-next-hop 181.1.1.1 interface vhostge-0_0_0-6691b5cb-9310-4a4
set groups cni routing-instances untrust-1 routing-options static route 121.1.1.0/24 qualified-next-hop 181.1.1.1 interface vhostge-0_0_0-6691b5cb-9310-4a4
set groups cni routing-instances untrust-1 interface vhostge-0_0_0-6691b5cb-9310-4a4
set groups cni routing-instances untrust-1 route-distinguisher 10:10
set groups cni routing-instances untrust-1 vrf-target target:10:10
set groups cni routing-instances trust-1 instance-type vrf
set groups cni routing-instances trust-1 routing-options rib trust-1.inet6.0 static route 181:2:1::1/128 qualified-next-hop 181:2:1::1 interface vhostge-0_0_1-6691b5cb-9310-4a4
set groups cni routing-instances trust-1 routing-options static route 1.21.1.1/32 qualified-next-hop 1.21.1.1 interface vhostge-0_0_1-6691b5cb-9310-4a4
set groups cni routing-instances trust-1 interface vhostge-0_0_1-6691b5cb-9310-4a4
set groups cni routing-instances trust-1 route-distinguisher 11:11
set groups cni routing-instances trust-1 vrf-target target:11:11
-
Verify the cRPD Routing Tables:
user@host > show route table trust.inet.0 trust.inet.0: 5 destinations, 5 routes (5 active, 0 holddown, 0 hidden) + = Active Route, - = Last Active, * = Both 10.20.1.1/32 *[Static/5] 03:59:00 > via vhostge-0_0_1-a6c764da-a46d-4832-b5 10.20.1.2/32 *[Local/0] 03:59:00 Local via vhostge-0_0_1-a6c764da-a46d-4832-b5 10.111.1.1/32 *[Local/0] 03:59:00 Local via jvknet1-88e1126 10.111.1.10/32 *[Static/5] 03:59:00 > via jvknet1-88e1126 10.222.1.0/24 *[Static/5] 03:59:00 > via vhostge-0_0_1-a6c764da-a46d-4832-b5user@host > show route table untrust.inet.0 untrust.inet.0: 9 destinations, 9 routes (9 active, 0 holddown, 0 hidden) + = Active Route, - = Last Active, * = Both 10.111.1.0/24 *[Static/5] 04:00:31 > via vhostge-0_0_0-a6c764da-a46d-4832-b5 10.222.1.0/24 *[OSPF/150] 03:56:03, metric 0, tag 0 > to 172.16.0.12 via ens192 172.16.0.0/24 *[Direct/0] 04:00:31 > via ens192 172.16.0.11/32 *[Local/0] 04:00:31 Local via ens192 172.16.1.0/24 *[OSPF/10] 03:56:03, metric 2 > to 172.16.0.12 via ens192 172.16.2.1/32 *[Static/5] 04:00:31 > via vhostge-0_0_0-a6c764da-a46d-4832-b5 172.16.2.2/32 *[Local/0] 04:00:31 Local via vhostge-0_0_0-a6c764da-a46d-4832-b5 172.16.4.1/32 *[OSPF/150] 03:56:03, metric 0, tag 0 > to 172.16.0.12 via ens192user@host > show route table trust-1.inet.0 trust-1.inet.0: 2 destinations, 2 routes (2 active, 0 holddown, 0 hidden) + = Active Route, - = Last Active, * = Both 1.21.1.1/32 *[Static/5] 00:05:42 > via vhostge-0_0_1-6691b5cb-9310-4a4 1.21.1.2/32 *[Local/0] 00:05:42 Local via vhostge-0_0_1-6691b5cb-9310-4a4user@host > show route table untrust-1.inet.0 untrust-1.inet.0: 3 destinations, 3 routes (3 active, 0 holddown, 0 hidden) + = Active Route, - = Last Active, * = Both 121.1.1.0/24 *[Static/5] 00:05:51 > via vhostge-0_0_0-6691b5cb-9310-4a4 181.1.1.1/32 *[Static/5] 00:05:51 > via vhostge-0_0_0-6691b5cb-9310-4a4 181.1.1.2/32 *[Local/0] 00:05:51 Local via vhostge-0_0_0-6691b5cb-9310-4a4 -
To verify the IPSec tunnel status for the first cSRX instance, login to the cSRX shell using the
kubectl exec -it csrx_pod_name -n jcnr -- bashcommand. Typeclito navigate to the CLI mode. Verify the cSRX configuration, security associations and flows:user@host> show configuration ## Last commit: 2024-10-01 10:25:50 UTC by root version 20240621.103832_builder.r1429411; system { root-authentication { encrypted-password *disabled*; ## SECRET-DATA } services { ssh { root-login allow; } } } interfaces { ge-0/0/0 { unit 0 { family inet { address 172.16.2.1/30; } } } ge-0/0/1 { unit 0 { family inet { address 10.20.1.1/30; } } } st0 { unit 0 { family inet; } } } routing-options { static { route 172.16.4.0/24 next-hop 172.16.2.2/32; route 10.111.1.0/24 next-hop 10.20.1.2/32; } } security { ike { proposal ike-phase-172-16-2-1-proposal { authentication-method pre-shared-keys; dh-group group5; authentication-algorithm sha-256; encryption-algorithm aes-256-cbc; lifetime-seconds 3600; } policy ike-phase-172-16-2-1-policy { proposals ike-phase-172-16-2-1-proposal; pre-shared-key ascii-text "$9$zt3l3AuIRhev8FnNVsYoaApu0RcSyev8XO1NVYoDj.P5F9AyrKv8X"; ## SECRET-DATA } gateway remote-172-16-2-1 { ike-policy ike-phase-172-16-2-1-policy; address 172.16.4.1; external-interface ge-0/0/0.0; local-address 172.16.2.1; version v2-only; } } ipsec { proposal ipsec-172-16-2-1-proposal { protocol esp; } policy ipsec-172-16-2-1-policy { perfect-forward-secrecy { keys group5; } proposals ipsec-172-16-2-1-proposal; } vpn ipsec-remote-172-16-2-1 { bind-interface st0.0; ike { gateway remote-172-16-2-1; ipsec-policy ipsec-172-16-2-1-policy; } traffic-selector ts1 { local-ip 10.111.1.0/24; remote-ip 10.222.1.0/24; } establish-tunnels immediately; } } policies { default-policy { permit-all; } } zones { security-zone untrust { host-inbound-traffic { system-services { all; } protocols { all; } } interfaces { ge-0/0/0.0; st0.0; } } security-zone trust { host-inbound-traffic { system-services { all; } protocols { all; } } interfaces { ge-0/0/1.0; } } } }user@host> show security ike security-associations Index State Initiator cookie Responder cookie Mode Remote Address 73 UP 6895337b7ae4b449 2bdca7788a896e50 IKEv2 172.16.4.1
user@host> show security ipsec security-associations
  Total active tunnels: 1     Total IPsec sas: 1
  ID      Algorithm       SPI      Life:sec/kb  Mon lsys Port  Gateway
  <500002 ESP:3des/sha1   0x0283e69b 2132/ unlim -  root 500   172.16.4.1
  >500002 ESP:3des/sha1   0xbdd5cc1e 2132/ unlim -  root 500   172.16.4.1
user@host> show security ipsec statistics
ESP Statistics:
  Encrypted bytes:          2878576
  Decrypted bytes:          1739472
  Encrypted packets:          21166
  Decrypted packets:          20708
AH Statistics:
  Input bytes:                    0
  Output bytes:                   0
  Input packets:                  0
  Output packets:                 0
Errors:
  AH authentication failures: 0, Replay errors: 0
  ESP authentication failures: 0, ESP decryption failures: 0
  Bad headers: 0, Bad trailers: 0
  Invalid SPI: 0, TS check fail: 0
  Exceeds tunnel MTU: 0
  Discarded: 0
user@host> show security flow session
Session ID: 2, Policy name: N/A, Timeout: N/A, Session State: Valid
  In: 172.16.4.1/0 --> 172.16.2.1/0;esp, Conn Tag: 0x0, If: ge-0/0/0.0, Pkts: 0, Bytes: 0,

Session ID: 2696, Policy name: N/A, Timeout: N/A, Session State: Valid
  In: 172.16.4.1/20915 --> 172.16.2.1/10740;esp, Conn Tag: 0x0, If: ge-0/0/0.0, Pkts: 7, Bytes: 952,
Total sessions: 2
-
To verify the IPSec tunnel status for the second cSRX instance, login to the cSRX shell using the
kubectl exec -it csrx_pod_name -n jcnr2
                                -- bash
command. Typeclito navigate to the CLI mode. Verify the cSRX configuration, security associations and flows:user@host> show configuration ## Last commit: 2026-03-11 09:06:34 UTC by root version "20260225.155850__cd-builder.r1540939 [_cd-builder]"; system { root-authentication { encrypted-password "$6$i9Ef62BKus15tn3L$V7XnQPt5C6HB513syyL5At4HFIMq9J66Zj2/JSO7LbpFpxvSg2HbyT3jwB7EJ7wqrcJ.ii0eQI4GVro5rudsq0"; ## SECRET-DATA } services { netconf { ssh; } ssh { root-login allow; port 22; } } } interfaces { ge-0/0/0 { unit 0 { family inet { address 181.1.1.1/30; } family inet6 { address 181:1:1::1/64; } } } ge-0/0/1 { unit 0 { family inet { address 1.21.1.1/30; } family inet6 { address 181:2:1::1/64; } } } st0 { unit 0 { family inet; family inet6; } unit 1 { family inet; family inet6; } } } routing-options { static { route 191.1.1.0/24 next-hop 181.1.1.2/32; route 200.1.1.0/24 next-hop 181.1.1.2/32; route 111.1.1.0/24 next-hop 1.21.1.2/32; route 192.1.1.0/24 next-hop 1.21.1.2/32; } rib inet6.0 { static { route abcd:210:1:1::0/64 next-hop 181:2:1::2/128; route abcd:210:1:2::0/64 next-hop 181:2:1::2/128; } } } security { zones { security-zone untrust-1 { host-inbound-traffic { system-services { all; } protocols { all; } } interfaces { ge-0/0/0.0; st0.0; st0.1; } } security-zone trust-1 { host-inbound-traffic { system-services { all; } protocols { all; } } interfaces { ge-0/0/1.0; } } } policies { default-policy { permit-all; } } alg { dns disable; ftp disable; h323 disable; mgcp disable; msrpc disable; sunrpc disable; sccp disable; sip disable; talk disable; tftp disable; pptp disable; } }user@host> show security ike security-associations Index State Initiator cookie Responder cookie Mode Remote Address 73 UP 6895337b7ae4b449 2bdca7788a896e50 IKEv2 172.16.4.1
user@host> show security ipsec security-associations
  Total active tunnels: 1     Total IPsec sas: 1
  ID      Algorithm       SPI      Life:sec/kb  Mon lsys Port  Gateway
  <500002 ESP:3des/sha1   0x0283e69b 2132/ unlim -  root 500   172.16.4.1
  >500002 ESP:3des/sha1   0xbdd5cc1e 2132/ unlim -  root 500   172.16.4.1
user@host> show security ipsec statistics
ESP Statistics:
  Encrypted bytes:          2878576
  Decrypted bytes:          1739472
  Encrypted packets:          21166
  Decrypted packets:          20708
AH Statistics:
  Input bytes:                    0
  Output bytes:                   0
  Input packets:                  0
  Output packets:                 0
Errors:
  AH authentication failures: 0, Replay errors: 0
  ESP authentication failures: 0, ESP decryption failures: 0
  Bad headers: 0, Bad trailers: 0
  Invalid SPI: 0, TS check fail: 0
  Exceeds tunnel MTU: 0
  Discarded: 0
user@host> show security flow session
Session ID: 2, Policy name: N/A, Timeout: N/A, Session State: Valid
  In: 172.16.4.1/0 --> 172.16.2.1/0;esp, Conn Tag: 0x0, If: ge-0/0/0.0, Pkts: 0, Bytes: 0,

Session ID: 2696, Policy name: N/A, Timeout: N/A, Session State: Valid
  In: 172.16.4.1/20915 --> 172.16.2.1/10740;esp, Conn Tag: 0x0, If: ge-0/0/0.0, Pkts: 7, Bytes: 952,
Total sessions: 2
-
You can also verify the flow in the vRouter CLI:
# flow -l
Flow table(size 161218560, entries 629760)

Entries: Created 21 Added 21 Deleted 42 Changed 44Processed 21 Used Overflow entries 0
(Created Flows/CPU: 0 0 0 0 0 0 0 0 0 0 0 0 0 0 0 0 0 1 20)(oflows 0)

Action:F=Forward, D=Drop N=NAT(S=SNAT, D=DNAT, Ps=SPAT, Pd=DPAT, L=Link Local Port)
 Other:K(vrf)=Key_Vrf_Id, S(nh)=RPF_Nexthop
 Flags:E=Evicted, Ec=Evict Candidate, N=New Flow, M=Modified Dm=Delete Marked
TCP(r=reverse):S=SYN, F=FIN, R=RST, C=HalfClose, E=Established, D=Dead
 Stats:Packets/Bytes

    Index                Source:Port/Destination:Port                      Proto(V)
-----------------------------------------------------------------------------------