Overlay Management Access
Overlay management access in a bare metal deployment allows you to manage a Cloud-Native Router deployment using an overlay network.
Overlay Management Overview
We present an example on how to configure a Cloud-Native Router for management access across the overlay.
In some deployments, you may want to have management access to a Cloud-Native Router across a dedicated management network on the overlay. This overlay network would carry OAM traffic (such as SSH, SNMP, gNMI, syslog, etc.) between a Cloud-Native Router and a remote management host.
To facilitate this, we provide the ability for you to specify a low-throughput overlay interface on the vRouter to carry OAM traffic from the local Linux kernel on an SR-IOV-enabled and Virtual Ethernet Bridge (VEB)-capable NIC. Due to internal limitations, you can't use a regular fabric interface to connect to an overlay interface.
Figure 1 shows an example of this approach where a management host manages the Cloud-Native Router on a managed node across an overlay. For completeness, we show a transit node that sits between the management host and the managed node.
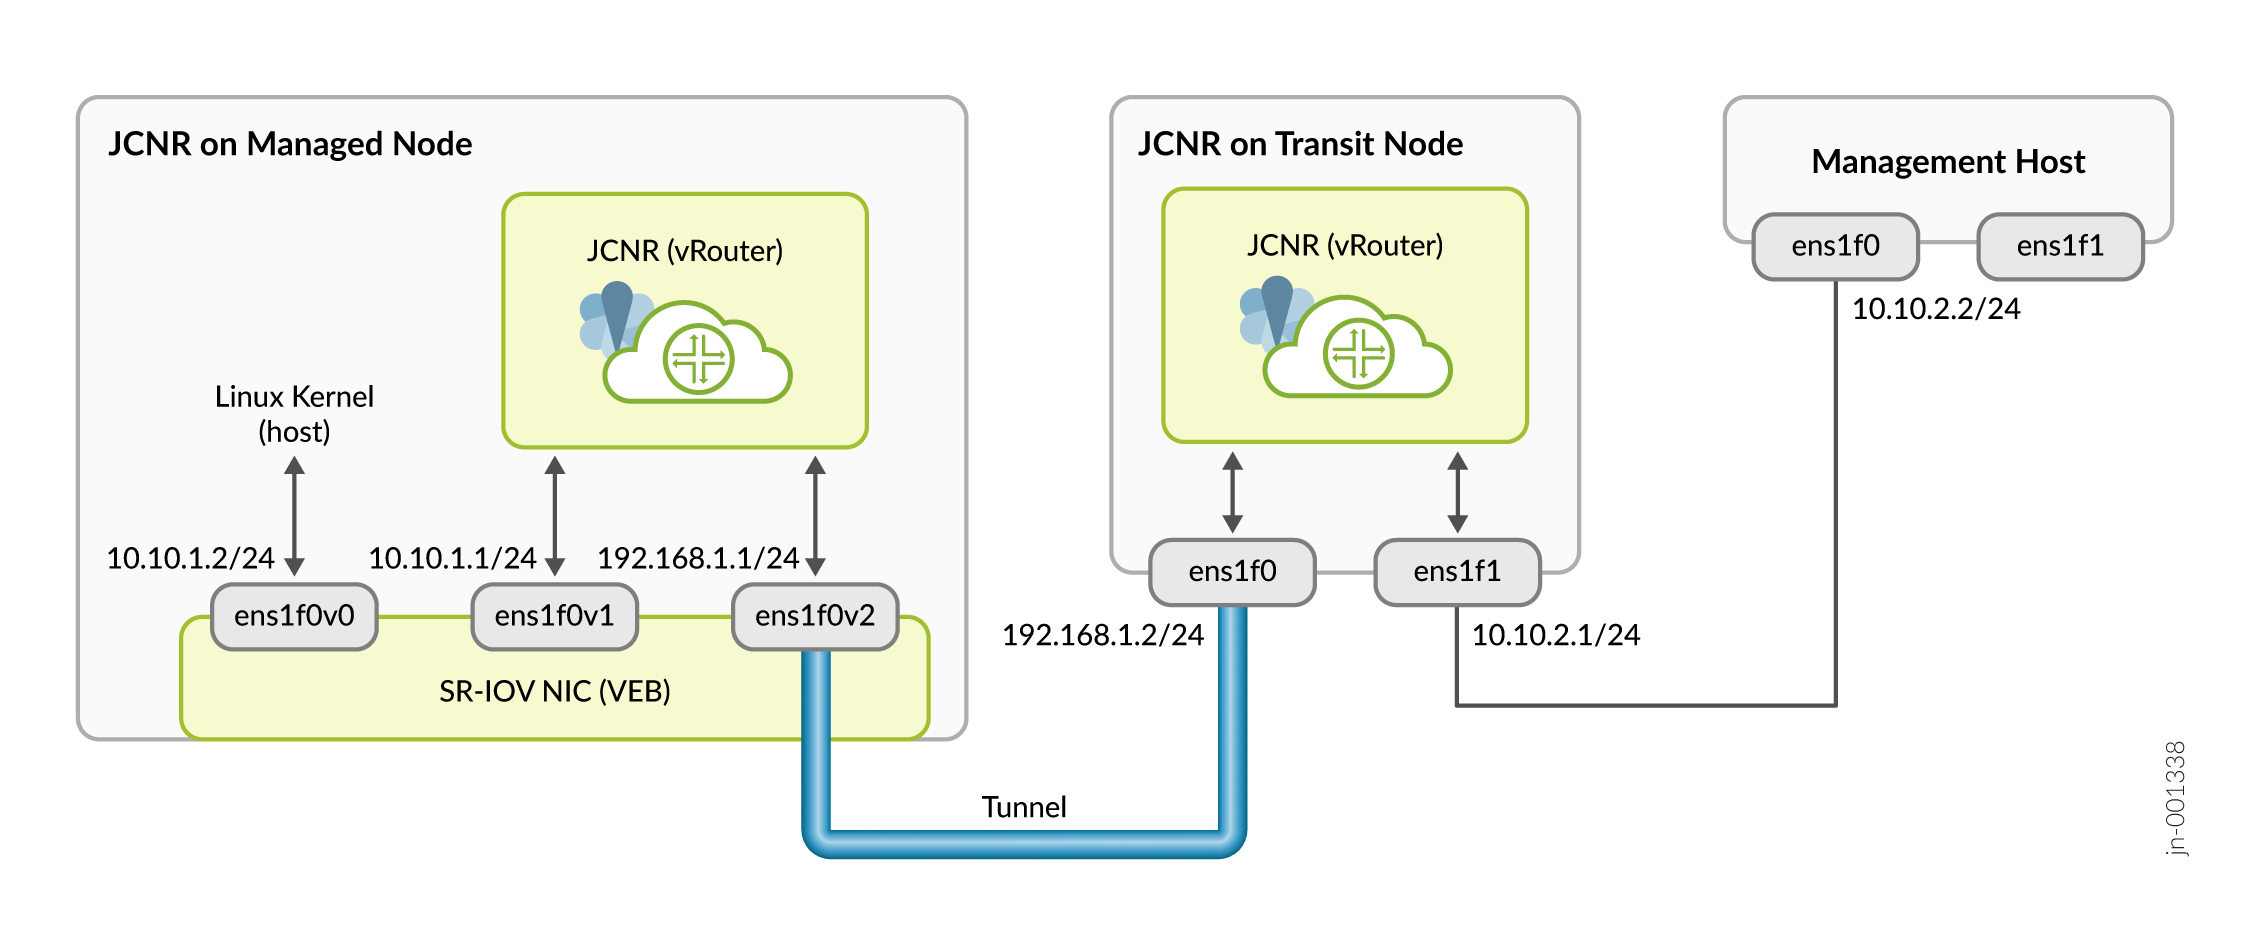
The managed node has three virtual functions: one for the Linux kernel and two for the vRouter. OAM traffic originating from the Linux kernel is sent on the ens1f0v0 interface where it is switched by the VEB in the SR-IOV-enabled NIC to the local vRouter on the ens1f0v1 interface. This ens1f0v1 interface is configured as the overlay OAM interface. We recommend that you rate limit and implement firewall rules on this interface to control and limit traffic going to the Linux kernel.
The local vRouter receives OAM traffic on the ens1f0v1 interface and routes it out the ens1f0v2 interface through a tunnel to the transit node. The tunnel can be any type that the Cloud-Native Router supports, such as MPLSoUDP, VxLAN, or SR-MPLS.
The transit node receives the tunneled traffic on the ens1f0 interface and extracts the OAM packets from the tunnel and routes them out the ens1f1 interface to the attached management host. OAM traffic in the other direction behaves similarly but in reverse.
To make use of this capability, you must do the following:
-
Create three virtual functions for the SR-IOV-enabled NIC on the managed node. As a minimum, the kernel and the vRouter OAM interface must be on the same NIC.
-
Configure the Cloud-Native Router installation Helm chart on the managed node to specify the OAM (fabricWorkload) interface and install the Cloud-Native Router.
-
Install the Cloud-Native Router on the transit node.
-
Add a route on the Linux kernel on the managed node to route OAM traffic to the local Cloud-Native Router.
-
Configure a tunnel between the managed node and the transit node.
-
Add a route on the management host to route OAM traffic to the transit Cloud-Native Router.
The following sections provide the details behind these steps.
Install Cloud-Native Router on the Managed and Transit Nodes
This example procedure shows how to configure the Cloud-Native Routers for management access on the overlay in a bare metal deployment.
Configure the OAM Route on the Managed Node
This example procedure shows how to configure the OAM route on the managed node for management access on the overlay.
In our example, since we only have a single interface for the Linux kernel, we'll simply add a default route to point to the local Cloud-Native Router.
If your installation has more than one interface for the Linux kernel, then you might want to add a specific route for the OAM traffic instead.
ip route add default via 10.10.1.1
ip route show
default via 10.10.1.1 dev ens1f0v0
Configure the Tunnel Between the Managed and Transit Nodes
This example procedure shows how to configure an MPLSoUDP tunnel between the Cloud-Native Routers on the managed and transit nodes to carry OAM traffic in the management overlay.
Configure the OAM Route on the Management Host
This example procedure shows how to configure the OAM route on the management host for management access on the overlay.
There are different ways you can configure the OAM route. In this example we'll create a separate routing instance with a default route to the transit Cloud-Native Router. We'll then create a rule for OAM traffic to use this separate routing instance.