Upgrade Device NOS
Upgrade the network operating systems (NOS) of your managed network devices from the GUI.
We highly recommend that you become familiar with this procedure before beginning the upgrade process.
NOS Upgrade Overview
You can upgrade a device NOS from the GUI with a few steps. If you've defined your own device profiles, you may need to update them first. You'll register the new OS image that you obtained from the vendor, then click a button to start the upgrade. The upgrade tasks and other requirements are taken care of and pristine config is updated.
For information about supported upgrade paths, see NOS Upgrade Paths in the References section.
Predefined device profiles with supported OS versions are included in the product. When you upgrade the server, device profiles with the OS versions that are supported in the new version are also updated. You can then upgrade the NOS to one of the newly supported versions.
However, device profiles that you've created (cloned) yourself, are not managed, so when you upgrade the server those device profiles aren't automatically updated with newly supported versions. You'll need to follow a few extra steps to add them as described in the next section.
Before beginning the process, make sure of the following:
- Make sure that you understand the device configuration lifecycle and that you're comfortable with managing deploy modes.
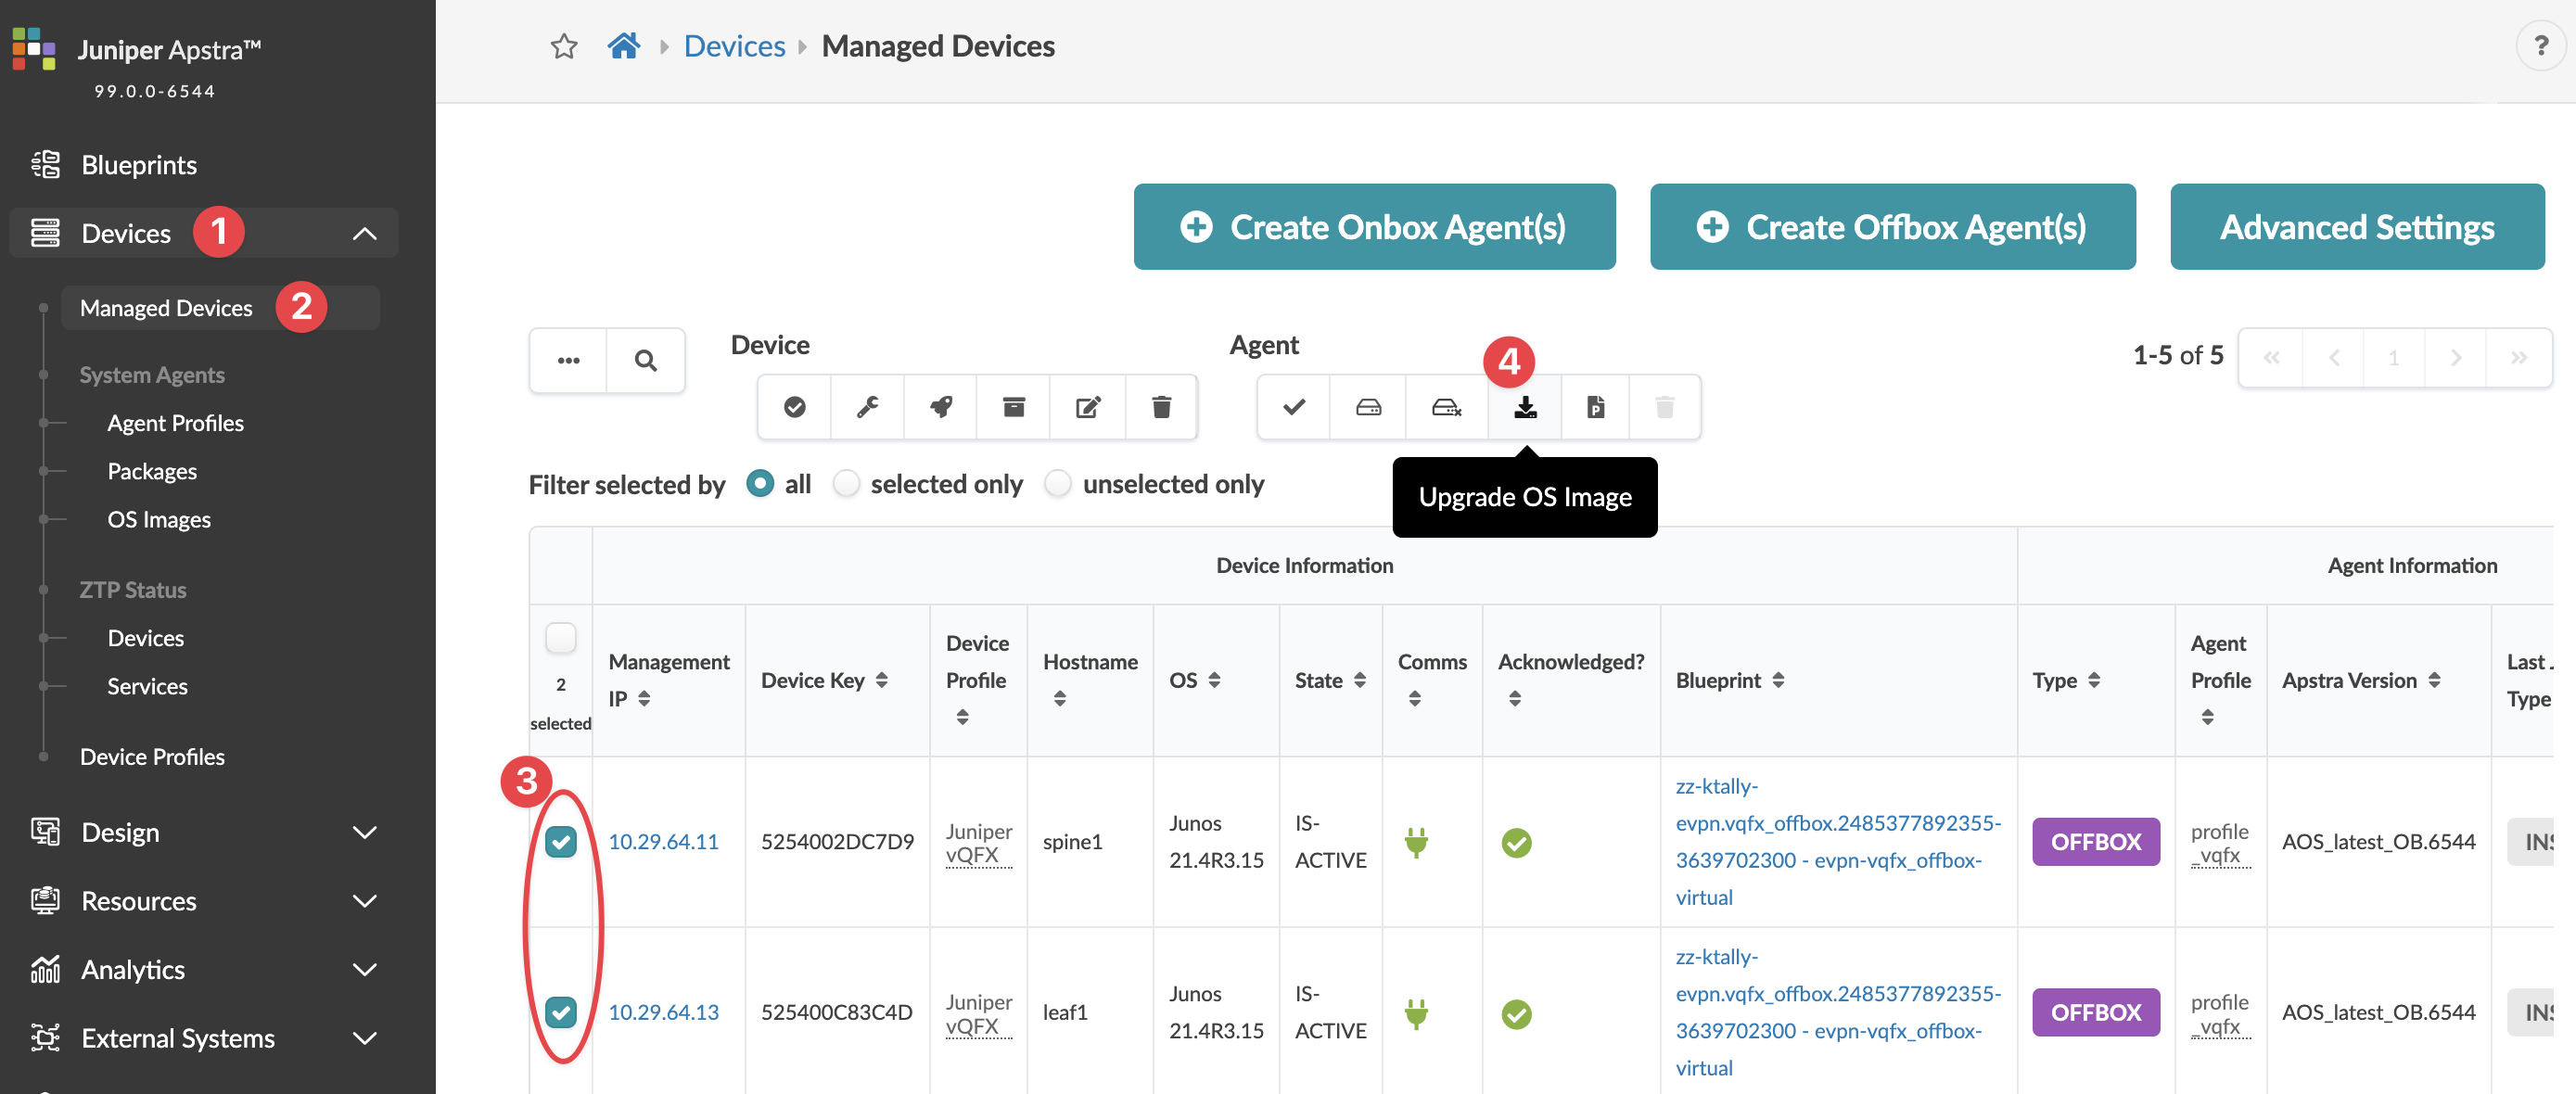
- Make sure that the software is managing the device you're upgrading. Navigate to Devices > Managed Devices and confirm that your device is in the table and that it is acknowledged (with a green check mark).
- Before upgrading NOS, delete any device AAA/TACACS+ configlets from the blueprint. After the upgrade is complete, you can reapply them.
- Make sure that the Admin state of the device is set to normal. Navigate to Devices > Managed Devices, click on the Management IP of the device to confirm the admin state. (Do NOT set the Admin state to MAINT/DECOMM or the device could enter an unrecoverable state.)
-
Make sure the deploy mode of the device is set to Drain.
- Make sure that the version specified is the same on both the server and the device. If they are different, you can't upgrade the device. If you attempt to upgrade with different versions, you will not receive a warning; the task status remains in the IN PROGRESS state indefinitely.
Update User-defined Device Profiles
Make sure that your devices are in the appropriate states for upgrading as described in the overview above.
If you've created (cloned) your own device profiles, you'll need to manually specify OS versions in the device profile and the blueprint that uses that device profile. (If your devices use predefined device profiles, then proceed to the next section to register the new OS image.)
-
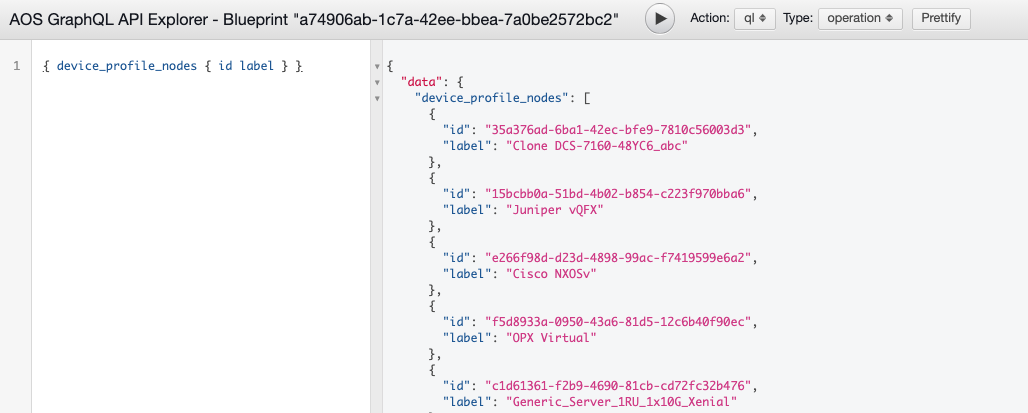
From the left navigation menu, navigate to Platform >
Developers > GraphQL Explorer and find the ID for the
device profile. You can find it with the query variables {
device_profile_nodes { id label } }
In this example, the "id" for the label "Clone DCS-7160-48YC6_abc" is "35a376ad-6ba1-42ec-bfe9-7810c56003d3".
Register / Upload OS Image
Obtain the OS image from the device vendor.
CAUTION:Make sure to select a compatible device operating system image for the device that you're upgrading. If you use an incompatible image and the upgrade fails, the deployment lock is not released automatically, even if you recover the device. To release the deployment lock and activate the device again, remove the device assignment from the blueprint, decommission and normalize the device (from Devices > Managed Devices), then reassign the device to the blueprint. For assistance, contact Juniper Support.
From the left navigation menu, navigate to Devices > System Agents > OS Images and click Register OS Image (top-right).
You can see how much space is left for uploading new NOS images.
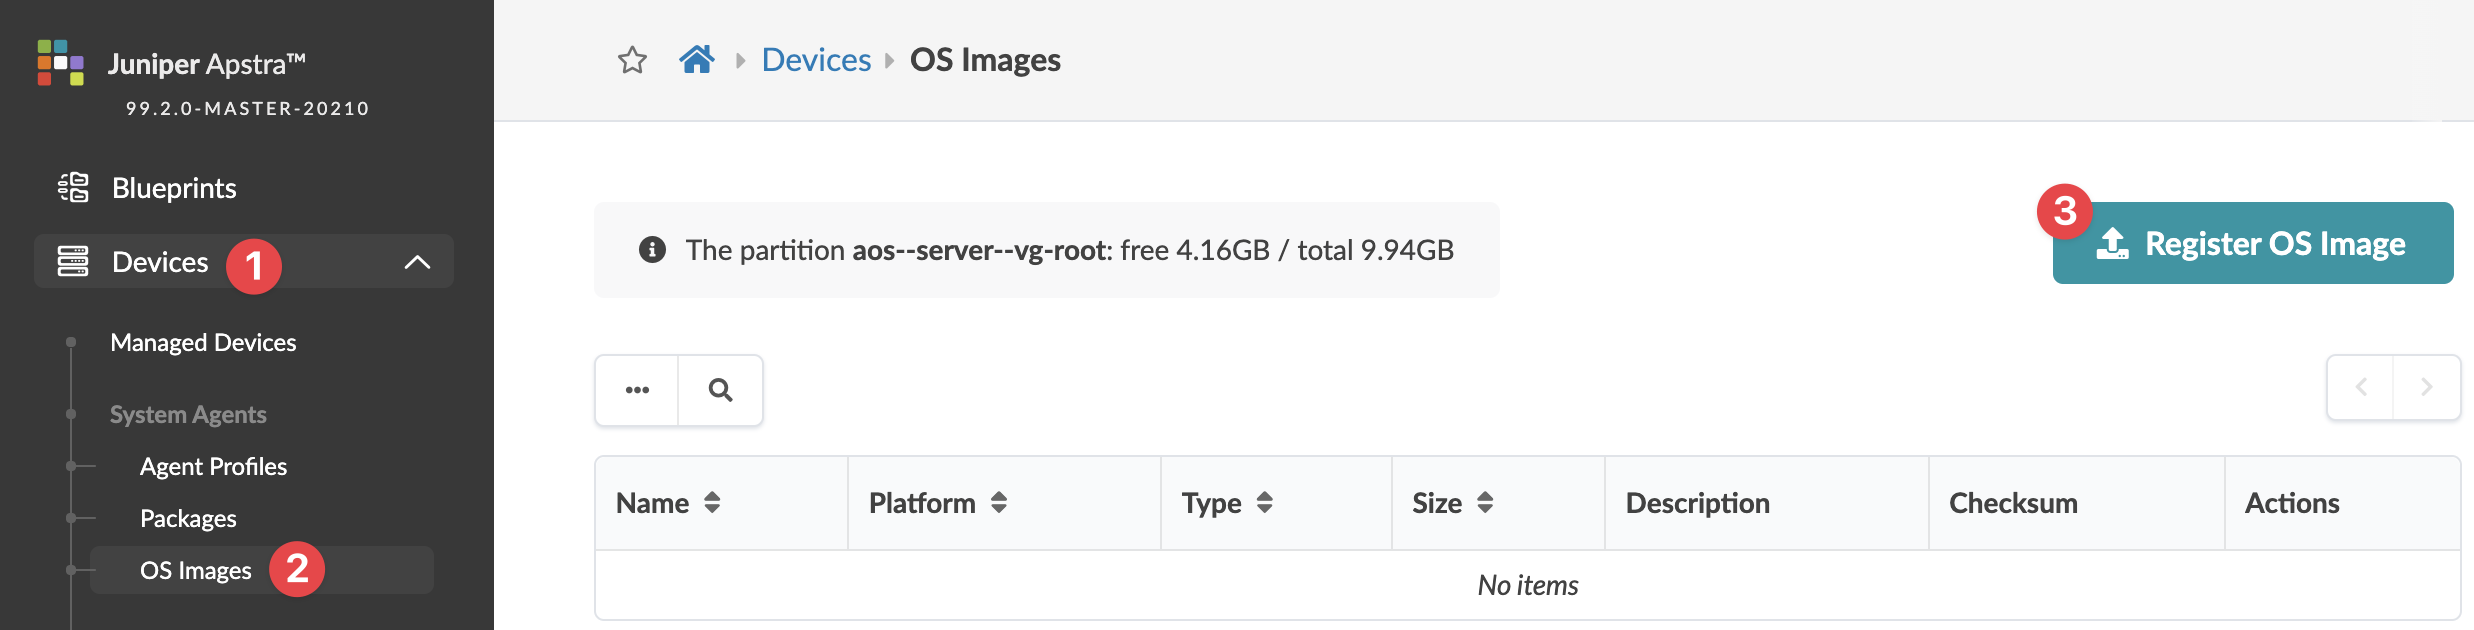
The Register Device OS Image dialog opens; if the partition has under 5GB of free space a warning appears.
Select the platform from the drop-down list (EOS, NXOS, SONIC, JUNOS) and enter a description.
Either upload the image directly to the server or provide a URL download link pointing to an image file on an accessible HTTP server (described in sections below).
Method One: Upload Image
Select Upload Image, then either click Choose File and navigate to the image on your computer, or drag and drop the image from your computer into the dialog window and click Open.
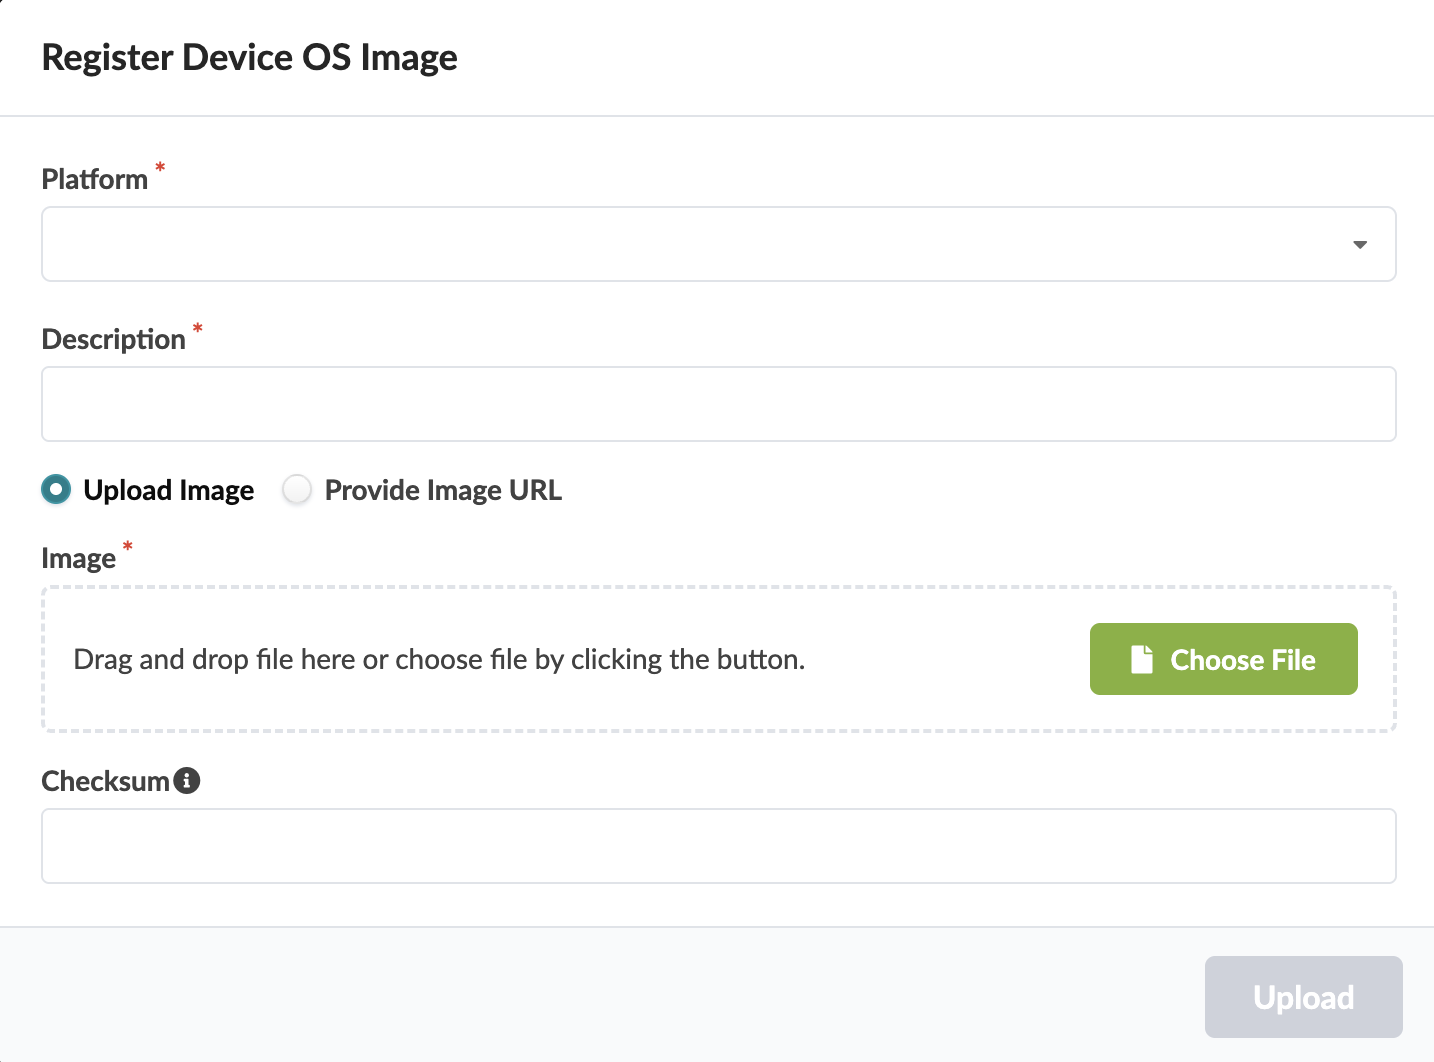
Add a checksum (optional) (described in section below).
Click Upload.
The software validates that the software package is validated for is supported by the switch OS. If it isn't supported (because the file extension is wrong, for example), then the upload fails immediately, before uploading begins.
The software validates the (optional) checksum. If it can't be verified, the upload process fails immediately, before uploading begins.
If all validation passes, the image is uploaded and appears in the table view.
Method Two: Provide Image URL
If another HTTP server is accessible to the devices being upgraded via their network management port, you can register the OS Image instead of uploading it. HTTP and HTTPS URLs are supported. (FTP, SFTP, SCP and others are not supported.)
Select Provide Image URL.
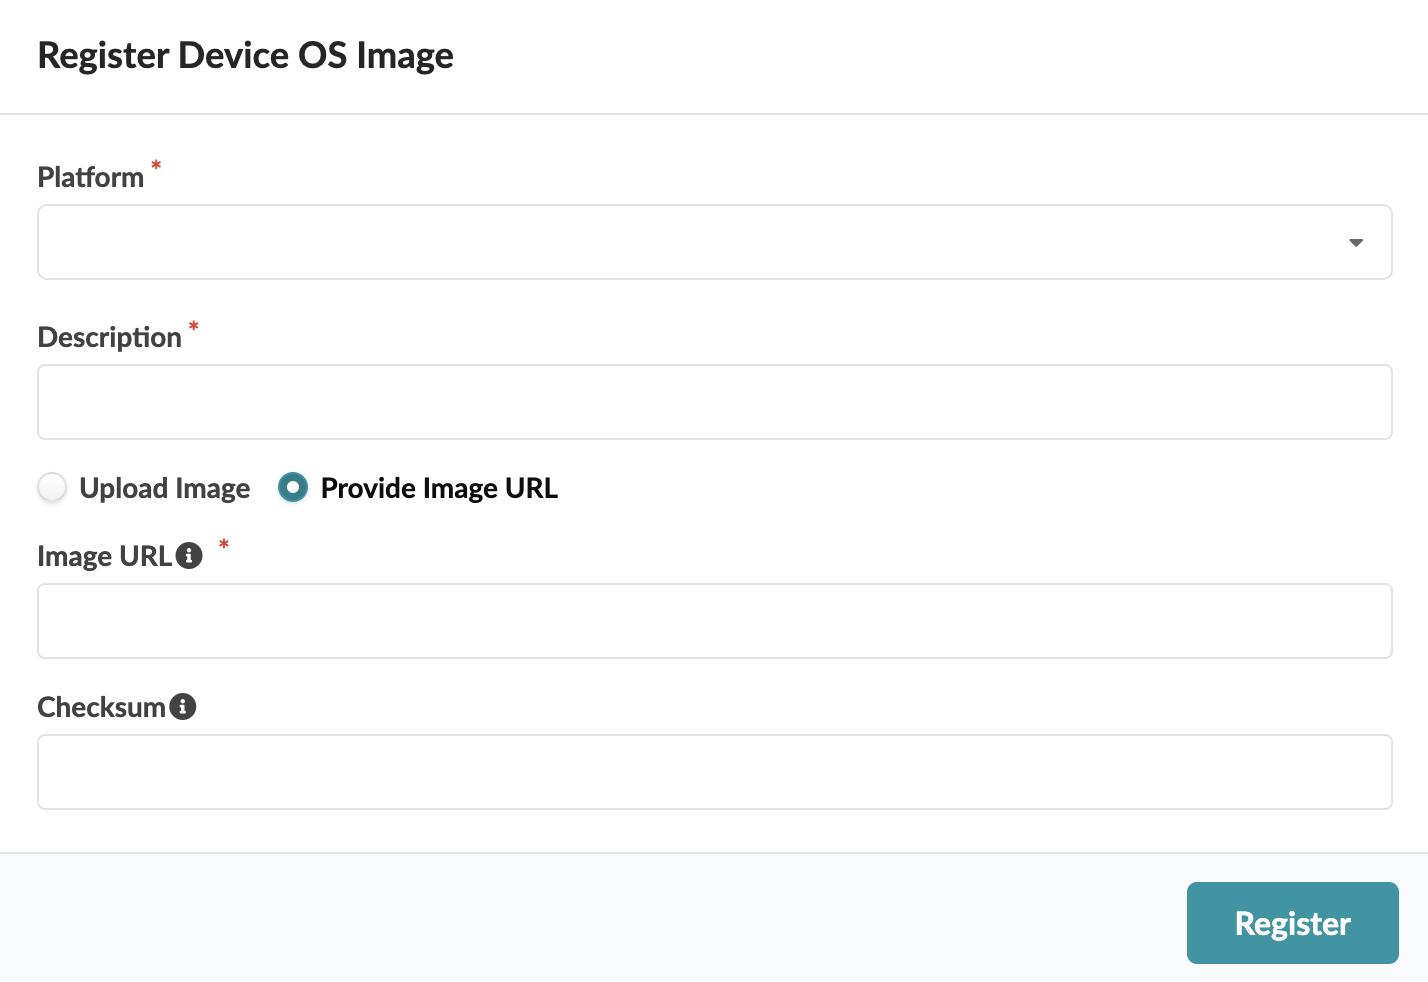
Enter the URL that points to the image on the other server.
Add a checksum (optional) (described in the section below).
Click Register.
The software validates the (optional) checksum. If it can't be verified, the process stops.
If validation passes, the image appears in the table view.
Add Checksum (Optional)
The platform determines the type of checksum that's used:
- Juniper Junos - MD5 (32 characters) or SHA256 (64 characters)
- Enterprise SONiC - MD5 (32 characters)
- Cisco NX-OS - SHA512 (128 characters)
- Arista EOS - SHA512 (128 characters)
If the device vendor provides a checksum file, we recommend that you download the file and copy it to the Checksum field. If a checksum file is not available, you can generate a checksum with the Linux md5sum or shasum commands, as applicable, or with equivalent programs.
$ shasum -a 512 EOS-4.20.11M.swi
dbfd28d3597777a6ee5946b52277205fc714e11ab992574b7ef1156ffcd6e379979979f8c009f665fc21212e4d38d1794a412d79bab149f859aa72be417c0975  EOS-4.20.11M.swi
$
Keep Interfaces Up (Optional)
Early in the upgrade process, device configuration is rolled back to its pristine state and interfaces are automatically disabled. After NOS is upgraded the devices have a new pristine configuration and interfaces remain disabled. When you reboot devices, rendered configuration is pushed to the device and interfaces are enabled.
Interfaces remain disabled before the intended configuration is pushed to prevent traffic blackholing. To keep interfaces enabled during upgrade, you can change the default setting as follows:
-
From the left navigation menu of the GUI, navigate to Devices >
Managed Devices, click Advanced Settings
 The Advanced Settings dialog opens.
 -
Select the Skip Shutting Down Interfaces During Upgrade check box,
then click Update.
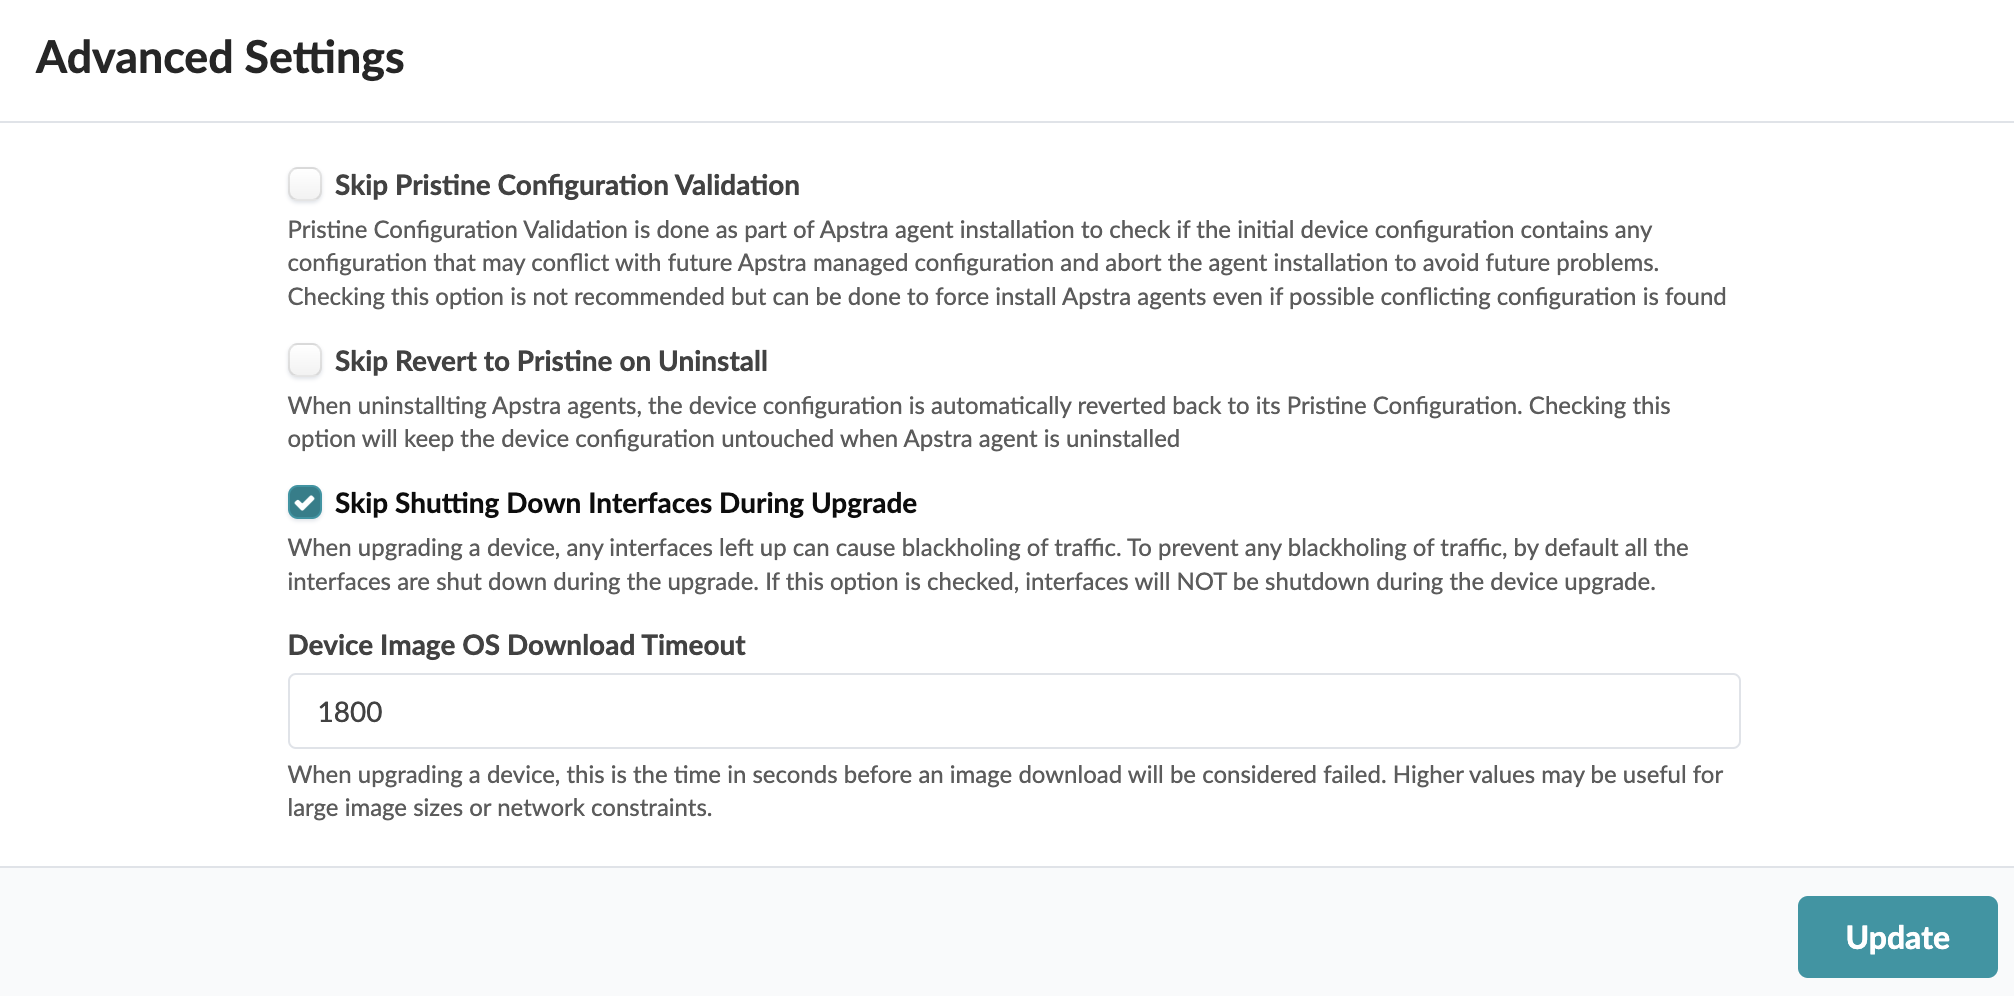 The setting is saved and you're returned to the Managed Devices page.
Set Image Download Timeout (Optional)
When the connection between the controller and the device (on different networks) experiences slower performance, it can lead to timeouts. You can set (increase) the timeout value for image downloads, as follows:
-
From the left navigation menu of the GUI, navigate to Devices >
Managed Devices, click Advanced Settings
The Advanced Settings dialog opens.
-
Enter a value up to 2700 (45 minutes) in the Device Image OS Download
Timeout field, then click Update.
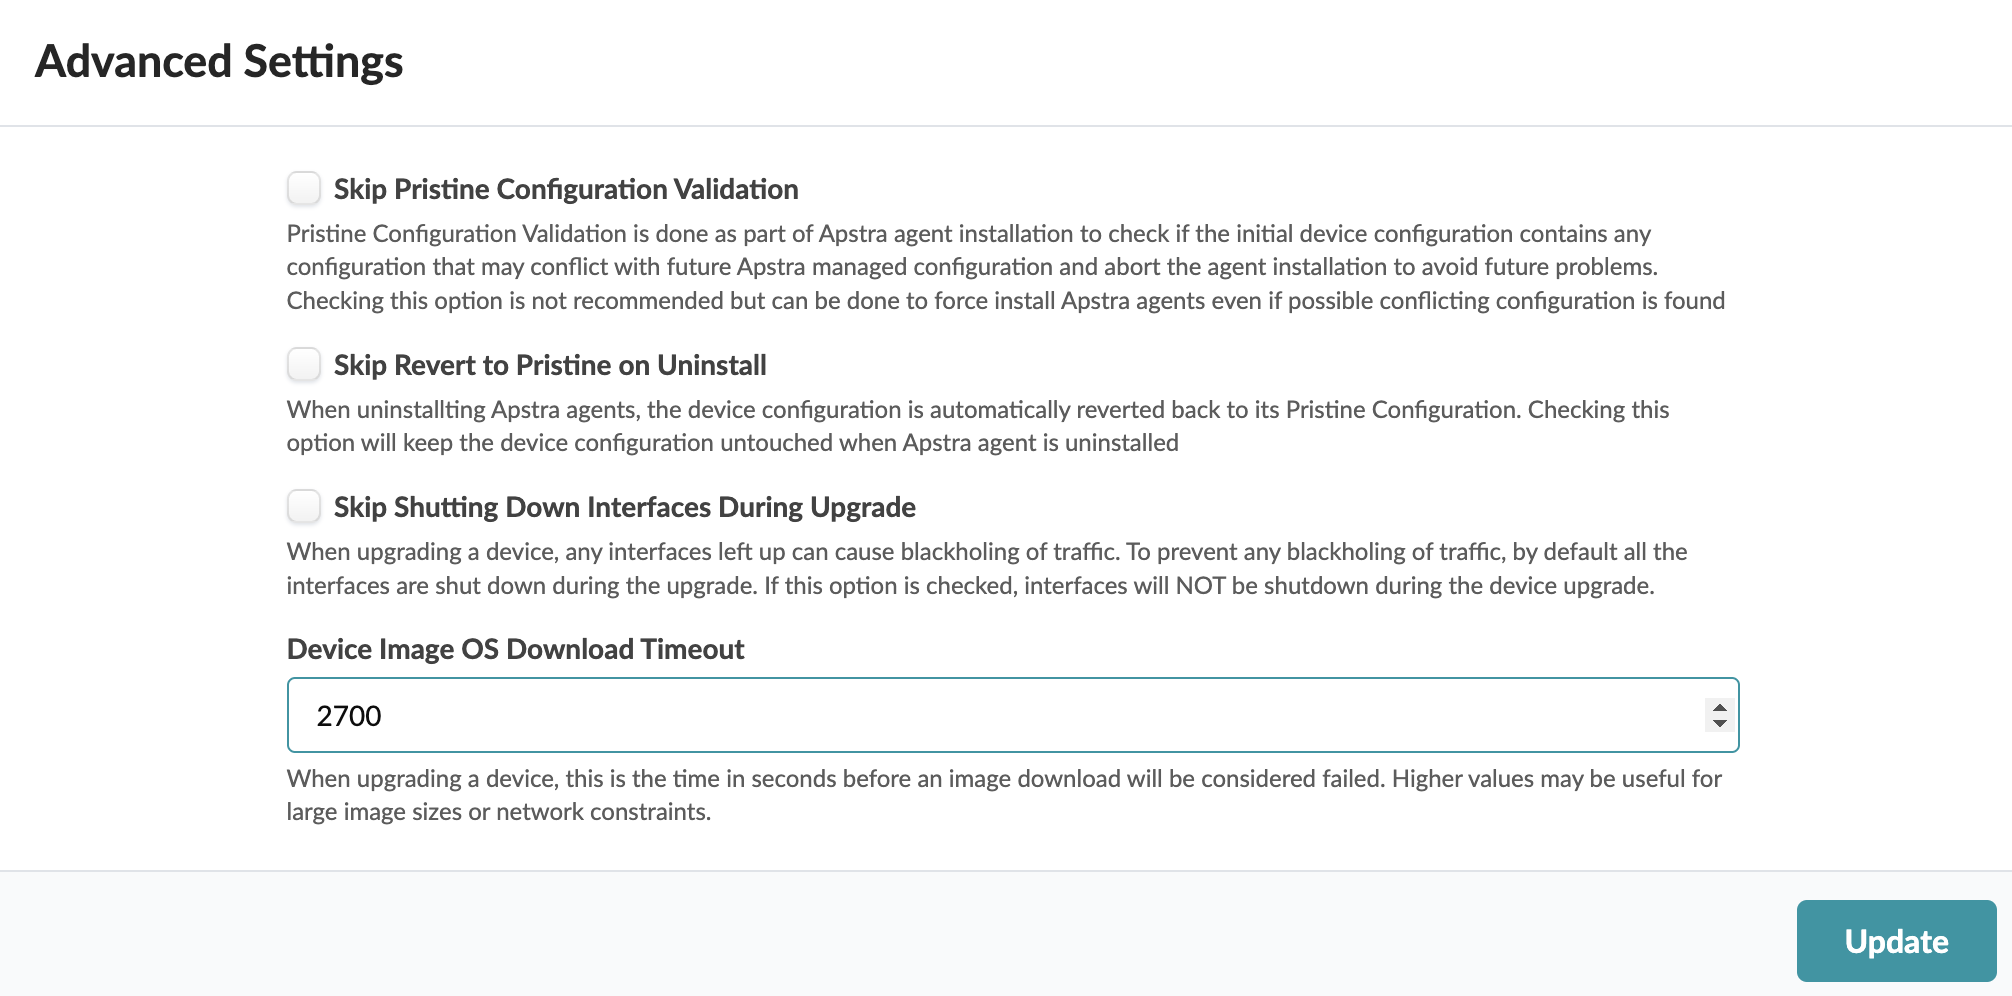 The setting is saved and you're returned to the Managed Devices page.
Upgrade OS Image
Make sure that your devices are in the appropriate states for upgrading as described in the overview above, and that if your device profiles are user-defined that you've updated them accordingly.
-
From the left navigation menu, navigate to Devices > Managed
Devices, and select the check box(es) for the device(s) to
upgrade. (If you have many devices, use the query function to filter
selections.) All selected devices must be of the same type, and they must be
upgraded to the same image and version. To search for specific devices (such
as for all EOS devices) click the Search button
(magnifying glass) and enter a query.