Help us improve your experience.

Let us know what you think.

Do you have time for a two-minute survey?


Upgrade Apstra on New VM (VM-VM)

By upgrading Apstra on a new VM, you'll receive Ubuntu Linux OS fixes, including security vulnerability updates. To upgrade the Apstra server you need Apstra OS admin user privileges and Apstra admin user group permissions.

Step 1: Pre-Upgrade Validation

  1. Refer to Upgrade Paths to confirm that you're upgrading to a supported version. To find your current Apstra version in the Apstra GUI, look in the upper left corner of the left navigation menu under the Juniper Apstra logo.
  2. Log in to the Apstra server as admin (For example, if your Apstra server IP address were 10.28.105.3, the command would be ssh admin@10.28.105.3).
  3. Run the command service aos status to check that the server is active and has no issues.
  4. Check the new Apstra version release notes for configuration-rendering changes that could impact the data plane.
  5. Review each blueprint to confirm that all Service Config is in the SUCCEEDED state. If necessary, undeploy and remove devices from the blueprint to resolve any pending or failed service config.
  6. Review each blueprint for probe anomalies, and resolve them as much as possible. Take notes of any remaining anomalies.
  7. Refer to the Apstra User Guide (References > Devices > Qualified Devices and NOS Versions) to verify that the device models and NOS versions are qualified on the new Apstra version. Upgrade or downgrade as needed to one of the supported versions.
  8. If you're using Junos devices, the pristine configuration must include the essential mgmt_junos VRF. See Juniper Support Knowledge Base article KB77094 for more information.
    CAUTION:

    If the pristine configuration doesn't include the mgmt_junos VRF, then deployment will fail.

  9. Remove any Device AAA configuration. During device upgrade, configured device agent credentials are required for SSH access.
  10. Remove any configlets used to configure firewalls. If you use FW's Routing Engine filters on devices, you'll need to update them to include the IP address of the new controller and worker VMs.
  11. To upgrade device system agents, Apstra must be able to SSH to all devices using the credentials that were configured when creating the agents. To check this from the Apstra GUI, navigate to Devices > Agents, select the check box(es) for the device(s) to check, then click the Check button in the Agent menu. Verify that the states of all jobs is SUCCESS. If any check job fails, resolve the issue before proceeding with the Apstra upgrade.
  12. As root user, run the command sudo aos_backup to back up the Apstra server.
    CAUTION:

    The upgraded Apstra server doesn't include any time voyager revisions, so if you need to revert back to a past state, this backup is required. Previous states are not included due to the tight coupling with the reference designs which may change between Apstra versions.

  13. Copy the backup files from /var/lib/aos/snapshot/<shapshot_name> to an external location.
  14. Make sure that the new VM has the Required Server Resources for the Apstra server.

Step 2: Deploy New Apstra Server

Note:

If you customized the /etc/aos/aos.conf file in the old Apstra server (for example, if you updated the metadb field to use a different network interface), you must re-apply the changes to the same file in the new Apstra server VM. It's not migrated automatically.

  1. As a registered support user, download the Apstra VM image from Juniper Support Downloads (for example, aos_server_5.0.0-63) and transfer it to the new Apstra server.
  2. Install and configure the new Apstra VM image with the new IP address (same or new FQDN may be used).
  3. If you're using an Apstra cluster (offbox agents, IBA probes) and you're going to reuse your worker VMs, install the new software by running sudo bash aos_<aos_version>.run. If you're using new worker VMs, skip this step.
    Note:

    Example of replacing all VMs: if you have a controller and 2 worker nodes and you want to upgrade all of them to new VMs, you would create 3 VMs with the new Apstra version and designate one of them to be the controller.

  4. Verify that the new Apstra server has SSH access to the old Apstra server.
  5. Verify that the new Apstra server can reach system agents. (See Required Comminication Ports.)
  6. Verify that the new Apstra server can reach applicable external systems (such as NTP, DNS, vSphere server, LDAP/TACACs+ server and so on).

Step 3: Import State

CAUTION:

If you perform any API/GUI write operations to the old Apstra server after you've started importing the new VM, those changes won't be copied to the new Apstra server.

  1. Log in to the new Apstra server as user admin.
  2. Run the sudo aos_import_state command to import SysDB from the old server, apply necessary translations, and import configuration. Include the following arguments, as applicable:
    • --ip-address <old-apstra-server-ip>
    • --username <admin-username>
    • For Apstra clusters with new worker node IP addresses, include the following: --cluster-node-address-mapping <old-node-ip> <new-node-ip>
    • To run the upgrade preconditions checks without running the actual upgrade use the following:--dry-run-connectivity-validation

    • To not check connectivity validation include the following: --skip-connectivity-validation

    • If SSH credentials on your older Apstra version are not as strict as the requirements for the new Apstra version, then you need to add the --override-cluster-node-credentials argument to the aos_import_state command when importing your database to the new Apstra version. Otherwise, the upgrade will fail.

    Example command: Single VM or Apstra Cluster with Same Worker Nodes

    Example Command: Apstra Cluster with New Worker Nodes

    In the example above, 10.28.105.4 and 10.28.105.7 are old worker node IP addresses; 10.28.105.6 and 10.28.105.8 are new worker node IP addresses.

    Root is required for importing the database, so you'll be asked for the SSH password and root password for the remote Apstra VM.

    Note:

    When you upgrade an Apstra cluster, the SSH password for old controller, old worker and new worker must be identical, otherwise the upgrade fails authentication. In the above example, the password you enter for 'SSH password for remote AOS VM' is used for remote controller, old worker, and new worker VMs. (AOS-27351)

    If you change the worker VMs' SSH password after the upgrade, then you also need to update the worker's password in the Apstra GUI (Platform > Apstra Cluster > Nodes).

    Note:

    The size of the blueprint and the Apstra server VM resources determine how long it takes to complete the import. If the database import exceeds the default value (40 min or 2400 seconds), the operation may 'time out'. If this happens, you can increase the timeout value with the AOS_UPGRADE_DOCKER_EXEC_TIMEOUT command.

    For example, the following command increases the time before timeout to 2 hours (7200 seconds).

    admin@aos-server:~$ sudo AOS_UPGRADE_DOCKER_EXEC_TIMEOUT=7200 aos_import_state --ip-address 10.10.10.10 --username admin

    The upgrade script presents a summary view of the devices within the fabric that will receive configuration changes during the upgrade. A warning appears on the screen recommending that you read Release Notes and Upgrade Paths documentation before proceeding. The release notes include a category for Configuration Rendering Changes. Configuration rendering changes are clearly documented at the top explaining the impact of each change on the network.

    The Apstra Upgrade Summary shows information separated by device roles (superspine, spine, leaf, leaf pair, and access switch for example). If an incremental config was applied instead of a full config, more details are displayed about the changes.

  3. After you've reviewed the summary, enter q to exit the summary. The AOS Upgrade: Interactive Menu appears where you can review the exact configuration change on each device. If you're using configlets, verify that the new configuration pushed by the upgrade does not conflict with any existing configlets.
    CAUTION:

    The Apstra Reference Design in the new Apstra release may have changed in a way that invalidates configlets. To avoid unexpected outcomes, verify that your configlets don’t conflict with the newly rendered config. If you need to update your configlets, quit the upgrade, update your configlets, then run the upgrade again.

  4. If you want to continue with the upgrade after reviewing pending changes, enter c.
  5. If you want to stop the upgrade, enter q to abort the process. If you quit at this point and later decide to upgrade, you must start the process from the beginning.
    Note:

    If the Apstra upgrade fails (or in the case of some other malfunction) you can gracefully shut down the new Apstra server and re-start the old Apstra server to continue operations.

Step 4: Keep Old VM's IP Address (Optional)

If you want to keep the old VM's IP address you must perform the following extra steps before changing the Operation Mode and upgrading the devices' agent.

  1. Shutdown the old VM or change its IP address to a different address to release the IP address. This is required to avoid any duplicated IP address issue.
  2. Go to the new VM's Apstra interactive menu from the CLI.
  3. Click Network to update the IP address and confirm the other parameters.
  4. For the new IP address to take effect, restart the network service, either from the same menu before exiting or from the CLI after leaving the menu.

Step 5: Change Operation Mode to Normal

When you initiate an Apstra server upgrade, the operation mode changes from Normal to Maintenance automatically. Maintenance mode prevents any offbox agents from going online prematurely. No configuration is pushed and no telemetry is pulled. At this point, if you decide to continue using the previous Apstra version instead of upgrading, you could just shut down the new Apstra server. If you decide to complete the upgrade, change the mode back to Normal.

  1. Log in to the Apstra GUI.
  2. If you'd like to view pending service configuration changes, navigate to the dashboard of the blueprint and click PENDING to see the affected devices.
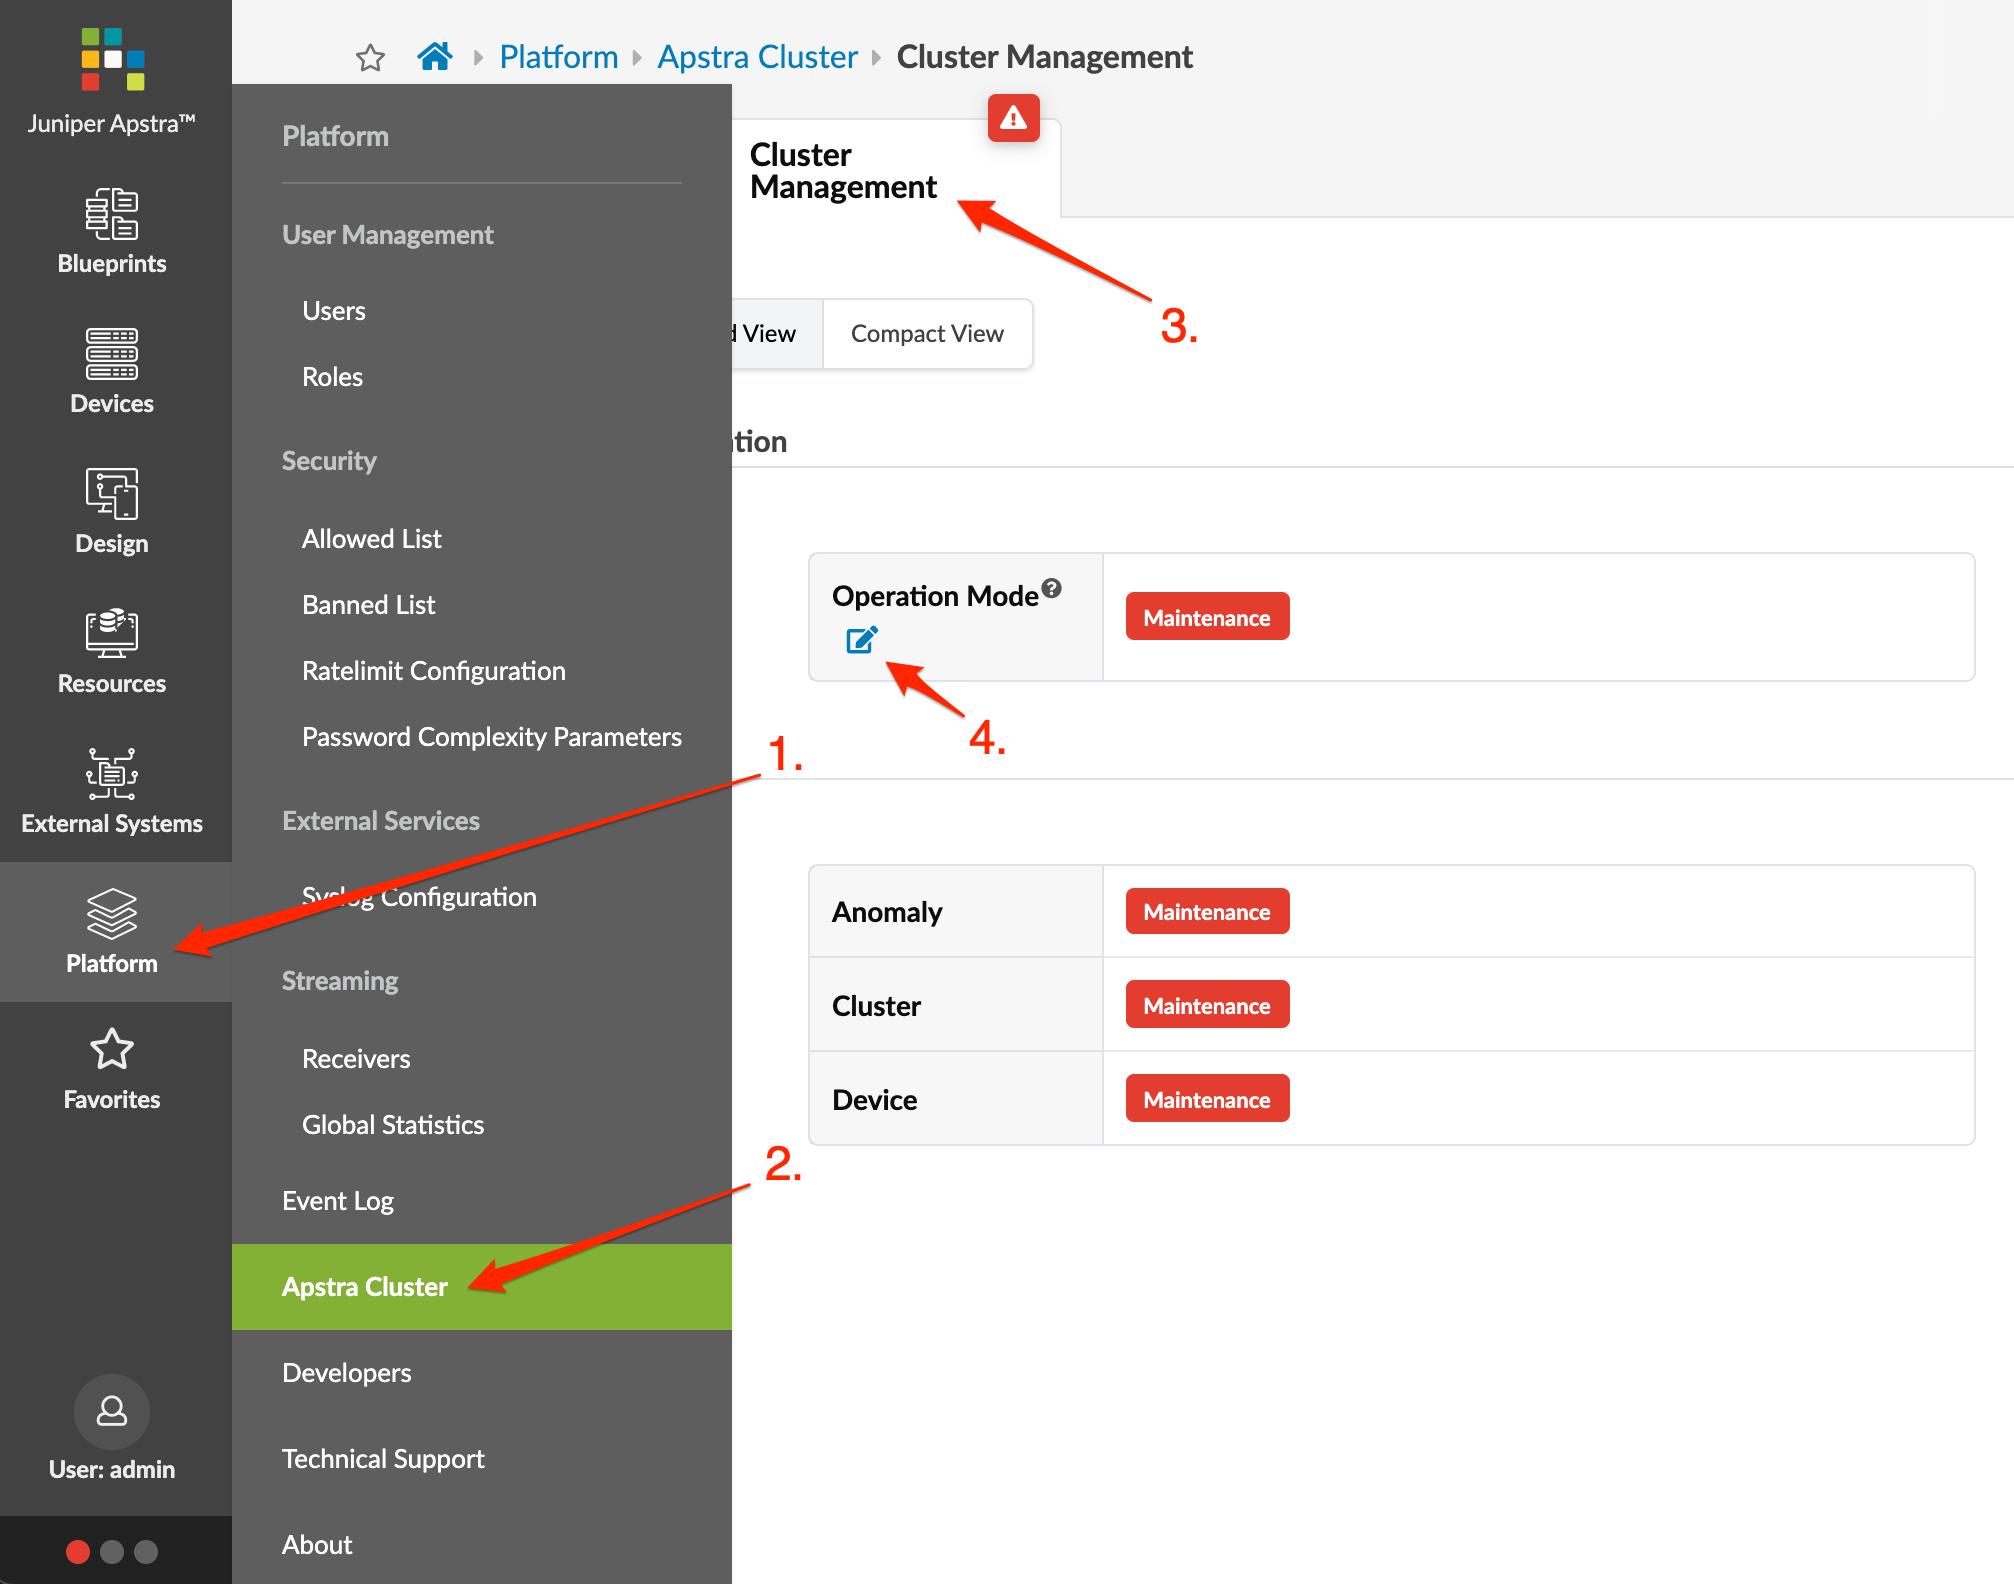
  3. From the left navigation menu, navigate to Platform > Apstra Cluster > Cluster Management.
  4. Click the Change Operation Mode button, select Normal, then click Update. Any offbox agents, whether they're on the controller or worker VMs automatically go online and reconnect devices and push any pending configuration changes. After a few moments the temporary anomalies on the dashboard resolve and the service configuration section shows that the operation has SUCCEEDED.

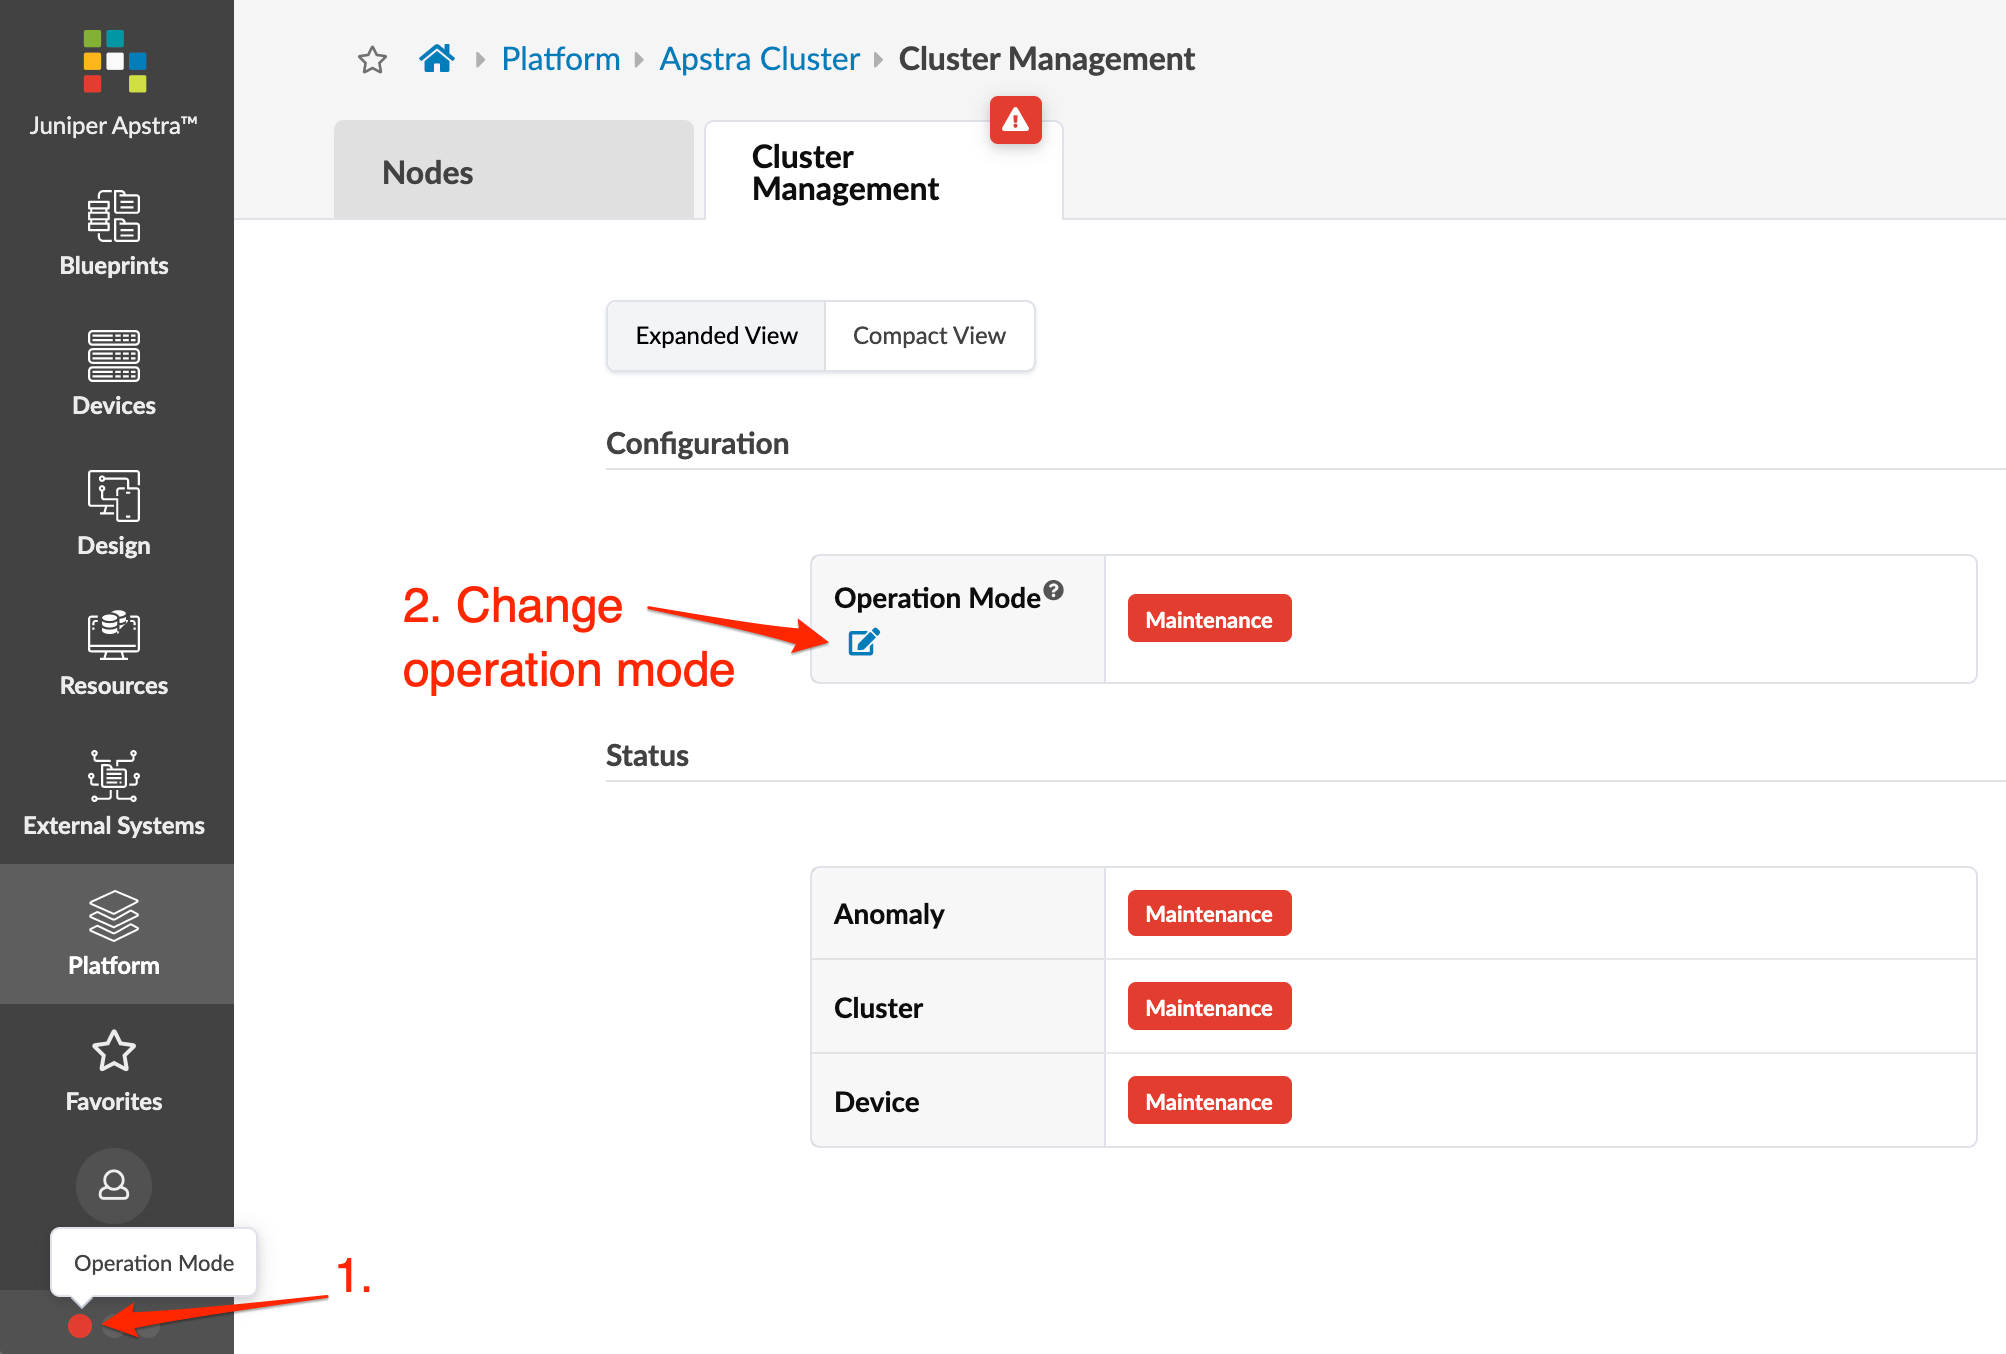
    You can also access the Cluster Management page from the lower left section of any page. You have continuous platform health visibility from here as well, based on colors.

    From the bottom of the left navigation menu, click one of the dots, then click Operation Mode to go to Cluster Management. Click the Change Operation Mode button, select Normal, then click Update.

Step 6: Upgrade Onbox Agents

The Apstra server and onbox agents must be running the same Apstra version. If versions are different the agents won't connect to the Apstra server.

If you're running a multi-state blueprint, especially 5-stage, we recommend that you upgrade agents in stages: first upgrade superspines, then spines, then leafs. We recommend this order because of path hunting. Instead of routing everything up to a spine, or from a spine to a superspine, it's possible for routing to temporarily go from leaf to spine back down to another leaf and back up to another spine. To minimize the chances of this happening, we recommend upgrading devices in stages.

  1. Log in to the Apstra GUI as user admin.
  2. From the left navigation menu, navigate to Devices > Managed Devices and select the check boxes for the device(s) to upgrade (up to 100 devices at a time). You can upgrade multiple onbox agents at the same time, but the order of device upgrade is important.
    • Upgrade agents for superspines first.
    • Upgrade agents for spines second.
    • Upgrade agents for leafs third.
    When you select one or more devices the Device and Agent menus appear above the table.
  3. Click the Install button to initiate the install process.
    The job state changes to IN PROGRESS. If agents are using a previous version of the Apstra software, they are automatically upgraded to the new version. Then they connect to the server and push any pending configuration changes to the devices. Telemetry also resumes, and the job states change to SUCCESS.
  4. In the Liveness section of the blueprint dashboard confirm there are no device anomalies.
    Note:

    If you need to roll back to the previous Apstra version after initiating agent upgrade, you must build a new VM with the previous Apstra version and restore the configuration to that VM. For assistance, contact Juniper Technical Support.

Step 7: Shut Down Old Apstra Server

  1. Update any DNS entries to use the new Apstra server IP/FQDN based on your configuration.
  2. If you're using a proxy for the Apstra server, make sure it points to the new Apstra server.
  3. Gracefully shut down the old Apstra server. You will have been asked if you want the old Apstra server shut down; if you responded yes, then the service aos stop command is run automatically to shut down the old Apstra server for you.
  4. If you're upgrading an Apstra cluster and you replaced your worker nodes with new VMs, shut down the old worker VMs as well.
Next Steps:

If the NOS versions of your devices are not qualified on the new Apstra version, upgrade them to a qualified version. (See the Juniper Apstra User Guide for details.)