Help us improve your experience.

Let us know what you think.

Do you have time for a two-minute survey?


Adopt the Juniper Apstra Cloud Services Edge and Enable Juniper Apstra Flow

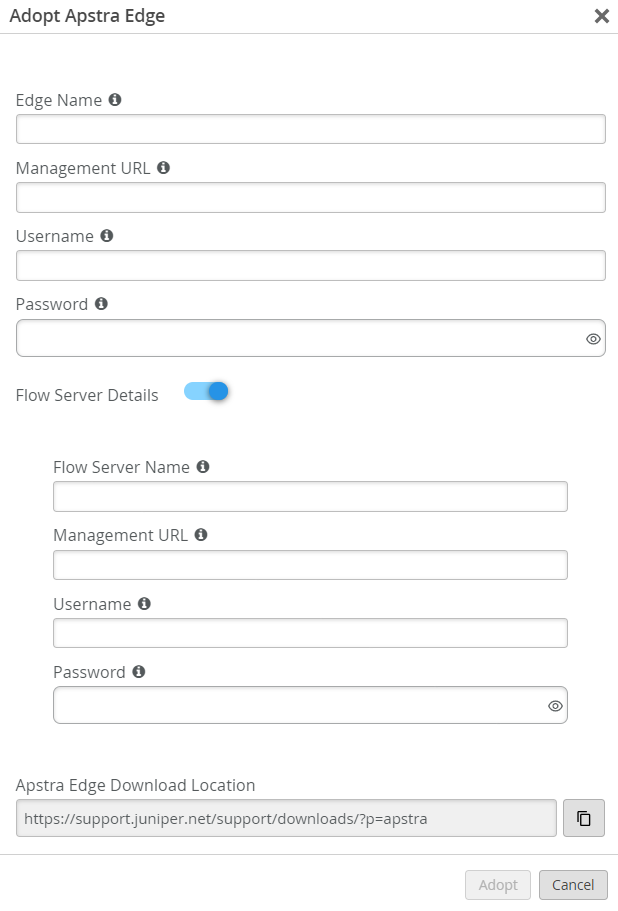
Follow these steps to Adopt the Juniper Apstra Cloud Services Edge and enable Juniper Apstra Flow for your Apstra-managed fabric. Note that the Juniper Apstra Edge and Flow Server are separate VMs. After your enter the information for each VM, the aos-edge configuration is updated and the Edge can communicate with the Apstra Flow VM.
Note:

This guide assumes that you have Juniper Apstra Flow installed. For information about how to install Juniper Apstra Flow, see the Juniper Apstra Flow Installation and Upgrade Guide.

  1. Using the Juniper Apstra Cloud Services URL that was provided during the entitlement process, access your organization using the appropriate login credentials. Alternatively, to access the GUI as the first admin user without an invite:
    1. Access the GUI directly at https://dc.ai.juniper.net.
    2. Click Create Account and fill in the required information.
    3. Click Create Account.
      ACS sends a verification e-mail to activate your account.
    4. Click Validate me! in the e-mail body.
      The New Account page appears.
    5. Click Create Organization.
    6. Type a unique name for your organization and click Create.
      The New Account page appears.
    7. Click the organization on the New Account page.
    The Marvis Actions page displays.
  2. On the left side of the page, select Organization > Inventory.
    1. From the Inventory tab, select Adopt Apstra Edge on the top right of the page.
    2. Fill in the following fields:
      • Edge Name: The name of the Juniper Apstra Edge instance

      • Management URL: The management URL of your Juniper Apstra Cloud Services UI

      • Username: The username you use to access the Juniper Apstra Cloud Services UI

      • Password: The password you use to access the Juniper Apstra Cloud Services UI

      • Data Center Edge Download Location: The Juniper Downloads URL for the latest Apstra Edge distribution. Use the following Juniper Downloads link to download the latest Apstra Edge version: https://support.juniper.net/support/downloads/?p=apstra.

    3. Select the toggle for Flow Server Details and fill in the following fields:
      • Flow Server Name: The name of the Apstra Flow Server instance

      • Management URL: The IP address or hostname of your Apstra Flow VM, with the management port.

        https://<ip-or-hostname-of-flow-data-vm>:9200/

        .
      • Username: The username you use to access the Juniper Apstra Flow Server dashboard UI. The default username is admin.

      • Password: The password you use to access the Juniper Apstra Flow Server dashboard UI. The default password is Apstra-Flow5.

        Note:

        We recommend that you change the default password after your log in.

    4. Select Adopt.

    Configuration form for adopting an Apstra Edge in a network management system with fields for Edge Name, Management URL, Username, Password, Flow Server Details toggle, Flow Server Name, Flow Server Management URL, Flow Server Username, Flow Server Password, and Apstra Edge Download Location link. Adopt and Cancel buttons are at the bottom.
  3. Retrieve the registration code for the Juniper Apstra Cloud Services Edge instance.
    The registration code associates the Juniper Apstra Edge instance with Marvis.
    1. Select the box next to your Edge component and select More > Get Registration Code at the top of the page.
    2. Copy the code and select Close.
      Note:

      This registration code registers the Apstra Edge with Juniper Apstra Cloud Services, which uses the code to retrieve unique organization ID, secret, and device ID during Edge installation. These IDs must be stored securely as they cannot be retrieved after the initial setup is complete. is required to initialize the Juniper Apstra Cloud Services Edge container.

  4. Save the registration code as it is needed for the next steps.