Putting It All Together
Introduction
The following use cases are examples of different network designs that utilize different methods and techniques of the Apstra Freeform features we’ve discussed. These examples are meant to help you better understand how the features of Apstra and Freeform are used to address various networking use cases.
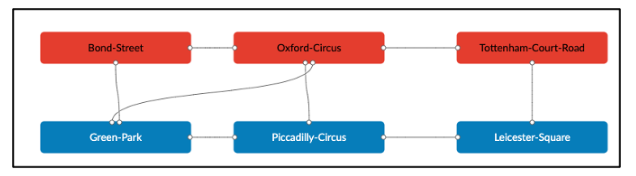
Use Case 1: Small Version of London Tube (CloudLabs Topology)
This use case uses a small version of the London underground system as a map to design a network topology from arbitrary switches. The concept here is to create a simple network design using Jinja templates, and a Property Set. This use case demonstrates how you can create a complete network design using straightforward Jinja templating and Property Sets.
This use case is available as a hands-on lab using Juniper Apstra Cloudlabs (see the related links section at the end of this article for more information about CloudLabs). A GitHub repository includes the Jinja files and JSON Property Sets you can reference, contribute to, or even fork.
The following image shows the topology of the environment for this use case.
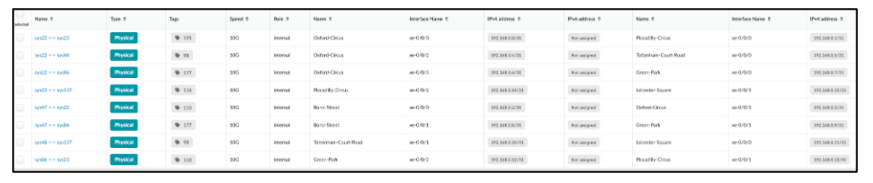
In the following image, note that all system links show tags and IP addresses assigned via the topology editor/API:
Rendered Configurations for Use Case 1
The following examples are rendered configurations for the Bond-Street
device in the topology.
The Interfaces Code Block:
interfaces {
    replace: xe-0/0/0 {
      unit 0 {
interfaces {
    replace: xe-0/0/0 {
      unit 0 {
        description "facing_oxford-circus:xe-0/0/1";
        family inet {
          address 192.168.0.2/31;
        }
      }
    }
    replace: xe-0/0/1 {
      unit 0 {
        description "facing_green-park:xe-0/0/1";
        family inet {
          address 192.168.0.8/31;
        }
      }
    }
    replace: lo0 {
      unit 0 {
          family inet {
              address 10.0.0.2/32;
          }
The Policy-Options Code Block:
policy-options {
  policy-statement send-direct {
      term 1 {
          from protocol direct;
          then accept;
      }
  }
  policy-statement add-med-110 {
          from {
            route-filter 0.0.0.0/0 longer;
          }
          then {
            metric add 110;
          }
          then  {
            accept
          }
  }
  policy-statement add-med-177 {
          from {
            route-filter 0.0.0.0/0 longer;
          }
          then {
            metric add 177;
          }
          then  {
            accept
          }
  }
}
The Protocols Code Block:
protocols {
  lldp {
      port-id-subtype interface-name;
      port-description-type interface-description;
      neighbour-port-info-display port-id;
      interface all;
  }
  replace: rstp {
    bridge-priority 0;
    bpdu-block-on-edge;
  }
  bgp {
    group external-peers {
      type external;
      export send-direct;
      neighbor 192.168.0.3 {
        peer-as 22;
        export add-med-110;
      }
      neighbor 192.168.0.9 {
        peer-as 86;
        export add-med-177;
      }
    }
  }
}
routing-options {
  autonomous-system  47;
}
Config Templates
The following are example Config Templates for Use Case 1.
Config Template system.jinja.
system {
    host-name {{hostname}};
}
This is the main.jinja config template. This template is the
system.jinja template that uses the builtin “hostname” variable from the
Device Context to set the system host-name.
Config Template interfaces.jinja.
 {% set this_router=hostname %}
interfaces {
{% for interface_name, iface in interfaces.iteritems() %}
    replace: {{ interface_name }} {
      unit 0 {
        description "{{iface['description']}}";
        family inet {
          address {{iface['ipv4_address']}}/{{iface['ipv4_prefixlen']}};
        }
      }
    }
{% endfor %}
    replace: lo0 {
      unit 0 {
          family inet {
              address {{ property_sets.data[this_router]['loopback'] }}/32;
          }
      }
   }
}
Note the following:
-
{% set this_router=hostname %}: Sets the variablethis_router=hostname. -
{% for interface_name, iface in interfaces.iteritems() %}: A for loop that walks through the interfaces and inserts the proper interface stanza syntax for Junos. This includes the description of the interface and the family inet address and prefix length from the device context. You can populate these values via the Links view in the Topology Editor. -
 replace: lo0 { unit 0 { family inet { address {{
              property_sets.data[this_router]['loopback'] }}/32; } }
: This code inserts theproperty_setdata for this router’s loopback address into the loopback stanza.
Config Template protocols.jinja.
{% set this_router=hostname %}
policy-options {
  policy-statement send-direct {
      term 1 {
          from protocol direct;
          then accept;
      }
  }
{% for interface_name, iface in interfaces.iteritems() %}
{% set link_med = iface.link_tags[0] %}
{#
  this may create multiple identical policy-statements, but JunOS is smart enough
  to squash them.
#}
  policy-statement add-med-{{ link_med }} {
          from {
            route-filter 0.0.0.0/0 longer;
          }
          then {
            metric add {{ link_med }};
          }
          then  {
            accept
          }
  }
{% endfor %}
}

protocols {
  lldp {
      port-id-subtype interface-name;
      port-description-type interface-description;
      neighbour-port-info-display port-id;
      interface all;
  }
  replace: rstp {
    bridge-priority 0;
    bpdu-block-on-edge;
  }


  bgp {
    group external-peers {
      type external;
      export send-direct;
      {% for interface_name, iface in interfaces.iteritems() %}
      neighbor {{ iface.neighbor_interface.ipv4_address }} {
        {% set peer_hostname=iface.neighbor_interface.system_hostname %}
        peer-as {{ property_sets.data[peer_hostname]['asn'] }};
        export add-med-{{ iface.link_tags[0] }};
      }
      {% endfor %}
    }
  }
}

routing-options {
  autonomous-system  {{ property_sets.data[this_router]['asn'] }};
}
Note the following:
-
{% set this_router=hostname %}: Sets the variablethis_router = hostnamefrom the device context. -
 policy-statement send-direct { term 1 { from protocol direct; then accept;
              }
: Sets apolicy-optionsstanza to send to all directly-attached routes. -
{% set link_med = iface.link_tags[0] %}: Sets the variablelink_medto the tag associated with the interface via the Topology. -
The
lldpsection underprotocolssets the Link Layer Discovery Protocol (LLDP) parameters. -
The
rstpsection underprotocolssets the Rapid Spanning Tree Protocol (RSTP) parameters. -
group external-peers {underbgp: Groupexternal-peers. -
type external;: Sets the type (eBGP) of external policy. -
export send-direct;: Export policy ofsend-direct. -
{% for interface_name, iface in interfaces.iteritems() %}: Walk the interface tree and insert neighbors for any neighbor that has an IPv4 address. -
neighbor {{ iface.neighbor_interface.ipv4_address }}: Set thepeer_hostnamevariable to the neighbor interfaces hostname. -
{% set peer_hostname=iface.neighbor_interface.system_hostname %}: Grab the peer from theproperty_setsdata "asn". -
peer-as {{ property_sets.data[peer_hostname]['asn'] }}; export add-med-{{ iface.link_tags[0] }};:Peer-asstanza is set with an export policy ofadd-med-tags. -
routing-options { autonomous-system {{ property_sets.data[this_router]['asn']
              }};}
: Set therouting-optionsstanza with the autonomous system from the Property Set's "asn" value.
Rendered Property Set
{
    "bond-street": {
      "asn": 47,
      "loopback": "10.0.0.2"
    },
    "green-park": {
      "asn": 86,
      "loopback": "10.0.0.4"
    },
    "tottenham-court-road": {
      "asn": 48,
      "loopback": "10.0.0.3"
    },
    "leicester-square": {
      "asn": 137,
      "loopback": "10.0.0.5"
    },
    "piccadilly-circus": {
      "asn": 23,
      "loopback": "10.0.0.1"
    },
    "oxford-circus": {
      "asn": 22,
      "loopback": "10.0.0.0"
    }
  }
This straightforward Property Set is represented as a list of dictionaries that include the following:
-
The name of the system (Underground station) is the key. For example,
"bond-street". -
ASN which is the autonomous system number BGP peering. For example,
"asn":
              47
. -
Loopback which is the loopback address of the system, station to peer with. For example,
"loopback": "10.0.0.2".
Use Case 2: Tags and Property Sets to Drive Day-2 Configuration
Introduction
The small topology shown below has been constructed in the Freeform topology editor. It
has three switches and two external systems, named ESXi-1 & ESXi-2. The links facing
the two hosts are tagged with esxBlueTrunk and
esxRedTrunk, respectively. This use case demonstrates how you can use
Freeform to dynamically build the switch trunk facing the ESXi hosts, determined by the
entries in the Property Set and the tags assigned in the Topology.
The role of the tag in this instance is to indicate where the trunk should be configured/created. In this instance, the Property Set's role is to hold the relevant data required to configure the trunk members, the VLANs, and the IRBs.

This use case exemplifies the benefits of utilizing a carefully crafted Configuration Template (Jinja2), Tags, and Property Sets, to build configurations without the need to re-craft the Config Template. As new tags are assigned to the topology or new VNs are assigned to the Property Set, the associated config is dynamically built for these trunks.
End-State Configuration
For the interface tagged with esxBlueTrunk, the final Junos
configuration will include:
The Interfaces Block
interfaces {
  ae2 {
  description esxBlueTrunk
    unit 0 {
      family ethernet-switching {
          interface-mode trunk
          vlan {
            members [
                    vn99
                    vn100
                    vn101
            ]
         }
      }
    }
  }
The IRB Block
irb {
    unit 99 {
        family inet {
            mtu 9000;
            address 1.1.99.1/24;
        }
    }
    unit 100 {
        family inet {
            mtu 9000;
            address 1.1.100.1/24;
        }
    }
    unit 101 {
        family inet {
            mtu 9000;
            address 1.1.101.1/24;
        }
    }
  }
}
The VLAN Block
vlans {
  vn99 {
    vlan-id 99;
    description vMotionVN-99;
    l3-interface irb.99;
  }
  vn100 {
    vlan-id 100;
    description storageVN-100;
    l3-interface irb.100;
  }
  vn101 {
    vlan-id 101;
    description mgmtVN-101;
    l3-interface irb.101;
  }
}
esx Property Set
The following Property Set includes the necessary details required to build the Junos Trunk config:
|
esxTrunk Property Set |
Description |
|---|---|
      "esxRedtrunk": {
        "200": {
          "subnet": "1.1.200.0/24",
          "description": "going nowhere",
          "gateway": "1.1.200.1/24"
        },
        "201": {
          "subnet": "1.1.201.0/24",
          "description": "going somewhere",
          "gateway": "1.1.201.1/24"
        }
      },
      "esxBlueTrunk": {
        "99": {
          "subnet": "1.1.99.0/24",
          "description": "vMotionVN",
          "gateway": "1.1.99.1/24"
        },
        "100": {
          "subnet": "1.1.100.0/24",
          "description": "storageVN",
          "gateway": "1.1.100.1/24"
        },
        "101": {
          "subnet": "1.1.101.0/24",
          "description": "mgmtVN",
          "gateway": "1.1.101.1/24"
        }
      },
      "esxPinkTrunk": {
        "88": {
          "subnet": "1.1.88.0/24",
          "description": "vMotionVN",
          "gateway": "1.1.88.1/24"
        },
        "89": {
          "subnet": "1.1.89.0/24",
          "description": "storageVN",
          "gateway": "1.1.89.1/24"
        },
        "90": {
          "subnet": "1.1.90.0/24",
          "description": "mgmtVN",
          "gateway": "1.1.90.1/24"
        }
|
The esxTrunk Property Set (to the left) has been constructed as a dictionary of
dictionaries for good reason: to enable recursive lookup. The esxBlueTrunk
dictionary has been expanded to show values 99, 100, 101 which in this instance are
used as both VLAN IDs, and as a key to the dictionary below it. The dictionaries
below provide key : value pairs for the subnet, the gateway, and the description. In
this example, the subnet is not required and exists purely for reference. With the data organized in this way, the Config Template has been designed to recurse through two data structures to search for matching tags: 1. The esxTrunk Property Set 2. The topology from the topology editor When the tag in both data sets match, the Config Template produces the desired configuration. By cross-referencing the Property Set to the left with the Junos configuration outputs in the End-State Configurations section, you can see that:
Both the esx(Red / Pink)Trunk, hold similar information as the esxBlueTrunk To enable efficient recursive walking of both the Property Set to the left and the tags assigned to the links in the topology, the tags have been purposely assigned the same values
|
This esxTrunk Property Set has been constructed as a dictionary of dictionaries for good reason: to enable recursive lookup. The esxBlueTrunk dictionary has been expanded to show values 99, 100, 101 which in this instance, are used as both VLAN IDs, and as a key to the dictionary below it. The dictionaries below provide key : value pairs for the subnet, the gateway, and the description. In this example, the subnet is not required and exists purely for reference.
With the data organized in this way, the Config Template has been designed to recurse through two data structures to search for matching tags:
-
The esxTrunk Property Set
-
The topology from the topology editor
When the tag in both data sets match, the Config Template produces the desired configuration.
By cross-referencing the Property Set with the Junos configuration output above, you can see that:
- The values esx[Red | Blue | Pink]Trunk, are used as the tags to match, as we walk through both datasets.
- The values 99, 100, 101 are used as the VLAN IDs
- The gateway is used as the IRB address
- The description is used to overwrite the original interface description (as required)
Both the esx(Red / Pink)Trunk, hold similar information as the esxBlueTrunk.
To enable efficient recursive walking of both the Property Set and the tags assigned to the links in the topology, the tags have been purposely assigned the same values
- esxRedTrunk
- esxBlueTrunk
- esxPinkTrunk
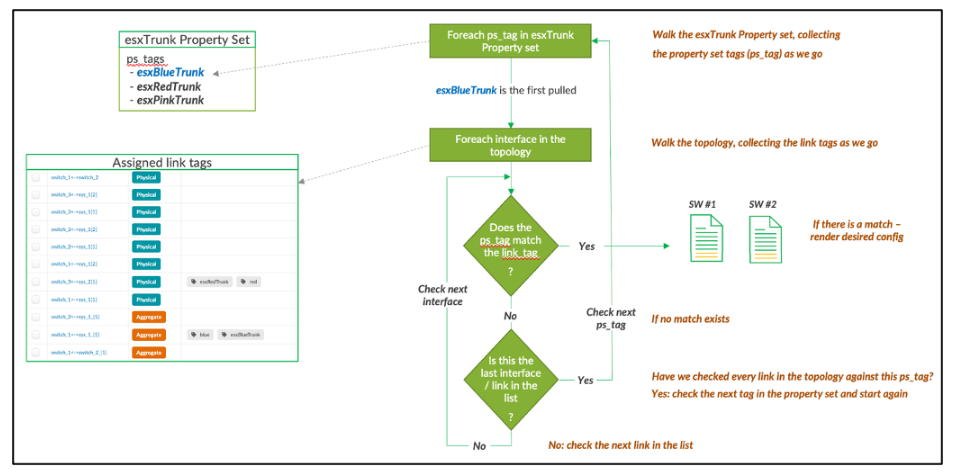
Jinja2 Base Config Template State Machine
The Config Template esxTunks.jinja flow is described below.
Jinja2 Base Config Template
The following Jinja2-based Config Template utilizes both the assigned tag and the Property Set to build the required config.
| Config Template | Descriptions |
|---|---|
{% set Rendered_VNs = {} %}
{% for ps_tag in property_sets.esxTrunk %}


  {% for interface_name, iface in interfaces.iteritems() %}
    {% if ((iface.link_tags) and (ps_tag in iface.link_tags)) %}


interfaces {
  {{interface_name}} {
  description {{ ps_tag }}


  unit 0 {
      family ethernet-switching {
          interface-mode trunk
          vlan {
            members [
                {% for vlan_id in property_sets.esxTrunk[ps_tag] %}
                {% set _ = Rendered_VNs.update({vlan_id: ps_tag}) %}
                    vn{{ vlan_id }}
                {% endfor %}
            ]
         }
      }
    }
  }
  {% endif %}
  {% endfor %}
  {% endfor %}

irb {
{% for vn in Rendered_VNs %}
{% set tag = Rendered_VNs[vn] %}
    unit {{ vn }} {
        family inet {
            mtu 9000;
            address {{ property_sets.esxTrunk[tag][vn]['gateway'] }};
        }
    }
    {% endfor %}
  }
}
vlans {
{% for vn in Rendered_VNs|unique %}
{% set tag = Rendered_VNs[vn] %}
  vn{{ vn }} {
    vlan-id {{ vn }};
    description {{ property_sets.esxTrunk[tag][vn]['description'] }}-{{ vn }};
    l3-interface irb.{{ vn }};
  }
  {% endfor %}
}
|
A global dictionary to store VNs to render Start by traversing the esxTrunk Property Set shown above. The first value retrieved, and stored in the variable ps_tag (Property Set tag) is one of the strings:
Now traverse or ‘iterate’ through the interfaces in the topology If an interface link_tag exists and the ps_tag is in the list of interface link tags, the condition has been met where trunk configuration will be rendered Start outputting the interfaces block Output the interface_name where ps_tag equals the interface link tag Optionally assign a description, although Freeform will have already assigned this description from the topology Set the Unit number and associated config to describe the trunk Set the trunk member Traverse the esxTrunk Property Set using the ps_tag to retrieve the VLAN IDs Enter each VLAN ID in the dictionary declared at line 1for later use Output the vn VLAN ID detailed in the esxTrunk Property Set End the for loop when there are no more entries in the esxTrunk Property Set End the if statement above End the for statement above End the for statement above Start outputting the irb block Traverse the Rendered_VNs dictionary For readability, set the variable tag to the tag stored in the dictionary Set the unit number using the vlan_id Set the gateway address stored in the esxTrunk PropertySet using the tag, vn and the key ‘gateway’ to access the stored string End the for statement above Start outputting the vlans block As per the irb block above, traverse the Rendered_VNs dictionary, For readability, set the variable tag to the tag stored in the dictionary Set the vn number Set the vlan_id ID Set the description as required Set the layer3 irb number End the for statement above |
Use Case 3: Advanced Example Using Centrally Routed Bridging (CloudLabs Topology)
This use case is a complete CRB example that was written by Apstra Engineering. This example is built completely with static Jinja templates, and all of the data is in Property Sets for the network and devices. This allows the users of this CRB example to operate, expand, and change the network just by editing Property Sets and allowing you not to touch the underlying Jinja templates. This use case aims to give you an example of the art of the possible and demonstrate the flexibility and power of the Freeform feature. All the configuration templates, property sets, and Jinja templates and functions have embedded documentation to help you understand the use and function.
This use case is available to you as a fully deployed hands-on sandbox using Juniper Apstra Cloudlabs. There is also a GitHub repository that includes all the same files. You can use this as an example of performing certain functions to make your own advanced Config Templates for your use case.
The Advanced CRB templates are modular in nature and start at a root level and then include others. Below is a diagram of how the rendered configuration is developed based on the different Jinja templates.
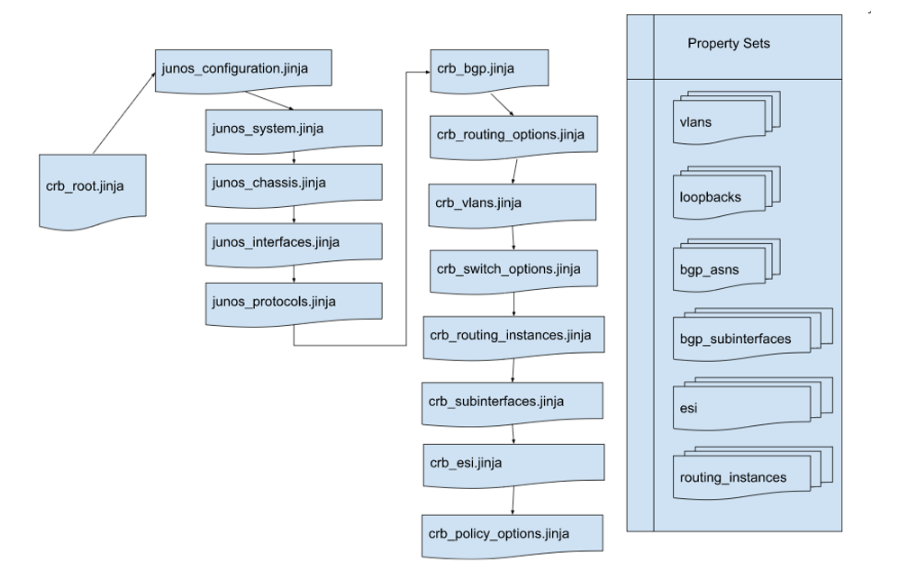
Note that Property Sets are available to any Jinja Config Templates and act as global variables.
The Advanced CRB example is useful to understand how far you can take using jinja and property sets in your design.Instead of including all of the Config Templates and Property Sets here we will just outline a few examples and discuss them in detail to explain the key takeaways.
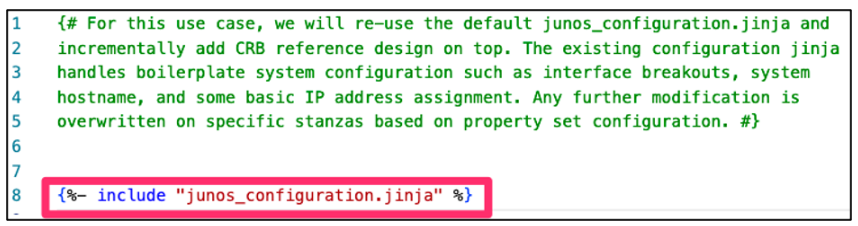
First, it is important to understand that the crb_root.jinja includes
another whole set of jinja which is called junos_configuration.jinja and
this is included with the Freeform standard distribution.
In this use case, we use the following Property Set, called
routing_instances.json:
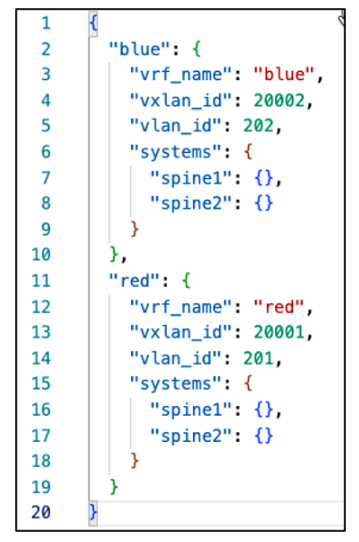
Note that there are two dictionaries and inside, they have the systems listed that they apply to, so from this we can use the following Jinja to check if the system name matches the property set.
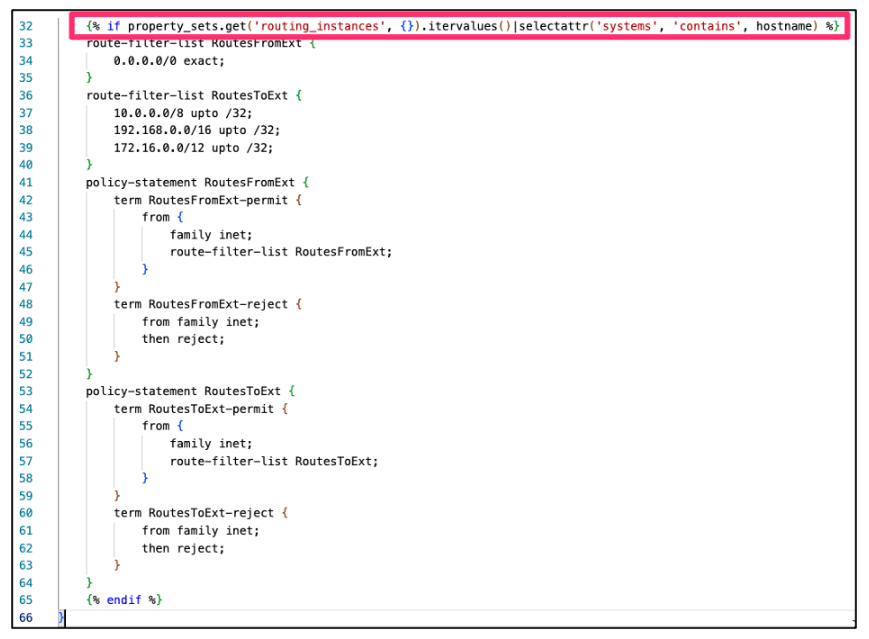
The Jinja for crb_policy_options.jinja is primarily static as it is the
same for most devices but if the device is a spine we need to provide external connectivity,
so we need to add some more info to that section of the configuration. The if
statement below checks if the systems value contains the hostname of the device, and if it
does, then it adds the external policy and route filters.
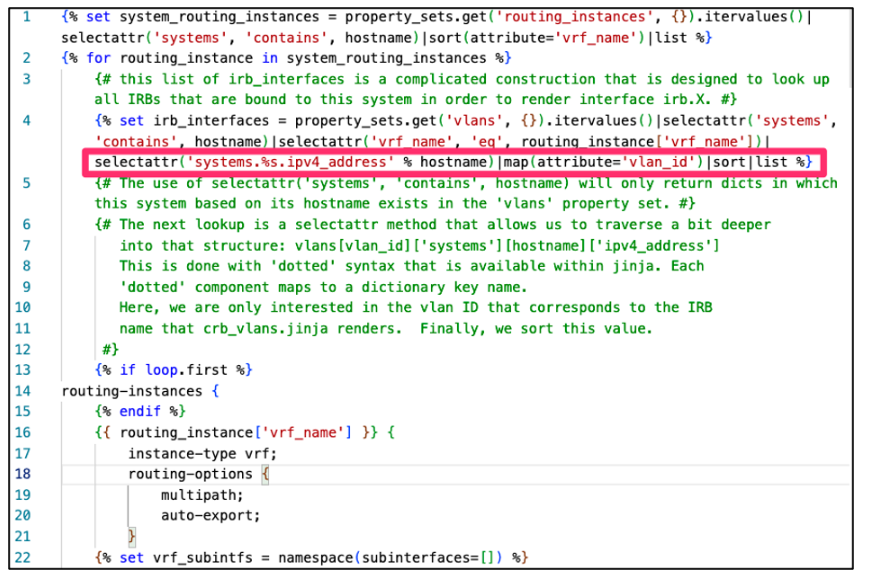
Next, lets take a look at crb_routing_instances.jinja it uses a complex
Jinja “for” loop that looks up values for all IRB interfaces that are bound to the
system selected and renders the interfaces irb.x. The code is documented
clearly and shows the power of the “.” (dot) notation in Jinja with the
'systems.%s.ipv4_address' use. First, let’s examine the vlan “20” in the
Property Set vlans.json.
The %s syntax is a string representing selectattr
('systems.%s.ipv4_address' % hostname) where hostname is the name of the
system. So, this line basically returns the key 20 in this example:
The complete set of Config Templates and Property Sets are available on the GitHub Repository referenced in the Related Information section. Most of the Config Templates are self-documented, so you can easily review the code and learn as you go. Please use these examples of performing certain functions to make your own advanced Config Templates for your desired use case.
Summary
Apstra’s Data Center Reference Design is designed to be a plug-and-play solution, automating what goes on “under the hood” so that Day-0 through Day-2 operations are simplified and efficient. Sometimes however, our customers need a customized reference design for their Data Center fabric. Freeform is designed to meet those custom needs, providing you with the tools to specify your own reference design while still leveraging many of Apstra’s Intent-Based Analytics capabilities.
This article takes the reader from the basic constructs Freeform uses – Tags, Device Contexts, Property Sets, and Config Templates – to creating a straightforward Freeform Blueprint, to a number of advanced case studies.
For documentation about editing Jinja docs, see https://<apstra_ip>/static/jinja_docs/ .