APM Installation
APM Installation Overview
Juniper Address Pool Manager (APM) is an automated, centralized, container-based cloud-native application that network operators and administrators use to manage IP prefix resources. APM works with managed broadband network gateways (BNGs) to monitor address pools on BNGs. When the number of free addresses drops below a set threshold, the BNG raises an alarm. The alarm triggers APM to allocate unused prefixes from its global list of prefixes and provision a subset of the prefixes to the BNG as new pools.
APM can be installed on a single Kubernetes cluster or on a multiple geography, multiple cluster setup. The installation requirements and installation process for these two types of setups are different. See the followings sections for the requirements for your APM setup:
The term BNG in this document also applies to the BNG CUPS Controller.
You can deploy APM on any hardware that meets the requirements. The following sections describe:
-
APM installation requirements
-
How to install APM
-
How to adjust APM setup parameters
APM Installation Requirements
To install APM, you need the following hardware and software requirements listed in this section.
- APM Requirements for a Single Geography Setup
- APM Requirements for a Multiple Geography Setup
- Additional Requirements
APM Requirements for a Single Geography Setup
APM installs on a Kubernetes cluster physical or VMs. For availability, you must have at least three nodes hosting the control plane's etcd function and three nodes hosting the worker function in the cluster.
APM has been qualified against the single geography cluster described in Table 1.
| Category | Details |
|---|---|
|
Kubernetes cluster |
The Kubernetes cluster requires the following:
|
|
Jump host |
The jump host requires the following:
|
|
Jump host software |
The jump host requires the following software:
|
|
Storage |
A storage class named jnpr-bbe-storage. |
|
Network load balancer address |
One for APMi. |
|
Registry storage |
Each APM release requires approximately 3 GiB of container images. |
APM Requirements for a Multiple Geography Setup
A geographically redundant, multiple cluster APM setup consists of three separate Kubernetes clusters. Each of the three clusters is geographically separated, so that service impacting events affecting one cluster do not affect the other clusters. The clusters which comprise the multiple cluster setup take on specific roles.
One cluster takes on the role of the management cluster and the other two clusters take on the role of workload clusters. The workload clusters provide a redundant platform where most of the APM application runs. The management cluster hosts execution of the Karmada multiple cluster orchestration software. Karmada manages the propagation of APM workloads across the workload clusters.
Each Kubernetes cluster node in a multiple cluster can be constructed from a physical or VM.
For POC installations, you cannot use the BBE cloudsetup utility to build the clusters used in a multiple geography multiple cluster setup. A separate procedure is available through support to build a POC multiple geography multiple cluster setup.
APM has been qualified against the multiple geography cluster described in Table 2.
| Category | Details |
|---|---|
|
Cluster |
The multiple cluster consists of three clusters with each cluster consisting of 3 hybrid nodes. The three clusters must consist of one management cluster and two workload clusters. Note:
Make sure that the cluster and service CIDRs for each workload cluster do not overlap. The cluster internal networks of each workload cluster are connected by a Submariner IP tunnel. The internal CIDRS must be distinct. |
|
Management Cluster |
The management cluster requires the following:
|
|
Workload cluster |
Each workload cluster requires the following:
|
|
Jump host |
The jump host requires the following:
|
|
Jump host software |
Depending on which Kubernetes distribution you are using, the software required on the jump host may be different. See the following for the required software for each Kubernetes distribution:
|
|
Storage |
A storage class named jnpr-bbe-storage |
|
Network load balancer addresses |
One on each workload cluster for APMi and one on the management cluster for bbe-observer. |
|
Registry storage |
Each APM release requires approximately 3 gibibytes (GiB) of container images. Required for each cluster. |
In a single geography APM setup, you can make some basic assumptions about the cluster's parameters. You can use a quick start tool like BBE Cloudsetup to create a single geography APM. The construction of a production environment APM setup with multiple geographies and multiple clusters requires much more input from you to build.
Additional Requirements
The BNG is a Juniper Networks MX Series Junos OS router or a Juniper BNG CUPS Controller (BNG CUPS Controller).
We recommend the following releases:-
Junos OS Release 23.4R2-S5 or later
-
BNG CUPS Controller 24.4R2 or later
For APM, confirm that you have a juniper.net user account with permissions to download the APM software package. Download and install the APM software from a machine that will not be part of the Kubernetes cluster.
Install a Single Geography APM
Use the procedures in this section to install a single geography APM for the first time.
Before you begin, confirm that you have met the requirements for the APM installation.
We recommend that you use a secure connection between APM and the BNG.
You have the following two options for installing APM:
-
Install a Single Geography APM Using the APM Installation Utility—You can install APM using the APM utility, which streamlines the installation process.
Note:BBE Cloudsetup is a utility that you can use to quickly get started with using APM. It is not a life cycle tool for the cluster. You cannot expand the width of the cluster, perform node maintenance, upgrade infrastructure components, and so on. A Kubernetes cluster for production purposes should be designed and constructed with the requirements of the production environment and with appropriate support to maintain its life cycle. For information about BBE Cloudsetup, see BBE Cloudsetup Installation Guide.
-
Install a Single Geography APM Without Using the APM Utility—You can install APM on a preexisting Kubernetes cluster of your choice. This process is a manual process and does not use the APM utility that comes with the APM installation package.
Before starting the APM installation, make sure that you have the following information:
Required Information:
- Container registry details:
-
If you are using a BBE Cloudsetup created cluster.
-
External registry address.
-
External registry port number (usually 5000).
-
-
If you are using an OpenShift Container Platform cluster:
-
External registry (FQDN)
-
Internal (Docker) registry address
-
Internal (Docker) registry port number
-
-
Optional Information:
- APM initial configuration file. If a configuration file is not supplied, a basic configuration file is automatically generated.
- Storage class name for persistent volume claim (PVC) creation (default is jnpr-bbe-storage).
- PVC Size (default is 90 MiB).
- Archival configuration details. This is required if you are planning to mirror a
copy of the APM configuration to an external server.
-
Either the name of the SSH private key file or the name of the Kubernetes secret that is present in the jnpr-apm namespace containing the SSH private key.
-
The SCP URL of the server where the configuration file will be archived. An SCP URL takes the form of
scp://user-login@server-fqdn:server-port/absolute-file-path(for example,scp://user@host1.mydomain.com:30443/home/user/configs/apm).
-
- Syslog server details. This is required if you are planning to export APM logs
to an external syslog collector. Note:
If BBE Event Collection and Visualization is detected running on the target cluster, the address and port values of the ECAV deployment will be suggested as the default.
-
Syslog server address.
-
Syslog server port number.
-
- Network load balancer details. This is required if you are planning to use a
specific network load balancer pool and address for APMi.
-
Network load balancer pool name.
-
Network load balancer pool address.
-
- APMi Details:
- Port (default is 20557)
- TLS details. You will need one of the following:
-
None (insecure)
-
The key and certificate files. Or the name of the Kubernetes secret that is present in the jnpr-apm namespace that contains the key and certificate information.
-
-
Service Account Name—The name of the Kubernetes service account used to bind certain operational privileges to the mgmt microservice. If a service account name is not provided, APM creates a service account named apm-svca during rollout.
-
SSH service type—If SSH access to the mgmt microservice is specified (
--ssh
                                                  <ip>:<port>
), you must specify whether the service should be created as a node port (NodePort) service or a load balancer (LoadBalancer) service. If LoadBalancer is selected, a MetalLB pool is created containing the supplied external IP address. The load balancer service created at rollout is assigned the external IP address from the newly created MetalLB pool. -
DBSync service type—The
apm multicluster statusAPM utility command collects the state to display from the DBSync microservice through a Kubernetes service. By default, a node port service is created for this purpose. If you selectLoadBalancer, you are prompted for an external IP address and a MetalLB pool is created containing the supplied external IP address. TheLoadBalancerservice created at rollout is assigned the external IP address from the newly created MetalLB pool. - Number of worker processes for the provman microservice (default is 3).
Install a Single Geography APM Using the APM Installation Utility
You use the procedure in this section if you are installing a single geography APM.
Start APM in a Single Geography Setup
Use this procedure to configure and start APM in a single geography setup.
Install a Single Geography APM Without Using the APM Utility
The instructions in this section describe the installation steps for installing a single geography APM on a preexisting Kubernetes cluster of your choice. This process is a manual process and does not use the APM utility that comes with the APM installation package.
Install APM in a Multiple Geography Setup
Use the installation procedures in this section for an APM setup that consists of multiple APMs that are located in different geographical locations.
Before you begin, confirm that you meet the requirements for the APM installation (see Table 2).
Prerequisites
Before starting the APM installation, make sure that you have the following information:
For descriptions of the following information, see Table 3.
Required Information:
-
The cluster context names of the workload clusters, the management cluster's karmada context and the management cluster's working context.
For example, your context output might look like the following:
kubectl config get-contexts CURRENT NAME CLUSTER AUTHINFO NAMESPACE * karmada-apiserver karmada-apiserver karmada-admin mgmt mgmt mgmt-admin workload-a workload-a workload-a-admin workload-b workload-b workload-b-admin -
Karmada kubeconfig—The kubeconfig file for the Karmada context on the management cluster. You can extract the kubeconfig file for the Karmada context from the management cluster context in the karmada-system namespace.
For an example of the command to run, see the following:
kubectl get secrets -n karmada-system --context management-context-name -o jsonpath='{.data.karmada\.config}' | base64 -d > karmada-secret-file -
Container registry details for each cluster:
Note:You must collect the following information for all three clusters.
-
External registry address
-
External registry port number (usually 5000)
-
Optional Information:
-
Service account for the controller manager. If you select
Truefor this prompt, you are prompted for a service account name. If you do not selectTrue, a service account namedbbe-observer-controller-manageris created. -
Service account for the gRPC server. If you select
Truefor this prompt, you are prompted for a service account name. If you do not selectTrue, a service account namedbbe-observer-grpc-serveris created. - APM initial configuration file. If a configuration file is not supplied, a basic configuration file is automatically generated.
- Storage class name for persistent volume claim (PVC) creation (default is jnpr-bbe-storage).
- PVC Size (default is 90 MiB).
- Archival configuration details. This is required if you are planning to
mirror a copy of the APM configuration to an external server.
-
Either the name of the SSH private key file or the name of the Kubernetes secret that is present in the jnpr-apm namespace containing the SSH private key.
-
The Secure Copy Protocol (SCP) URL of the server where the configuration file will be archived. An SCP URL takes the form of
scp://user-login@server-fqdn:server-port/absolute-file-path(for example,scp://user@host1.mydomain.com:30443/home/user/configs/apm).
-
- Syslog server details. This is required if you are planning to export
APM logs to an external syslog collector. Note:
If BBE Event Collection and Visualization is detected running on the target cluster, the address and port values of the ECAV deployment will be suggested as the default.
-
Syslog server address.
-
Sysylog server port number.
-
- Network load balancer details. This is required if you are planning to
use a specific network load balancer pool and address for APMi.
-
Network load balancer pool name.
-
Network load balancer pool address.
-
- APMi Details:
- Port (default is 20557)
- TLS details. You will need one of the following:
-
None (insecure)
-
Either the key and certificate files or the name of the Kubernetes secret that is present in the jnpr-apm namespace that contains the key and certificate information.
-
-
Service account name—The name of the Kubernetes service account used to bind certain operational privileges to the mgmt microservice. If a service account name is not provided, APM creates a service account named apm-svca during rollout.
-
DBSync service type—The
apm multicluster statusAPM utility command collects the state to display from the DBSync microservice through a Kubernetes service. By default, a node port service is created for this purpose. If you selectLoadBalancer, you are prompted for an external IP address and a MetalLB pool is created containing the supplied external IP address. TheLoadBalancerservice created at rollout is assigned the external IP address from the newly created MetalLB pool. - Number of worker processes for the provman microservice (default is 3).
Install the APM Application (Multiple Geography Setup)
-
Use the
sudo -E apm linkcommand to link to the cluster. In preparation for runningsetup, thelinkcommand takes the list of workload cluster contexts and an observer context and associates them to the loaded APM software package.$ sudo -E apm link --context karmada-context-name --version 3.5.0 --workload-contexts workload-1-context-name workload-2-context-name --observer-context management-context-name Linking karmada-context-name to 3.5.0... Adding workload-1-context-name to karmada-context-name workload context list... done. Adding workload-2-context-name to karmada-context-name workload context list... done. done. Linking BBE Observer to Address Pool Manager... Linking management-context-name to 3.5.0 ... done. done. Linking complete, please run apm setup. The following releases can be cleaned...
-
context
                                    karmada-context-name
—The context name of the Karmada context that is created when Karmada is installed on the management cluster. -
worload-contexts
                                            workload-1-context-name
                                        workload-2-context-name
—The two workload context names. -
observer-context
                                            management-context-name
—The context name for the management cluster. Be aware that this context is not the same as the Karmada context name that is associated with the management cluster. -
version software-release—The APM software version, as displayed from theapm_loaderoutput.
Note:During installation, Karmada is installed on the management cluster and Karmada creates its own context on the management cluster. The Karmada context is used to target any operations involving the workload clusters. The management cluster also has its own context that is used for running noncritical centralized workloads (for example, BBE Event Collection and Visualization). You use this management cluster context for the observer-context.
Figure 1 shows where the different contexts are located in a multiple cluster setup.
Figure 1: Multiple Cluster Contexts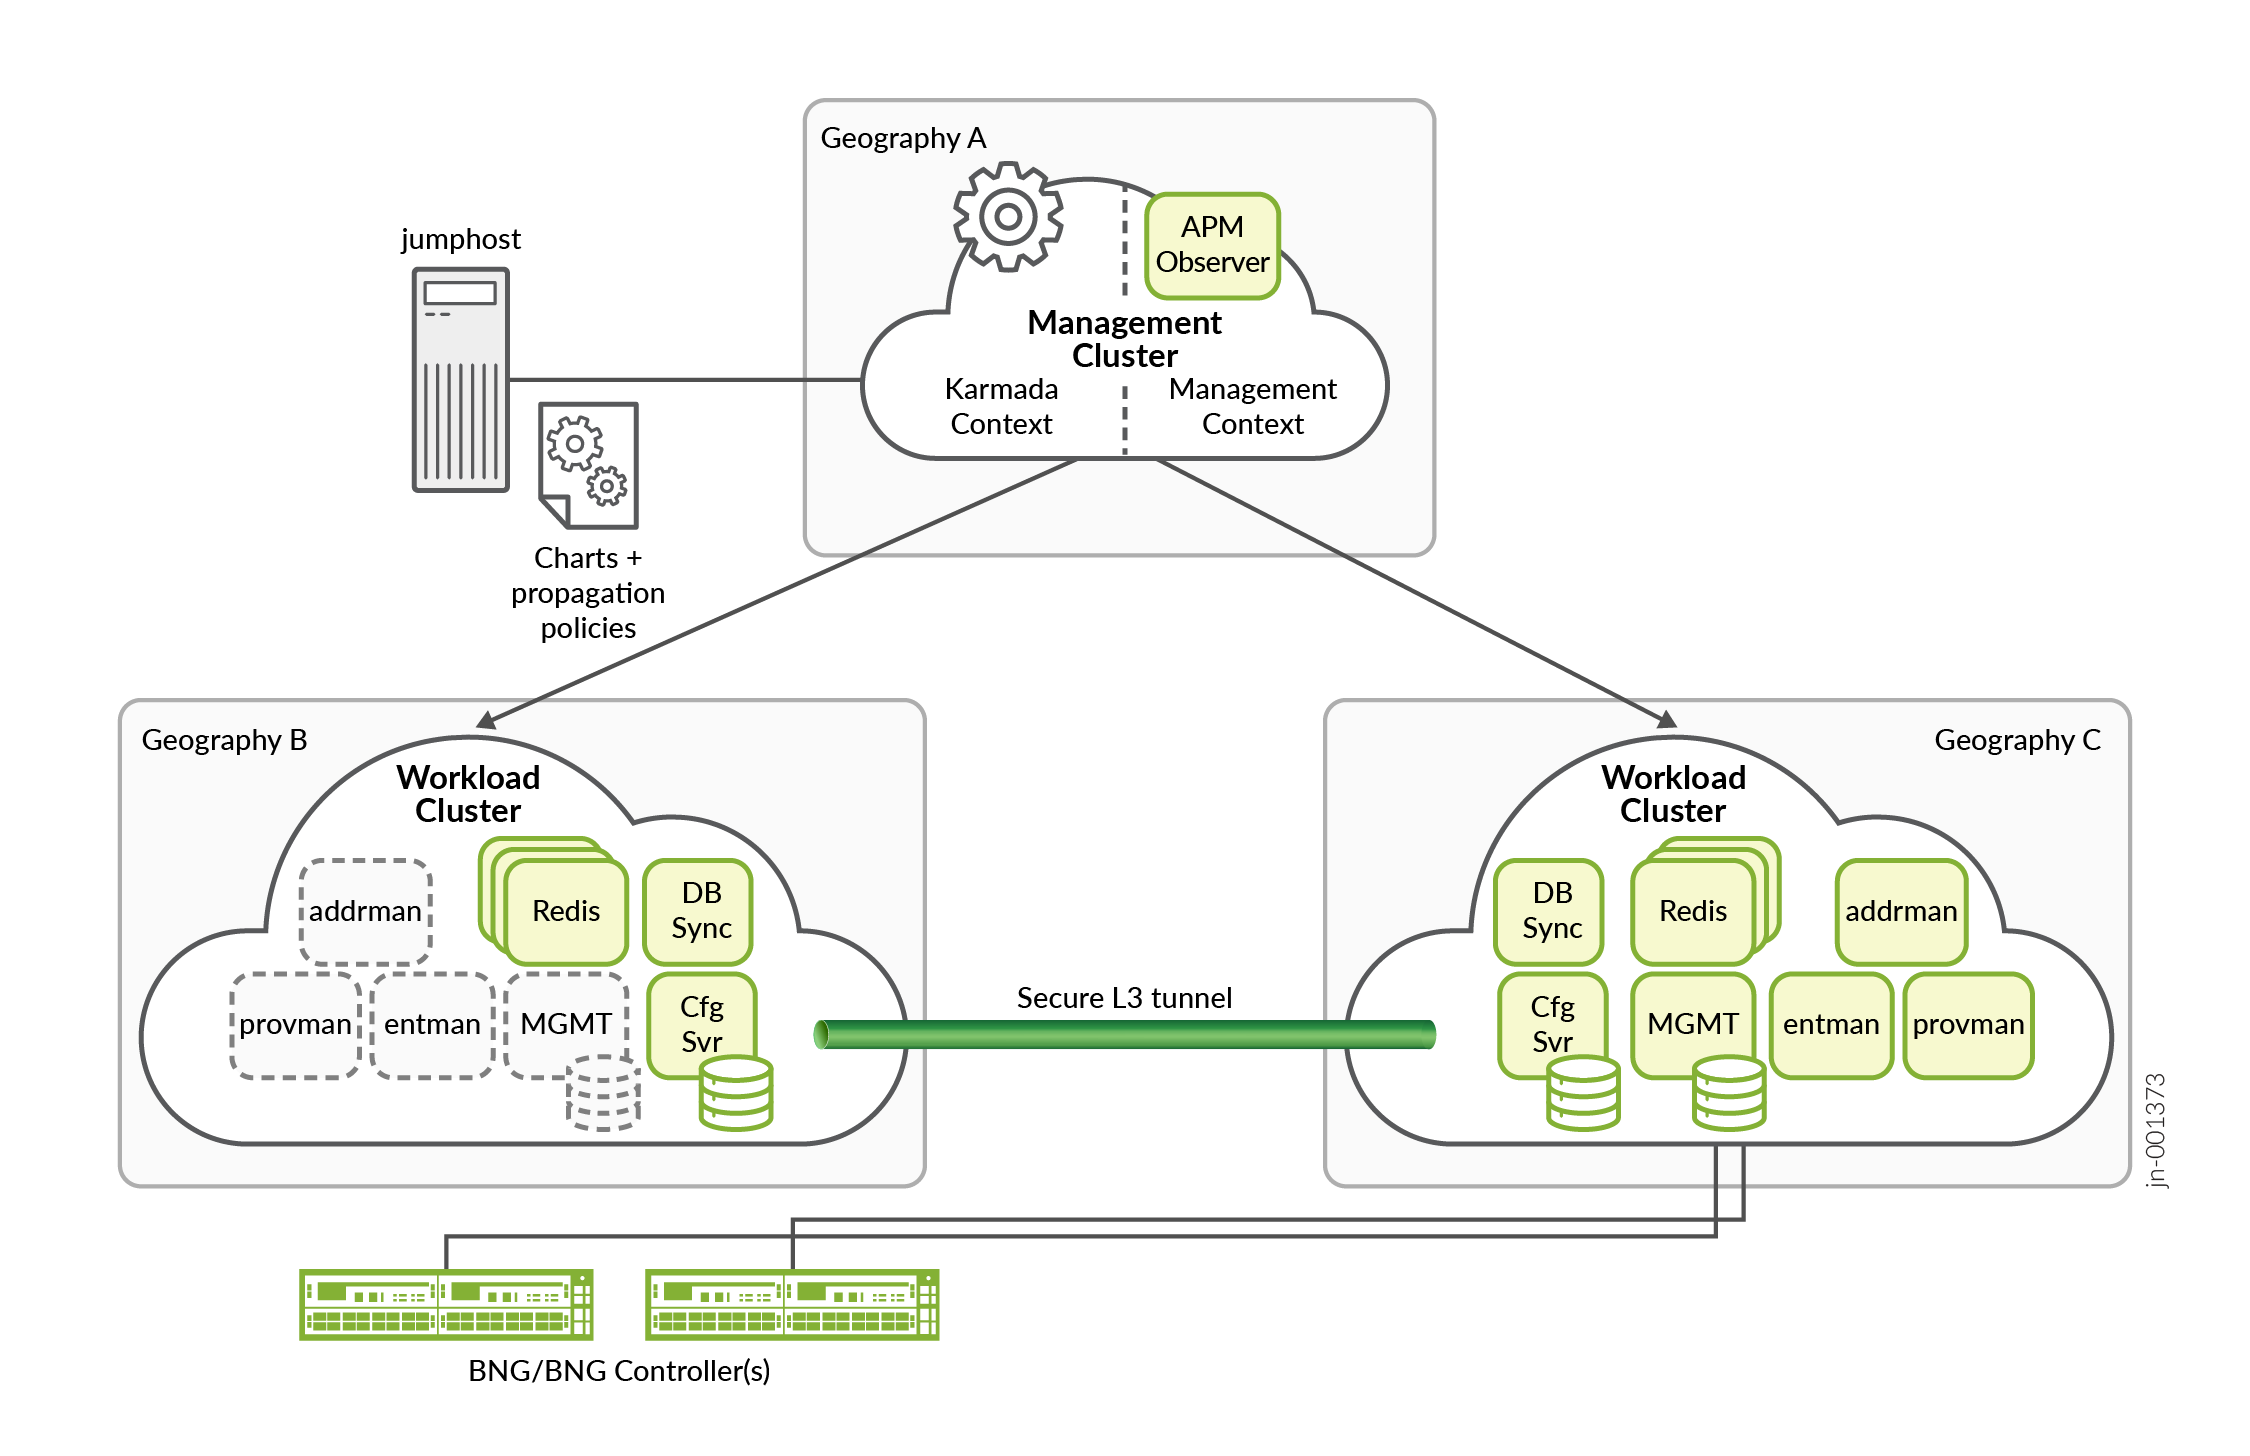
-
Start APM in a Multiple Geography Setup
Use this procedure to configure and to start APM in a multiple geography setup.