Help us improve your experience.

Let us know what you think.

Do you have time for a two-minute survey?


Step 2: Up and Running

Generate a Voucher Certificate

To onboard your device, you'll need to generate a voucher certificate through the Juniper Agile Licensing (JAL) portal. This voucher certificate validates that a device with a serial number belongs to the correct owner. You can generate a voucher certificate for one device or for multiple devices.

Generate a Voucher Certificate for One Device

Here's how to generate a voucher certificate for your network device using the JAL Portal.

  1. Open a Web browser and log in to JAL Portal.
  2. Click My Entitlements, find the S-ALL-S-DV-P SKU, and click Activate.
  3. On the Product Activation page, fill in the following details:
    1. Select the Software Version.
    2. Enter the Device Serial Number. This is a software serial number on the fulfillment document that was emailed to you after you purchased your Juniper software license. To find the device serial number, see Locating my Product Serial Number or Software Support Reference Number (SSRN).
    3. Select the Voucher Certificate expiration date.
    4. Enter the email address that will receive the confirmation email.
    5. Upload the Pinned Domain Certificate or select the previously uploaded Pinned Domain. To find the pinned domain certificate, see Generate a Root CA Certificate with CLI
    6. Read the agreement and select I Agree with Terms and Conditions.
    7. Click Activate.
  4. On the Activation Complete page, download or email the activation code using the Download and E-Mail options. Click I’m Done to activate the SKU.

    That's it! You have successfully onboarded your device. You can see the activated SKU in the My Activations section.

Generate Voucher Certificates for Multiple Devices

Here's how to generate voucher certificates for multiple network devices using the JAL Portal.

  1. Open a Web browser and log in to JAL Portal.
  2. Click Bulk Tool, and then do the following:
    1. Click Bulk License Activation Tool in the upper right corner.

    2. Click Download Excel File on the Bulk Voucher Certificate Entitlement Activation page to download the voucher certificate template file.

  3. Open the voucher certificate template file and enter the activation code, serial number, software version, and expiration date.
    1. To find the activation code, navigate to My Entitlements and find the S-ALL-S-DV-P SKU.
    2. Enter the Device Serial Number. This is a software serial number that was emailed to you when you purchased your Juniper software license. To find the device serial number, see Locating my Product Serial Number or Software Support Reference Number (SSRN)
    3. Choose a Date up to when you want the Secure ZTP to be active.
  4. Save the voucher certificate template.
  5. Upload the saved voucher certificate template file.
  6. Upload the Pinned Domain Certificate or select the previously uploaded Pinned Domain. To find the pinned domain certificate, see Generate a Root CA Certificate with CLI .
  7. Enter the email address you want to receive the confirmation email.
  8. Read the agreement and select I Agree with Terms and Conditions .
  9. Click Upload File.
  10. After the voucher certificate template file is uploaded, you'll receive two email messages:
    • The first email notifies you that the SKUs have been submitted for activation.

    • The second email confirms that the SKUs are activated. The activation code is included in the attached file.

  11. Your SKUs are now activated and are listed in the My Activations section.

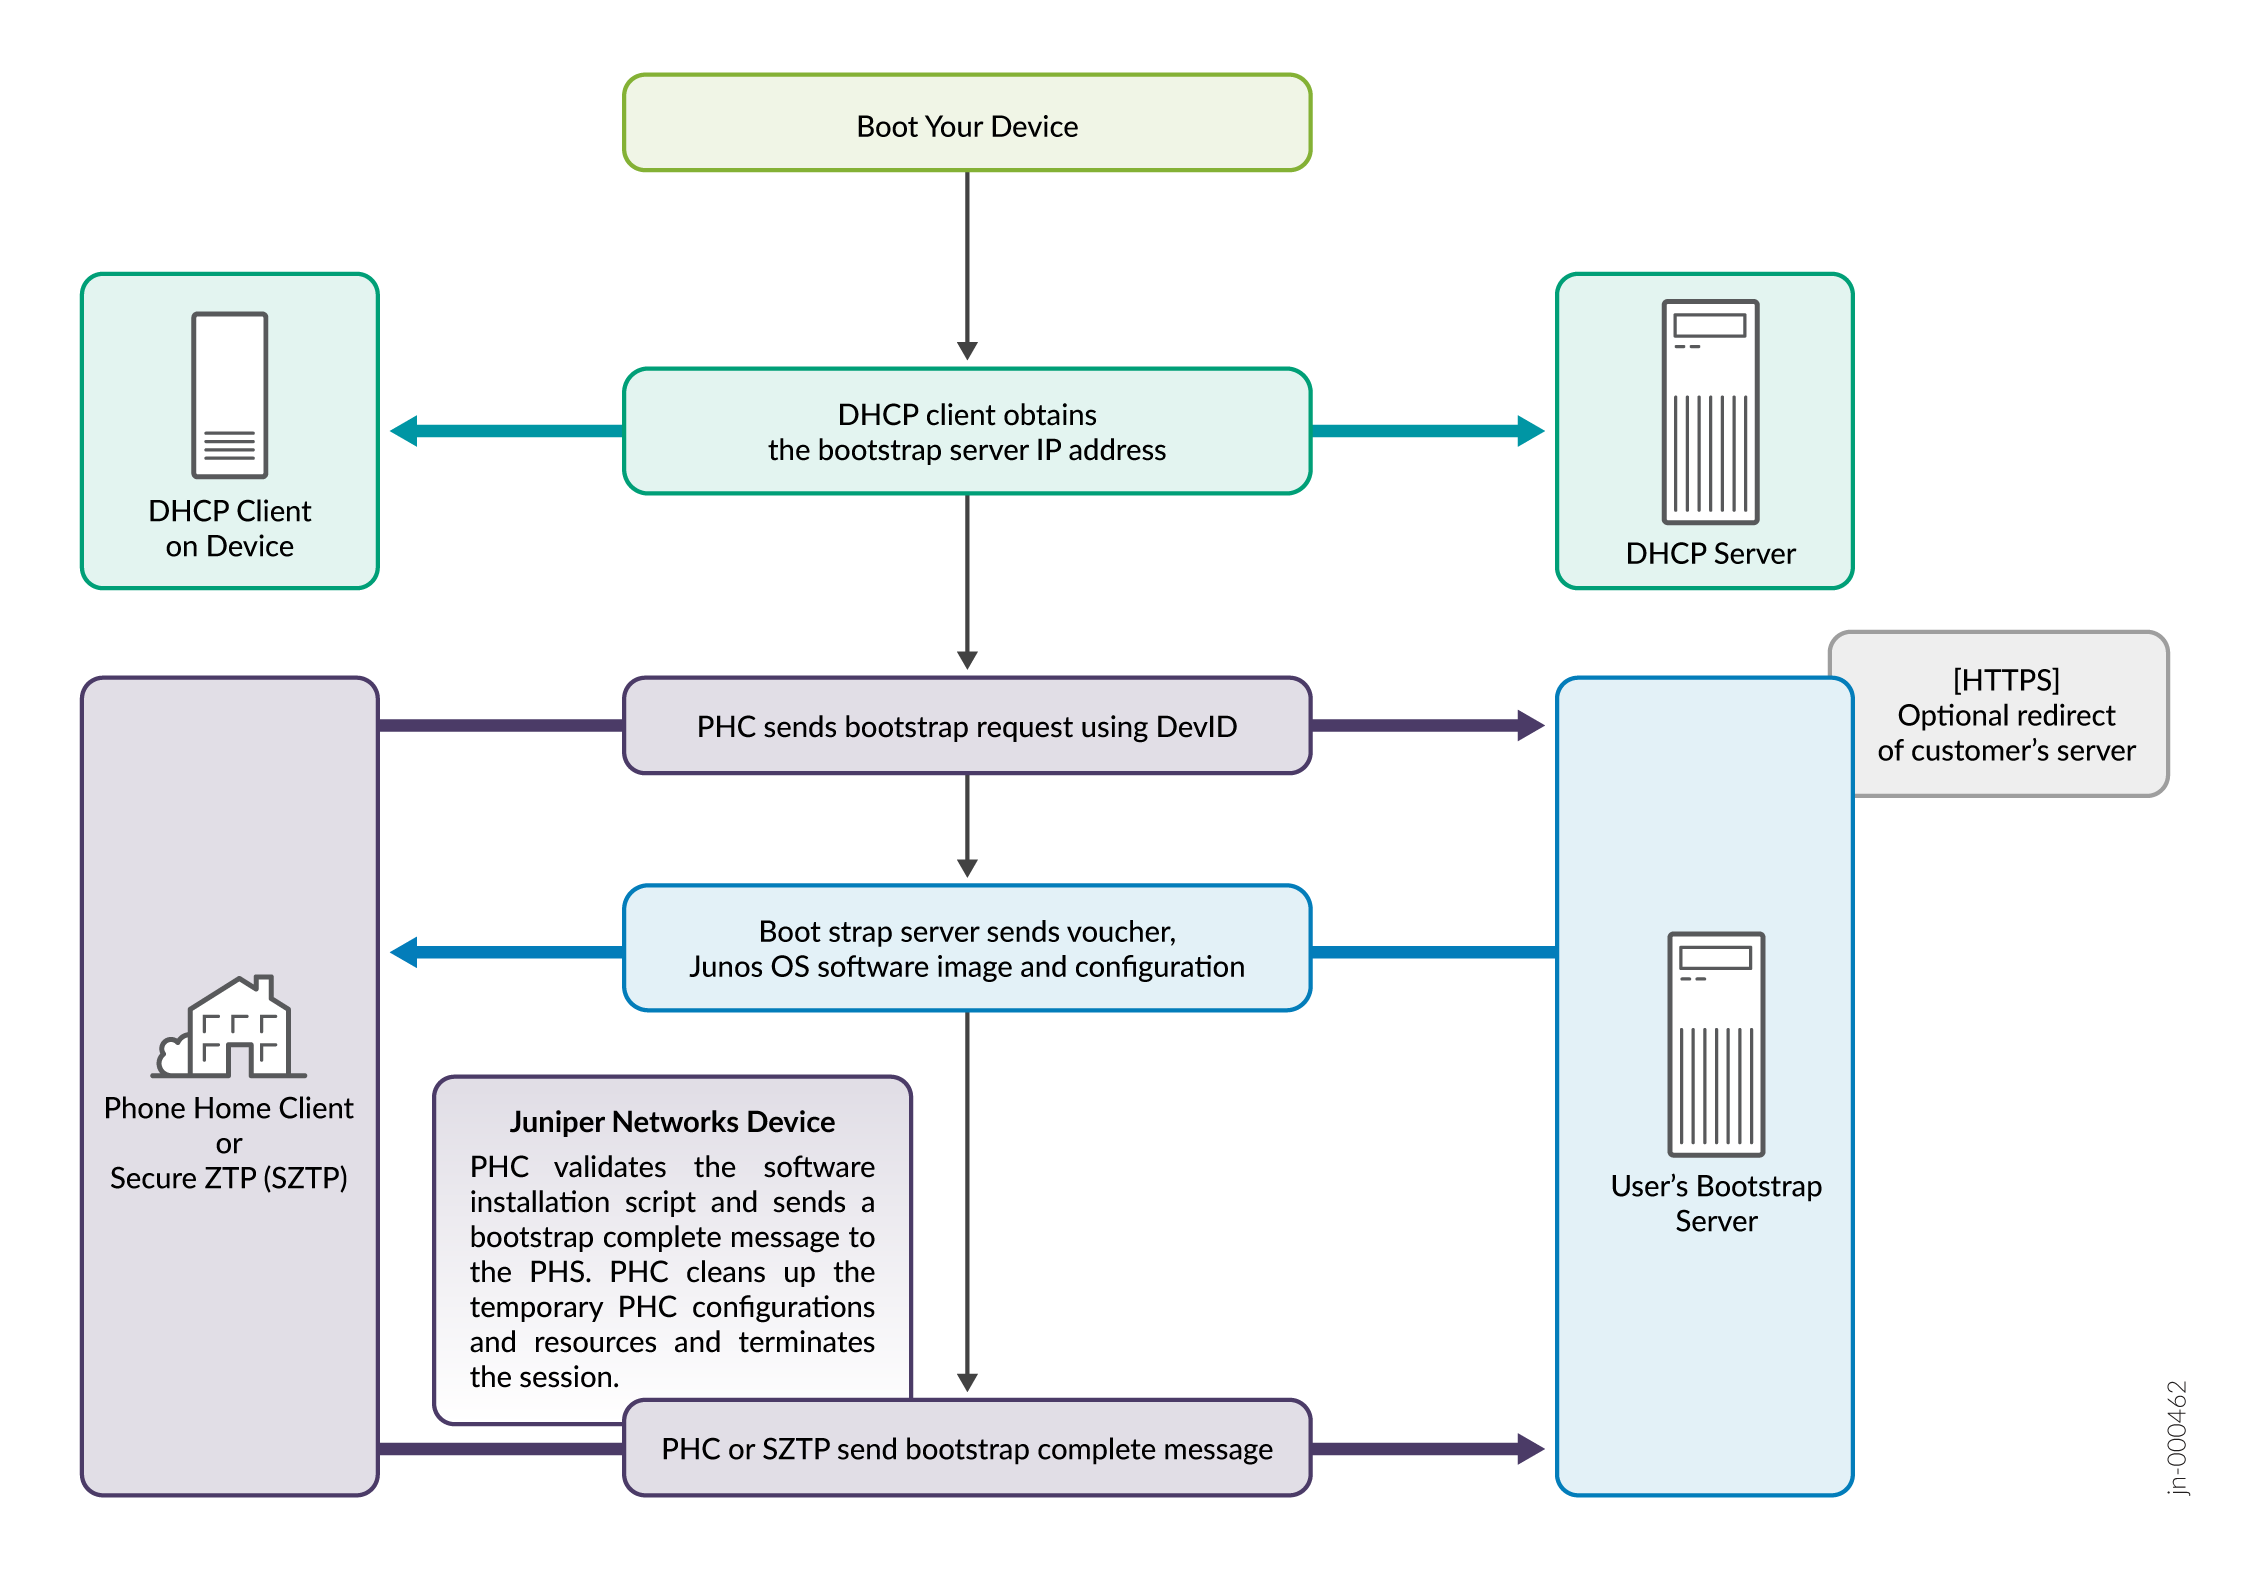
Workflow for Onboarding Devices with Secure ZTP

Here’s an overview of the steps for onboarding a factory-default device with Secure ZTP

  1. Boot the device in a factory-default state.

  2. Deploy your DHCP and DNS servers. Configure DCHP option 143 on your DHCP server so it can advertise the names of your redirect and bootstap servers.

  3. Deploy your redirect and bootstrap servers.

  4. Generate redirect and bootstrap information for each network device.

  5. Use the redirect and bootstrap information that the redirect and bootstrap servers provide to provision your network devices

  6. Acquire DevID trust anchors from Juniper Networks.

  7. Connect to DHCP:

    • The DHCP client sends a request to the DHCP server to obtain the bootstrap server information.

    • The DHCP server sends the bootstrap server IP address and requested information.

  8. Connect to PHC:

    • The phone-home client (PHC) on your device sends a bootstrap request to either the bootstrap server or DNS to obtain the IP address of the phone-home server. The PHC also requests the device's serial number and activation code of the server.

    • The bootstrap server responds and sends the IP address of the phone-home server as well as its owner certificate to the PHC.

    • If needed, the PHC requests for the Junos OS software image. The bootstrap server responds and sends the image and configuration to the PHC.

  9. Software Installation:

    • Your network device reboots after the software image installation completes.

    • The PHC runs pre-configuration scripts, commits the configuration, runs post-configuration scripts, sends a bootstrap complete message to the bootstrap server, cleans up the PHC related configurations and resources, and terminates the session.