Help us improve your experience.

Let us know what you think.

Do you have time for a two-minute survey?


Step 2: Up and Running

Create Organization Account and Add Devices

Before You Begin

The following ports must be opened:

  • Inbound port 443 for users’ connection to Web is associated to the UI virtual IP address.

  • Outbound port 25 for outbound to configured mail server is associated to the Management IP address.

  • Inbound port 7804 from all managed devices is associated to the device connection virtual IP address.

  • Outbound port 443 for signature download URL is associated to the Management IP address.

  • Inbound port 6514 for inbound connection for traffic log is associated to the log collector virtual IP address.

  1. Enter the UI virtual IP address or FQDN (domain name) in a browser to access the Juniper Security Director login page. Follow on-screen instructions to create and activate your account. For details, see Log In to the Juniper Security Director Web UI.
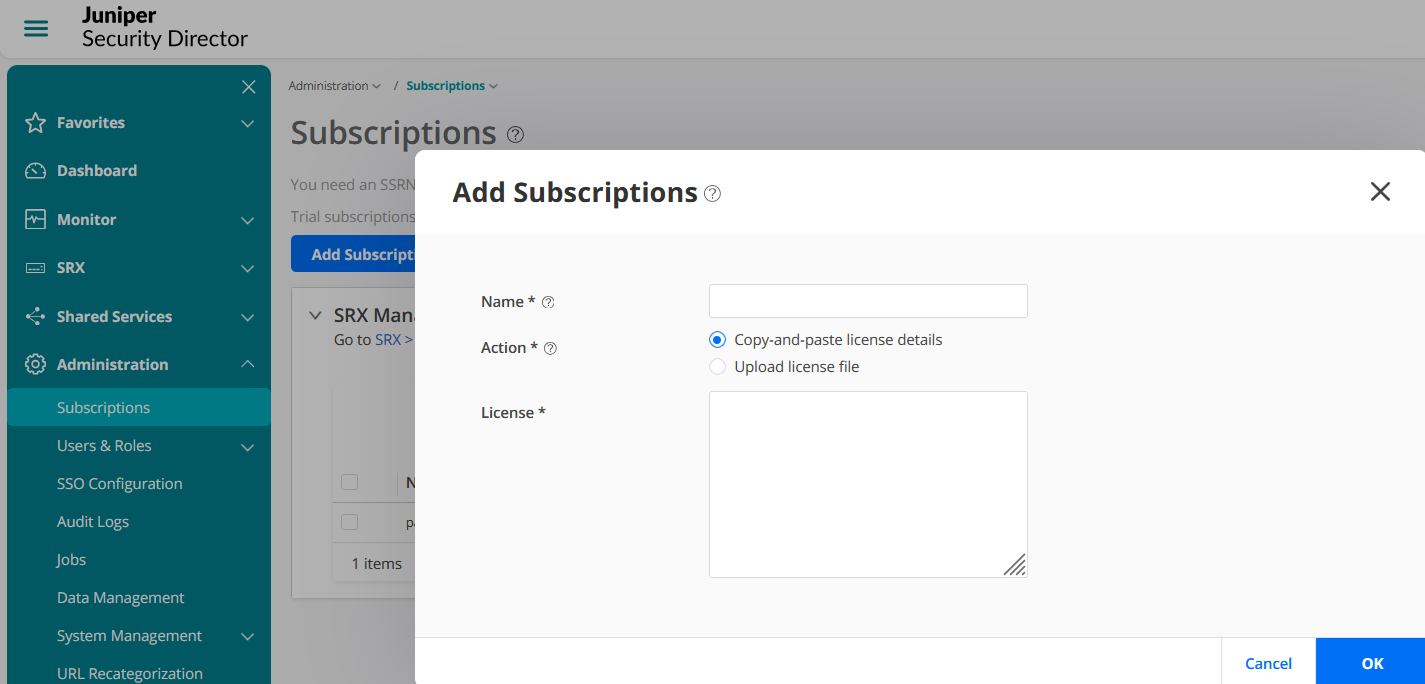
  2. Login to Juniper Security Director, click Add Subscriptions. You can also use a 60-day trial subscription that is available by default. Juniper Security Director interface showing Add Subscriptions pop-up with fields for subscription name and license details. Options to paste or upload license. Sidebar includes Dashboard, Monitor, SRX, Shared Services, Administration.
  3. Enter a name for the subscription and select either of the following options:
    1. Copy-and-paste license details—Copy license key and paste in the License field.
    2. Upload license file—Click Browse and navigate to the license.txt file. Click Open. Please note you can upload only .txt file.
  4. Click OK. You can view your added subscriptions from Subscriptions > SRX Management Subscriptions. If you do not see your subscriptions, go to Administration > Jobs page to view the status.
  5. Select SRX > Device Management > Devices, and click the + icon to add your devices.
    Note:

    To know about supported devices, see Juniper Security Director Supported Firewalls.

  6. Click Adopt SRX Devices and select one of the following:
    • SRX Devices

    • SRX Clusters

    • SRX Multinode High Availability (MNHA) Pairs

    Screenshot of Juniper Security Director interface for adding SRX devices, showing type selection, instructions, and input field to specify the number of devices.
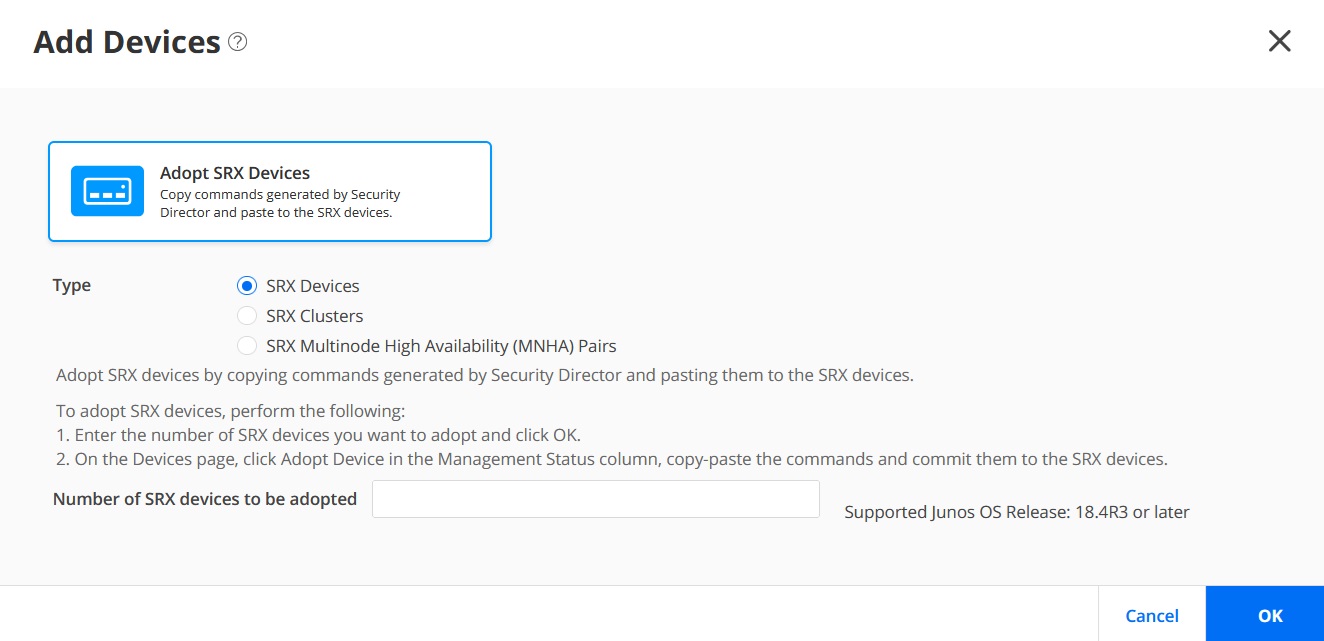
Follow the on-screen instructions to continue. For details, see Add Devices.
  7. Copy and paste commands from the devices page to the SRX Series Firewall or the primary cluster device console. Then commit the changes. It will take few seconds for device discovery. After device discovery is successful, verify the following fields on the Devices page:
    • Management Status changes from Discovery in progress to Up.

    • Inventory Status and Device Config Status changes from Out of Sync to In Sync.

    Note:

    In case of discovery failure, go to the Administration > Jobs page and view the status.

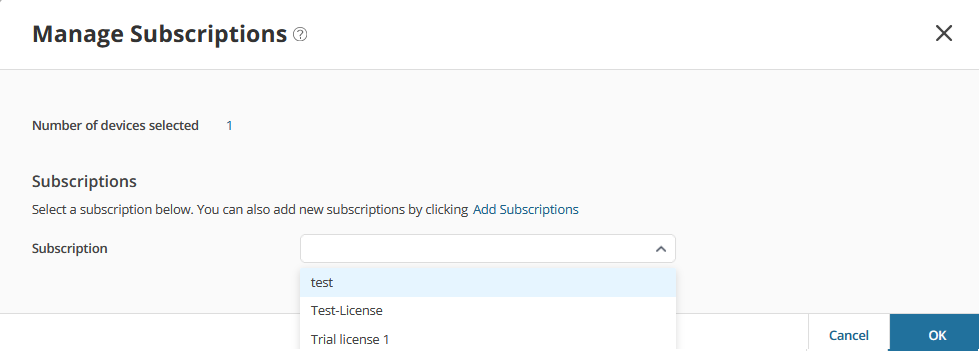
Associate Devices with Your Juniper Security Director Subscription

  1. Go to SRX > Device Management > Devices select the device, and click Manage Subscriptions. Follow the on-screen instructions.Manage Subscriptions interface showing device subscription options. One device selected with subscription paid1 S-SD-SRX-S1-OP-5 expiring 9 December 2029. Usage 0 of 10 devices. Options to add subscriptions and buttons to cancel or confirm with OK.
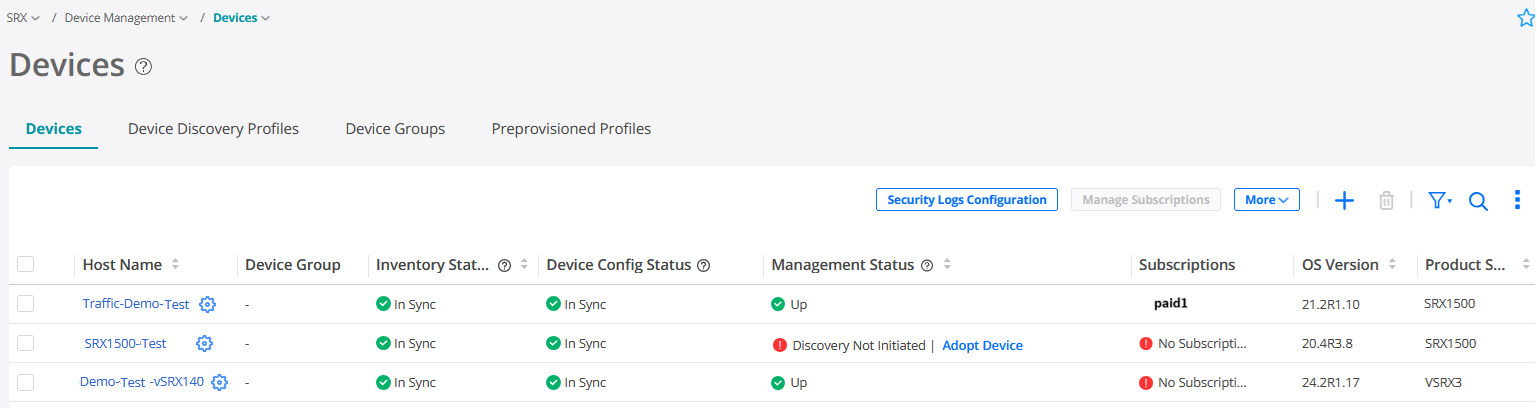
  2. Verify that Subscriptions column displays the subscription name for your device. Congratulations! You have successfully associated your device to Juniper Security Director. Device management interface showing three devices: Traffic-Demo-Test, SRX1500-Test, Demo-Test -vSRX140. All devices are in sync. SRX1500-Test management status is Discovery Not Initiated, option to Adopt Device. Traffic-Demo-Test has subscription paid1.

Verify Configuration on Adopted Devices

Verify your device configurations in Juniper Security Director.
  • Go to SRX > Security Policy > SRX Policy and verify the imported security policies.

  • Go to SRX > NAT Policy > NAT and verify the imported NAT policies.

  • Go to SRX > Device Management > Devices, click Security Logs Configuration, and verify the security log configurations.

If you've set up security policy, NAT, IPSec VPN, and logs on the device, these configurations will be imported into Juniper Security Director.