Step 2: Up and Running
Access the CLI
You configure Junos cRPD using Junos CLI commands for routing services. Here's how to access the Junos CLI:
- Log in to the Junos cRPD container.
root@crpd:~# docker exec -it crpd01 cli
- Check the Junos OS
version.
root@crpd01> show version
Hostname: crpd01
Model: cRPD
Junos: 24.2R1.14
cRPD package version : 24.2R1.14 built by builder on 2024-06-22 01:04:40 UTC
- Enter configuration mode.
root@crpd01> configure
Entering configuration mode
- Add a password to the root administration user account. Enter a plain text
password.
[edit]
root@crpd01# set system root-authentication plain-text-password
New password:
Retype new password:
- Commit the configuration.
[edit]
root@crpd01# commit
commit complete
root@crpd01# exit
Exiting configuration mode

root@crpd01> exit
root@crpd:~#
- Continue customizing the configuration, if required.
Interconnect cRPD Instances
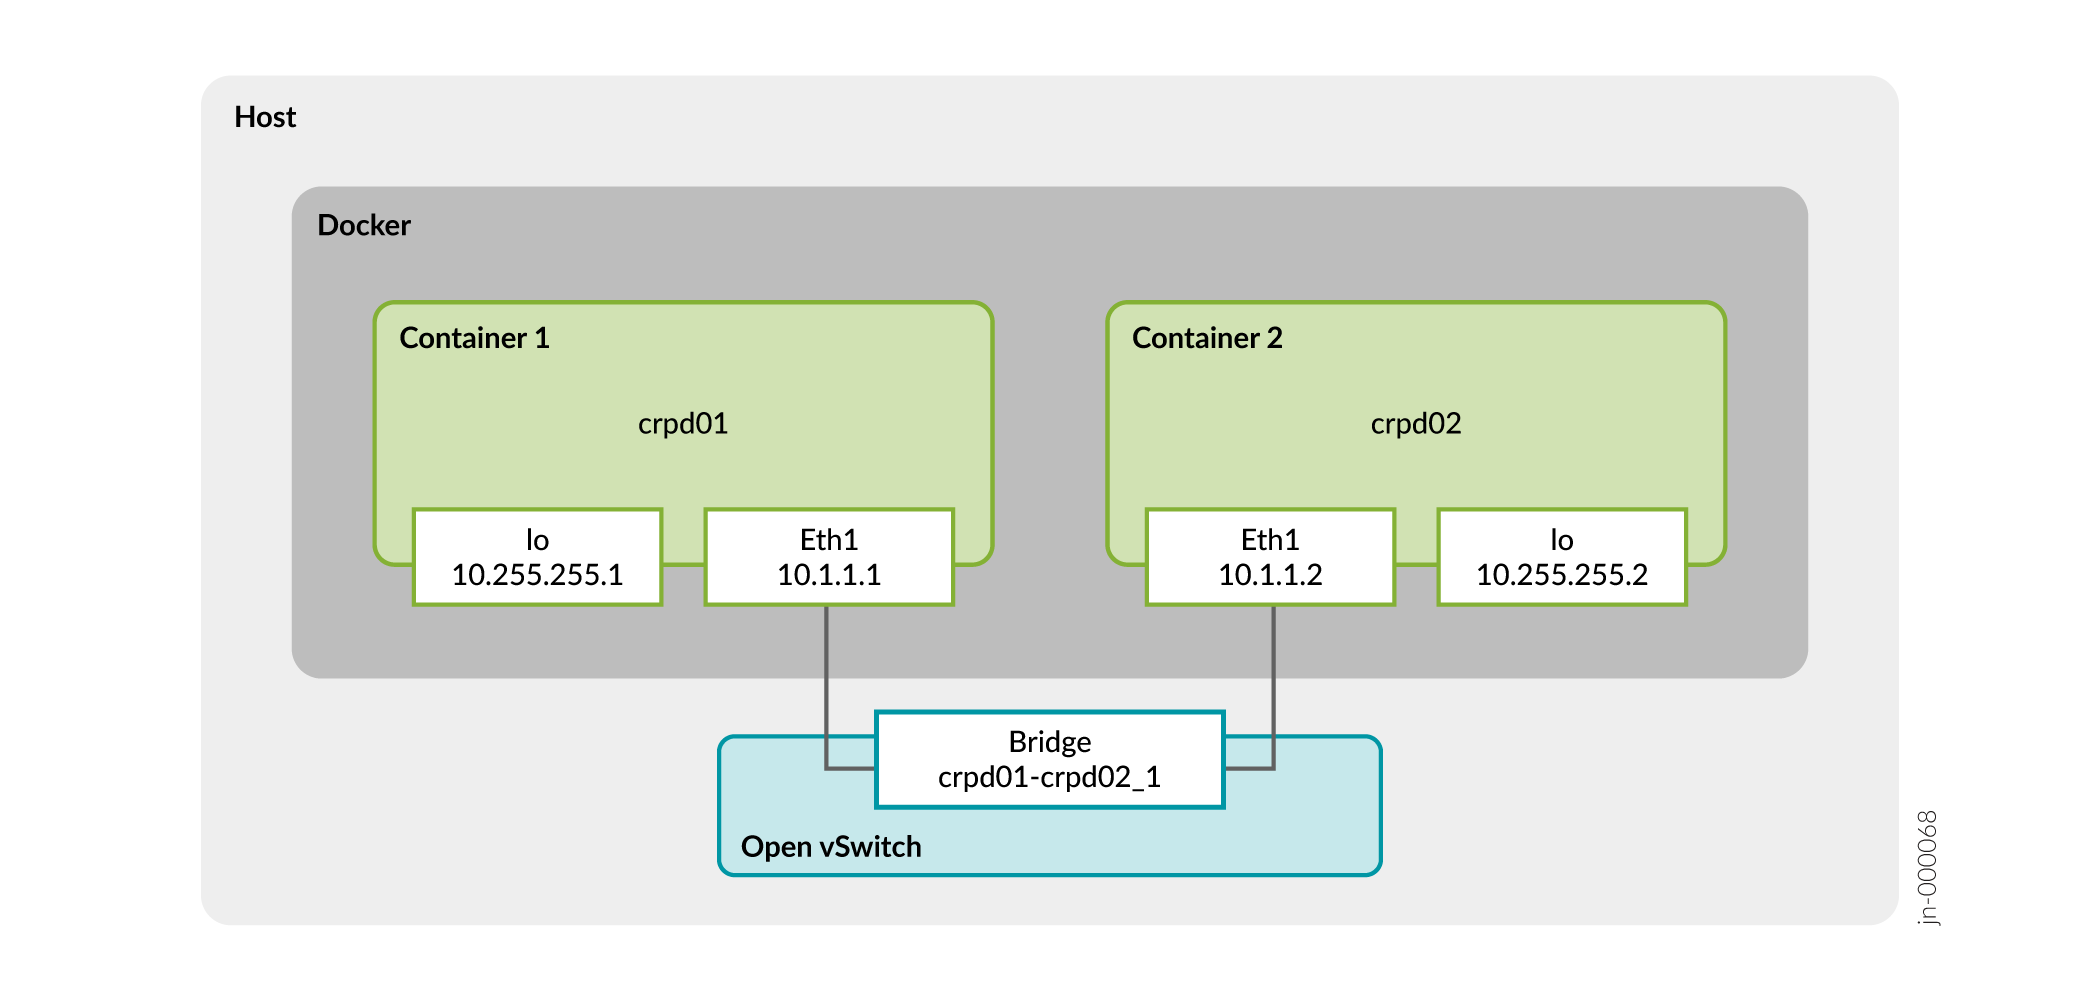
Now let's learn how to build point-to-point links between two Junos cRPD containers.
In this example, we use two containers, crpd01 and crpd02, and connect them using eth1 interfaces that are connected to an OpenVswitch (OVS) bridge on the host. We're using an OVS bridge for Docker networking because it supports multiple host networking and provides secure communication. Refer to the following illustration:
- Install the OVS switch
utility.
root@crpd:~# apt install openvswitch-switch
Reading package lists... Done
Building dependency tree
Reading state information... Done
The following additional packages will be installed:
  libunbound8 openvswitch-common python3-openvswitch python3-sortedcontainers
Suggested packages:
  openvswitch-doc python-sortedcontainers-doc
The following NEW packages will be installed:
  libunbound8 openvswitch-common openvswitch-switch python3-openvswitch python3-sortedcontainers
0 upgraded, 5 newly installed, 0 to remove and 58 not upgraded.
Need to get 3,167 kB of archives.
After this operation, 14.2 MB of additional disk space will be used.
Do you want to continue? [Y/n] y
Get:1 http://us.archive.ubuntu.com/ubuntu focal-updates/main amd64 libunbound8 amd64 1.9.4-2ubuntu1.6 [349 kB]
Get:2 http://us.archive.ubuntu.com/ubuntu focal/main amd64 python3-sortedcontainers all 2.1.0-2 [27.3 kB]
Get:3 http://us.archive.ubuntu.com/ubuntu focal-updates/main amd64 openvswitch-common amd64 2.13.8-0ubuntu1.4 [1,156 kB]
Get:4 http://us.archive.ubuntu.com/ubuntu focal-updates/main amd64 python3-openvswitch all 2.13.8-0ubuntu1.4 [94.9 kB]
Get:5 http://us.archive.ubuntu.com/ubuntu focal-updates/main amd64 openvswitch-switch amd64 2.13.8-0ubuntu1.4 [1,539 kB]
Fetched 3,167 kB in 1s (3,989 kB/s)
Selecting previously unselected package libunbound8:amd64.
(Reading database ... 72451 files and directories currently installed.)
Preparing to unpack .../libunbound8_1.9.4-2ubuntu1.6_amd64.deb ...
- Create another Junos cRPD container called crpd02.
root@crpd:~# docker volume create crpd02-config
crpd02-config
root@crpd:~# docker volume create crpd02-varlog
crpd02-varlog
root@crpd:~# docker run --rm --detach --name crpd02 -h crpd02 --net=none --privileged -v crpd02-config:/config -v crpd02-varlog:/var/log -it crpd:24.2R1.14
c000db8998b708b6ff04581d53404d3164a1137c99c9adbe4c34ce3ea3f74671
Verify the newly created container details.
root@crpd:~# docker ps
CONTAINER ID   IMAGE            COMMAND                 CREATED          STATUS          PORTS     NAMES
c000db8998b7   crpd:24.2R1.14   "/sbin/runit-init.sh"   20 seconds ago   Up 20 seconds             crpd02
710b3b6ca824   crpd:24.2R1.14   "/sbin/runit-init.sh"   6 minutes ago    Up 6 minutes              crpd01
- Log in to the Junos cRPD container.
root@crpd:~# docker exec -it crpd02 cli
root@crpd02> configure
Entering configuration mode
- Add a password to the root administration user account. Enter a plain text
password.
[edit]
root@crpd02# set system root-authentication plain-text-password
New password:
Retype new password:
- Commit the configuration.
[edit]
root@crpd02# commit
commit complete
root@crpd02# exit
Exiting configuration mode

root@crpd01> exit
root@crpd:~#
- Configure a new
bridge named
crpd01-crpd02_1
and add eth1 interface to crpd01 and crpd02
containers.
root@crpd:~# ovs-vsctl add-br crpd01-crpd02_1
root@crpd:~# ovs-docker add-port crpd01-crpd02_1 eth1 crpd01
root@crpd:~# ovs-docker add-port crpd01-crpd02_1 eth1 crpd02
Log in to the crpd01 container and verify the interface configuration.
root@crpd:~# docker exec -it crpd01 bash ===> Containerized Routing Protocols Daemon (CRPD) Copyright (C) 2020-2023, Juniper Networks, Inc. All rights reserved. <=== root@crpd01:/# ifconfig eth1 eth1: flags=4163<UP,BROADCAST,RUNNING,MULTICAST> mtu 1500 inet6 fe80::300a:aeff:fe25:2eb2 prefixlen 64 scopeid 0x20<link> ether 32:0a:ae:25:2e:b2 txqueuelen 1000 (Ethernet) RX packets 15 bytes 1402 (1.4 KB) RX errors 0 dropped 0 overruns 0 frame 0 TX packets 7 bytes 746 (746.0 B) TX errors 0 dropped 0 overruns 0 carrier 0 collisions 0 root@crpd01:/# exit exit- Log in to the crpd02 container and verify the interface
configuration.
root@crpd:~# docker exec -it crpd02 bash ===> Containerized Routing Protocols Daemon (CRPD) Copyright (C) 2020-2023, Juniper Networks, Inc. All rights reserved. <=== root@crpd02:/# ifconfig eth1 eth1: flags=4163<UP,BROADCAST,RUNNING,MULTICAST> mtu 1500 inet6 fe80::48d4:b1ff:fe30:9694 prefixlen 64 scopeid 0x20<link> ether 4a:d4:b1:30:96:94 txqueuelen 1000 (Ethernet) RX packets 8 bytes 656 (656.0 B) RX errors 0 dropped 0 overruns 0 frame 0 TX packets 7 bytes 746 (746.0 B) TX errors 0 dropped 0 overruns 0 carrier 0 collisions 0 root@crpd02:/# exit exit root@crpd:~# - Configure
IP addresses to the eth1
interfaces.
root@crpd:~# docker exec -d crpd01 ifconfig eth1 10.1.1.1/24
root@crpd:~# docker exec -d crpd02 ifconfig eth1 10.1.1.2/24
Log in to the Junos cRPD container crpd01.
root@crpd:~# docker exec -it crpd01 bash ===> Containerized Routing Protocols Daemon (CRPD) Copyright (C) 2020-2023, Juniper Networks, Inc. All rights reserved. <=== root@crpd01:/# ifconfig eth1 eth1: flags=4163<UP,BROADCAST,RUNNING,MULTICAST> mtu 1500 inet 10.1.1.1 netmask 255.255.255.0 broadcast 10.1.1.255 inet6 fe80::300a:aeff:fe25:2eb2 prefixlen 64 scopeid 0x20<link> ether 32:0a:ae:25:2e:b2 txqueuelen 1000 (Ethernet) RX packets 17 bytes 1542 (1.5 KB) RX errors 0 dropped 0 overruns 0 frame 0 TX packets 7 bytes 746 (746.0 B) TX errors 0 dropped 0 overruns 0 carrier 0 collisions 0- Send a ping to the crpd02 container to confirm connectivity between the two containers.
Use the IP address of eth1 of crpd02 (10.1.1.2) to ping the
container.
root@crpd01:/# ping 10.1.1.2 -c 2
PING 10.1.1.2 (10.1.1.2) 56(84) bytes of data.
64 bytes from 10.1.1.2: icmp_seq=1 ttl=64 time=0.323 ms
64 bytes from 10.1.1.2: icmp_seq=2 ttl=64 time=0.042 ms

--- 10.1.1.2 ping statistics ---
2 packets transmitted, 2 received, 0% packet loss, time 1018ms
rtt min/avg/max/mdev = 0.042/0.182/0.323/0.141 ms
root@crpd01:/# exit
exit
The output confirms that the two containers can communicate with each other.
Log in to the Junos cRPD container crpd02.
root@crpd:~# docker exec -it crpd02 bash ===> Containerized Routing Protocols Daemon (CRPD) Copyright (C) 2020-2023, Juniper Networks, Inc. All rights reserved. <=== root@crpd02:/# ifconfig eth1 eth1: flags=4163<UP,BROADCAST,RUNNING,MULTICAST> mtu 1500 inet 10.1.1.2 netmask 255.255.255.0 broadcast 10.1.1.255 inet6 fe80::48d4:b1ff:fe30:9694 prefixlen 64 scopeid 0x20<link> ether 4a:d4:b1:30:96:94 txqueuelen 1000 (Ethernet) RX packets 16 bytes 1244 (1.2 KB) RX errors 0 dropped 0 overruns 0 frame 0 TX packets 12 bytes 1124 (1.1 KB) TX errors 0 dropped 0 overruns 0 carrier 0 collisions 0- Send a ping to the crpd01 container to confirm connectivity between the two containers.
Use the IP address of eth1 of crpd01 (10.1.1.1) to ping the
container.
root@crpd02:/# ping 10.1.1.1
PING 10.1.1.1 (10.1.1.1) 56(84) bytes of data.
64 bytes from 10.1.1.1: icmp_seq=1 ttl=64 time=0.509 ms
64 bytes from 10.1.1.1: icmp_seq=2 ttl=64 time=0.074 ms
64 bytes from 10.1.1.1: icmp_seq=3 ttl=64 time=0.074 ms
^C
--- 10.1.1.1 ping statistics ---
3 packets transmitted, 3 received, 0% packet loss, time 2048ms
rtt min/avg/max/mdev = 0.074/0.219/0.509/0.205 ms
The output confirms that the two containers can communicate with each other.
Configure Open Shortest Path First (OSPF)
Now you have two containers, crpd01 and crpd02, that are connected and communicating. The next step is to establish neighbor adjacencies for the two containers. OSPF-enabled routers must form adjacencies with their neighbor before they can share information with that neighbor.
- Configure OSPF on the crpd01 container.
[edit] root@crpd01# show policy-options policy-statement adv { term 1 { from { route-filter 10.10.10.0/24 exact; } then accept; } } [edit] root@crpd01# show protocols ospf { area 0.0.0.0 { interface eth1; interface lo0.0; } export adv; } [edit] root@crpd01# show routing-options router-id 10.255.255.1; static { route 10.10.10.0/24 reject; } - Commit the configuration.
[edit]
root@crpd01# commit
commit complete
- Repeat steps 1 and 2 to configure OSPF on the crpd02
container.
root@crpd02# show policy-options policy-statement adv { term 1 { from { route-filter 10.20.20.0/24 exact; } then accept; } } [edit] root@crpd02# show routing-options router-id 10.255.255.2; static { route 10.20.20.0/24 reject; } [edit] root@crpd02# show protocols ospf area 0.0.0.0 { interface eth1; interface lo0.0; } export adv; - Use show commands to verify OSPF neighbors that have an immediate adjacency.
root@crpd01> show ospf neighbor

Address          Interface              State           ID               Pri  Dead
10.1.1.2         eth1                   Full            10.255.255.2     128    38
root@crpd01> show ospf route
Topology default Route Table:

Prefix             Path  Route      NH       Metric NextHop       Nexthop
                   Type  Type       Type            Interface     Address/LSP
10.255.255.2       Intra AS BR      IP            1 eth1          10.1.1.2
10.1.1.0/24        Intra Network    IP            1 eth1
10.20.20.0/24      Ext2  Network    IP            0 eth1          10.1.1.2
10.255.255.1/32    Intra Network    IP            0 lo0.0
10.255.255.2/32    Intra Network    IP            1 eth1          10.1.1.2
The output shows the container's own loopback address and the loopback addresses of any containers which it is immediately adjacent to. The output confirms that the Junos cRPD has established an OSPF neighbor relationship and has learned their addresses and interfaces.
View Junos cRPD Core Files
When a core file is generated, you can find the output in the /var/crash
folder. The generated core files are stored on the system that is hosting the Docker
containers.
- Change to the directory where crash files are stored.
root@linux-host:~# cd /var/crash
- List the crash files.
root@linux-host:/var/crash#
 ls -l

total 32
-rw-r----- 1 root root 29304 Jul 14 15:14 _usr_bin_unattended-upgrade.0.crash
- Identify the location of the core files.
root@linux-host:/var/crash# sysctl kernel.core_pattern
kernel.core_pattern = |/bin/bash -c "$@" -- eval /bin/gzip > /var/crash/%h.%e.core.%t-%p-%u.gz