
Fast Track to Rack Installation and Power
This procedure guides you through the simplest steps to install the SRX400 Firewalls on a desk or other level surface. The procedure also includes the steps to mount each firewall in a two-post rack and connect it to power. Have more complex installation needs? See Install the SRX400 Firewalls.

Install the SRX400 Firewalls
Before you install, review the following:
You can mount SRX400 firewalls in the following ways:
On a desk or any other level surface using rubber feet.
In a two-post rack or cabinet using the SRX400-RMK rack-mount kit (ordered separately).
We’ll walk you through the steps on how to mount the firewall on a desk, level surface, or two-post rack.
Mount an SRX400 on a Desk or Other Level Surface
Ensure that you have the following parts and tools available:
-
Four rubber feet to stabilize the chassis on a desk or other level surface (provided)
-
One AC power adapter.
All the SRX400 models can be mounted on a desk or other level surface using the rubber feet.
To mount an SRX400 on a desk or other level surface:
Place the desk in its permanent location, allowing adequate clearance for airflow and maintenance, and secure it to the building structure.
Remove the firewall from the shipping carton—see Unpack the SRX400.
Turn the chassis upside down on the desk or the level surface where you intend to mount the firewall.
Attach the rubber feet to the bottom of the chassis.
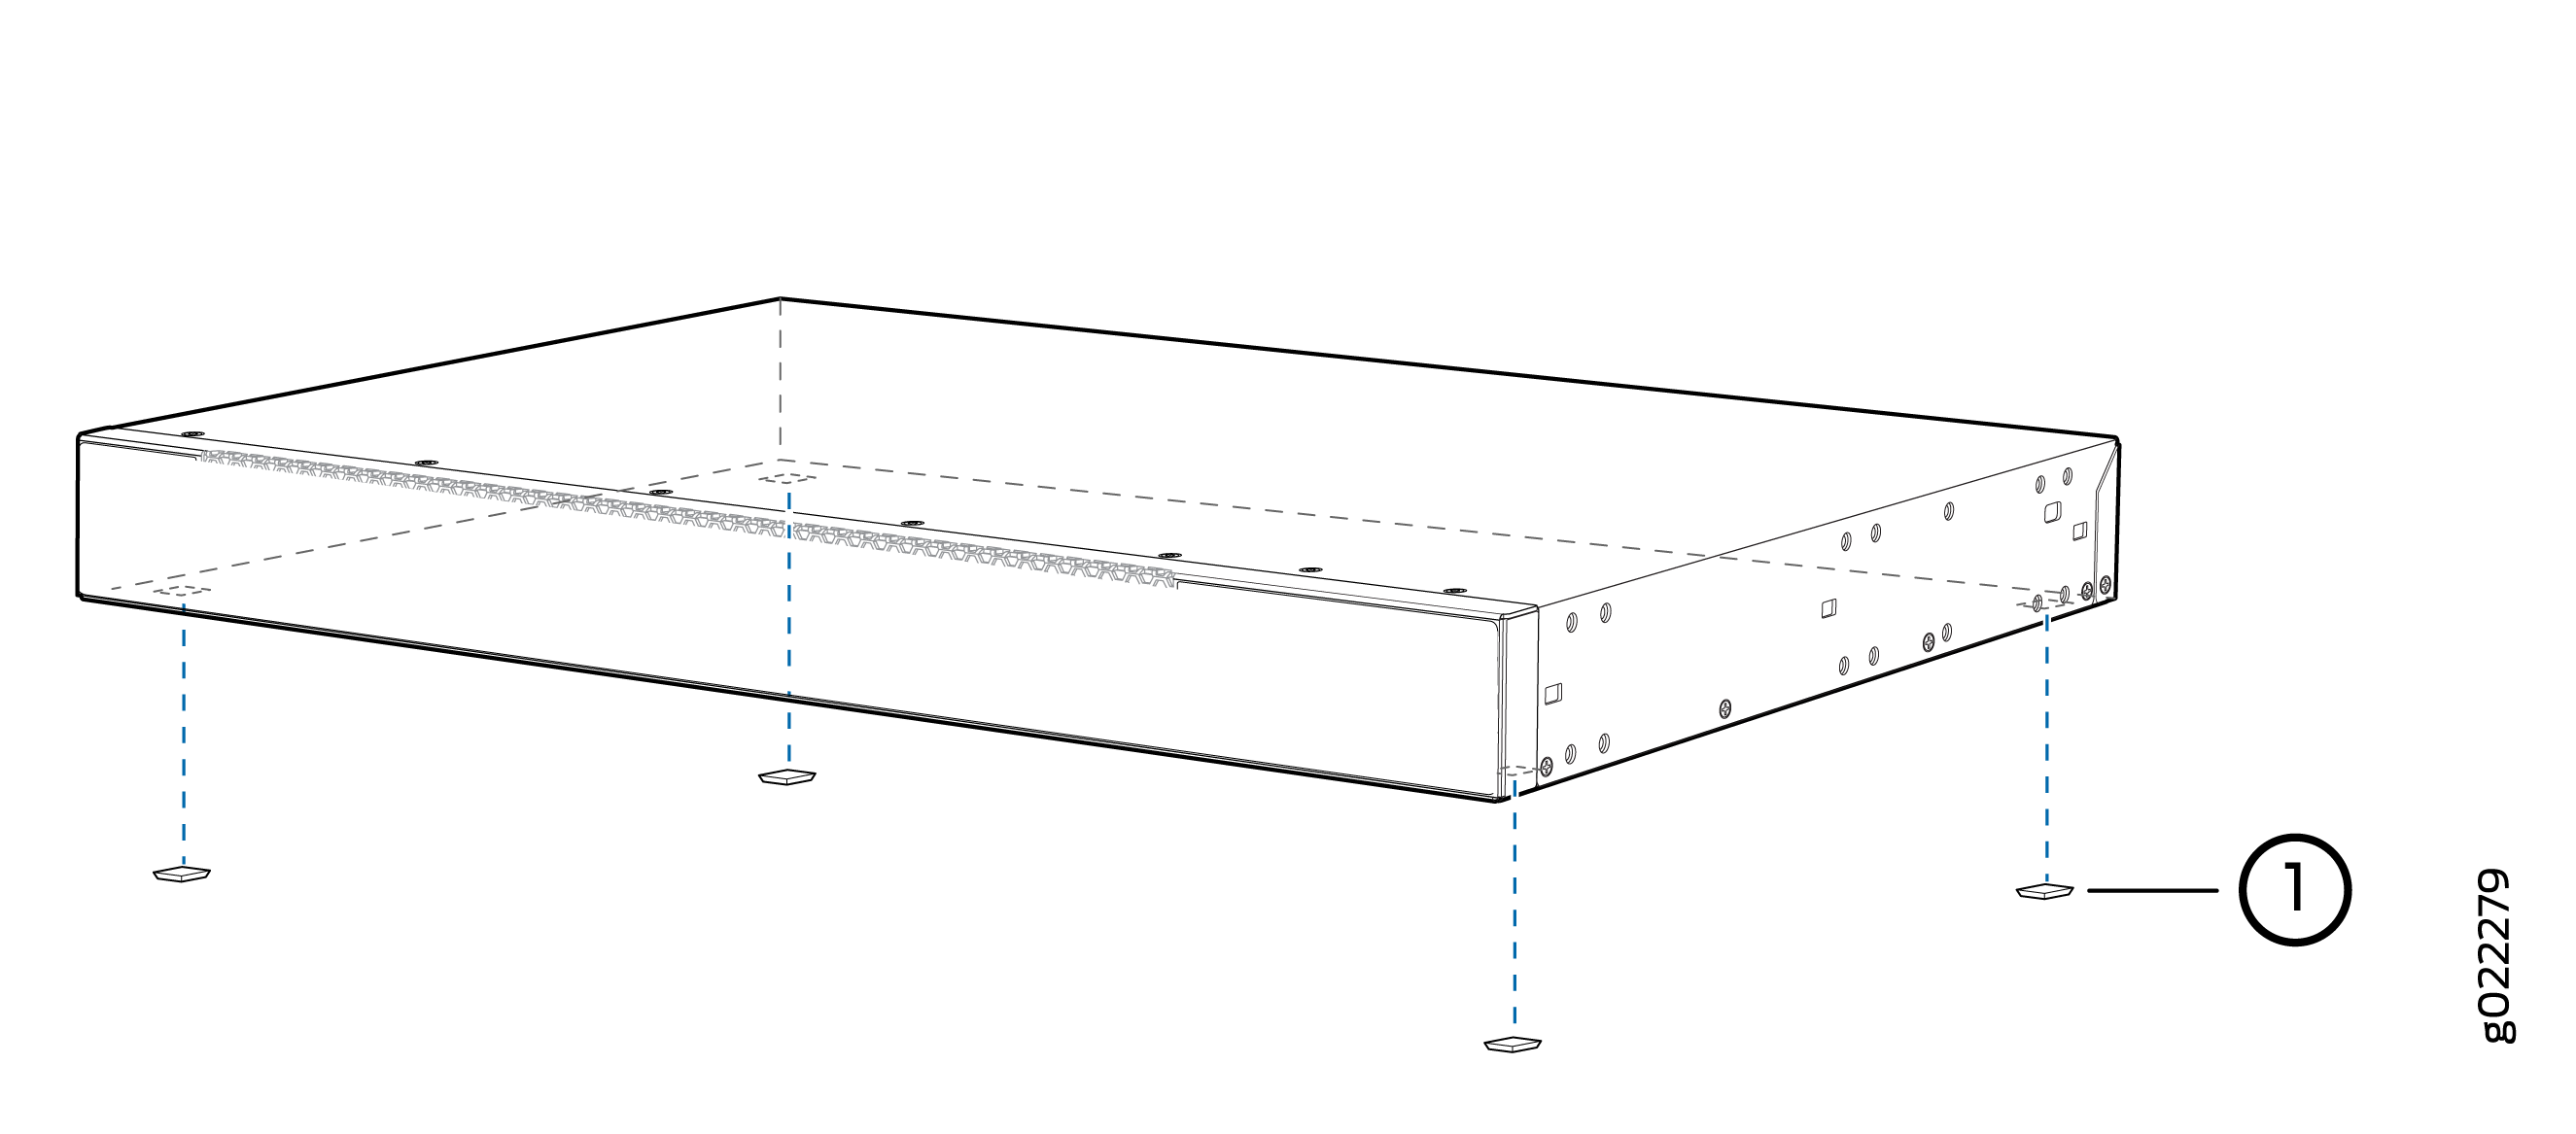
Callout Component 1 Rubber feet Turn the chassis right side up and place it on the desk or the level surface.
Ensure the firewall rests firmly on the desk or level surface.
After you finish mounting the firewall on a desk or level surface, see Connect the SRX400 Firewalls to Power.
Mount an SRX400 on a Two-Post Rack
All the SRX400 models can be mounted on a two-post rack using the separately orderable SRX400-RMK rack-mount kit.
Ensure that you have the following parts and tools available:
-
SRX400-RMK rack mount kit—separately orderable
-
Power adapter tray
-
Four cable ties
-
Four M4 screws
-
-
One AC power adapter
-
Phillips (+) screwdriver, number 2
If you are mounting multiple SRX400 devices on a rack, mount the devices leaving 1-U space between the devices.
If you are mounting multiple units on a rack, mount the units from the bottom to the top of the rack in decreasing order of weights. Therefore, you mount the heaviest unit right at the bottom and the lightest unit right at the top of the rack.
To mount an SRX400 firewall on a two-post rack:
Remove the firewall, power adapter tray, and AC power adapter from the shipping carton.
The power adapter tray will host the SRX400 firewall and an AC power adapter.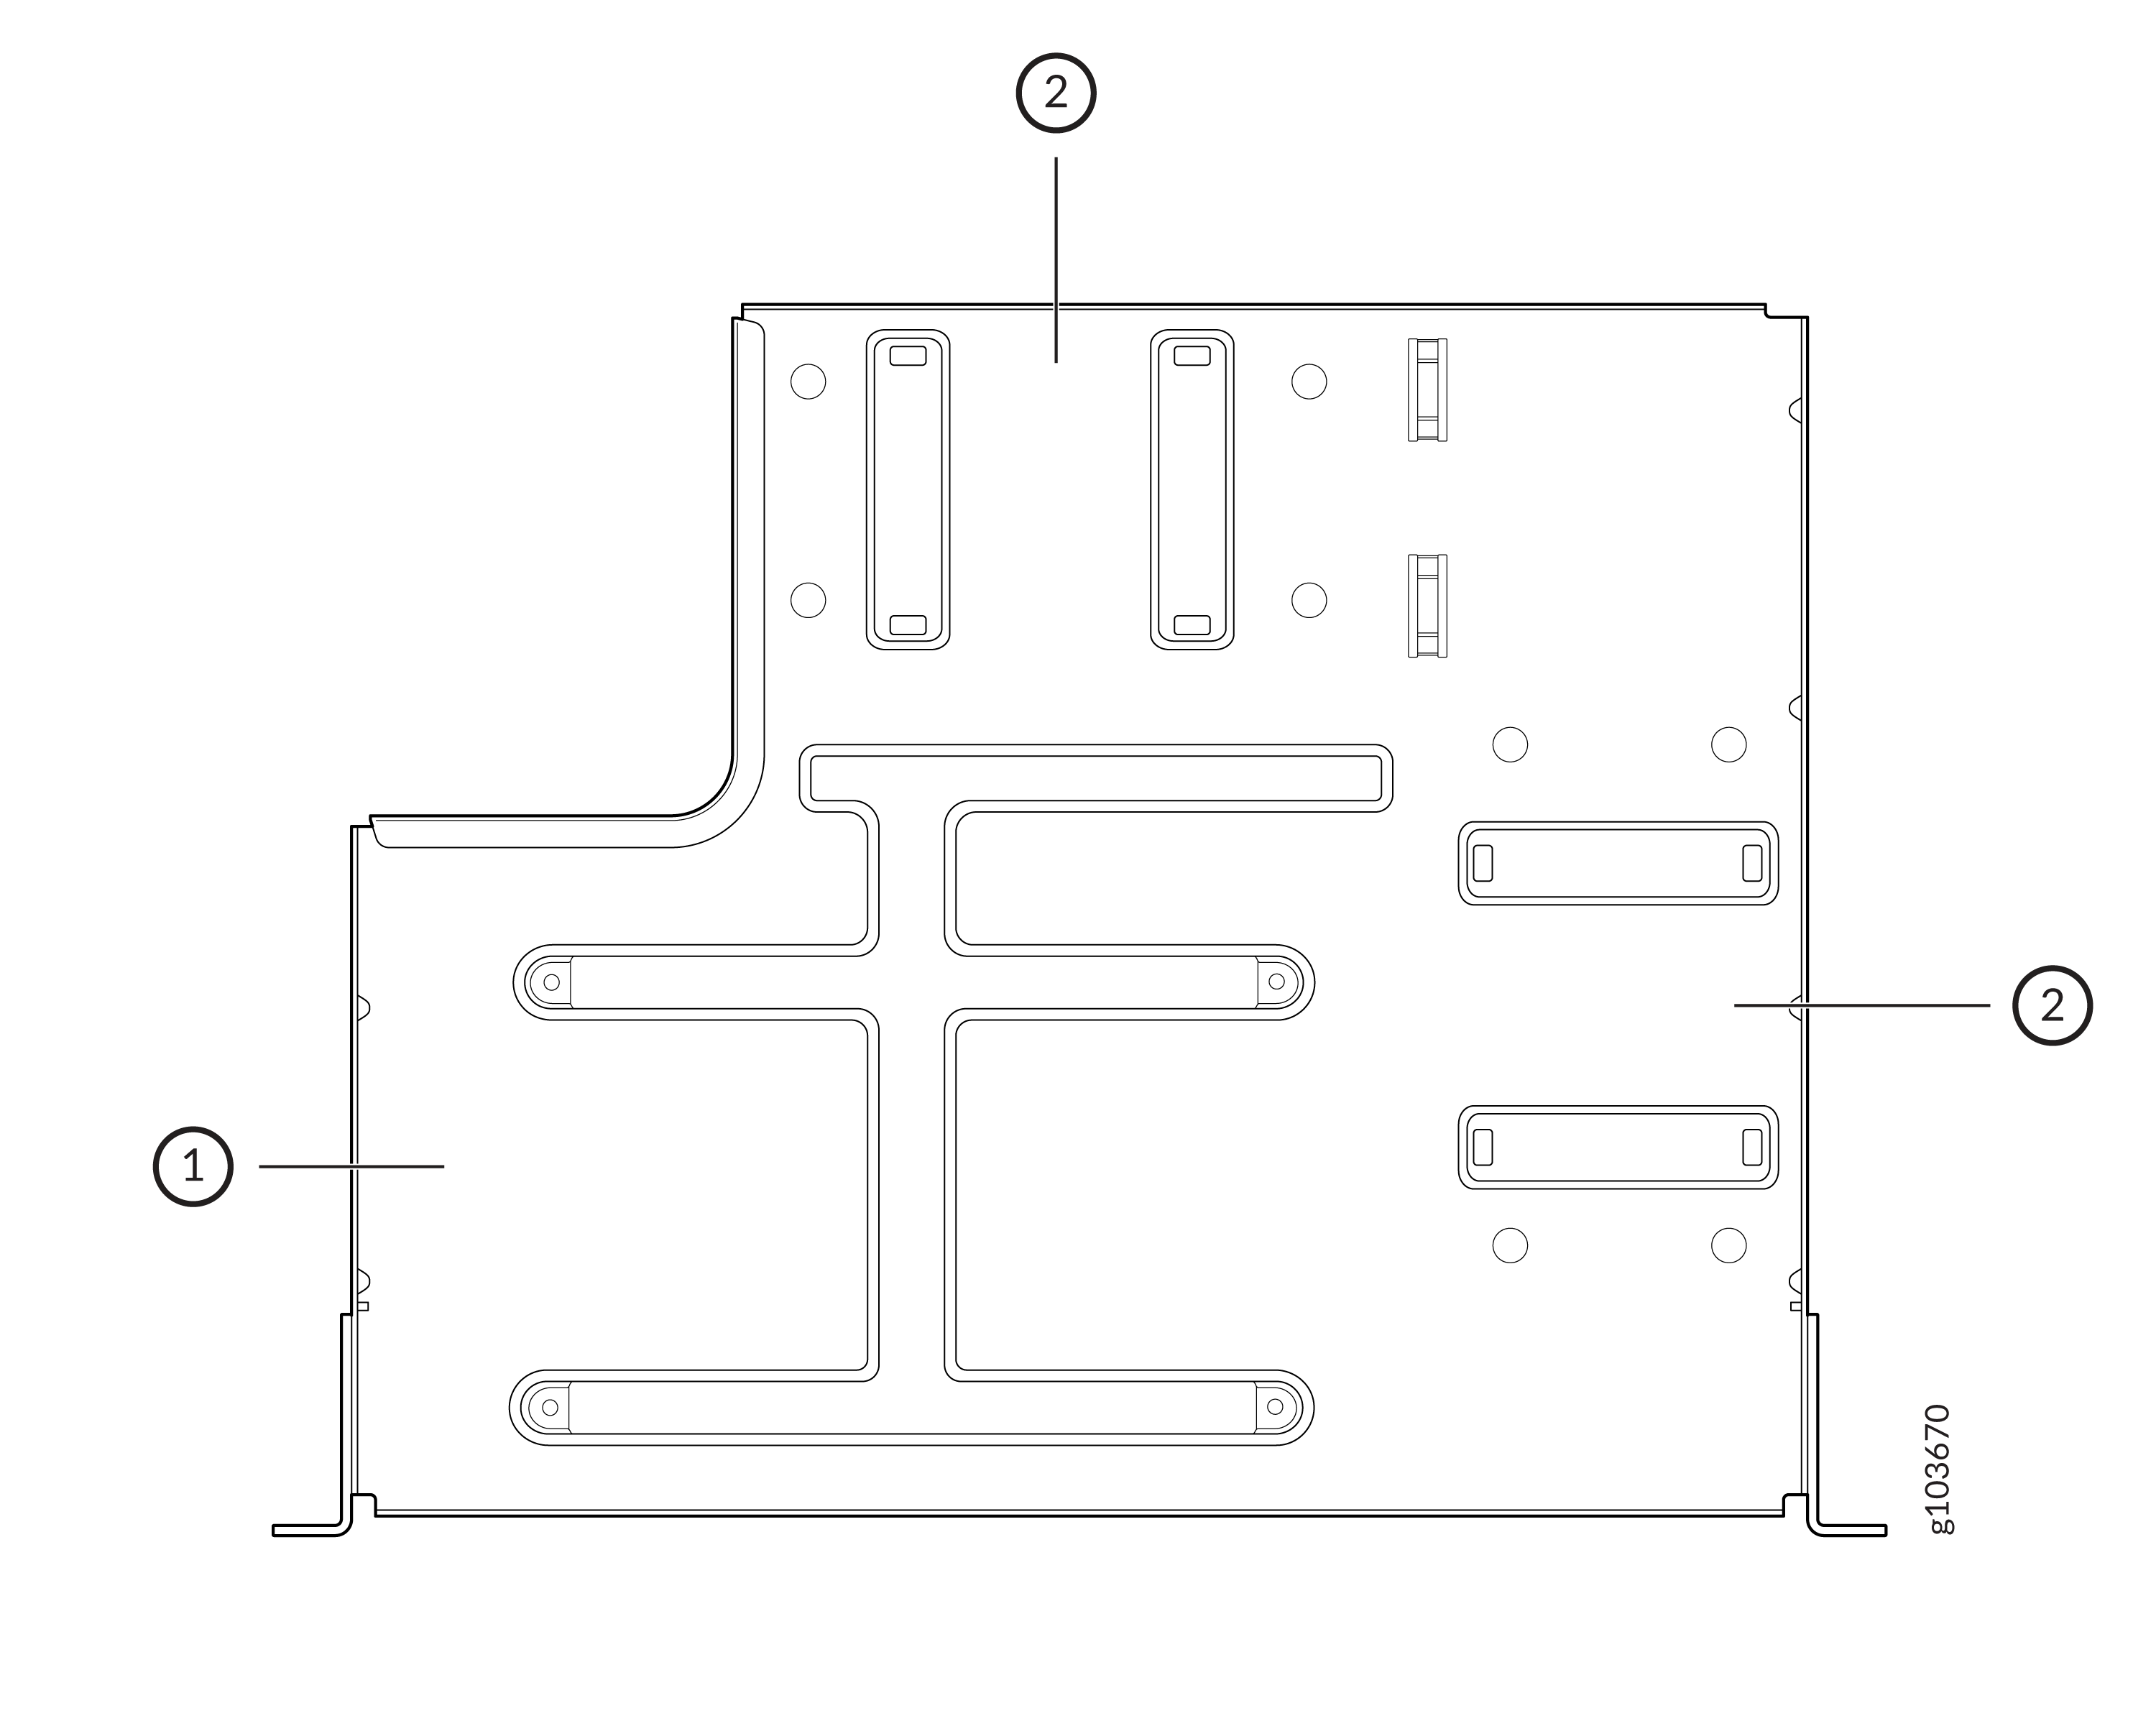
Callout
Component
1
SRX400 Chassis
2
Power Adapter
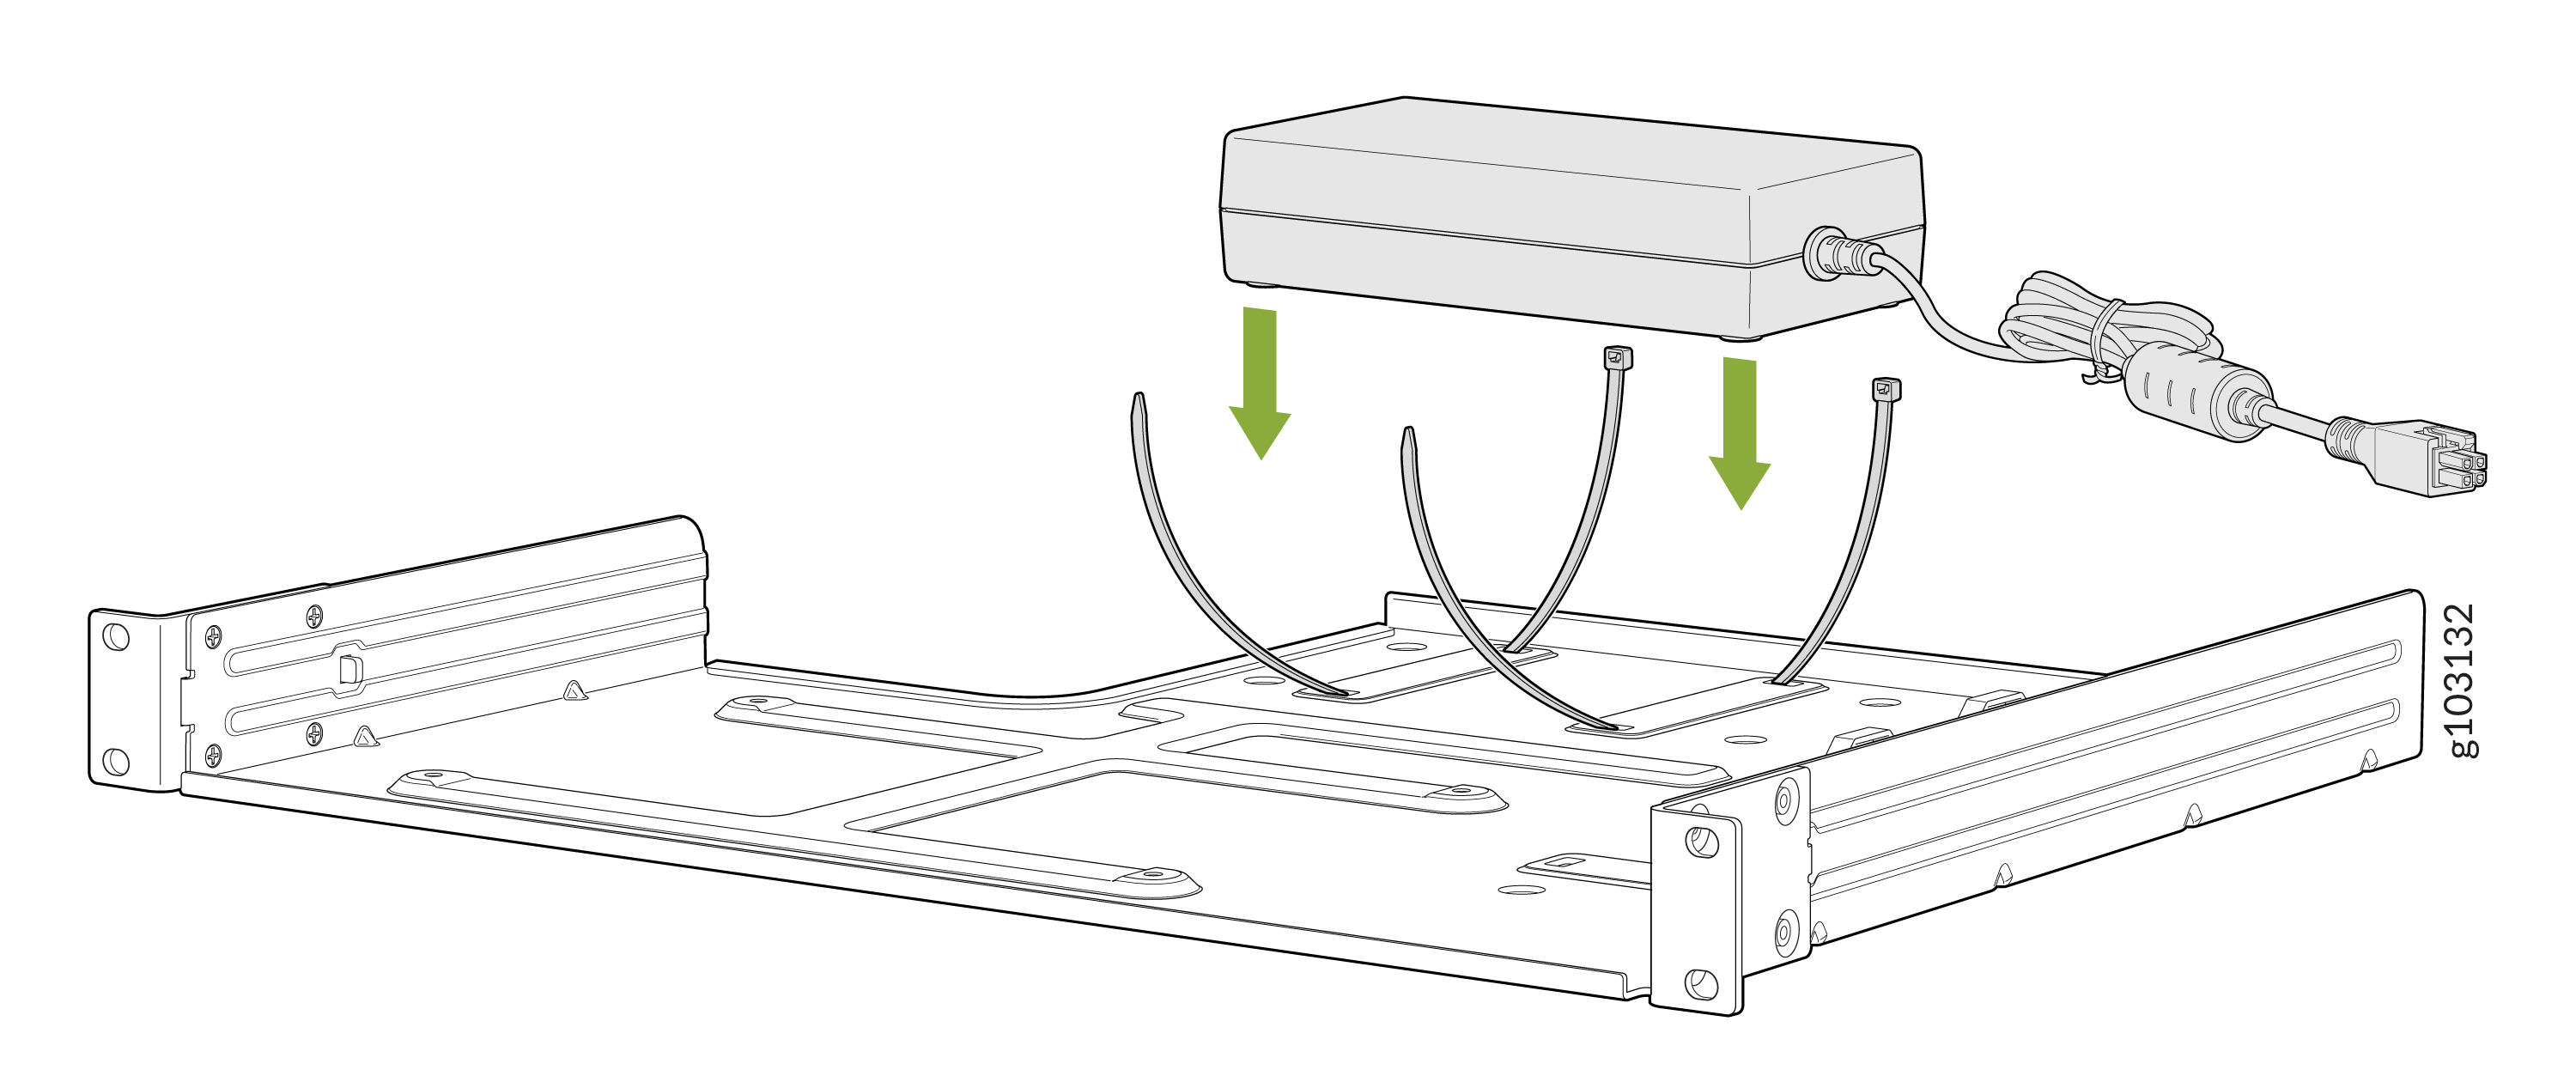
- To install the power adapter on the tray, ensure you have the following parts
available:
An AC power adapter
Two cable ties
Take a cable tie and insert the tail end of the cable tie through the two holes on the tray.
Repeat 2.a with the second cable tie.
Place the power adapter on the tray in between the cable ties.
Take the tailend of one cable tie, insert it through the square locking piece (other end of the cable tie), and pull the tie through the main head to set the length of excess material.
Repeat 2.d with the second cable tie.
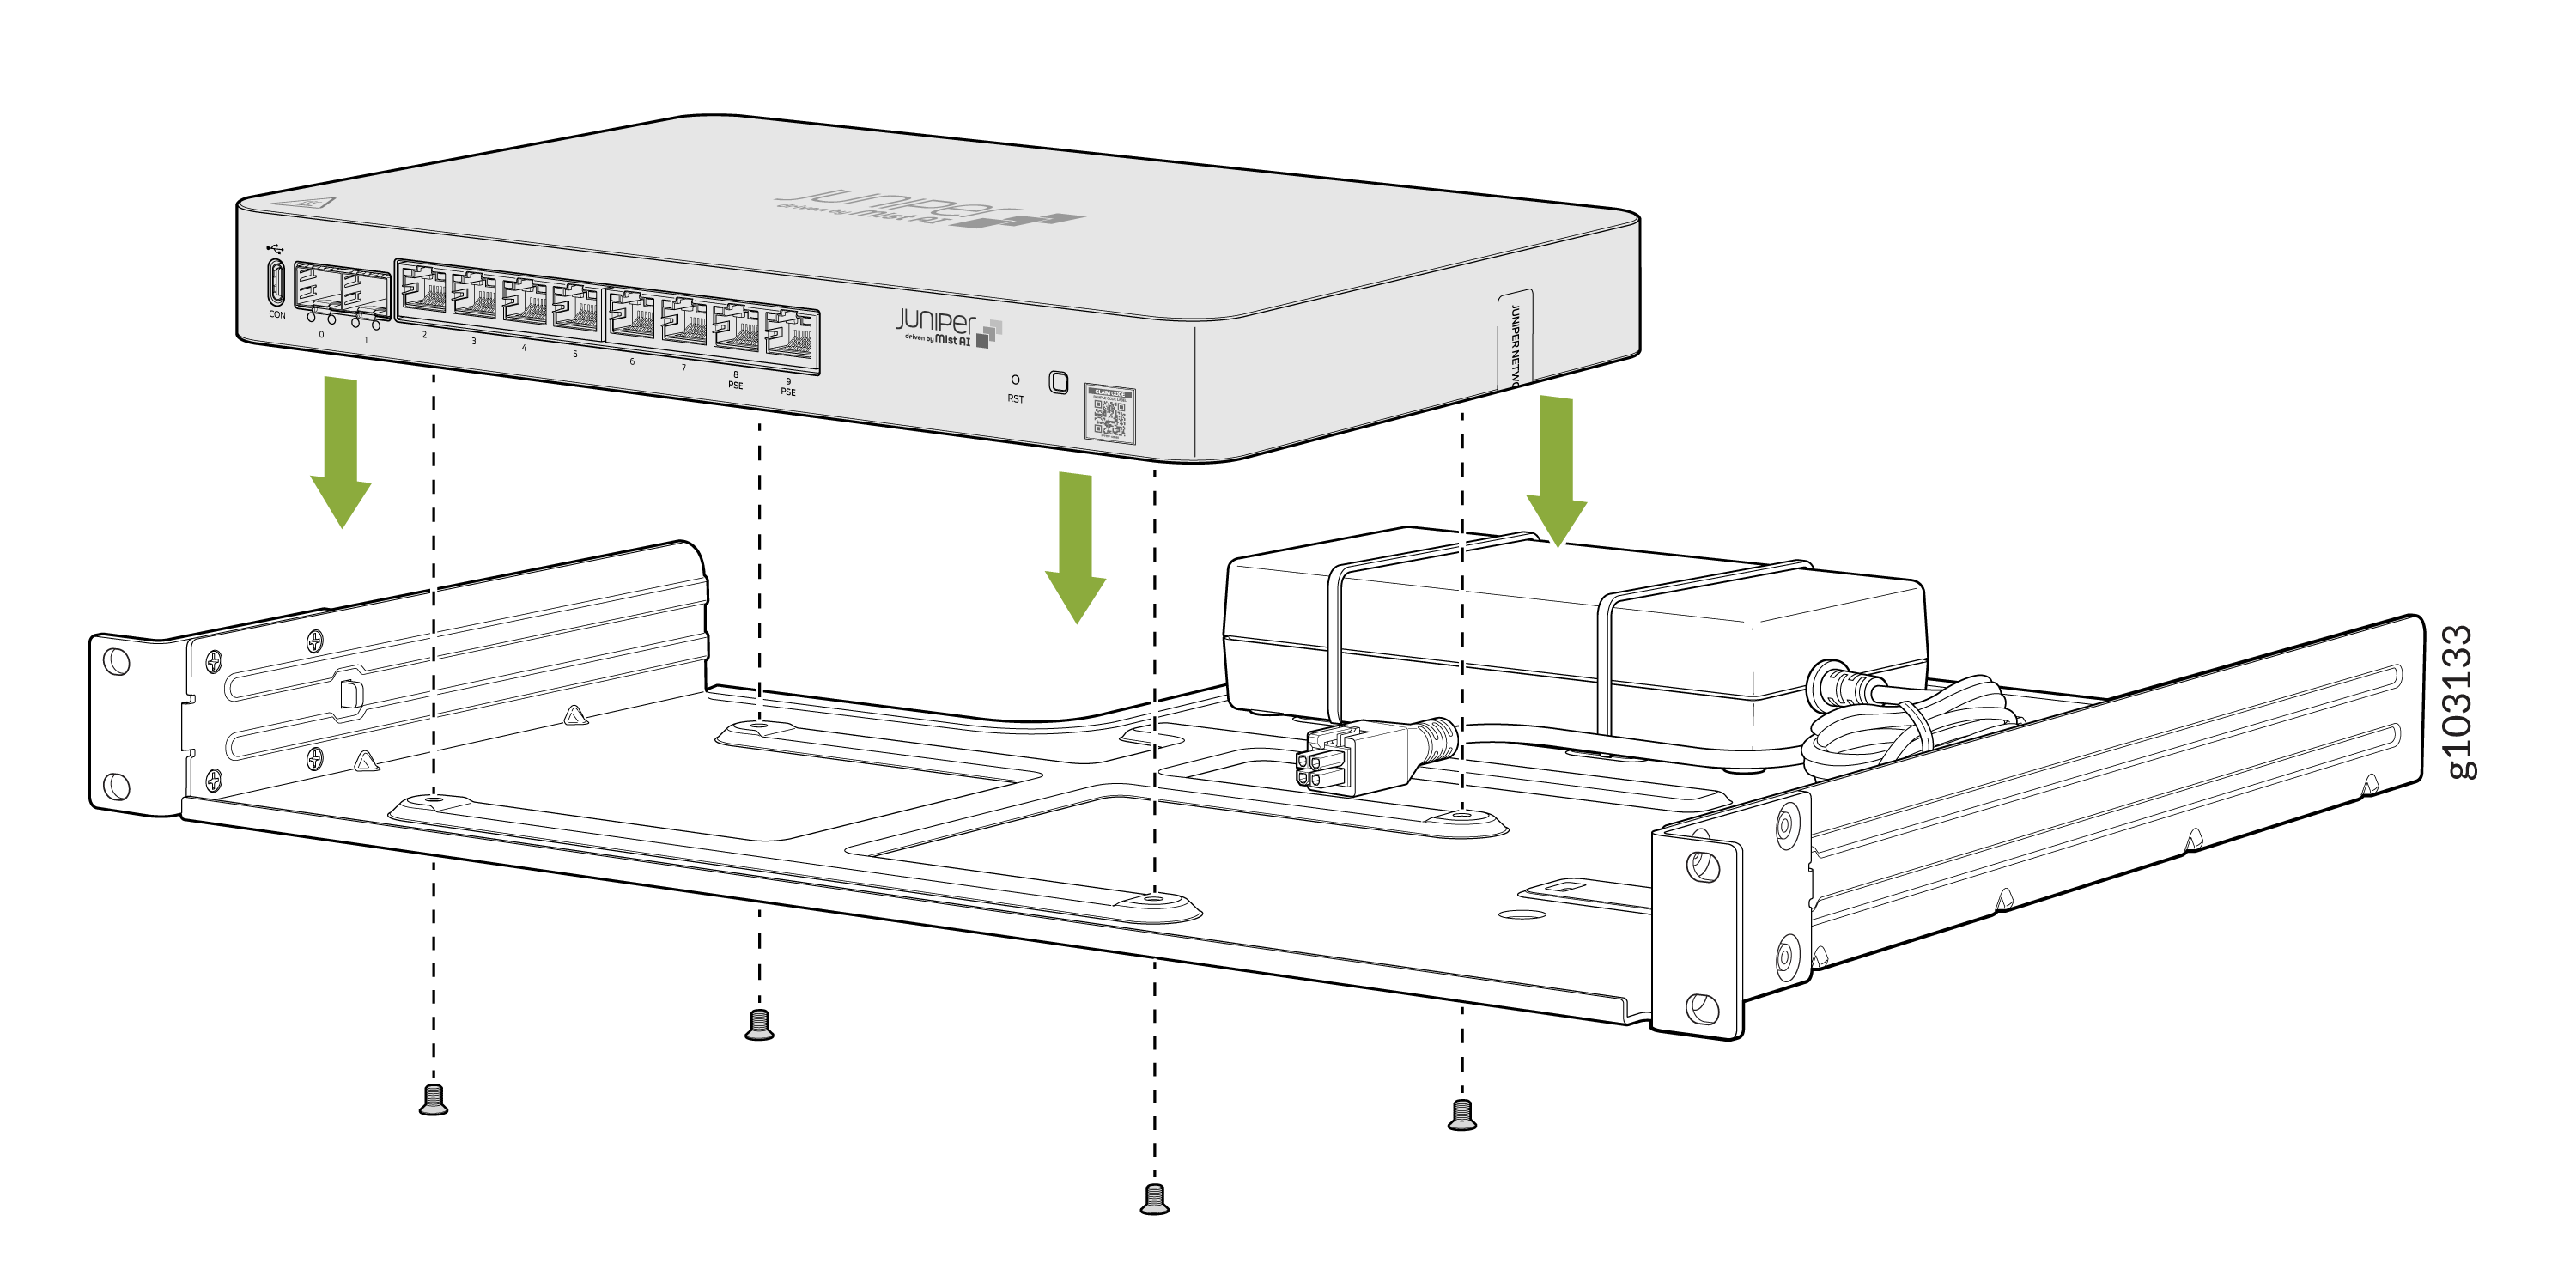
To install any one of the SRX400 chassis on the tray:
Have one person grasp the sides of the tray and hold it.
Have a second person position the chassis on the tray and align the bottom holes of the chassis with the four holes on the tray.
Install the four M4 screws into each of these four holes on the tray. Use the Phillips (+) screwdriver, number 2 to tighten the four screws and secure the chassis to the tray.
Plug the DC connector end of the power cable into the power connector on the back of the firewall.
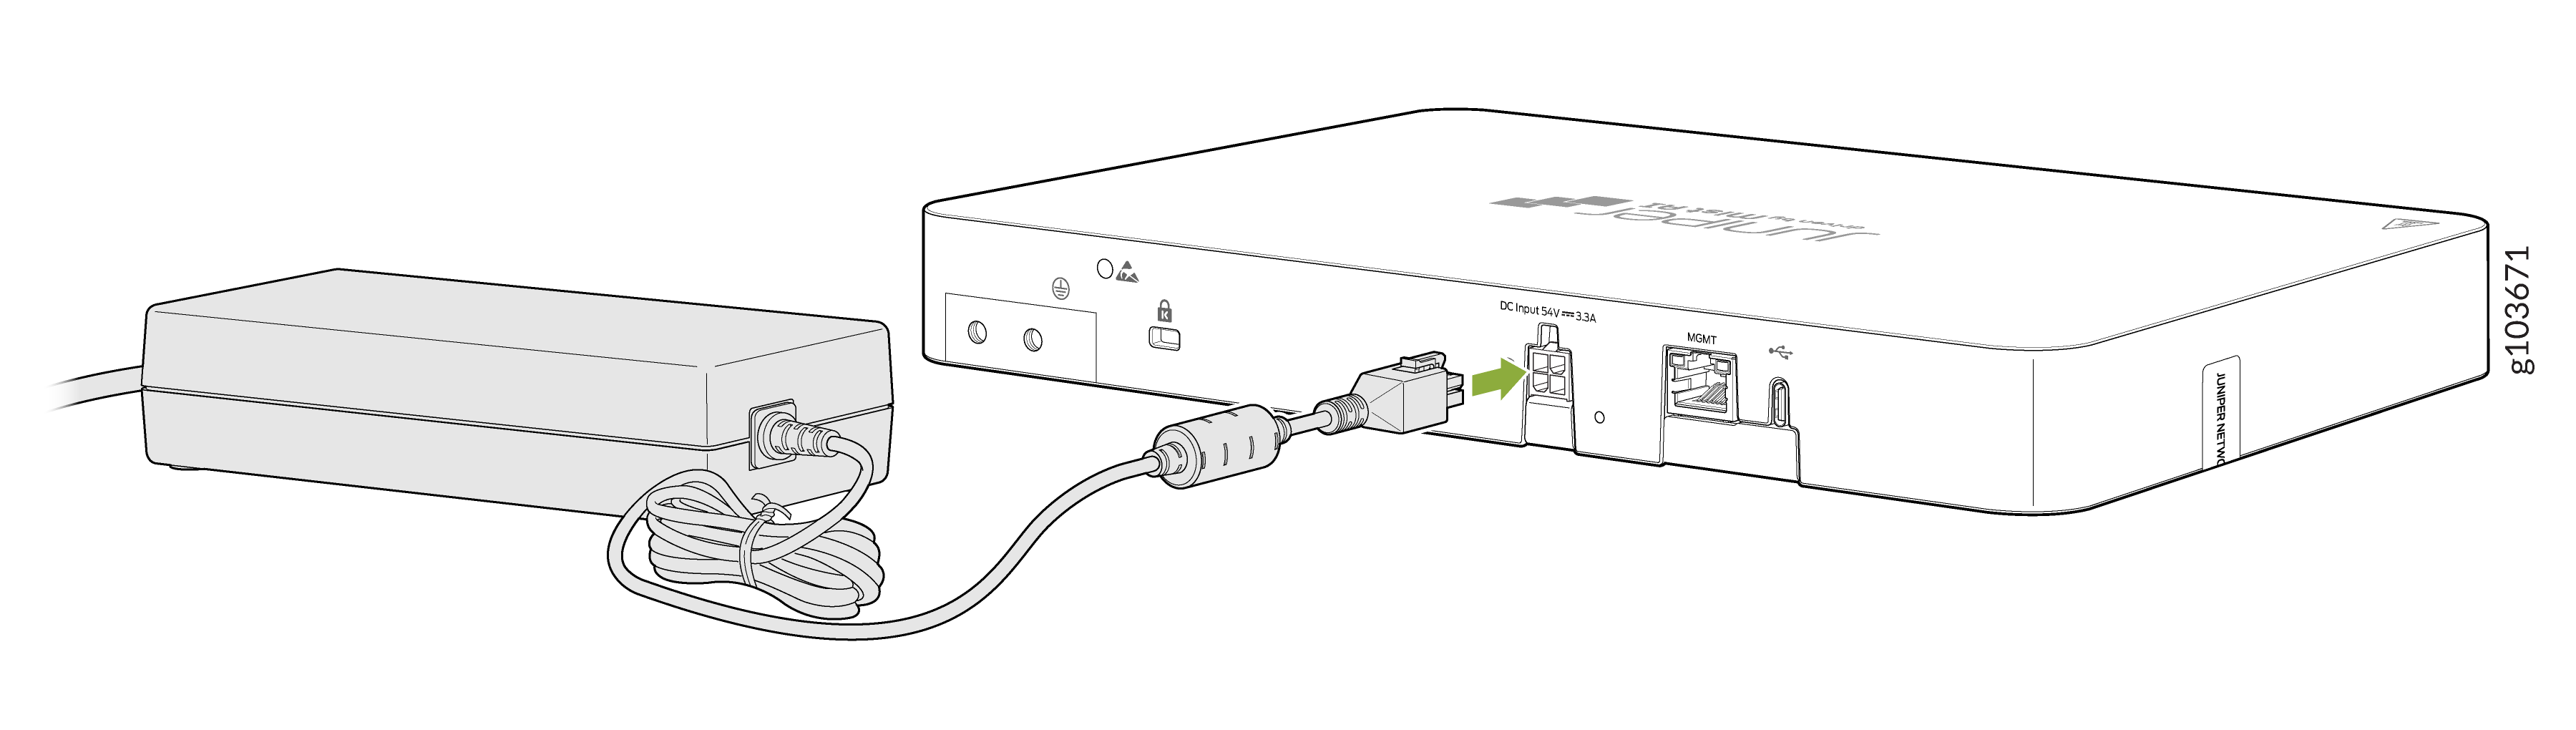
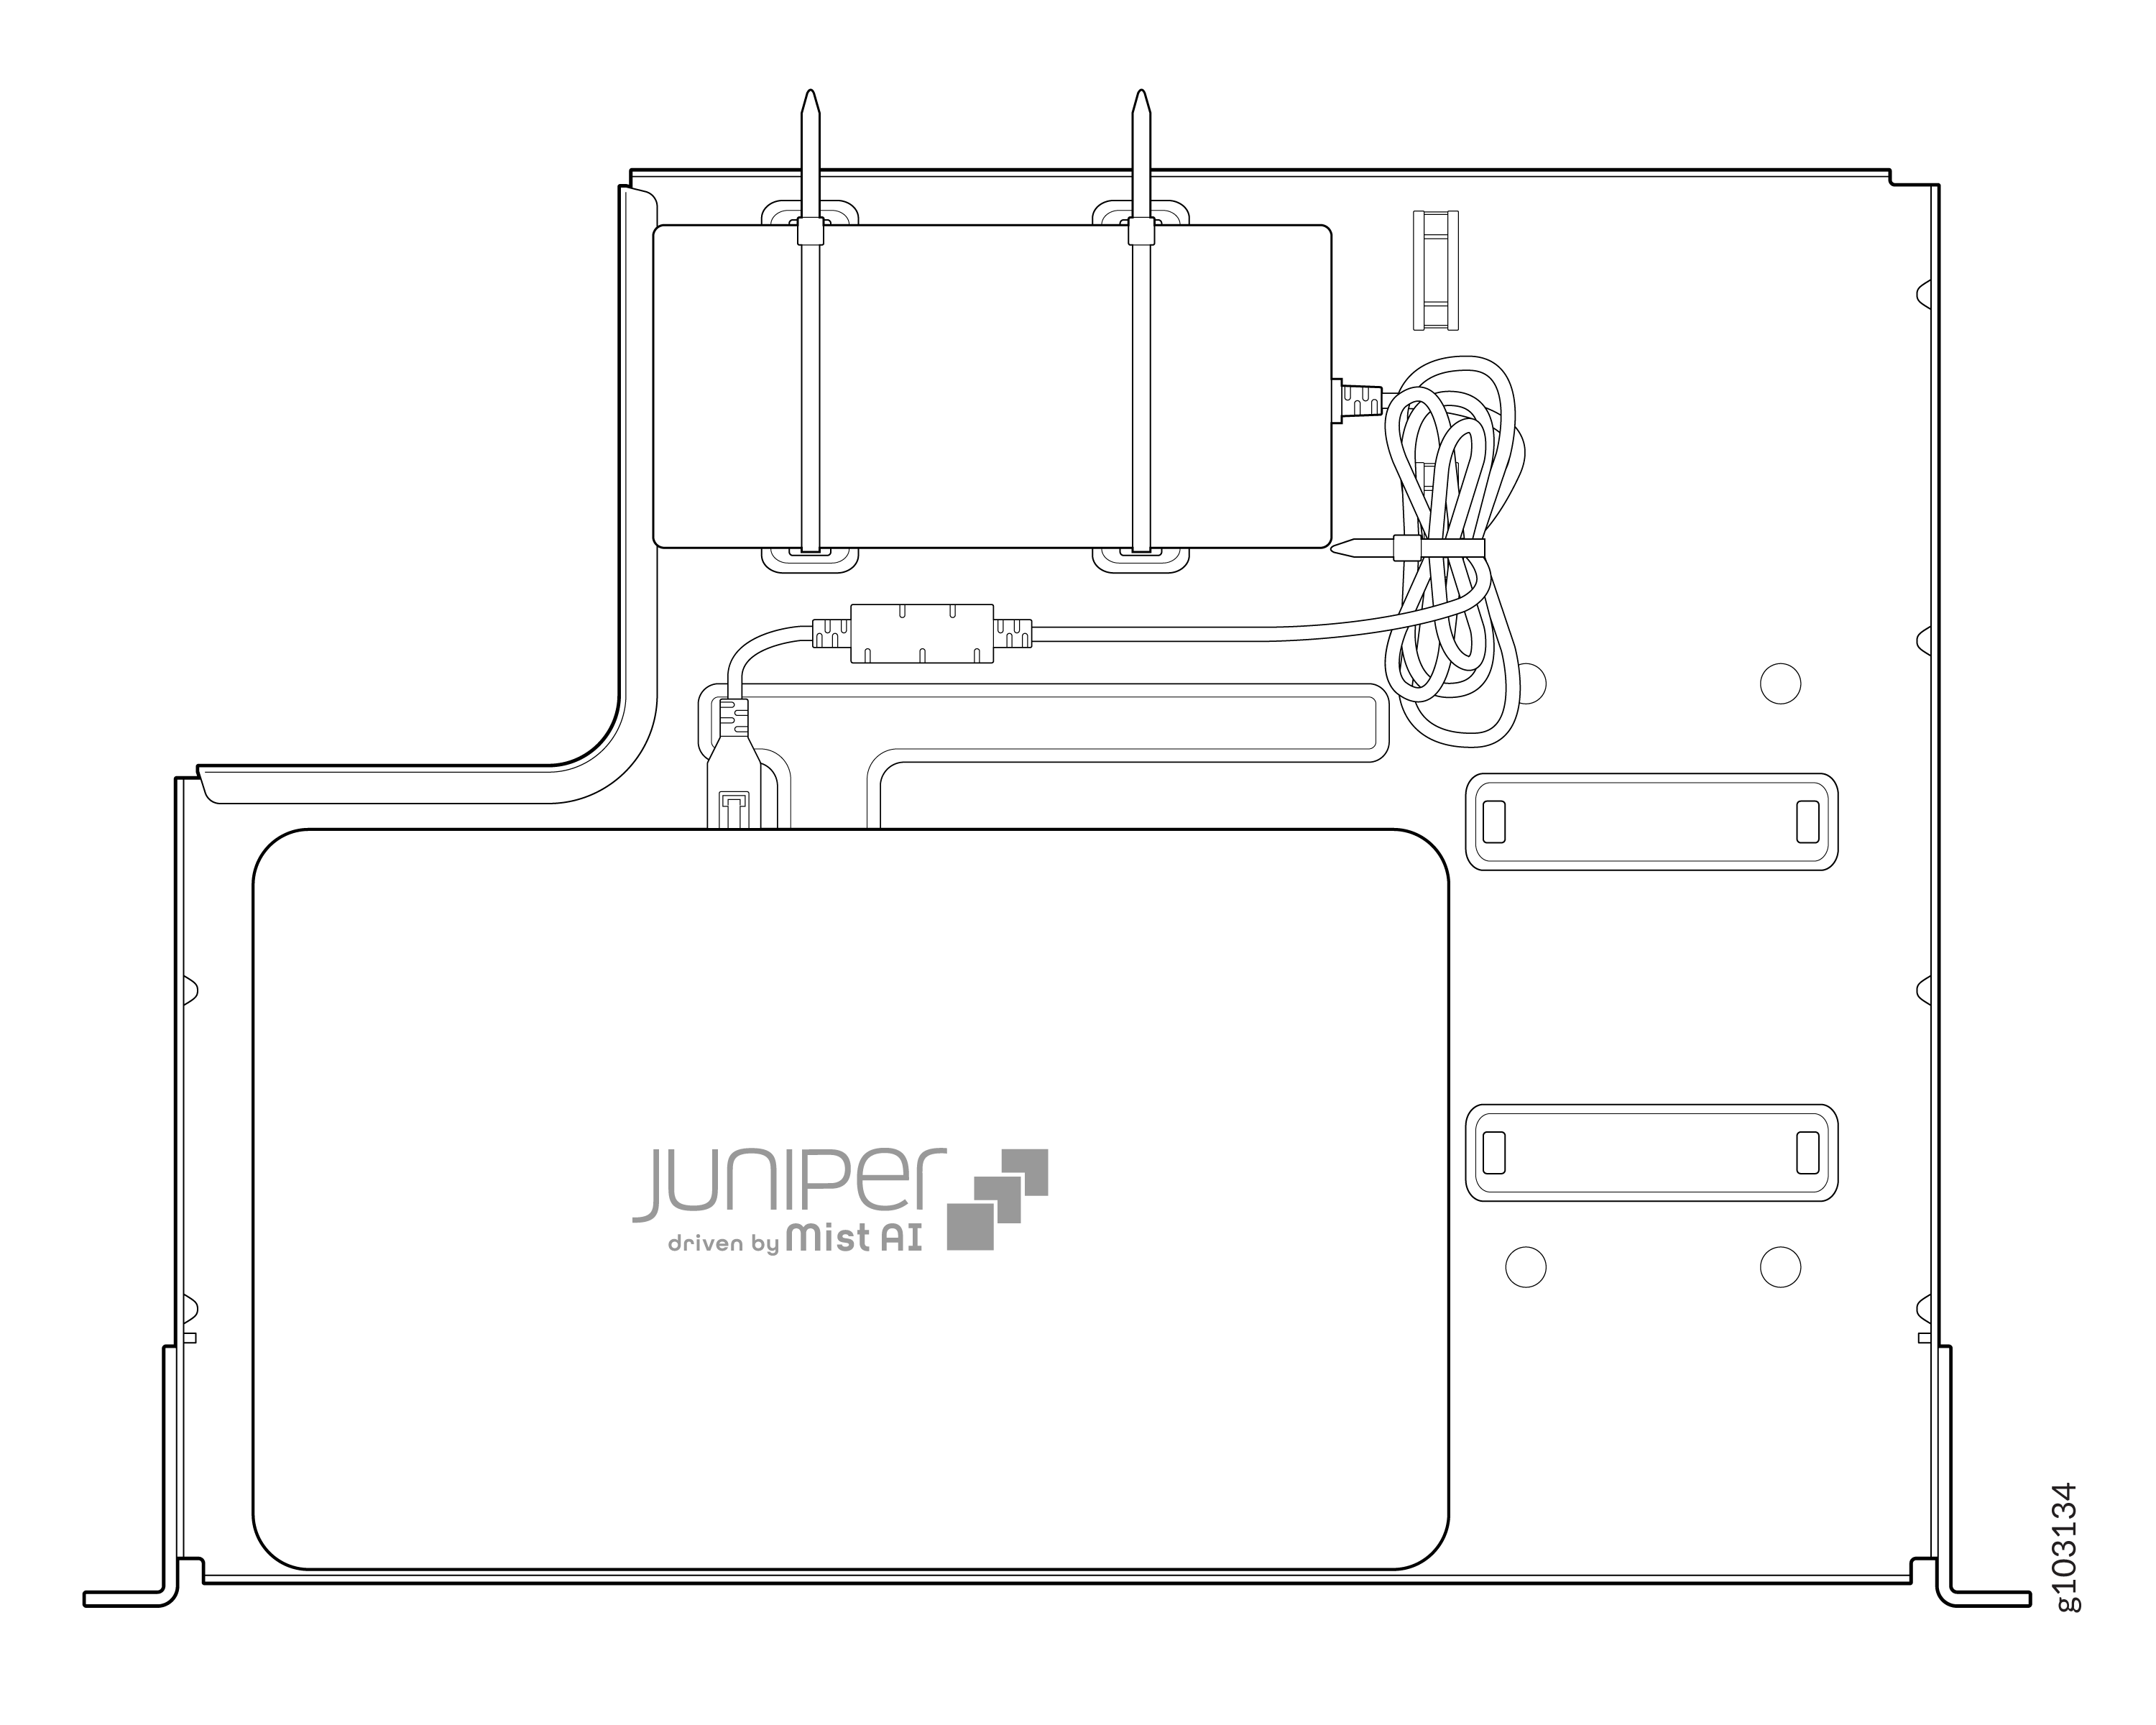
Have one person grasp the sides of the firewall, lift it, and position it in the rack.
Align each bottom hole of the power adapter tray with a hole in each rack rail, making sure the firewall is level.
Have a second person secure the firewall to the rack by using four mounting screws (not provided). Use the Phillips (+) screwdriver, number 2 to tighten the four screws and secure the power adapter tray to the rack. Tighten the screws with a torque of 18 Nm.
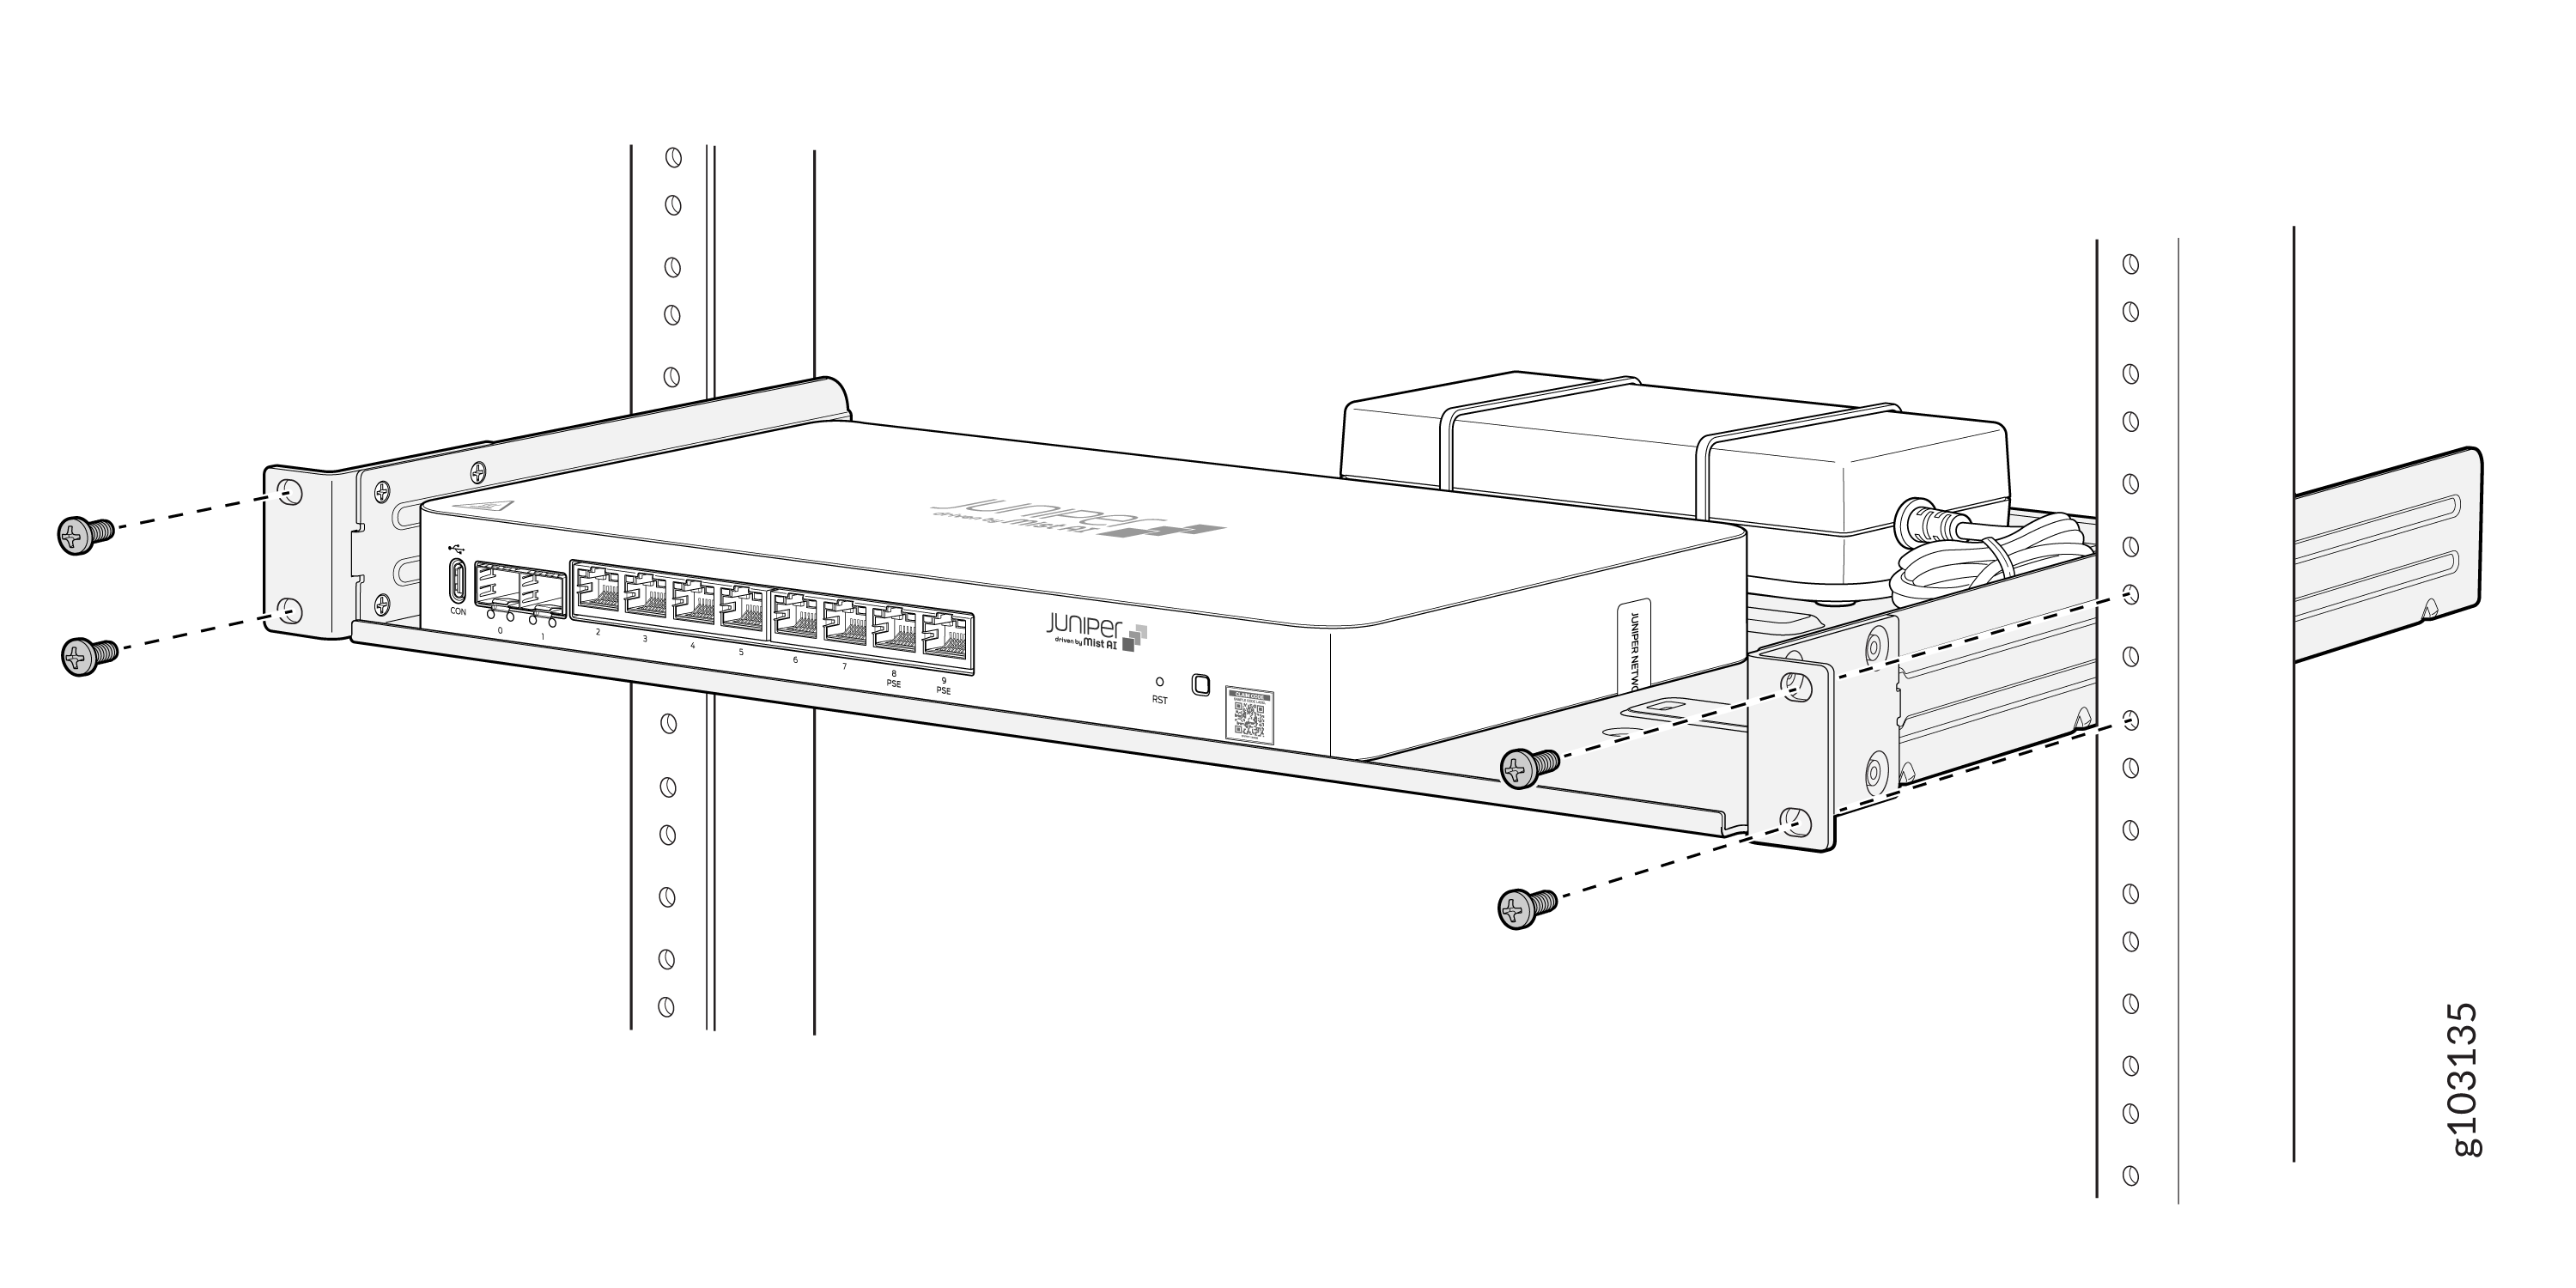
Ensure that the firewall is level by verifying that all the screws on one side of the rack are aligned with the screws on the other side.
Connect the SRX400 Firewalls to Power
Connecting the SRX400 to power involves the following steps and safety precautions to prevent equipment damage and personal injury.
Ground the SRX400 Firewalls
Before connecting an SRX400 to an earth ground, ensure that you have the following parts and tools:
-
An electrostatic discharge (ESD) grounding strap (not provided)
-
Grounding cable for your firewall (not provided)—The grounding cable must be 14 AWG stranded wire and rated 90 °C or according to local electrical code.
-
Grounding lug for your grounding cable (not provided)—This lug attaches to the chassis grounding point. The grounding lug required is a : Panduit LCD10-14AF-L or equivalent.
-
Two M5 X 9.5 screws (not provided)
-
A Phillips screwdriver to tighten the screws (not provided).
You must install heat-shrink tubing insulation around the crimped section of the power cables and lugs.
To meet safety and electromagnetic interference (EMI) requirements and to ensure proper operation, you must connect the SRX400 to an earth ground before you connect the firewall to power.
Before you connect an earth ground to the protective earthing terminal of the firewall, ensure that a licensed electrician attaches an appropriate grounding terminal to the grounding cable you supply. Using a grounding cable with an incorrectly attached terminal can damage the firewall.
To ground the SRX400:
- Wrap and fasten one end of the electrostatic discharge (ESD) cable grounding strap around your bare wrist, and connect the other end to a site ESD point or to the ESD point on the chassis.
- Ensure that all grounding surfaces are clean and brought to a bright finish before making the grounding connections.
- Connect the 14 AWG grounding cable to a proper earth ground, such as the rack in which you mount the firewall.
-
Place the grounding cable terminal over the grounding point (sized for M5 X 9.5
grounding screws) on the rear of the chassis.
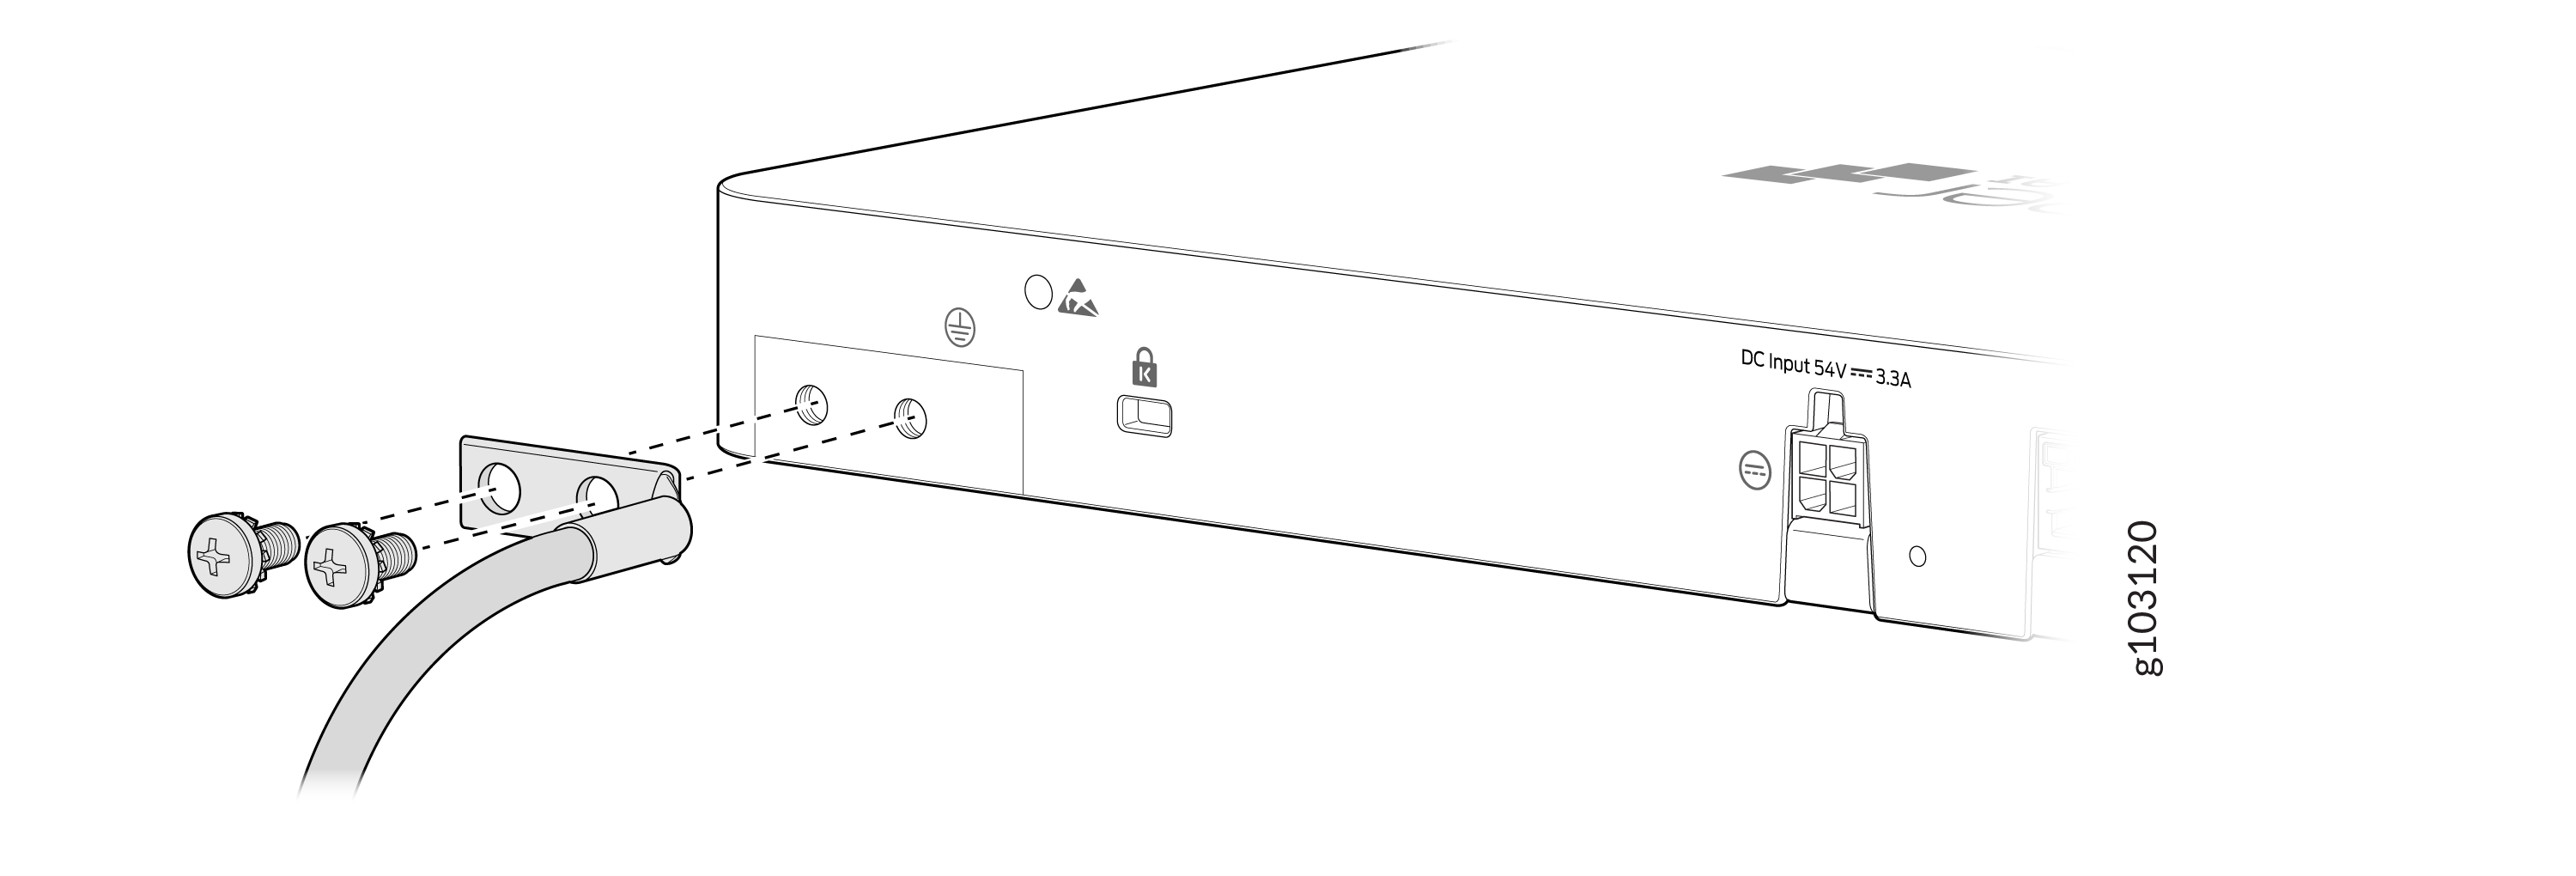
- Secure the grounding cable terminal to the grounding point with the two M5 X 9.5 screws. Apply between 2.5 Nm and 2.8 Nm of torque to the screw.
- Dress the grounding cable. Ensure that the cable doesn’t block access to or come in contact with other device components, and that it doesn’t drape where people could trip over it.
Connect the Power Cord and Power On the SRX400
Ensure that you have a power cord appropriate for your geographical location.
For information about the supported AC power cord specifications for your firewall, see SRX400 Firewalls Power System.
To connect the power cord:
- Wrap and fasten one end of the electrostatic discharge (ESD) grounding strap around your bare wrist, and connect the other end to a site ESD point or to the ESD point on the chassis.
- Locate the AC power cord shipped with the firewall; the cord has plug appropriate for your geographical location.
- Insert the AC power cord coupler firmly into the power cord inlet on the AC power adapter.
- If the AC power source outlet has a power switch, turn it off.
- Plug the AC power cord into an AC power source outlet.
- The SRX400 models do not have a power switch and each device powers on as soon as you plug it in.
Power Off the SRX400
You can power off the SRX400 in one of the following ways:
-
Graceful shutdown—Using the CLI—Use the
request system power-offcommand.The device begins gracefully shutting down the operating system (OS) and then powers itself off.
CAUTION:Use the graceful shutdown method to power off or reboot the firewall.
-
Forced shutdown—Unplug the power cord or switch off the power source.
CAUTION:Forced shutdown can result in data loss and corruption of the file system.
Use the forced shutdown method as a last resort to recover the firewall if the firewall OS is not responding to the graceful shutdown method.