Configuring Junos OS on the SRX345
The services gateway is shipped with the Juniper Networks Junos operating system (Junos OS) preinstalled and ready to be configured when the device is powered on. You can perform the initial software configuration of the services gateway by using the browser-based setup wizard or by using the command-line interface (CLI).
SRX345 Firewall Factory-Default Settings
The SRX345 device is shipped with the following factory-default settings:
|
Source Zone |
Destination Zone |
Policy Action |
|---|---|---|
|
trust |
trust |
permit |
|
trust |
untrust |
permit |
|
Source Zone |
Destination Zone |
Policy Action |
|---|---|---|
|
trust |
untrust |
Source NAT to untrust zone interface |
|
Port Label |
Interface |
Security Zone |
DHCP State |
IP Address |
|---|---|---|---|---|
|
0/0 and 0/15 |
ge-0/0/0 and ge-0/0/15 |
untrust |
Client |
Unassigned |
|
0/1 to 0/14 |
VLAN Interface irb.0 (ge-0/0/1 to ge-0/0/14) |
trust |
Server |
192.168.2.1/24 |
|
MGMT |
fxp0 |
Server |
192.168.1.1/24 |
|
Interface |
Security Zone |
IP Address |
|---|---|---|
|
cl-1/0/0 |
N/A |
N/A |
|
dl0 (logical) |
untrust |
ISP assigned* |
|
Only if the LTE Mini-PIM is present |
||
The SRX345 device is shipped with the following services and protocols enabled by default:
|
Services |
Protocols |
Device Startup Mode |
|---|---|---|
|
SSH HTTPS |
RSTP (all interfaces) |
Switching |
Starting in Junos OS Release 25.2R1 the factory-default device configuration does not
include the netconf ssh statement at the [edit system
services] hierarchy level.
To provide secure traffic, a basic set of screens are configured on the untrust zone.
If the current active configuration fails, you can use the load
factory-default command to revert to the factory-default configuration.
How to View Factory-Default Settings
To view the factory-default settings on your device:
Log in as the root user and provide your credentials.
View the list of default configuration files:
user@host> file list /etc/config
View the required default configuration file.
user@host> file show /etc/config/<config file name>
When you commit changes to the configuration, a new configuration file is created,
which becomes the active configuration. If the current active configuration fails,
you can use the load factory-default command to revert to the
factory-default configuration.
Initial Configuration Using the CLI
You can use either the serial or the mini-USB console port on the device.
- Connect to the Serial Console Port
- Connect to the Mini-USB Console Port
- Configure the SRX345 Using the CLI
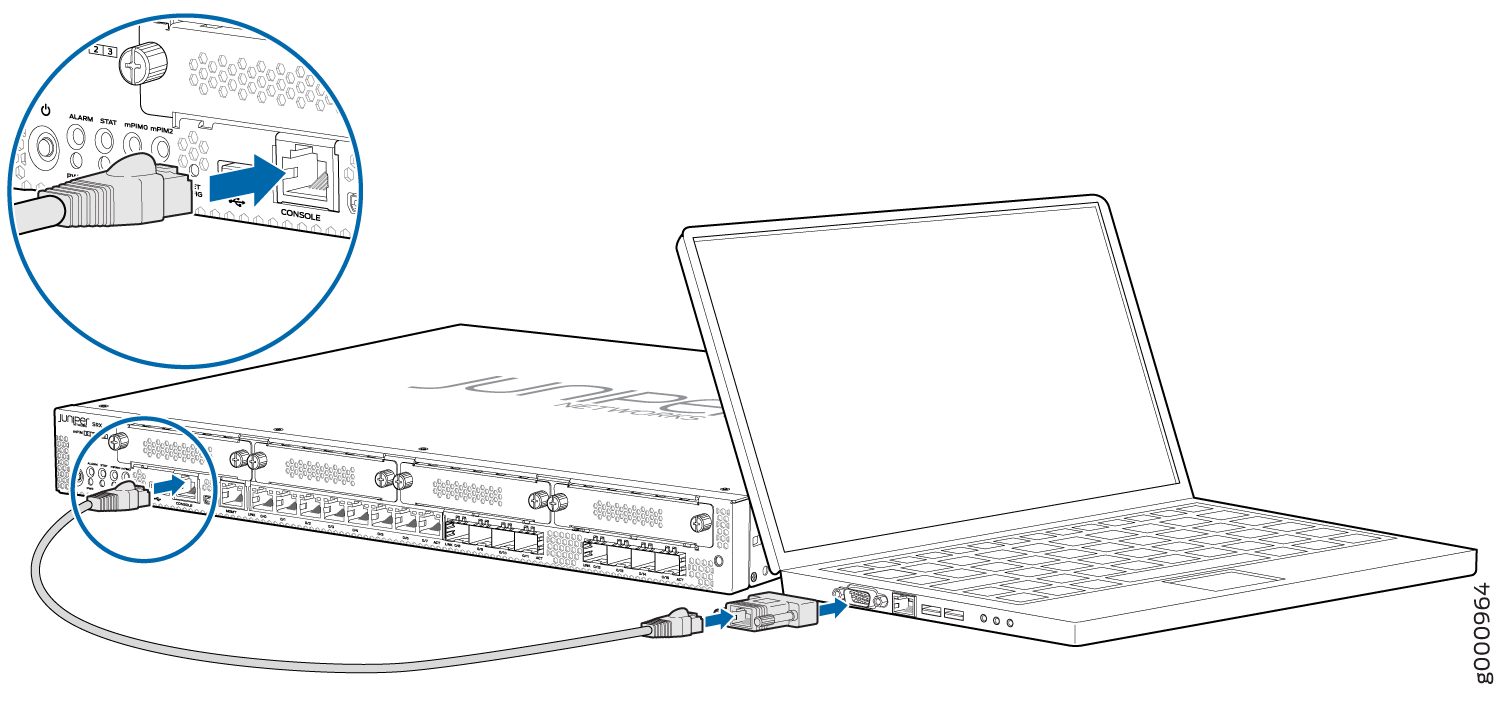
Connect to the Serial Console Port
To connect to the serial console port:
- Connect the other end of the Ethernet cable to the serial
console port on the SRX345.Figure 1: Connect to the Console Port on the SRX345
Connect to the Mini-USB Console Port
To connect to the mini-USB console port:
Configure the SRX345 Using the CLI
To configure the SRX345 by using the CLI:
Initial Configuration Using J-Web
- Configure Using J-Web
- Customize the Configuration for Junos OS Release 19.2
- Customize the Configuration for Junos OS Release 15.1X49-D170
Configure Using J-Web
To configure the device by using J-Web:
- Connect the other end of the Ethernet cable to the management
device.Figure 2: Connecting the SRX345 to a Management Device
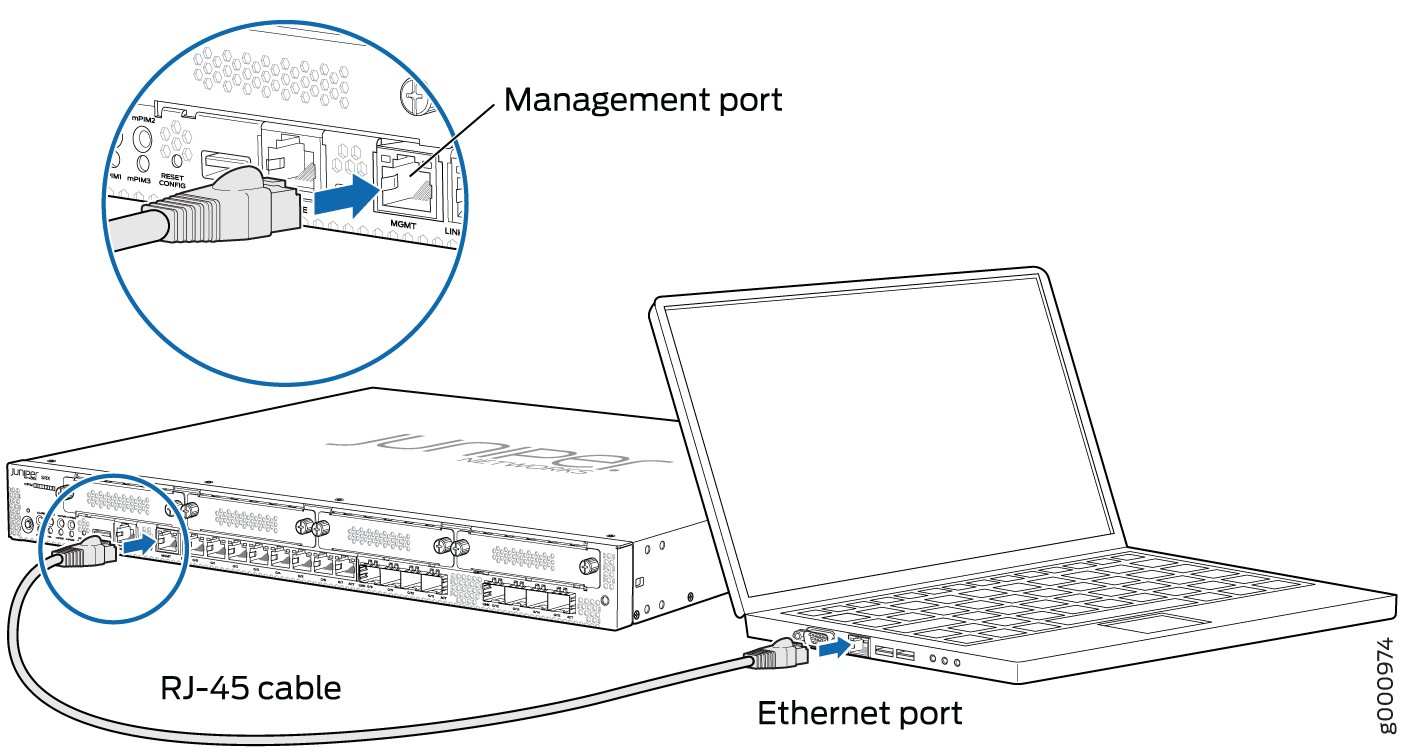
The SRX345 functions as a DHCP server and automatically assigns an IP address to the laptop.
- Open a browser and type https://192.168.1.1. The Phone Home Client page appears.

- Set a root authentication password in the Skip to J-Web
page and click Submit.

The J-Web login page appears. The SRX345 already has factory-default settings configured to make it a plug-and-play device. So all you have to do to get the SRX345 up and running is connect it to your LAN and WAN networks.
You can continue to customize the settings by logging in to J-Web and selecting the configuration mode that’s right for you. You can then follow the screens as they appear in the Setup wizard.
To customize the configuration in Junos OS Release 19.2, see Customize the Configuration for Junos OS Release 19.2.
To customize the configuration in Junos OS Release 15.1X49-D170, see Customize the Configuration for Junos OS Release 15.1X49-D170.
Customize the Configuration for Junos OS Release 19.2
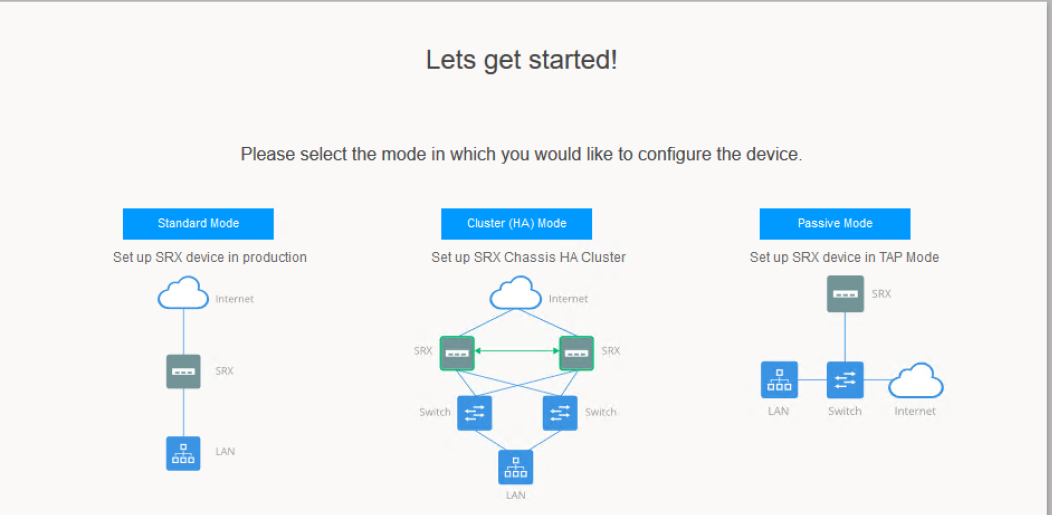
You can select any one of the configuration modes to customize the configuration:
Standard—Configure basic security settings for the SRX345.
Cluster (HA)—Set up the SRX345 in chassis cluster mode.
Passive—Set up the SRX345 in Tap mode. Tap mode enables the SRX345 to passively monitor traffic flows across a network.
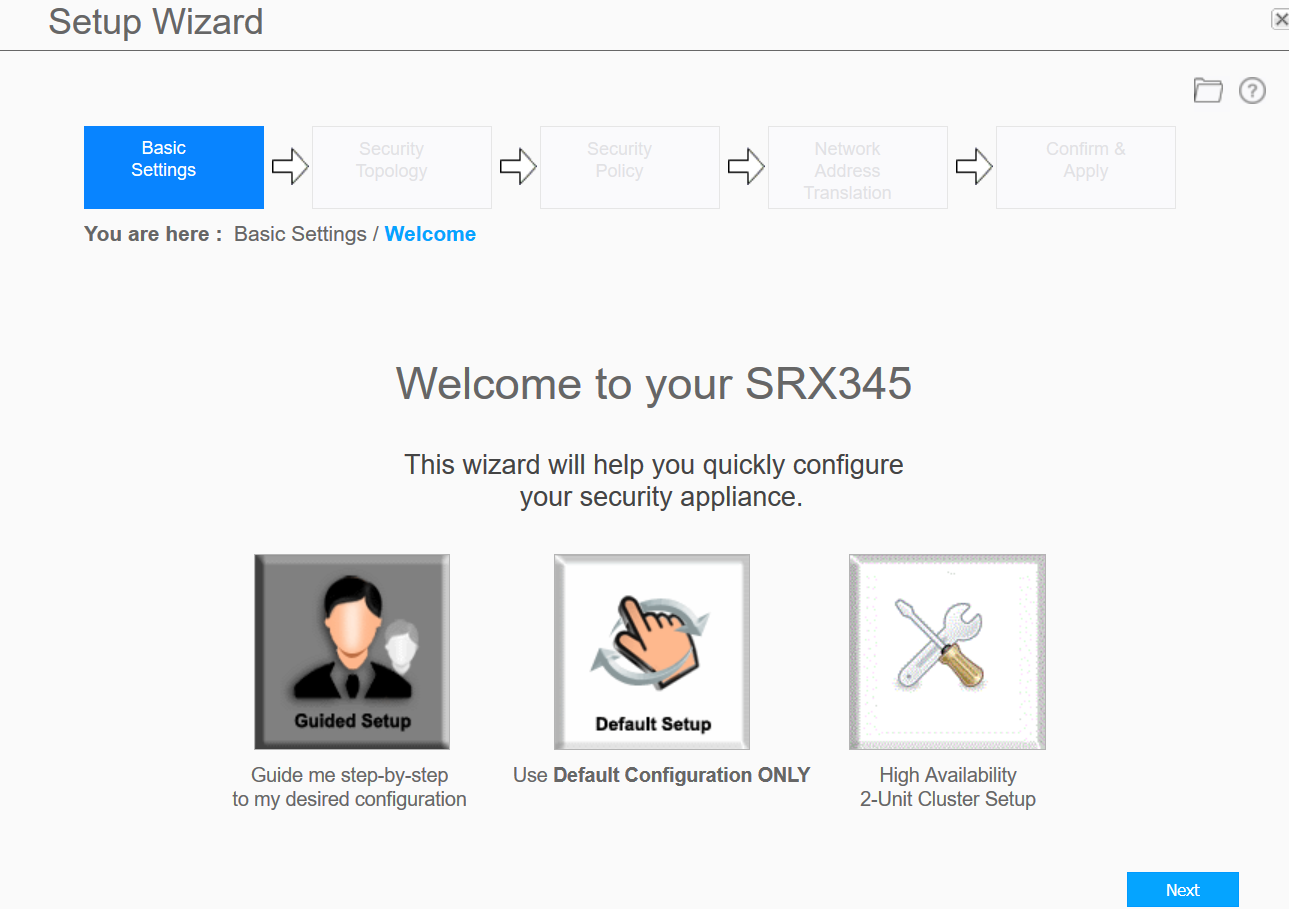
Customize the Configuration for Junos OS Release 15.1X49-D170
You can select any one of the configuration modes to customize the configuration:
Guided Setup (uses a dynamic IP address)—Enables you to set up the SRX345 in a custom security configuration. You can select either the Basic or the Expert option.
The following table compares the Basic and Expert levels:
Options
Basic
Expert
Number of internal zones allowed
3
≥ 3
Internet zone configuration options
Static IP
Dynamic IP
Static IP
Static pool
Dynamic IP
Internal zone service configuration
Allowed
Allowed
Internal destination NAT configuration
Not Allowed
Allowed
Note:If you change the IP address of the port to which the laptop is connected, you might lose connectivity to the device when applying the configuration in the Guided Setup mode. To access J-Web again, open a new browser window and type https://new IP address.
Default Setup (uses a dynamic IP address)—Enables you to quickly set up the SRX345 with the default configuration. Any additional configuration can be done after the wizard setup is completed.
High Availability—Enables you to set up a chassis cluster with a default basic configuration.
Configure the Device Using ZTP with Juniper Networks Network Service Controller
You can configure using ZTP for Junos OS Release 19.2 and earlier releases.
You can use ZTP to complete the initial configuration of the SRX345 in your network automatically, with minimum intervention.
Network Service Controller is a component of the Juniper Networks Contrail Service Orchestration platform that simplifies and automates the design and implementation of custom network services that use an open framework.
For more information, refer to the Network Service Controller section in the datasheet at http://www.juniper.net/assets/us/en/local/pdf/datasheets/1000559-en.pdf.
To configure the device automatically using ZTP:
To complete the ZTP process, ensure that the SRX345 is connected to the Internet.
If you already have the authentication code, enter the code in the webpage displayed.
Figure 3: Authentication Code Page
On successful authentication, the initial configuration is applied and committed on the SRX345. Optionally, the latest Junos OS image is installed on the SRX345 before the initial configuration is applied.
If you do not have the authentication code, you can use the J-Web setup wizard to configure the SRX345. Click Skip to J-Web and configure the SRX345 using J-Web.