The SRX340 and SRX345 services gateways allows
optional installation of a 100 GB serial advanced technology attachment
(SATA) solid-state drive (SSD), which can be used for storing traffic
log entries. The SATA SSD is not hot-swappable.
Note: Use only a Juniper-qualified SATA SSD.
Before you install the SSD, ensure that you have taken the necessary
precautions to prevent electrostatic discharge (ESD) damage (see Prevention of Electrostatic Discharge Damage).
- Power off the services gateway.
- Attach an ESD grounding strap to your bare wrist and connect
the strap to the ESD point on the chassis.
- Remove the two screws securing the SSD cover plate located
on the rear panel, and remove the SSD tray from the slot.
Figure 1: Removing the SSD Tray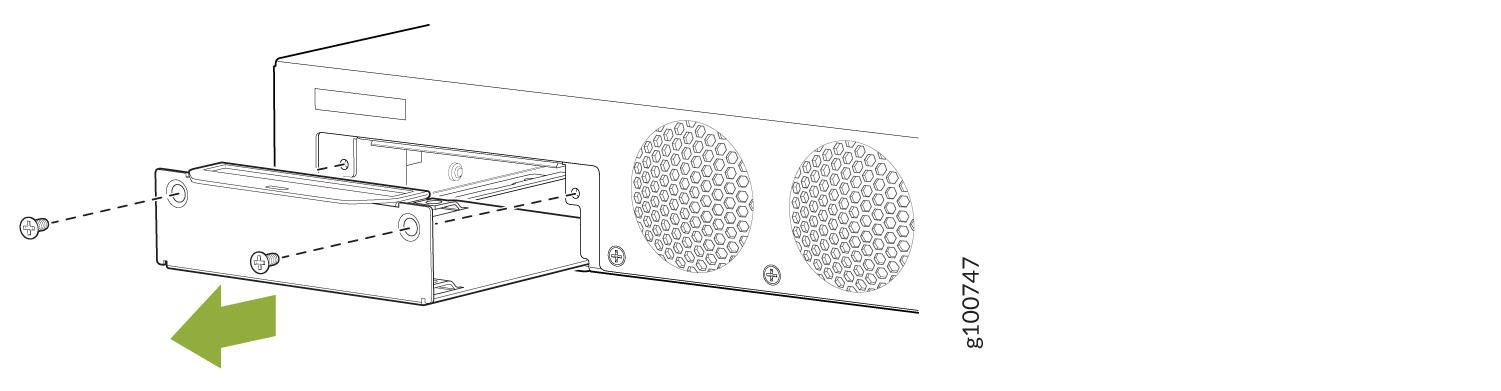
- Place the SSD on the tray, with the label facing up. Secure
the SSD to the tray by using four M3x6 mm screws. Apply between 4.5
in.-lb (0.51 N-m) and 6 in.-lb (0.67 N-m) of torque to each screw.
Figure 2: Securing the
SSD to the SSD Tray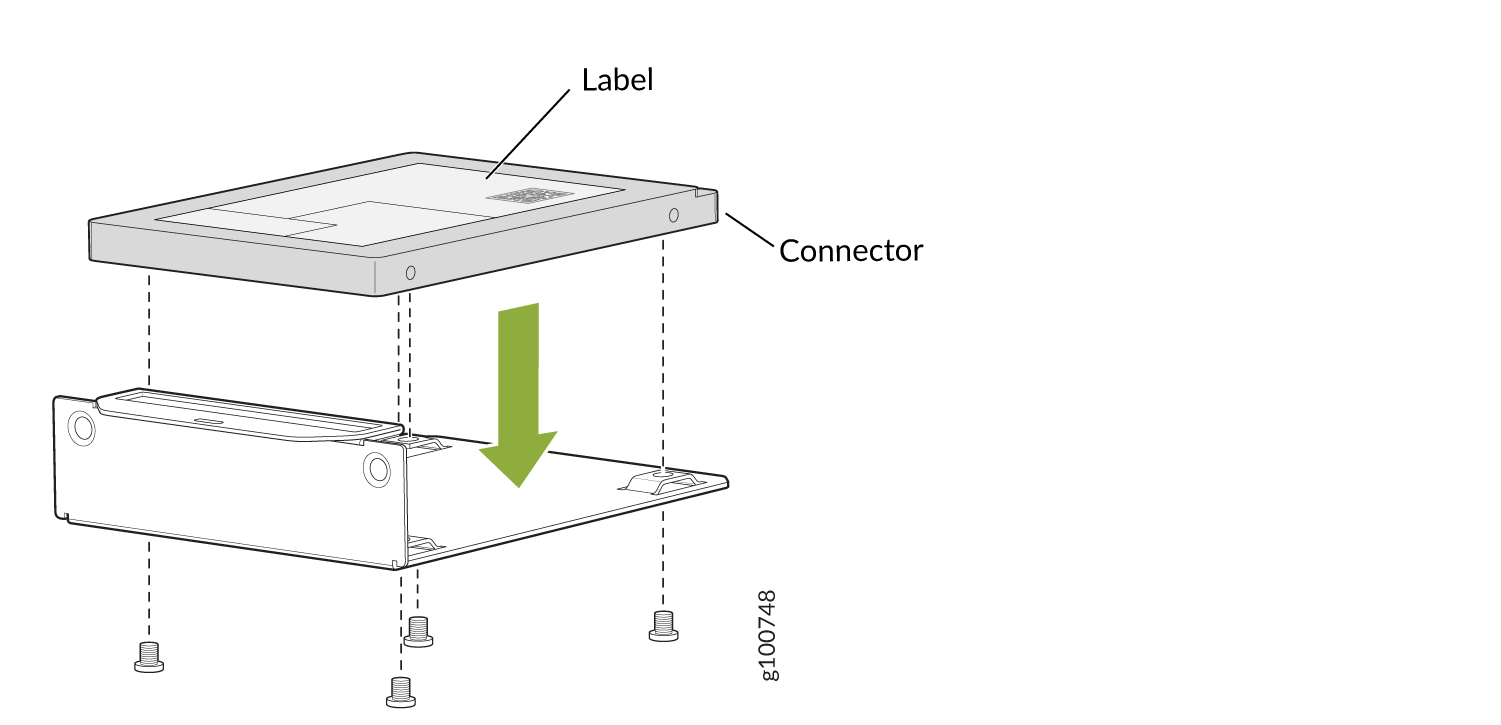
- Slide the SSD tray into the slot and secure the cover
plate.
Figure 3: Installing the SSD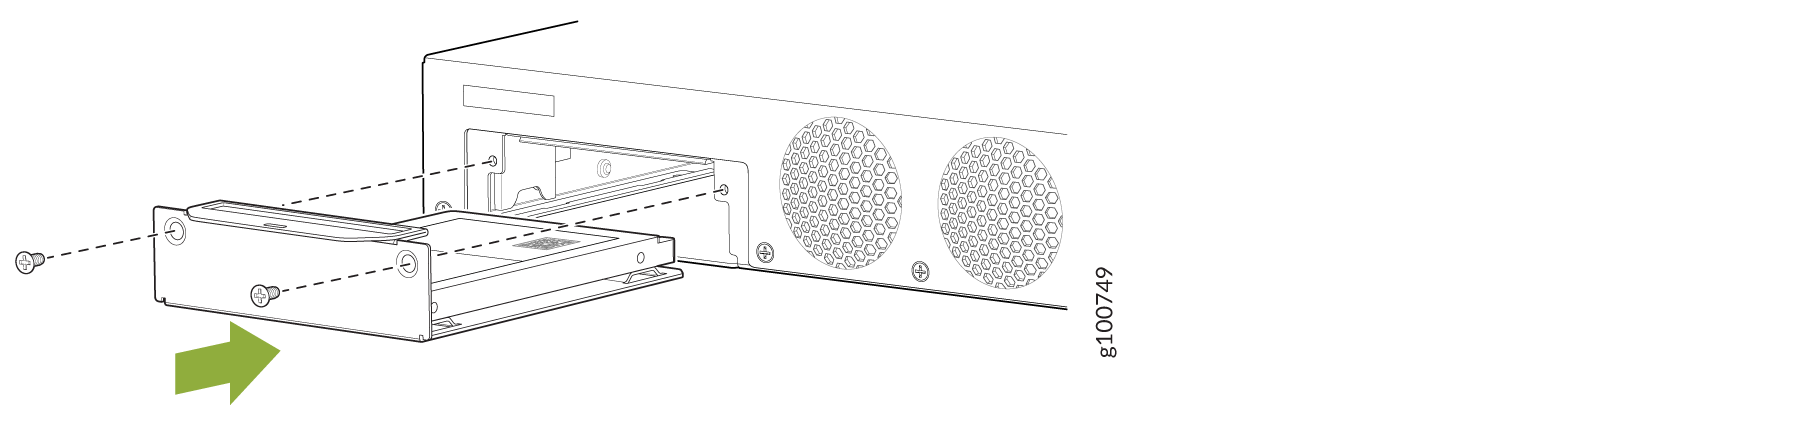
- Power on the services gateway.
If the SSD is unformatted, the SSD is formatted during the bootup
process. A single partition in the Unix (UFS) format is created, which
occupies the entire SSD. The partition is mounted on the /var/ssd directory automatically. A symbolic link
(symlink) from the /mfs/var/traffic-log directory to the /var/ssd/traffic-log directory is created.
- Verify that the SSD information is displayed in the output
of the
show chassis hardware detail and show system
storage detail commands.user@host> show chassis hardware detail
Hardware inventory:
Item Version Part number Serial number Description
Chassis CZ2916AF0098 SRX345
Routing Engine REV 0x07 650-065042 CZ2916AF0098 RE-SRX345
da0 7718 MB ATP CG eUSB Nand Flash
ad0 95396 MB SFSA100GQ1AA4TO-C-LB-21 000060158419A3000068 Hard Disk
usb0 (addr 1) product 0x0000 0 vendor 0x0000 uhub0
usb0 (addr 2) product 0x1000 4096 vendor 0x090c umass0
FPC 0 FPC
PIC 0 8xGE,8xGE SFP Base PIC
Xcvr 12 REV 01 740-021308 AD154130TYA SFP+-10G-SR
FPC 1 REV 01 650-073957 AG49041294 FPC
PIC 0 LTE for AA mPIM
FPC 2 REV 06 750-064613 BCAN2181 FPC
PIC 0 1x Serial mPIM (RoHS)
FPC 3 REV 09 750-064612 BCBB9371 FPC
PIC 0 1x VDSL2 mPIM (RoHS)
FPC 4 REV 06 750-064611 BCAZ1189 FPC
PIC 0 1x T1E1 mPIM (RoHS)
Power Supply 0
user@host> show system storage detail
Filesystem       1024-blocks       Used      Avail   Capacity   Mounted on
/dev/da0s1a           592690     400812     144464        74%  /
devfs                      1          1          0       100%  /dev
/dev/md0               20012      11884       6528        65%  /junos
/cf/packages          592690     400812     144464        74%  /junos/cf/packages
devfs                      1          1          0       100%  /junos/cf/dev
/dev/md1             1383532    1383532          0       100%  /junos
/cf                    20012      11884       6528        65%  /junos/cf
devfs                      1          1          0       100%  /junos/dev/
/cf/packages          592690     400812     144464        74%  /junos/cf/packages1
procfs                     4          4          0       100%  /proc
/dev/bo0s3e           189432         20     174258         0%  /config
/dev/bo0s3f          5239224      27584    4792504         1%  /cf/var
/dev/md2             1056324     100514     871306        10%  /mfs
/cf/var/jail         5239224      27584    4792504         1%  /jail/var
/cf/var/jails/rest-api    5239224      27584    4792504    1%  /web-api/var
/cf/var/log          5239224      27584    4792504         1%  /jail/var/log
devfs                      1          1          0       100%  /jail/dev
/dev/md3                1884          4       1730         0%  /jail/mfs
/dev/ssd            96138198       3406   88443738         0%  /var/ssd