SRX320 Firewall Factory-Default Settings
The SRX320 ships with the following factory-default settings:
|
Source Zone |
Destination Zone |
Policy Action |
|---|---|---|
|
trust |
trust |
permit |
|
trust |
untrust |
permit |
|
Source Zone |
Destination Zone |
Policy Action |
|---|---|---|
|
trust |
untrust |
Source NAT to untrust zone interface |
|
Port Label |
Interface |
Security Zone |
DHCP State |
IP Address |
|---|---|---|---|---|
|
0/0 and 0/7 |
ge-0/0/0 and ge-0/0/7 |
untrust |
Client |
Unassigned |
|
0/1 to 0/6 |
VLAN interface irb.0 (ge-0/0/1 to ge-0/0/6) |
trust |
Server |
192.168.1.1/24 |
|
Interface |
Security Zone |
IP Address |
|---|---|---|
|
cl-1/0/0 |
N/A |
N/A |
|
dl0 (logical) |
untrust |
ISP assigned* |
|
*Only if the LTE Mini-PIM is present |
||
The SRX320 ships with the following services and protocols enabled by default:
|
Services |
Protocols |
Device Startup Mode |
|---|---|---|
|
SSH HTTPS |
RSTP (all interfaces) |
Switching |
Starting in Junos OS Release 25.2R1 the factory-default device configuration does not
include the netconf ssh statement at the [edit system
services] hierarchy level.
To provide secure traffic, a basic set of screens are configured on the untrust zone. In addition, the default security policy blocks traffic that originates from any untrust zone interface from passing to the trust zone.
How to Load and View Factory-Default Settings
Your device ships with a set of factory-default configuration files. To view the factory-default settings on your device:
-
Log in as the root user and provide your credentials.
-
View the full list of default configuration files for various hardware platforms:
user@host> file list /etc/config
-
To display the contents of a specific default configuration file:
user@host> file show /etc/config/<config file name>
When you commit changes to the configuration, a new configuration file is created,
which becomes the active configuration. You can always load a fresh factory-default
configuration with the load factory-default configuration mode
command to revert to the factory-default configuration. The Junos software selects
the correct default configuration for the hardware platform when you issue the
load factory-default configuration command.
You use the show configuration operational mode command, or simply
the show command when in configuration mode, to view the
settings.
You can also load a factory default configuration using the front panel RESET CONFIG button. See Using the RESET CONFIG Button on the SRX320 Services Gateway.
Plug and Play for Cloud-Based Provisioning
This section shows you how to leverage the SRX320 factory defaults for Plug and Play Internet connectivity. You use this connectivity to remotely manage and configure the SRX320, either manually or through a cloud-based provisioning service.
Follow these steps to quickly get your SRX320 on the Internet to access cloud-based provisioning services such as Juniper Mist Cloud or Contrail Service Orchestration (CSO). The Plug and Play connectivity of the SRX320 with a factory default configuration is shown below.
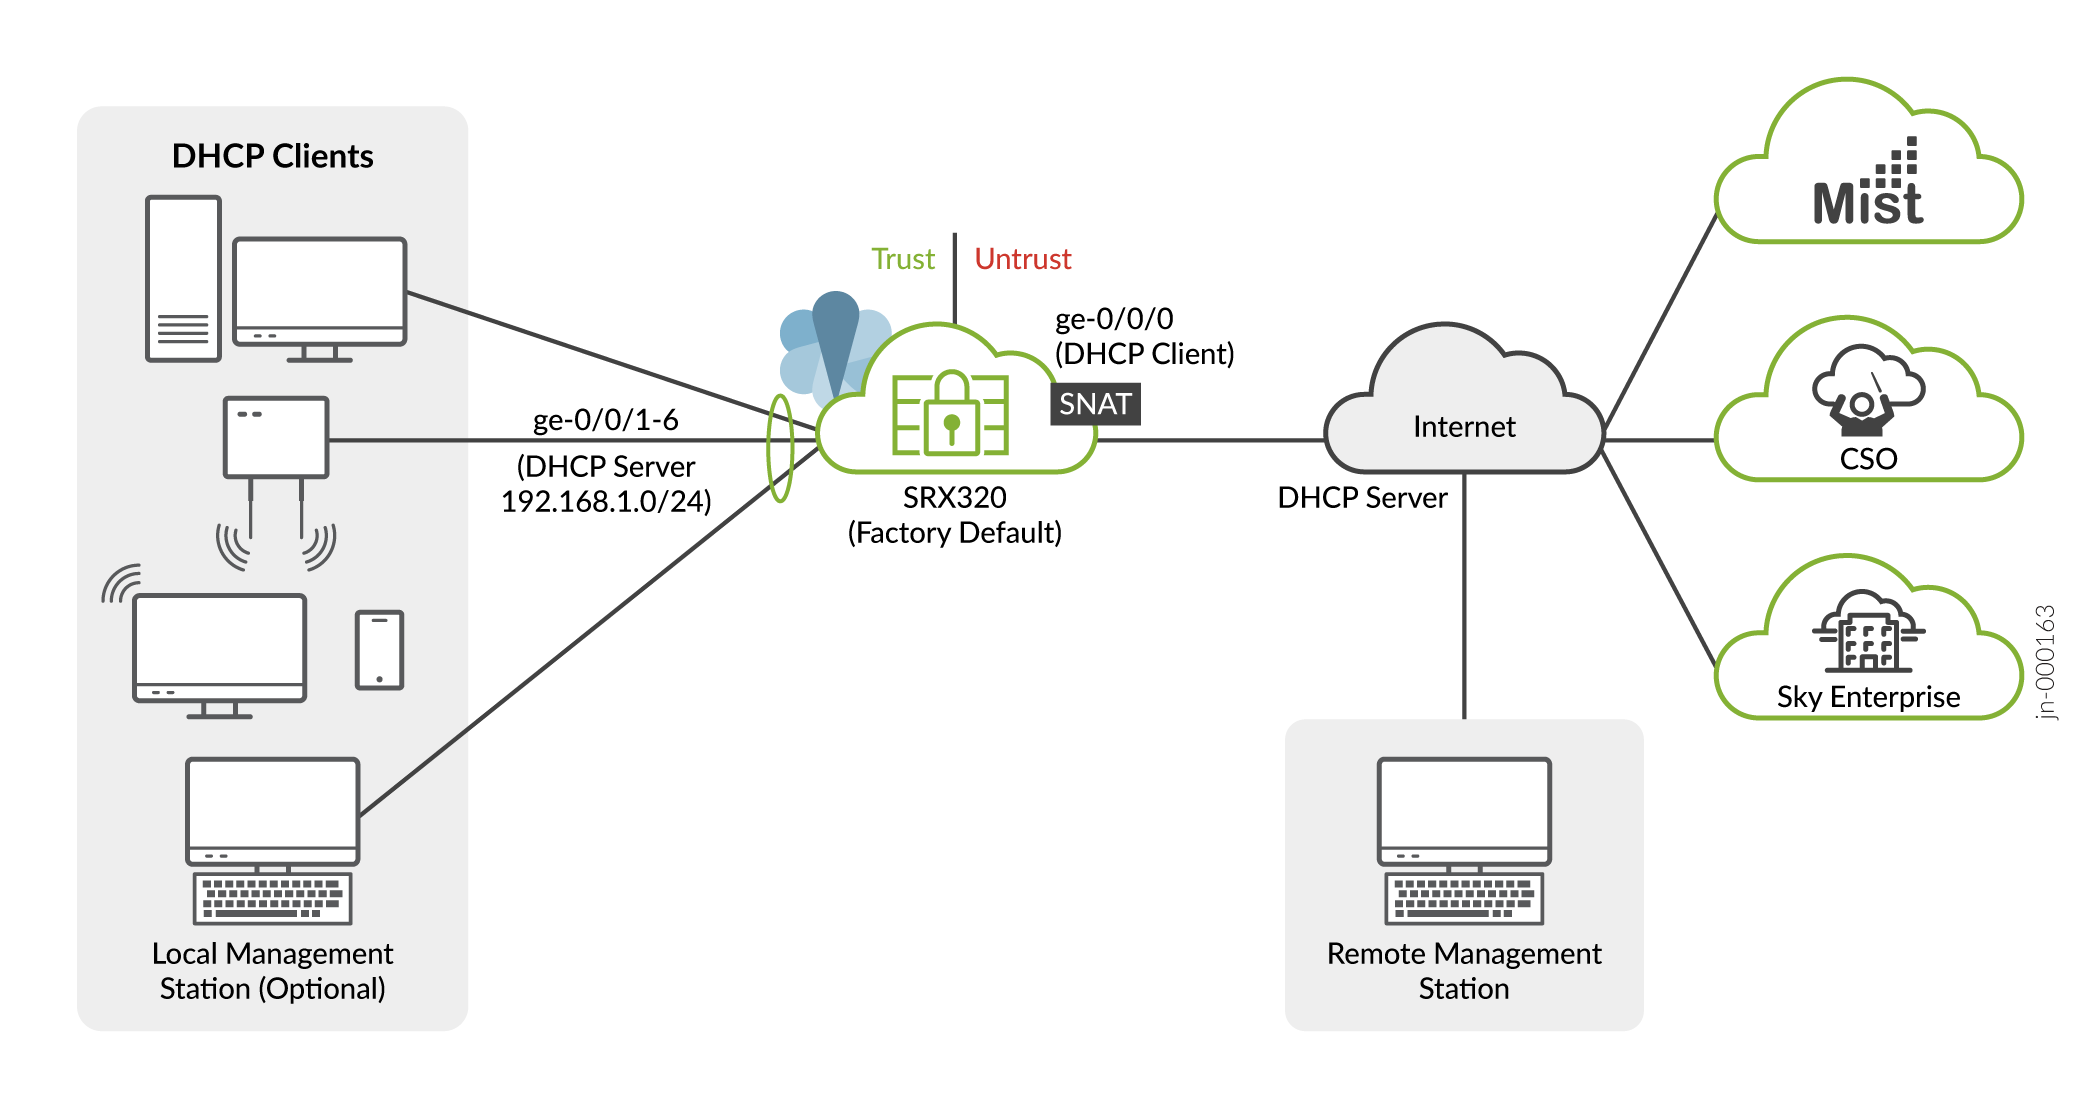
- Connect the WAN network to port 0/0 (ge-0/0/0). In the default configuration the ge-0/0/0 is your WAN interface. In the default configuration this interface is placed in the untrust zone and is configured as a DHCP client. These settings allow the SRX to receive an IP address and default route from the service provider.
- Configure your LAN clients (PCs, notebooks, APs, etc.) for DHCP address
assignment. Attach these devices to any of the LAN ports from 0/1 through 0/6
(ge-0/0/1 through ge-0/0/6). That's it, you're done!
In the default configuration the LAN ports are configured in a trust VLAN with an associated IRB interface. DHCP services are provided to the trust VLAN through that IRB interface, which is also placed into the trust zone. The result is that all LAN ports share a common IP subnet with full Layer 2 (untagged) connectivity through the SRX. At Layer 3, the IRB interface associates the LAN with a 192.168.1.0/24 subnet, with the 192.168.1.1 address reserved for itself.
The LAN devices are assigned an IP address and default gateway from the 192.168.1.0/24 subnet through DHCP.
- Verify that the SRX320 is providing Internet connectivity. Open a browser on a
device attached to a LAN port and point it to http://www.juniper.net. If the
page doesn’t load, check the Internet connection.
To isolate any faults, try these steps:
- Power cycle the WAN modem. Verify the modem is correctly connecting to the service provider.
- Ping an Internet destination from the SRX320 using the CLI to test internet connectivity. Make sure the destination is allowed to reply to pings, and try using both a name and IP address to isolate DNS from connectivity issues.
- Generate a ping from a LAN device to the 192.168.1.1 address assigned to the IRB interface on the SRX. A successful reply validates DHCP and Layer 2 connectivity between the LAN devices and the SRX.
- Use the
show dhcp server bindingcommand to check the LAN side DHCP server address assignments.
At this point, both the SRX320 and the LAN devices have Internet access. The default policy permits all traffic from the trust to untrust zone. The default policy also perform SNAT on traffic leaving the WAN. By default all response traffic is allowed back from the untrust to the trust zone. Traffic that originates in the untrust (WAN) zone is blocked from the trust zone. HTTPS, TFTP, and DHCP traffic is allowed to originate from the untrust zone and be sent to the local host.
You are able to access the SRX using J-Web to perform initial configuration both locally and remotely. For local access, use a machine attached to a LAN port and point your browser to https://191.168.1.1. To access remotely, over the WAN interface, you need to know the IP address assigned to the SRX by the WAN provider. See The J-Web Setup Wizard for details on performing initial setup using J-Web setup wizard. You can always access the SRX320 locally using the console port to perform additional configuration. Refer to SRX320 Day One+ for details on using the CLI for initial configuration.
Note:In the default configuration a password is not needed to access the SRX320 using J-Web, either locally or remotely. You should either adopt the SRX into a cloud provisioning service, or manually configure a root password (using J-Web or the Junos CLI), as soon as possible after attaching your SRX to the Internet.