Help us improve your experience.

Let us know what you think.

Do you have time for a two-minute survey?


Install the SRX1600 in a Rack

Mount the SRX1600 on a rack by following the recommended procedures that are appropriate for your site.

You can mount the SRX1600 on a four-post rack or in a cabinet. Use the toolless rack mount kit shipped with the device.

Complete the following prerequisites before you mount the device:

Note:

Ensure that you support the rear of the chassis throughout the process of mounting the appliance on the rack.

CAUTION:

A qualified technician must verify that the rack or cabinet is strong enough to support the device's weight before mounting the device. Have the technician verify also that the rack or cabinet has adequate support at the installation site.

CAUTION:

If you are installing more than one device on a rack or in a cabinet, install the first device at the bottom of the rack.

Mount your Device by Using the JNP-4P-TL-1RU-RMK Rack Mount Kit on a Square Hole 4-Post Rack

Ensure that you have the following tools and parts available:

  • An ESD grounding strap—not provided.

  • A pair of side mounting brackets that attach to the chassis—provided with the rack mount kit.

  • A pair of front and rear mounting rails that attach to the rack posts—provided with the rack mount kit.

To mount the device on a four-post rack:

  1. Review the General Safety Guidelines and Warnings.
  2. Wrap and fasten one end of the electrostatic discharge (ESD) cable grounding strap around your bare wrist, and connect the other end to a site ESD point.
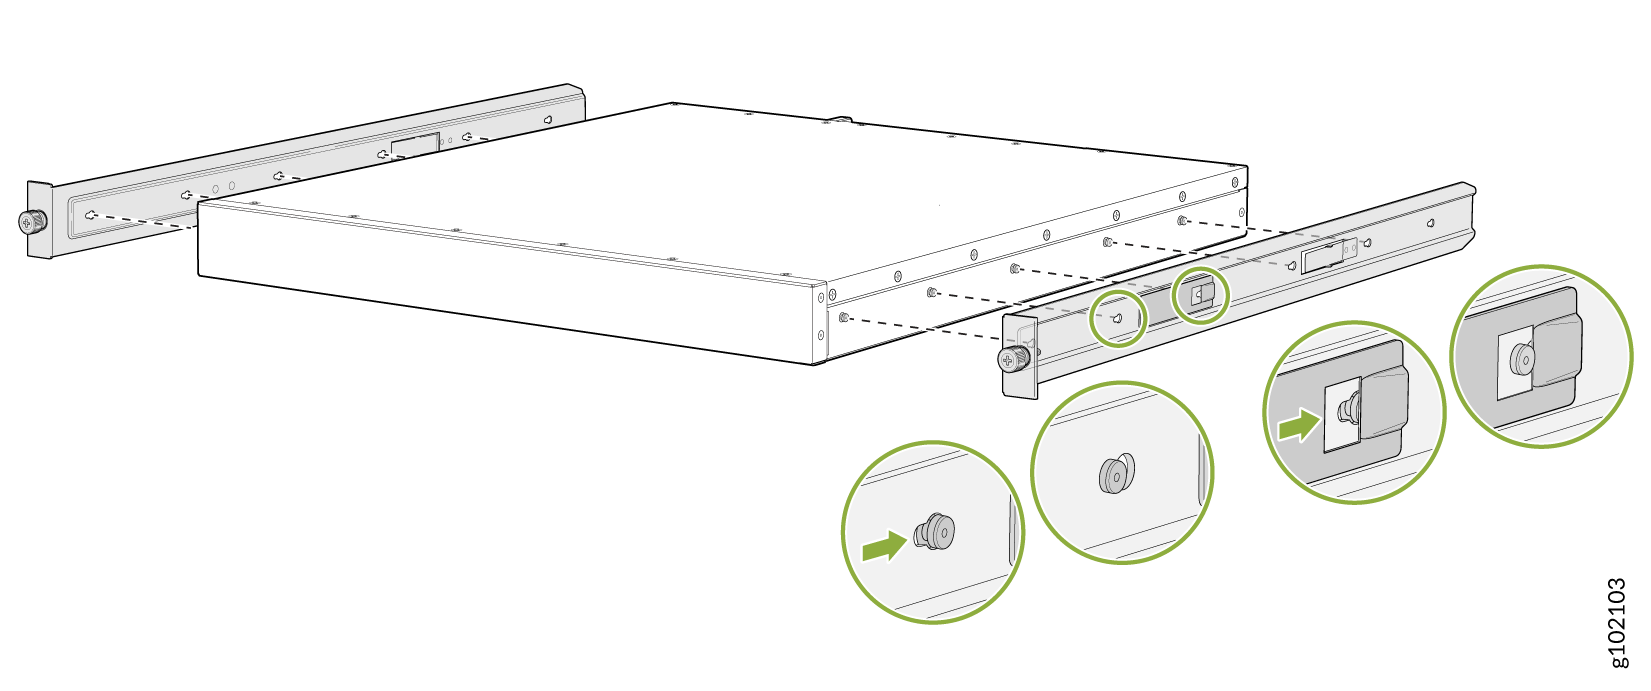
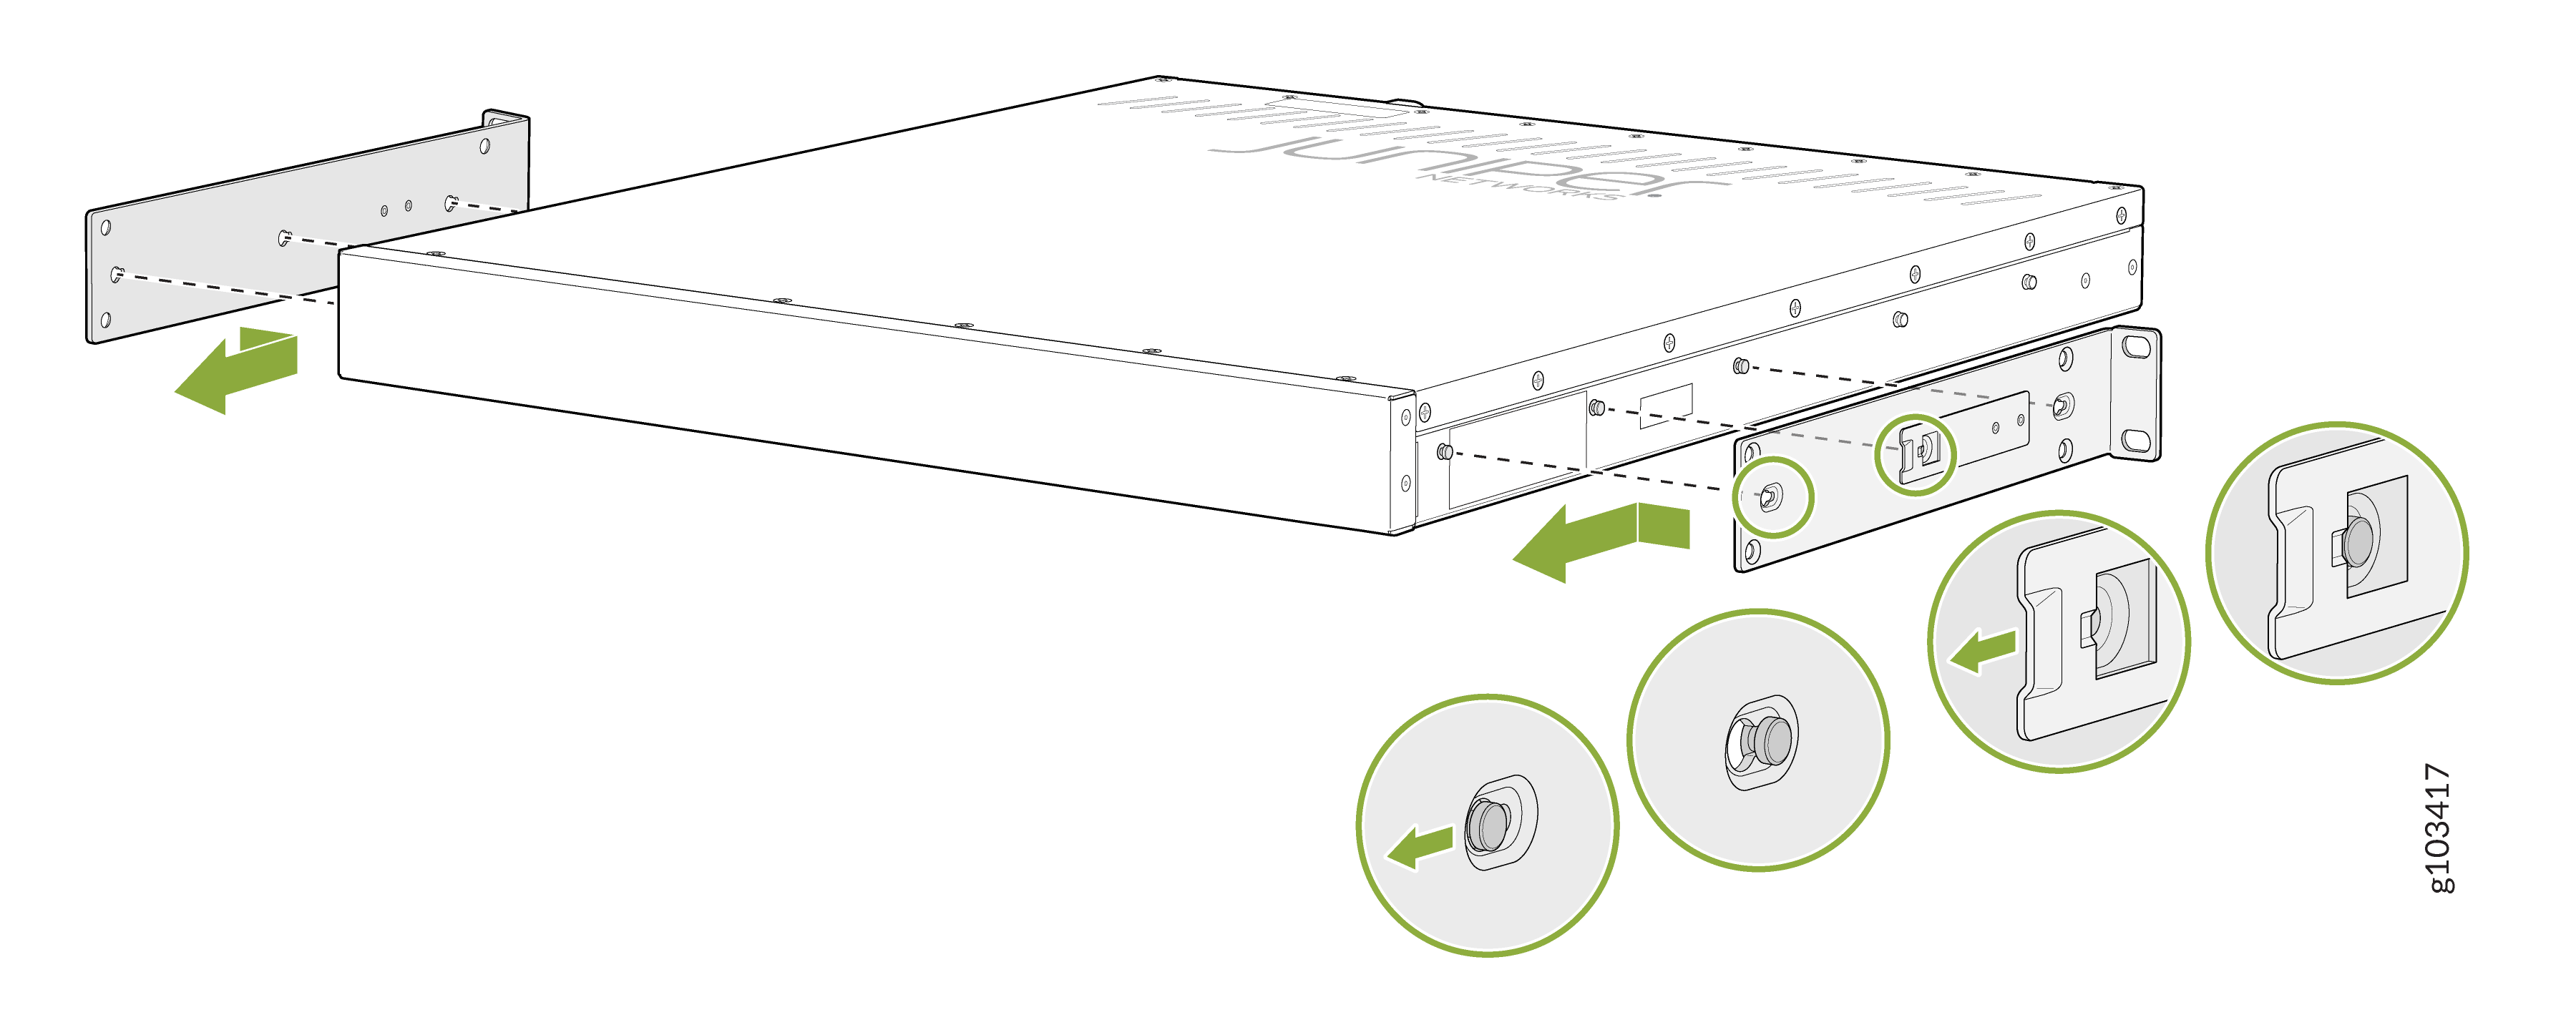
  3. To attach the side mounting brackets to the chassis, align the keyholes on the mounting brackets over the shoulder screws on the chassis. Slide the mounting brackets toward the rear of the chassis.
    Figure 1: Attach the Side Mounting Brackets Instructional diagram for installing a rack-mounted device on sliding rails in a server rack. Green arrows show locking mechanisms and screw placements.
  4. Assemble the mounting rails by sliding the rear floating rails into the front rails.
    Figure 2: Assemble the Mounting Rails Diagram of drawer slides assembly with arrows indicating the process of fitting components together for smooth drawer operation.
  5. Install the mounting rails on the rack:
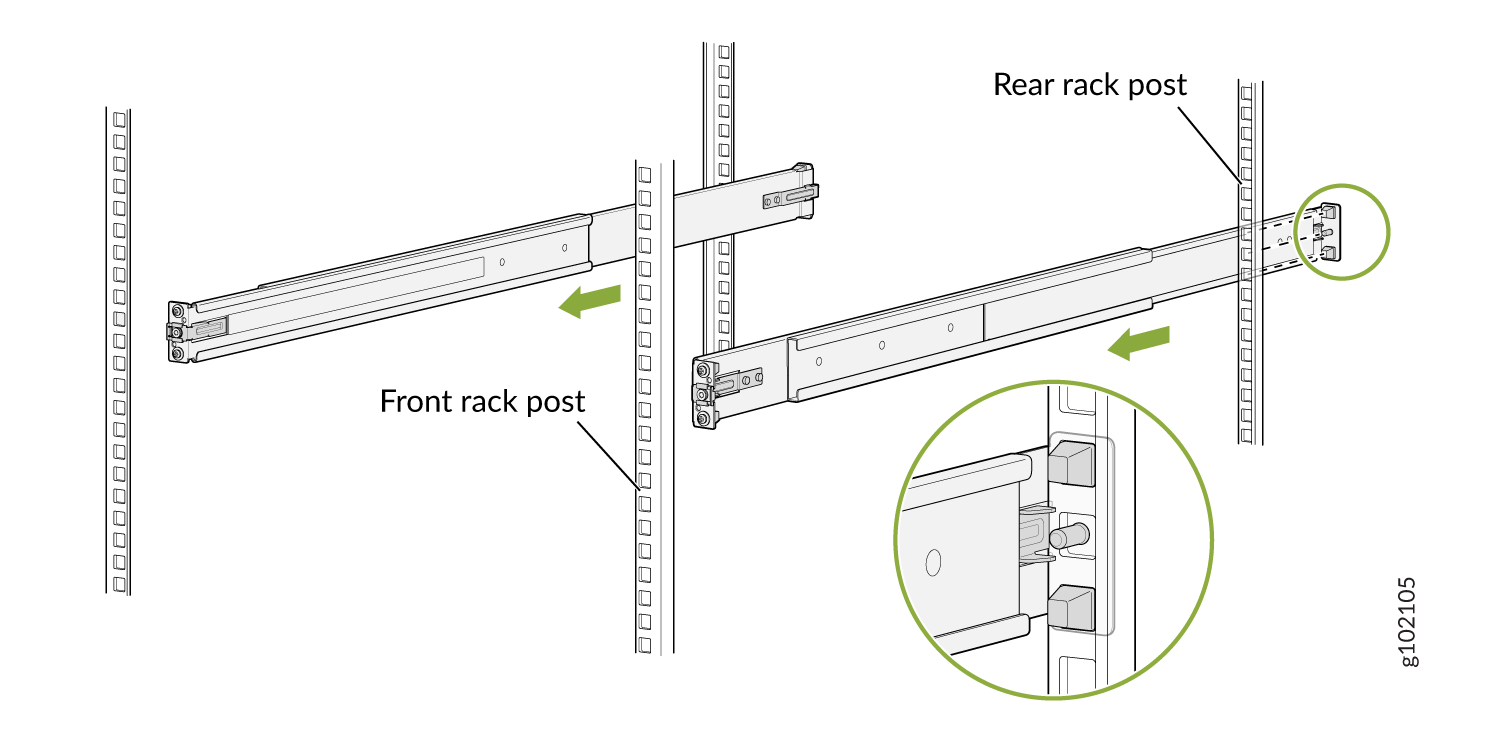
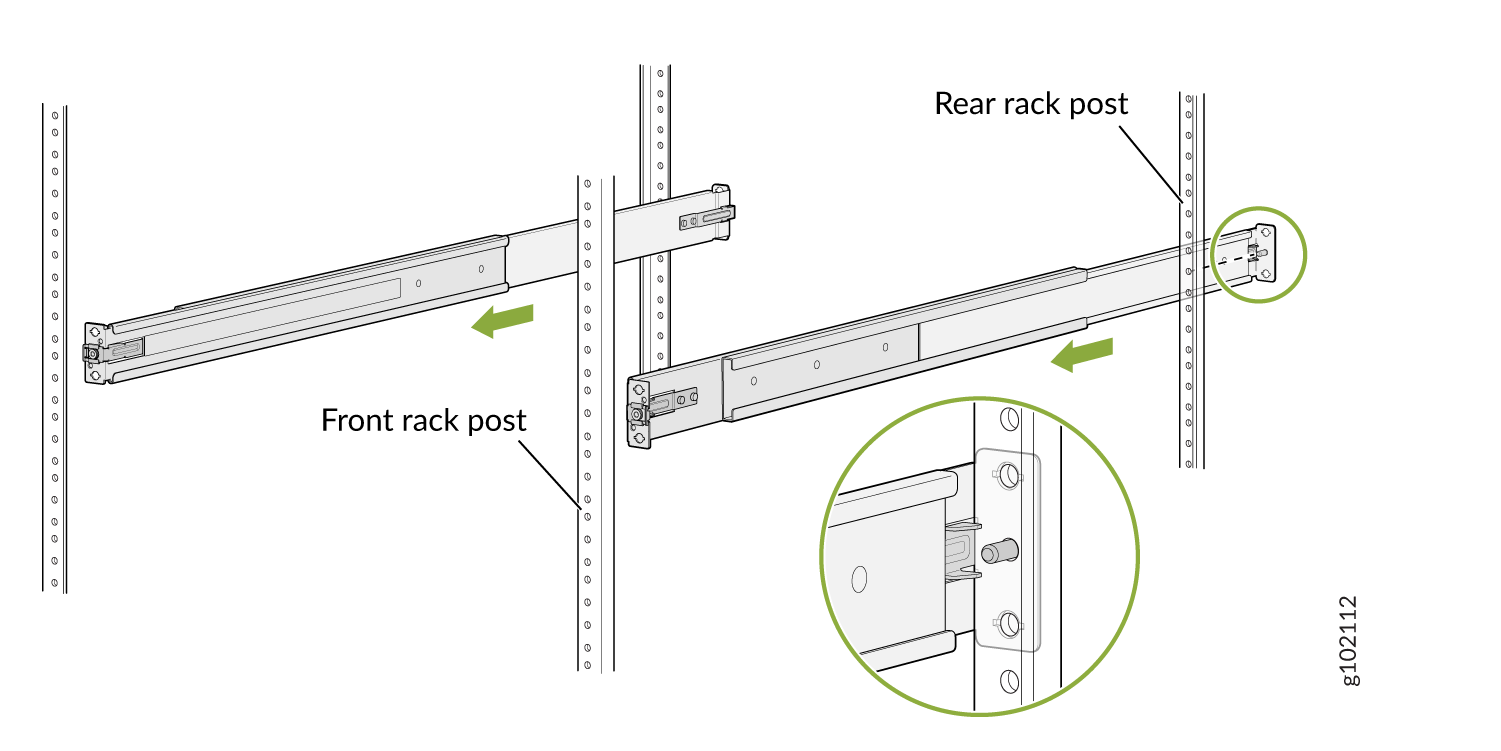
    1. Align the guide blocks of the rear mounting rails with the rear-post holes. Pull the rear mounting rails toward the front of the rack to lock the rails in place. You will hear a distinct click sound when the latch locks into the corresponding rack holes.
      Figure 3: Install the Rear Mounting Rails Installing rack rails into server rack with green arrows indicating insertion direction. Zoomed-in view shows rail connection at rear rack post.
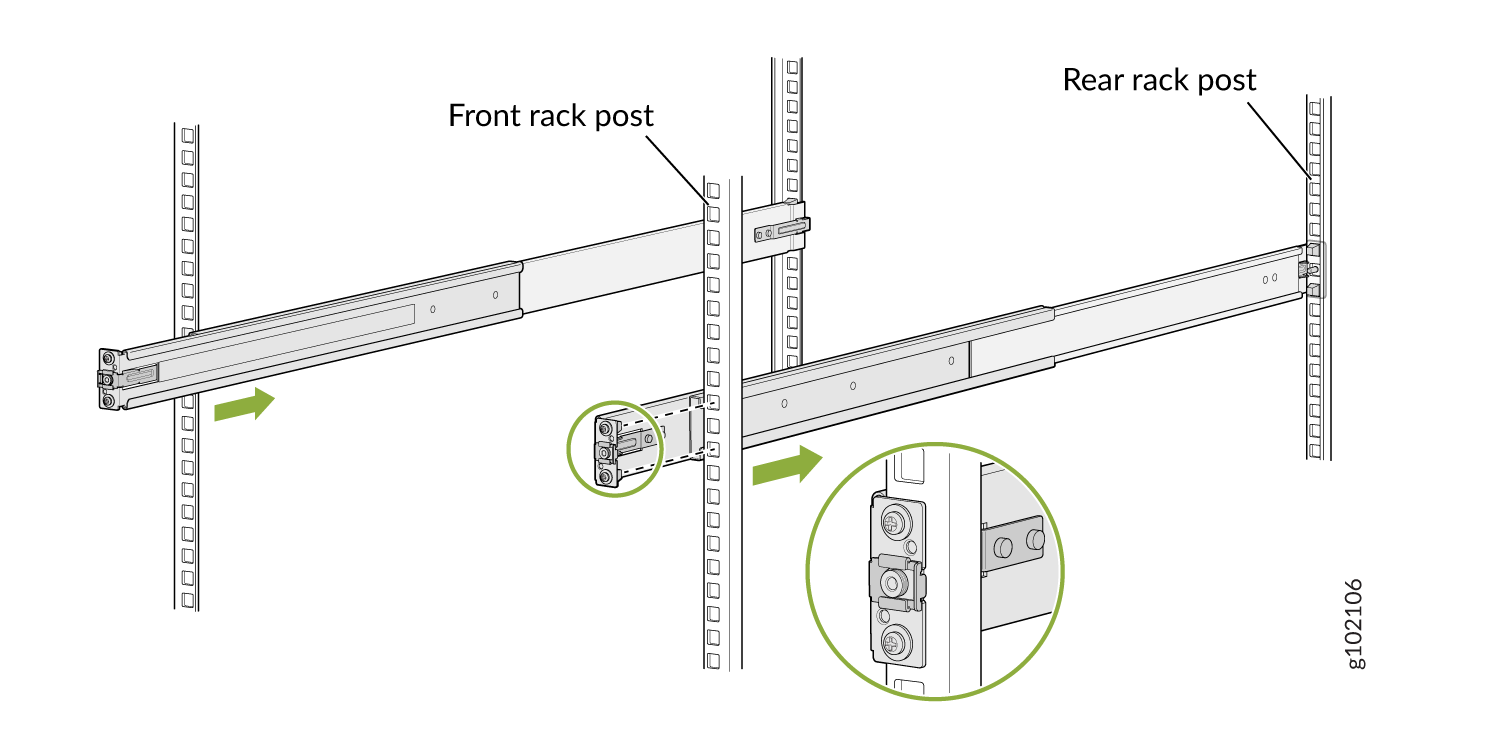
    2. Align the guide blocks of the front mounting rails with the front-post holes. Push the front mounting rails toward the rear of the rack to lock the rails in place. You will hear a distinct click sound when the latch locks into the corresponding rack holes.
      Figure 4: Install the Front Mounting Rails Rack-mount rail installation process with sliding rails attached to front and rear rack posts. Green arrows show installation direction.
    3. Visually ensure that the front and rear latches are locked into place on the mounting rails. The mounting rails should be securely installed on the rack.
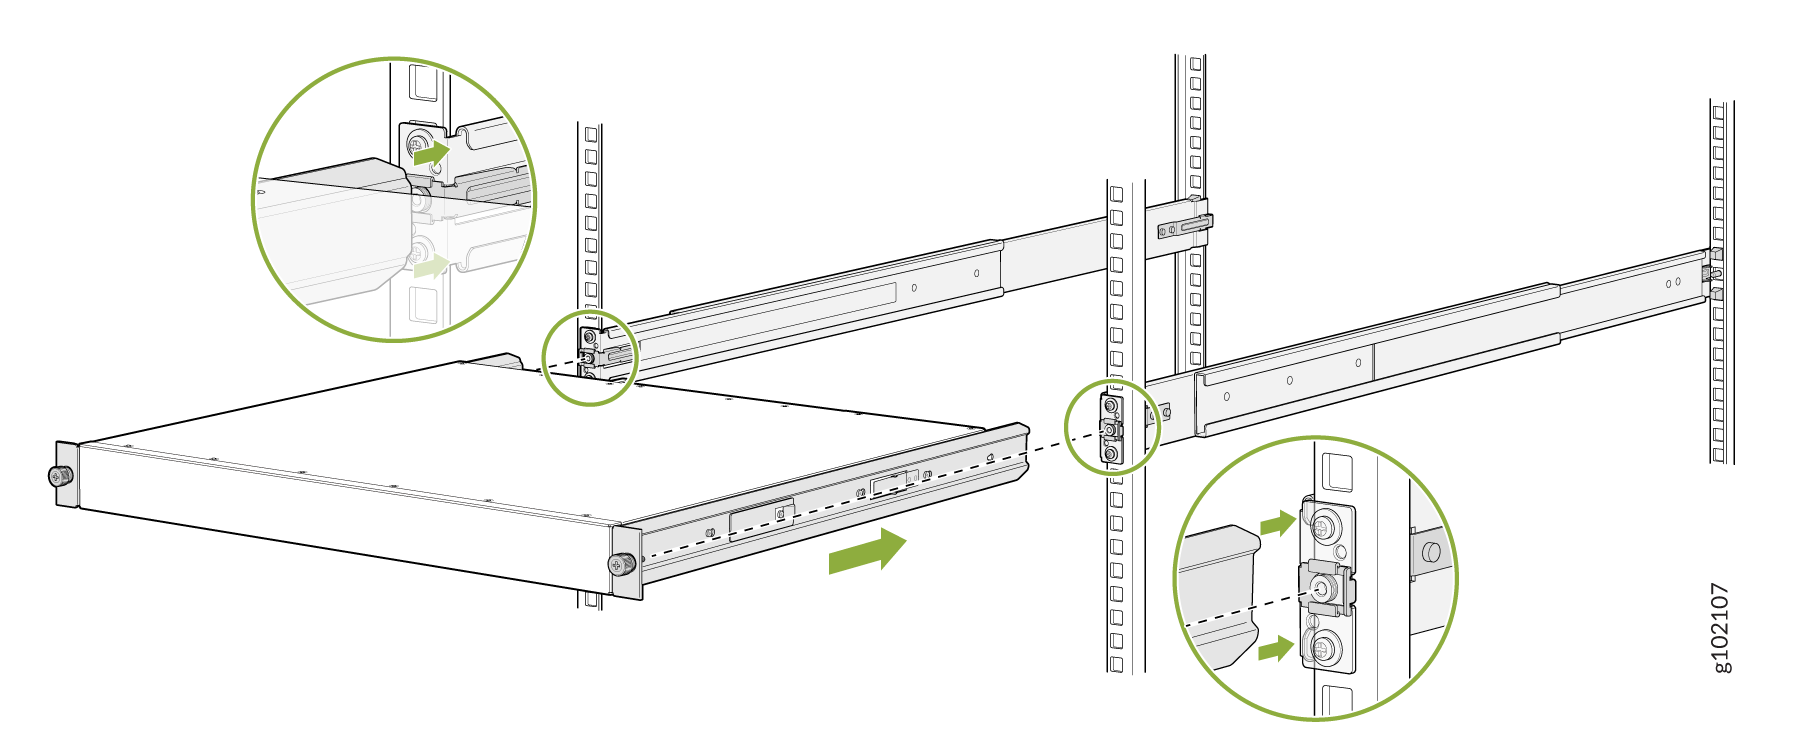
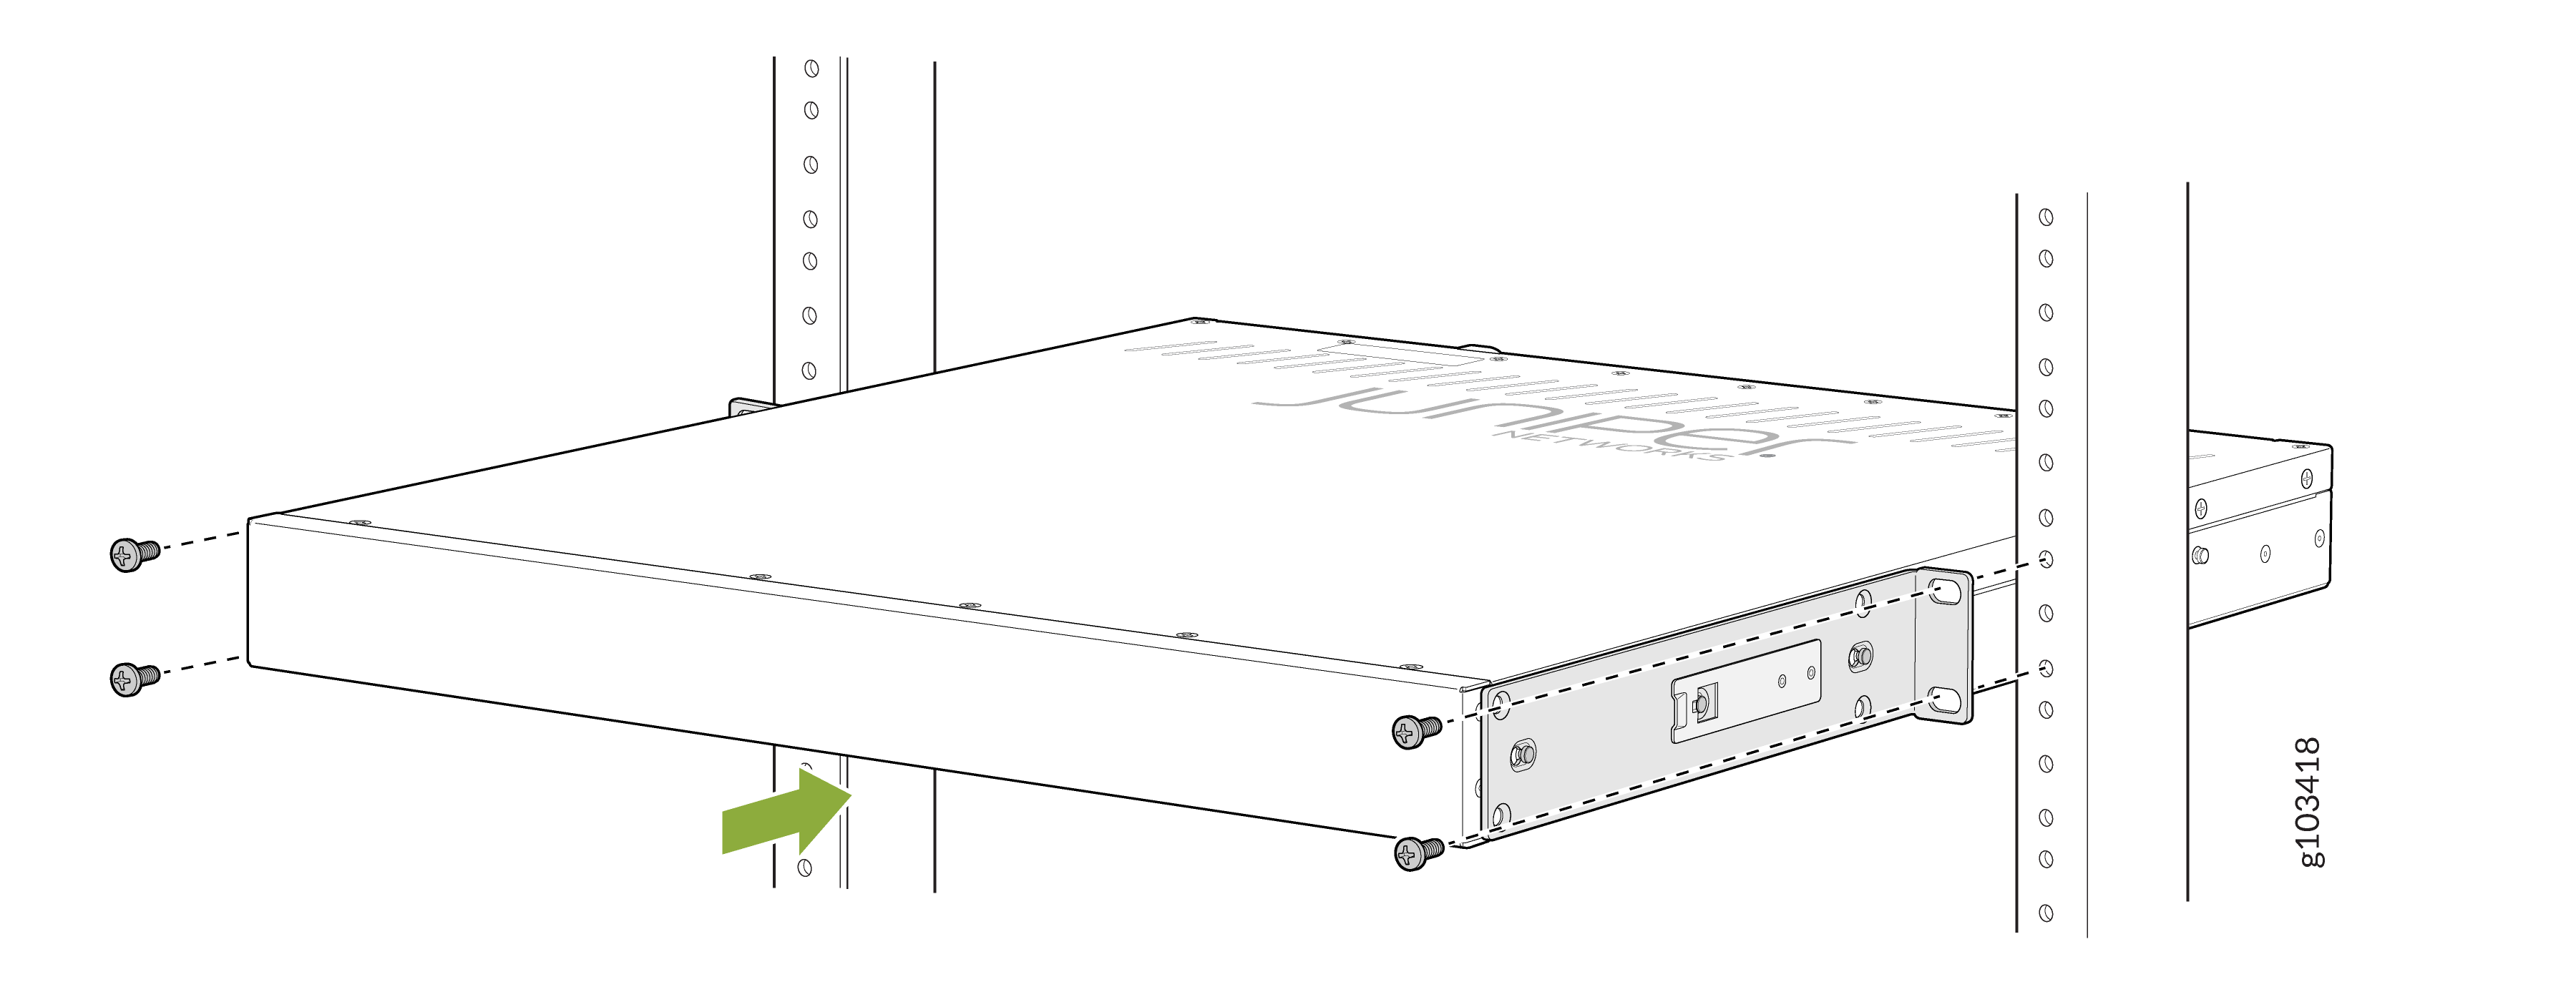
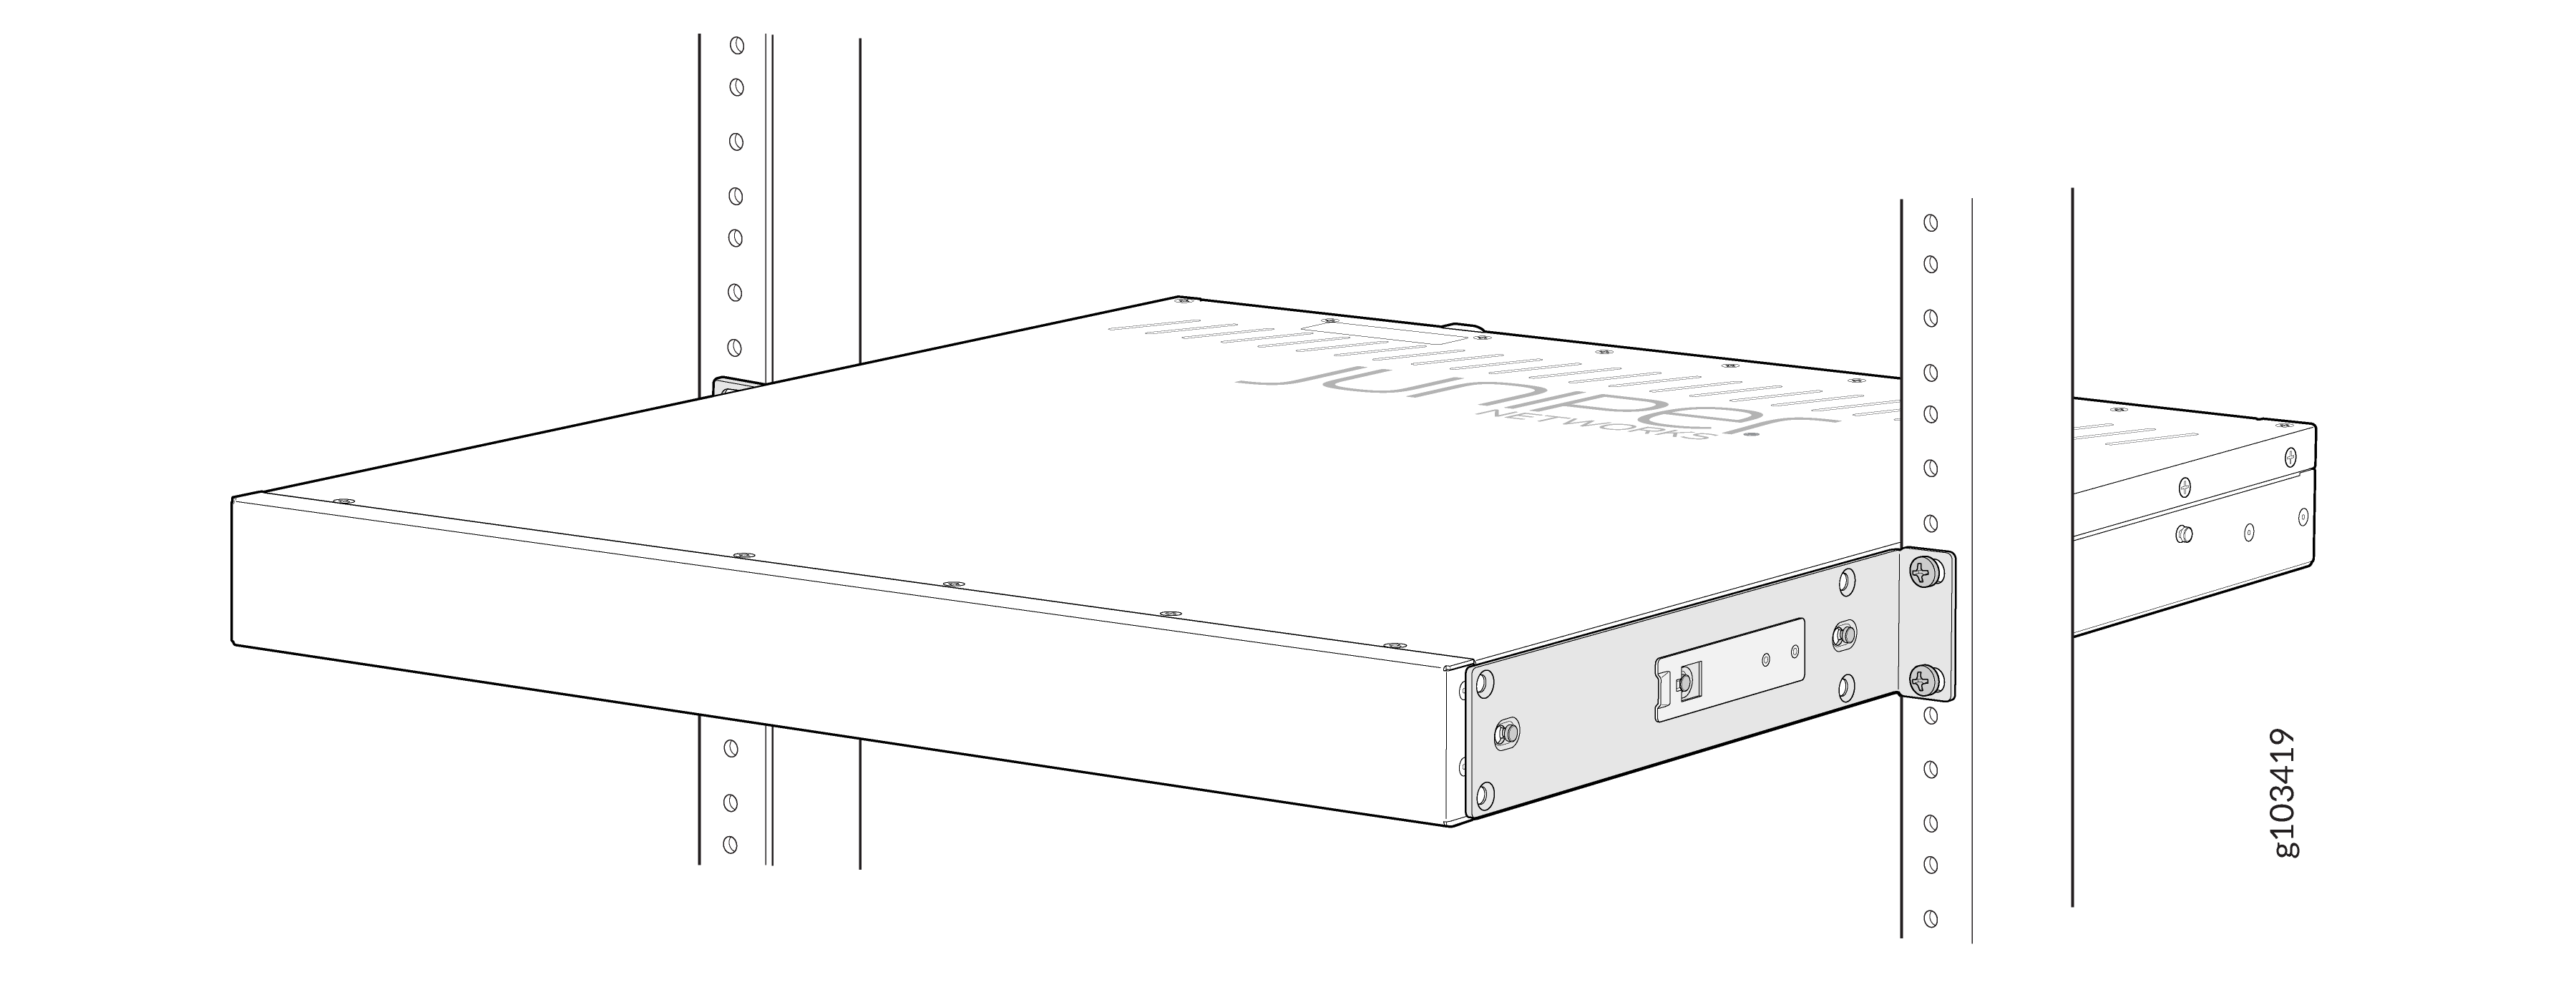
  6. Lift the device and position it in the rack, aligning the side mounting-brackets with the mounting rails. Slide the device into the channels of the rack mounting rails.
    Figure 5: Slide the Device into the Rack Diagram of server installation in a rack using sliding rails, with green arrows highlighting key steps.
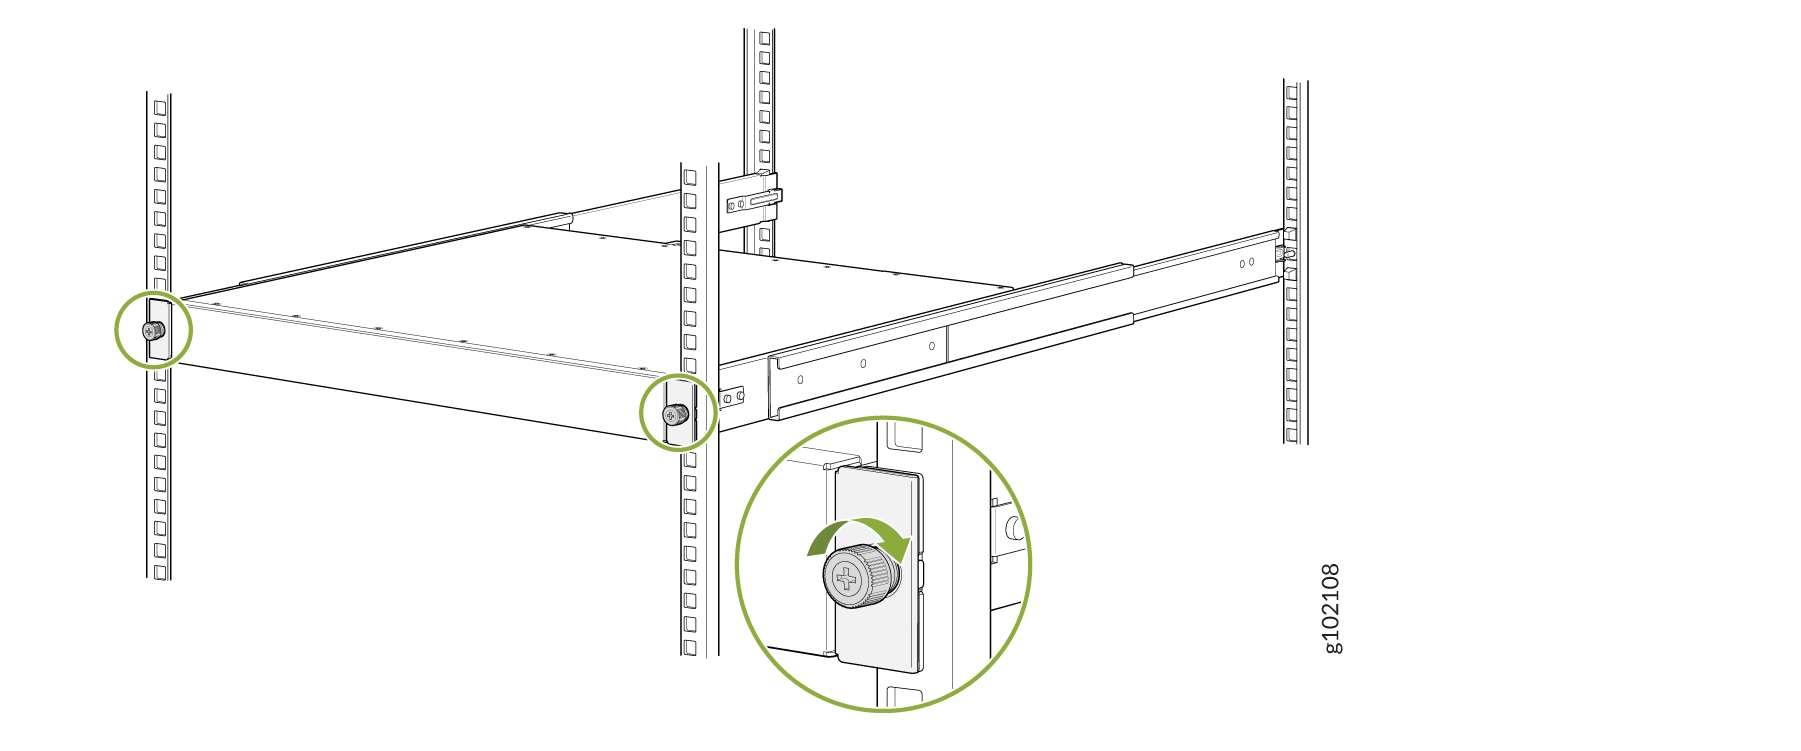
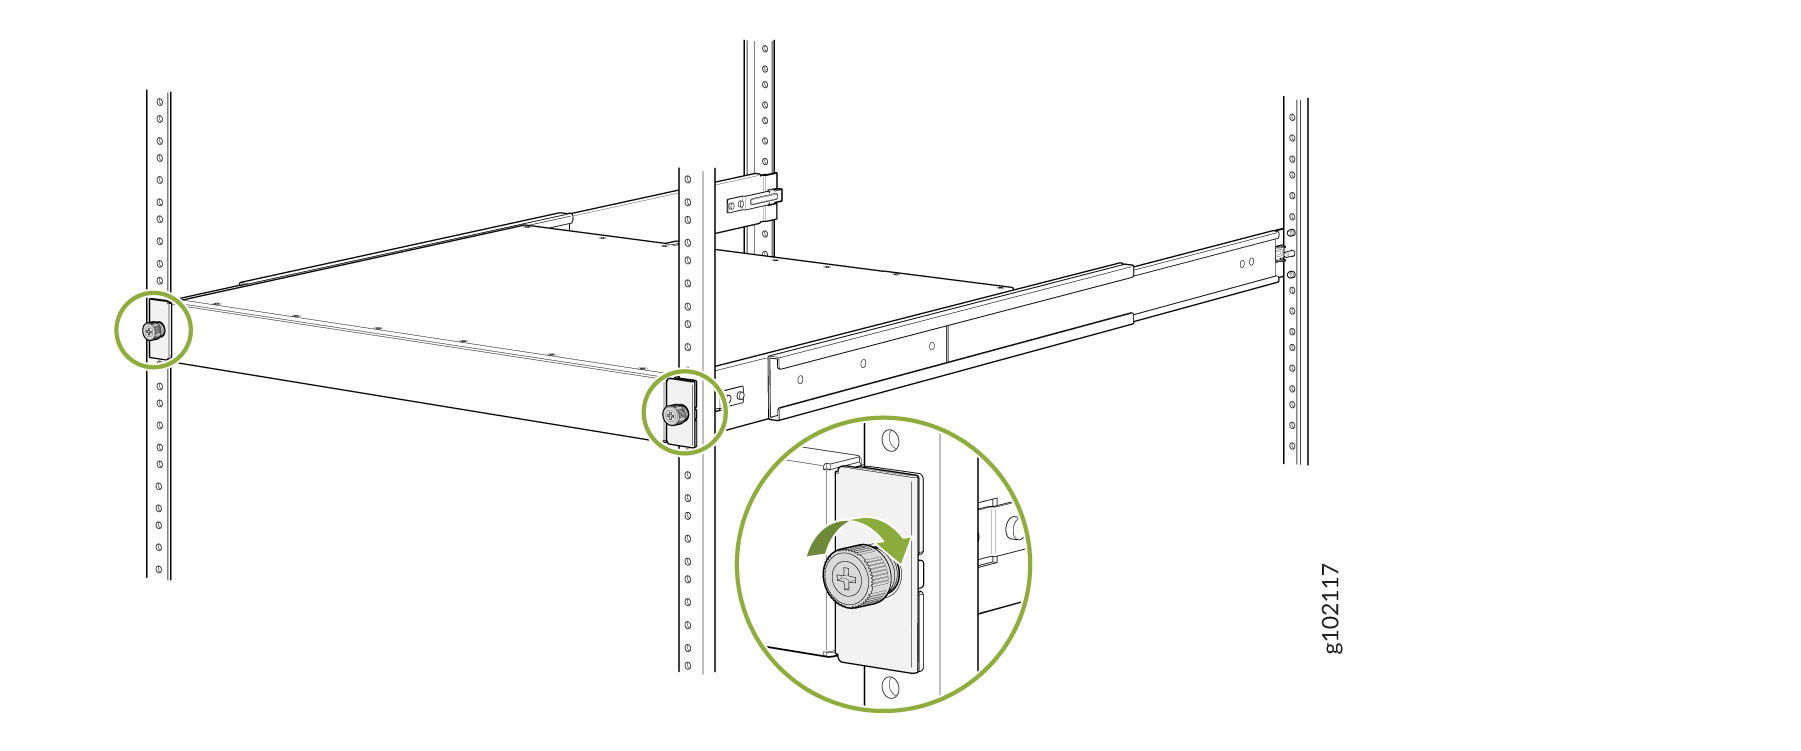
  7. Tighten the two thumbscrews to secure the device.
    Figure 6: Tighten the Thumbscrews Rack-mounted shelf being installed into server rack with green circles highlighting adjustment mechanism knob or screw for securing shelf.

Mount your Device by Using the JNP-4P-TL-1RU-RMK Rack Mount Kit on a Threaded-Hole 4-Post Rack

Ensure that you have the following tools and parts available:

  • An ESD grounding strap—not provided.

  • A Number 2 Phillips (+) screwdriver—not provided.

  • Eight screws to attach the mounting rails to the rack posts—not provided.

  • A pair of side mounting brackets that attach to the chassis—provided with the rack mount kit.

  • A pair of mounting front and rear rails that attach to the rack posts—provided with the rack mount kit.

To mount the device on a four-post rack with threaded holes:

  1. Review the General Safety Guidelines and Warnings.
  2. Wrap and fasten one end of the electrostatic discharge (ESD) cable grounding strap around your bare wrist, and connect the other end to a site ESD point.
  3. To attach the side mounting brackets to the chassis, align the keyholes on the mounting brackets over the shoulder screws on the chassis. Slide the mounting brackets toward the rear of the chassis.
    Figure 7: Attach the Side Mounting Brackets Attach the Side Mounting Brackets
  4. Assemble the mounting rails:
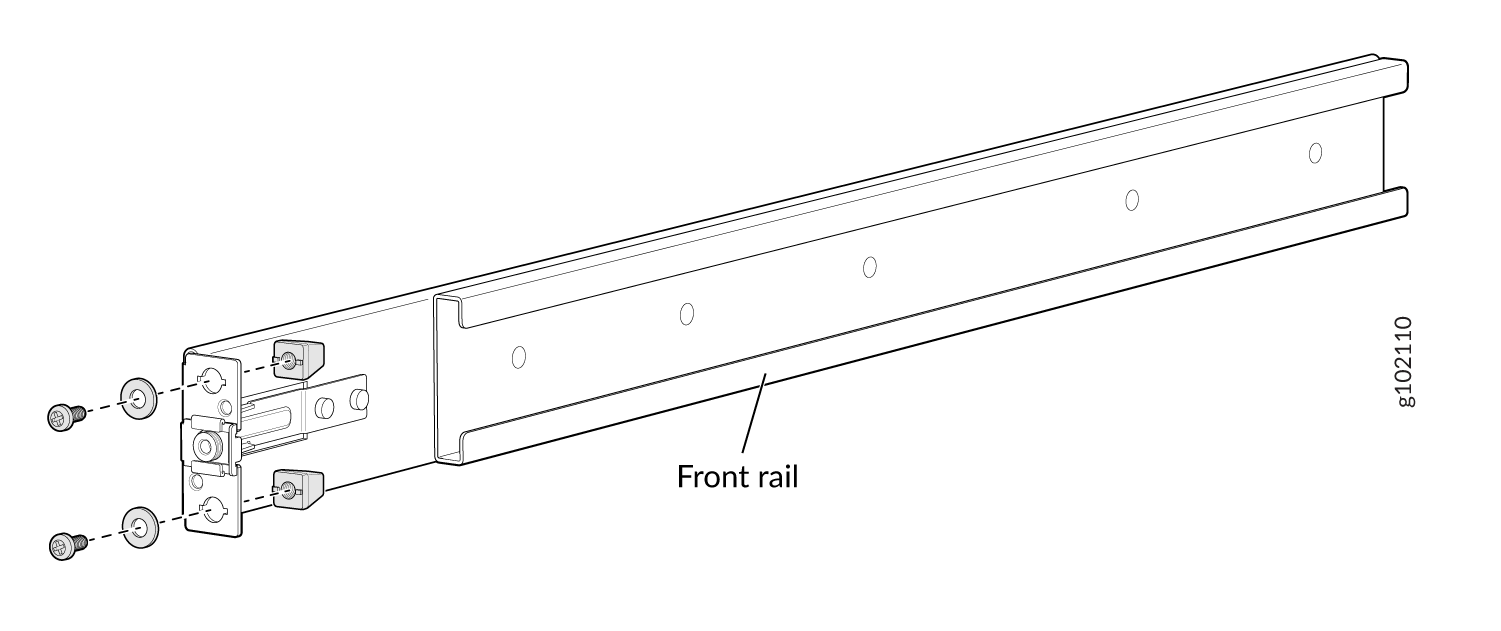
    1. Remove the guide blocks from the front mounting rails by loosening the screws and washers.
      Figure 8: Removing the Guide Blocks from the Front Mounting Rail Exploded view of front rail assembly with screws, washers, and brackets, showing how components fit together.
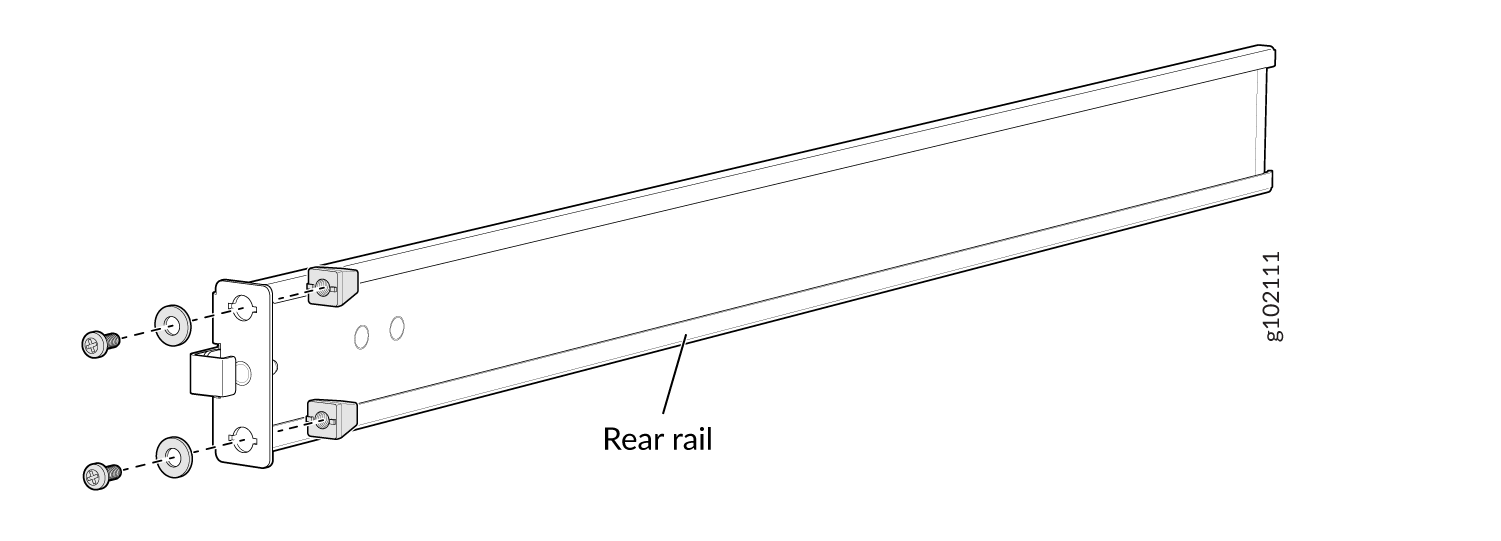
    2. Remove the guide blocks from the rear mounting rail by loosening the screws and washers.
      Figure 9: Removing the Guide Blocks from the Rear Mounting Rail Technical drawing of a rear rail with exploded views of screws, washers, and brackets for assembly.
    3. Slide the rear floating rails into the front rails.
      Figure 10: Assemble the Mounting Rails Diagram of drawer slides showing components with green arrows indicating movement direction for smooth opening and closing.
  5. Install the mounting rails on the rack:
    1. Insert the guide pin of the rear mounting rails into the rear-post holes. Pull the rear mounting rails toward the front of the rack to lock the rails in place. You will hear a distinct click sound when the latch locks into place.
      Figure 11: Install the Rear Mounting Rails Rack rail system installation showing rails mounted between front and rear rack posts with green arrows indicating attachment direction.
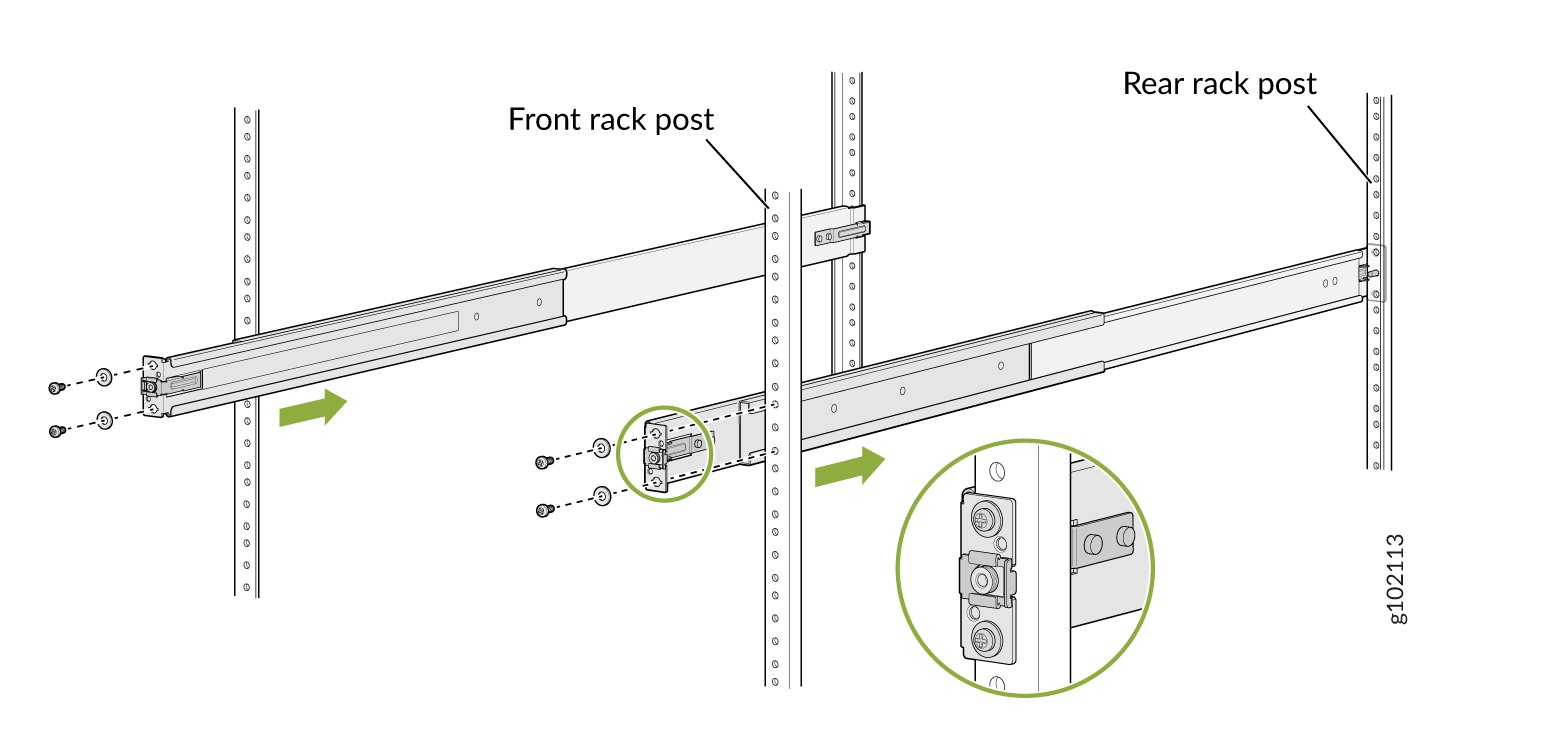
    2. Insert the guide pin of the front mounting rails into the front-post holes. Push the front mounting rails toward the rear of the rack to lock the rails in place. You will hear a distinct click sound when the latch locks into place. Secure the front mounting rails to the front rack post by using screws appropriate for your rack threaded size (not provided).
      Figure 12: Install and Secure the Front Mounting Rails Illustration showing installation of server rack rail kit with rails attached to front and rear posts using screws. Green arrows indicate rail adjustment direction.
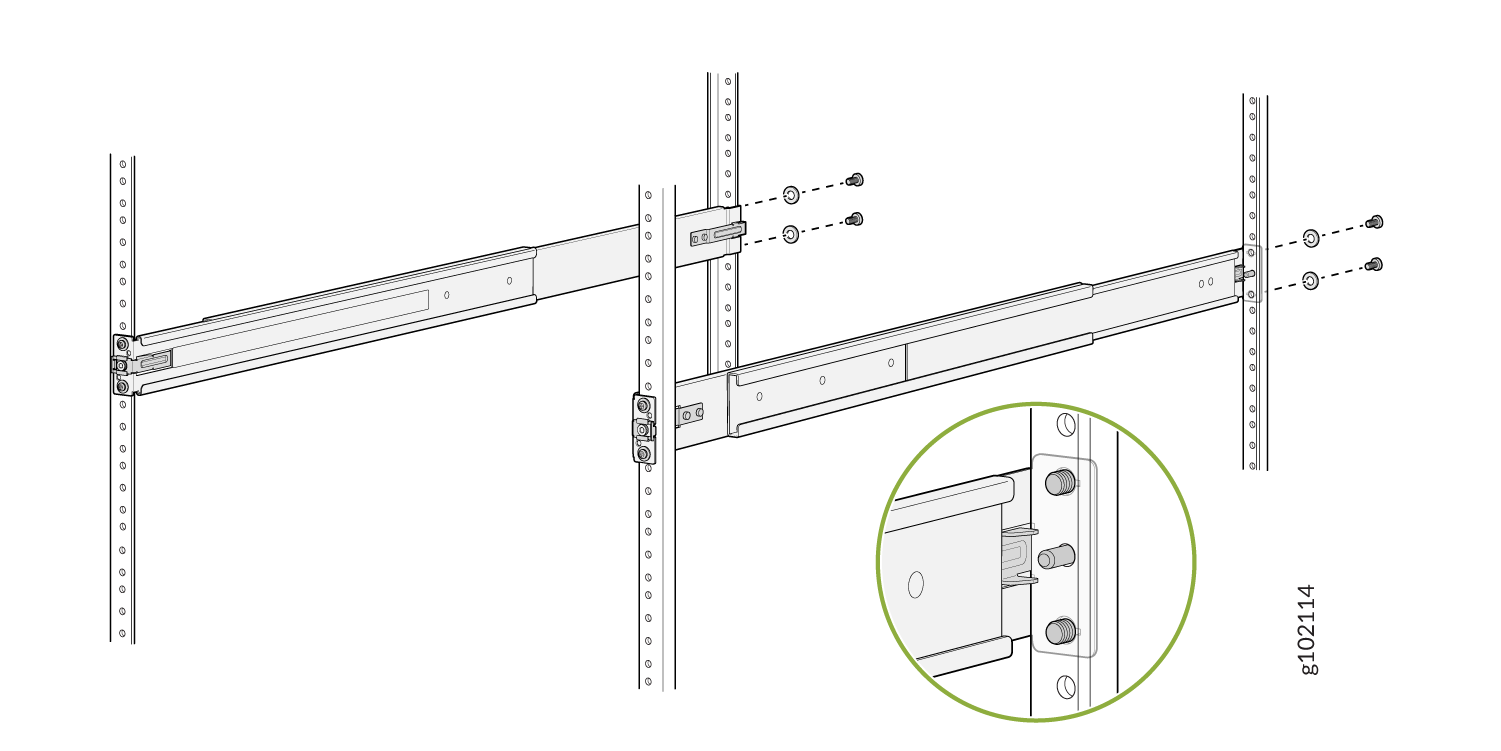
    3. Secure the rear mounting rails to the rear rack post by using screws appropriate for your rack threaded size (not provided).
      Figure 13: Secure the Rear Mounting Brackets Assembly diagram showing horizontal support beams being attached to vertical posts with screws and brackets; inset highlights connection detail.
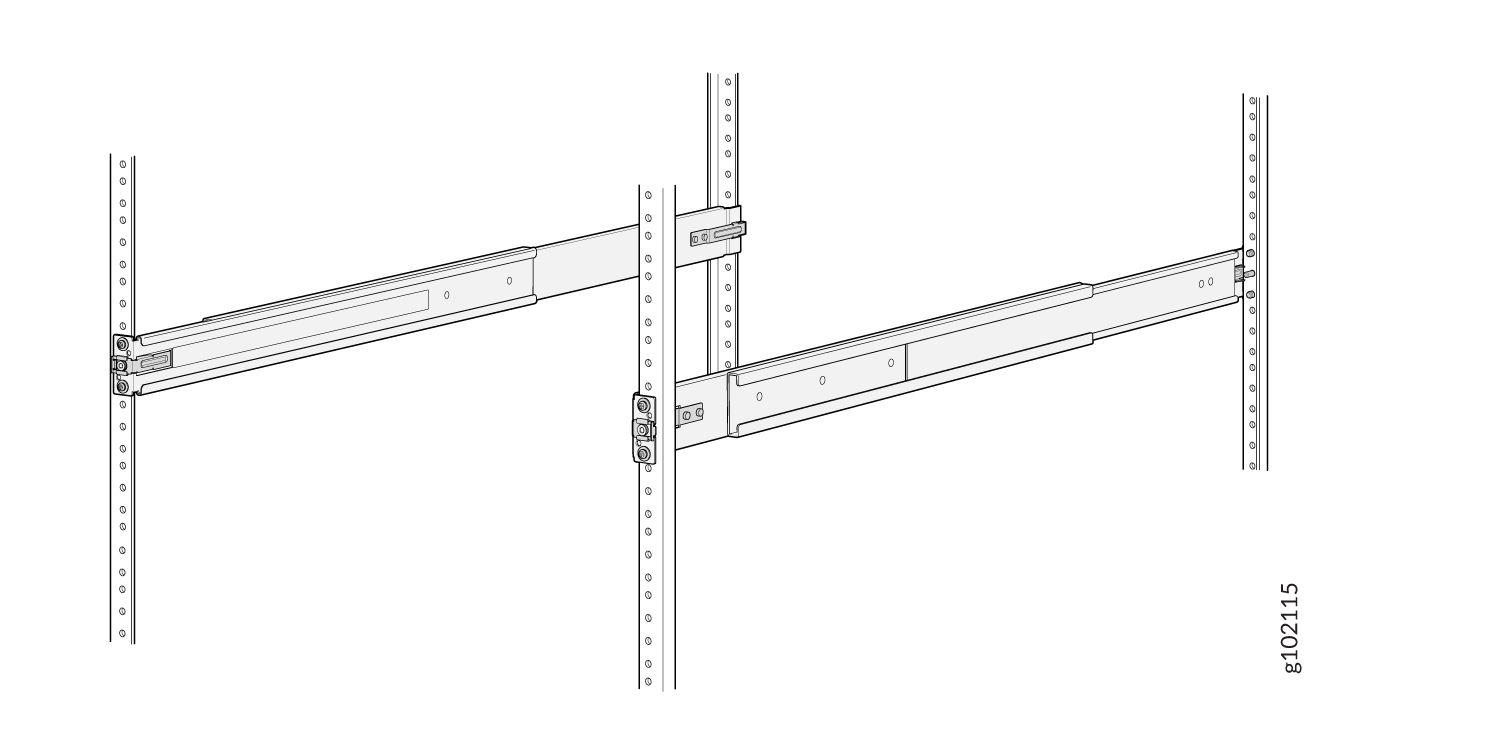
    4. Visually ensure that the front and rear latches are locked into place on the mounting rails. The mounting rails should be securely installed on the rack.
      Figure 14: Mounting Rails Installed and Secured Technical diagram of a modular shelving system with horizontal beams, vertical posts, and adjustable holes for warehouse use.
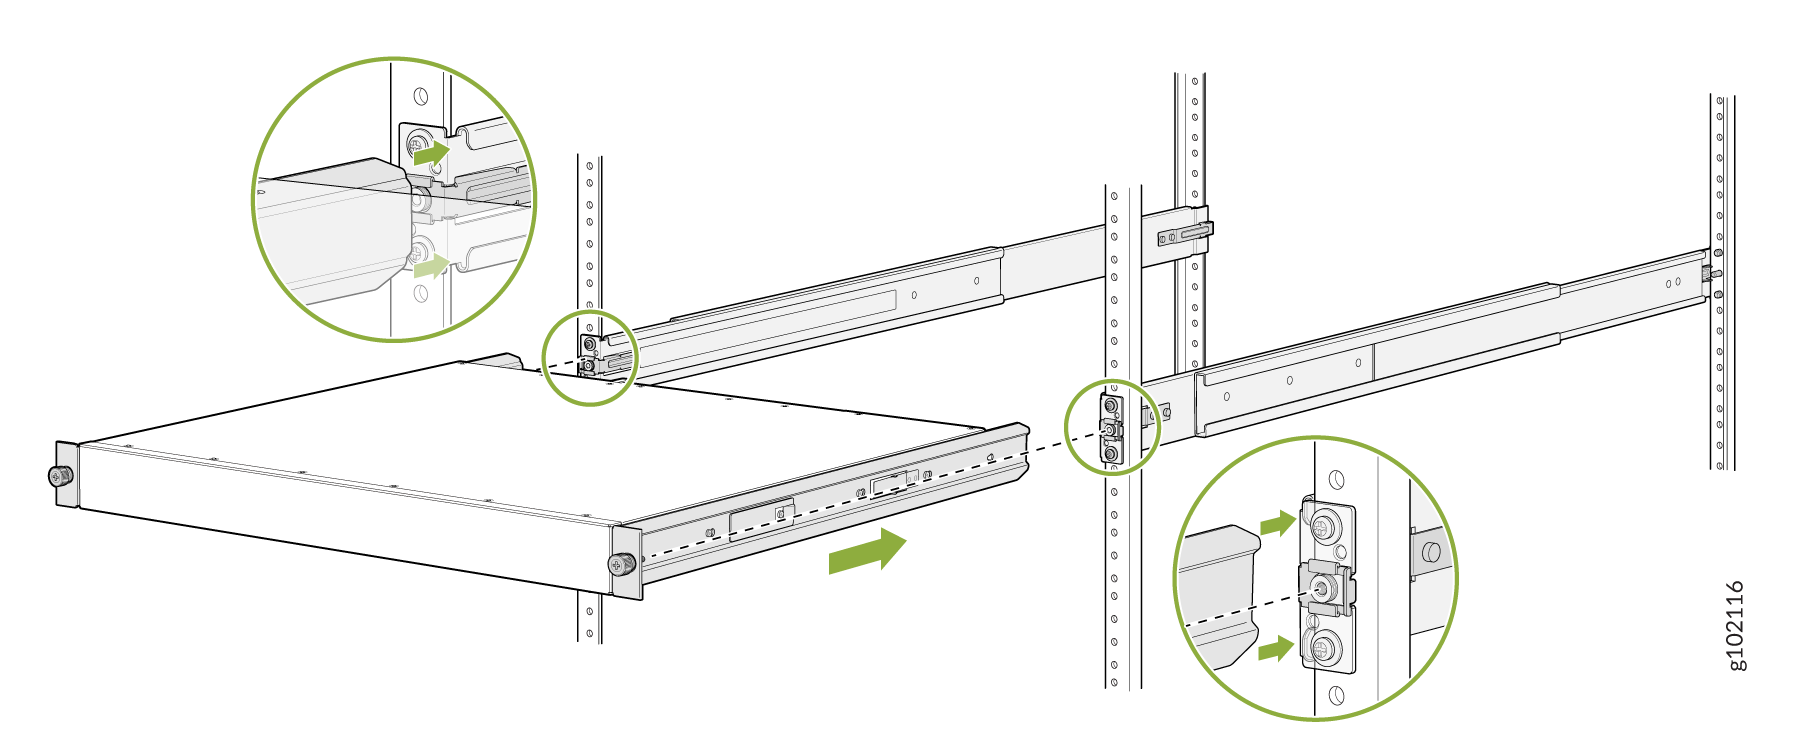
  6. Lift the device and position it in the rack, aligning the side mounting brackets with the mounting rails. Slide the device into the channels of the rack mounting rails.
    Figure 15: Slide the Device into the Rack Server installation in rack using sliding rails; highlights mounting points and alignment with arrows.
  7. Tighten the two thumbscrews to secure the device.
    Figure 16: Tighten the Thumbscrews Diagram of a rack-mounted sliding shelf with a focus on the tool-less knob that secures the shelf to the rack's vertical rails.