Step 1: Begin
To install and perform initial configuration of a Juniper Networks EX9204 Ethernet Switch, you need:
You can use either Juniper Routing Director (formerly Juniper Paragon Automation) or the device CLI to deploy the EX9200 switch to the network.
One small mounting shelf and 22 mounting screws (provided)
Phillips (+) screwdrivers, numbers 1 and 2 (not provided)
7/16-in. (11-mm) torque-controlled driver or socket wrench (not provided)
One mechanical lift (optional, not provided)
Electrostatic discharge (ESD) wrist strap with cable (provided)
2.5-mm flat-blade (–) screwdriver (not provided)
Power cord with a plug appropriate for your geographical location for each power supply (not provided)
Ethernet cable with an RJ-45 connector attached (not provided)
RJ-45 to DB-9 serial port adapter (not provided)
Management host, such as a PC, with an Ethernet port (not provided)
We no longer include the RJ-45 console cable with the DB-9 adapter as part of the device package. If the console cable and adapter are not included in your device package, or if you need a different type of adapter, you can order the following separately:
-
RJ-45 to DB-9 adapter (JNP-CBL-RJ45-DB9)
-
RJ-45 to USB-A adapter (JNP-CBL-RJ45-USBA)
-
RJ-45 to USB-C adapter (JNP-CBL-RJ45-USBC)
If you want to use RJ-45 to USB-A or RJ-45 to USB-C adapter you must have X64 (64-Bit) Virtual COM port (VCP) driver installed on your PC. See, https://ftdichip.com/drivers/vcp-drivers/ to download the driver.
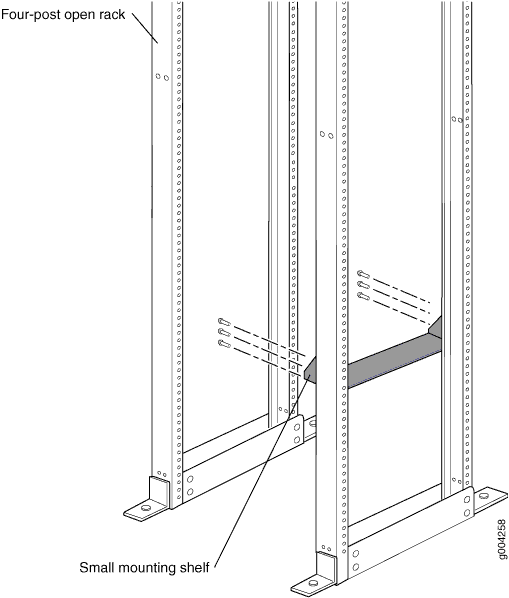
Install the Mounting Shelf in a Rack
The following table specifies the holes in which you insert cage nuts and screws to install the mounting hardware required (an x indicates a mounting hole location). The hole distances are relative to one of the standard U divisions on the rack. The bottom of all mounting shelves is at 0.02 in. (0.05 cm) above a U division.
Holes |
Distance Above U Division |
Mounting Shelf |
4 |
2.00 in. (5.1 cm) 1.14 U |
X |
3 |
1.51 in. (3.8 cm) 0.86 U |
X |
2 |
0.88 in. (2.2 cm) 0.50 U |
X |
1 |
0.25 in. (0.6 cm) 0.14 U |
X |
- Tighten all the screws completely.
Mount the Switch
An empty chassis weighs approximately 52.02lb (23.60 kg) and a fully loaded chassis weighs approximately 128.08 lb (58.1 kg). We strongly recommend that you use a mechanical lift or have at least three persons to lift the chassis, and remove all the components from the chassis before mounting.
While mounting multiple units on a rack, mount the heaviest unit at the bottom and mount the other units from the bottom to the top in decreasing weight order
- Safely remove all components—power supplies, Switch Fabric (SF) module, fan tray, air filter, and line cards—from the chassis.
- Ensure that the rack is properly secured to the building in its permanent location.
- Ensure that a mounting shelf is installed to support the weight of the chassis.
- Position the chassis in front of the rack, centering it in front of the mounting shelf.
- Lift the chassis approximately 0.75 in. (1.9 cm) above the surface of the mounting shelf, and position it as close as possible to the shelf.
- Carefully slide the chassis onto the mounting shelf so that the bottom of the chassis and the mounting shelf overlap by approximately 2 in. (5.08 cm).
- Slide the chassis further until the mounting brackets touch the rack rails. The shelf ensures that the holes in the mounting brackets and the front-mounting brackets of the chassis align with the holes in the rack rails.
- Install a mounting screw into each of the open mounting holes aligned with the rack, starting from the bottom. Ensure that all the mounting screws on one side of the rack are aligned with the m
- Reinstall the chassis components. Ensure that all empty slots are covered with a blank panel before operating the switch.
Connect Power to the Switch
Connecting EX9204 to AC power
Do not mix AC and DC power supplies in the same switch.
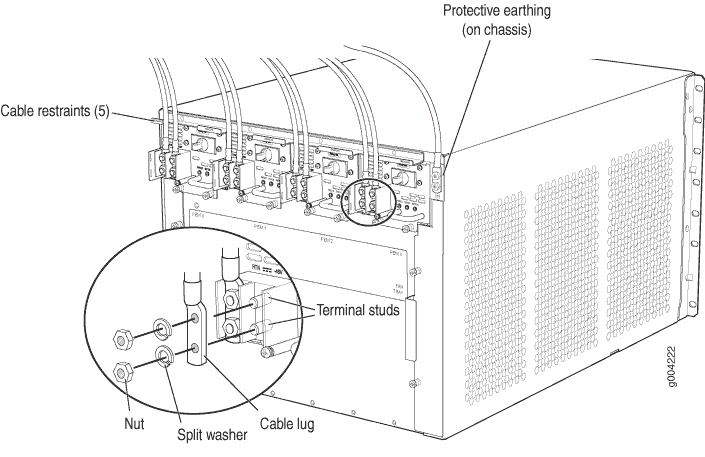
- Attach an ESD wrist strap to your bare wrist, and connect the strap to the ESD points on the chassis.
- Set the power switch of the AC power supply to the OFF (0) position.
- Insert the coupler end of the power cord into the AC power cord inlet on the AC power supply faceplate.
- Insert the power cord plug into the power source outlet and switch on the dedicated customer site circuit breaker.
- Set the power switch of the AC power source outlet to the ON (|) position.
- Set the power switch of the AC power supply to the ON (|) position and verify that the AC OK and the DC OK LEDs are on and steadily lit green, and the PS FAIL LED is not lit.
Connecting EX9204 to DC power
For each power supply:
Ensure that the input circuit breaker is open so that the cable leads will not become active while you are connecting DC power.
- Set the power switch of the DC power supply to the ON (—) position and verify
that the PWR OK, BRKR ON, and INPUT OK LEDs are steadily lit green.