Step 1: Prepare the Site for Installation
Prepare your site for installation by observing the following guidelines:
You can install the router in a four-post rack or cabinet or an open-frame rack.
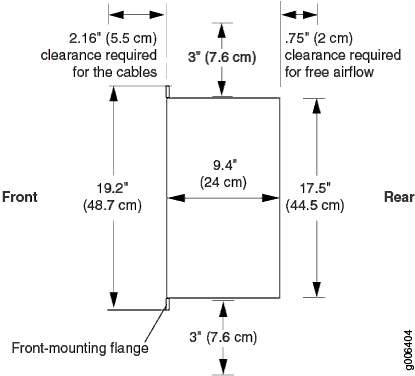
The rack rails must be spaced widely enough to accommodate the chassis's external dimensions: 1.7 in. (4.4 cm) high, 9.4 in. (24 cm) deep, and 17.5 in. (44 cm) wide. The outer edges of the mounting brackets extend the width to 19.2 in. (48.7 cm).
One person must be available to lift the router while another secures the router to the rack.
The rack must be strong enough to support the weight of the fully configured router, up to 7 lb (3.2 kg).
For service personnel to remove and install hardware components, allow at least 2.16 in. (5.5 cm) in front of the router.
The rack or cabinet must have an adequate supply of cooling air.
Ensure that the cabinet allows the chassis hot exhaust air to exit from the cabinet without recirculating into the router.
When deploying the router in environments where the router may operate between 131° F (55° C) and 149° F (65° C), allow a 1 rack unit (U) gap above and below the router.
When installing the router in a cabinet, ensure that the bottom of the cabinet is closed and there is no opening.
You must install the router into a rack that is secured to the building structure.
Mount the router at the bottom of the rack if it is the only unit in the rack.
When mounting the router in a partially filled rack, load the rack from the bottom to the top, with the heaviest component at the bottom of the rack.
Install the router only in restricted areas, such as dedicated equipment rooms and equipment closets, in accordance with Articles 110-16, 110-17, and 110-18 of the National Electrical Code, ANSI/NFPA 70.