Unpacking the MX240 Router
Tools and Parts Required to Unpack the MX240 Router
To unpack the router and prepare for installation, you need the following tools:
Phillips (+) screwdriver, number 2
1/2-in. or 13-mm open-end or socket wrench to remove bracket bolts from the shipping pallet
Blank panels to cover any slots not occupied by a component
Unpacking the MX240 Router
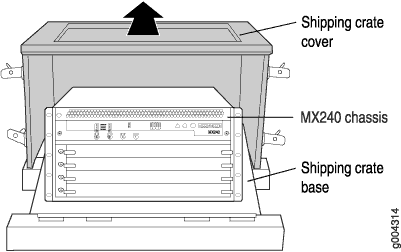
The router is shipped in a wooden crate. A wooden pallet forms the base of the crate. The router chassis is bolted to this pallet. Quick Start installation instructions and a cardboard accessory box are also included in the shipping crate.
The shipping container measures 21 in. (53.3 cm) high, 23.5 in. (60.0 cm) wide, and 32.5 in. (82.5 cm) deep. The total weight of the container containing the router and accessories can range from 93 lb (42.2 kg) to 169 lb (76.7 kg).
The router is maximally protected inside the shipping crate. Do not unpack it until you are ready to begin installation.
To unpack the router (see Figure 1):
- Save the shipping crate cover, pallet, and packing materials
in case you need to move or ship the router at a later time.Figure 1: Contents of the Shipping Crate
Verifying the MX240 Router Parts Received
A packing list is included in each shipment. Check the parts in the shipment against the items on the packing list. The packing list specifies the part numbers and descriptions of each part in your order.
If any part is missing, contact a customer service representative.
A fully configured router contains the router chassis with installed components, listed in Table 1, and an accessory box, which contains the parts listed in Table 2. The parts shipped with your router can vary depending on the configuration you ordered.
|
Component |
Quantity |
|---|---|
|
Chassis, including midplane, craft interface, and rack-mounting brackets |
1 |
|
DPCs |
Up to 3 |
|
MPCs |
Up to 3 |
|
FPC |
Up to 1 |
|
Routing Engines |
1 or 2 |
|
SCBs |
1 or 2 |
|
DC power supplies |
1 or 2 |
|
AC power supplies (220 V) |
1 or 2 |
|
AC power supplies (110 V) |
2 or 4 |
|
Fan tray |
1 |
|
Air filter |
1 |
|
Air filter tray |
1 |
|
Quick start installation instructions |
1 |
|
Mounting shelf |
1 |
|
Blank panels for slots without components installed |
One blank panel for each slot not occupied by a component |
|
Part |
Quantity |
|---|---|
|
Screws to mount chassis and small shelf |
22 |
|
DC power terminal Lugs, 6-AWG |
5 |
|
Terminal block plug, 3–pole, 5.08 mm spacing, 12A, to connect the router alarms |
2 |
|
Label, accessories contents, MX240 |
1 |
|
USB flash drive with Junos OS Note:
The hardware device packages shipped after September 2025 may not include bootable USB flash drives. If your device package does not include a bootable USB flash drive, we recommend that you create a bootable USB flash drive following the instructions provided in Best Practices for Upgrade/Downgrade from Bootable USB. You may obtain a USB flash drive from any commercial source. The USB flash drive must have:
|
1 |
|
Read me first document |
1 |
|
Affidavit for T1 connection |
1 |
|
Juniper Networks Product Warranty |
1 |
|
End User License Agreement |
1 |
|
Document sleeve |
1 |
|
3 in. x 5 in. pink bag |
2 |
|
9 in. x 12 in. pink bag, ESD |
2 |
|
Accessory box, 19 in. x 12 in. x 3 in. |
1 |
|
ESD wrist strap with cable |
1 |
We no longer include the RJ-45 console cable with the DB-9 adapter as part of the device package. If the console cable and adapter are not included in your device package, or if you need a different type of adapter, you can order the following separately:
-
RJ-45 to DB-9 adapter (JNP-CBL-RJ45-DB9)
-
RJ-45 to USB-A adapter (JNP-CBL-RJ45-USBA)
-
RJ-45 to USB-C adapter (JNP-CBL-RJ45-USBC)
If you want to use RJ-45 to USB-A or RJ-45 to USB-C adapter you must have X64 (64-Bit) Virtual COM port (VCP) driver installed on your PC. See, https://ftdichip.com/drivers/vcp-drivers/ to download the driver.