Upgrading to the Control Board-Routing Engine REMX2K-X8-64G in a Redundant Host Subsystem
A redundant host subsystem consists of a primary Routing Engine-Control Board (CB-RE) (RE0) and a backup CB-RE (RE1). To upgrade the host subsystem to use the REMX2K-X8-64G CB-RE, you must first uninstall the backup CB-RE and install the REMX2K-X8-64G CB-RE, which then becomes the backup CB-RE. Configure this backup CB-RE as the primary CB-RE. Then replace the other CB-RE and configure it as the backup CB-RE.
Save the router configuration before upgrading the CB-RE.
Taking the Host Subsystem Offline
To take the host subsystem offline perform the following steps:
Removing the Backup CB-RE
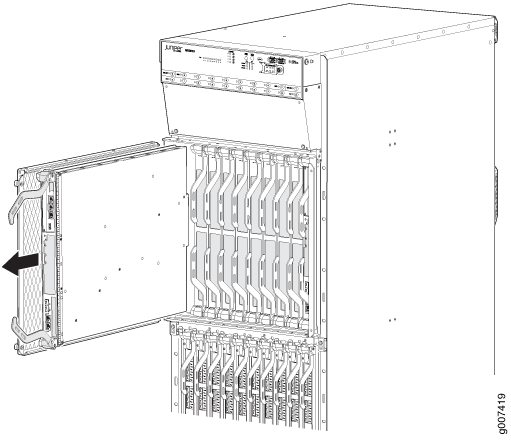
To remove a CB-RE (see Figure 1):
Remove the CB-RE as a unit.
Before removing a CB-RE, ensure that you know how to operate the ejector handles properly to avoid damage to the equipment.
Before you replace a CB-RE, you must take the host subsystem offline. If there is only one host subsystem, taking the host subsystem offline shuts down the router.
- Place an electrostatic bag or antistatic mat on a flat, stable surface.
- Attach an electrostatic discharge (ESD) grounding strap to your bare wrist, and connect the strap to one of the ESD points on the chassis.
- Open the ejector handles outward simultaneously to unseat the CB-RE.
- Grasp the ejector handles, and slide the CB-RE about halfway out of the chassis.
- Place one hand underneath the CB-RE to support it, and slide it completely out of the chassis.
- Place the CB-RE on the antistatic mat or inside an antistatic bag.
- If you are not replacing the CB-RE immediately, install a blank panel over the empty slot.
Installing the REMX2K-X8-64G CB-RE
To install a CB-RE:
The CB-RE might require several minutes to boot. After the CB-RE boots, verify that it is installed correctly by checking the FAIL, RE0, and RE1 LEDs on the craft interface. If the router is operational and the CB-RE is functioning properly, the green ONLINE LED on the CB-RE lights steadily. If the red FAIL LED on the CB-RE lights steadily instead, remove and install the CB-RE again. If the red FAIL LED still lights steadily, the CB-RE is not functioning properly. Contact your customer support representative.
Verifying and Configuring the Upgraded CB-RE as the Primary
After replacing the backup CB-RE with the REMX2K-X8-64G CB-RE, perform the following steps:
Verifying and Configuring the Upgraded CB-RE as the Backup
After replacing the primary CB-RE with the REMX2K-X8-64G CB-RE, perform the following steps:
- Use the
request chassis routing-engine master switchcommand to make the newly installed REMX2K-X8-64G CB-RE (RE0) the backup CB-RE. - Use the
commit synchronizecommand to copy the active configuration from the primary CB-RE to the backup CB-RE.