Initial Setup for Juniper Mist Edge Devices
To set up your Juniper Mist Edge device:
Connect the AC power cords to the AC power supply units
Press the power button to power on the device.
Claim your device on the Juniper Mist portal. See Claim a Mist Edge Device.
Connect the out-of-band management (OOBM) port on the rear panel of the device to an access-mode interface of a switch.
See Configure the OOBM Port for the configuration.
Connect the tunnel (data) ports on the rear panel of the device to the network.
See Configure the Tunnel Ports for the configuration.
For the detailed configuration and deployment procedures, see the Juniper Mist Edge Guide.
Claim a Mist Edge Device
You can claim and onboard Juniper Mist Edge devices to your network by using the Mist AI mobile app or using the Juniper Mist portal.
- Claim a Mist Edge Using the Mist AI Mobile App
- Claim a Juniper Mist Edge Device Using the Juniper Mist Portal
Claim a Mist Edge Using the Mist AI Mobile App
- Download and install the Mist AI app from the Google Play Store or Apple App Store.
-
Open the Mist AI app and log in using your account credentials.
-
Select your organization.
-
Perform one of these steps:
-
Tap Claim Devices to Org.
-
Select Device Inventory > Mist Edges tab and tap + on the top-right corner of the screen.
-
-
Enter the claim code in the Claim code field and tap Claim.
You could also locate the QR code on the Juniper Mist Edge device and focus the camera on the QR code.
The application automatically claims the Mist Edge device and adds it to your site.
-
Select Device Inventory. You'll see the new Juniper Mist Edge device listed under the Unassigned group on the Mist Edges tab.
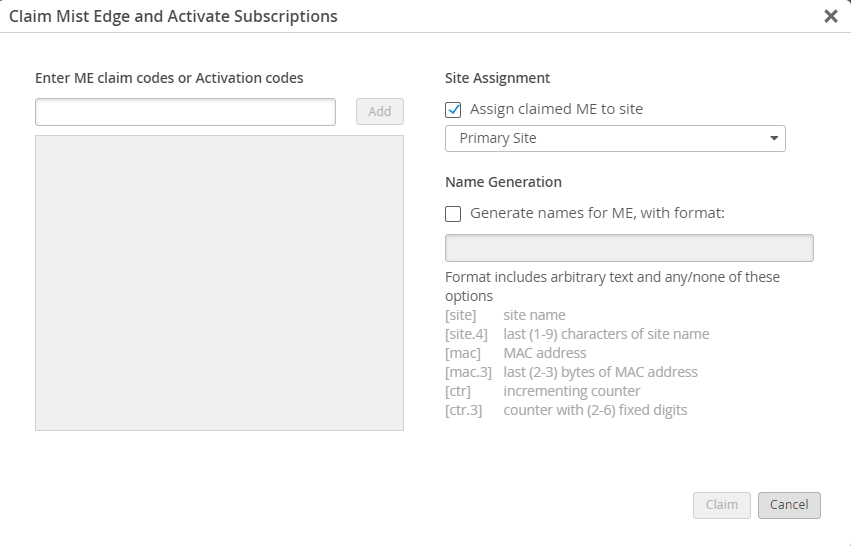
Claim a Juniper Mist Edge Device Using the Juniper Mist Portal
-
Log in to your account at https://manage.mist.com/.
-
Navigate to Mist Edges and click Claim Mist Edge.
-
Enter the Mist Edge claim code and click Add.
You can find the claim code above the QR code on the pull-out information tab on the front panel of the device.
-
(Optional) Select the site to which you want to assign the device. The Assigned claimed ME to site check box is selected by default. You can choose to assign the device to a primary site (default) or any other site. If you want to assign the device to a site later, clear the Assigned claimed ME to site check box.
-
(Optional) Select the Generate names for ME, with format: check box and enter a name format for the device. You can use this option only if you are assigning the device to a site.
You can also rename and assign a device to a site after you claim the device.
-
Click Claim.
Configure the OOBM Port
The out-of-band management (OOBM) port is located on the rear panel of the device.
-
If your network is Dynamic Host Configuration Protocol (DHCP) enabled, you must first
connect to the Juniper Mist™ cloud by using DHCP. Use the Juniper Mist portal to
configure the static IP address.
By default, the OOBM port is configured for DHCP.
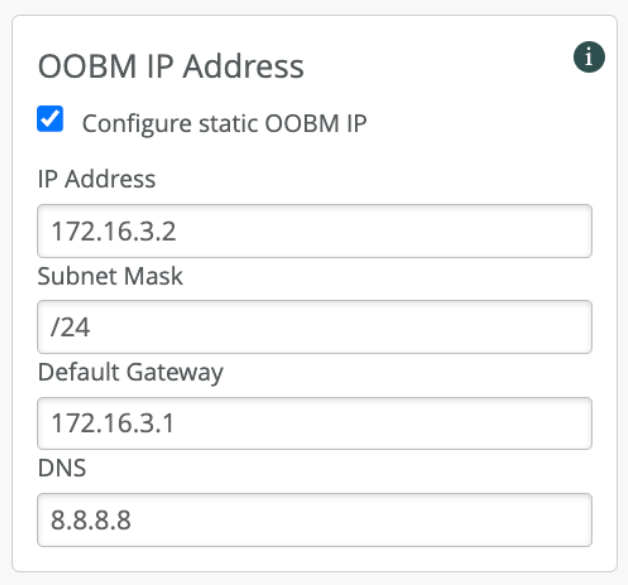
You can now access the Juniper Mist Edge CLI by using the OOBM IP address. The username is mist and the password is the claim code of the device.
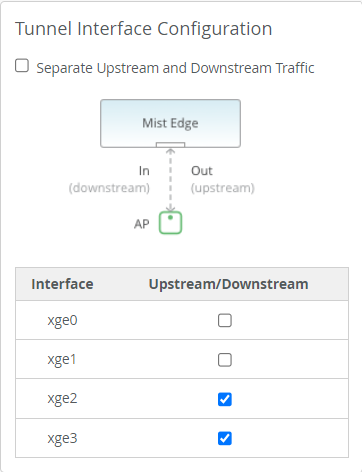
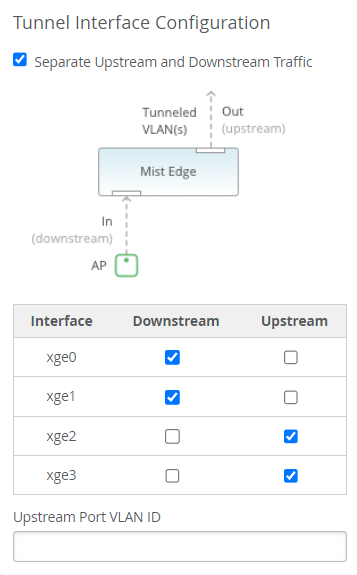
Configure the Tunnel Ports
You can configure the tunnel (data) ports on your device as single-arm or as dual-arm (downstream and upstream) interfaces.
-
Single Arm—Carries both upstream and downstream traffic on a single port. You can configure and detect one or more ports as a single Link Aggregation Control Protocol (LACP).
-
Dual Arm—Carries upstream and downstream traffic on two different ports. You can configure and detect dual arm port configuration as two LACPs.
The following interfaces are related to the tunnel ports:
-
Tunnel IP—The interface where the Layer 2 Tunneling Protocol version 3 (L2TPv3) or IPsec tunnel between the Juniper Mist Edge device and an access point (AP) terminates. It is also called the downstream interface.
-
Data interface—The interface connected to a trunk port that has all the VLANs configured to which the wireless LAN (WLAN) maps. It is also called the upstream interface.
To set up the tunnel ports:
-
(Optional) To create a dual-arm tunnel interface, go to the Tunnel Interface
Configuration page on the Juniper Mist portal and click Separate
Upstream and Downstream Traffic. You can assign the interfaces as
needed.
Upstream Port VLAN ID is optional and should only be used whenever the upstream switch port is configured as an access port with a single untagged VLAN.
-
(Optional) To create a single-arm tunnel interface, go to the Tunnel
Interface Configuration page on the Juniper Mist portal and clear the
Separate Upstream and Downstream Traffic check box. You can
assign the interfaces as needed.
Upstream Port VLAN ID is optional and should only be used whenever the upstream switch port is configured as an access port with a single untagged VLAN.