Configuring the Local Site on PE Routers in Layer 2 VPNs
For each local site, the PE router advertises a set of VPN labels to the other PE routers servicing the Layer 2 VPN. The VPN labels constitute a single block of contiguous labels; however, to allow for reprovisioning, more than one such block can be advertised. Each label block consists of a label base, a range (the size of the block), and a remote site ID that identifies the sequence of remote sites that connect to the local site using this label block (the remote site ID is the first site identifier in the sequence). The encapsulation type is also advertised along with the label block.
The following sections explain how to configure the connections to the local site on the PE router.
Not all subtasks are supported on all platforms; check the CLI on your device.
Configuring a Layer 2 VPN Routing Instance
To
configure a Layer 2 VPN on your network, configure a Layer 2
VPN routing instance on the PE router by including the l2vpn statement:
On the EX9200 switches, replace encapsulation-type with the encapsulation statement.
l2vpn {
    (control-word | no-control-word);
    encapsulation-type type;
    traceoptions {
        file filename <files number> <size size> <world-readable | no-world-readable>;
        flag flag <flag-modifier> <disable>;
    }
    site site-name {
        site-identifier identifier;
        site-preference preference-value {
            backup;
            primary;
        }
        interface interface-name {
            description text;
            remote-site-id remote-site-id;
        }
    }
}
You can include this statement at the following hierarchy levels:
[edit routing-instances routing-instance-name protocols][edit logical-systems logical-system-name routing-instances routing-instance-name protocols]
You cannot configure a routing protocol (OSPF, RIP, IS-IS or
BGP) inside a Layer 2 VPN routing instance (instance-type l2vpn). The Junos CLI disallows this configuration.
Instructions for how to configure the remaining statements are included in the sections that follow.
Configuring the Site
All the Layer 2 circuits provisioned for a local
site are listed as the set of logical interfaces (specified by including
the interface statement) within the site statement.
On each PE router, you must configure each site that has a circuit
to the PE router. To do this, include the site statement:
site site-name {
    site-identifier identifier;
    site-preference preference-value {
        backup;
        primary;
    }
    interface interface-name {
        description text;
        remote-site-id remote-site-ID;
    }
}
You can include this statement at the following hierarchy levels:
[edit routing-instances routing-instance-name protocols l2vpn][edit logical-systems logical-system-name routing-instances routing-instance-name protocols l2vpn]
You must configure the following for each site:
site-name—Name of the site.site-identifier identifier—Unsigned 16-bit number greater than zero that uniquely identifies the local Layer 2 VPN site. The site identifier corresponds to the remote site ID configured on another site within the same VPN.interface interface-name—The name of the interface and, optionally, a remote site ID for remote site connections. See Configuring the Remote Site ID.
Configuring the Remote Site ID
The remote site ID allows you to configure a sparse Layer 2 VPN topology. A sparse topology means that each site does not have to connect to all the other sites in the VPN; thus it is unnecessary to allocate circuits for all the remote sites. Remote site IDs are particularly important if you configure a topology more complicated than full-mesh, such as a hub-and-spoke topology.
The remote site ID (configured with the remote-site-id statement) corresponds to the site ID (configured with the site-identifier statement) configured at a separate site. Figure 1 illustrates the relationship between the
site identifier and the remote site ID.
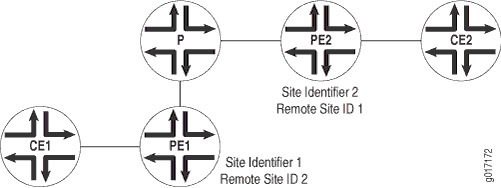
As illustrated by the figure, the configuration for Router PE1 connected to Router CE1 is as follows:
site-identifier 1;
interface so-0/0/0 {
    remote-site-id 2;
}
The configuration for Router PE2 connected to Router CE2 is as follows:
site-identifier 2;
interface so-0/0/1 {
    remote-site-id 1;
}
The remote site ID (2) on Router PE1 corresponds
to the site identifier (2) on Router PE2. On Router
PE2, the remote site ID (1) corresponds to the site identifier
(1) on Router PE1.
To configure the remote site ID, include the remote-site-id statement:
remote-site-id remote-site-id;
You can include this statement at the following hierarchy levels:
[edit routing-instances routing-instance-name protocols l2vpn site site-name interface interface-name][edit logical-systems logical-system-name routing-instances routing-instance-name protocols l2vpn site site-name interface interface-name]
If you do not explicitly include the remote-site-id statement for the interface configured at the [edit routing-instances routing-instance-name protocols l2vpn site site-name] hierarchy level, a remote site ID is assigned to that interface.
The remote site ID for an interface is automatically set to 1
higher than the remote site ID for the previous interface. The order
of the interfaces is based on their site-identifier statements.
For example, if the first interface in the list does not have a remote
site ID, its ID is set to 1. The second interface in the list
has its remote site ID set to 2, and the third has its remote
site ID set to 3. The remote site IDs of any interfaces that
follow are incremented in the same manner if you do not explicitly
configure them.
Configuring the Encapsulation Type
The encapsulation type you configure at each Layer 2 VPN
site varies depending on which Layer 2 protocol you choose to
configure. If you configure ethernet-vlan as the encapsulation
type, you need to use the same protocol at each Layer 2 VPN site.
You do not need to use the same protocol at each Layer 2 VPN site if you configure any of the following encapsulation types:
atm-aal5—Asynchronous Transfer Mode (ATM) Adaptation Layer (AAL5)atm-cell—ATM cell relayatm-cell-port-mode—ATM cell relay port promiscuous modeatm-cell-vc-mode—ATM virtual circuit (VC) cell relay nonpromiscuous modeatm-cell-vp-mode—ATM virtual path (VP) cell relay promiscuous modecisco-hdlc—Cisco Systems-compatible High-Level Data Link Control (HDLC)ethernet—Ethernetethernet-vlan—Ethernet virtual LAN (VLAN)frame-relay—Frame Relayframe-relay-port-mode—Frame Relay port modeinterworking—Layer 2.5 interworking VPNppp—Point-to-Point Protocol (PPP)
If you configure different protocols at your Layer 2 VPN sites, you need to configure a translational cross-connect (TCC) encapsulation type. For more information, see Configuring TCC Encapsulation for Layer 2 VPNs and Layer 2 Circuits.
To configure the Layer 2 protocol accepted by the PE router,
specify the encapsulation type by including the encapsulation-type statement:
encapsulation-type type;
For EX9200 switches, specify the encapsulation type by including
the encapsulation statement:
encapsulation type;
You can include this statement at the following hierarchy levels:
[edit routing-instances routing-instance-name protocols l2vpn][edit logical-systems logical-system-name routing-instances routing-instance-name protocols l2vpn]
Configuring a Site Preference and Layer 2 VPN Multihoming
You can specify the preference value advertised for a particular Layer 2 VPN site. The site preference value is encoded in the BGP local preference attribute. When a PE router receives multiple advertisements with the same CE device identifier, the advertisement with the highest local preference value is preferred.
You can also use the site-preference statement to
enable multihoming for Layer 2 VPNs. Multihoming allows you to
connect a CE device to multiple PE routers. In the event that a connection
to the primary PE router fails, traffic can be automatically switched
to the backup PE router.
To configure a site preference for a Layer 2 VPN, include
the site-preference statement:
site-preference preference-value {
    backup;
    primary;
}
You can include this statement at the following hierarchy levels:
[edit routing-instances routing-instance-name protocols l2vpn site site-name][edit logical-systems logical-system-name routing-instances routing-instance-name protocols l2vpn site site-name]
You can also specify either the backup option or
the primary option for the site-preference statement.
The backup option specifies the preference value as 1, the lowest
possible value, ensuring that the Layer 2 VPN site is the least
likely to be selected. The primary option specifies the preference
value as 65,535, the highest possible value, ensuring that the
Layer 2 VPN site is the most likely to be selected.
For Layer 2 VPN multihoming configurations, specifying
the primary option for a Layer 2 VPN site designates
the connection from the PE router to the CE device as the preferred
connection if the CE device is also connected to another PE router.
Specifying the backup option for a Layer 2 VPN site
designates the connection from the PE router to the CE device as the
secondary connection if the CE device is also connected to another
PE router.
Tracing Layer 2 VPN Traffic and Operations
To trace Layer 2 VPN protocol traffic, specify options
for the traceoptions statement in the Layer 2 VPN
configuration:
traceoptions {
    file filename <files number> <size size> <world-readable | no-world-readable>;
    flag flag <flag-modifier> <disable>;
}
You can include this statement at the following hierarchy levels:
[edit routing-instances routing-instance-name protocols l2vpn][edit logical-systems logical-system-name routing-instances routing-instance-name protocols l2vpn]
The following trace flags display the operations associated with Layer 2 VPNs:
all—All Layer 2 VPN tracing options.connections—Layer 2 connections (events and state changes).error—Error conditions.general—General events.nlri—Layer 2 advertisements received or sent by means of the BGP.normal—Normal events.policy—Policy processing.route—Routing information.state—State transitions.task—Routing protocol task processing.timer—Routing protocol timer processing.topology—Layer 2 VPN topology changes caused by reconfiguration or advertisements received from other PE routers using BGP.
Disabling Normal TTL Decrementing for VPNs
To diagnose networking problems related to VPNs, it can be useful
to disable normal time-to-live (TTL) decrementing. In Junos, you can
do this with the no-propagate-ttl and no-decrement-ttl statements. However, when you are tracing VPN traffic, only the no-propagate-ttl statement is effective.
For the no-propagate-ttl statement to have an effect
on VPN behavior, you need to clear the PE-router-to-PE-router BGP
session, or disable and then enable the VPN routing instance.
For more information about the no-propagate-ttl and no-decrement-ttl statements, see the MPLS Applications User Guide..