Configure Policy-Based IPsec VPN with Certificates
This example shows how to configure, verify, and troubleshoot PKI. This topic includes the following sections:
Requirements
This example uses the following hardware and software components:
Junos OS Release 9.4 or later
Juniper Networks security devices
Before you begin:
Ensure that the internal LAN interface of the SRX Series Firewall is ge-0/0/0 in zone trust and has a private IP subnet.
Ensure that the Internet interface of the device is ge-0/0/3 in zone untrust and has a public IP.
Ensure that all traffic between the local and remote LANs is permitted, and traffic can be initiated from either side.
Ensure that the SSG5 has been preconfigured correctly and loaded with a ready-to-use local certificate, CA certificate, and CRL.
Ensure that the SSG5 device is configured to use the FQDN of ssg5.example.net (IKE ID).
Ensure that PKI certificates with 1024-bit keys are used for the IKE negotiations on both sides.
Ensure that the CA is a standalone CA at the domain example.com for both VPN peers.
Overview
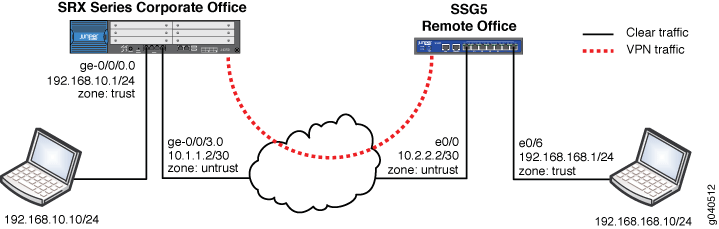
Figure 1 shows the network topology used for this example to configure a policy-based IPsec VPN to allow data to be securely transferred between a corporate office and a remote office.
The PKI administration is the same for both policy-based VPNs and route-based VPNs.
In this example, the VPN traffic is incoming on interface ge-0/0/0.0 with the next hop of 10.1.1.1. Thus the traffic is outgoing on interface ge-0/0/3.0. Any tunnel policy must consider incoming and outgoing interfaces.
Optionally, you can use a dynamic routing protocol such as OSPF (not described in this document). When processing the first packet of a new session, the device running Junos OS first performs a route lookup. The static route, which is also the default route, dictates the zone for the outgoing VPN traffic.
Many CAs use hostnames (for example, FQDN) to specify various elements of the PKI. Because the CDP is usually specified using a URL containing an FQDN, you must configure a DNS resolver on the device running Junos OS.
The certificate request can be generated by the following methods:
Creating a CA profile to specify the CA settings
Generating the PKCS10 certificate request
The PKCS10 certificate request process involves generating a public or private key pair and then generating the certificate request itself, using the key pair.
Take note of the following information about the CA profile:
The CA profile defines the attributes of a certificate authority.
Each CA profile is associated with a CA certificate. If a new or renewed CA certificate needs to be loaded without removing the older CA certificate, a new profile must be created. This profile can also be used for online fetching of the CRL.
There can be multiple such profiles present in the system created for different users.
If you specify a CA administrator e-mail address to send the certificate request to, then the system composes an e-mail from the certificate request file and forwards it to the specified e-mail address. The e-mail status notification is sent to the administrator.
The certificate request can be sent to the CA through an out-of-band method.
The following options are available to generate the PKCS10 certificate request:
certificate-id— Name of the local digital certificate and the public/private key pair. This ensures that the proper key pair is used for the certificate request and ultimately for the local certificate.Starting in Junos OS Release 19.1R1, a commit check is added to prevent user from adding
.,/,%, and space in a certificate identifier while generating a local or remote certificates or a key pair.subject— Distinguished name format that contains the common name, department, company name, state, and country:CN — Common name
OU — Department
O — Company name
L — Locality
ST — State
C — Country
CN — Phone
DC — Domain component
You are not required to enter all subject name components. Note also that you can enter multiple values of each type.
domain-name— FQDN. The FQDN provides the identity of the certificate owner for IKE negotiations and provides an alternative to the subject name.filename (path | terminal)— (Optional) Location where the certificate request should be placed, or the login terminal.ip-address— (Optional) IP address of the device.email— (Optional) E-mail address of the CA administrator.You must use a domain-name, an ip-address, or an e-mail address.
The generated certificate request is stored in a specified file location. A local copy of the certificate request is saved in the local certificate storage. If the administrator reissues this command, the certificate request is generated again.
The PKCS10 certificate request is stored in a specified file
and location, from which you can download it and send it to the CA
for enrollment. If you have not specified the filename or location,
you can get PKCS10 certificate request details by using the show
security pki certificate-request certificate-id <id-name> command in the CLI. You can copy the command output and paste it
into a Web front end for the CA server or into an e-mail.
The PKCS10 certificate request is generated and stored on the system as a pending certificate or certificate request. An e-mail notification is sent to the administrator of the CA (in this example, certadmin@example.com).
A unique identity called certificate-ID is used to name the generated key pair. This ID is also used in certificate enrollment and request commands to get the right key pair. The generated key pair is saved in the certificate store in a file with the same name as the certificate-ID. The file size can be 1024 or 2048 bits.
A default (fallback) profile can be created if intermediate CAs are not preinstalled in the device. The default profile values are used in the absence of a specifically configured CA profile.
In the case of a CDP, the following order is followed:
Per CA profile
CDP embedded in CA certificate
Default CA profile
We recommend using a specific CA profile instead of a default profile.
The administrator submits the certificate request to the CA. The CA administrator verifies the certificate request and generates a new certificate for the device. The administrator for the Juniper Networks device retrieves it, along with the CA certificate and CRL.
The process of retrieving the CA certificate, the device’s new local certificate, and the CRL from the CA depends on the CA configuration and software vendor in use.
Junos OS supports the following CA vendors:
Entrust
Verisign
Microsoft
Although other CA software services such as OpenSSL can be used to generate certificates, these certificates are not verified by Junos OS.
Configuration
- PKI Basic Configuration
- Configuring a CA Profile
- Generating a Public-Private Key Pair
- Enrolling a Local Certificate
- Loading CA and Local Certificates
- Configuring the IPsec VPN with the Certificates
PKI Basic Configuration
Step-by-Step Procedure
The following example requires you to navigate various levels in the configuration hierarchy. For instructions on how to do that, see Using the CLI Editor in Configuration Mode in the Junos OS CLI User Guide.
To configure PKI:
Configure an IP address and protocol family on the Gigabit Ethernet interfaces.
[edit interfaces]
user@host# set ge-0/0/0 unit 0 family inet address 192.168.10.1/24
user@host# set ge-0/0/3 unit 0 family inet address 10.1.1.2/30
Configure a default route to the Internet next hop.
[edit]
user@host# set routing-options static route 0.0.0.0/0 next-hop 10.1.1.1
Set the system time and date.
[edit]
user@host# set system time-zone PST8PDT
After the configuration is committed, verify the clock settings using the
show system uptimecommand.user@host> show system uptime Current time: 2007-11-01 17:57:09 PDT System booted: 2007-11-01 14:36:38 PDT (03:20:31 ago) Protocols started: 2007-11-01 14:37:30 PDT (03:19:39 ago) Last configured: 2007-11-01 17:52:32 PDT (00:04:37 ago) by root 5:57PM up 3:21, 4 users, load averages: 0.00, 0.00, 0.00
Set the NTP server address.
user@host> set date ntp 130.126.24.24
1 Nov 17:52:52 ntpdate[5204]: step time server 172.16.24.24 offset -0.220645 sec
Set the DNS configuration.
[edit]
user@host# set system name-server 172.31.2.1
user@host# set system name-server 172.31.2.2
Configuring a CA Profile
Step-by-Step Procedure
-
Create a trusted CA profile.
[edit]
user@host# set security pki ca-profile ms-ca ca-identity example.com
-
Create a revocation check to specify a method for checking certificate revocation.
Set the refresh interval, in hours, to specify the frequency in which to update the CRL. The default values are next-update time in CRL, or 1 week, if no next-update time is specified.
[edit]
user@host# set security pki ca-profile ms-ca revocation-check crl refresh-interval 48
In the
revocation-checkconfiguration statement, you can use thedisableoption to disable the revocation check or select thecrloption to configure the CRL attributes. You can select thedisable on-download-failureoption to allow the sessions matching the CA profile, when CRL download failed for a CA profile. The sessions will be allowed only if no old CRL is present in the same CA profile. -
Specify the location (URL) to retrieve the CRL (HTTP or LDAP). By default, the URL is empty and uses CDP information embedded in the CA certificate.
[edit]
user@host# set security pki ca-profile ms-ca revocation-check crl url http://srv1.example.com/CertEnroll/EXAMPLE.crl
Currently you can configure only one URL. Support for backup URL configuration is not available.
-
Specify an e-mail address to send the certificate request directly to a CA administrator.
user@host# set security pki ca-profile ms-ca administrator email-address certadmin@example.com
-
Commit the configuration:
user@host# commit and-quit
commit completeExiting configuration mode
Generating a Public-Private Key Pair
Step-by-Step Procedure
When the CA profile is configured, the next step is to generate a key pair on the Juniper Networks device. To generate the private and public key pair:
Create a certificate key pair.
user@host> request security pki generate-key-pair certificate-id ms-cert size 1024
Results
After the public-private key pair is generated, the Juniper Networks device displays the following:
Generated key pair ms-cert, key size 1024 bits
Enrolling a Local Certificate
Step-by-Step Procedure
-
Generate a local digital certificate request in the PKCS-10 format. See request security pki generate-certificate-request.
user@host> request security pki generate-certificate-request certificate-id ms-cert subject "CN=john doe,CN=10.1.1.2,OU=sales,O=example, L=Sunnyvale,ST=CA,C=US" email user@example.net filename ms-cert-req
Generated certificate request
-----BEGIN CERTIFICATE REQUEST-----
MIIB3DCCAUUCAQAwbDERMA8GA1UEAxMIam9obiBkb2UxDjAMBgNVBAsTBXNhbGVz
MRkwFwYDVQQKExBKdW5pcGVyIE5ldHdvcmtzMRIwEAYDVQQHEwlTdW5ueXZhbGUx
CzAJBgNVBAgTAkNBMQswCQYDVQQGEwJVUzCBnzANBgkqhkiG9w0BAQEFAAOBjQAw
gYkCgYEA5EG6sgG/CTFzX6KC/hz6Czal0BxakUxfGxF7UWYWHaWFFYLqo6vXNO8r
OS5Yak7rWANAsMob3E2X/1adlQIRi4QFTjkBqGI+MTEDGnqFsJBqrB6oyqGtdcSU
u0qUivMvgKQVCx8hpx99J3EBTurfWL1pCNlBmZggNogb6MbwES0CAwEAAaAwMC4G
CSqGSIb3DQEJDjEhMB8wHQYDVR0RBBYwFIESInVzZXJAanVuaXBlci5uZXQiMA0G
CSqGSIb3DQEBBQUAA4GBAI6GhBaCsXk6/1lE2e5AakFFDhY7oqzHhgd1yMjiSUMV
djmf9JbDz2gM2UKpI+yKgtUjyCK/lV2ui57hpZMvnhAW4AmgwkOJg6mpR5rsxdLr
4/HHSHuEGOF17RHO6x0YwJ+KE1rYDRWj3Dtz447ynaLxcDF7buwd4IrMcRJJI9ws
-----END CERTIFICATE REQUEST-----
Fingerprint:
47:b0:e1:4c:be:52:f7:90:c1:56:13:4e:35:52:d8:8a:50:06:e6:c8 (sha1)
a9:a1:cd:f3:0d:06:21:f5:31:b0:6b:a8:65:1b:a9:87 (md5)
In the sample of the PKCS10 certificate, the request starts with and includes the BEGIN CERTIFICATE REQUEST line and ends with and includes the END CERTIFICATE REQUEST line. This portion can be copied and pasted to your CA for enrollment. Optionally, you can also offload the ms-cert-req file and send that to your CA.
-
Submit the certificate request to the CA, and retrieve the certificate.
Loading CA and Local Certificates
Step-by-Step Procedure
Load the local certificate, CA certificate, and CRL.
user@host> file copy ftp://192.168.10.10/certnew.cer certnew.cer /var/tmp//...transferring.file.........crYdEC/100% of 1459 B 5864 kBps
user@host> file copy ftp:// 192.168.10.10/CA-certnew.cer CA-certnew.cer /var/tmp//...transferring.file.........UKXUWu/100% of 1049 B 3607 kBps
user@host> file copy ftp:// 192.168.10.10/certcrl.crl certcrl.crl /var/tmp//...transferring.file.........wpqnpA/100% of 401 B 1611 kBps
You can verify that all files have been uploaded by using the command
file list.Load the certificate into local storage from the specified external file.
You must also specify the certificate ID to keep the proper linkage with the private or public key pair. This step loads the certificate into the RAM cache storage of the PKI module, checks the associated private key, and verifies the signing operation.
user@host> request security pki local-certificate load certificate-id ms-cert filename certnew.cer
Local certificate loaded successfully
Load the CA certificate from the specified external file.
You must specify the CA profile to associate the CA certificate to the configured profile.
user@host> request security pki ca-certificate load ca-profile ms-ca filename CA-certnew.cer
Fingerprint:
1b:02:cc:cb:0f:d3:14:39:51:aa:0f:ff:52:d3:38:94:b7:11:86:30 (sha1)
90:60:53:c0:74:99:f5:da:53:d0:a0:f3:b0:23:ca:a3 (md5)
Do you want to load this CA certificate ? [yes,no] (no) yes
CA certificate for profile ms-ca loaded successfully
Load the CRL into the local storage.
The maximum size of the CRL is 5 MB. You must specify the associated CA profile in the command.
user@host> request security pki crl load ca-profile ms-ca filename certcrl.crl
CRL for CA profile ms-ca loaded successfully
Results
Verify that all local certificates are loaded.
user@host> show security pki local-certificate certificate-id ms-cert detail Certificate
identifier: ms-cert
Certificate version: 3
Serial number: 3a01c5a0000000000011
Issuer:
Organization: Example, Organizational unit: example, Country: US, State:
CA, Locality: Sunnyvale,
Common name: LAB
Subject:
Organization: Example, Organizational unit: example, Country: US,
State: CA, Locality: Sunnyvale,
Common name: john doe
Alternate subject: "user@example.net", fqdn empty, ip empty
Validity:
Not before: 11- 2-2007 22:54
Not after: 11- 2-2008 23:04
Public key algorithm: rsaEncryption(1024 bits)
30:81:89:02:81:81:00:e4:41:ba:b2:01:bf:09:31:73:5f:a2:82:fe
1c:fa:0b:36:a5:d0:1c:5a:91:4c:5f:1b:11:7b:51:66:16:1d:a5:85
15:82:ea:a3:ab:d7:34:ef:2b:39:2e:58:6a:4e:eb:58:03:40:b0:ca
1b:dc:4d:97:ff:56:9d:95:02:11:8b:84:05:4e:39:01:a8:62:3e:31
31:03:1a:7a:85:b0:90:6a:ac:1e:a8:ca:a1:ad:75:c4:94:bb:4a:94
8a:f3:2f:80:a4:15:0b:1f:21:a7:1f:7d:27:71:01:4e:ea:df:58:bd
69:08:d9:41:99:98:20:36:88:1b:e8:c6:f0:11:2d:02:03:01:00:01
Signature algorithm: sha1WithRSAEncryption
Distribution CRL:
ldap:///CN=LAB,CN=LABSRV1,CN=CDP,CN=Public%20Key%20Services,CN=Services,
CN=Configuration,DC=domain,DC=com?certificateRevocationList?base?
objectclass=cRLDistributionPoint
http://labsrv1.domain.com/CertEnroll/LAB.crl
Fingerprint:
c9:6d:3d:3e:c9:3f:57:3c:92:e0:c4:31:fc:1c:93:61:b4:b1:2d:58 (sha1)
50:5d:16:89:c9:d3:ab:5a:f2:04:8b:94:5d:5f:65:bd (md5)
You can display the individual certificate details by specifying certificate-ID in the command line.
Verify all CA certificates or the CA certificates of an individual CA profile (specified).
user@host> show security pki ca-certificate ca-profile ms-ca detail
Certificate identifier: ms-ca
Certificate version: 3
Serial number: 44b033d1e5e158b44597d143bbfa8a13
Issuer:
Organization: Example, Organizational unit: example, Country: US, State:
CA, Locality: Sunnyvale,
Common name: example
Subject:
Organization: Example, Organizational unit: example, Country: US, State:
CA, Locality: Sunnyvale,
Common name: example
Validity:
Not before: 09-25-2007 20:32
Not after: 09-25-2012 20:41
Public key algorithm: rsaEncryption(1024 bits)
30:81:89:02:81:81:00:d1:9e:6f:f4:49:c8:13:74:c3:0b:49:a0:56
11:90:df:3c:af:56:29:58:94:40:74:2b:f8:3c:61:09:4e:1a:33:d0
8d:53:34:a4:ec:5b:e6:81:f5:a5:1d:69:cd:ea:32:1e:b3:f7:41:8e
7b:ab:9c:ee:19:9f:d2:46:42:b4:87:27:49:85:45:d9:72:f4:ae:72
27:b7:b3:be:f2:a7:4c:af:7a:8d:3e:f7:5b:35:cf:72:a5:e7:96:8e
30:e1:ba:03:4e:a2:1a:f2:1f:8c:ec:e0:14:77:4e:6a:e1:3b:d9:03
ad:de:db:55:6f:b8:6a:0e:36:81:e3:e9:3b:e5:c9:02:03:01:00:01
Signature algorithm: sha1WithRSAEncryption
Distribution CRL:
ldap:///CN=LAB,CN=LABSRV1,CN=CDP,CN=Public%20Key%20Services,CN=Services,
CN=Configuration,DC=domain,DC=com?certificateRevocationList?base?
objectclass=cRLDistributionPoint
http://srv1.domain.com/CertEnroll/LAB.crl
Use for key: CRL signing, Certificate signing, Non repudiation
Fingerprint:
1b:02:cc:cb:0f:d3:14:39:51:aa:0f:ff:52:d3:38:94:b7:11:86:30 (sha1)
90:60:53:c0:74:99:f5:da:53:d0:a0:f3:b0:23:ca:a3 (md5)
Verify all loaded CRLs or the CRLs of the specified individual CA profile.
user@host> show security pki crl ca-profile ms-ca detail
CA profile: ms-ca
CRL version: V00000001
CRL issuer: emailAddress = certadmin@example.net, C = US, ST = CA,
L = Sunnyvale, O = Example, OU = example, CN = example
Effective date: 10-30-2007 20:32
Next update: 11- 7-2007 08:52
Verify the certificate path for the local certificate and the CA certificate.
user@host> request security pki local-certificate verify certificate-id ms-cert
Local certificate ms-cert verification success
user@host> request security pki ca-certificate verify ca-profile ms-ca
CA certificate ms-ca verified successfully
Configuring the IPsec VPN with the Certificates
Step-by-Step Procedure
To configure the IPsec VPN with the certificate, refer to the network diagram shown in Figure 1
Configure security zones and assign interfaces to the zones.
In this example packets are incoming on
ge-0/0/0, and the ingress zone is the trust zone.[edit security zones security-zone] user@host# set trust interfaces ge-0/0/0.0 user@host# set untrust interfaces ge-0/0/3.0
Configure host-inbound services for each zone.
Host-inbound services are for traffic destined for the Juniper Networks device. These settings include but are not limited to the FTP, HTTP, HTTPS, IKE, ping, rlogin, RSH, SNMP, SSH, Telnet, TFTP, and traceroute.
[edit security zones security-zone]
user@host# set trust host-inbound-traffic system-services all
user@host# set untrust host-inbound-traffic system-services ike
Configure the address book entries for each zone.
[edit security zones security-zone]
user@host# set trust address-book address local-net 192.168.10.0/24
user@host# set untrust address-book address remote-net 192.168.168.0/24
Configure the IKE (Phase 1) proposal to use RSA encryption.
[edit security ike proposal rsa-prop1]
user@host# set authentication-method rsa-signatures
user@host# set encryption-algorithm 3des-cbc
user@host# set authentication-algorithm sha1
user@host# set dh-group group2
Configure an IKE policy.
The phase 1 exchange can take place in either main mode or aggressive mode.
[edit security ike policy ike-policy1]
user@host# set mode main
user@host# set proposals rsa-prop1
user@host# set certificate local-certificate ms-cert
user@host# set certificate peer-certificate-type x509- signature
user@host# set certificate trusted-ca ms-ca
Configure an IKE gateway.
In this example, the peer is identified by an FQDN (hostname). Therefore the gateway IKE ID should be the remote peer domain name. You must specify the correct external interface or peer ID to properly identify the IKE gateway during Phase 1 setup.
[edit security ike gateway ike-gate]
user@host# set external-interface ge-0/0/3.0
user@host# set ike-policy ike-policy1
user@host# set dynamic hostname ssg5.example.net
Configure the IPsec policy.
This example uses the Standard proposal set, which includes
esp-group2-3des-sha1andesp-group2- aes128-sha1proposals. However, a unique proposal can be created and then specified in the IPsec policy if needed.[edit security ipsec policy vpn-policy1] user@host# set proposal-set standard user@host# set perfect-forward-secrecy keys group2
Configure the IPsec VPN with an IKE gateway and IPsec policy.
In this example, the ike-vpn VPN name must be referenced in the tunnel policy to create a security association. Additionally, if required, an idle time and a proxy ID can be specified if they are different from the tunnel policy addresses.
[edit security ipsec vpn ike-vpn ike]
user@host# set gateway ike-gate
user@host# set ipsec-policy vpn-policy1
Configure bidirectional tunnel policies for VPN traffic.
In this example, traffic from the host LAN to the remote office LAN requires a from-zone trust to-zone untrust tunnel policy. However, if a session needs to originate from the remote LAN to the host LAN, then a tunnel policy in the opposite direction from from-zone untrust to-zone trust is also required. When you specify the policy in the opposite direction as the pair-policy, the VPN becomes bidirectional. Note that in addition to the permit action, you also need to specify the IPsec profile to be used. Note that for tunnel policies, the action is always permit. In fact, if you are configuring a policy with the deny action, you will not see an option for specifying the tunnel.
[edit security policies from-zone trust to-zone untrust]
user@host# set policy tunnel-policy-out match source-address local-net
user@host# set policy tunnel-policy-out match destination-address remote-net
user@host# set policy tunnel-policy-out match application any
user@host# set policy tunnel-policy-out then permit tunnel ipsec-vpn ike-vpn pair-policy tunnel-policy-in
user@host# top edit security policies from-zone untrust to-zone trust
user@host# set policy tunnel-policy-in match source-address remote-net
user@host# set policy tunnel-policy-in match destination-address local-net
user@host# set policy tunnel-policy-in match application any
user@host# set policy tunnel-policy-in then permit tunnel ipsec-vpn ike-vpn pair-policy tunnel-policy-out
Configure a source NAT rule and a security policy for Internet traffic.
The device uses the specified source-nat interface, and translates the source IP address and port for outgoing traffic, using the IP address of the egress interface as the source IP address and a random higher port for the source port. If required, more granular policies can be created to permit or deny certain traffic.
[edit security nat source rule-set nat-out]
user@host#set from zone trust
user@host#set to zone untrust
user@host#set rule interface-nat match source-address 192.168.10.0/24
user@host#set rule interface-nat match destination-address 0.0.0.0/0
user@host#set rule interface-nat then source-nat interface
[edit security policies from-zone trust to-zone untrust]
user@host# set policy any-permit match source-address any
user@host# set policy any-permit match destination-address any
user@host# set policy any-permit match application any
user@host# set policy any-permit then permit
Move the tunnel policy above the any-permit policy.
[edit security policies from-zone trust to-zone untrust]
user@host# insert policy tunnel-policy-out before policy any-permit
The security policy should be below the tunnel policy in the hierarchy because the policy list is read from top to bottom. If this policy were above the tunnel policy, then the traffic would always match this policy and would not continue to the next policy. Thus no user traffic would be encrypted.
Configure the tcp-mss setting for TCP traffic across the tunnel.
TCP-MSS is negotiated as part of the TCP 3-way handshake. It limits the maximum size of a TCP segment to accommodate the MTU limits on a network. This is very important for VPN traffic because the IPsec encapsulation overhead along with the IP and frame overhead can cause the resulting ESP packet to exceed the MTU of the physical interface, causing fragmentation. Because fragmentation increases the bandwidth and device resources usage, and in general it should be avoided.
The recommended value to use for tcp-mss is 1350 for most Ethernet-based networks with an MTU of 1500 or higher. This value might need to be altered if any device in the path has a lower value of MTU or if there is any added overhead such as PPP, Frame Relay, and so on. As a general rule, you might need to experiment with different tcp-mss values to obtain optimal performance.
user@host# set security flow tcp-mss ipsec-vpn mss mss-value
Example:
[edit]
user@host# set security flow tcp-mss ipsec-vpn mss 1350
user@host# commit and-quit
commit complete
Exiting configuration mode
Verification
Confirm that the configuration is working properly.
- Confirming IKE Phase 1 Status
- Getting Details on Individual Security Associations
- Confirming IPsec Phase 2 Status
- Displaying IPsec Security Association Details
- Checking IPsec SA Statistics
- Testing Traffic Flow Across the VPN
- Confirming the Connectivity
Confirming IKE Phase 1 Status
Purpose
Confirm the VPN status by checking any IKE Phase 1 security associations status.
PKI related to IPsec tunnels is formed during Phase 1 setup. Completion of Phase 1 indicates that PKI was successful.
Action
From operational mode, enter the show security ike security-associations command.
user@host> show security ike security-associations


Index Remote Address State Initiator cookie Responder cookie Mode
 2010.2.2.2 UP af4f78bc135e4365 48a35f853ee95d21 Main
Meaning
The output indicates that:
The remote peer is 10.2.2.2 and the status is UP, which means the successful association of Phase 1 establishment.
The remote peer IKE ID, IKE policy, and external interfaces are all correct.
Index 20 is a unique value for each IKE security association. You can use this output details to get further details on each security association. See Getting Details on Individual Security Associations.
Incorrect output would indicate that:
The remote peer status is Down.
There are no IKE security associations .
There are IKE policy parameters, such as the wrong mode type (Aggr or Main), PKI issues, or Phase 1 proposals (all must match on both peers). For more information, see Troubleshooting IKE, PKI, and IPsec Issues.
External interface is invalid for receiving the IKE packets. Check the configurations for PKI-related issues, check the key management daemon (kmd) log for any other errors, or run trace options to find the mismatch. For more information, see Troubleshooting IKE, PKI, and IPsec Issues.
Getting Details on Individual Security Associations
Purpose
Get details on individual IKE.
Action
From operational mode, enter the show security ike security-associations index 20 detail command.
user@host> show security ike security-associations index 20 detail
IKE peer 10.2.2.2, Index 20,
Role: Responder, State: UP
Initiator cookie: af4f78bc135e4365, Responder cookie: 48a35f853ee95d21
Exchange type: Main, Authentication method: RSA-signatures
Local: 10.1.1.2:500, Remote: 10.2.2.2:500
Lifetime: Expires in 23282 seconds
Algorithms:
Authentication : sha1
Encryption : 3des-cbc
Pseudo random function: hmac-sha1
Traffic statistics:
Input bytes : 10249
Output bytes : 4249
Input packets: 10
Output packets: 9
Flags: Caller notification sent
IPsec security associations: 2 created, 1 deleted
Phase 2 negotiations in progress: 0
Meaning
The output displays the details of the individual IKE SAs such as role (initiator or responder), status, exchange type, authentication method, encryption algorithms, traffic statistics, Phase 2 negotiation status, and so on.
You can use the output data to:
Know the role of the IKE SA. Troubleshooting is easier when the peer has the responder role.
Get the traffic statistics to verify the traffic flow in both directions.
Get the number of IPsec security associations created or in progress.
Get the status of any completed Phase 2 negotiations.
Confirming IPsec Phase 2 Status
Purpose
View IPsec (Phase 2) security associations.
When IKE Phase 1 is confirmed, view the IPsec (Phase 2) security associations.
Action
From operational mode, enter the show security ipsec security-associations command.
user@host> show security ipsec security-associations

total configured sa: 2
ID Gateway Port Algorithm SPI Life:sec/kb Mon vsys
<2 10.2.2.2 500 ESP:3des/sha1 bce1c6e0 1676/ unlim - 0
>2 10.2.2.2 500 ESP:3des/sha1 1a24eab9 1676/ unlim - 0
Meaning
The output indicates that:
There is a configured IPsec SA pair available . The port number 500 indicates that a standard IKE port is used. Otherwise, it is Network Address Translation-Traversal (NAT-T), 4500, or random high port.
The security parameter index (SPI) is used for both directions. The lifetime or usage limits of the SA is expressed either in seconds or in kilobytes. In the output, 1676/ unlim indicates Phase 2 lifetime is set to expire in 1676 seconds and there is no specified lifetime size.
The ID number shows the unique index value for each IPsec SA.
A hyphen (
-) in the Mon column indicates that VPN monitoring is not enabled for this SA.The virtual system (vsys) is zero, which is the default value.
Phase 2 lifetime can be different from the Phase 1 lifetime because Phase 2 is not dependent on Phase 1 after the VPN is up.
Displaying IPsec Security Association Details
Purpose
Display the individual IPsec SA details identified by the index number.
Action
From operational mode, enter the show security ipsec security-associations index 2 detail command.
user@host> show security ipsec security-associations index 2 detail
Virtual-system: Root
Local Gateway: 10.1.1.2, Remote Gateway: 10.2.2.2
Local Identity: ipv4_subnet(any:0,[0..7]=192.168.10.0/24)
Remote Identity: ipv4_subnet(any:0,[0..7]=192.168.168.0/24)
DF-bit: clear
Policy-name: tunnel-policy-out
Direction: inbound, SPI: bce1c6e0, AUX-SPI: 0
Hard lifetime: Expires in 1667 seconds
Lifesize Remaining: Unlimited
Soft lifetime: Expires in 1093 seconds
Mode: tunnel, Type: dynamic, State: installed, VPN Monitoring: -
Protocol: ESP, Authentication: hmac-sha1-96, Encryption: 3des-cbc
Anti-replay service: enabled, Replay window size: 32
Direction: outbound, SPI: 1a24eab9, AUX-SPI: 0
Hard lifetime: Expires in 1667 seconds
Lifesize Remaining: Unlimited
Soft lifetime: Expires in 1093 seconds
Mode: tunnel, Type: dynamic, State: installed, VPN Monitoring: -
Protocol: ESP, Authentication: hmac-sha1-96, Encryption: 3des-cbc
Anti-replay service: enabled, Replay window size: 32
Meaning
The output displays the local Identity and the remote Identity.
Note that a proxy ID mismatch can cause Phase 2 completion to fail. The proxy ID is derived from the tunnel policy (for policy-based VPNs). The local address and remote address are derived from the address book entries, and the service is derived from the application configured for the policy.
If Phase 2 fails due to a proxy ID mismatch, verify which address book entries are configured in the policy and ensure that the correct addresses are sent. Also ensure that the ports are matching. Double-check the service to ensure that the ports match for the remote and local servers.
If multiple objects are configured in a tunnel policy for source address, destination address, or application, then the resulting proxy ID for that parameter is changed to zeroes.
For example, assume the following scenario for a tunnel policy:
Local addresses of 192.168.10.0/24 and 10.10.20.0/24
Remote address of 192.168.168.0/24
Application as junos-http
The resulting proxy ID is local 0.0.0.0/0, remote 192.168.168.0/24, service 80.
The resulting proxy IDs can affect the interoperability if the remote peer is not configured for the second subnet. Also, if you are employing a third-party vendor’s application, you might have to manually enter the proxy ID to match.
If IPsec fails to complete, then check the kmd log or use the set traceoptions command. For more information, see Troubleshooting IKE, PKI, and IPsec Issues.
Checking IPsec SA Statistics
Purpose
Check statistics and errors for an IPsec SA.
For troubleshooting purpose, check the Encapsulating Security Payload/Authentication Header (ESP/AH) counters for any errors with a particular IPsec SA.
Action
From operational mode, enter the show security ipsec statistics index 2 command.
user@host> show security ipsec statistics index 2
ESP Statistics:
Encrypted bytes: 674784
Decrypted bytes: 309276
Encrypted packets: 7029
Decrypted packets: 7029
AH Statistics:
Input bytes: 0
Output bytes: 0
Input packets: 0
Output packets: 0
Errors:
AH authentication failures: 0, Replay errors: 0
ESP authentication failures: 0, ESP decryption failures: 0
Bad headers: 0, Bad trailers: 0
Meaning
An error value of zero in the output indicates a normal condition.
We recommend running this command multiple times to observe any packet loss issues across a VPN. Output from this command also displays the statistics for encrypted and decrypted packet counters, error counters, and so on.
You must enable security flow trace options to investigate which ESP packets are experiencing errors and why. For more information, see Troubleshooting IKE, PKI, and IPsec Issues.
Testing Traffic Flow Across the VPN
Purpose
Test traffic flow across the VPN after Phase 1 and
Phase 2 have completed successfully. You can test traffic flow by
using the ping command. You can ping from local host to
remote host. You can also initiate pings from the Juniper Networks
device itself.
This example shows how to initiate a ping request from the Juniper Networks device to the remote host. Note that when pings are initiated from the Juniper Networks device, the source interface must be specified to ensure that the correct route lookup takes place and the appropriate zones are referenced in the policy lookup.
In this example, the ge-0/0/0.0 interface resides in the same security zone as the local host and must be specified in the ping request so that the policy lookup can be from zone trust to zone untrust.
Action
From operational mode, enter the ping 192.168.168.10 interface ge-0/0/0 count 5 command.
user@host> ping 192.168.168.10 interface ge-0/0/0 count 5
PING 192.168.168.10 (192.168.168.10): 56 data bytes
64 bytes from 192.168.168.10: icmp_seq=0 ttl=127 time=8.287 ms
64 bytes from 192.168.168.10: icmp_seq=1 ttl=127 time=4.119 ms
64 bytes from 192.168.168.10: icmp_seq=2 ttl=127 time=5.399 ms
64 bytes from 192.168.168.10: icmp_seq=3 ttl=127 time=4.361 ms
64 bytes from 192.168.168.10: icmp_seq=4 ttl=127 time=5.137 ms
--- 192.168.168.10 ping statistics ---
5 packets transmitted, 5 packets received, 0% packet loss
round-trip min/avg/max/stddev = 4.119/5.461/8.287/1.490 ms
Confirming the Connectivity
Purpose
Confirm the connectivity between a remote host and a local host.
Action
From operational mode, enter the ping 192.168.10.10 from ethernet0/6 command.
ssg5-> ping 192.168.10.10 from ethernet0/6

Type escape sequence to abort
Sending 5, 100-byte ICMP Echos to 192.168.10.10, timeout is 1 seconds from ethernet0/6
!!!!!
Success Rate is 100 percent (5/5), round-trip time min/avg/max=4/4/5 ms
Meaning
You can confirm end-to-end connectivity by using the ping command from the remote host to the local host. In this
example, the command is initiated from the SSG5 device.
Failed end-to-end connectivity can indicate an issue with routing, policy, end host, or encryption/decryption of the ESP packets. To verify the exact causes of the failure:
Check IPsec statistics for details on errors as described in Checking IPsec SA Statistics.
Confirm end host connectivity by using the
pingcommand from a host on the same subnet as the end host. If the end host is reachable by other hosts, then you can assume that the issue is not with the end host.Enable security flow trace options for troubleshooting the routing-related and policy-related issues.
Troubleshooting IKE, PKI, and IPsec Issues
Troubleshoot IKE, PKI, and IPsec issues.
- Basic Troubleshooting Steps
- Checking the Free Disk Space on Your Device
- Checking the Log Files to Verify Different Scenarios and Uploading Log Files to an FTP
- Enabling IKE Trace Options to View Messages on IKE
- Enabling PKI Trace Options to View Messages on IPsec
- Setting up IKE and PKI Trace Options to Troubleshoot IKE Setup Issues with Certificates
- Analyzing the Phase 1 Success Message
- Analyzing the Phase 1 Failure Message (Proposal Mismatch)
- Analyzing the Phase 1 Failure Message (Authentication Failure)
- Analyzing the Phase 1 Failure Message (Timeout Error)
- Analyzing the Phase 2 Failure Message
- Analyzing the Phase 2 Failure Message
- Troubleshooting Common Problems Related to IKE and PKI
Basic Troubleshooting Steps
Problem
The basic troubleshooting steps are as follows:
Identifying and isolating the problem.
Debugging the problem.
The common approach of starting troubleshooting is with the lowest layer of the OSI layers and working your way up the OSI stack to confirm the layer in which the failure occurs.
Solution
Basic steps for troubleshooting IKE, PKI, and IPsec are as follows:
Confirm the physical connectivity of the Internet link at the physical and data link levels.
Confirm that the Juniper Networks device has connectivity to the Internet next hop and connectivity to the remote IKE peer.
Confirm IKE Phase 1 completion.
Confirm IKE Phase 2 completion if IKE Phase 1 completion is successful.
Confirm the traffic flow across the VPN (if the VPN is up and active).
Junos OS includes the trace options feature. Using this feature, you can enable a trace option flag to write the data from the trace option to a log file, which can be predetermined or manually configured and stored in flash memory. These trace logs can be retained even after a system reboot. Check the available flash storage before implementing trace options.
You can enable the trace options feature in configuration mode and commit the configuration to use the trace options feature. Similarly to disable trace options, you must deactivate trace options in configuration mode and commit the configuration.
Checking the Free Disk Space on Your Device
Problem
Check the statistics on the free disk space in your device file systems.
Solution
From operational mode, enter the show system storage command.
user@host> show system storage
Filesystem Size Used Avail Capacity Mounted on
/dev/ad0s1a 213M 74M 137M 35% /
devfs 1.0K 1.0K 0B 100% /dev
devfs 1.0K 1.0K 0B 100% /dev/
/dev/md0 180M 180M 0B 100% /junos
/cf 213M 74M 137M 35% /junos/cf
devfs 1.0K 1.0K 0B 100% /junos/dev/
procfs 4.0K 4.0K 0B 100% /proc
/dev/bo0s1e 24M 13K 24M 0% /config
/dev/md1 168M 7.6M 147M 5% /mfs
/cf/var/jail 213M 74M 137M 35% /jail/var
The /dev/ad0s1a represents the onboard flash memory
and is currently at 35 percent capacity.
Checking the Log Files to Verify Different Scenarios and Uploading Log Files to an FTP
Problem
View the log files to check security IKE debug messages, security flow debugs, and the state of logging to the syslog.
Solution
From operational mode, enter the show log kmd, show log pkid, show log security-trace, and show log messages commands.
user@host> show log kmd
user@host> show log pkid
user@host> show log security-trace
user@host> show log messages
You can view a list of all logs in the /var/log directory by
using the show log command.
Log files can also be uploaded to an FTP server by using the file copy command.
(operational mode):
user@host> file copy path/filename dest-path/filename
Example:
user@host> file copy /var/log/kmd ftp://192.168.10.10/kmd.log
ftp://192.168.10.10/kmd.log 100% of 35 kB 12 MBps
Enabling IKE Trace Options to View Messages on IKE
Problem
To view success or failure messages for IKE or IPsec,
you can view the kmd log by using the show log kmd command.
Because the kmd log displays some general messages, it can be useful
to obtain additional details by enabling IKE and PKI trace options.
Generally, it is best practice to troubleshoot the peer that has the responder role. You must obtain the trace output from the initiator and responder to understand the cause of a failure.
Configure IKE tracing options.
Solution
user@host> configure
Entering configuration mode

[edit]
user@host# edit security ike traceoptions
[edit security ike traceoptions]
user@host# set file ?
Possible completions:
<filename> Name of file in which to write trace information
files Maximum number of trace files (2..1000)
match Regular expression for lines to be logged
no-world-readable Don't allow any user to read the log file
size Maximum trace file size (10240..1073741824)
world-readable Allow any user to read the log file
[edit security ike traceoptions]
user@host# set flag ?
Possible completions:
all Trace everything
certificates Trace certificate events
database Trace security associations database events
general Trace general events
ike Trace IKE module processing
parse Trace configuration processing
policy-manager Trace policy manager processing
routing-socket Trace routing socket messages
timer Trace internal timer events
If you do not specify file names for the <filename> field, then all IKE trace options are written to the kmd log.
You must specify at least one flag option to write trace data to the log. For example:
file size— Maximum size of each trace file, in bytes. For example, 1 million (1,000,000 ) can generate a maximum file size of 1 MB.files— Maximum number of trace files to be generated and stored in a flash memory device.
You must commit your configuration to start the trace.
Enabling PKI Trace Options to View Messages on IPsec
Problem
Enable PKI trace options to identify whether an IKE failure is related to the certificate or to a non-PKI issue.
Solution
[edit security pki traceoptions]
user@host# set file ?
Possible completions:
<filename> Name of file in which to write trace information
files Maximum number of trace files (2..1000)
match Regular expression for lines to be logged
no-world-readable Don't allow any user to read the log file
size Maximum trace file size (10240..1073741824)
world-readable Allow any user to read the log file
[edit security pki traceoptions]
user@host# set flag ?
Possible completions:
all Trace with all flags enabled
certificate-verification PKI certificate verification tracing
online-crl-check PKI online crl tracing
Setting up IKE and PKI Trace Options to Troubleshoot IKE Setup Issues with Certificates
Problem
Configure the recommended settings for IKE and PKI trace options.
The IKE and PKI trace options use the same parameters, but the default filename for all PKI-related traces is found in the pkid log.
Solution
user@host> configure
Entering configuration mode

[edit security ike traceoptions]
user@host# set file size 1m
user@host# set flag ike
user@host# set flag policy-manager
user@host# set flag routing-socket
user@host# set flag certificates

[edit security pki traceoptions]
user@host# set file size 1m
user@host# set flag all
user@host# commit and-quit
commit complete
Exiting configuration mode
Analyzing the Phase 1 Success Message
Problem
Understand the output of the show log kmd command when the IKE Phase 1 and Phase 2 conditions are successful.
Solution
Nov 7 11:52:14 Phase-1 [responder] done for local=ipv4(udp:500,[0..3]=
10.1.1.2) remote=fqdn(udp:500,[0..15]=ssg5.example.net)
Nov 7 11:52:14 Phase-2 [responder] done for
p1_local=ipv4(udp:500,[0..3]=10.1.1.2) p1_remote=fqdn(udp:500,[0..15]=ssg5.example.net)
p2_local=ipv4_subnet(any:0,[0..7]=192.168.10.0/24)
p2_remote=ipv4_subnet(any:0,[0..7]=192.168.168.0/24)
The sample output indicates:
10.1.1.2—Local address.ssg5.example.net—Remote peer (hostname with FQDN).udp: 500—NAT-T was not negotiated.Phase 1 [responder] done—Phase 1 status, along with the role (initiator or responder).Phase 2 [responder] done—Phase 1 status, along with the proxy ID information.You can also confirm the IPsec SA status by using the verification commands mentioned in Confirming IKE Phase 1 Status.
Analyzing the Phase 1 Failure Message (Proposal Mismatch)
Problem
Understanding the output of the show log kmd command, where the IKE Phase 1 condition is a failure, helps in
determining the reason for the VPN not establishing Phase 1.
Solution
Nov 7 11:52:14 Phase-1 [responder] failed with error(No proposal chosen) for
local=unknown(any:0,[0..0]=) remote=fqdn(udp:500,[0..15]=ssg5.example.net)
Nov 7 11:52:14 10.1.1.2:500 (Responder) <-> 10.2.2.2:500 { 011359c9 ddef501d - 2216ed2a bfc50f5f [-
1] / 0x00000000 } IP; Error = No proposal chosen (14)
The sample output indicates:
10.1.1.2—Local address.ssg5.example.net—Remote peer (hostname with FQDN).udp: 500—NAT-T was not negotiated.Phase-1 [responder] failed with error (No proposal chosen)—Phase 1 failure because of proposal mismatch.
To resolve this issue, ensure that the parameters for the IKE gateway Phase 1 proposals on both the responder and the initiator match. Also confirm that a tunnel policy exists for the VPN.
Analyzing the Phase 1 Failure Message (Authentication Failure)
Problem
Understand the output of the show log kmd command when the IKE Phase 1 condition is a failure. This helps
in determining the reason for the VPN not establishing Phase 1.
Solution
Nov 7 12:06:36 Unable to find phase-1 policy as remote peer:10.2.2.2 is not recognized.
Nov 7 12:06:36 Phase-1 [responder] failed with error(Authentication failed) for
local=ipv4(udp:500,[0..3]=10.1.1.2) remote=ipv4(any:0,[0..3]=10.2.2.2)
Nov 7 12:06:36 10.1.1.2:500 (Responder) <-> 10.2.2.2:500 { f725ca38 dad47583 - dab1ba4c ae26674b [-
1] / 0x00000000 } IP; Error = Authentication failed (24)
The sample output indicates:
10.1.1.2—Local address.10.2.2.2—Remote peerPhase 1 [responder] failed with error (Authentication failed)—Phase 1 failure due to the responder not recognizing the incoming request originating from a valid gateway peer. In the case of IKE with PKI certificates, this failure typically indicates that an incorrect IKE ID type was specified or entered.
To resolve this issue, confirm that the correct peer IKE ID type is specified on the local peer based on the following:
How the remote peer certificate was generated
Subject Alternative Name or DN information in the received remote peer certificate
Analyzing the Phase 1 Failure Message (Timeout Error)
Problem
Understand the output of the show log kmd command when the IKE Phase 1 condition is a failure.
Solution
Nov 7 13:52:39 Phase-1 [responder] failed with error(Timeout) for local=unknown(any:0,[0..0]=)
remote=ipv4(any:0,[0..3]=10.2.2.2)
The sample output indicates:
10.1.1.2—Llocal address.10.2.2.2—Remote peer.Phase 1 [responder] failed with error(Timeout)—Phase 1 failure.This error indicates that either the IKE packet is lost enroute to the remote peer or there is a delay or no response from the remote peer.
Because this timeout error is the result of waiting on a response from the PKI daemon, you must review the PKI trace options output to see whether there is a problem with PKI.
Analyzing the Phase 2 Failure Message
Problem
Understand the output of the show log kmd command when the IKE Phase 2 condition is a failure.
Solution
Nov 7 11:52:14 Phase-1 [responder] done for local=ipv4(udp:500,[0..3]=
10.1.1.2) remote=fqdn(udp:500,[0..15]=ssg5.example.net)
Nov 7 11:52:14 Failed to match the peer proxy ids
p2_remote=ipv4_subnet(any:0,[0..7]=192.168.168.0/24)
p2_local=ipv4_subnet(any:0,[0..7]=10.10.20.0/24) for the remote peer:ipv4(udp:500,[0..3]=10.2.2.2)
Nov 7 11:52:14 KMD_PM_P2_POLICY_LOOKUP_FAILURE: Policy lookup for Phase-2 [responder] failed for
p1_local=ipv4(udp:500,[0..3]=10.1.1.2) p1_remote=ipv4(udp:500,[0..3]=10.2.2.2)
p2_local=ipv4_subnet(any:0,[0..7]=10.10.20.0/24)
p2_remote=ipv4_subnet(any:0,[0..7]=192.168.168.0/24)
Nov 7 11:52:14 10.1.1.2:500 (Responder) <-> 10.2.2.2:500 { 41f638eb cc22bbfe - 43fd0e85 b4f619d5 [0]
/ 0xc77fafcf } QM; Error = No proposal chosen (14)
The sample output indicates:
10.1.1.2—Local address.ssg5.example.net—Remote peer (IKE ID type hostname with FQDN).Phase 1 [responder] done—Phase 1 success.Failed to match the peer proxy ids—The Incorrect proxy IDs are received. In the previous sample, the two proxy IDs received are 192.168.168.0/24 (remote) and 10.10.20.0/24 (local) (for service=any). Based on the configuration given in this example, the expected local address is 192.168.10.0/24. This shows that there is a mismatch of configurations on the local peer, resulting in the failure of proxy ID match.To resolve this issue, correct the address book entry or configure the proxy ID on either peer so that it matches the other peer.
The output also indicates the reason for failure is
No
proposal chosen
. However in this case you also see the messageFailed to match the peer proxy ids.
Analyzing the Phase 2 Failure Message
Problem
Understand the output of the show log kmd command when the IKE Phase 2 condition is a failure.
Solution
Nov 7 11:52:14 Phase-1 [responder] done for local=ipv4(udp:500,[0..3]=
10.1.1.2) remote=fqdn(udp:500,[0..15]=ssg5.example.net)
Nov 7 11:52:14 10.1.1.2:500 (Responder) <-> 10.2.2.2:500 { cd9dff36 4888d398 - 6b0d3933 f0bc8e26 [0]
/ 0x1747248b } QM; Error = No proposal chosen (14)
The sample output indicates:
10.1.1.2—Local address.fqdn(udp:500,[0..15]=ssg5.example.net—Remote peer.Phase 1 [responder] done—Phase 1 success.Error = No proposal chosen—No proposal was chosen during Phase 2. This issue is due to proposal mismatch between the two peers.To resolve this issue, confirm that the Phase 2 proposals match on both peers.
Troubleshooting Common Problems Related to IKE and PKI
Problem
Troubleshoot common problems related to IKE and PKI.
Enabling the trace options feature helps you to gather more information on the debugging issues than is obtainable from the normal log entries. You can use the trace options log to understand the reasons for IKE or PKI failures.
Solution
Methods for troubleshooting the IKE -and-PKI-related issues:
Ensure that the clock, date, time zone, and daylight savings settings are correct. Use NTP to keep the clock accurate.
Ensure that you use a two-letter country code in the "C=" (country) field of the DN.
For example: use “US” and not “USA” or “United States.” Some CAs require that the country field of the DN be populated, allowing you to enter the country code value only with a two-letter value.
Ensure that if a peer certificate is using multiple OU=or CN= fields, you are using the distinguished name with container method (the sequence must be maintained and is case- sensitive).
If the certificate is not valid yet, check the system clock and, if required, adjust the system time zone or just add a day in the clock for a quick test.
Ensure that a matching IKE ID type and value are configured.
PKI can fail due to a revocation check failure. To confirm this, temporarily disable revocation checking and see whether IKE Phase 1 is able to complete.
To disable revocation checking, use the following command in configure mode:
set security pki ca-profile <ca-profile> revocation-check
disable