ON THIS PAGE
Example: Configuring a Routing Policy for Conditional Advertisement Enabling Conditional Installation of Prefixes in a Routing Table
This example shows how to configure conditional installation of prefixes in a routing table using BGP export policy.
Requirements
This example uses the following hardware and software components:
M Series Multiservice Edge Routers, MX Series 5G Universal Routing Platforms, or T Series Core Routers
Junos OS Release 9.0 or later
Overview
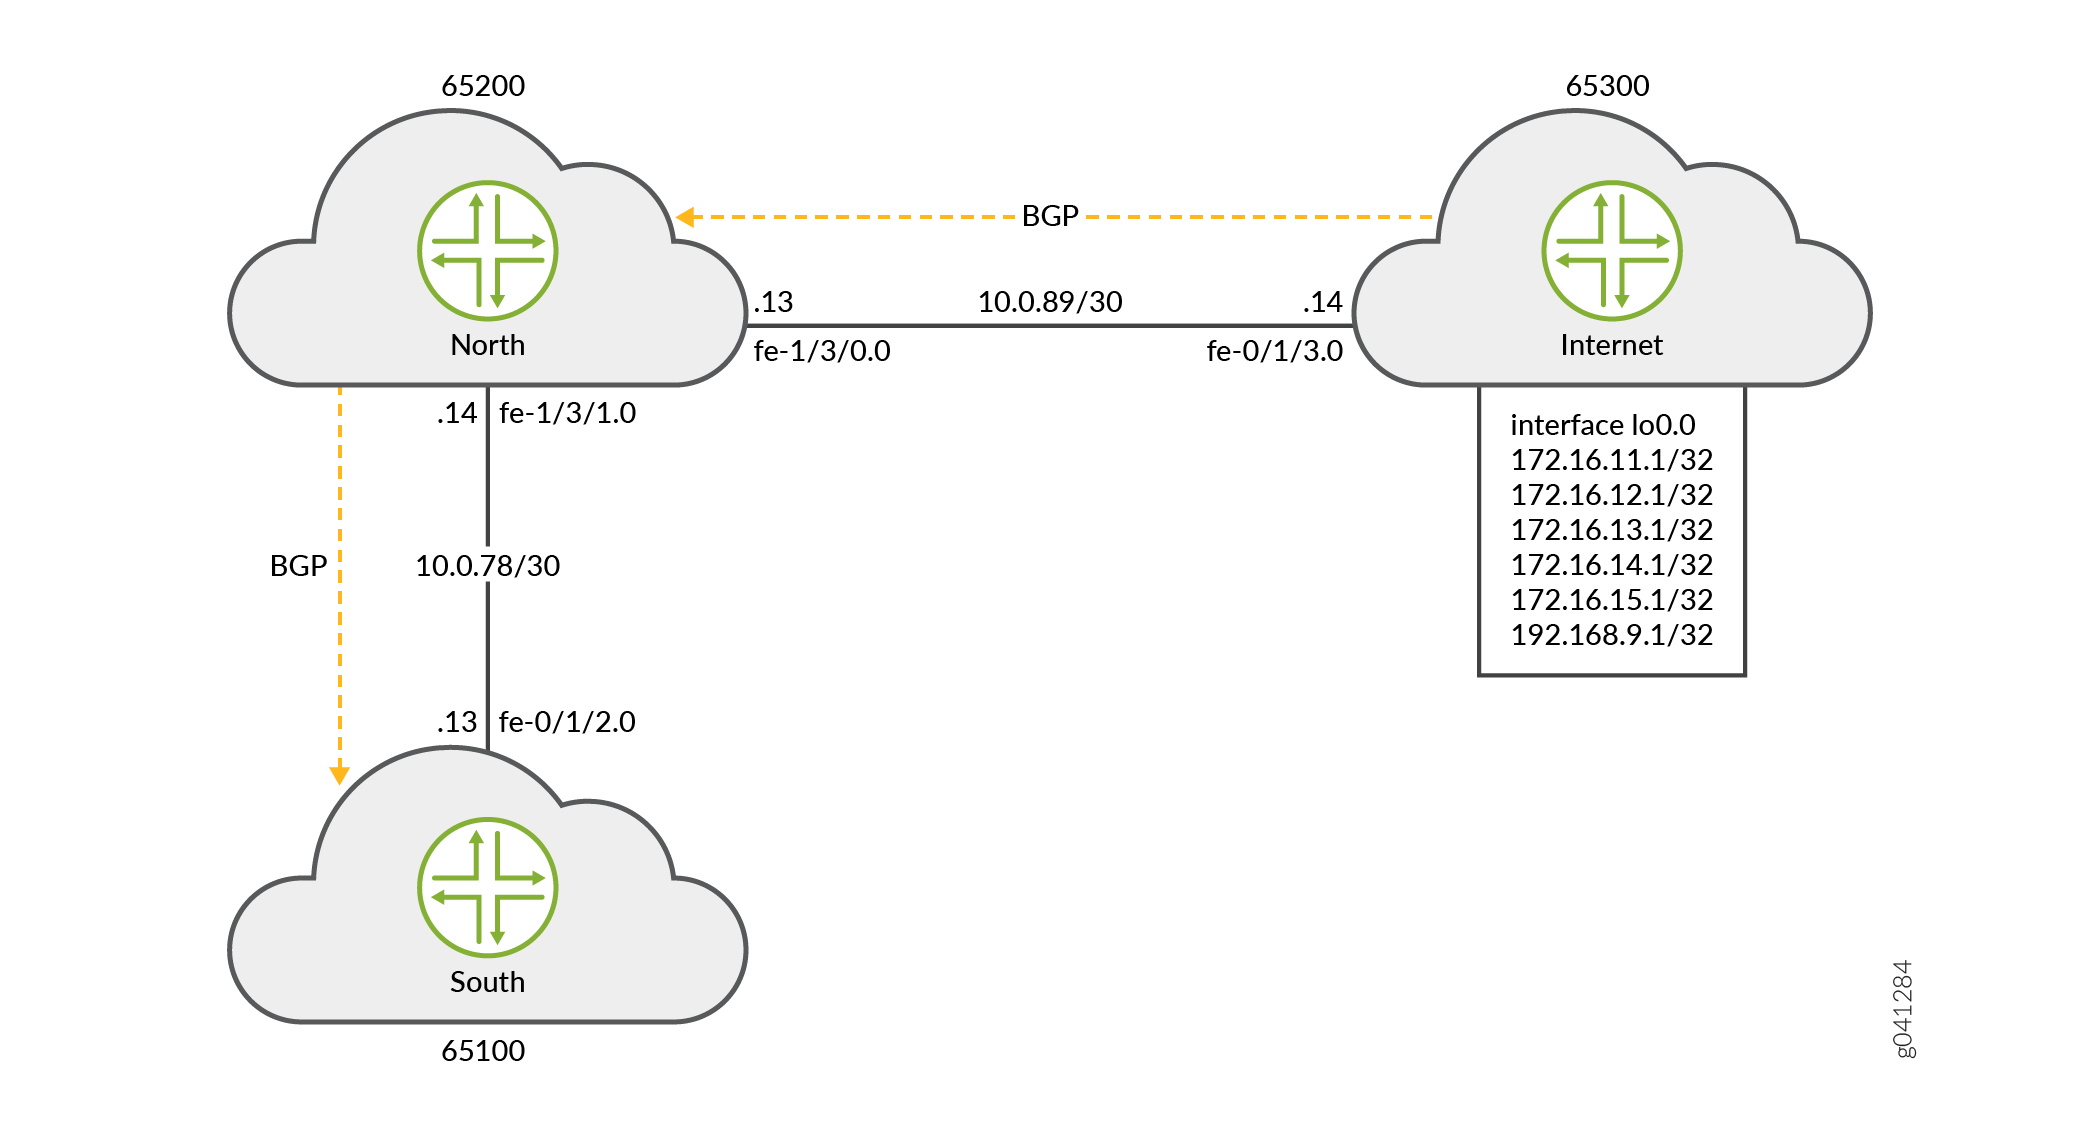
In this example, three routers in three different autonomous systems (ASs) are connected and configured with the BGP protocol. The router labeled Internet, which is the upstream router, has five addresses configured on its lo0.0 loopback interface (172.16.11.1/32, 172.16.12.1/32, 172.16.13.1/32, 172.16.14.1/32, and 172.16.15.1/32), and an extra loopback address (192.168.9.1/32) is configured as the router ID. These six addresses are exported into BGP to emulate the contents of a BGP routing table of a router connected to the Internet, and advertised to North.
The North and South routers use the 10.0.89.12/30 and 10.0.78.12/30 networks, respectively, and use 192.168.7.1 and 192.168.8.1 for their respective loopback addresses.
Figure 1 shows the topology used in this example.
Router North exports the 172.16.0.0/16 BGP routes it learns from Router Internet to Router South. These routes might represent the routes owned by the Internet router's domain. In addition, when the specific 172.16.11.1/32 route is present, Router North also advertises a default route. The 172.16.11.1 route might represent the Internet router's link to a tier 1 transit peering provider that provides full internet connectivity.
Router South receives all six routes, but should only install the default route and one other specific route (172.16.11.1/32) in its routing table.
To summarize, the example meets the following requirements:
-
On North, send all 172.16/16 prefixes. In addition, also send 0/0 to South only if a particular route is present in the inet.0 routing table (in this example 172.16.11.1/32).
-
On South, accept and install the default route and the 172.16.11.1/32 route in the routing and forwarding tables. Drop all other routes. Consider that South might be a lower-end device that cannot accept a full Internet routing table. As a result the operator only wants South to have the default route and one other specific prefix.
The first requirement is met with an export policy on North:
user@North# show policy-options
policy-statement conditional-export-bgp {
    term prefix_11 {
        from {
            protocol bgp;
            route-filter 172.16.0.0/16 orlonger;
        }
        then accept;
    }
    term conditional-default {
        from {
            route-filter 0.0.0.0/0 exact;
            condition prefix_11;
        }
        then accept;
    }
    term others {
        then reject;
    }
}
condition prefix_11 {
    if-route-exists {
        172.16.11.1/32;
        table inet.0;
    }
}
The logic of the conditional export policy can be summarized as follows: If 0/0 is present, and if 172.16.11.1/32 is present, then send the 0/0 prefix. This implies that if 172.16.11.1/32 is not present, then do not send 0/0.
The second requirement is met with an import policy on South:
user@South# show policy-options
policy-statement import-selected-routes {
    term 1 {
        from {
            rib inet.0;
            neighbor 10.0.78.14;
            route-filter 0.0.0.0/0 exact;
            route-filter 172.16.11.1/32 exact;
        }
        then accept;
    }
    term 2 {
        then reject;
    }
}
In this example, four routes are dropped as a result of the import policy on South. This is because the export policy on North leaks all of the routes received from Internet, and the import policy on South excludes some of these routes.
It is important to understand that in Junos OS, although an import policy (inbound route filter) might reject a route, not use it for traffic forwarding, and not include it in an advertisement to other peers, the router retains these routes as hidden routes. These hidden routes are not available for policy or routing purposes. However, they do occupy memory space on the router. A service provider filtering routes to control the amount of information being kept in memory and processed by a router might want the router to entirely drop the routes being rejected by the import policy.
Hidden routes can be viewed by using the show route receive-protocol bgp
neighbor-address hidden command. The hidden
routes can then be retained or dropped from the routing table by configuring the
keep all | none statement at the [edit protocols
bgp] or [edit protocols bgp group
group-name] hierarchy level.
The rules of BGP route retention are as follows:
-
By default, all routes learned from BGP are retained, except those where the AS path is looped. (The AS path includes the local AS.)
-
By configuring the
keep allstatement, all routes learned from BGP are retained, even those with the local AS in the AS path. -
By configuring the
keep nonestatement, BGP discards routes that were received from a peer and that were rejected by import policy or other sanity checking. When this statement is configured and the inbound policy changes, Junos OS re-advertises all the routes advertised by the peer.
When you configure keep all or keep none and the
peers support route refresh, the local speaker sends a refresh message and performs
an import evaluation. For these peers, the sessions do not restart. To determine if
a peer supports refresh, check for Peer supports Refresh capability
in the output of the show bgp neighbor command.
If you configure keep all or keep none and the
peer does not support session restart, the associated BGP sessions are restarted
(flapped).
Topology
Configuration
CLI Quick Configuration
To quickly configure this example, copy the
following commands, paste them into a text file, remove any line breaks,
change any details necessary to match your network configuration,
and then copy and paste the commands into the CLI at the [edit] hierarchy level.
Router Internet
set interfaces lo0 unit 0 family inet address 172.16.11.1/32
set interfaces lo0 unit 0 family inet address 172.16.12.1/32
set interfaces lo0 unit 0 family inet address 172.16.13.1/32
set interfaces lo0 unit 0 family inet address 172.16.14.1/32
set interfaces lo0 unit 0 family inet address 172.16.15.1/32
set interfaces lo0 unit 0 family inet address 192.168.9.1/32
set interfaces fe-0/1/3 unit 0 family inet address 10.0.89.14/30
set protocols bgp group toNorth local-address 10.0.89.14
set protocols bgp group toNorth peer-as 65200
set protocols bgp group toNorth neighbor 10.0.89.13
set protocols bgp group toNorth export into-bgp
set policy-options policy-statement into-bgp term 1 from interface lo0.0
set policy-options policy-statement into-bgp term 1 then accept
set routing-options router-id 192.168.9.1
set routing-options autonomous-system 65300
Router North
set interfaces fe-1/3/1 unit 0 family inet address 10.0.78.14/30
set interfaces fe-1/3/0 unit 0 family inet address 10.0.89.13/30
set interfaces lo0 unit 0 family inet address 192.168.8.1/32
set protocols bgp group toInternet local-address 10.0.89.13
set protocols bgp group toInternet peer-as 65300
set protocols bgp group toInternet neighbor 10.0.89.14
set protocols bgp group toSouth local-address 10.0.78.14
set protocols bgp group toSouth export conditional-export-bgp
set protocols bgp group toSouth peer-as 65100
set protocols bgp group toSouth neighbor 10.0.78.13
set policy-options policy-statement conditional-export-bgp term prefix_11 from protocol bgp
set policy-options policy-statement conditional-export-bgp term prefix_11 from route-filter 172.16.0.0/16 orlonger
set policy-options policy-statement conditional-export-bgp term prefix_11 then accept
set policy-options policy-statement conditional-export-bgp term conditional-default from route-filter 0.0.0.0/0 exact
set policy-options policy-statement conditional-export-bgp term conditional-default from condition prefix_11
set policy-options policy-statement conditional-export-bgp term conditional-default then accept
set policy-options policy-statement conditional-export-bgp term others then reject
set policy-options condition prefix_11 if-route-exists 172.16.11.1/32
set policy-options condition prefix_11 if-route-exists table inet.0
set routing-options static route 0/0 reject
set routing-options router-id 192.168.8.1
set routing-options autonomous-system 65200
Router South
set interfaces fe-0/1/2 unit 0 family inet address 10.0.78.13/30
set interfaces lo0 unit 0 family inet address 192.168.7.1/32
set protocols bgp group toNorth local-address 10.0.78.13
set protocols bgp group toNorth import import-selected-routes
set protocols bgp group toNorth peer-as 65200
set protocols bgp group toNorth neighbor 10.0.78.14
set policy-options policy-statement import-selected-routes term 1 from neighbor 10.0.78.14
set policy-options policy-statement import-selected-routes term 1 from route-filter 172.16.11.1/32 exact
set policy-options policy-statement import-selected-routes term 1 from route-filter 0.0.0.0/0 exact
set policy-options policy-statement import-selected-routes term 1 then accept
set policy-options policy-statement import-selected-routes term 2 then reject
set routing-options router-id 192.168.7.1
set routing-options autonomous-system 65100
Configuring Conditional Installation of Prefixes
Step-by-Step Procedure
The following example requires that you navigate various levels in the configuration hierarchy. For information about navigating the CLI, see Using the CLI Editor in Configuration Mode in the Junos OS CLI User Guide.
To configure conditional installation of prefixes:
Configure the router interfaces forming the links between the three routers.
Router Internet
[edit interfaces]
user@Internet# set fe-0/1/3 unit 0 family inet address 10.0.89.14/30
Router North
[edit interfaces]
user@North# set fe-1/3/1 unit 0 family inet address 10.0.78.14/30
user@North# set fe-1/3/0 unit 0 family inet address 10.0.89.13/30
Router South
[edit interfaces]
user@South# set fe-0/1/2 unit 0 family inet address 10.0.78.13/30
Configure five loopback interface addresses on Router Internet to emulate BGP routes learned from the Internet that are to be imported into the routing table of Router South, and configure an additional address (192.168.9.1/32) that will be configured as the router ID.
Router Internet
[edit interfaces lo0 unit 0 family inet]
user@Internet# set address 172.16.11.1/32
user@Internet# set address 172.16.12.1/32
user@Internet# set address 172.16.13.1/32
user@Internet# set address 172.16.14.1/32
user@Internet# set address 172.16.15.1/32
user@Internet# set address 192.168.9.1/32
Also, configure the loopback interface addresses on Routers North and South.
Router North
[edit interfaces lo0 unit 0 family inet]
user@North# set address 192.168.8.1/32
Router South
[edit interfaces lo0 unit 0 family inet]
user@South# set address 192.168.7.1/32
Configure the static default route on Router North to be advertised to Router South.
[edit routing-options]
user@North# set static route 0/0 reject
Define the condition for exporting prefixes from the routing table on Router North.
[edit policy-options condition prefix_11]
user@North# set if-route-exists 172.16.11.1/32
user@North# set if-route-exists table inet.0
Define export policies (
into-bgpandconditional-export-bgp) on Routers Internet and North respectively, to advertise routes to BGP.Note:Ensure that you reference the condition,
prefix_11(configured in Step 4), in the export policy.Router Internet [edit policy-options policy-statement into-bgp ] user@Internet# set term 1 from interface lo0.0 user@Internet# set term 1 then accept
Router North
[edit policy-options policy-statement conditional-export-bgp]
user@North# set  term prefix_11 from protocol bgp
user@North# set  term prefix_11 from route-filter 172,16.0.0/16 orlonger
user@North# set  term prefix_11 then accept
user@North# set  term conditional-default from route-filter 0.0.0.0/0 exact
user@North# set  term conditional-default from condition prefix_11
user@North# set  term conditional-default then accept
user@North# set term others then reject
Define an import policy (
import-selected-routes) on Router South to import some of the routes advertised by Router North into its routing table.[edit policy-options policy-statement import-selected-routes ] user@South# set term 1 from neighbor 10.0.78.14 user@South# set term 1 from route-filter 172.16.11.1/32 exact user@South# set term 1 from route-filter 0.0.0.0/0 exact user@South# set term 1 then accept user@South# set term 2 then reject
Configure BGP on all three routers to enable the flow of prefixes between the autonomous systems.
Note:Ensure that you apply the defined import and export policies to the respective BGP groups for prefix advertisement to take place.
Router Internet
[edit protocols bgp group toNorth]
user@Internet# set local-address 10.0.89.14
user@Internet# set peer-as 65200
user@Internet# set neighbor 10.0.89.13
user@Internet# set export into-bgp
Router North
[edit protocols bgp group toInternet]
user@North# set local-address 10.0.89.13
user@North# set peer-as 65300
user@North# set neighbor 10.0.89.14
[edit protocols bgp group toSouth]
user@North# set local-address 10.0.78.14
user@North# set peer-as 65100
user@North# set neighbor 10.0.78.13
user@North# set export conditional-export-bgp
Router South
[edit protocols bgp group toNorth]
user@South# set local-address 10.0.78.13
user@South# set peer-as 65200
user@South# set neighbor 10.0.78.14
user@South# set import import-selected-routes
Configure the router ID and autonomous system number for all three routers.
Note:In this example, the router ID is configured based on the IP address configured on the lo0.0 interface of the router.
Router Internet
[edit routing options]
user@Internet# set router-id 192.168.9.1
user@Internet# set autonomous-system 65300
Router North
[edit routing options]
user@North# set router-id 192.168.8.1
user@North# set autonomous-system 65200
Router South
[edit routing options]
user@South# set router-id 192.168.7.1
user@South# set autonomous-system 65100
Results
From configuration mode, confirm your configuration
by issuing the show interfaces, show protocols bgp, show policy-options, and show routing-options commands. If the output does not display the intended configuration,
repeat the instructions in this example to correct the configuration.
Device Internet
user@Internet# show interfaces
fe-0/1/3 {
    unit 0 {
        family inet {
            address 10.0.89.14/30;
        }
    }
}
lo0 {
    unit 0 {
        family inet {
            address 172.16.11.1/32;
            address 172.16.12.1/32;
            address 172.16.13.1/32;
            address 172.16.14.1/32;
            address 172.16.15.1/32;
            address 192.168.9.1/32;
        }
    }
}
user@Internet# show protocols bgp
group toNorth {
    local-address 10.0.89.14;
    export into-bgp;
    peer-as 65200;
    neighbor 10.0.89.13;
}
user@Internet# show policy-options
policy-statement into-bgp {
    term 1 {
        from interface lo0.0;
        then accept;
    }
}
user@Internet# show routing-options
router-id 192.168.9.1;
autonomous-system 65300;
Device North
user@North# show interfaces
fe-1/3/1 {
    unit 0 {
        family inet {
            address 10.0.78.14/30;
        }
    }
}
fe-1/3/0 {
    unit 0 {
        family inet {
            address 10.0.89.13/30;
        }
    }
}
lo0 {
    unit 0 {
        family inet {
            address 192.168.8.1/32;
        }
    }
}
user@North# show protocols bgp
group toInternet {
    local-address 10.0.89.13;
    peer-as 65300;
    neighbor 10.0.89.14;
}
group toSouth {
    local-address 10.0.78.14;
    export conditional-export-bgp;
    peer-as 65100;
    neighbor 10.0.78.13;
}
user@North# show policy-options
policy-statement conditional-export-bgp {
    term prefix_11 {
        from {
            protocol bgp;
            route-filter 172.16.0.0/16 orlonger;
        }
        then accept;
    }
    term conditional-default {
        from {
            route-filter 0.0.0.0/0 exact;
            condition prefix_11;
        }
        then accept;
    }
    term others {
        then reject;
    }
}
condition prefix_11 {
    if-route-exists {
        172.16.11.1/32;
        table inet.0;
    }
}
user@North# show routing-options
static {
    route 0.0.0.0/0 reject;
}
router-id 192.168.8.1;
autonomous-system 65200;
Device South
user@South# show interfaces
fe-0/1/2 {
    unit 0 {
        family inet {
            address 10.0.78.13/30;
        }
    }
}
lo0 {
    unit 0 {
        family inet {
            address 192.168.7.1/32;
        }
    }
}
user@South# show protocols bgp
bgp {
    group toNorth {
        local-address 10.0.78.13;
        import import-selected-routes;
        peer-as 65200;
        neighbor 10.0.78.14;
    }
}
user@South# show policy-options
policy-statement import-selected-routes {
    term 1 {
        from {
            neighbor 10.0.78.14;
            route-filter 172.16.11.1 exact;
            route-filter 0.0.0.0/0 exact;
        }
        then accept;
    }
    term 2 {
        then reject;
    }
}
user@South# show routing-options
router-id 192.168.7.1;
autonomous-system 65100;
If you are done configuring the routers, enter commit from configuration mode.
Verification
Confirm that the configuration is working properly.
- Verifying BGP
- Verifying Prefix Advertisement from Router Internet to Router North
- Verifying Prefix Advertisement from Router North to Router South
- Verifying BGP Import Policy for Installation of Prefixes
- Verifying Conditional Export from Router North to Router South
- Verifying the Presence of Routes Hidden by Policy (Optional)
Verifying BGP
Purpose
Verify that BGP sessions have been established between the three routers.
Action
From operational mode, run the show bgp neighbor neighbor-address command.
Check the BGP session on Router Internet to verify that Router North is a neighbor.
user@Internet> show bgp neighbor 10.0.89.13
Peer: 10.0.89.13+179 AS 65200    Local: 10.0.89.14+56187 AS 65300
  Type: External    State: Established    Flags: [ImportEval Sync]
  Last State: OpenConfirm   Last Event: RecvKeepAlive
  Last Error: None
  Export: [ into-bgp ]
  Options: [Preference LocalAddress PeerAS Refresh]
  Local Address: 10.0.89.14 Holdtime: 90 Preference: 170
  Number of flaps: 0
  Peer ID: 192.168.8.1     Local ID: 192.168.9.1       Active Holdtime: 90
  Keepalive Interval: 30         Group index: 0    Peer index: 0
  BFD: disabled, down
  Local Interface: fe-0/1/3.0
  NLRI for restart configured on peer: inet-unicast
  NLRI advertised by peer: inet-unicast
  NLRI for this session: inet-unicast
  Peer supports Refresh capability (2)
  Stale routes from peer are kept for: 300
  Peer does not support Restarter functionality
  NLRI that restart is negotiated for: inet-unicast
  NLRI of received end-of-rib markers: inet-unicast
  NLRI of all end-of-rib markers sent: inet-unicast
  Peer supports 4 byte AS extension (peer-as 65200)
  Peer does not support Addpath
  Table inet.0 Bit: 10000
    RIB State: BGP restart is complete
    Send state: in sync
    Active prefixes:              0
    Received prefixes:            0
    Accepted prefixes:            0
    Suppressed due to damping:    0
    Advertised prefixes:          6
  Last traffic (seconds): Received 9    Sent 18   Checked 28
  Input messages:  Total 12     Updates 1       Refreshes 0     Octets 232
  Output messages: Total 14     Updates 1       Refreshes 0     Octets 383
  Output Queue[0]: 0
Check the BGP session on Router North to verify that Router Internet is a neighbor.
user@North> show bgp neighbor 10.0.89.14
Peer: 10.0.89.14+56187 AS 65300  Local: 10.0.89.13+179 AS 65200
  Type: External    State: Established    Flags: [ImportEval Sync]
  Last State: OpenConfirm   Last Event: RecvKeepAlive
  Last Error: None
  Options: [Preference LocalAddress PeerAS Refresh]
  Local Address: 10.0.89.13 Holdtime: 90 Preference: 170
  Number of flaps: 0
  Peer ID: 192.168.9.1     Local ID: 192.168.8.1       Active Holdtime: 90
  Keepalive Interval: 30         Group index: 0    Peer index: 0
  BFD: disabled, down
  Local Interface: fe-1/3/0.0
  NLRI for restart configured on peer: inet-unicast
  NLRI advertised by peer: inet-unicast
  NLRI for this session: inet-unicast
  Peer supports Refresh capability (2)
  Stale routes from peer are kept for: 300
  Peer does not support Restarter functionality
  NLRI that restart is negotiated for: inet-unicast
  NLRI of received end-of-rib markers: inet-unicast
  NLRI of all end-of-rib markers sent: inet-unicast
  Peer supports 4 byte AS extension (peer-as 65300)
  Peer does not support Addpath
  Table inet.0 Bit: 10001
    RIB State: BGP restart is complete
    Send state: in sync
    Active prefixes:              6
    Received prefixes:            6
    Accepted prefixes:            6
    Suppressed due to damping:    0
    Advertised prefixes:          0
  Last traffic (seconds): Received 14   Sent 3    Checked 3
  Input messages:  Total 16     Updates 2       Refreshes 0     Octets 402
  Output messages: Total 15     Updates 0       Refreshes 0     Octets 348
  Output Queue[0]: 0
Check the following fields in these outputs to verify that BGP sessions have been established:
Peer—Check if the peer AS number is listed.
Local—Check if the local AS number is listed.
State—Ensure that the value is
Established. If not, check the configuration again and seeshow bgp neighborfor more details on the output fields.
Similarly, verify that Routers North and South form peer relationships with each other.
Meaning
BGP sessions are established between the three routers.
Verifying Prefix Advertisement from Router Internet to Router North
Purpose
Verify that the routes sent from Router Internet are received by Router North.
Action
From operational mode on Router Internet, run the
show route advertising-protocol bgp neighbor-addresscommand.user@Internet> show route advertising-protocol bgp 10.0.89.13 inet.0: 8 destinations, 8 routes (8 active, 0 holddown, 0 hidden) Prefix Nexthop MED Lclpref AS path * 172.16.11.1/32 Self I * 172.16.12.1/32 Self I * 172.16.13.1/32 Self I * 172.16.14.1/32 Self I * 172.16.15.1/32 Self I * 192.168.9.1/32 Self I
The output verifies that Router Internet advertises the routes 172.16.11.1/32, 172.16.12.1/32, 172.16.13.1/32, 172.16.14.1/32, 172.16.15.1/32, and 192.168.9.1/32 (the loopback address used as router ID) to Router North.
From operational mode on Router North, run the
show route receive-protocol bgp neighbor-addresscommand.user@North> show route receive-protocol bgp 10.0.89.14 inet.0: 12 destinations, 12 routes (12 active, 0 holddown, 0 hidden) Prefix Nexthop MED Lclpref AS path * 172.16.11.1/32 10.0.89.14 65300 I * 172.16.12.1/32 10.0.89.14 65300 I * 172.16.13.1/32 10.0.89.14 65300 I * 172.16.14.1/32 10.0.89.14 65300 I * 172.16.15.1/32 10.0.89.14 65300 I * 192.168.9.1/32 10.0.89.14 65300 I
The output verifies that Router North has received all the routes advertised by Router Internet.
Meaning
Prefixes sent by Router Internet have been successfully installed into the routing table on Router North.
Verifying Prefix Advertisement from Router North to Router South
Purpose
Verify that the routes received from Router Internet and the static default route are advertised by Router North to Router South.
Action
From operational mode on Router North, run the
show route 0/0 exactcommand.user@North> show route 0/0 exact inet.0: 12 destinations, 12 routes (12 active, 0 holddown, 0 hidden) + = Active Route, - = Last Active, * = Both 0.0.0.0/0 *[Static/5] 00:10:22 RejectThe output verifies the presence of the static default route (0.0.0.0/0) in the routing table on Router North.
From operational mode on Router North, run the
show route advertising-protocol bgp neighbor-addresscommand.user@North> show route advertising-protocol bgp 10.0.78.13 inet.0: 12 destinations, 12 routes (12 active, 0 holddown, 0 hidden) Prefix Nexthop MED Lclpref AS path * 0.0.0.0/0 Self I * 172.16.11.1/32 Self 65300 I * 172.16.12.1/32 Self 65300 I * 172.16.13.1/32 Self 65300 I * 172.16.14.1/32 Self 65300 I * 172.16.15.1/32 Self 65300 I
The output verifies that Router North is advertising the static route and the 172.16.11.1/32 route received from Router Internet, as well as many other routes, to Router South.
Verifying BGP Import Policy for Installation of Prefixes
Purpose
Verify that the BGP import policy successfully installs the required prefixes.
Action
See if the import policy on Router South is operational by checking if only the static default route from Router North and the 172.16.11.1/32 route from Router South are installed in the routing table.
From operational mode, run the show route receive-protocol
bgp neighbor-address command.
user@South> show route receive-protocol bgp 10.0.78.14
inet.0: 10 destinations, 11 routes (6 active, 0 holddown, 4 hidden)
  Prefix                  Nexthop              MED     Lclpref    AS path
* 0.0.0.0/0               10.0.78.14                              65200 I
* 172.16.11.1/32          10.0.78.14                              65200 65300 I
The output verifies that the BGP import policy is operational on Router South, and only the static default route of 0.0.0.0/0 from Router North and the 172.16.11.1/32 route from Router Internet have leaked into the routing table on Router South.
Meaning
The installation of prefixes is successful because of the configured BGP import policy.
Verifying Conditional Export from Router North to Router South
Purpose
Verify that when Device Internet stops sending the 172.16.11.1/32 route, Device North stops sending the default 0/0 route.
Action
Cause Device Internet to stop sending the 172.16.11.1/32 route by deactivating the 172.16.11.1/32 address on the loopback interface.
[edit interfaces lo0 unit 0 family inet]
user@Internet# deactivate address 172.16.11.1/32
user@Internet# commit
From operational mode on Router North, run the
show route advertising-protocol bgp neighbor-addresscommand.user@North> show route advertising-protocol bgp 10.0.78.13 inet.0: 11 destinations, 11 routes (11 active, 0 holddown, 0 hidden) Prefix Nexthop MED Lclpref AS path * 172.16.12.1/32 Self 65300 I * 172.16.13.1/32 Self 65300 I * 172.16.14.1/32 Self 65300 I * 172.16.15.1/32 Self 65300 I
The output verifies that Router North is not advertising the default route to Router South. This is the expected behavior when the 172.16.11.1/32 route is not present.
Reactivate the 172.16.11.1/32 address on Device Internet’s loopback interface.
[edit interfaces lo0 unit 0 family inet]
user@Internet# activate address 172.16.11.1/32
user@Internet# commit