vSRX仮想ファイアウォール3.0上のGeneve Flow Infrastructure
このトピックでは、vSRX仮想ファイアウォール3.0上のGeneve flowインフラストラクチャの概要と設定について説明します。
概要
Geneve(Generic Network Virtualization Encapsulation)は、インターネット技術タスクフォース(IETF)によって開発されたネットワークカプセル化プロトコルです。
ジュネーブ プロトコルは、データ センター環境でのネットワーク仮想化のユース ケースをサポートします。このような環境では、ジュネーブトンネルは、クラウド環境(Amazon Web Services(AWS)やVMware環境など)で実行される仮想ネットワーク機能(VNF)のバックプレーンとして機能します。
Junos OS リリース 23.1R1 以降、vSRX仮想ファイアウォール 3.0(ジュニパーネットワーク®スのvSRX仮想ファイアウォール仮想ファイアウォールの現在のバージョン)は、ジュネーブ トンネル パケット処理用のジュネーブ フロー インフラストラクチャをサポートします。このサポートにより、vSRX仮想ファイアウォール3.0を使用して次のことが可能になります。
Geneve Flowインフラストラクチャのサポートにより、vSRX仮想ファイアウォール3.0で以下が可能になります。
-
さまざまなクラウド展開でトランジットルーターまたはトンネルエンドポイントデバイスの機能を実行します。
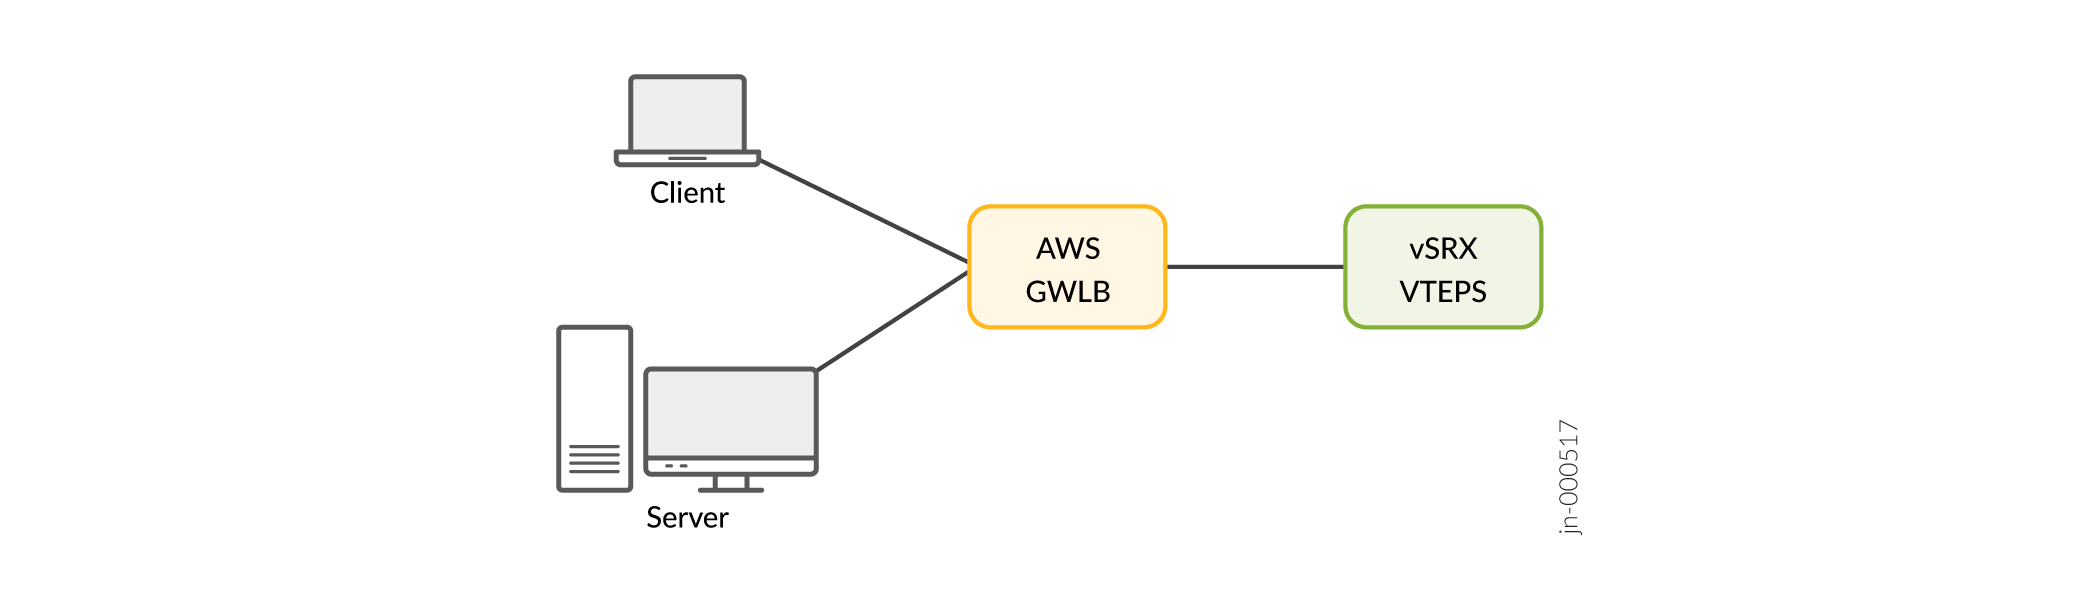
たとえば、透過的なロードバランシングとパケットルーティングに Geneve プロトコルのカプセル化を使用する AWS Gateway Load Balancer (GWLB) サービスを使用して vSRX仮想ファイアウォール 3.0 をデプロイできます。
-
受信した Geneve トンネル パケットのカプセル化とカプセル化解除を行います。
-
内部トラフィックにレイヤー4(L4)およびレイヤー7(L7)サービスを適用します。
vSRX仮想ファイアウォール3.0は、クラウド導入のトンネルエンドポイントとして、レイヤー3(L3)インターフェイスでGeneveパケットを受信し、(インスペクション後に)パケットを同じ宛先エンドポイントに転送します。
以下を決定する検査プロファイルにポリシーを添付する必要があります。
-
vSRX仮想ファイアウォール3.0が処理するジュネーブトラフィックのタイプ。
-
vSRX仮想ファイアウォール3.0が内部トラフィックに適用するポリシー。
vSRX仮想ファイアウォール3.0で通常のセキュリティポリシーを設定して、内部トラフィックにL4およびL7サービスを適用できます。
何も変更せずにL3カプセル化されたトラフィックを受信した後、vSRX仮想ファイアウォール3.0は以下を実行します。
- 受信した Geneve トンネル パケットのカプセル化を解除します。
- トンネル ヘッダーを解析します。
- 内部 IP パケットに対して L4 および L7 インスペクションを実行します。
- トラフィックをカプセル化します。
- 宛先トンネルのエンドポイントにトラフィックを転送します。
Geneve Flow インフラストラクチャ サポートのメリット
-
データカプセル化:ネットワーク仮想化のためのトンネリングをサポートするフレームワークを提供します。
-
マルチテナントサポート:ネットワーク仮想化のためのトンネリングをサポートするフレームワークを提供します。AWSなどのマルチテナントクラウドプロバイダは、Geneveプロトコルを使用して透過的なロードバランシングを実行できます。
-
パケットの透過的なルーティングの実行—GWLBとvSRX仮想ファイアウォール3.0は、Geneveカプセル化を使用してアプリケーショントラフィックを相互に交換するため、GWLBは元のトラフィックの内容を保持することができます。
-
ヘルスチェック—ベンダー(AWSなど)は、Geneveトンネルを介してヘルスプローブを実行し、仮想マシン(VM)のステータスを確認できます。
Geneve パケットフロートンネルインスペクションのセキュリティポリシーの有効化
この設定を使用して、vSRX仮想ファイアウォール3.0でジュネーブパケットフロートンネル検査用のセキュリティポリシーを有効にします。
vSRX仮想ファイアウォール3.0インスタンスでのGeneveサポートにより、vSRX3.0を使用して次のことが可能になります。
-
キャンパス、データセンター、パブリッククラウド環境のエンドポイントとそのバンチを接続します。
-
これらの環境は、組み込みのセキュリティで保護します。
必要条件
この例では、以下のハードウェアとソフトウェアのコンポーネントを使用しています。
-
vSRX仮想ファイアウォール3.0
-
Junos OS リリース 23.1R1
開始する前に、以下を実行します。
-
ジュネーブプロトコルがどのように機能するかを必ず理解してください。
概要
この構成を使用すると、次のことができます。
-
セキュリティ ポリシーが Geneve トンネルのカプセル化された L3 パケットを処理できるようにします。
-
VNI およびベンダー TLV 属性に基づいて Geneve トラフィックの個別のプロファイルを作成 - インスペクション プロファイルにアタッチされたポリシーによって、処理する Geneve トラフィックのタイプと内部トラフィックに適用するポリシーを指定できます。
-
vSRX仮想ファイアウォール3.0で通常のセキュリティポリシーを設定して、内部トラフィックにL4およびL7サービスを適用します。
設定(トンネルエンドポイントとしてのvSRX仮想ファイアウォール3.0)
- AWS GWLBとvSRX仮想ファイアウォール3.0をトンネルエンドポイントとして使用したSimplified Geneve トラフィックフロートポロジー
- CLIクイック構成
- プロシージャ
- 業績
- トンネル インスペクション プロファイルと VNI の確認
- トンネル インスペクション プロファイルと VNI の確認
AWS GWLBとvSRX仮想ファイアウォール3.0をトンネルエンドポイントとして使用したSimplified Geneve トラフィックフロートポロジー
 としてのvSRX仮想ファイアウォール 3.0
CLIクイック構成
この例を迅速に設定するには、以下のコマンドをコピーして、テキスト ファイルに貼り付け、改行を削除し、ネットワーク設定に一致させる必要がある詳細情報を変更し、コマンドを [edit] 階層レベルで CLI にコピー アンド ペーストして、設定モードから commit を入力します。
trustゾーンとuntrustゾーンを定義して、すべてのホストトラフィックを許可します。
set security tunnel-inspection inspection-profile ti-vendor geneve g-rule policy-set ps-vendorset security tunnel-inspection inspection-profile ti-vendor geneve g-rule vni vni-vendorset security tunnel-inspection vni vni-vendor vni-id 0set security policies from-zone vtepc to-zone junos-host policy self match application junos-geneveset security policies from-zone vtepc to-zone junos-host policy self match source-address anyset security policies from-zone vtepc to-zone junos-host policy self match destination-address anyset security policies from-zone vtepc to-zone junos-host policy self then permit tunnel-inspection ti-vendorset security policies default-policy deny-allset security policies policy-set ps-vendor policy self match source-address anyset security policies policy-set ps-vendor policy self match destination-address anyset security policies policy-set ps-vendor policy self match application anyset security policies policy-set ps-vendor policy self then permitset interfaces ge-0/0/1 mtu 9000set interfaces ge-0/0/1 unit 0 family inet address anyset interfaces ge-0/0/1 unit 0 family inet6 address any
プロシージャ
手順
次の例では、設定階層のいくつかのレベルに移動する必要があります。その方法の説明については、Junos OS CLIユーザーガイドの 設定モードでCLIエディターを使用するを参照してください。
vSRX仮想ファイアウォール3.0でトンネルインスペクション用のGeneve flowサポートを設定するには:
-
trustゾーンとuntrustゾーンを定義して、 [edit security zones] 階層のすべてのホストトラフィックを許可します。
-
tunnel-inspectionプロファイルを定義します。[edit security tunnel-inspection] user@host# set security tunnel-inspection inspection-profile ti-vendor geneve g-rule policy-set ps-vendor user@host# set security tunnel-inspection inspection-profile ti-vendor geneve g-rule vni vni-vendor user@host# set security tunnel-inspection vni vni-vendor vni-id 0
-
外部パケットに外部セッション ポリシーを定義し、参照されるトンネル インスペクション プロファイルを付加します
手記:ポリシー設定では、トンネルエンドポイントとしてのvSRX仮想ファイアウォール3.0の外側ポリシーの
to-zoneは、トラフィックを処理するための組み込み(予約済み識別子)ゾーンであるjunos-hostである必要があります。[edit security policies] user@host# set security policies from-zone vtepc to-zone junos-host policy self match source-address any user@host# set security policies from-zone vtepc to-zone junos-host policy self match destination-address any user@host# set security policies from-zone vtepc to-zone junos-host policy self match application junos-geneve user@host# set security policies from-zone vtepc to-zone junos-host policy self then permit tunnel-inspection ti-vendor user@host# set security policies default-policy deny-all
-
カプセル化解除されたパケットを処理するために、
policy-setで内部ポリシーを定義します。[edit security policies] user@host# set security policies policy-set ps-vendor policy self match source-address any user@host# set security policies policy-set ps-vendor policy self match destination-address any user@host# set security policies policy-set ps-vendor policy self match application any user@host# set security policies policy-set ps-vendor policy self then permit
-
VTEPC(仮想トンネルエンドポイントクライアント)の
from-zoneに関連付けられたインターフェイスを設定して、Geneveカプセル化されたパケットとヘルスチェックパケットを受信します。[edit] user@host# set interfaces ge-0/0/1 mtu 9000 user@host# set interfaces ge-0/0/1 unit 0 family inet address any user@host# set interfaces ge-0/0/1 unit 0 family inet6 address any
業績
設定モードから、 show security policies コマンドを入力して設定を確認します。出力結果に意図した設定内容が表示されない場合は、この例の手順を繰り返して設定を修正します。
user@host# show security policies
from-zone trust to-zone untrust {
policy p1 {
match {
source-address any;
destination-address any;
application any;
}
then {
permit {
application-services {
application-traffic-control {
rule-set ftp-test1;
}
}
}
}
}
policy internet-access {
match {
source-address any;
destination-address any;
application any;
}
then {
permit;
}
}
}
from-zone untrust to-zone trust {
policy dst-nat-pool-access {
match {
source-address any;
destination-address 233.252.0.1/21;
application any;
}
then {
permit;
}
}
}
from-zone vtepc to-zone junos-host {
policy self {
match {
source-address any;
destination-address any;
application junos-geneve;
}
then {
permit {
tunnel-inspection {
ti-vendor;
}
}
}
}
}
policy-set ps-vendor {
policy self {
match {
source-address any;
destination-address any;
application any;
}
then {
permit;
}
}
}
default-policy {
deny-all;
}
user@host# show security tunnel-inspection
inspection-profile ti-vendor {
geneve g-rule {
policy-set ps-vendor;
vni vni-vendor;
}
}
vni v1 {
vni-id 0;
}
vni vni-vendor {
vni-id 0;
}
デバイスでの機能の設定が完了したら、設定モードから commit を入力します。
トンネル インスペクション プロファイルと VNI の確認
目的
tunnel-inspection プロファイルと VXLAN ネットワーク識別子(VNI)が設定されていることを確認します。
アクション
動作モードから、 show security tunnel-inspection profiles ti-vendor コマンドと show security tunnel-inspection vnis コマンドを入力します。
user@host> show security tunnel-inspection profiles ti-vendor
--------------------------------------------------------------------------
Logical system: root-logical-system
Profile count: 1
Profile: ti-vendor
Type: Geneve
geneve count: 1
geneve name: g-rule
VNI count: 1
VNI: vni-vendor
Policy set: ps-vendor
Inspection level: 1
user@host> show security tunnel-inspection vnis
--------------------------------------------------------------------------
Logical system: root-logical-system
VNI count: 1
VNI name: vni-vendor
VNI id count: 0
意味
出力には、Geneve トンネル検査プロファイルが有効で、VXLAN ネットワーク識別子(VNI)が設定されていることが示されています。
設定(トランジットルーターとしてのvSRX仮想ファイアウォール3.0)
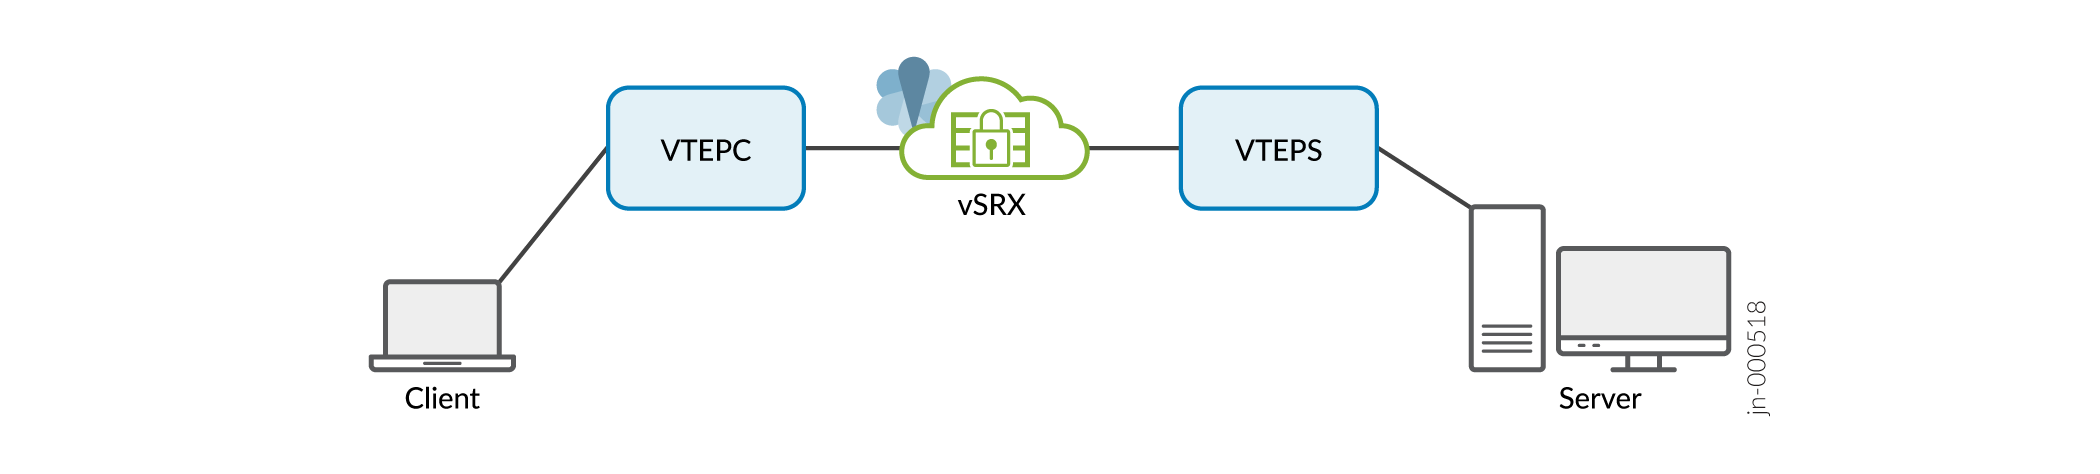
簡素化されたジュネーブのトラフィックフロートポロジー トランジットルーターとしてのvSRX仮想ファイアウォール3.0
この導入モードでは、仮想トンネルエンドポイントクライアント(vtepc)(Geneve Tunnelエンドポイント)は、クライアントとサーバーの両方を宛先とするパケットが仮想トンネルエンドポイントサーバー(vteps)(vSRX仮想ファイアウォール3.0)を通過するようにする必要があります。送信元ポートは、仮想トンネルエンドポイント(VTEP)によって選択されます。
 としての vSRX仮想ファイアウォール 3.0 の簡略化されたトポロジー
CLIクイック構成
この例を迅速に設定するには、以下のコマンドをコピーして、テキスト ファイルに貼り付け、改行を削除し、ネットワーク設定に一致させる必要がある詳細情報を変更し、コマンドを [edit] 階層レベルで CLI にコピー アンド ペーストして、設定モードから commit を入力します。
set security tunnel-inspection vni r1 vni-range 1 to 100set security tunnel-inspection vni r1 vni-id 500set security tunnel-inspection profile inspection-profile ti-vendor geneve geneve1 vni r1set security tunnel-inspection profile inspection-profile ti-vendor geneve geneve1 policy-set pset1set security tunnel-inspection vni r2 vni-range 200 to 400set security tunnel-inspection vni r2 vni-id 500set security tunnel-inspection profile inspection-profile ti-vendor geneve geneve2 vni r2set security tunnel-inspection profile inspection-profile ti-vendor geneve geneve2 policy-set pset2set security policies from-zone vtepc to-zone vteps policy p1 match application junos-geneveset security policies from-zone vtepc to-zone vteps policy p1 match source-address anyset security policies from-zone vtepc to-zone vteps policy p1 match destination-address anyset security policies from-zone vtepc to-zone vteps policy p1 then permit tunnel-inspection ti-vendorset security policies from-zone vteps to-zone vtepc policy p1 match application junos-geneveset security policies from-zone vteps to-zone vtepc policy p1 match source-address anyset security policies from-zone vteps to-zone vtepc policy p1 match destination-address anyset security policies from-zone vteps to-zone vtepc policy p1 then permit tunnel-inspection ti-vendorset security policies default-policy deny-allset security policies policy-set pset1 policy pset_p1 match source-address anyset security policies policy-set pset1 policy pset_p1 match destination-address anyset security policies policy-set pset1 policy pset_p1 match application anyset security policies policy-set pset1 policy pset_p1 then permitset interfaces ge-0/0/1 mtu 9000set interfaces ge-0/0/1 unit 0 family inet address anyset interfaces ge-0/0/1 unit 0 family inet6 address any
プロシージャ
手順
次の例では、設定階層のいくつかのレベルに移動する必要があります。その方法の説明については、Junos OS CLIユーザーガイドの 設定モードでCLIエディターを使用するを参照してください。
vSRX仮想ファイアウォール3.0(トランジットルーターとしてのvSRX仮想ファイアウォール3.0)でトンネル検査用のジュネーブフローサポートを設定するには:
-
trustゾーンとuntrustゾーンを定義して、 [edit security zones] 階層のすべてのホストトラフィックを許可します。
-
tunnel-inspectionプロファイルを定義します。[edit security tunnel-inspection] user@host# set security tunnel-inspection vni r1 vni-range 1 to 100 user@host# set security tunnel-inspection vni r1 vni-id 500 user@host# set security tunnel-inspection profile inspection-profile ti-vendor geneve geneve1 vni r1 user@host# set security tunnel-inspection profile inspection-profile ti-vendor geneve geneve1 policy-set pset1 user@host# set security tunnel-inspection vni r2 vni-range 200 to 400 user@host# set security tunnel-inspection vni r2 vni-id 500 user@host# set security tunnel-inspection profile inspection-profile ti-vendor geneve geneve2 vni r2 user@host# set security tunnel-inspection profile inspection-profile ti-vendor geneve geneve2 policy-set pset2
-
外部セッションポリシーを定義します。
手記:トランジットルーターとしてのvSRX仮想ファイアウォール3.0の場合、各方向に2つのポリシーが必要です。
from-zoneとto-zoneは、インターフェイスの下で定義する必要があるそれぞれのゾーンです。[edit security policies] user@host# set security policies from-zone vtepc to-zone vteps policy p1 match source-address any user@host# set security policies from-zone vtepc to-zone vteps policy p1 match destination-address any user@host# set security policies from-zone vtepc to-zone vteps policy p1 match application junos-geneve user@host# set security policies from-zone vtepc to-zone vteps policy p1 then permit tunnel-inspection ti-vendor user@host# set security policies from-zone vteps to-zone vtepc policy p1 match application junos-geneve user@host# set security policies from-zone vteps to-zone vtepc policy p1 match source-address any user@host# set security policies from-zone vteps to-zone vtepc policy p1 match destination-address any user@host# set security policies from-zone vteps to-zone vtepc policy p1 then permit tunnel-inspection ti-vendor user@host#set security policies default-policy deny-all
-
カプセル化解除されたパケットを処理するために、
policy-setで内部ポリシーを定義します。[edit security policies] user@host# set security policies policy-set pset1 policy pset_p1 match source-address any user@host# set security policies policy-set pset1 policy pset_p1 match destination-address any user@host# set security policies policy-set pset1 policy pset_p1 match application any user@host# set security policies policy-set pset1 policy pset_p1 then permit
-
VTEPC(仮想トンネルエンドポイントクライアント)の
from-zoneに関連付けられたインターフェイスを設定して、Geneveカプセル化されたパケットとヘルスチェックパケットを受信します。手記:トランジットモードの場合、vSRX仮想ファイアウォール3.0は、イングレスとエグレス用に2つのL3インターフェイスで設定する必要があります。
[edit]
user@host# set interfaces ge-0/0/1 mtu 9000
user@host# set interfaces ge-0/0/1 unit 0 family inet address any
user@host# set interfaces ge-0/0/1 unit 0 family inet6 address any
業績
設定モードから、 show security policies コマンドを入力して設定を確認します。出力結果に意図した設定内容が表示されない場合は、この例の手順を繰り返して設定を修正します。
user@host# show security policies
from-zone trust to-zone untrust {
    policy p1 {
        match {
            source-address any;
            destination-address any;
            application any;
        }
        then {
            permit {
                application-services {
                    application-traffic-control {
                        rule-set ftp-test1;
                    }
                }
            }
        }
    }
}
from-zone vtepc to-zone vteps {
        policy p1 {
        match {
            source-address any;
            destination-address any;
            application junos-geneve;
        }
        then {
            permit {
                tunnel-inspection {
                  ti-vendor;
                }
            }
        }
    }
}
from-zone vteps to-zone vtepc {
     policy p1 {
        match {
            source-address any;
            destination-address any;
            application junos-geneve;
        }
        then {
            permit {
                tunnel-inspection {
                   ti-vendor;
                }
            }
        }
    }
}
policy-set pset1 {
    policy pset_p1 {
        match {
            source-address any;
            destination-address any;
            application any;
        }
        then {
            permit;
        }
    }
}
default-policy {
    deny-all;
}}
user@host# show security tunnel-inspection
inspection-profile ti-vendor {
    geneve g-rule {
        policy-set ps-vendor;
        vni vni-vendor;
    }
}
inspection-profile pro1;
vni r1 {
    vni-id 500;
}
vni r2 {
    vni-id 500;
}
}
デバイスでの機能の設定が完了したら、設定モードから commit を入力します。