
例:テスト
ここでは、「 新しいテストエージェントの作成とデプロイ」のセクションに従って、テストエージェント(テストに必要な数だけ)が作成されていることを前提としています。
テスト用 YANG モデル パス
| 項目 | YANGモデルパス: /accounts/account/tests ... |
|---|---|
| テスト | /. |
| テスト[id] | /テスト |
| ID | /テスト/id |
| 名前 | /テスト/名前 |
| ステータス | /テスト/ステータス |
| 開始時間 | /テスト/開始時間 |
| 終了時間 | /テスト/終了時間 |
| レポートURL | /テスト/レポートURL |
| 手順 | /テスト/ステップ |
| ステップ[ID] | /テスト/ステップ/ステップ |
| 名前 | /test/steps/step/name |
| ID | /test/steps/step/id |
| 開始時間 | /test/steps/step/start-time |
| 終了時間 | /test/steps/step/end-time |
| ステータス | /test/steps/step/status |
| ステータスメッセージ | /test/steps/step/status-message |
| テンプレート | /テンプレート |
| テンプレート[名前] | /templates/template |
| 名前 | /templates/template/name |
| 説明 | /templates/template/description |
| パラメータ | /templates/template/parameters |
| パラメータ[キー] | /templates/template/parameters/parameter |
| キー | /templates/template/parameters/parameter/key |
| タイプ | /templates/template/parameters/parameter/type |
テストオーケストレーションの前提条件
- ncclientを使用してNETCONFを介してテストを開始するには、まず、アプリ内ヘルプの「テストと監視」>「テンプレートの作成」に記載されているように、コントロールセンターGUIを使用してテストテンプレートを作成する必要があります。そのテンプレートで「テンプレート入力」として指定されたすべてのフィールドは、テストテンプレートの開始をオーケストレーションする際に、XMLのパラメーターとして必要になります。
- ルーティングでのテストの実行アクティブテストは、オーケストレーションのコンテキストでは "状態" と見なされます。状態データは、 テストエージェントオーケストレーションの概要のセクションで説明されている設定データとは対照的に、設定データベースに保存されない書き込み不可能なデータです。つまり、基本的に、コントロールセンターのGUIでテストやテンプレートを変更しても、コントロールセンターと設定データベースの間で同期関連の問題は発生しません。
- テストレポートで正しく
report-urlするには、コントロールセンターのURLが正しく設定されていることを確認する必要があります。これはファイル/opt/netrounds-confd/settings.pyで行われます。デフォルトでは、コントロールセンターのホスト名はsocket.gethostname()を使用して取得されます。以下を参照してください。これで正しい結果が得られない場合は、このファイルでホスト名(またはURL全体)を手動で設定する必要があります。
# URL of Control Center without trailing slash.
# This is for example used in test report-url.
HOSTNAME = socket.gethostname()
NETROUNDS_URL = 'https://%s' % HOSTNAME
テストの開始
「 新しいテストエージェントの作成とデプロイ」セクションで説明したように、コマンドを実行します
pyang -f tree netrounds-ncc.yang
ディレクトリ /opt/netrounds-confd/ からYANGモデルを出力します。このモデルでは、ncclient を使用してテストを開始するための RPC は次のようになります。
+---x start-test
|  +---w input
|  |  +---w name          string
|  |  +---w account       -> /accounts/account/name
|  |  +---w template      string
|  |  +---w parameters
|  |     +---w parameter* [key]
|  |        +---w key                      string
|  |        +---w (value-type)
|  |           +--:(integer)
|  |           |  +---w integer?                 int64
|  |           +--:(float)
|  |           |  +---w float?                   decimal64
|  |           +--:(string)
|  |           |  +---w string?                  string
|  |           +--:(test-agent-interfaces)
|  |           |  +---w test-agent-interfaces
|  |           |     +---w test-agent-interface* [account test-agent interface]
|  |           |        +---w account       -> ../../../../../account
|  |           |        +---w test-agent    -> deref(../../../../../account)/../test-agents/test-agent/name
|  |           |        +---w interface     -> deref(../test-agent)/../interfaces/interface/name
|  |           |        +---w ip-version?   inet:ip-version
|  |           +--:(twamp-reflectors)
|  |           |  +---w twamp-reflectors
|  |           |     +---w twamp-reflector* [name]
|  |           |        +---w name    -> deref(../../../../../account)/../twamp-reflectors/twamp-reflector/name
|  |           +--:(y1731-meps)
|  |           |  +---w y1731-meps
|  |           |     +---w y1731-mep* [name]
|  |           |        +---w name    -> deref(../../../../../account)/../y1731-meps/y1731-mep/name
|  |           +--:(iptv-channels)
|  |           |  +---w iptv-channels
|  |           |     +---w iptv-channel* [name]
|  |           |        +---w name    -> deref(../../../../../account)/../iptv-channels/iptv-channel/name
|  |           +--:(sip-accounts)
|  |              +---w sip-accounts
|  |                 +---w sip-account* [account test-agent interface sip-address]
|  |                    +---w account        -> ../../../../../account
|  |                    +---w test-agent     -> deref(../../../../../account)/../test-agents/test-agent/name
|  |                    +---w interface      -> deref(../test-agent)/../interfaces/interface/name
|  |                    +---w sip-address    -> deref(../../../../../account)/../sip-accounts/sip-account/sip-address
|  +--ro output
|     +--ro result        test-status-t
|     +--ro id?           uint32
|     +--ro error-text?   string
説明については、付録の 「凡例」 セクションを参照してください。
以下の手順を以下に示します。
- テストエージェントはルーティングアクティブテストアカウントに登録されていますが、テストはまだ開始されていません。
- 必要な入力パラメーターは、実行されるテストテンプレートで識別されます。
- ncclient を使用して 60 秒間の HTTP テストが開始されます。
ステップ1:最初は、ルーティングアクティブテストアカウントでテストは開始されていません。以下のコントロールセンターGUIのスクリーンショットをご覧ください。

ステップ2:この例でテストを開始するために使用するテンプレートは、HTTPテストテンプレートです。2つの必須入力フィールド(ClientsとURL)があり、コントロールセンターのGUIでテンプレートを作成する際に指定しました。
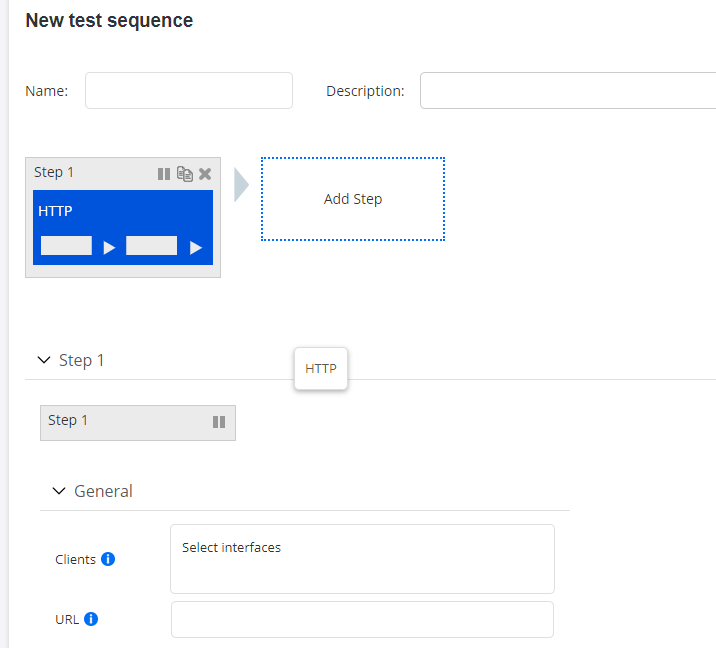
これらのパラメーター(とりわけ)は、NETCONFマネージャー(ncclient)によって設定データベースに伝達されるXML設定で定義します。
ステップ3:HTTPテストは、ncclientを使用して開始されます。
以下は、HTTPテストテンプレートに必要な設定情報とパラメーターを指定するコード例です。テンプレートの構築方法によっては、ここでの詳細が異なる場合があります。
各パラメーターに対して、 <key> 属性を指定する必要があります。キーは、コントロールセンターのパラメーターの Variable name と同じです。変数名は、次のように検査できます。
- サイドバーの [テスト] をクリックし、[ 新しいテストシーケンス] を選択します。
- マイテンプレートをクリックします。
- 目的のテンプレートの下にある 編集 リンクをクリックします。
- 右上隅にある [入力の編集 ] ボタンをクリックします。
この例では、デフォルトで、変数名はコントロールセンターに表示される表示名(「url」と「URL」など)の単なる小文字バージョンです。ただし、コントロールセンターのGUIでは、変数の名前を好きなように変更できます。
キーの他に、各パラメーターには、URLの<string>など、そのタイプを指定する必要があります。タイプに関する完全な情報を得るには、完全なYANGモデルを確認する必要があることに注意してください。テストエージェントインターフェイスの場合、以下のコードの<clients>で示すように、型はより複雑な構造を持っています。
with manager.connect(host=args.host, port=args.port, username=args.username,
                password=args.password, hostkey_verify=False) as m:

    # Run RPC "start-test"

    # A template named "HTTP_test" and having two inputs is assumed to exist
    xml = """<start-test xmlns="http://ncc.netrounds.com">
                <name>Netconf Initiated HTTP test</name>
                <account>{account}</account>
                <template>HTTP_test</template>
                <parameters>
                    <parameter>
                        <key>clients</key>
                        <test-agent-interfaces>
                            <test-agent-interface>
                                <account>{account}</account>
                                <test-agent>TA1</test-agent>
                                <interface>eth0</interface>
                            </test-agent-interface>
                        </test-agent-interfaces>
                    </parameter>
                    <parameter>
                        <key>url</key>
                        <string>http://www.google.se</string>
                    </parameter>
                </parameters>
            </start-test>""".format(account=args.netrounds_account)

    # Convert to ElementTree element
    elem = to_ele(xml)

    print m.dispatch(elem)
これで、ncclientを使用してスクリプトを実行できます。すべてが正しいと仮定すると、テストが開始され、その実行がコントロールセンターに表示されます。
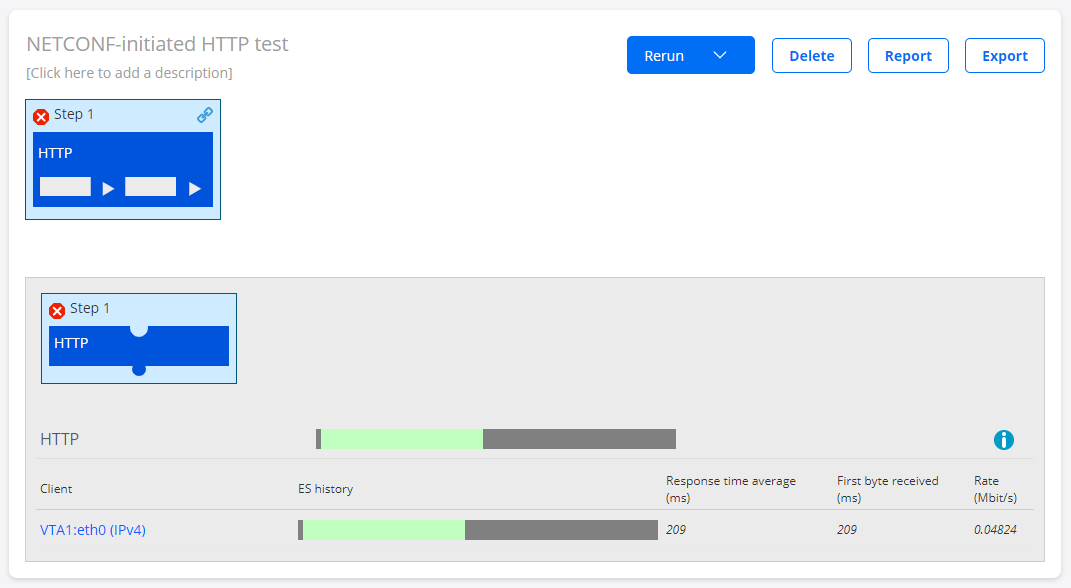
テストが正常に開始されると、コントロールセンターからテストIDが返されます。この例では、テストIDは3です。
<?xml version="1.0" encoding="UTF-8"?>
<rpc-reply xmlns="urn:ietf:params:xml:ns:netconf:base:1.0" message-id="urn:uuid:f08efc54-2086-4d09-af71-5b65fcecabe1"
xmlns:nc="urn:ietf:params:xml:ns:netconf:base:1.0"><id xmlns='http://ncc.netrounds.com'>3</id>
</rpc-reply>
テストIDは、コントロールセンターGUIのテストのURLにも記載されています。この例では、そのURLは https://host/demo/testing/3/です。
テスト結果の取得
テスト結果を取得する最も簡単な方法は、テスト ID をポイントすることです。
以下は、ID = 3の上記のHTTPテストから結果を取得するためのPythonコードです。
with manager.connect(host=args.host, port=args.port, username=args.username,
                password=args.password, hostkey_verify=False) as m:

    # Get results from test in account
    xml = """<accounts xmlns="http://ncc.netrounds.com">
                 <account>
                     <name>{account}</name>
                     <tests>
                         <test>
                             <id>{id}</id>
                         </test>
                     </tests>
                 </account>
             </accounts>""".format(account=args.netrounds_account,
                                   id=3)

    # Convert to ElementTree object
    ele = to_ele(m.get(filter=('subtree', xml)).data_xml)

    # Convert back to XML string and print
    print to_xml(ele, encoding='UTF-8', pretty_print=True)
出力は次のようになります。
<?xml version="1.0" ?>
                <data xmlns="urn:ietf:params:xml:ns:netconf:base:1.0" xmlns:nc="urn:ietf:params:xml:ns:netconf:base:1.0">
                    <accounts xmlns="http://ncc.netrounds.com">
                        <account>
                            <name xmlns:nc="urn:ietf:params:xml:ns:netconf:base:1.0">demo</name>
                            <tests>
                                <test>
                                    <id xmlns:nc="urn:ietf:params:xml:ns:netconf:base:1.0">3</id>
                                    <name>HTTP</name>
                                    <status>passed</status>
                                    <end-time>2017-01-26T22:23:53+00:00</end-time>
                                    <report-url>https://localhost//demo/testing/3/</report-url>
                                    <steps>
                                        <step>
                                            <id>4</id>
                                            <name>Step 1</name>
                                            <start-time>2017-01-26T22:22:51+00:00</start-time>
                                            <end-time>2017-01-26T22:23:51+00:00</end-time>
                                            <status>passed</status>
                                            <status-message/>
                                        </step>
                                    </steps>
                                </test>
                            </tests>
                        </account>
                    </accounts>
                </data>
テストテンプレートのエクスポートとインポート
テストテンプレートはJSON形式でエクスポートし、その形式でコントロールセンターに再インポートできます。これは、コントロールセンターの別のインストールでテストテンプレートを使用する場合に便利です。(テンプレートの初期作成は、コントロールセンターのGUIを使用して行うのが最適です)。
以下は、エクスポートとインポートを実行するためのコードです。
テストテンプレートのエクスポート
with manager.connect(host=args.host, port=args.port, username=args.username,
                password=args.password, hostkey_verify=False) as m:

    # Export selected templates from Control Center
    # In order to export all templates, remove the <templates></templates> node
    export_xml = """
    <export-test-templates xmlns="http://ncc.netrounds.com">
        <account>{account}</account>
        <templates>
            <template>
                <name>template_udp</name>
            </template>
            <template>
                <name>template_tcp</name>
            </template>
        </templates>
    </export-test-templates>""".format(account=args.netrounds_account)

    elem = to_ele(export_xml)
    response = m.dispatch(elem)

    # Get json config from response
    root = ET.fromstring(response._raw)
    json_config = root[0].text
    print json_config
テンプレートは json_config オブジェクトに含まれています。
テストテンプレートのインポート
テストテンプレートを含むJSON設定オブジェクトは、次のようにコントロールセンターに再インポートできます。
with manager.connect(host=args.host, port=args.port, username=args.username,
                password=args.password, hostkey_verify=False) as m:

    json_string = """
        {
            "templates":[
                {
                    "input":[
                        {
                        "require_bridge":false,
                        # ...
                        # Insert rest of JSON string here
                        # ...
                }
            ],
            "version": "2.29",
            "export_date": "2019-05-29T12:39:31.172594Z"
        }
    """

    # Import templates back into Control Center
    import_xml = """
        <import-test-templates xmlns="http://ncc.netrounds.com">
            <account>{account}</account>
            <overwrite>false</overwrite>
            <data>{data}</data>
        </import-test-templates>""".format(
            account=args.netrounds_account,
            data=json_string)

    elem = to_ele(import_xml)
    response = m.dispatch(elem)

    print response