NorthStarとHealthBotの統合
概要
NorthStar Controller と HealthBot 製品の統合は継続的な開発作業であり、段階的なアプローチでリリースされています。このトピックでは、NorthStar Controllerリリース5.1.0とHealthBotリリース2.1の統合のステータスについて説明します。
NorthStar Controllerは、サイドバイサイドインストールシナリオで、HealthBotを分析コレクターとして使用できます。NorthStarとHealthBotを個別にインストールおよび管理しますが、NorthStarの一部の分析コレクター機能は、ElasticsearchではなくHealthBotによって処理されるように設定します。NorthStar Controllerリリース5.1.0以降では、マルチベンダーサポートではなく、サポートされているのはジュニパーノードのみであり(マルチベンダーサポートとは対照的)、HealthBotで処理できるのは以下の分析コレクションのみです。
-
Junosテレメトリインターフェイス(JTI)LSP統計
-
JTIインターフェイス統計(論理および物理)
-
RPMプローブを使用したリンク遅延統計
-
LDP show コマンドを使用した LDP 需要統計
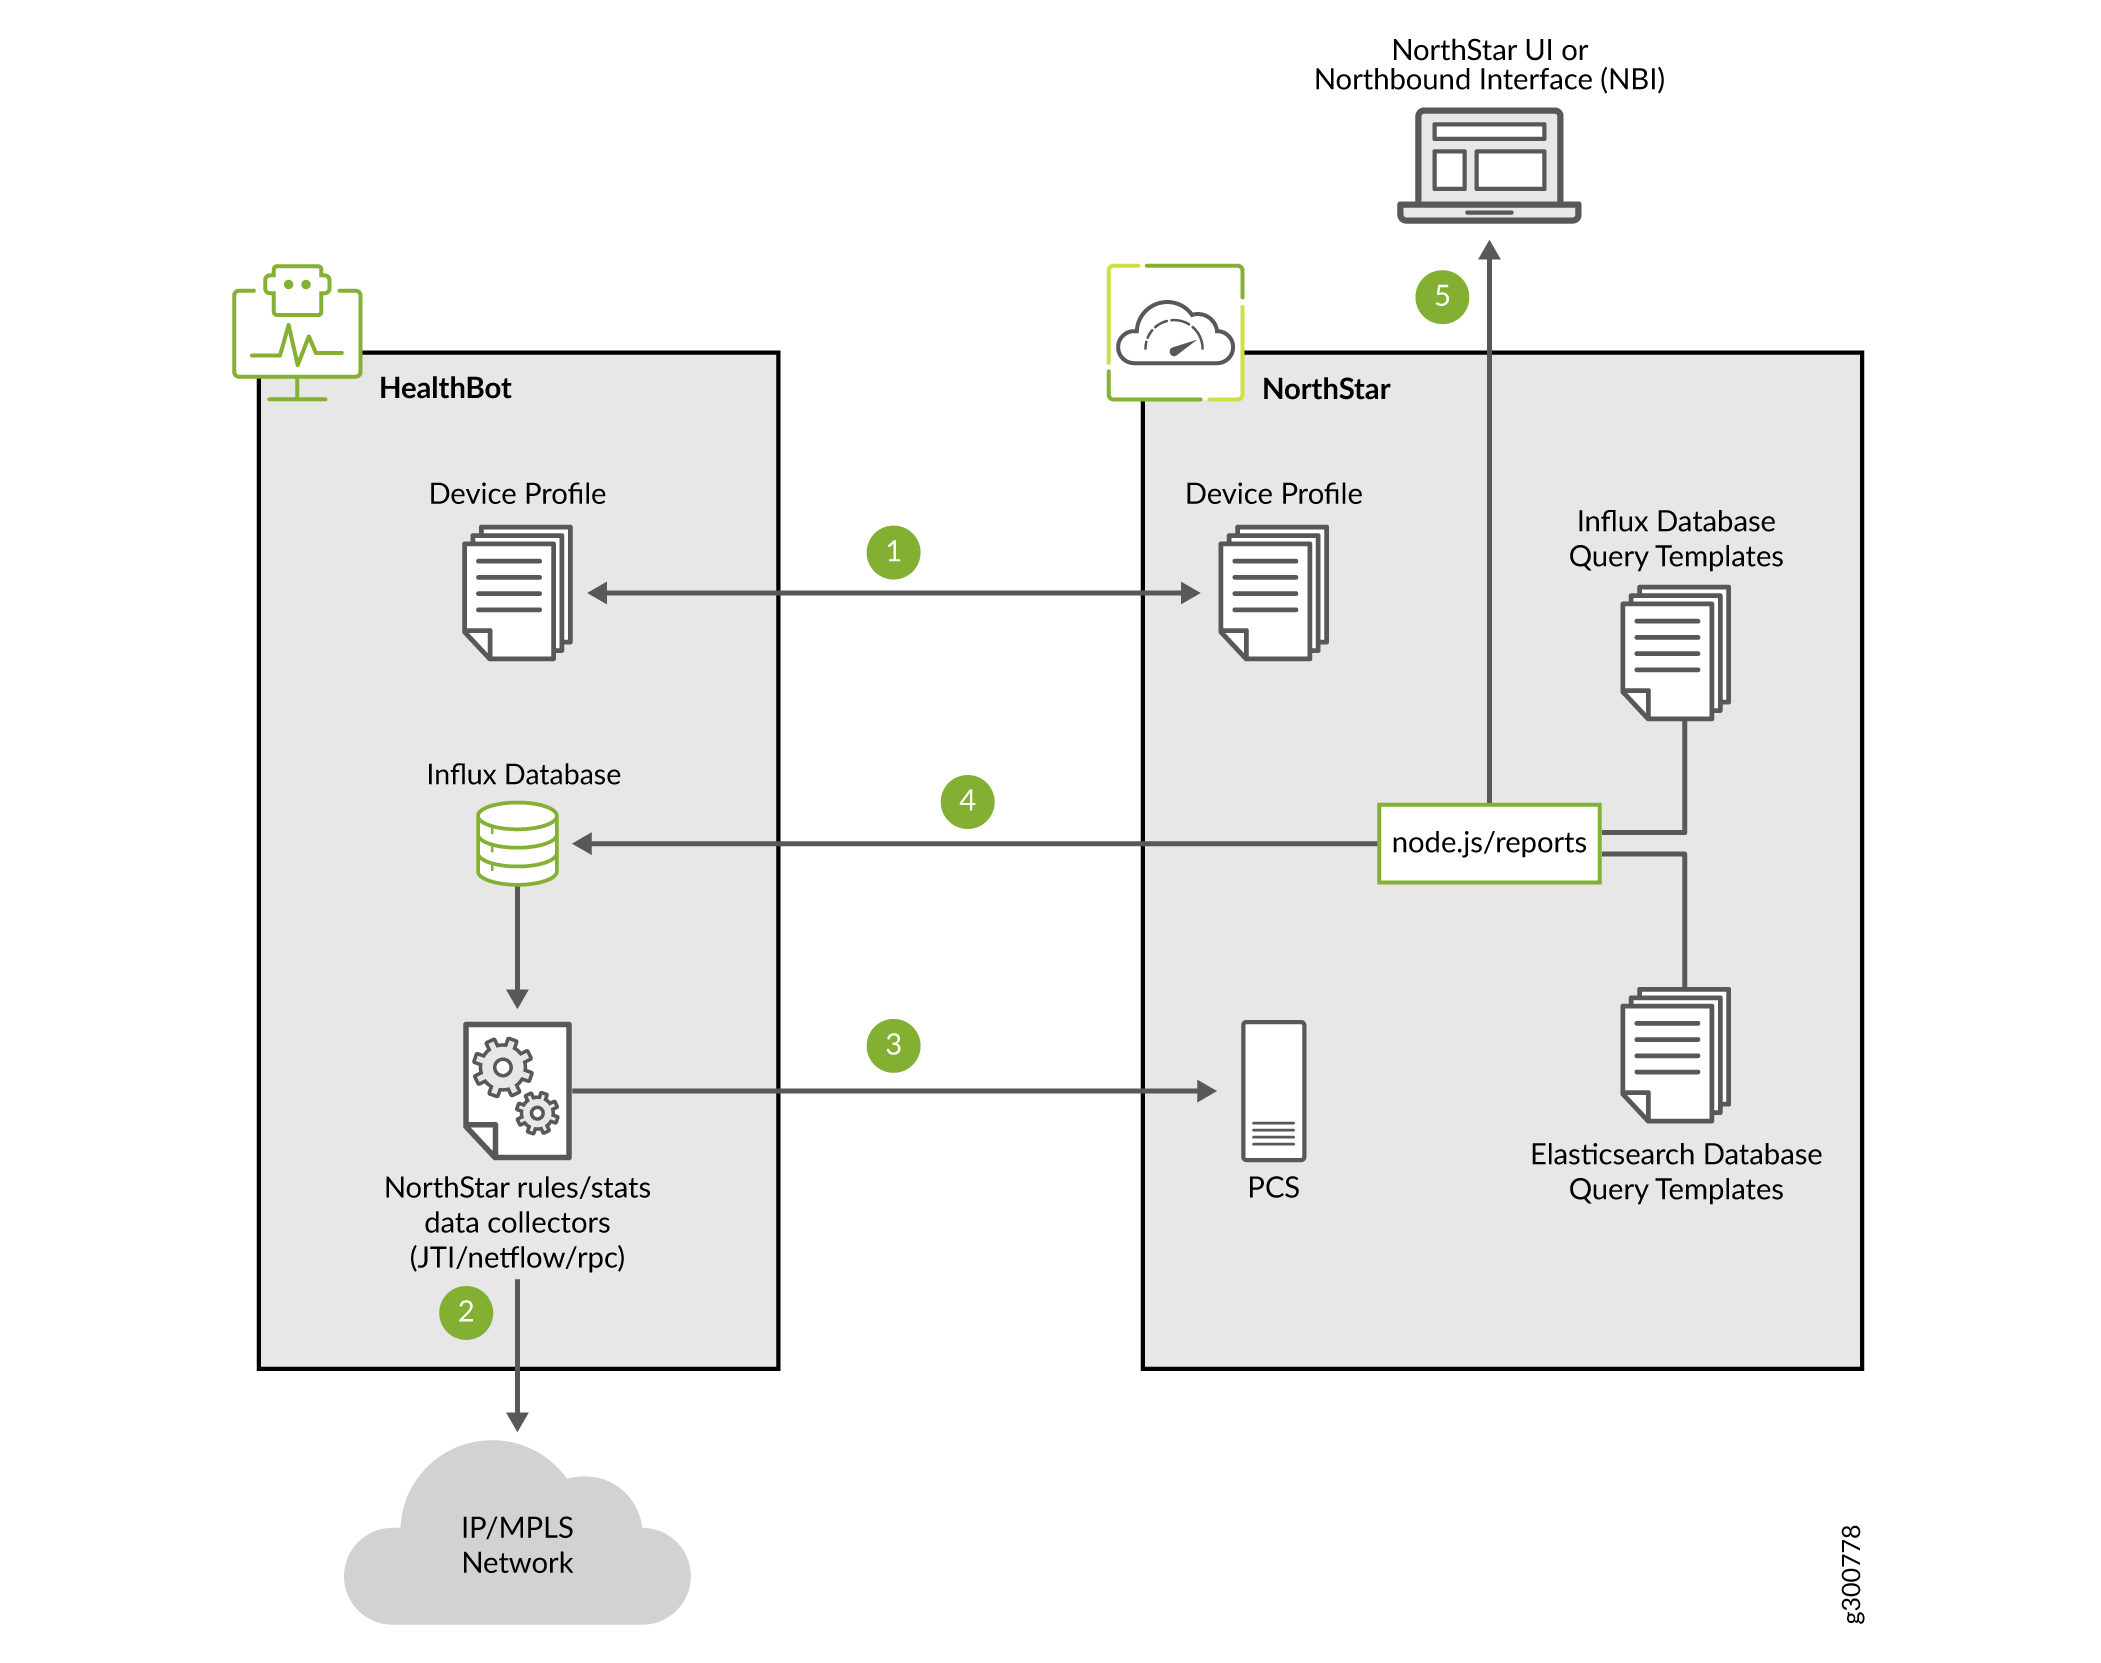
図1は、HealthBotとNorthStarのコンポーネント間の関係性をまとめたものです。番号は、以下のプロセスに対応しています。
-
NorthStarは、デバイスリストとプロファイル情報をHealthBotにプッシュします。
-
NorthStarは、ネットワークデバイスからのデータ収集に使用する一連のルールをHealthBotに提供します。
-
NorthStarルールにより、HealthBotはAMQPを介したライブサンプルデータの収集についてNorthStarに自動的に通知できます。
-
NorthStar node.jsとNorthStarレポートジェネレータは、jinjaテンプレートに基づいてHealthBotデータベースにクエリーを実行します。
-
HealthBotからの統計とデータは、NorthStar UIまたはその他のノースバウンドインターフェイス(NBI)で表示できます。
ルールとプレイブック、および一般的な HealthBot の操作については、HealthBot のドキュメントを参照してください。参考用に、以下の基本的なHealthBot用語を提供します。
| HealthBot用語 |
説明 |
|---|---|
| ルール |
ネットワークまたはJunosデバイスから特定の情報を抽出するために必要なコンポーネントまたはブロックのパッケージ。ルールは、分析アプリケーション向けにカスタマイズされたドメイン固有言語(DSL)に準拠しています。 |
| プレイブック |
特定のユースケースに対応するためのルールの集合。 |
| プレイブックインスタンス |
デバイスまたはネットワークグループに適用されるプレイブックの特定のインスタンス。 |
| ユーザー定義関数(UDF) |
ユーザー定義関数は、ルール内で使用されます。 |
NorthStarデータ収集ルールとプレイブックでHealthBotをアップデートする
HealthBotがNorthStarに収集データを提供できるように準備するには、以下の手順を実行します。
-
HealthBotサービスが稼働していることを確認します。
-
python3 モジュール リクエストと pika を HealthBot サーバーにインストールします。次に例を示します。
pip3 install requests; pip3 install pika
-
NorthStarアプリケーションサーバーからHealthBotサーバーの一時ディレクトリにNorthStarルールをコピーします。
[root@northstar]# cp /opt/northstar/northstar_bundle_x.x.x/hb_config/hb-rules-config.tar.gz /var/tmp -
HealthBotサーバーで、ルールファイルの暗号化を解除します。
[root@healthbot]# tar xvf hb-rules-config.tar.gz -
HealthBotサーバーで、NorthStarルールとプレイブックをHealthBotに挿入してHealthBot UIに表示されるようにするスクリプトを実行し、NorthStarのユーザー定義関数(UDF)を更新します。このスクリプトは、NorthStar と HealthBot 間の通信に必要な資格情報も取得します。
[root@healthbot]:~/ns/installation# ./install-ns-rules.shスクリプトは、次のプロンプトを表示します。
-
NorthStarサーバーのIPまたはVIPアドレスまたはホスト名
-
NorthStar管理者のユーザー名とパスワード
-
HealthBotアプリケーションサーバーのIPアドレス
-
HealthBot管理者のユーザー名とパスワード
スクリプトの進行状況が表示されます。
 root@healthbot:~/ns/installation# ./install-ns-rules.sh
Copying config file /opt/northstar/data/northstar.cfg from Northstar APP server, Please enter below info
---------------------------------------------------------------------------------------------------------
Please enter Northstar application server IP/VIP address or host name: 10.53.64.97
Please enter Northstar Web Admin username: admin
Please enter Northstar Web Admin password:
Please enter HealtBot application server IP address: 10.53.64.96
Please enter HealthBot Web Admin username: admin
Please enter HealthBot Web Admin password:
retrieving config file from application server...

Saving to /root/ns/input/northstar.cfg

Copying NS input files to /var/local/healthbot/input

Starting Northstar rules and playbook upload/creation
Rule/yml file directory: /root/ns/rules
Successfully import the yml file: ns-ldp-demand-stats.yml
Successfully import the yml file: ns-rpm-probe-ifl.yml
Successfully import the rule file: ns-jti-logical-interface.rule
Successfully import the rule file: ns-jti-label-switched-path.rule
Successfully import the rule file: ns-ldp-demand-stats.rule
Successfully import the rule file: ns-jti-physical-interface.rule
Successfully import the rule file: ns-rpm-probe-ifl.rule
Successfully created the playbook: "northstar"

Updating UDF....
Running /root/ns/installation/udf-config.sh in iagent engine..
Success! See /tmp/.iagent_modification.log for logs
Running /root/ns/installation/udf-config.sh in jtimon engine..
Success! See /tmp/.jtimon_modification.log for logs
Running /root/ns/installation/udf-config.sh in fluentd engine..
Success! See /tmp/.fluentd_modification.log for logs
Running /root/ns/installation/udf-config.sh in telegraf engine..
Success! See /tmp/.telegraf_modification.log for logs
Running /root/ns/installation/udf-config.sh in itsdb engine..
Success! See /tmp/.itsdb_modification.log for logs
-
-
HealthBotサーバーで以下のスクリプトを実行して、HealthBotとNorthStar間の接続を確認します。
[root@healthbot]# /ns_config/installation/ns_setup.py -t
Test connectivity with input/northstar.cfg

#
mq_host=10.53.64.97
mq_port=5672
mq_username=northstar
mq_password_enc=eF0A0DhJ0GiKcHlAfEnFgMpB

Connected to rabbitmq on 10.53.64.97 successfully
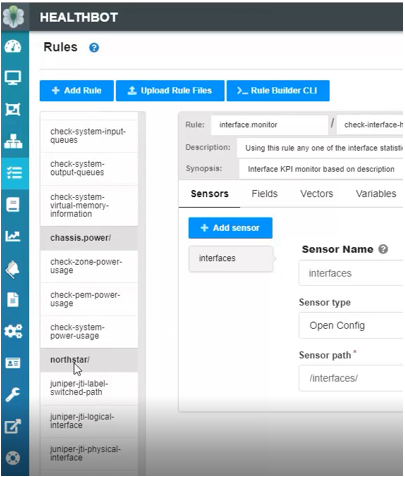
スクリプトが正常に完了すると、 図2に示すように、HealthBot UIにNorthStarルールが表示されるはずです。
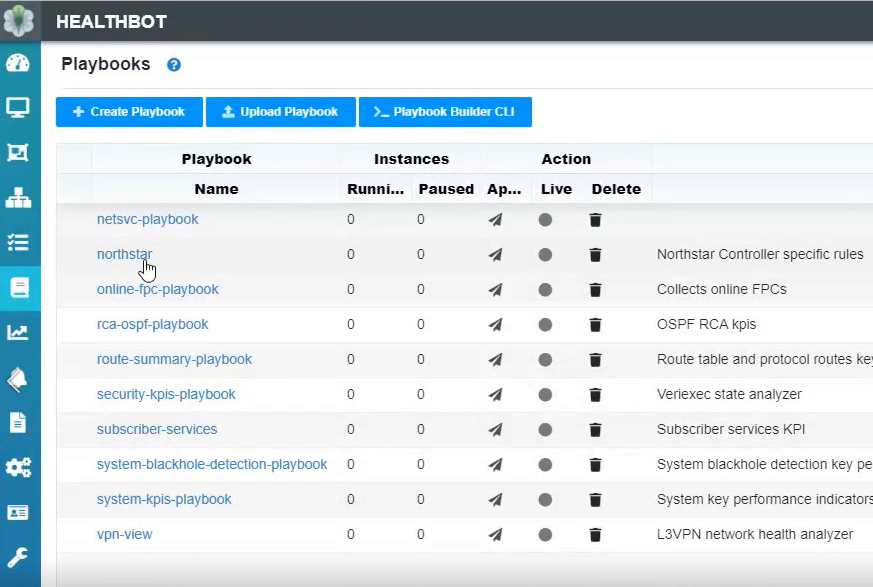
また、 図3に示すように、NorthStarプレイブックが表示されていることも確認できます。
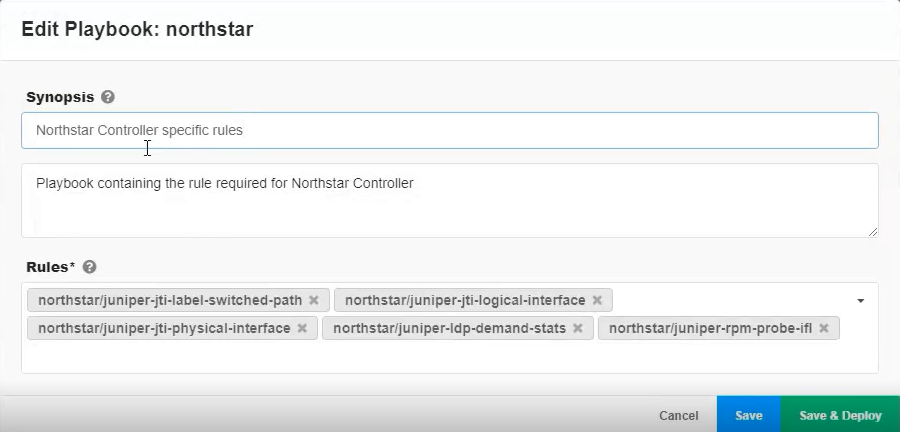
NorthStarプレイブックをクリックすると、 図4に示すように、NorthStarルールがプレイブックに関連付けられていることを確認できます。必要に応じて、ここからルールを削除できます。
 におけるNorthStar ルール
NorthStar側の設定
NorthStarがHealthBotから分析データを受信できるように準備するには、以下の手順を実行します。
-
config-healthbot-collectorオプションを指定してnet_setup.pyスクリプトを実行して、コレクションタイプをデフォルト(Elasticsearch)からHealthBotに変更します。
[root@northstar]# /opt/northstar/utils/net_setup.py --config-healthbot-collectorスクリプトは、変更を行うかどうかを確認するプロンプトを表示し、次の情報を入力するように求めます。
-
HealthBot WebサーバーのIPアドレス
-
HealthBot UIのユーザー名とパスワード
-
HealthBotデータベースのIPアドレス(これは通常、HealthBot WebサーバーのIPアドレスと同じです)
その後、スクリプトは設定ファイルを更新し、NorthStar Webサーバーを再起動します。プロセスが完了すると、成功メッセージが表示されます。
-
-
NorthStar CLIを使用して、HealthBot関連のパラメーターを設定します。
[root@ns1 root]# /opt/northstar/utils/cmgd_cli
root@ns1> edit
Entering configuration mode

[edit]
root@ns1# set northstar analytics healthbot openconfig-port 32767

[edit]
root@ns1# set northstar analytics healthbot iagent-port 830

[edit]
root@ns1# set northstar analytics healthbot native-port 4000

[edit]
root@ns1# set northstar analytics healthbot device-group-name northstar

[edit]
root@ns1# set northstar analytics healthbot playbook-name northstar

[edit]
root@ns1# set northstar analytics healthbot playbook-instance ns

[edit]
root@ns1# set northstar analytics healthbot rules northstar/juniper-jti-label-
switched-path,northstar/juniper-jti-logical-interface,northstar/juniper-jti-
physical-interface,northstar/juniper-ldp-demand-stats,northstar/juniper-rpm-probe-ifl;

[edit]
root@ns1# commit
root@ns1# exit
Exiting configuration mode

root@ns1> show configuration northstar analytics healthbot
openconfig-port 32767;
iagent-port 830;
native-port 4000;
device-group-name northstar;
playbook-name northstar;
playbook-instance ns;
rules northstar/juniper-jti-label-switched-path,northstar/juniper-jti-logical-
interface,northstar/juniper-jti-physical-interface,northstar/juniper-ldp-demand-
stats,northstar/juniper-rpm-probe-ifl;
-
ネットワーク内の各ジュニパーデバイスを設定して、JTIおよびRPMプローブデータをHealthBotサーバーに送信します。手順については 、「JTIテレメトリデータとRPM統計情報をデータコレクタに送信するためのルーターの設定 」を参照してください。
-
NorthStar UIで、 Administration > Device Profile に移動してデバイスプロファイル情報をHealthBotにプッシュし、NorthStarプレイブックインスタンスを適用します。
コレクションタイプを HealthBot に設定すると、 図 5 に示すように、NorthStar UI の [デバイス プロファイル] ウィンドウに [デバイスを HealthBot に更新] ボタンが表示されます。
図5:デバイスの更新ボタンが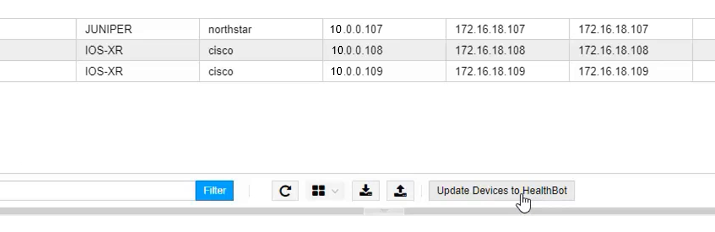 されたデバイスプロファイルウィンドウ
ボタンをクリックする前にデバイスを選択する必要はありません。ボタンをクリックすると、NorthStarが管理するすべてのジュニパーデバイスのすべてのデバイス情報がHealthBotに更新されます。プロセスが完了すると、成功メッセージが表示されます。
デバイス情報がHealthBotと共有されていることは、 図6に示すように、HealthBot UIダッシュボードの下のデバイスで確認できます。HealthBotにプッシュされたすべてのジュニパーデバイスがここに表示されています。いずれかのデバイス名をクリックすると、ポップアップウィンドウにプロファイル情報の詳細が表示されます。
図6:HealthBotダッシュボードのNorthStarデバイス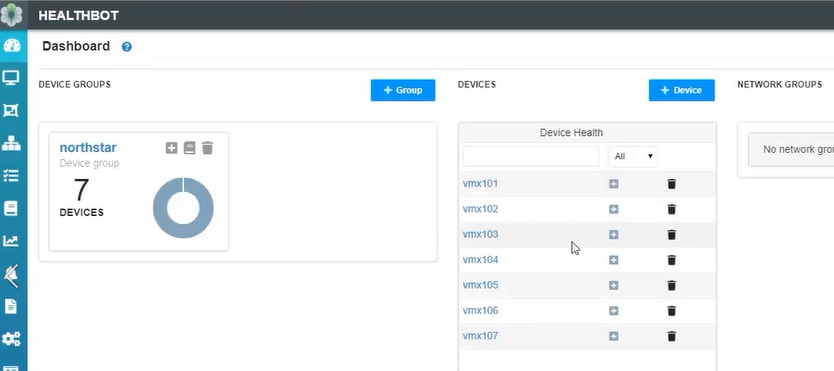
図6にも、NorthStarデバイスグループ(左端)が作成されていることに注目してください。グループの名前をクリックすると、HealthBotに情報をプッシュしたすべてのデバイスのリストが表示されます。
図 7に示すように、HealthBot UIのプレイブックで、NorthStarプレイブックインスタンスが作成されたことを確認できます。ディスプレイは、プレイブックの 1 つのインスタンスが実行されていることを示します。
図7:HealthBot UIのNorthStar Playbookインスタンス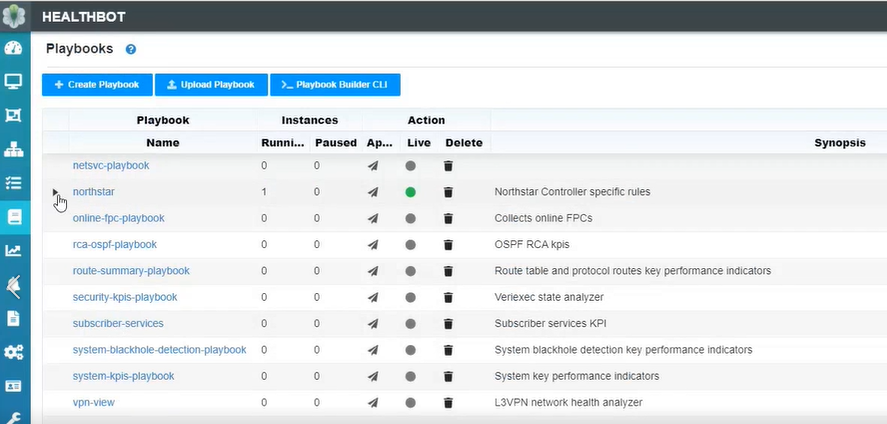
プレイブック名の横にある矢印をクリックすると、デバイスグループ、デバイス、ルールなどインスタンスの詳細が表示されます。
NorthStar UIでのデータを表示する
NorthStar UIでの収集データの表示は、収集タイプとしてHealthBotと変わりませんが、NorthStar/HealthBot統合のこのフェーズでは、いくつかの制限があります。以下はまだサポートされていません。
-
合計LSPトラフィックチャート
-
LSP、ノード、インターフェイス、インターフェイス遅延チャートの上位トラフィック
-
Netflowコレクション
-
SR 統計(SID トラフィック)
-
AS-Demandsレポートと需要グループレポート
注:これらのレポートは、Elasticsearchネイティブコレクションを使用して利用できます。