
アラートと通知を設定および管理する
アラートと電子メール通知を有効にして、ユーザーに影響を与える重大なイベントが発生したときに常に最新の情報を入手できます。オプションで、テンプレートを作成して、サイトごとに異なるアラートと通知を設定します。
ビデオの概要
このビデオでは、アラートの設定手順の概要を説明します。
The one thing I wanted to show is the alert framework. We get asked a lot in terms of, hey, what can we do in terms of the different alerts that the system is looking at? So you can see here I have my information turned off. I'm going to turn that on.
But real quickly, I wanted to go through, we have this alert framework. And you can look at alerts based on a per site basis. You can look at alerts based on an entire organization.
You can look at alerts just like if you want to get granular on client insight capabilities, the network rewind stuff. So we do the same thing with alerts. You can look at alerts for today. You can look at them for the last 60 minutes. You can do custom dates and ranges and things like that to see what's been going on if something gets reported. Or you just want to look at the current status from an alert perspective.
You can go through, and you can actually sort on different alert types. So if I wanted to just click on security, for example, now I'm looking at the security alerts. I can look at any type. And then I can actually turn them off. So if I didn't want to look at informational alerts, I just click on that box and turn them off. OK, so just that's a quick at-a-glance alerts.
Now, how do you configure these things? What types of alerts are in there? So if you go over here and click on alert configuration, I'll click on this. So what you can do is that you can set up different alert templates. You can set it up for an entire organization.
You can set it up for an individual site. And you can actually mix them. So maybe you wanted to have specific alerts for an entire organization that you have out there. But for a specific site or specific sites, maybe you wanted to get some additional learning information out there for different reasons. So you actually have the ability to do that. So right now, you can see here that this applies to scope, for example, my entire organization.
If I wanted to do a particular site, I can do that, click plus, and then add a site to this if that's something I wanted to do. The other thing that you can do is over here, I can click on this button. And what it would do is that it would actually clone or provide a copy of this current template.
You can rename that and configure it and then apply it to something else if that's something that you wanted to do. So you can actually clone templates as well. The other thing that you could do is, what it will do is that it will send alerts, send these alerts to the admins of the organization. Or you can actually say, just send it to the site admins. And then you could actually add additional recipients. So maybe you have folks on the security team, for example.
So you wanted to set up a template that was specific to security alerts. And when those security alerts got triggered, for example, like a rogue AP, maybe you want to send an email to somebody on the security team. That's just an example of something that you could do.
So if you look at the alert types, we have these, they're kind of segmented into a few different categories. You have the infrastructure side where if devices are online or offline, you can actually enable an alert. There's kind of two columns here. You can enable the alert, it will show up in the dashboard. And then you could also click on this box to send an email notification. So you can configure it that way as well.
And then if you scroll down in here, you got the infrastructure alerts, you got Marvis alerts. I'll show you what a non-compliant AP is as well. You got different, like all the stuff that's available from a Marvis actions perspective.
AP is authentication, DHCP, DNS, switches, gateways, things like that. If there's stuff going on with those devices, you could actually have alerts configured to be sent on those. And then on the security side, maybe you want to know, hey, if a rogue AP pops up, I want to make sure I have an alert.
And then I want to send an email to someone in IT or security or both that I have that. So I encourage you all to kind of go in here and check out all the different alert types that we have and what you can actually set this thing up to alert on. Okay, so that's alerts.
And just wanted to point that out. Like I said, I encourage you all to go in there, check it out, play with it, test it, do all that fun stuff and see how it works for you.
アラート設定ページの検索
左側のメニューから、 監視 > アラートを選択します。アラートページの右上隅にある アラート設定 ボタンをクリックします。

アクション
アラート設定ページでは、以下を実行できます。
-
デフォルトのテンプレートを設定します。このテンプレートは、組織全体または選択したサイトに適用するように設定できます。
注:テンプレート名は、アラート設定ページの左側にあります。 -
アラートの 一時停止 ボタンを使用すると、アラートや通知を一時的に停止できます。このボタンは、アラート設定ページの右上隅付近にあります。
-
テンプレートを作成ボタンを使用して、サイトごとに異なるテンプレートを作成します。このボタンは、アラート設定ページの右上隅付近にあります。
推奨アラート
推奨されるアラートは、デフォルトのアラートテンプレートで、および独自のテンプレートを作成するときに事前に選択されています。これらの選択を保持するか、チェックボックスをオフにして削除できます。
変更を行った後、推奨設定を復元する場合は、[アラートタイプ]セクションの右上隅付近にある[ Mist推奨アラートを有効にする ]ボタンをクリックします。
監視するアラートの範囲、受信者、タイプを選択します
アラートを選択するには:
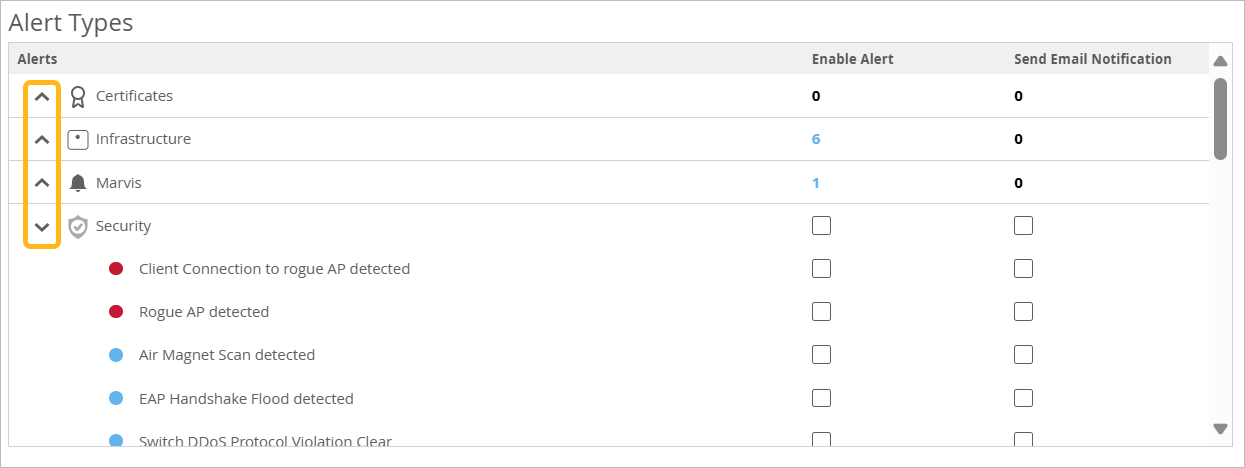
- アラートタイプで、監視>アラートページ(アラートを有効にするチェックボックス)または電子メール(電子メール通知を送信するチェックボックス)で監視するイベントを選択します。
-
さまざまなアラートの詳細については、「 ジュニパー Mist アラートタイプ」を参照してください。
-
アラートタイプセクションの左側にある展開/折りたたみアイコンを使用して、特定のアラートタイプに焦点を当てます。
-
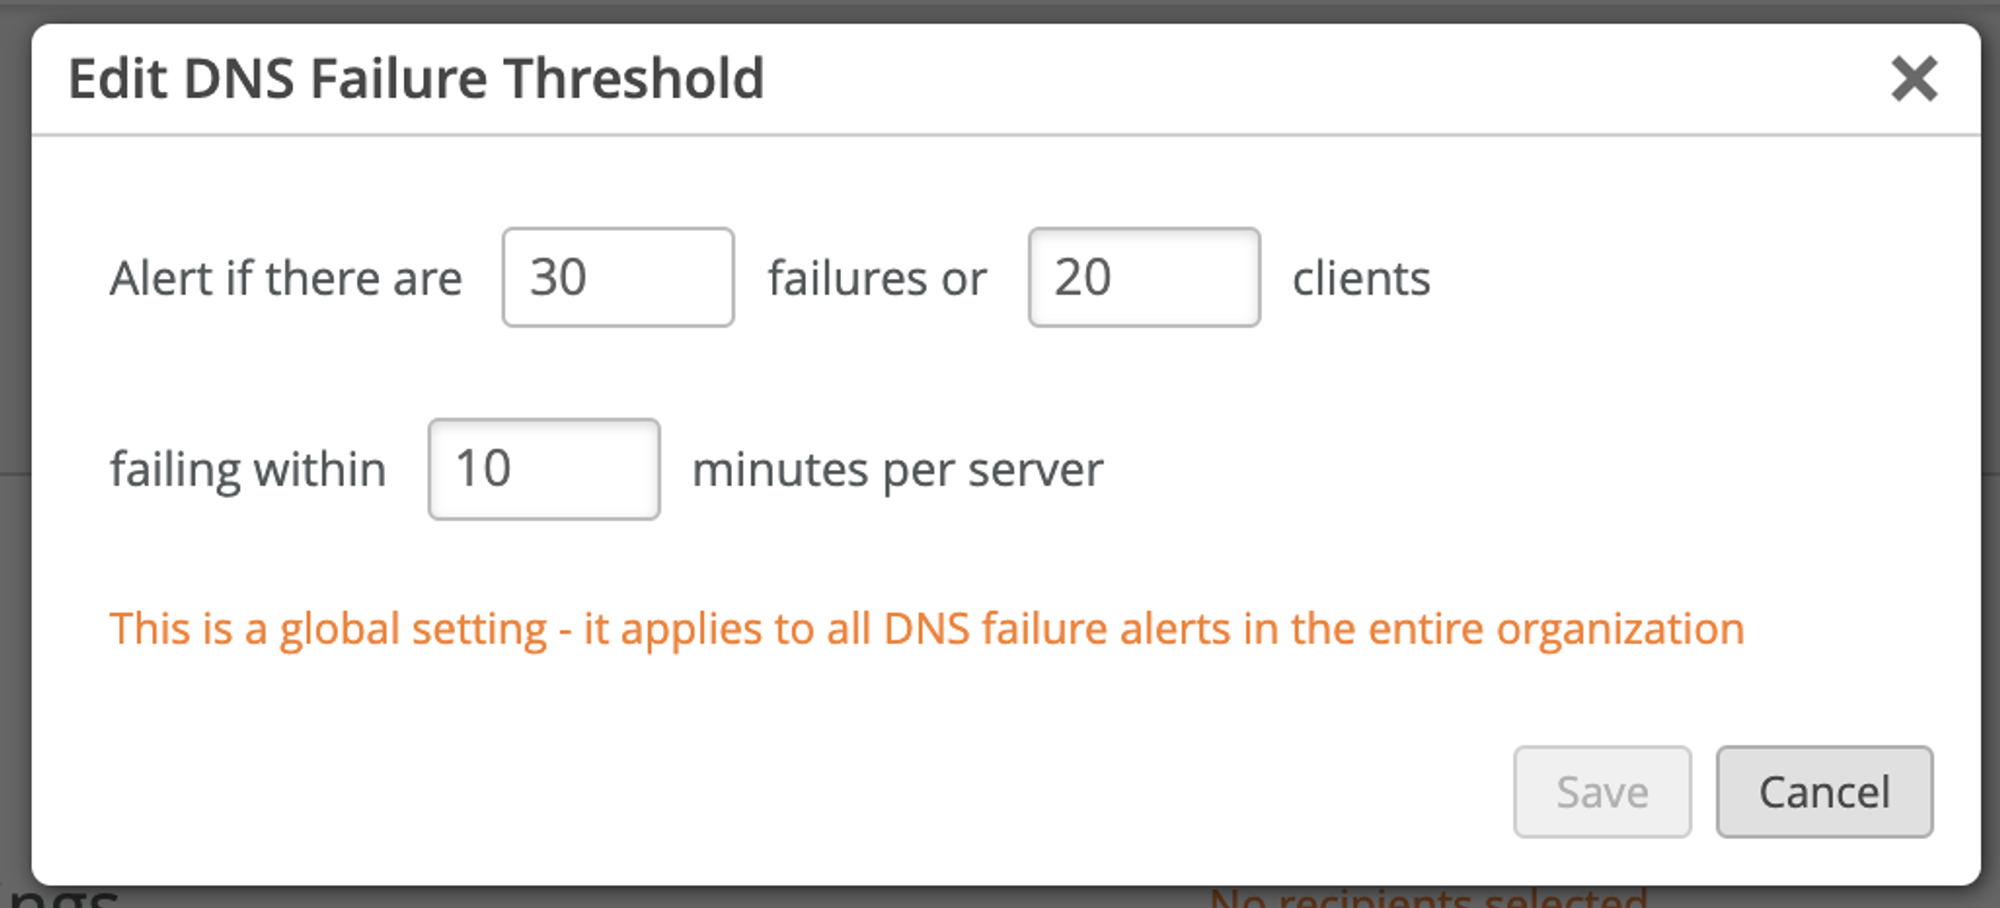
- アラートに鉛筆アイコンが表示されている場合は、それをクリックして設定を行います。
例えば、DNS失敗の鉛筆アイコンをクリックした場合、失敗の数、影響を受けたクライアント、期間に基づいてしきい値を設定できます。
アラートテンプレートの作成と管理
場所、人員、目的に応じて異なるテンプレートを作成できます。
-
テンプレートを作成するには—アラート設定ページの右上隅にある テンプレートの作成をクリックします。ページの左側にテンプレート名を入力します。スコープ、受信者、アラートタイプを選択します。次に、設定領域の右上隅にある 作成 をクリックします。
-
コピーしてテンプレートを作成するには:ページの左側で、コピーするテンプレートをクリックします。次に、設定エリアの右上隅にあるコピーボタンをクリックします。ページの左側に新しいテンプレートが表示され、名前の先頭に 「コピー」 というフレーズが表示されます。
-
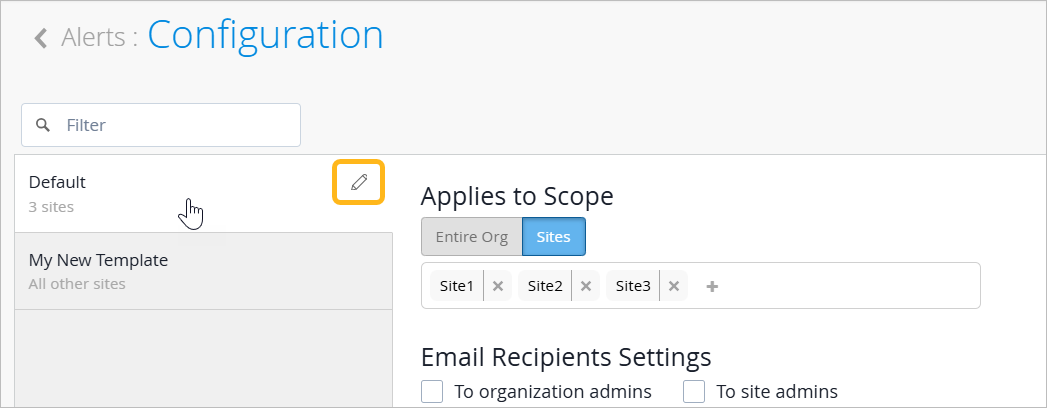
テンプレートの名前を変更するには—ページの左側で、テンプレート名をクリックします。次に、鉛筆アイコンをクリックし、名前を入力し、チェックマークボタンをクリックします。
-
テンプレートの設定を変更するには:ページの左側にあるテンプレート名をクリックします。変更を行い、設定領域の右上隅付近にある 保存をクリックします 。
-
テンプレートを削除するには:ページの左側で、テンプレート名をクリックします。次に、設定領域の右上隅付近にある削除アイコンをクリックします。
アラートを一時的に停止する
期間と範囲を指定します。次に例を示します。
-
企業全体のすべてのデバイスのアラートを一時停止します。
-
Mist Edgeなどの組織レベルのデバイスに対してのみアラートを一時停止します。
-
特定のサイトのアラートを一時停止します。
-
1つのサイトに対してのみアラートを一時停止します。
指定された期間中、指定されたデバイスとサイトのすべてのアラートが一時停止されます。範囲外のデバイスやサイトについては、通常のアラートが引き続き表示されます。期間が経過すると、有効になっているすべてのアラートは通常通り再開されます。
アラートを一時的に一時停止するには:
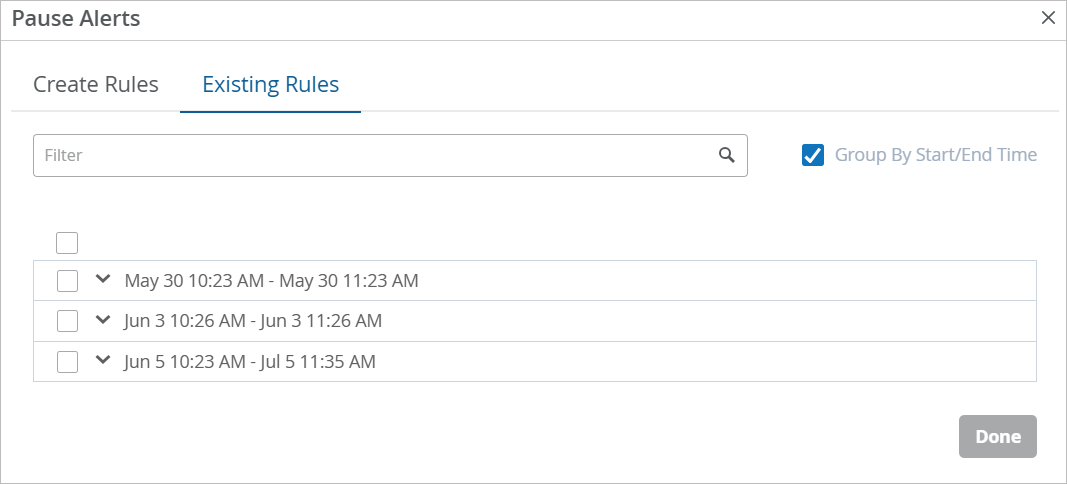
- アラートの一時停止ウィンドウで、 ルールの作成 タブと 既存のルール タブを使用して、一時停止ルールを作成および管理します。
表1:新しい一時停止ルールを作成する 新しいルールの範囲 手順 組織全体のすべてのアラートを一時停止します。 このアプローチは組織全体を対象としますが、含めるデバイスの種類を指定することもできます。 -
ルール の作成タブ をクリックします。
-
[ 組織全体] をクリックします。
-
片方または両方のチェックボックスを選択して、含めるデバイスのタイプを指定します。
-
組織—このボックスにチェックを入れると、特定のサイトではなく組織に割り当てられているMist Edgeなどのデバイスが含まれます。このボックスがオフになっている場合、組織レベルのデバイスに対して通常のアラートが表示されます。
-
サイト—このボックスにチェックを入れると、特定のサイトに割り当てられているデバイスが含まれます。オンボーディングには通常、サイトへのデバイスの割り当てが含まれるため、このオプションにはMist組織内のほとんどのデバイスが含まれます。このボックスがオフになっている場合、サイトに割り当てられたデバイスに対して通常のアラートが表示されます。
-
-
開始時刻と終了時刻を選択します。
-
作成をクリックしてルールを保存します。
既存のルールタブが表示されます。企業のデバイスのみを選択した場合は、新しいルールが1つ表示されます。サイト デバイスを選択した場合は、組織内のサイトごとに個別のルールが表示されます。
特定のサイトのアラートを一時停止します。 このアプローチは、指定したサイトのみを対象とします。通常どおり、他のサイトのアラートは引き続き受信されます。
-
ルール の作成タブ をクリックします。
-
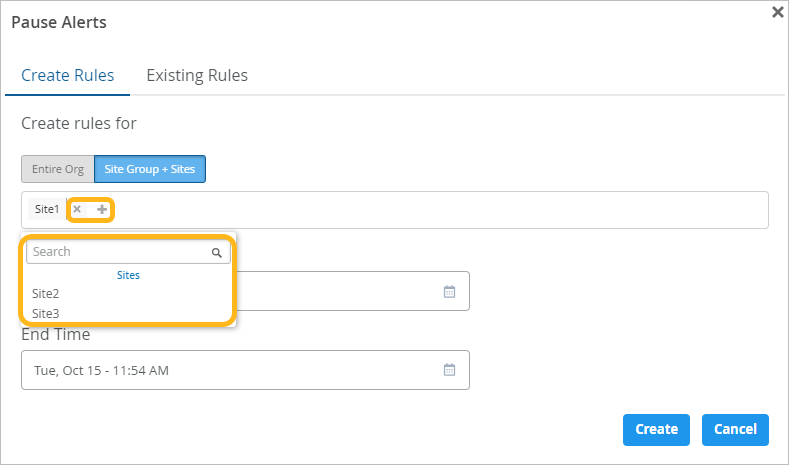
サイトグループ + サイトをクリックします。
-
[+] ボタンをクリックし、グループまたはサイトを選択します。
-
必要に応じて繰り返して、該当するサイトをすべて追加します。
注:誤ってサイトを追加した場合は、Xをクリックして削除します。 -
開始時刻と終了時刻を選択します。
-
作成をクリックしてルールを保存します。
既存のルールタブが表示されます。選択したサイトごとに1つのルールが表示されます。
注:サイトには、アクティブな一時停止ルールを1つだけ設定できます。新しいルールに、すでに一時停止が有効になっているサイトが含まれている場合は、メッセージがポップアップ表示されます。画面の指示に従って、古いルールを上書きするか、指定されたサイトを新しいルールから削除します。表2:既存のルールを管理する タスク オプション 一時停止のステータスを表示します。 既存の ルール タブで、 アクティブ 列を確認します。緑はアクティブなルールを示します。
一時停止をキャンセルします。 既存の ルール タブで、削除する各ルールのチェックボックスを選択します。次に 、削除をクリックします。
一時停止ルールのリストをフィルターします。 [ 既存のルール ] タブで、[ フィルター] ボックスに入力を開始します。一致するルールが表示されます。
一時停止ルールを日付別に整理します。 既存のルールタブで、開始/終了時刻によるグループ化を選択します。日付のある各セクションを展開または折りたたんで、ルールを表示または非表示にすることができます。
-