Help us improve your experience.

Let us know what you think.

Do you have time for a two-minute survey?


SCIMとMicrosoft Entra IDおよびOktaの統合

Mist Access Assuranceクラウドは、OAuth 2.0を使用してMicrosoft Entra ID(Azure AD)およびOktaと統合し、セキュアなユーザー認証と承認を実現します。クロスドメインID管理システム(SCIM)統合により、Access アシュアランスクラウドがローカルで同期されたユーザーとグループのリポジトリを維持できるようになり、遅延と外部IdPへの依存が軽減されるため、認証パフォーマンスが向上します。SCIMをEntra IDまたはOktaと統合するには、以下の手順に従ってください。

Mist Access Assuranceクラウドは、OAuth 2.0を使用してMicrosoft Entra ID(Azure AD)やOktaなどの外部IDプロバイダ(IdP)と統合します。この統合により、Mist Access Assuranceは以下を管理します。

  • EAP-TTLSおよびAdmin-Authの認証

  • IdPへのOAuth 2.0接続を介したEAP-TLS、EAP-TTLS、Admin-Authの認証(ユーザーグループ情報の取得)

認証と承認の操作には外部IdPとのリアルタイム通信が含まれるため、各制御パス呼び出しによりさらなる遅延が発生する可能性があり、認証とポリシー評価の全体的な応答時間に影響を与える可能性があります。また、IdPサービスが低下した場合に、潜在的なボトルネックや障害ドメインが追加されます。

認証プロセスを最適化するために、ジュニパー Mist Access Assuranceは、クロスドメインID管理(SCIM)ベースのIdPとの統合システムをサポートしています。SCIMベースの統合の主なメリットは、認証プロセス中の遅延が短縮されることです。

Mist Access Assuranceクラウドでは、SCIMを利用して、各顧客組織のユーザーおよびグループ情報のローカル同期リポジトリを維持します。このリポジトリを使用すると、ポリシーサービスは、外部IdPへのリアルタイム検索を必要とせずに、ユーザーグループのメンバーシップを評価し、承認ルールを適用できます。

注:

SCIMデータからグループマッピングを取得する際にMist Access Assuranceクラウドがエラーに遭遇した場合、外部IdPに接続することで、既存のOAuthベースの認証に自動的に復帰します。

SCIMを無効にすると、同期されたユーザーとグループデータがすべて削除され、IdPからのそれ以上の同期ができなくなります。

前提条件

SCIM を統合する前に、必ず以下のタスクを完了してください。

  1. Mist Access AssuranceをMicrosoft Entra IDまたはOkta IdPと統合します。詳細な手順については、「 Microsoft Entra ID統合」 と 「Okta統合」 を参照してください。

  2. SCIMの設定に進む前に、少なくとも1つのクライアントにMist Access Assuranceがオンボーディングされていることを確認してください。

  3. IdP設定でSCIMプロビジョニングを有効にします。SCIM認証トークンとSCIMベースURLは、SCIMプロビジョニングを有効にすると自動的に生成されます。これらのパラメーターは、IdPからMist Access Assuranceにユーザーとグループ情報を同期するために必要です。
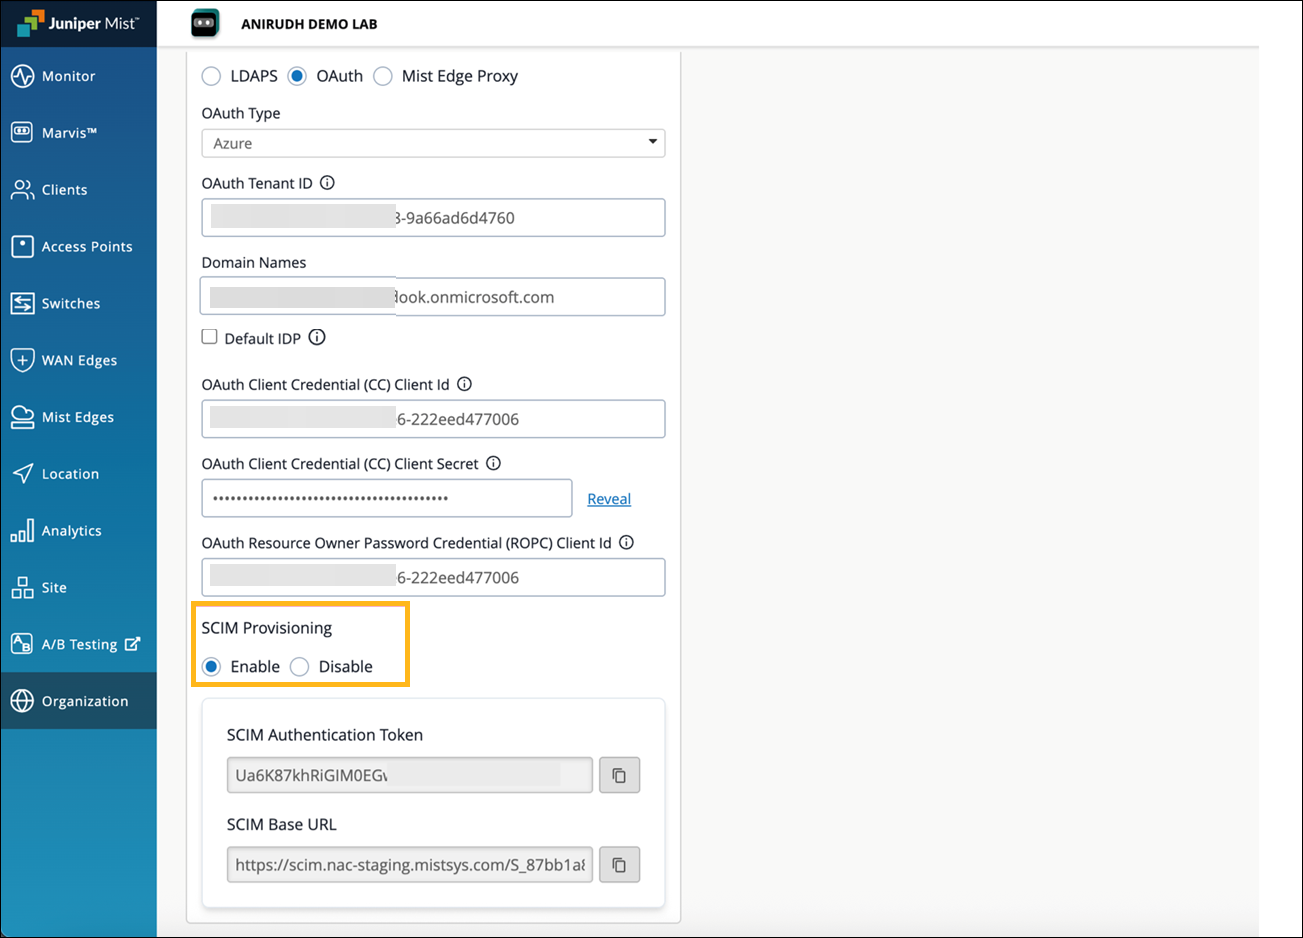
    Juniper Mist configuration interface for Azure OAuth setup and SCIM provisioning, showing fields for OAuth credentials, SCIM integration settings, and navigation options.

SCIM と Microsoft Entra ID を統合する方法

SCIM を Microsoft Entra ID と統合するには:
注:

サードパーティ製アプリケーションのスクリーンショットは、公開時点のものです。スクリーンショットがいつ、または将来正確になるかを知る方法はありません。これらの画面の変更や関連するワークフローのガイダンスについては、サードパーティーのWebサイトを参照してください。

  1. Microsoft Entra 管理センターにサインインし、 エンタープライズ アプリケーションに移動し、[ 新しいアプリケーション] をクリックします。
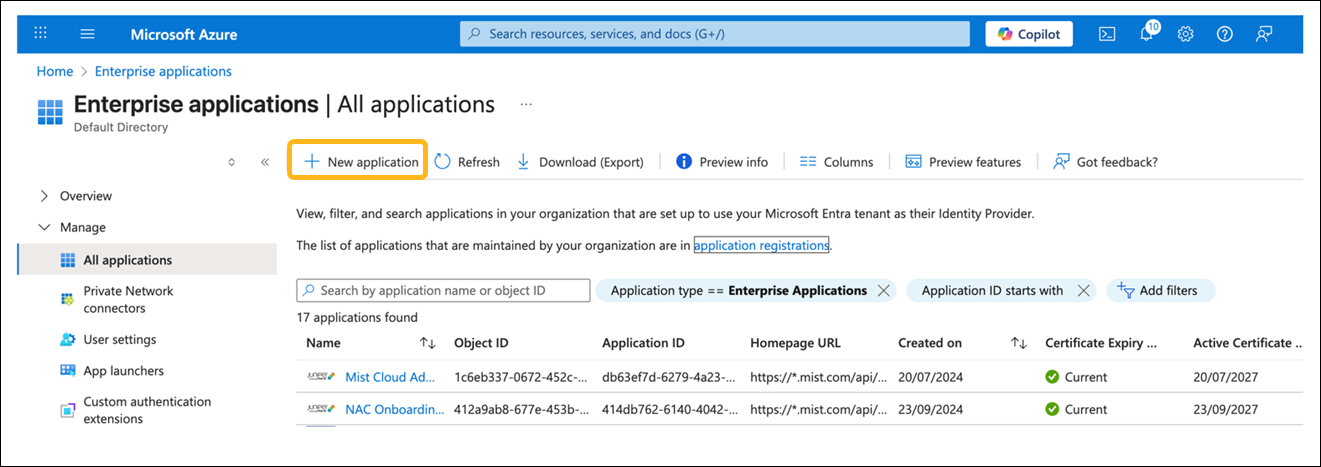
    Enterprise applications section in Azure portal showing tools to manage applications including search, filters, and a highlighted New application button.
  2. 独自のアプリケーションを作成をクリックします。アプリケーションの名前を入力し、作成をクリックします。
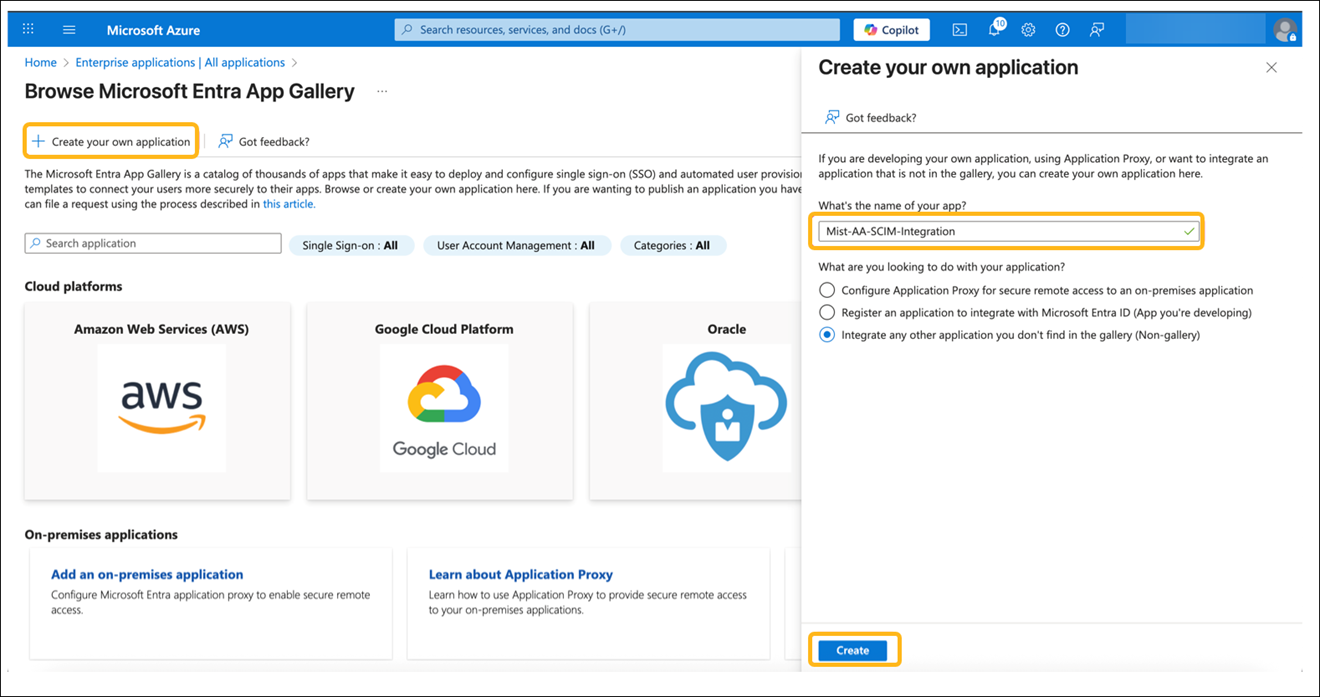
    Microsoft Entra App Gallery interface for creating and managing applications, with options for SSO apps, cloud platforms, on-premises proxies, and a custom app form for integration.
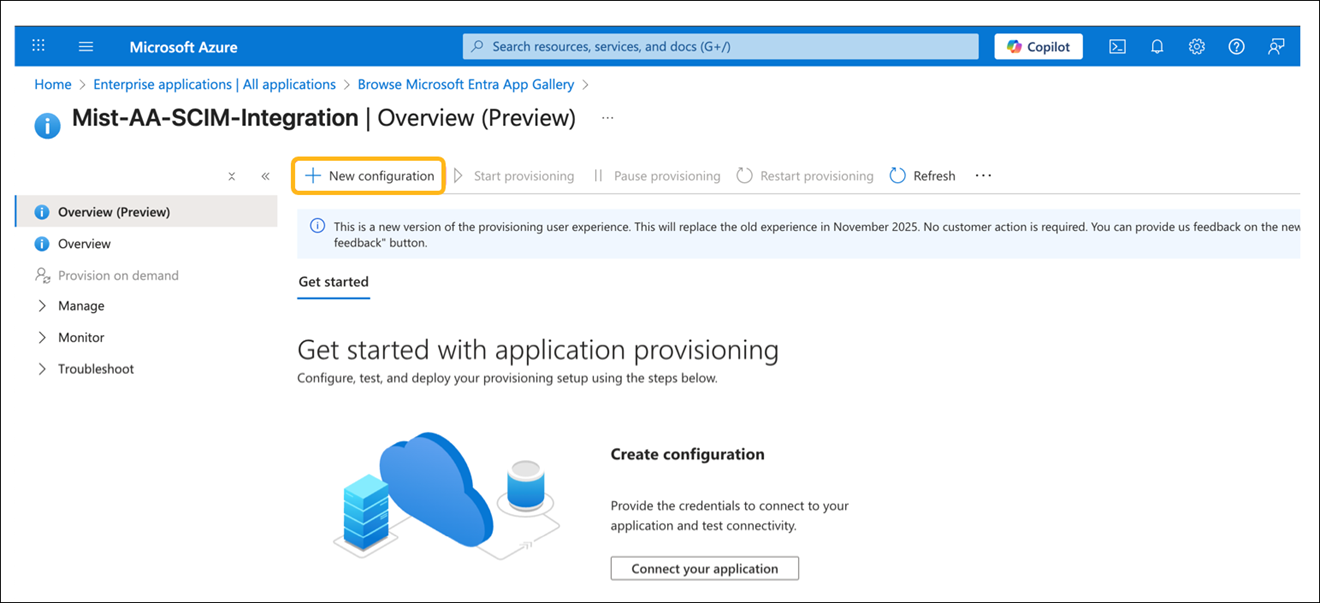
  3. アプリケーションを作成したら、管理セクションのプロ ビジョニング に移動し、 新しい設定をクリックします。
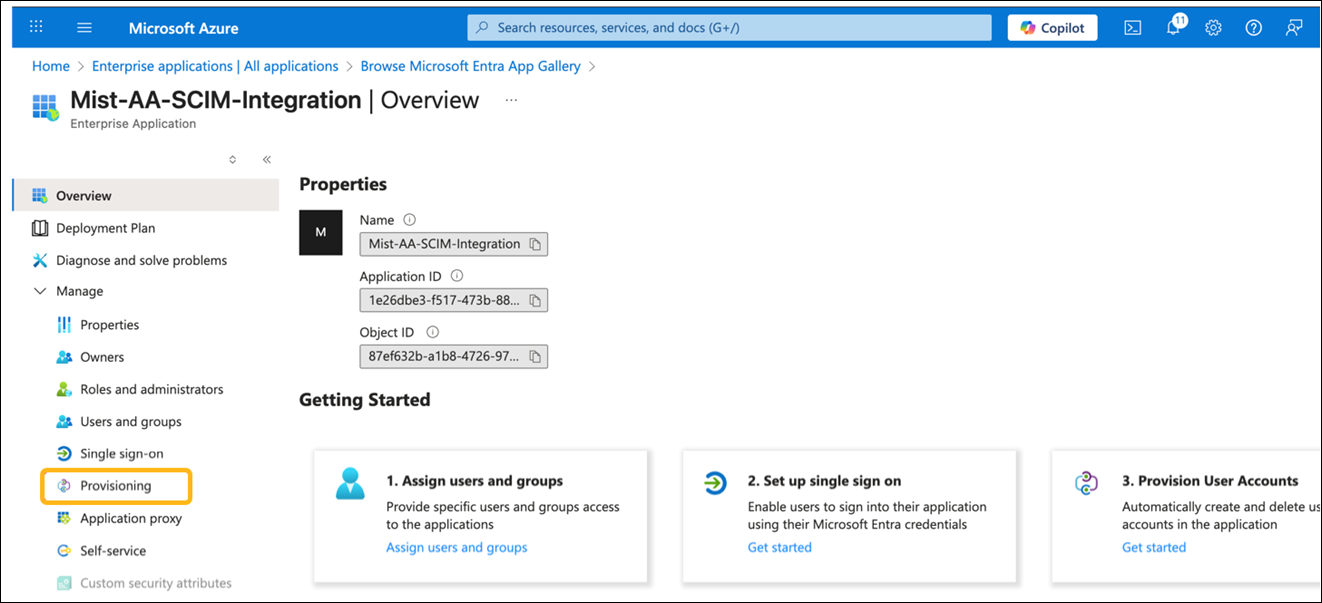
    Microsoft Azure portal interface for managing the Mist-AA-SCIM-Integration enterprise application, showing overview details, navigation menu, and provisioning highlighted.
    Microsoft Azure portal screenshot showing Mist-AA-SCIM-Integration provisioning overview with options to configure, manage, and start provisioning in preview mode.
  4. Mist Access Assurance IdP設定から以下の詳細を入力します。
    • テナントURL—SCIMベースURL

    • シークレットトークン—SCIM認証トークン

    接続 のテストをクリックし 、テストが成功したことを確認します。次に、「 作成」をクリックします。
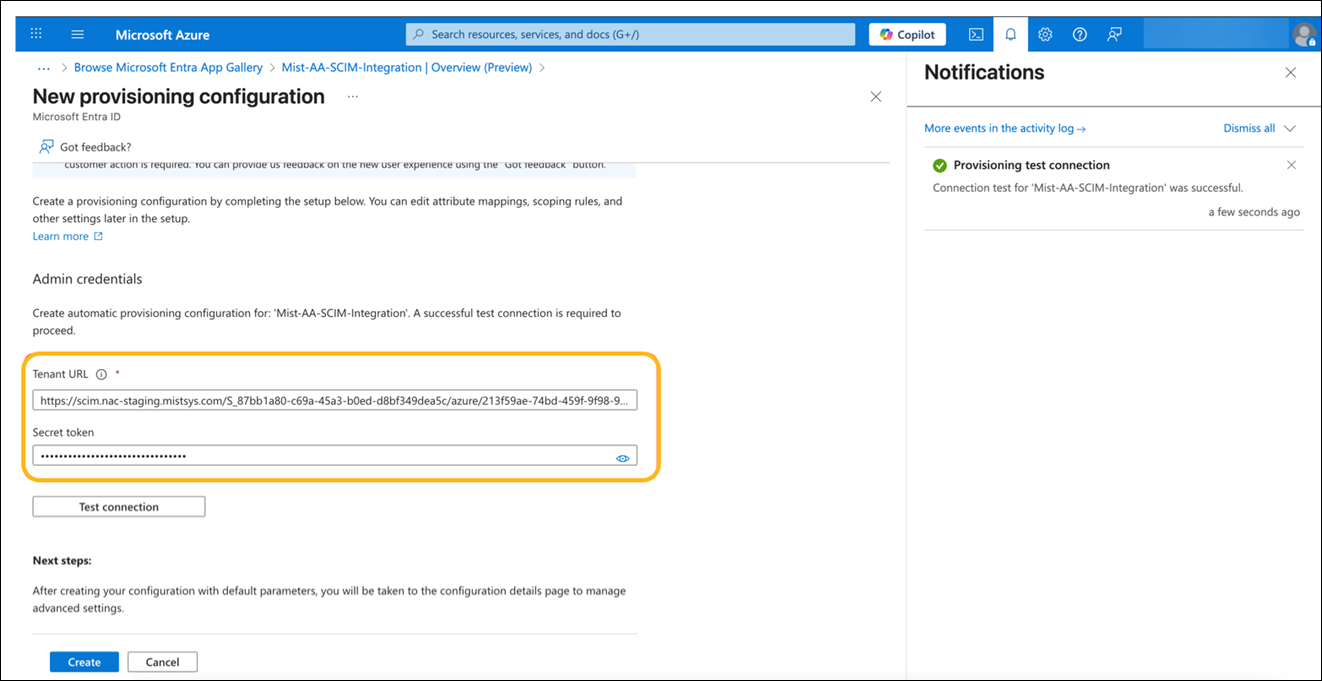
    Microsoft Azure interface for setting up provisioning configuration with fields for Tenant URL and Secret token. Notification indicates successful test connection for Mist-AA-SCIM-Integration. Options to test connection, create, or cancel configuration.

  5. 管理で ユーザーとグループ を選択し、 ユーザー/グループを追加 をクリックして、プロビジョニングするグループを割り当てます。
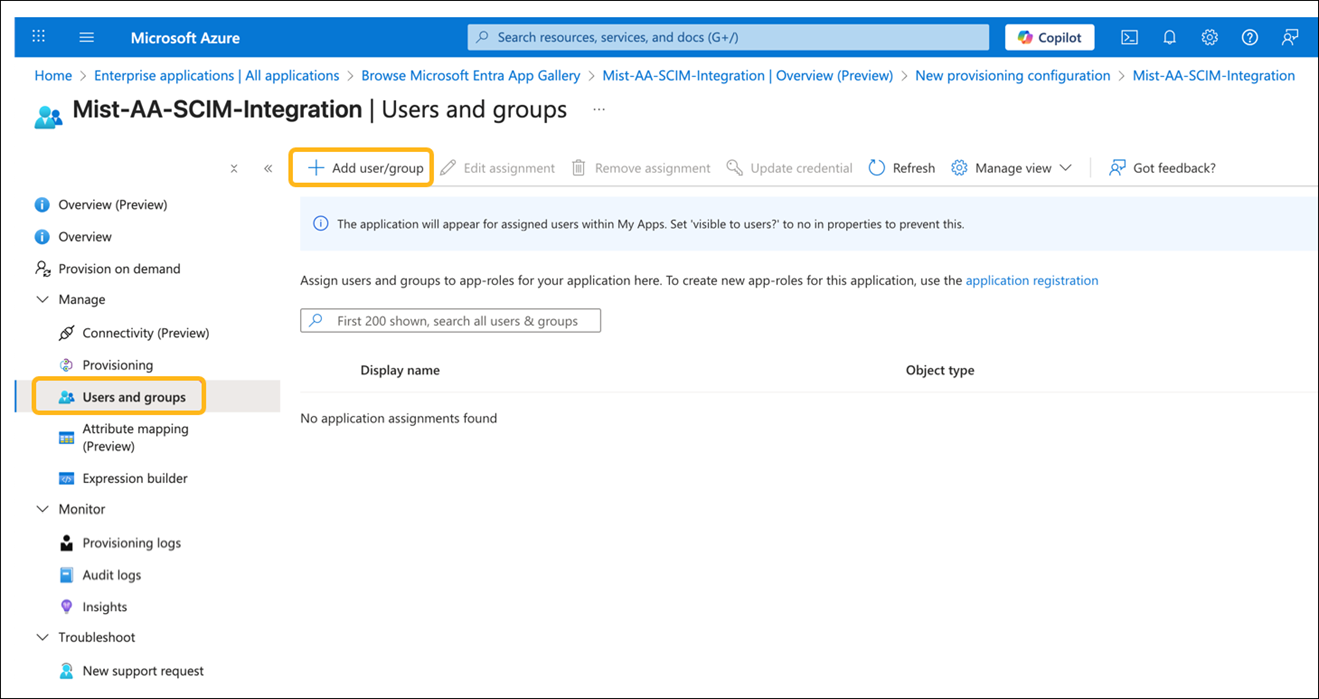
    Azure portal Users and groups section for Mist-AA-SCIM-Integration application, showing navigation path, no assignments found in the table, and Add user/group button highlighted.
  6. Mist Access Assuranceクラウドでプロビジョニングする必要があるグループを追加します。
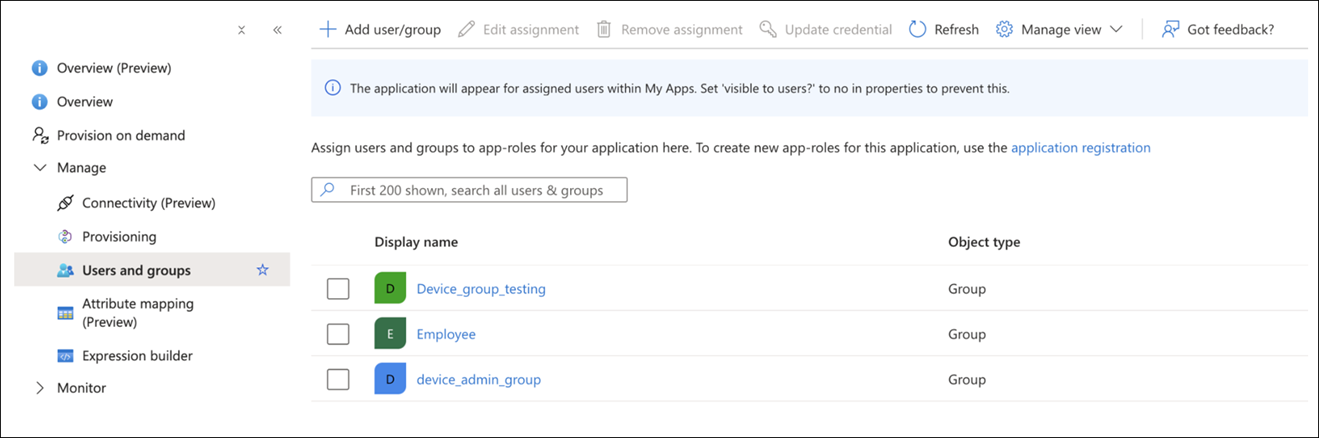
    Users and groups section in Azure AD portal showing provisioning settings for an application with three listed groups: Device_group_testing, Employee, and device_admin_group.
  7. プロビジョニングを開始をクリックします。
    注:Microsoft Entra ID のプロビジョニング間隔は約 40 分です。プロビジョニングステータスを確認するには、次の同期サイクルを待つ必要があります。
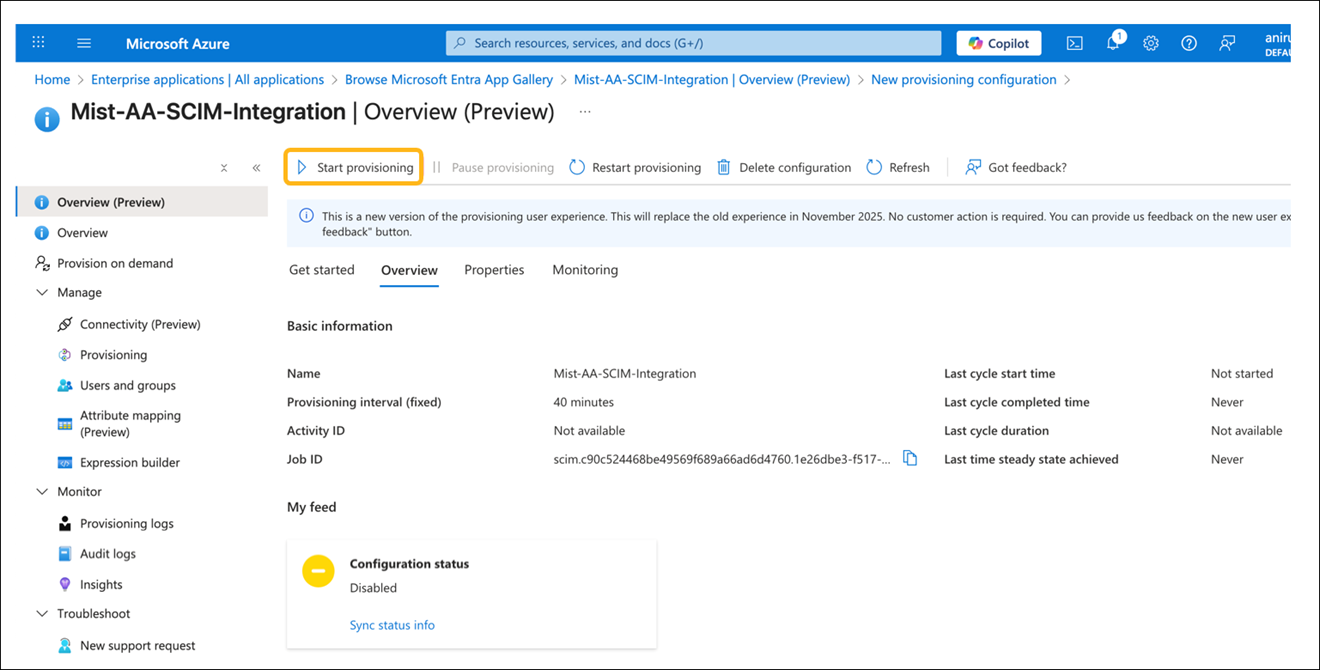
    Microsoft Azure portal screenshot showing the provisioning overview page for Mist-AA-SCIM-Integration, with navigation options, highlighted Start provisioning button, and basic information including name, provisioning interval, and configuration status.
  8. 40分のプロビジョニング間隔が経過した後、プロビジョニングステータスがEntra IDに「完了」と表示されていることを確認します。これで、Entra IDを使用したSCIMプロビジョニングの設定が完了しました。
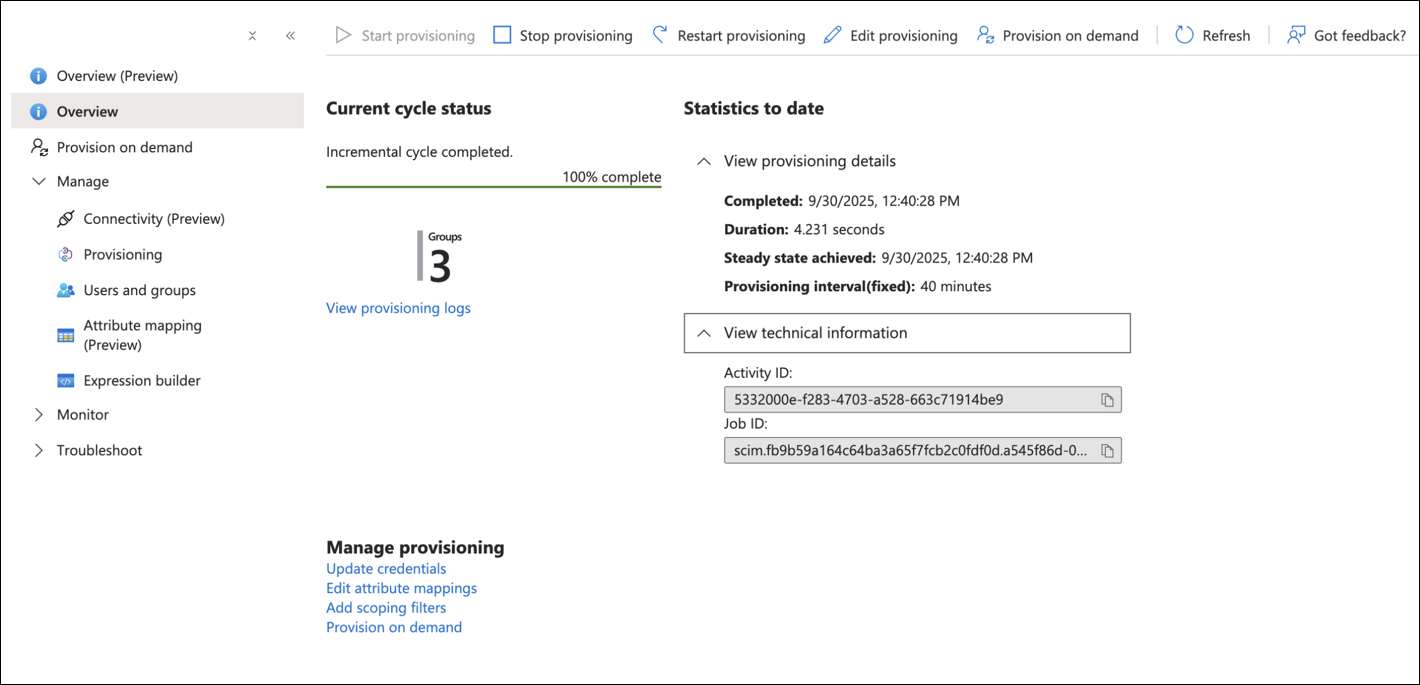
    Provisioning dashboard showing current cycle status as 100 percent complete with 3 groups provisioned, completion time 9/30/2025, and duration 4.231 seconds.

SCIMとOktaの統合方法

SCIMとOktaを統合するには:
注:

このトピックに含まれるスクリーンショットの一部は、サードパーティ製アプリケーションから取得したものです。これらのスクリーンショットは時間の経過とともに変更される可能性があり、アプリケーションの現在のバージョンと必ずしも一致するとは限らないことに注意してください。

  1. Okta管理コンソールにログインし、[ アプリケーション]>アプリ統合の作成に移動します。
  2. サインイン方法をSWA - Secure Web認証として選択し、次へをクリックします。
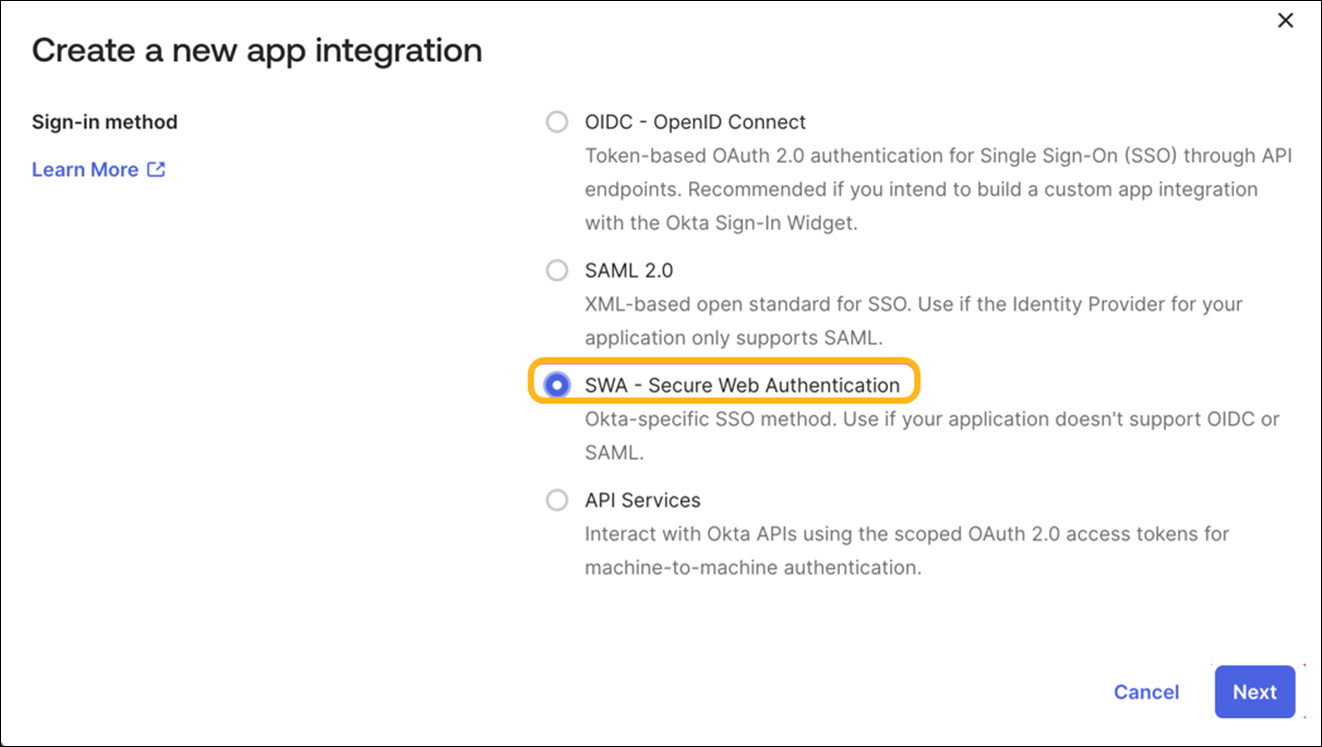
    User interface for selecting a sign-in method in app integration setup. SWA option is selected. Buttons: Learn More, Cancel, Next.
  3. アプリケーションの名前を入力し、アプリのログインページのURLを指定します。アプリの可視性とアプリのタイプを選択し、 完了をクリックします。
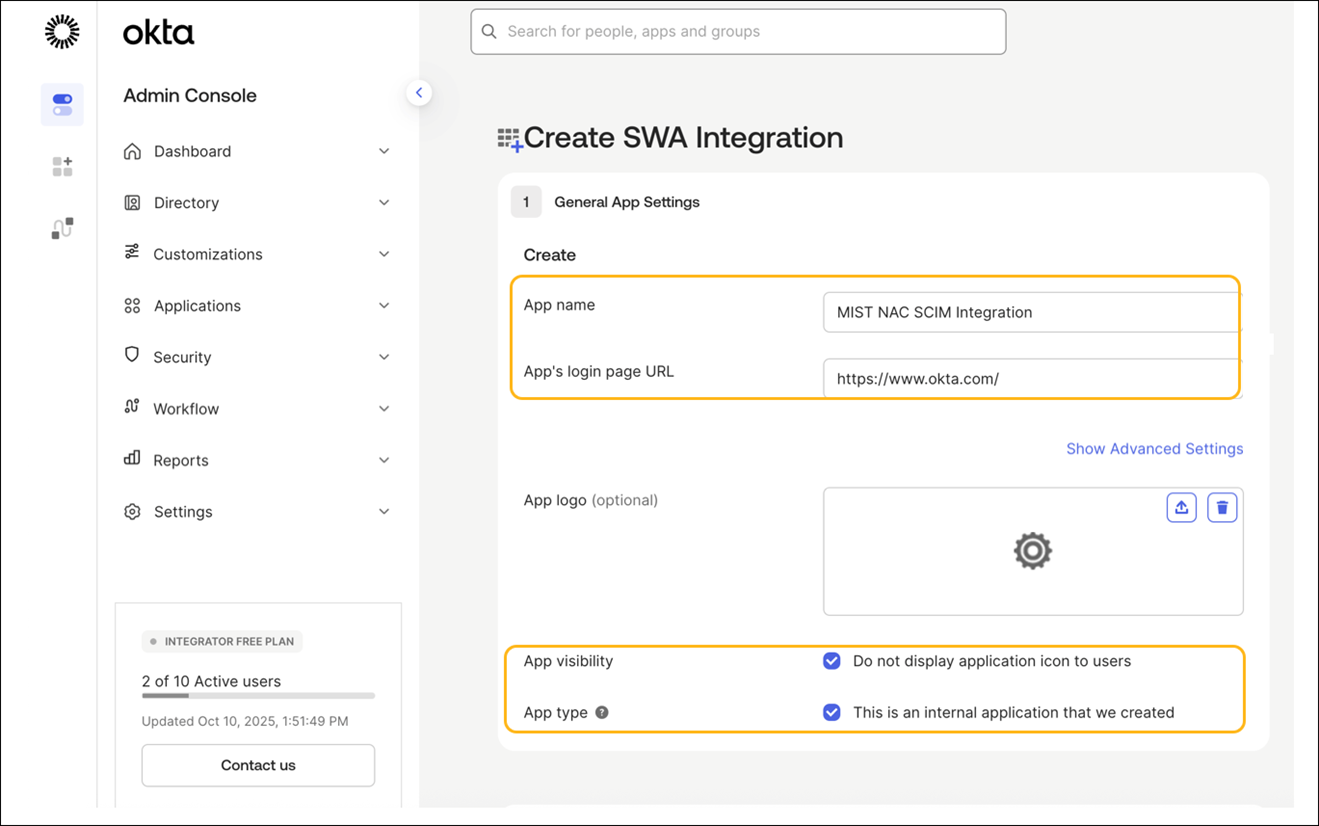
    Okta Admin Console page for creating a Secure Web Authentication Integration, showing app settings like name, login URL, logo upload, visibility, and app type options.
  4. 一般タブに切り替えて、 設定の編集をクリックします。プロビジョニングタイプを SCIM に設定し、 保存をクリックします。
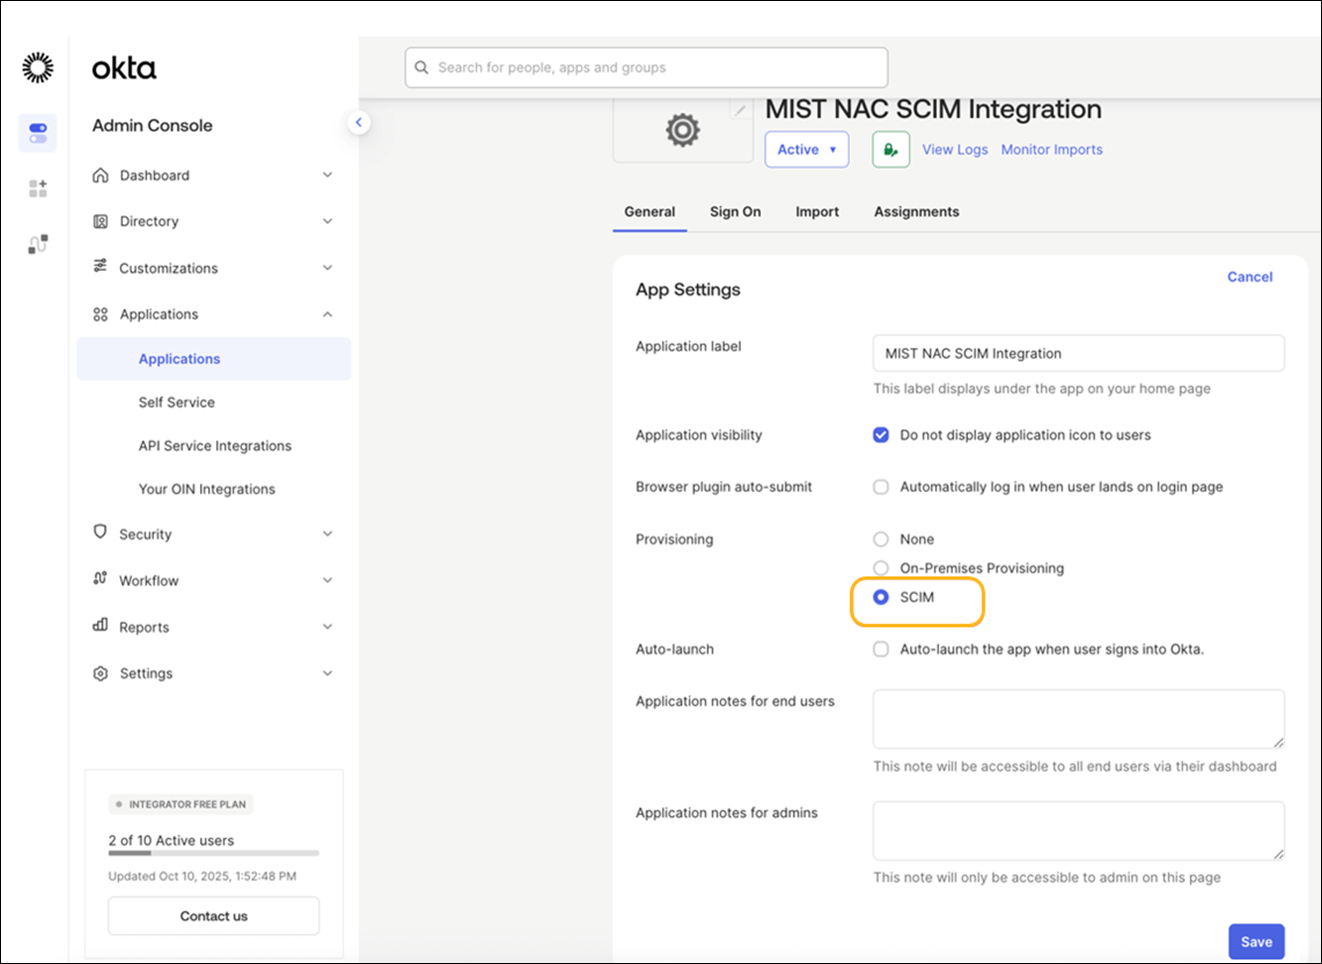
    Okta Admin Console configuration page for MIST NAC SCIM Integration under Applications section. Settings include application label, visibility, provisioning SCIM highlighted, auto-launch, and notes fields. Navigation menu lists Dashboard, Directory, Customizations, Applications, Security, Workflow, Reports, and Settings. Bottom shows Integrator Free Plan with 2 of 10 active users and last update timestamp. Save button visible for changes.
  5. プロビジョニングタブで、次の操作を行います。
    1. 以下の詳細を入力します。

      • SCIMコネクターベースURL—IdP設定からのSCIMベースURL
      • ユーザーの一意の識別子フィールド—userName
      • 認証モード—HTTPヘッダー
      • 認可—IdP設定からのSCIM認証トークン

    2. 新しいユーザーのプッシュ、プロファイルの更新のプッシュ、グループのプッシュチェックボックスを有効にします。
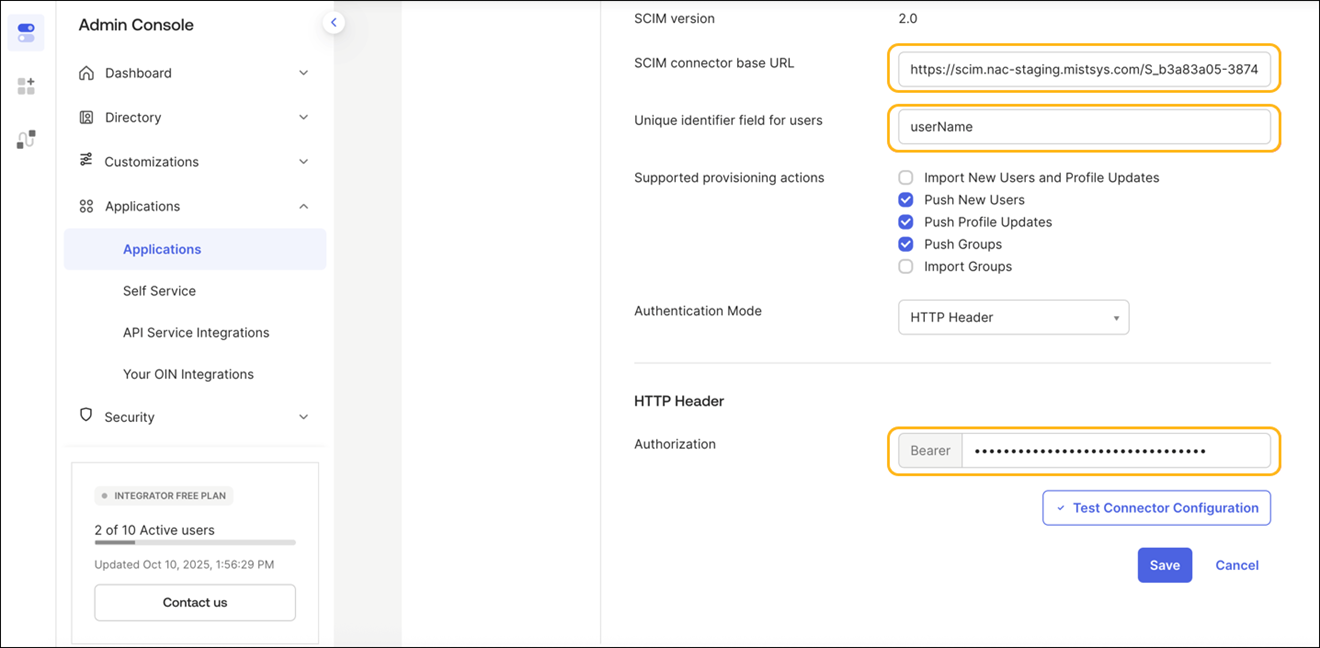
      Admin Console Applications section showing SCIM connector configuration with base URL, userName as unique identifier, provisioning actions, HTTP header authentication, test configuration button, and save or cancel options.

    3. コネクタ 設定のテストをクリックします。成功メッセージが表示されたら、[ 保存]をクリックします。
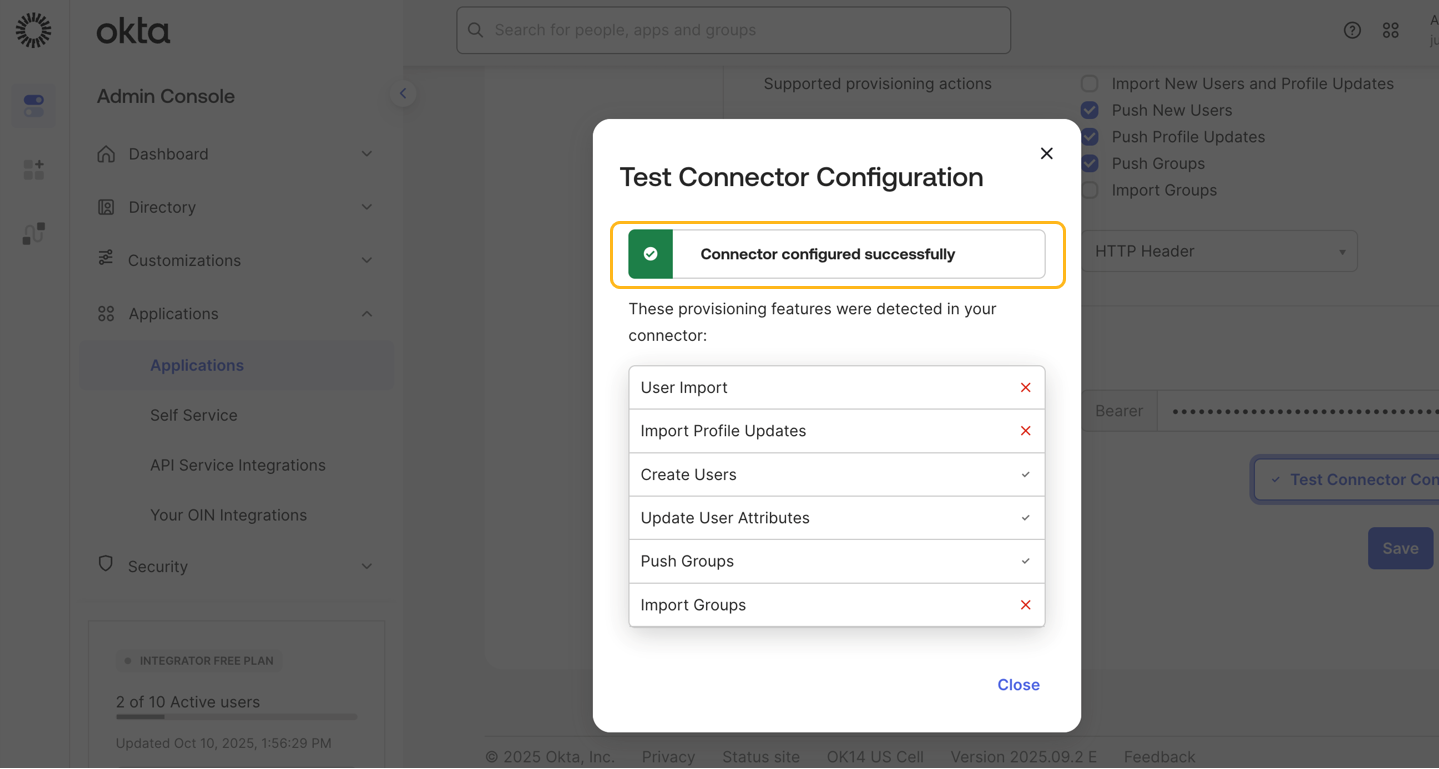
      Test Connector Configuration dialog in Okta Admin Console showing Connector configured successfully with a green checkmark. Lists provisioning features with checkmarks for enabled features and red Xs for unsupported ones.

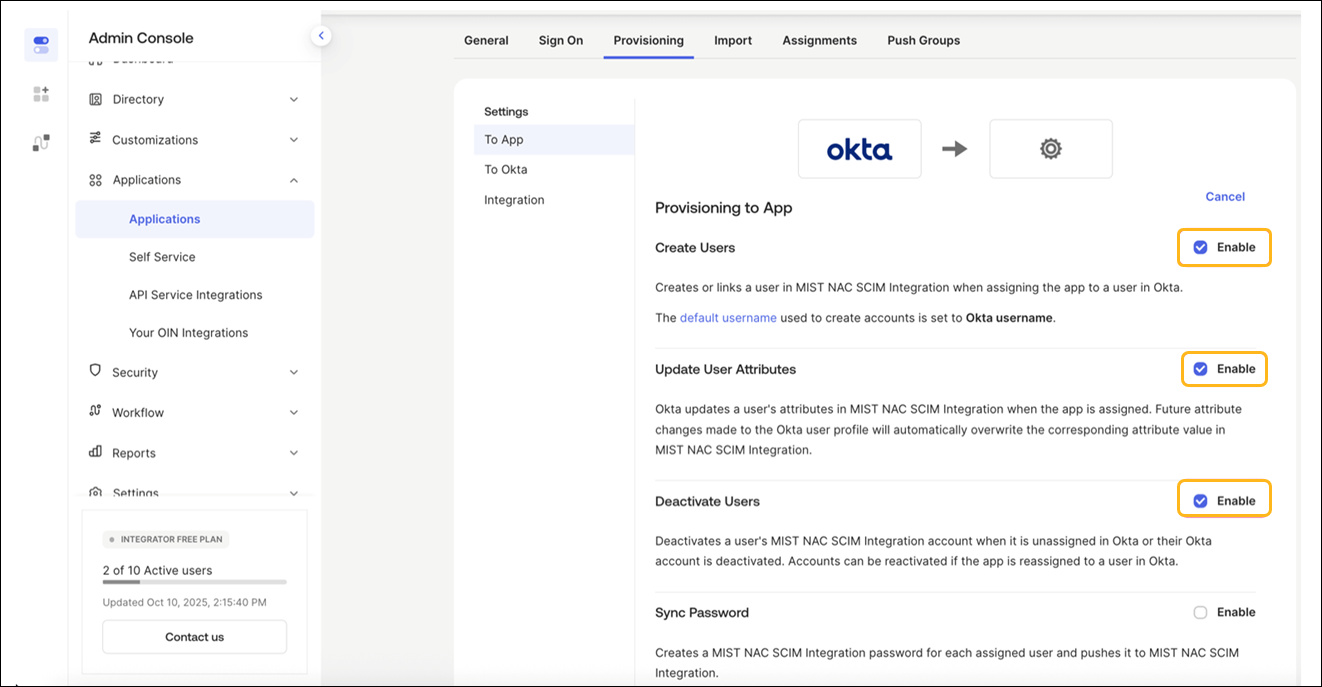
  6. プロビジョニング設定タブで、最初の3つのプロビジョニングオプションを有効にし、保存をクリックします。
    • ユーザーの作成

    • ユーザー属性の更新

    • ユーザーの非アクティブ化

    Admin Console showing provisioning settings for an Okta-integrated app. Create Users, Update User Attributes, and Deactivate Users are enabled, Sync Password is not enabled. Integrator Free Plan with 2 of 10 active users displayed.

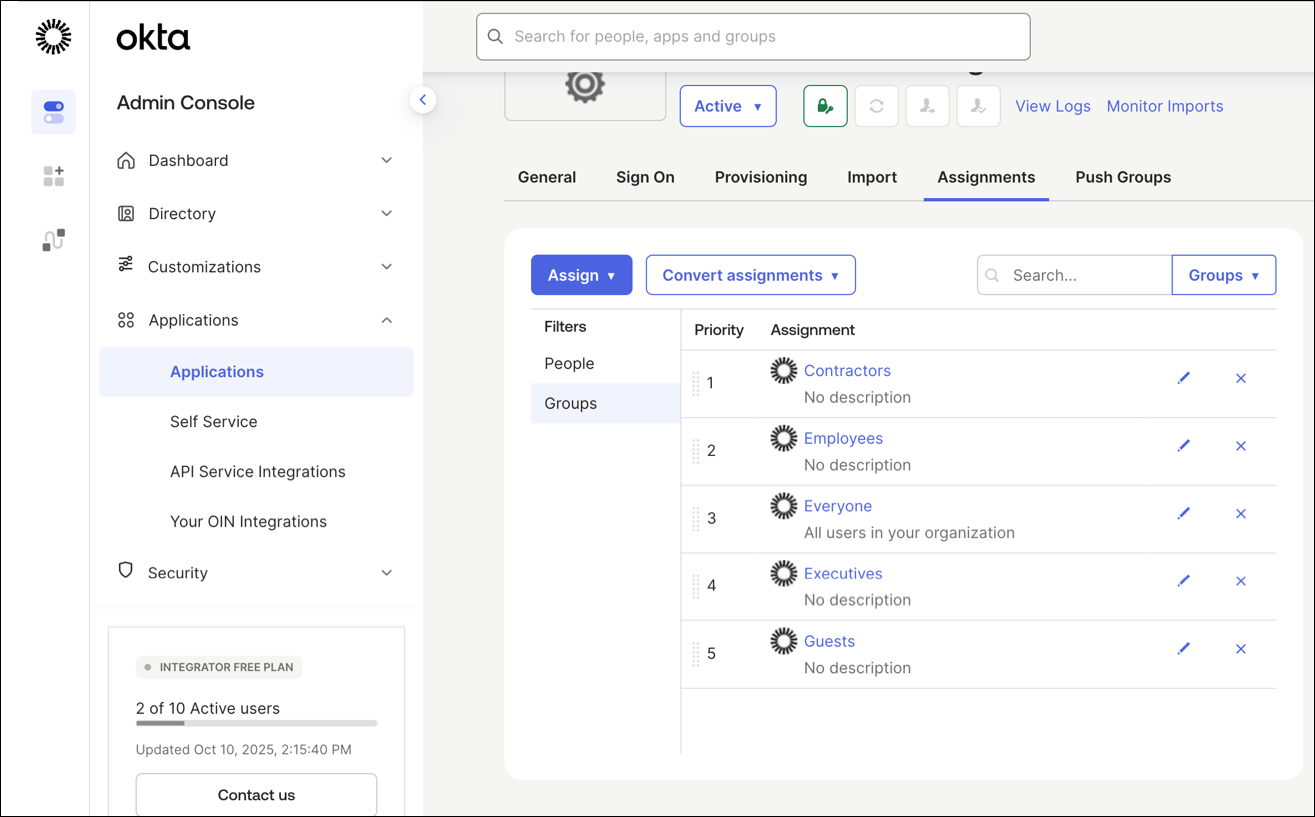
  7. 割り当てタブを選択し、グループに割り当て>割り当てを選択します。Mist Access Assuranceでプロビジョニングする必要があるグループを選択して割り当てます。
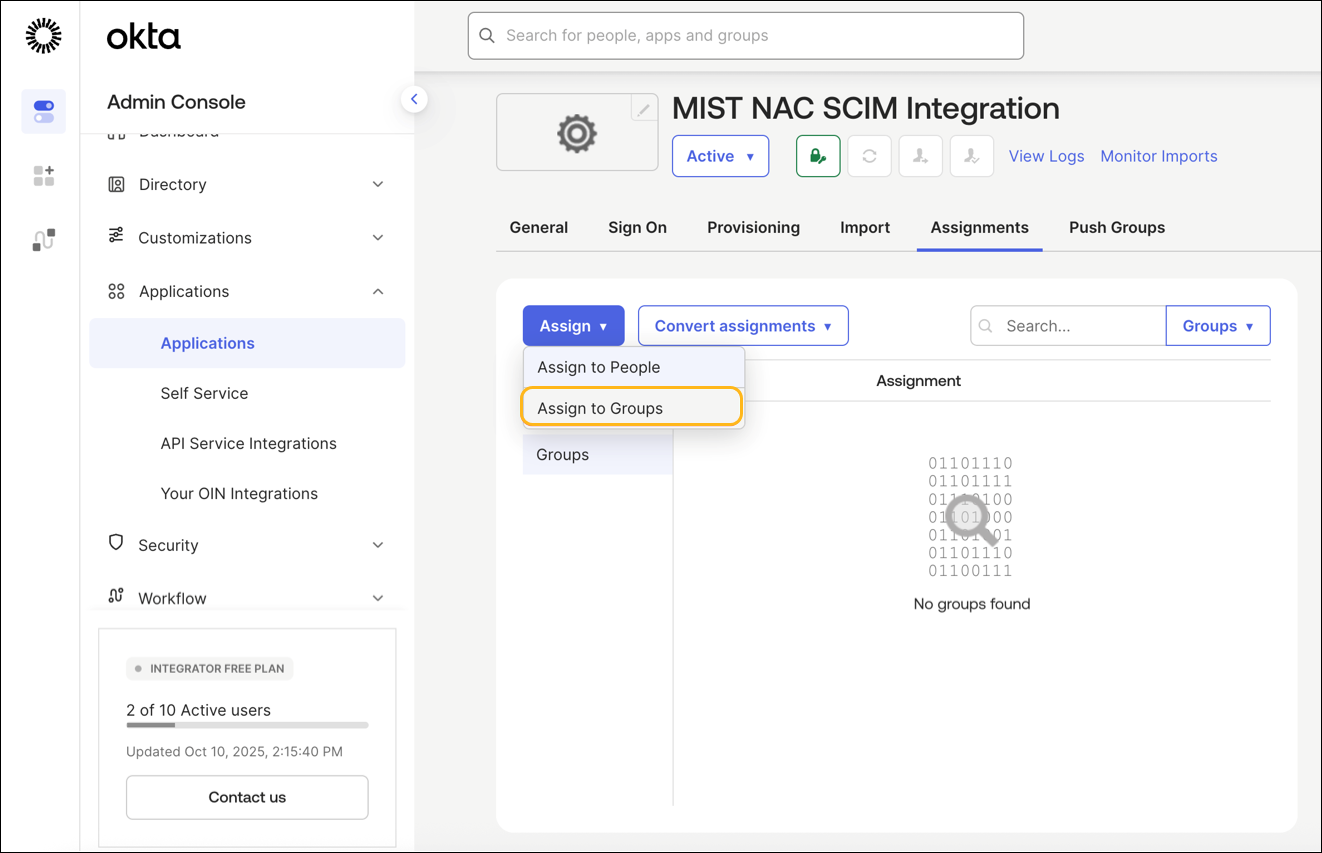
    Okta Admin Console showing the Assignments tab of MIST NAC SCIM Integration application, with Assign dropdown open to assign to people or groups.
    Okta Admin Console interface showing the Applications section, Assignments tab, with a list of groups like Contractors, Employees, and Guests, and options to assign or delete groups.
  8. 「プッシュグループ」タブに移動し、「プッシュグループ」>「名前でグループを検索」をクリックします。プロビジョニングに必要なすべてのグループをプッシュします。
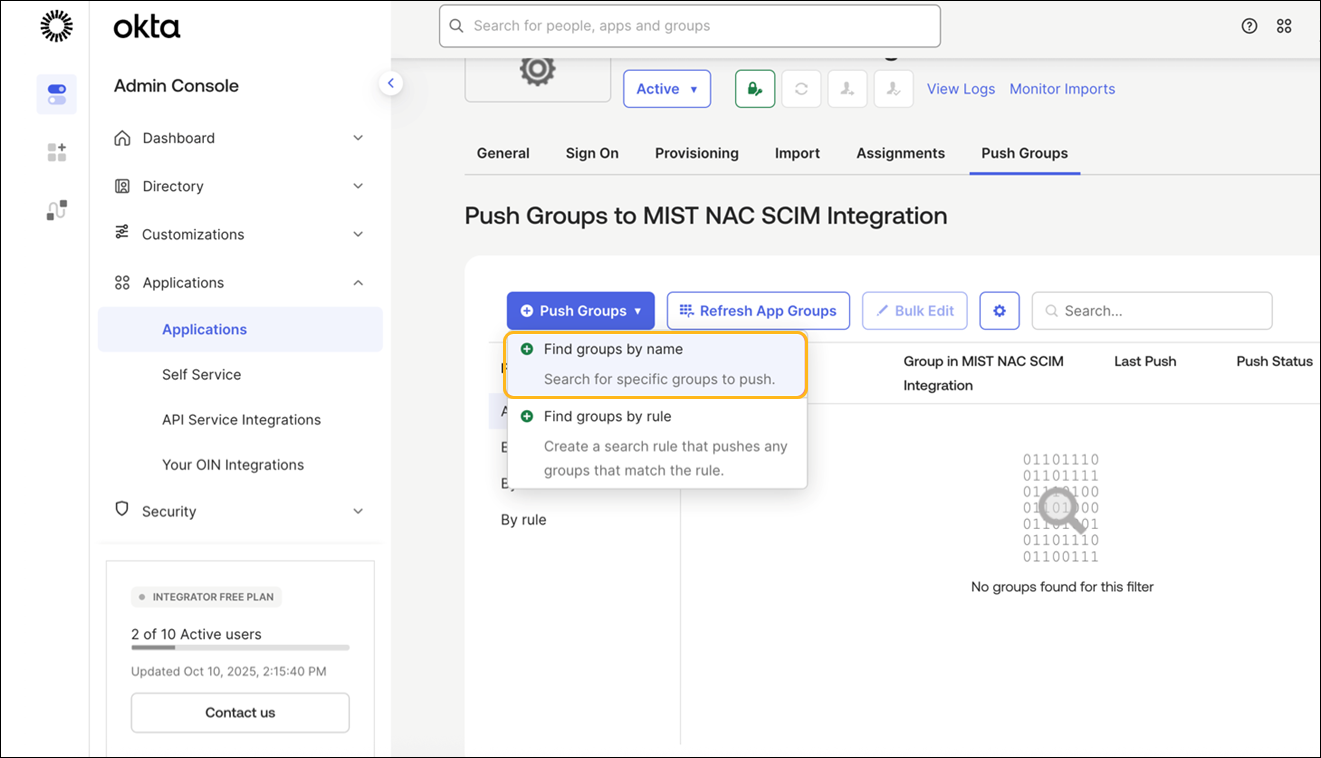
    Okta Admin Console interface showing Push Groups section under Applications, with options to find groups by name or rule, refresh app groups, bulk edit, and a table for group synchronization with MIST NAC SCIM integration.

    プッシュステータスがアクティブと表示されていることを確認します。これで、Okta IdPを使用したSCIMプロビジョニングの設定が完了しました。
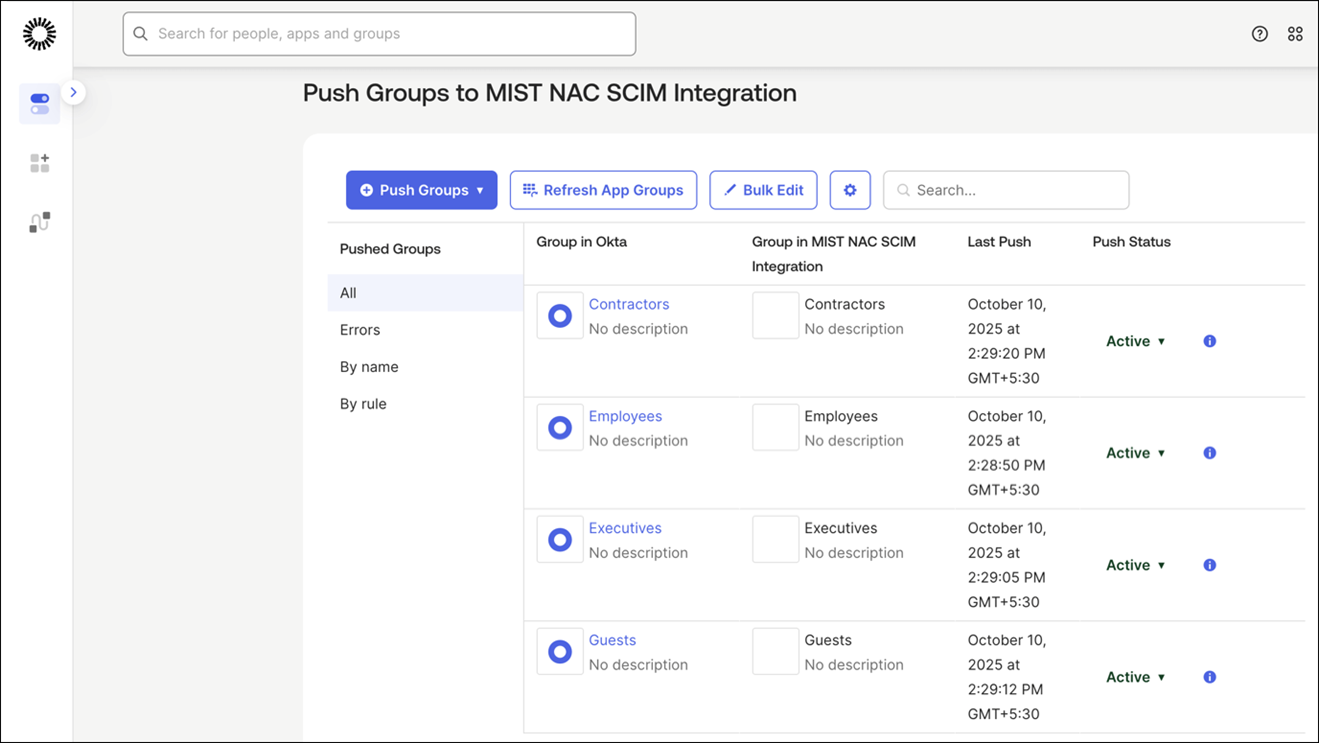
    Push Groups to MIST NAC SCIM Integration interface showing group synchronization tools, including Push Groups button, search bar, group list with sync status, and last push details.

クライアント接続と検証

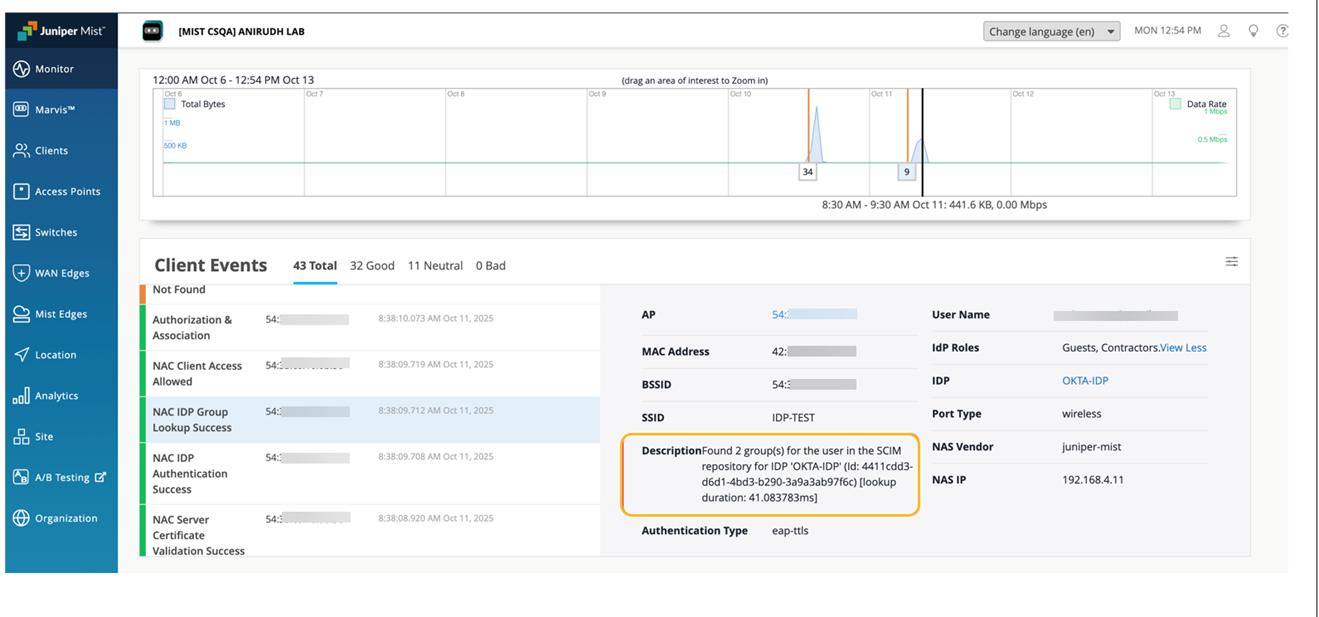
クライアントが接続されると、Mistポータルの[Insights]ページにクライアントイベントが表示されます。次の例では、EAP-TLSとEAP-TTLSの両方の認証方法を使用してクライアントが接続されました。いずれの場合も、認証(つまり、ユーザーグループの取得とマッピング)は、Mist Access Assurance SCIMデータベースを介して実行されました。この動作は、グループ情報のソースがSCIMリポジトリとして表示されているイベントの説明で確認できます。

例1:EAP-TLS認証を使用して接続されたクライアント
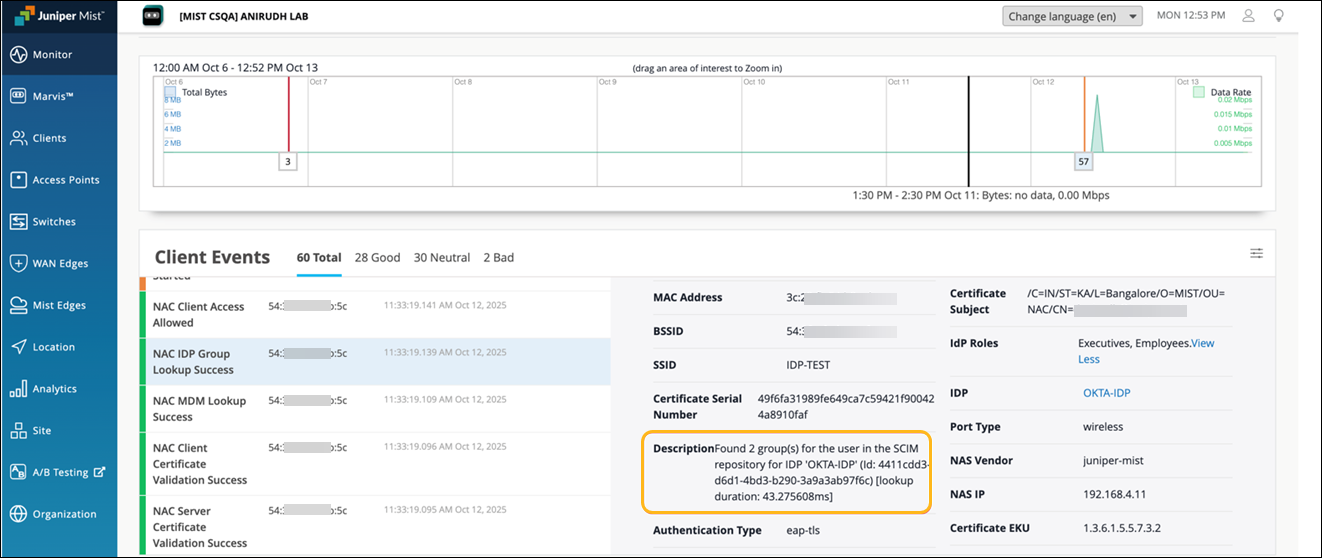
Screenshot of Juniper Mist network interface showing client events, network activity, and authentication details, including timeline graph, navigation menu, and detailed event data such as MAC address and authentication type.

例2:EAP-TTLS認証を使用して接続されたクライアント

Network management dashboard showing client events and network activity, including data usage graph, navigation menu, event list with statuses, and detailed authentication info.