Help us improve your experience.

Let us know what you think.

Do you have time for a two-minute survey?


JAMF管理対象デバイス向けのオンボードCAおよびSCEP統合

ジュニパーのオンボードCA設定 Mist Access Assuranceは、JAMFと直接統合してクライアント証明書の自動配布を行うクラウドネイティブのSCEPサービスを提供します。これにより、外部PKIが不要になり、EAP-TLS認証によりセキュアなWi-Fiオンボーディングが簡素化されます。

ジュニパー Mist Access Assuranceは、オンボード認証機関(CA)構成を提供し、フルマネージドのSCEP(簡易証明書登録プロトコル)インフラストラクチャを提供します。オンボード CA を有効にすると、Access アシュアランスは、Jamf SCEP URL、Jamf アクセストークン、Jamf Webhook URL など、シームレスな JAMF 統合に必要なすべての要素を自動的にプロビジョニングします。これらの値だけで、外部のPKIやオンプレミスのSCEPサービスを導入または保守することなく、JAMFをジュニパー Mist Access Assuranceと統合できます。Access アシュアランスが提供するオンボードCA証明書を使用して、JAMF内でSCEPプロファイルを設定し、登録済みデバイスへのセキュアなクライアント証明書の発行を可能にします。

Access アシュアランス SCEP インフラストラクチャを活用することで、JAMF が管理するエンドポイントへのクライアント証明書の配布を自動化し、EAP-TLS 認証用に Wi-Fi プロファイルにバインドできます。この機能により、ネットワークに接続するすべてのデバイスが、ジュニパー Mist Access Assurance クラウドから完全に管理されたまま、強力な証明書ベースの信頼を通じて認証されます。

注:デバイスが非アクティブまたはJAMFで削除されたとマークされた場合、ジュニパー Mistポータルからクライアント証明書を手動で取り消す必要があります。

JAMFがクライアント証明書配布のSCEPインフラストラクチャとしてジュニパー Mist Access Assuranceを活用できるようにするには、次の手順に従います。

オンボード CA 設定を有効にする

オンボード CA 設定を有効にするには:

  1. ジュニパー Mistポータルの左側のメニューから、組織>アクセス>証明書を選択します。

    認証局ページが表示されます。

  2. ページの右上隅にある設定アイコンをクリックし、オン ボードCA設定を選択します。
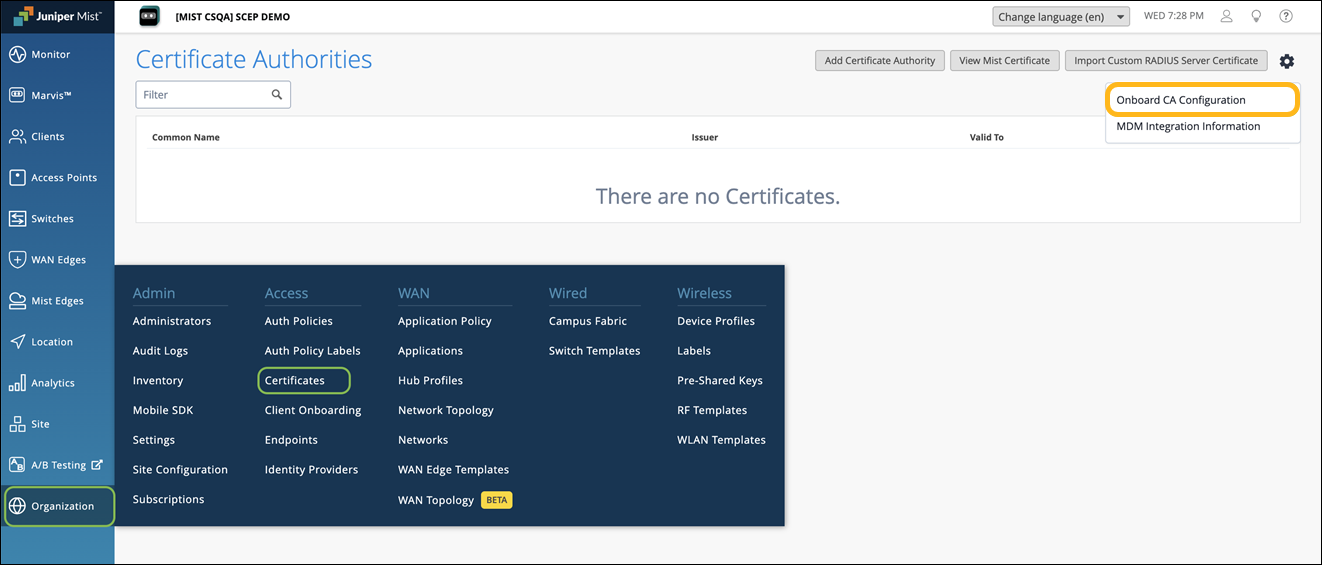
    Juniper Mist dashboard showing Certificate Authorities section with options to add, view, or import certificates, and a table stating no certificates available.

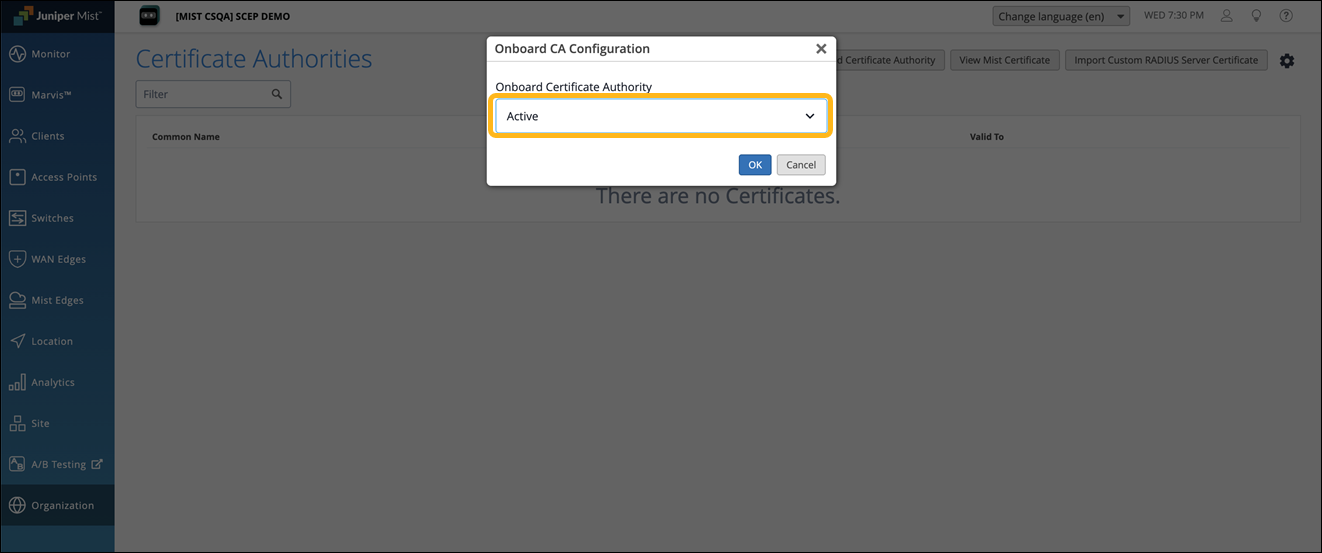
  3. アクティブを選択し、OKをクリックします。

    Juniper Mist platform interface with Onboard CA Configuration pop-up set to Active and no certificates listed.

    オンボード認証機関サービスが有効になり、MDMごとにそれぞれのSCEPエンドポイントが生成されます。

    オンボード CA 設定がアクティブになると、次のタブが表示されます。

    • 外部—外部CAの詳細を表示します。

    • 内部—NACポータルまたはMDMを介して組み込みのCAによって発行されたクライアント証明書の詳細を表示します。

  4. ページの右上隅にある設定アイコンをもう一度クリックし、 MDM統合情報を選択します。
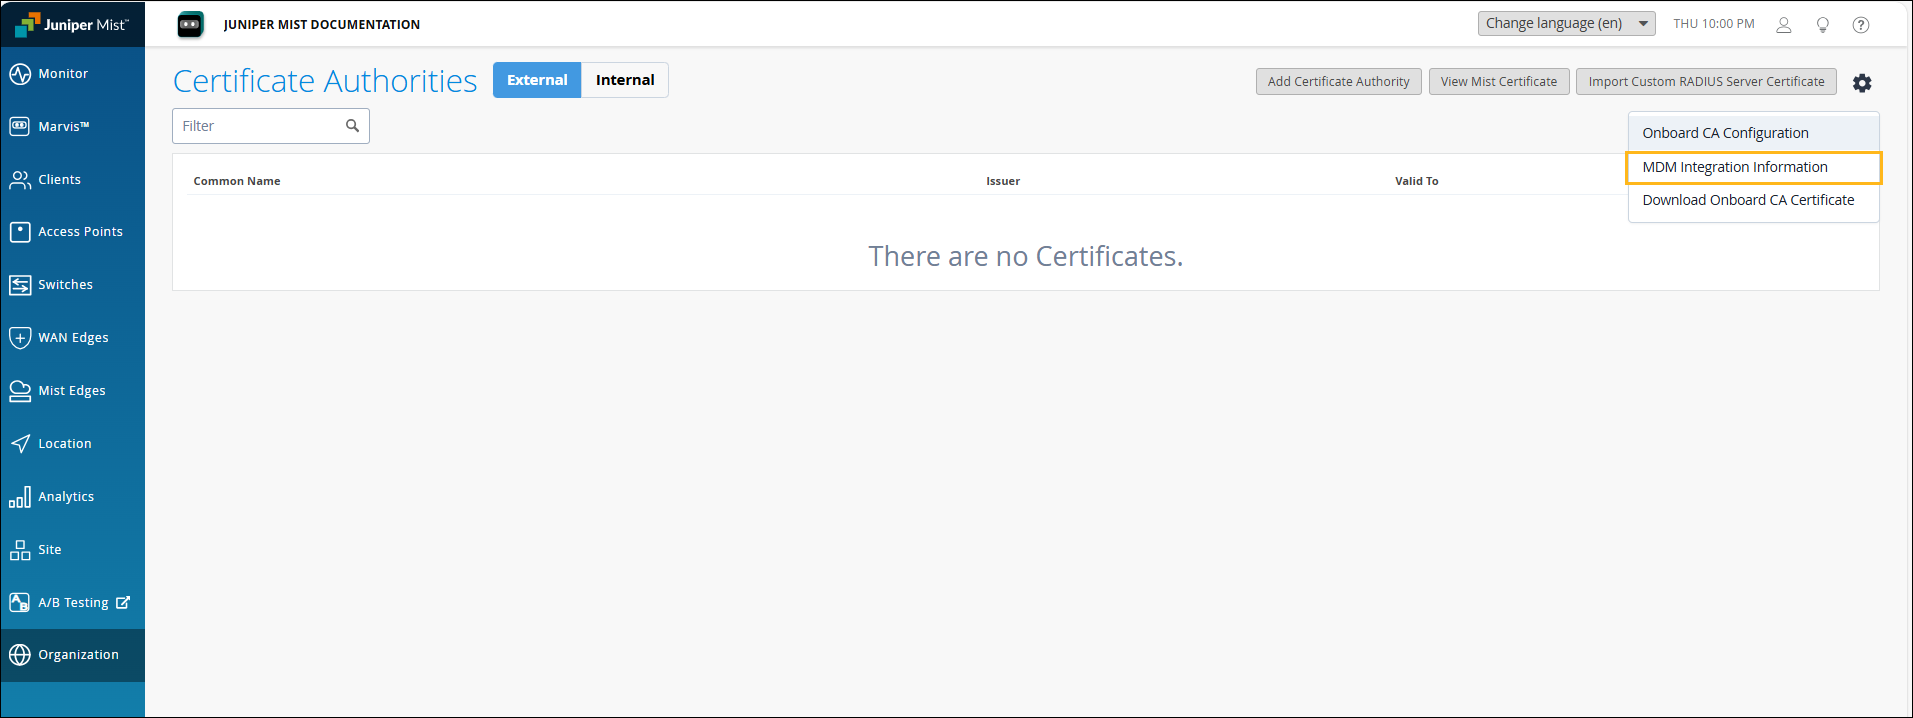
    Certificate Authorities section of the Juniper Mist dashboard showing no certificates listed, with options to add or import certificates and navigate tabs for External and Internal authorities.

  5. JAMFアクセストークン、JAMF Webhook URL、およびJAMF SCEP URLをコピーします。このURLをJAMF SCEPプロファイルで使用する必要があります。
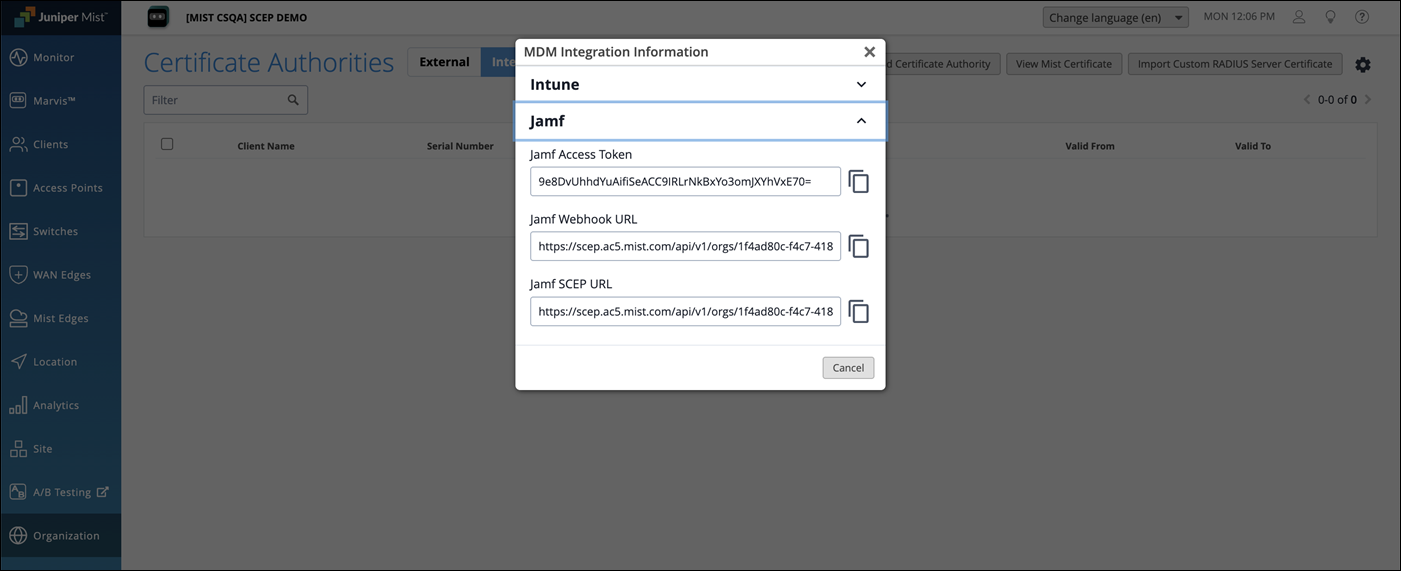
    Screenshot of Juniper Mist interface managing Certificate Authorities, with MDM Integration Information pop-up displaying Jamf integration fields for access token, webhook URL, and SCEP URL.

オンボードCAおよびMist組織のCA証明書をダウンロードします

Mist Org CA 証明書は、JAMF マネージドクライアントが Mist Access Assurance サービスの RADIUS サーバー証明書を信頼するように設定するために必要です。オンボード CA 証明書は、JAMF で SCEP プロファイルを設定するために必要です。

  1. 証明書ページの右上隅にある設定アイコンをクリックし、 オンボードCA証明書のダウンロードを選択します。この証明書は、JamfのSCEP証明書として使用されます。
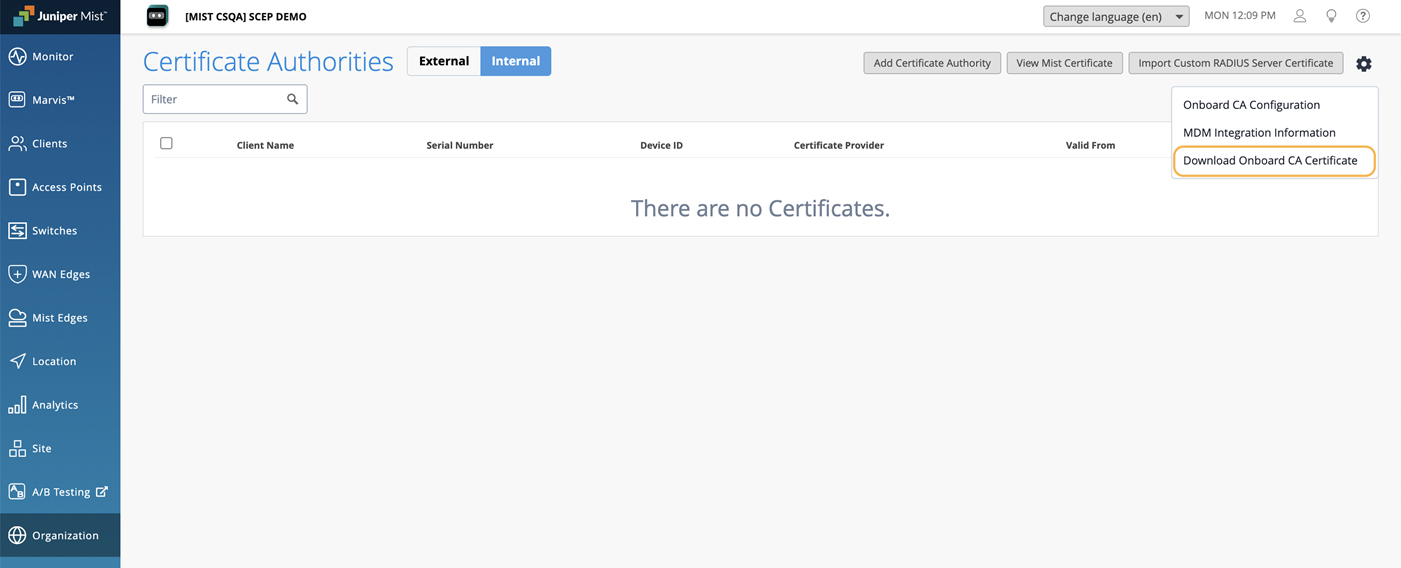
    Juniper Mist platform interface showing Certificate Authorities section with Internal tab selected, no certificates listed, and actions for adding or managing certificates.

  2. Organization>Access>Certificatesに移動します。Mist証明書を表示をクリックし、ダウンロードをクリックします。この証明書は、Jamf のルート証明書として使用されます。
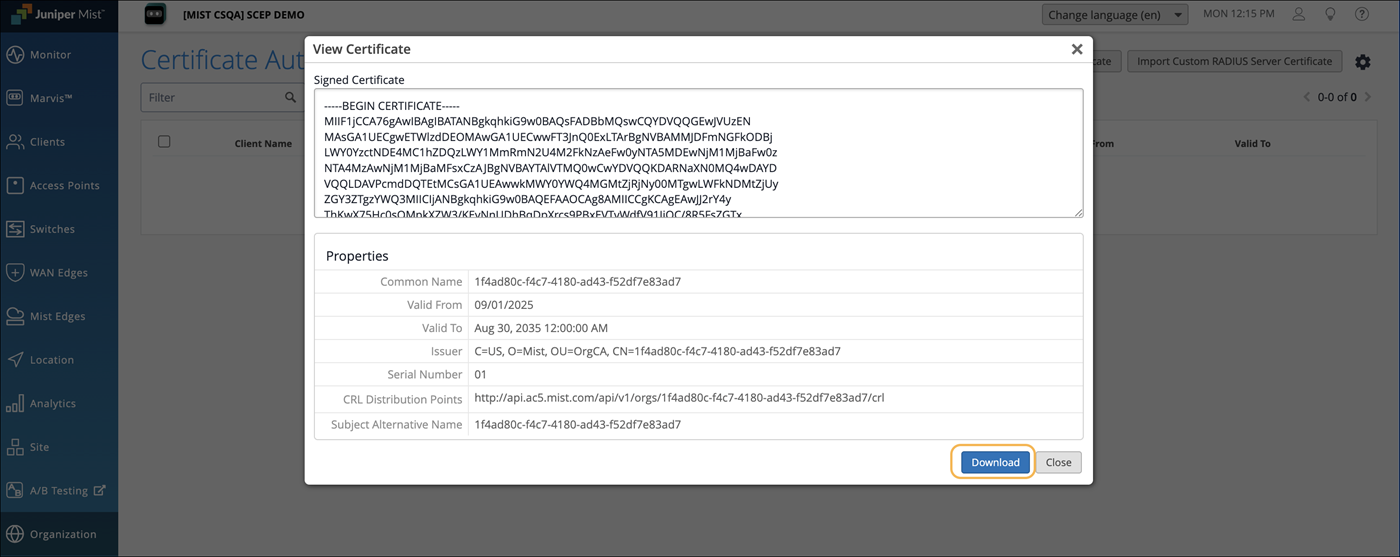
    Certificate management interface showing a View Certificate window with PEM-format certificate data, properties like Common Name, validity dates, issuer, and a download button. Navigation menu on the left includes options like Monitor and Clients. Branding suggests Juniper Mist system.

    注:カスタムRADIUSサーバー証明書を使用している場合、Mist組織CA証明書は必要ありません。カスタム RADIUS サーバー証明書発行者のルート CA 証明書が必要です。

JAMF Webhookを設定する

証明書登録リクエストごとに動的に生成されたSCEPチャレンジを受信するように、JAMF Webhookを設定する必要があります。

注:

サードパーティ製アプリケーションのスクリーンショットは、公開時点のものです。スクリーンショットがいつ、または将来正確になるかを知る方法はありません。これらの画面の変更や関連するワークフローのガイダンスについては、サードパーティーのWebサイトを参照してください。

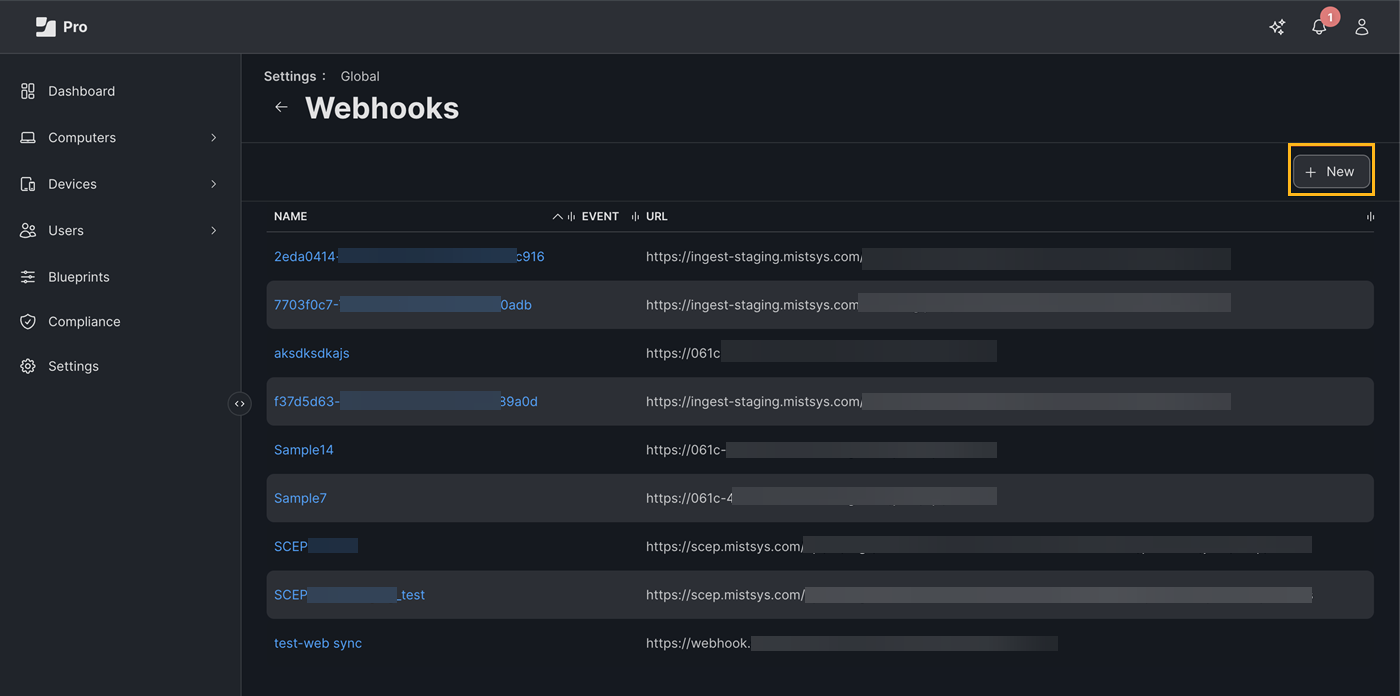
  1. JAMF Pro ダッシュボードで、[ 設定]>[Webhooks] に移動し、[ 新規] をクリックします。
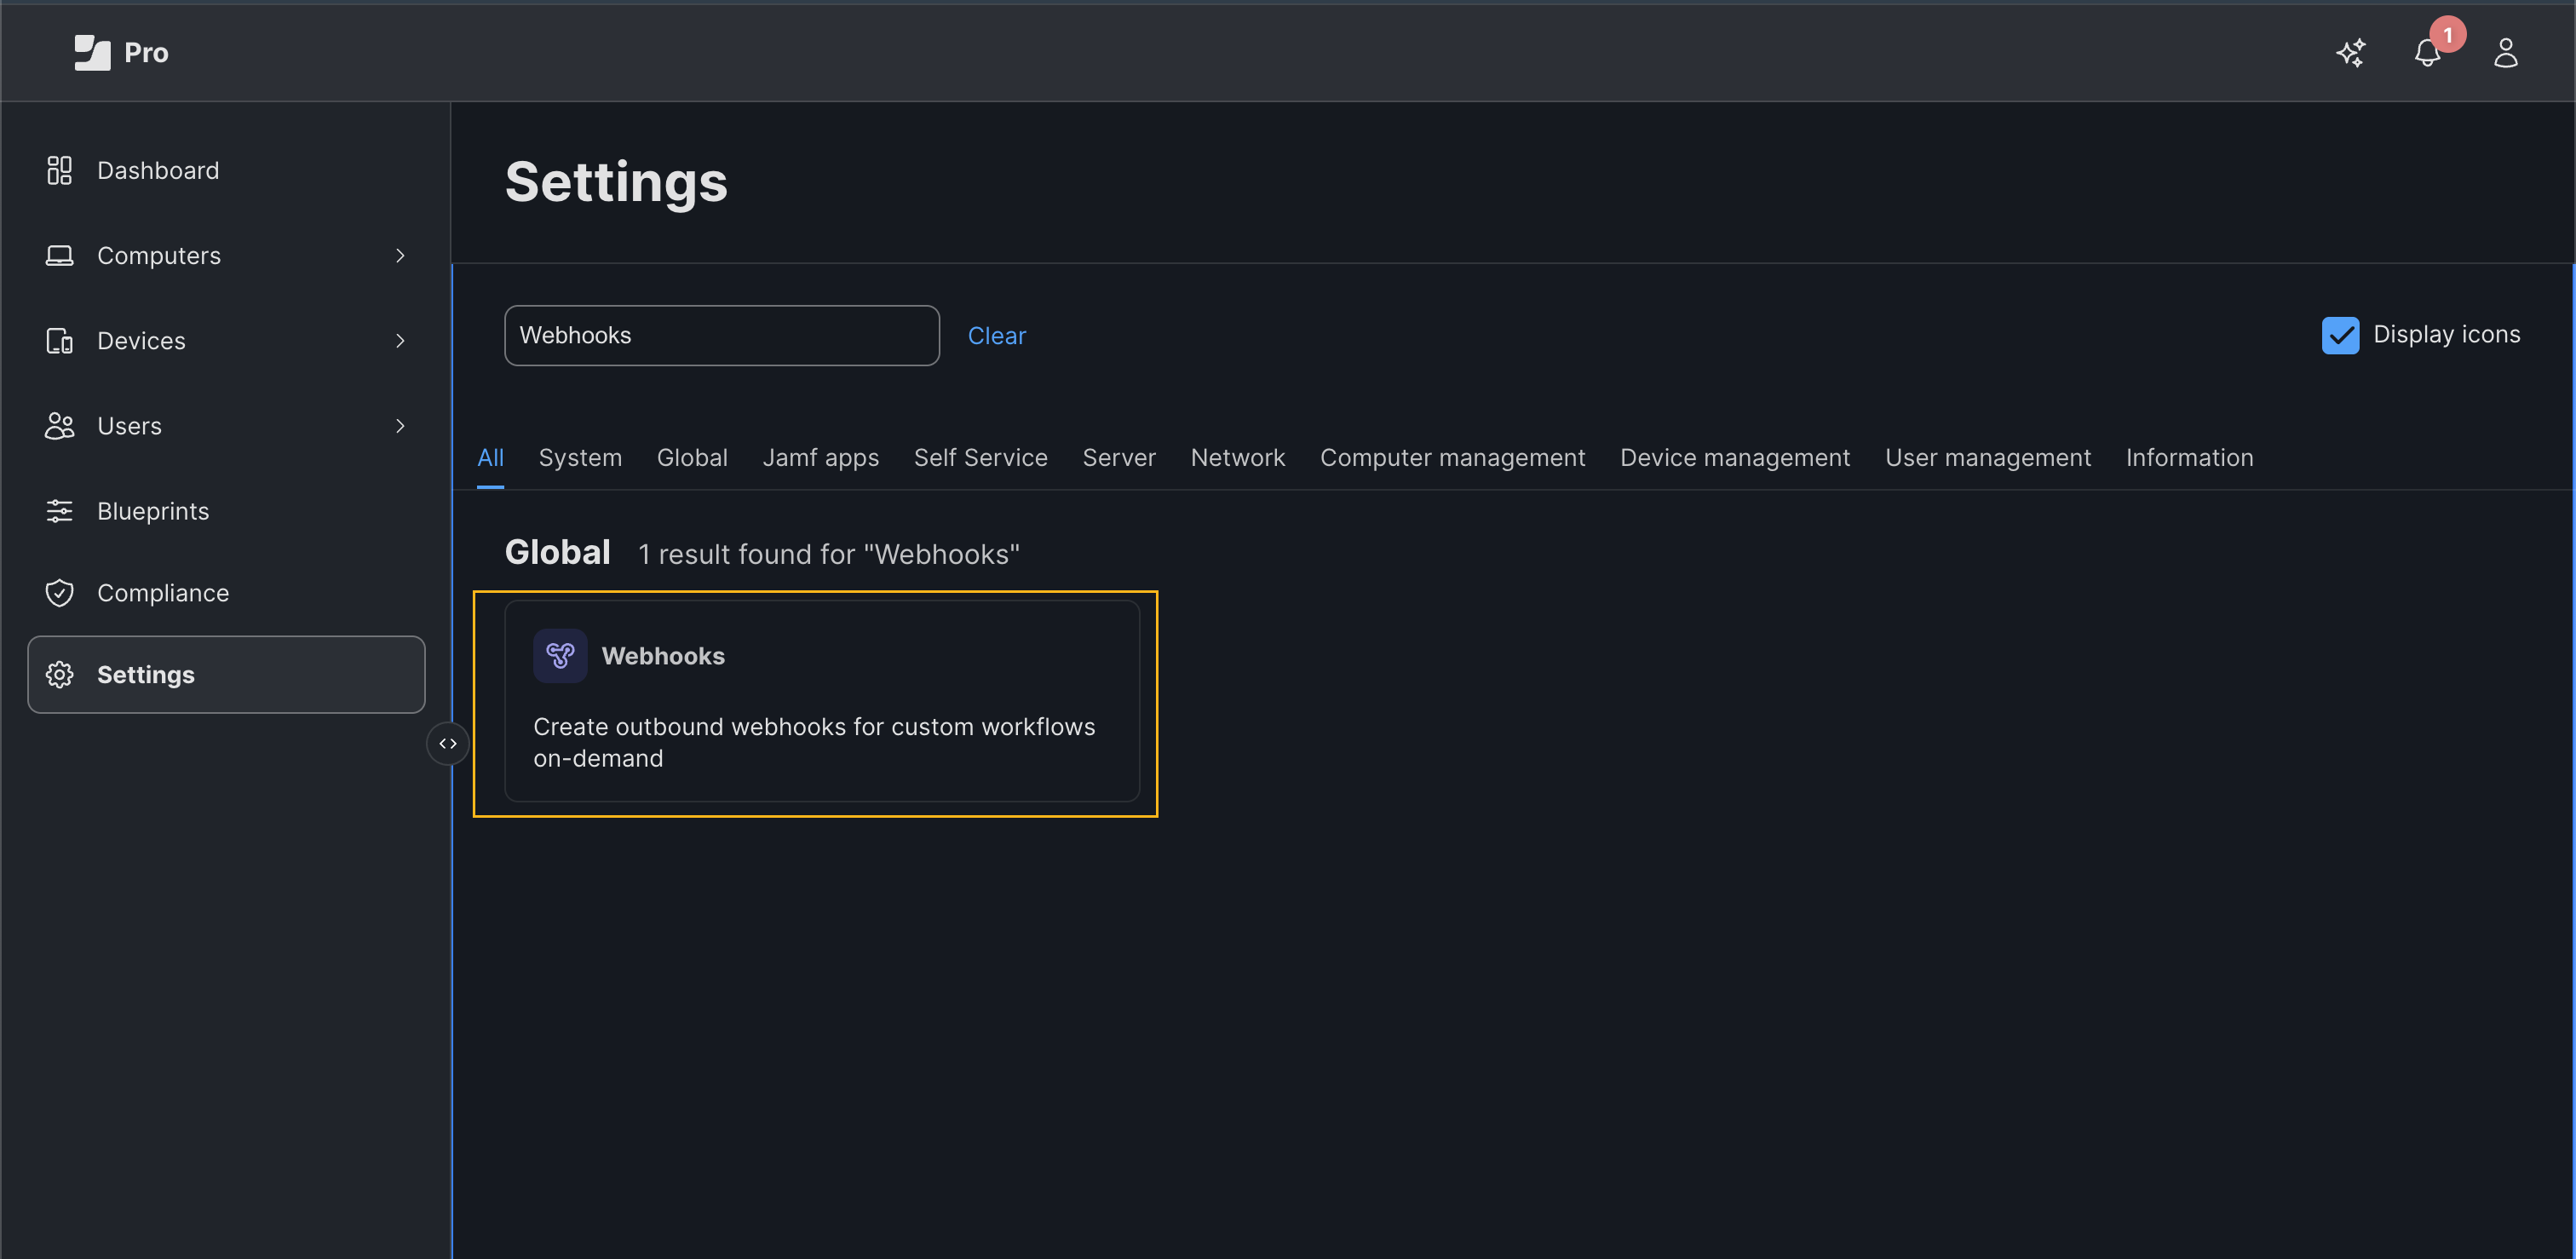
    Settings interface with dark theme showing navigation sidebar with categories like Dashboard, Devices, Users, and Settings. Main area displays Webhooks search result under Global category, with description Create outbound webhooks for custom workflows on-demand. Tabs for filtering settings by categories are at the top, and Display icons checkbox is visible on the right.

    User interface for managing webhooks with a list showing columns for Name, Event, and URL, a sidebar with navigation options, and a highlighted New button to add a webhook.

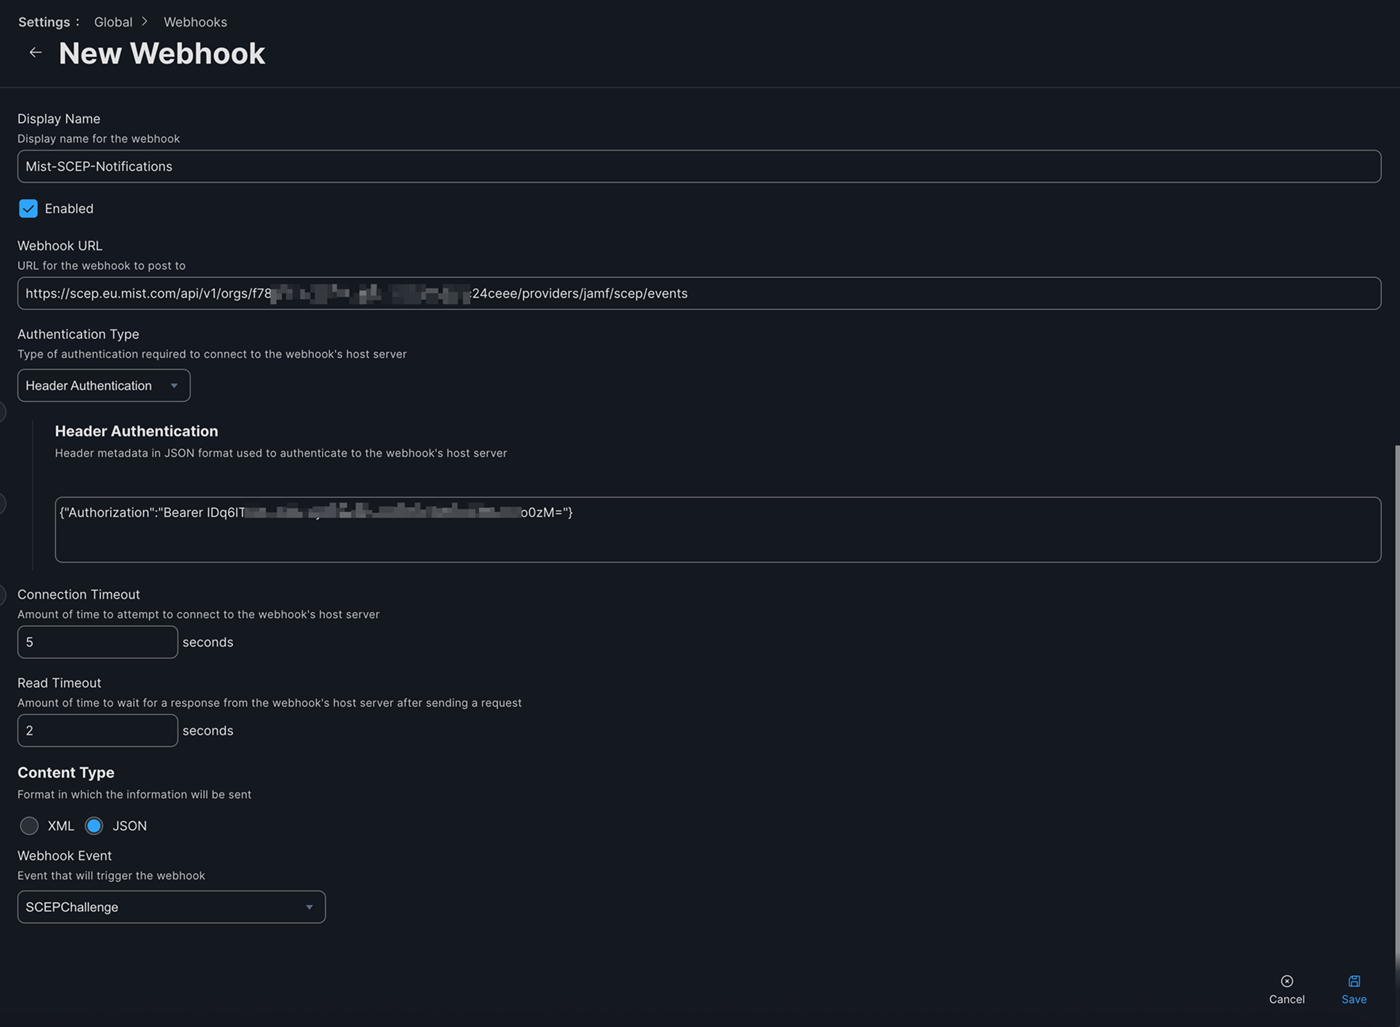
  2. 新しいWebhookページで、以下の情報を入力し、 保存をクリックします。

    • 表示名—Webhookの名前

    • Webhook URL。—先ほどコピーしたJamf Webhook URL。

    • 認証タイプ—ヘッダー認証

    • ヘッダーメタデータ—{"Authorization":"Bearer <Jamfアクセストークン"}

    • 接続タイムアウト—5秒

    • 読み取りタイムアウト—2秒

    • コンテンツタイプ—JSON

    • Webhookイベント—SCEPチャレンジ

    Configuration screen for setting up a webhook with display name Mist-SCEP-Notifications, enabled checkbox, URL, header authentication using a bearer token, 5-second connection timeout, 2-second read timeout, JSON content type, and SCEPChallenge event trigger. Save and Cancel buttons visible.

設定プロファイルの作成

例として macOS デバイスを使用しましたが、手順は iOS デバイスでも同じです。

注:

サードパーティ製アプリケーションのスクリーンショットは、公開時点のものです。スクリーンショットがいつ、または将来正確になるかを知る方法はありません。これらの画面の変更や関連するワークフローのガイダンスについては、サードパーティーのWebサイトを参照してください。

  1. JAMF Pro ダッシュボードで、[ コンピューター ] > [構成プロファイル ] に移動し、[ 新規] をクリックします。
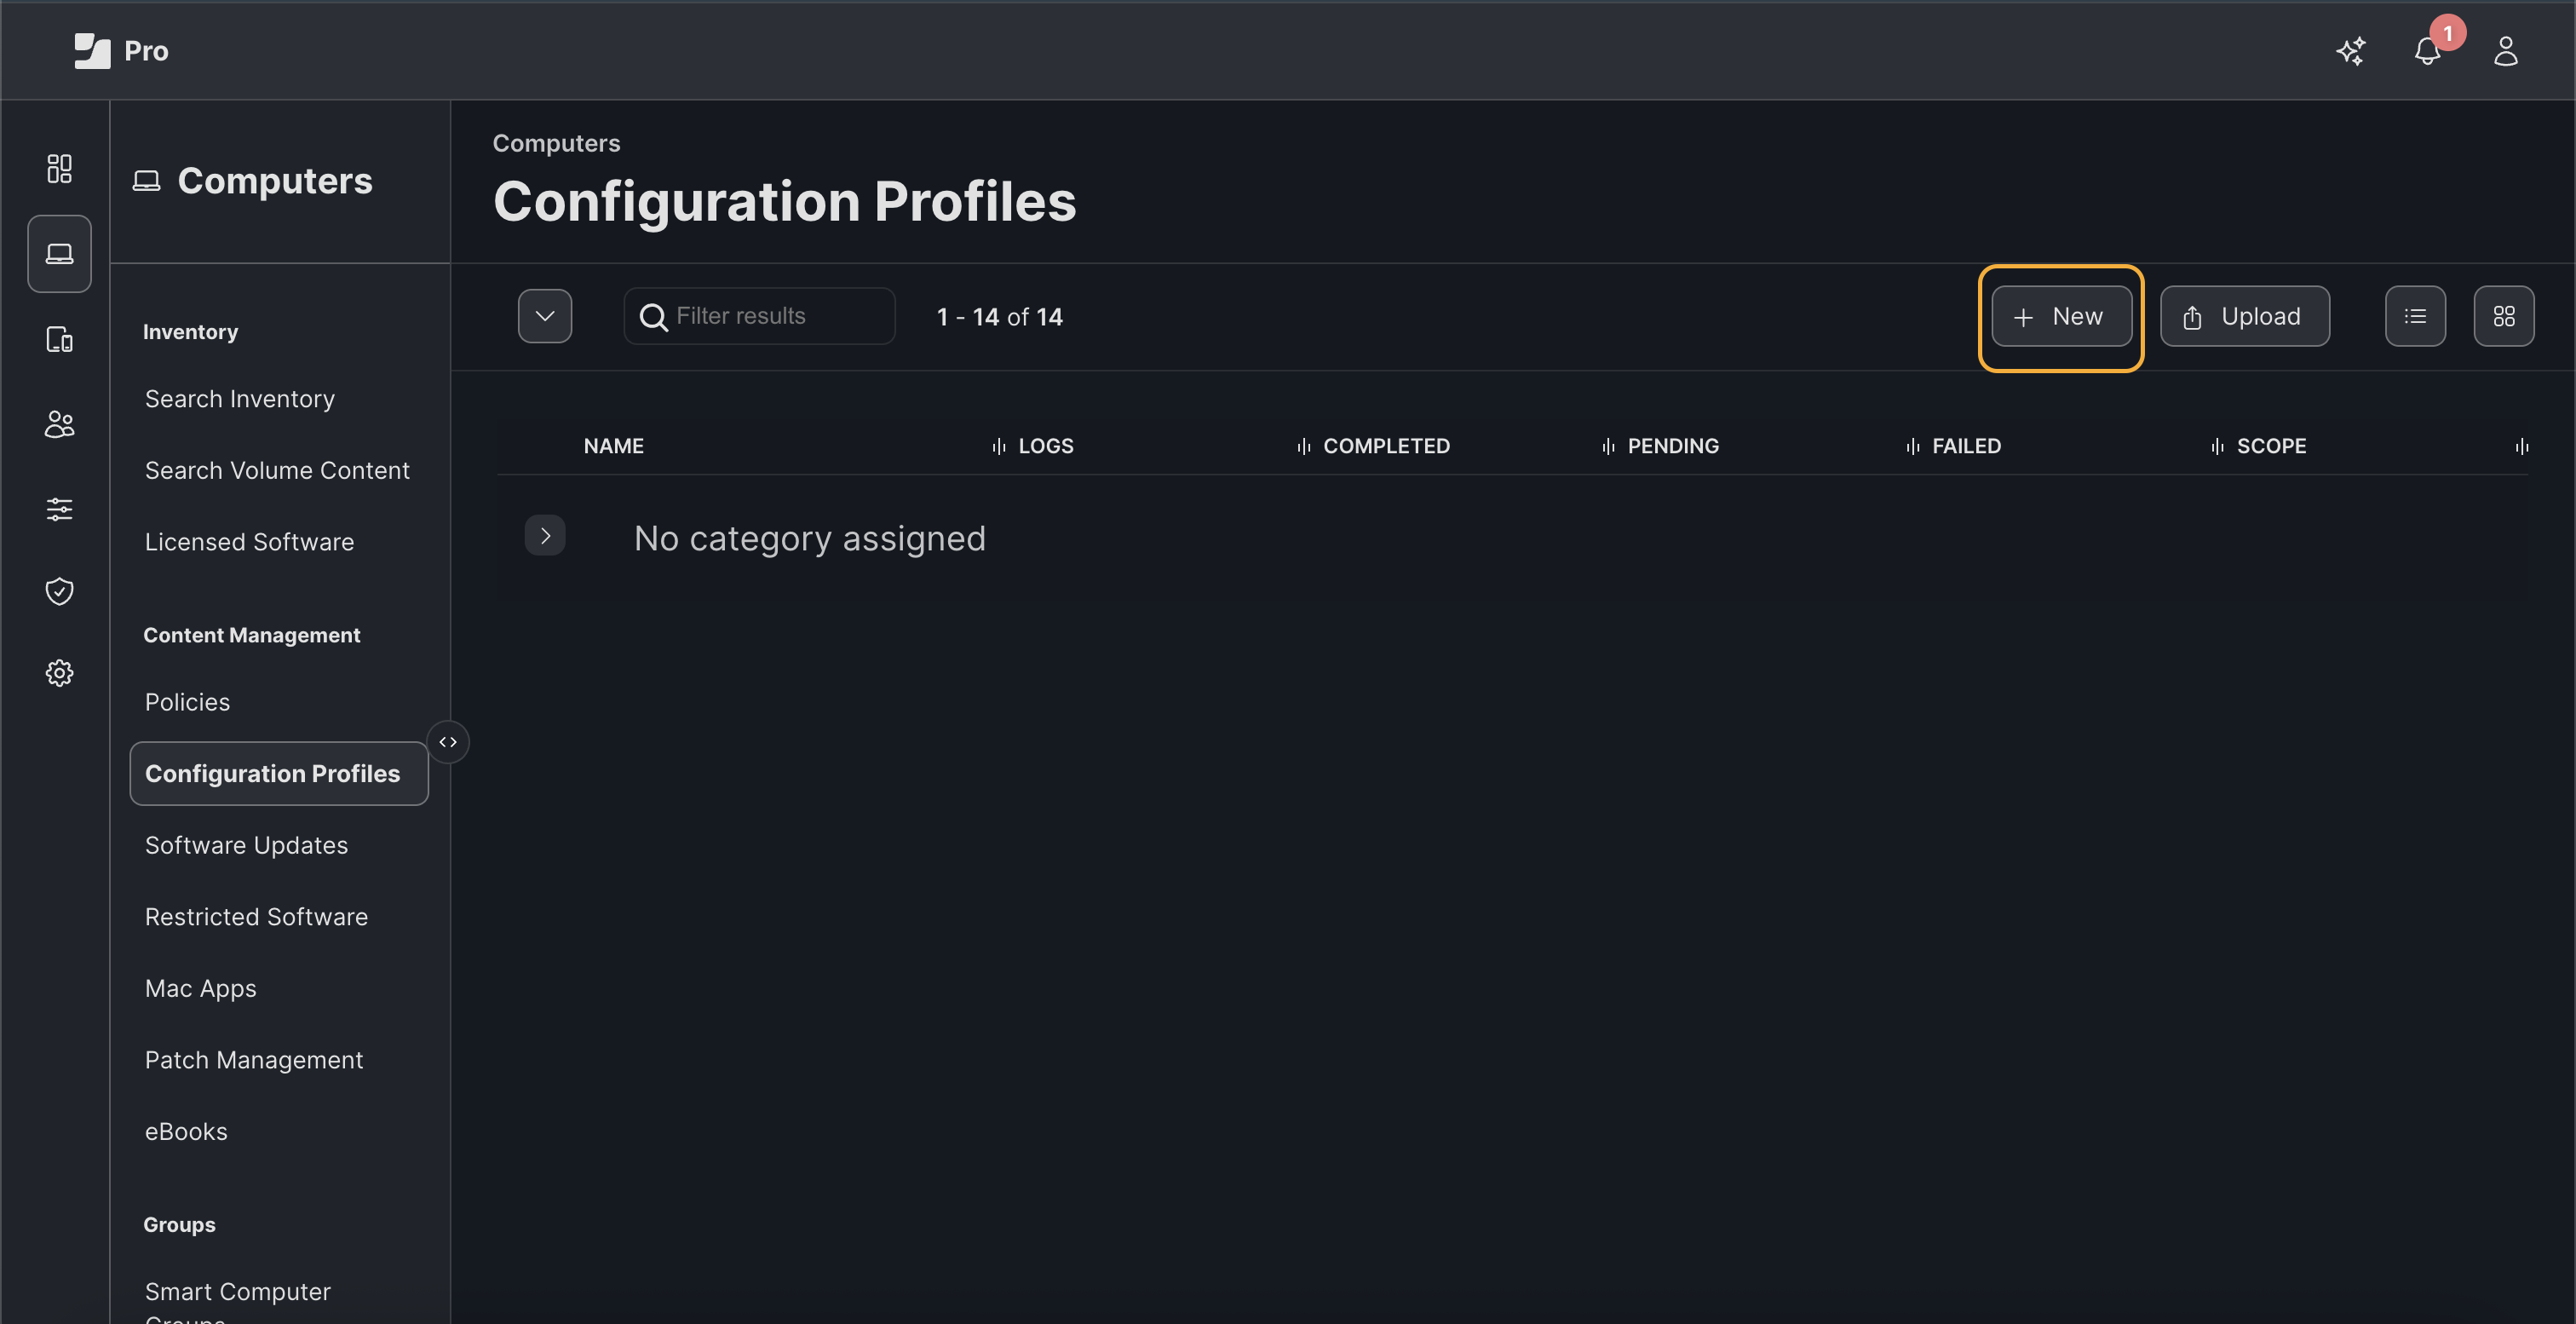
    Configuration Profiles interface under Computers section; sidebar menu includes inventory, search, and management options; main panel displays empty table with columns for profile status; action buttons for creating or uploading profiles.

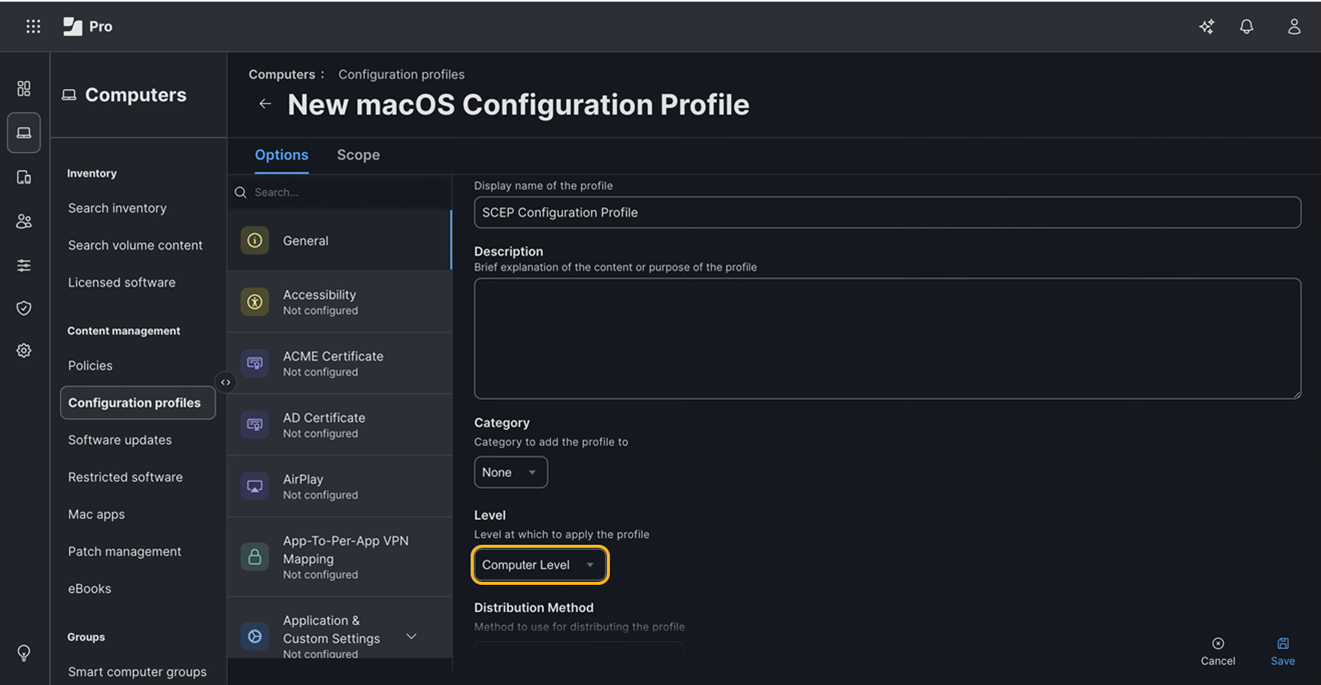
  2. レベルがコンピューターレベルに設定されていることを確認します。

    New macOS Configuration Profile interface showing fields for display name, description, category, level, distribution method, and save or cancel buttons. Configuration profiles section is selected in the navigation panel.

  3. 証明書タブを選択し、以下の情報を入力して保存をクリックします。

    • 証明書名

    • 証明書の アップロード をクリックし、先ほどダウンロードしたMist Org CA証明書をアップロードします。

      カスタムRADIUSサーバー証明書を使用している場合、Mist組織CA証明書は必要ありません。カスタム RADIUS サーバー証明書発行者のルート CA 証明書が必要です。
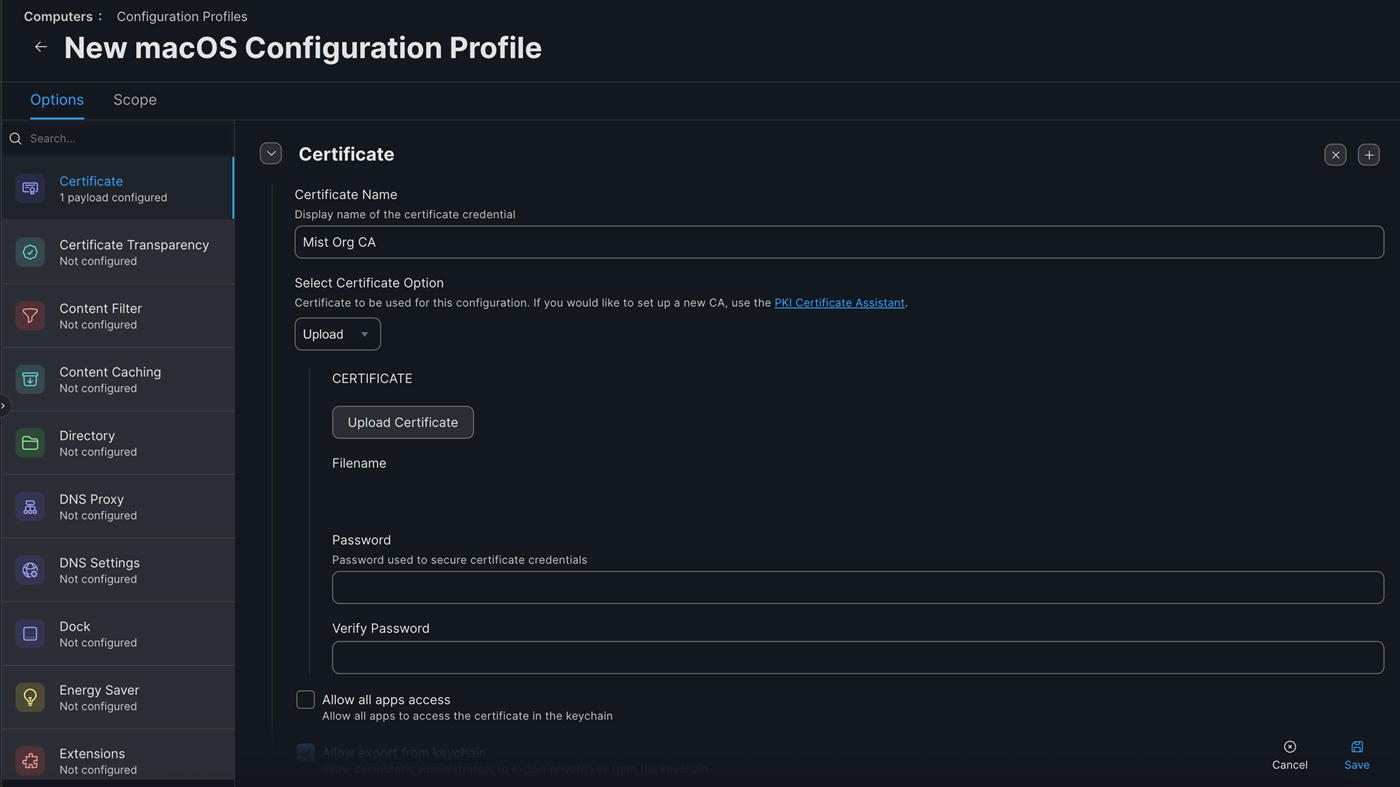
    Creating a macOS configuration profile with certificate upload, password entry, and app access options.

  4. SCEPタブを選択し、以下の情報を入力して保存をクリックします。

    • URL—Jamf SCEP URL
    • 名前—MIST-SCEP-CA
    • プロファイルの再配布—証明書の有効期限が切れてから、プロファイルを再度プッシュするまでの日数
    • 件名—CN=$COMPUTERNAME
    • SANタイプ—値$UDIDとともにDNS名を追加します
      注:

      NACがデバイスの識別とコンプライアンスチェックにこの値を使用するため、SAN:DNSフィールドにデバイスIDを含めることは必須です。

    • チャレンジタイプ—動的
    • 再試行回数—3
    • 再試行の遅延—5
    • 証明書有効期限通知しきい値—証明書有効期限通知を表示するための証明書有効期限日の前日数
    • キーサイズ—2048
    • デジタル署名として使用チェックボックスを選択します
    • キー 暗号化に使用 チェックボックスを選択します
    • 「 キーチェーンからのエクスポートを許可」 チェックボックスを選択しない
    • 証明書—前の手順でダウンロードしたMistオンボードCA証明書をアップロードします。
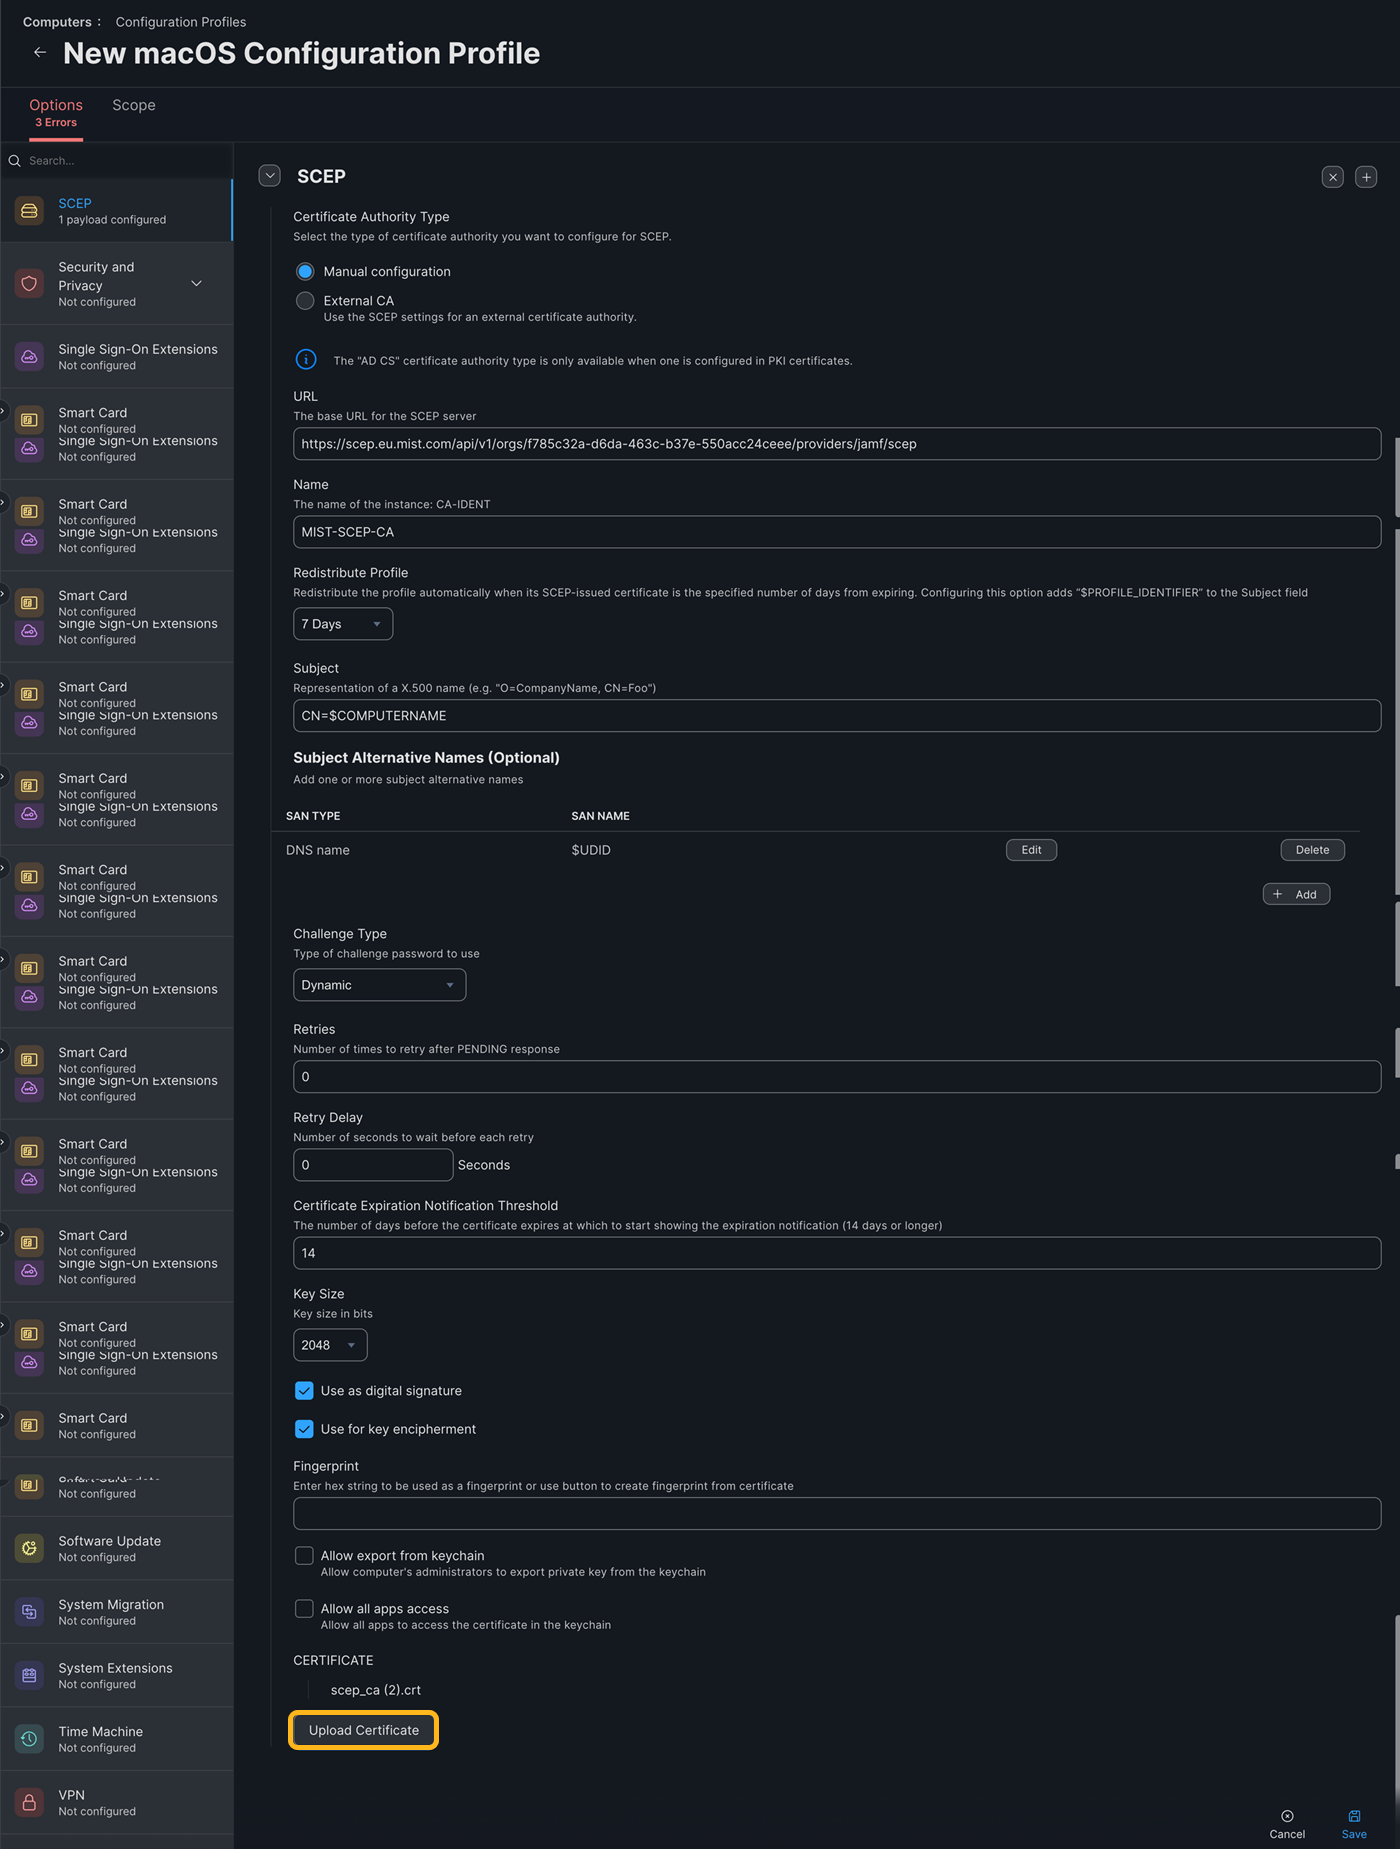
    Configuration interface for creating a macOS SCEP profile with fields for certificate authority type, SCEP server URL, instance name, redistribute profile days, X.500 subject name, subject alternative names, challenge type, retries, retry delay, expiration notification threshold, key size, certificate options, and upload certificate. Left sidebar lists other configuration categories with statuses. Save and Cancel buttons at the bottom.

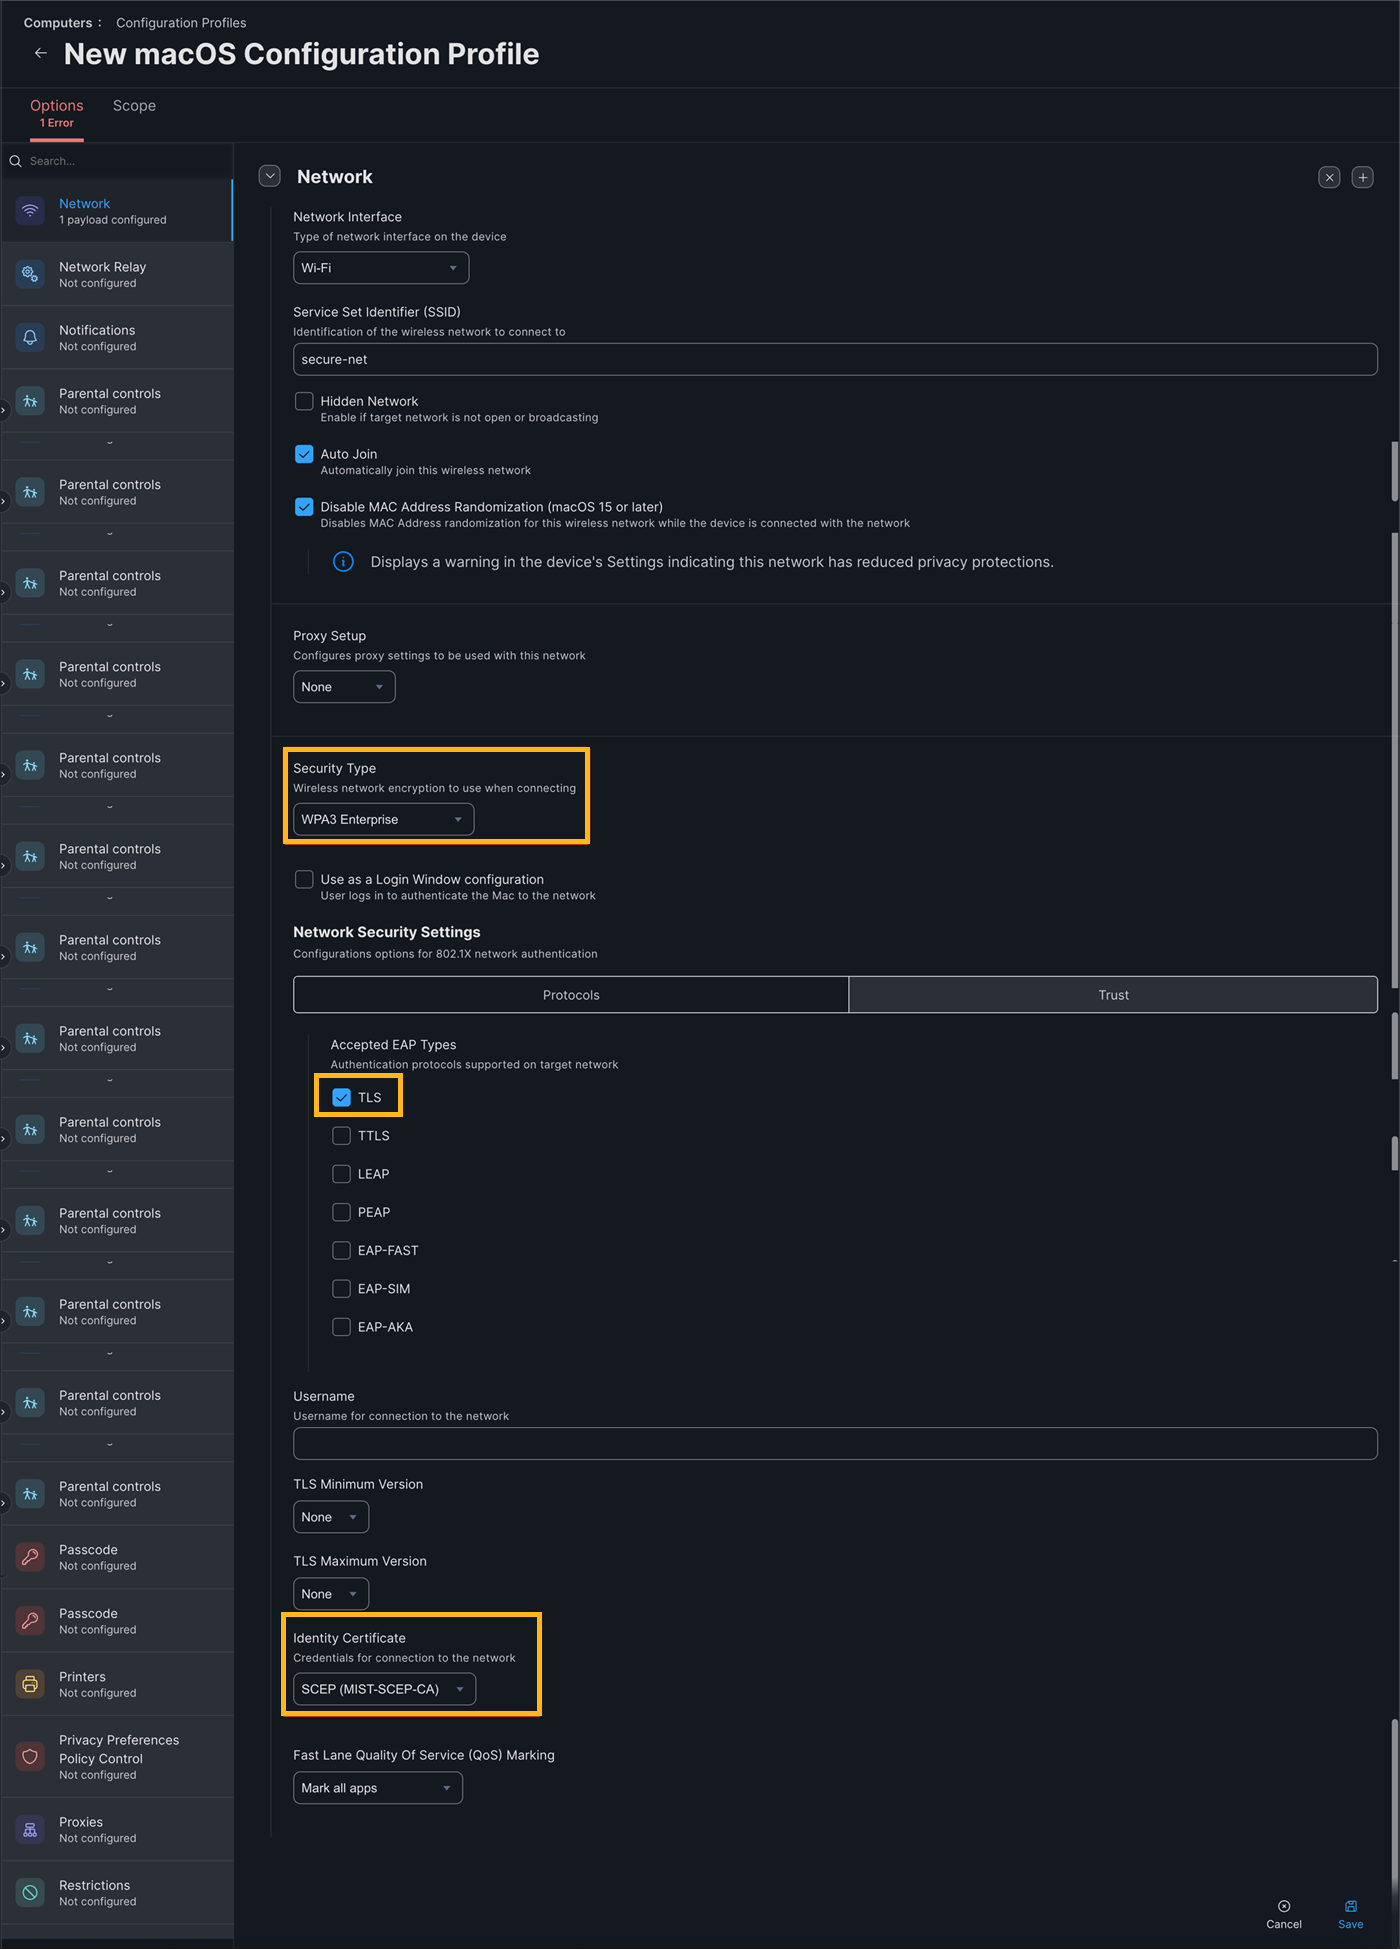
  5. ネットワークタブを選択し、設定をクリックしてWi-Fiプロファイルを有効にします。以下の情報を入力し、保存をクリックします。

    • SSID - SSID 名
    • セキュリティタイプ—WLAN設定によるWPA2またはWPA3エンタープライズ
    • 受け入れられるEAPタイプ—TLS
    • ID証明書—SCEP(MIST-SCEP-CA)

    Configuration screen for creating a macOS network profile with Wi-Fi set as the interface, SSID secure-net, WPA3 Enterprise encryption, EAP type TLS, and identity certificate SCEP MSFT-SCEP-CA selected.

    信頼 タブ を選択し、サーバー証明書の検証についてMist組織のCA証明書を確認します。
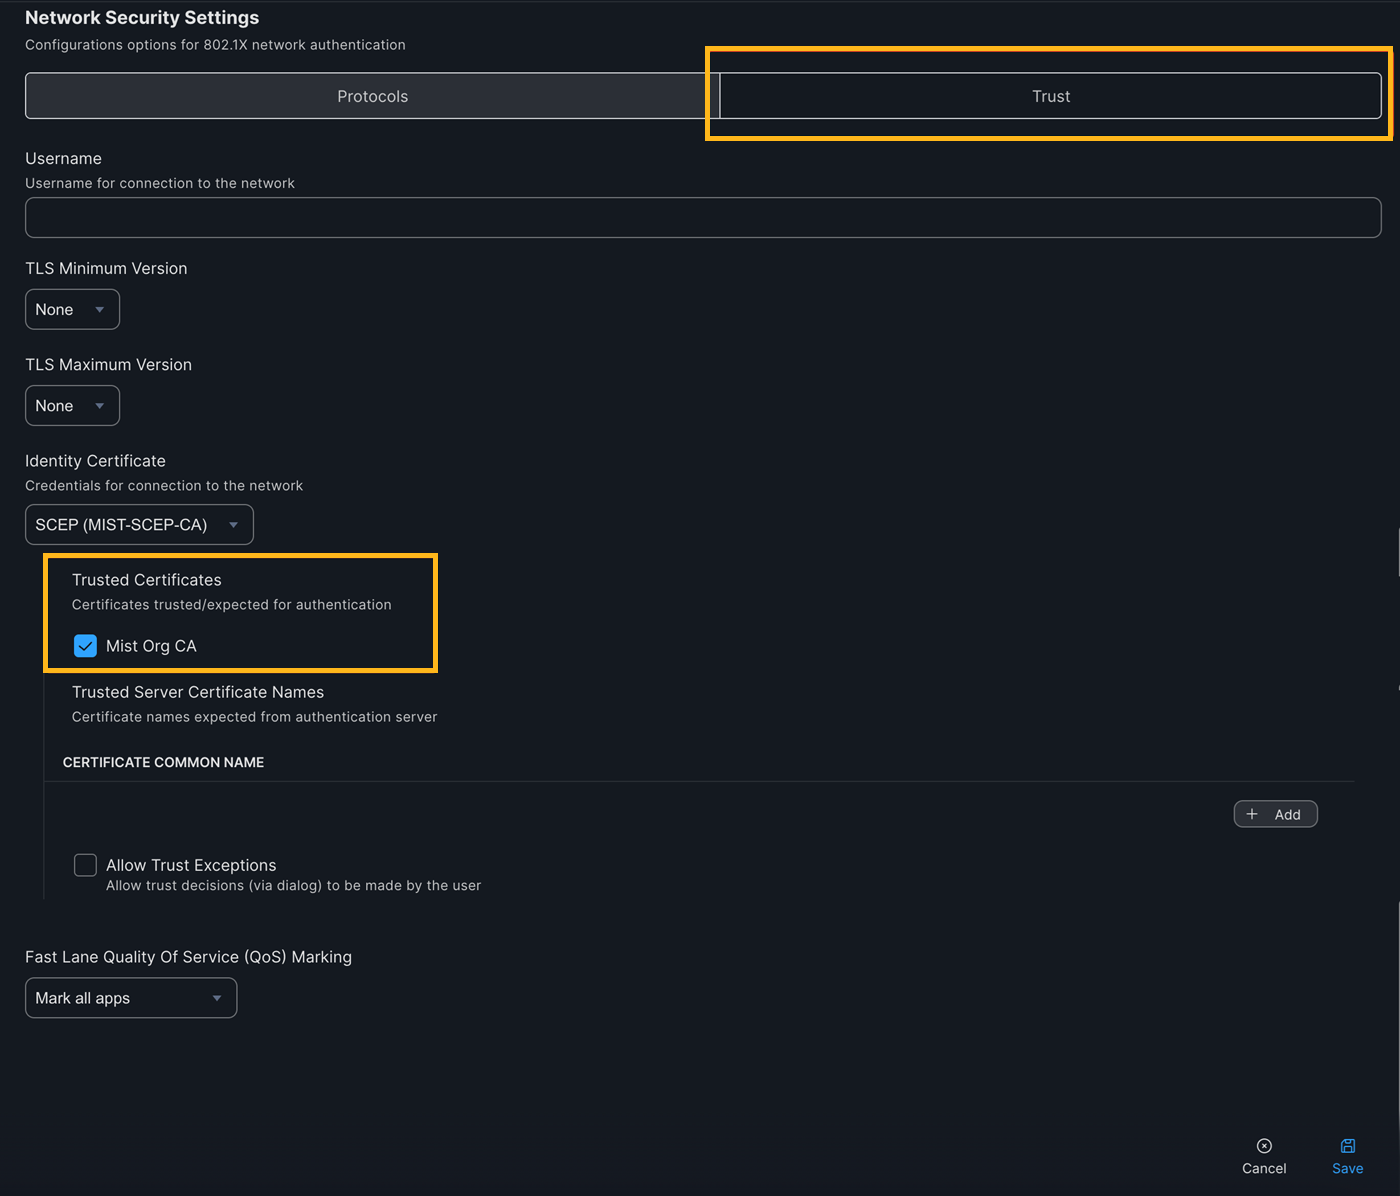
    Network Security Settings screen for 802.1X authentication, showing fields for username, TLS version, identity and trusted certificates, server certificate names, trust exceptions, and QoS marking, with Save and Cancel buttons.

  6. ス コープタブ を選択し、プロファイルをデバイスに割り当てます。

    プロファイルがクライアントにプッシュされると、[ キーチェーンアクセス ]>[マイ証明書]の下にmacOSデバイスに発行された新しい証明書が表示されます。

    ジュニパー Mistポータルに切り替えて、 クライアント証明書が証明書>内部で発行されていることを確認します。
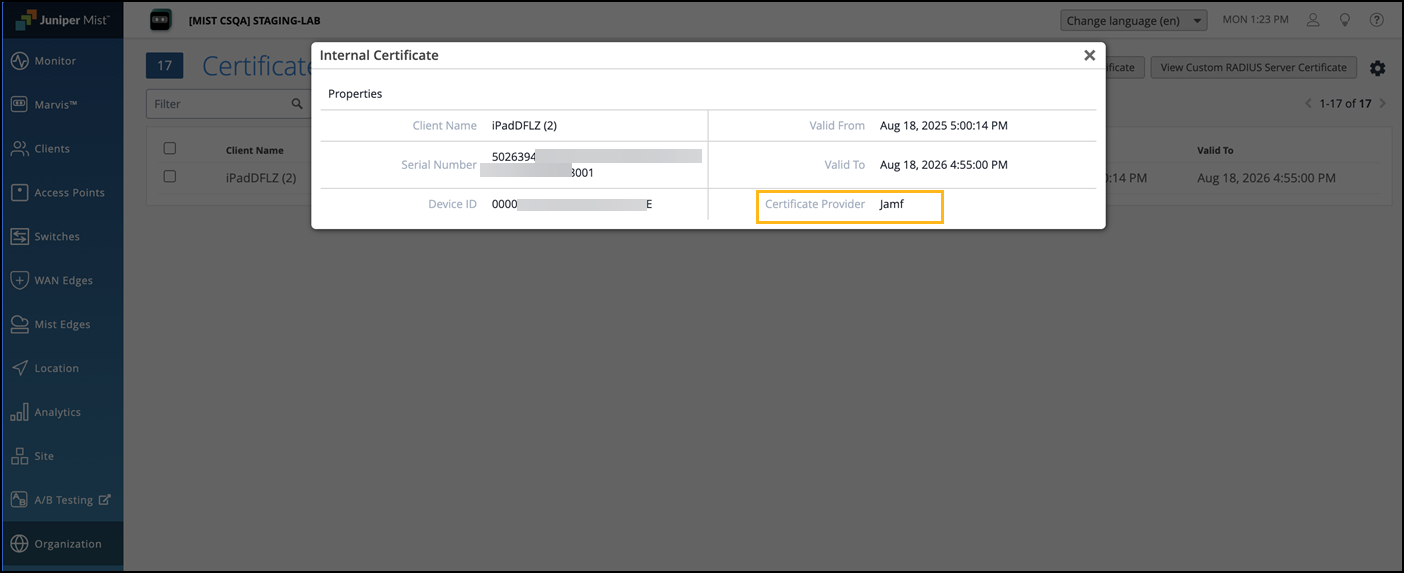
    Juniper Mist interface showing Internal Certificate details including client name iPadDFLZ 2, serial number, device ID, validity dates, and certificate provider Jamf. Sidebar options include Monitor, Marvis, Clients, and Access Points.

Jamf用Mist SCEPでカスタムクライアント証明書の有効性を設定する

デフォルトでは、Mist SCEP を使用して Jamf を通じて発行されたクライアント証明書は 1 年間有効です。カスタム証明書の有効期間を設定するには、証明書プロファイルのサブジェクトの代替名(SAN)フィールドにUniform Resource Identifierエントリーを含めます。以下の情報を提供する必要があります。

  • SANタイプ—値$UDIDとともにDNS名を追加します

  • 統一リソース識別子—以下を入力します。

    tag:juniper.net,CertValidity:<validity-in-days>

    例: tag:juniper.net,CertValidity:730。この例では、クライアント証明書の有効期間は、デフォルトの1年ではなく、証明書発行日から2年間有効です。
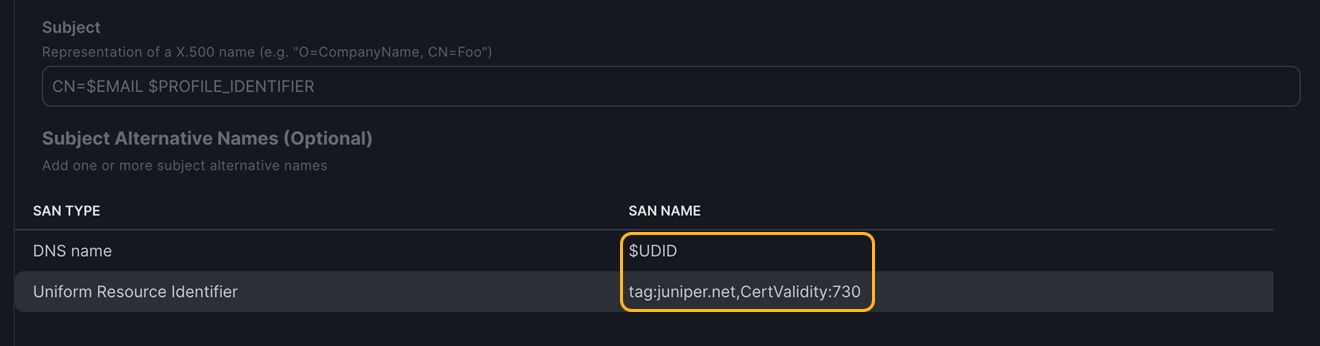
    Configuration interface for defining certificate subject and optional SANs. Highlighted URI SAN entry shows tag:juniper.net,CertValidity:730.