例: IoT デバイスの検出とポリシー適用を構成する
この例では、IoT デバイスの検出とセキュリティ ポリシーの適用のためにセキュリティ デバイスを構成します。
概要
ネットワーク内のIoTデバイス検出を開始するために必要なのは、Juniper ATP Cloudに接続されたセキュリティデバイスだけです。 図 1 は、この例で使用されているトポロジーを示しています。
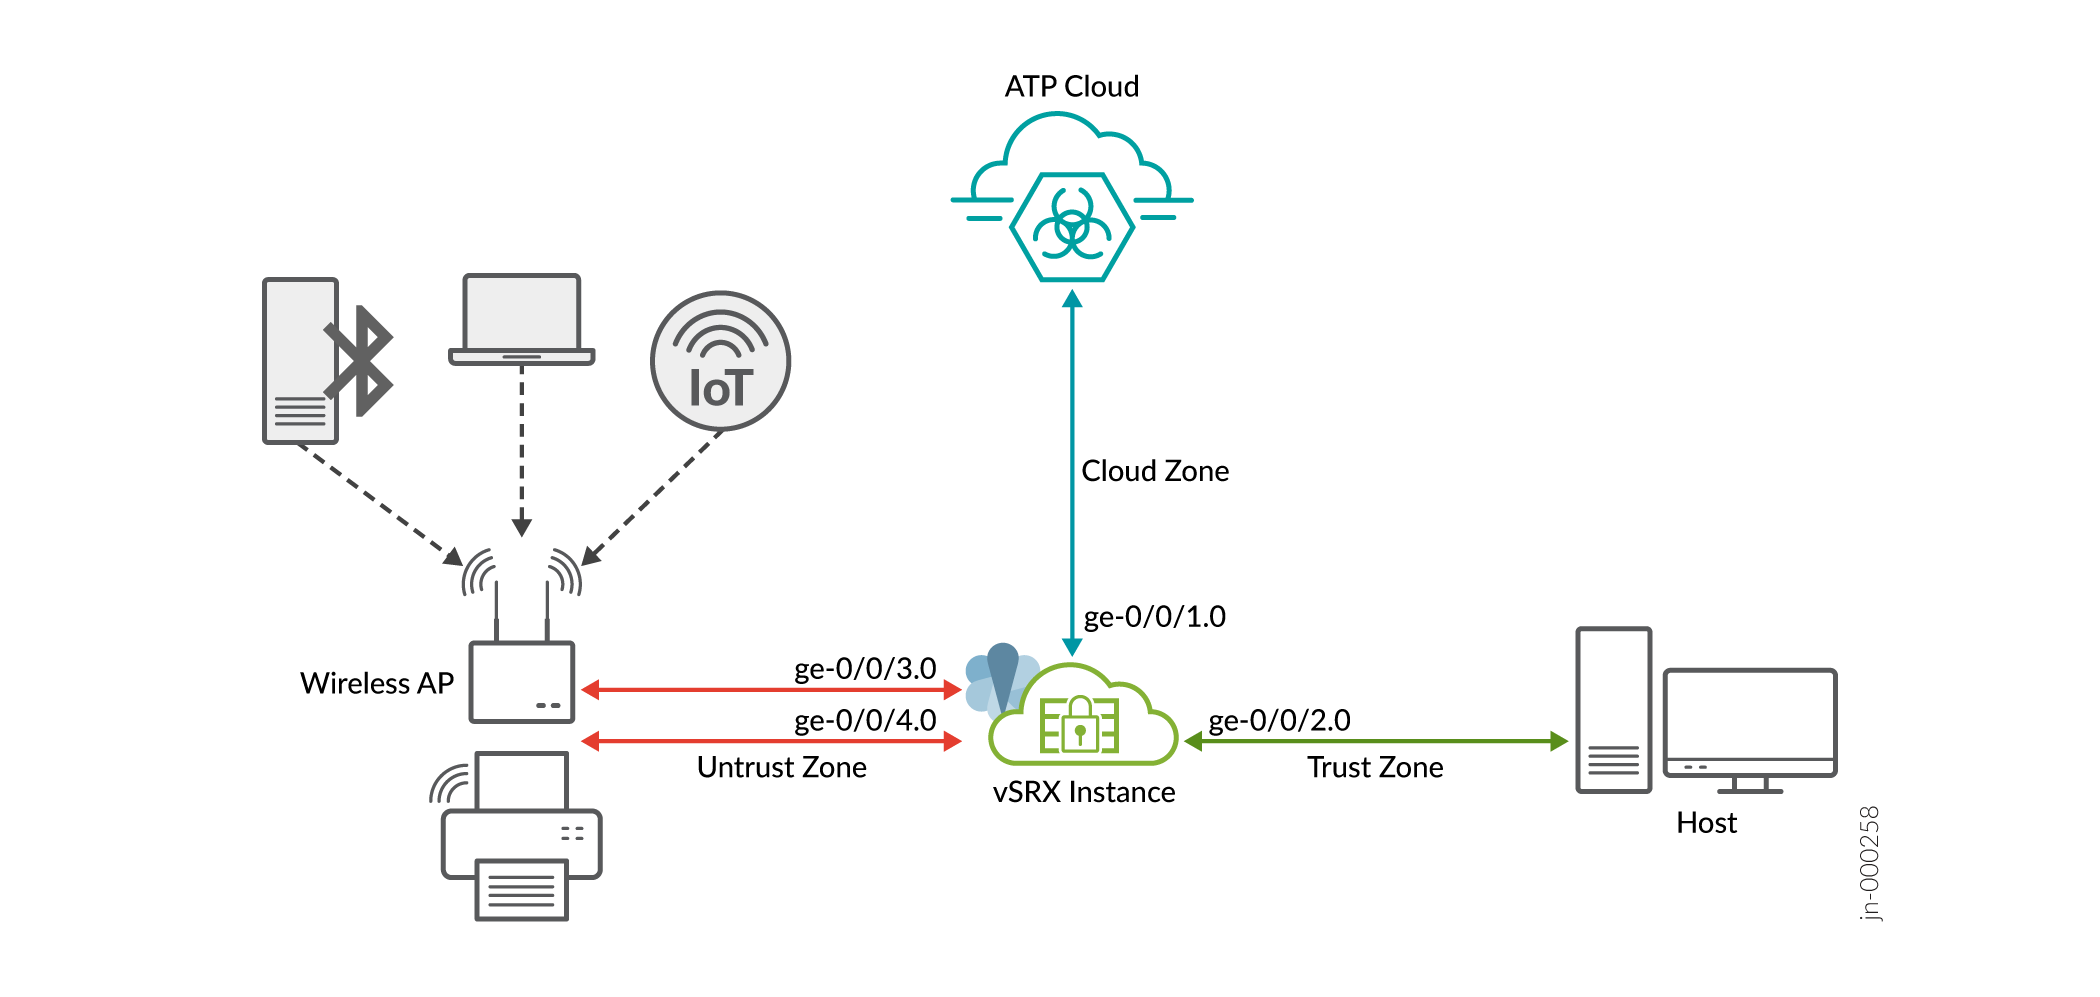
トポロジーに示されているように、ネットワークには、無線アクセスポイント(AP)を介してSRXシリーズファイアウォールに接続された一部のIoTデバイスが含まれています。セキュリティデバイスは、Juniper Cloud ATPサーバーとホストデバイスに接続されています。
セキュリティデバイスは、IoTデバイスのメタデータを収集し、関連情報をJuniper ATP Cloudにストリーミングします。IoT メタデータのストリーミングを有効にするには、セキュリティ メタデータ ストリーミング ポリシーを作成し、これらのポリシーをセキュリティ ポリシーにアタッチする必要があります。Juniper CloudサーバーにIoTデバイスを分類するのに十分な詳細がある場合、IoTデバイストラフィックのストリーミングは自動的に一時停止します。
Juniper ATPクラウドがIoTデバイスを検出して分類します。検出された IoT デバイスのインベントリを使用して、動的なアドレス グループの形式で脅威フィードを作成します。セキュリティ デバイスが動的アドレス グループをダウンロードすると、動的アドレス グループを使用して IoT トラフィックのセキュリティ ポリシーを作成および適用できます。
表 1 と 表 2 は、この例で使用されるパラメーターの詳細を示しています。
| ゾーン | インターフェイス | の接続先 |
|---|---|---|
| 信託 | ge-0/0/2.0 | クライアントデバイス |
| 信頼できない | ge-0/0/4.0 と ge-0/0/3.0 | IoTトラフィックを管理するためのアクセスポイント |
| 雲 | ge-0/0/1.0 | インターネット(Juniper ATPクラウドに接続するため) |
| ポリシー | タイプ | アプリケーション |
|---|---|---|
| P1の | セキュリティポリシー | trustゾーンからuntrustゾーンへのトラフィックを許可します |
| P2の | セキュリティポリシー | untrustゾーンからtrustゾーンへのトラフィックを許可します |
| P3の | セキュリティポリシー | trustゾーンからクラウドゾーンへのトラフィックを許可します |
| P1の | メタデータ ストリーミング ポリシー | untrustゾーンからtrustゾーンへのトラフィックメタデータをストリーミング |
| P2の | メタデータ ストリーミング ポリシー | trustゾーンからclodゾーンへのトラフィックメタデータのストリーミング |
| Unwanted_Applications | グローバルセキュリティポリシー | グローバルなコンテキストで、脅威フィードとセキュリティポリシーに基づいてIoTトラフィックを防止 |
必要条件
- SRXシリーズファイアウォールまたはNFXシリーズデバイス
- IoT セキュリティはプレミアム ATP 機能であり、エンタイトルメントにはプレミアム ライセンス(プレミアム 1 または プレミアム 2)が必要です。詳細については、 ATP Cloudのソフトウェアライセンスを確認してください。
- Junos OS リリース 22.1R1 以降
- Juniper Advanced Threat Preventionクラウドアカウント Juniper Advanced Threat Preventionクラウドアカウントの登録を参照してください。
ジュニパーでは、Junos OS リリース 22.1R1 の vSRX仮想ファイアウォールインスタンスを使用して、構成を検証およびテストしました。
構成
SRXシリーズファイアウォールとJuniper ATP Cloudを連携させる
Juniper ATP Cloud Webポータルと通信するには、SRXシリーズファイアウォールを設定する必要があります。SRXシリーズファイアウォールがインターネットに接続されていることを確認します。以下の初期設定を完了して、SRXシリーズファイアウォールをインターネットに設定してください。
- インターフェイスを設定します。この例では、SRXシリーズファイアウォールのインターネットに接続するインターフェイスとしてインターフェイスge-0/0/1.0を使用しています。
[edit]
user@host# set interfaces ge-0/0/1 unit 0 family inet address 10.50.50.1/24
- インターフェイスをセキュリティ ゾーンに追加します。
[edit]
user@host# set security zones security-zone cloud interfaces ge-0/0/1.0 host-inbound-traffic system-services all
user@host# set security zones security-zone cloud interfaces ge-0/0/1.0 host-inbound-traffic protocols all
- DNSを設定します。
[edit]
user@host# set groups global system name-server 172.16.1.1
- NTPを設定します。
[edit]
user@host# set groups global system processes ntp enable
user@host# set groups global system ntp boot-server 192.168.1.20
user@host# set groups global system ntp server 192.168.1.20
SRXシリーズがge-0/0/1.0インターフェイスを介してインターネットにアクセスできるようになったら、次のステップに進みます。
- 必要なライセンスとアプリケーション シグネチャ パッケージの確認
- セキュリティデバイスをJuniper ATP Cloudに登録する
- IoT トラフィック ストリーミング設定の構成
- SRXシリーズファイアウォールを設定する
- ATP Cloudで検出されたIoTデバイスを表示する
- 脅威フィードの作成
- 適応型脅威プロファイリングフィードを使用したセキュリティポリシーの作成
- 業績
必要なライセンスとアプリケーション シグネチャ パッケージの確認
- 適切なJuniper ATPクラウドライセンスがあることを確認します。ライセンスステータスを確認するには、
show system licenseコマンドを使用します。出力には、次のサンプルに示すように、SRX デバイスタイプ(SRXまたはvSRX)とJunosバージョンに基づくレガシー ATP Cloudブランディング(SkyATP)が表示される場合がありますuser@host> show system license License identifier: JUNOS123456 License version: 4 Software Serial Number: 1234567890 Customer ID: JuniperTest Features: Sky ATP - Sky ATP: Cloud Based Advanced Threat Prevention on SRX firewalls date-based, 2016-07-19 17:00:00 PDT - 2016-07-30 17:00:00 PDTroot@host> show system license License identifier: JUNOS123456 License version: 4 Software Serial Number: 1234567890 Customer ID: JuniperTest Features: ATP Cloud - Cloud Based Advanced Threat Prevention on SRX firewalls date-based, 2016-07-19 17:00:00 PDT - 2016-07-30 17:00:00 PDT手記:エンタイトルメントがクラウドで管理されている場合、SRXシリーズファイアウォール上の
show system licenseコマンドにATP Cloudライセンスが表示されないことがあります。これは、SRXシリーズデバイスにATP Cloudのライセンスキーをインストールする必要がないためです。代わりに、SRXシリーズシリアル番号と認証コードを使用してライセンス キーを生成すると、権利が自動的にクラウド サーバーに転送されます。vSRX仮想ファイアウォールの場合は、インストール済みのライセンスが必要です。 - デバイスのセキュリティデバイスに最新のアプリケーションシグネチャパックがインストールされていることを確認します。
- アプリケーション識別ライセンスがデバイスにインストールされていることを確認します。
user@host> show system license
License usage:
Licenses Licenses Licenses Expiry
Feature name used installed needed
logical-system 4 1 3 permanent
License identifier: JUNOSXXXXXX
License version: 2
Valid for device: AA4XXXX005
Features:
appid-sig - APPID Signatur
- 最新バージョンのアプリケーション シグネチャ パックをダウンロードします。
user@host> request services application-identification download
- ダウンロード状況を確認してください。
user@host> request services application-identification download status
Downloading application package 3475 succeeded.
- アプリケーション識別シグネチャ パックをインストールします。
user@host> request services application-identification install
- インストールされているアプリケーション署名パックのバージョンを確認します。
user@host> show services application-identification version
  Application package version: 3418
  Release date: Tue Sep 14 14:40:55 2021 UTC
- アプリケーション識別ライセンスがデバイスにインストールされていることを確認します。
セキュリティデバイスをJuniper ATP Cloudに登録する
まず、Juniper ATPクラウドにセキュリティデバイスを登録します。デバイスを既に登録している場合は、この手順をスキップして、 IoT トラフィック ストリーミング設定の構成に直接ジャンプできます。そうでない場合は、次のいずれかの方法を使用してデバイスを登録します。
方法1:CLIを使用したセキュリティデバイスの登録
- SRXシリーズファイアウォールで、以下のコマンドを実行して登録プロセスを開始します。
user@host> request services advanced-anti-malware enroll
Please select geographical region from the list:
1. North America
2. European Region
3. Canada
4. Asia Pacific
Your choice: 1
- 既存のレルムを選択するか、新しいレルムを作成します。
Enroll SRX to:
1. A new SkyATP security realm (you will be required to create it first)
2. An existing SkyATP security realm
オプション 1 を選択して、レルムを作成します。次の手順を使用します。
-
You are going to create a new Sky ATP realm, please provide the required information:
-
Please enter a realm name (This should be a name that is meaningful to your organization. A realm name can only contain alphanumeric characters and the dash symbol. Once a realm is created, it cannot be changed):

Real name: example-company-a
-
Please enter your company name:
Company name: Example Company A
-
Please enter your e-mail address. This will be your username for your Sky ATP account:
Email: me@example-company-a.com
-
Please setup a password for your new Sky ATP account (It must be at least 8 characters long and include both uppercase and lowercase letters, at least one number, at least one special character):
Password: **********
Verify: **********
-
Please review the information you have provided:
Region: North America
New Realm: example-company-a
Company name: Example Company A
Email: me@example-company-a.com
-
Create a new realm with the above information? [yes,no]
yes
Device enrolled successfully!
SRXシリーズをJuniper ATP Cloudに登録するために、既存のレルムを使用することもできます。
-
show services advanced-anti-malwareステータスCLIコマンドを使用して、SRXシリーズファイアウォールがクラウドサーバーに接続されていることを確認します。root@idpreg-iot-v2# run show services advanced-anti-malware dynamic-filter status Feb 09 18:36:46 Dynamic Filter Server Connection Status: Server Hostname: srxapi.us-west-2.sky.junipersecurity.net Server Port: 443 Proxy Hostname: None Proxy Port: None Control Plane Connection Status: Connected Last Successful Connect: 2022-02-09 18:36:07 PST Pkts Sent: 2 Pkts Received: 6
方法2:Juniper ATP Cloud Webポータルにセキュリティデバイスを登録する
Junos OSオペレーション(op)スクリプトを使用して、Juniper Advanced Threat Preventionクラウドサービスに接続するようにSRXシリーズファイアウォールを設定できます。
- Juniper ATP Cloud Web ポータルで、[デバイス] ページの [登録] ボタンをクリックします。
- コマンドをクリップボードにコピーし、[OK]をクリックします。
- 運用モードで、SRXシリーズファイアウォールのJunos OS CLIにコマンドを貼り付けます。
show services advanced-anti-malwarestatus コマンドを使用して、SRXシリーズ ファイアウォールからクラウドサーバへの接続が確立されていることを確認します。次のサンプルのサーバーホスト名は、あくまでも例です。user@host> show services advanced-anti-malware statusServer connection status: Server hostname: srxapi.us-west-2.sky.junipersecurity.net Server realm: qatest Server port: 443 Proxy hostname: None Proxy port: None Control Plane: Connection time: 2022-02-15 21:31:03 PST Connection status: Connected Service Plane: fpc0 Connection active number: 18 Connection retry statistics: 48サンプルでは、接続ステータスは、クラウドサーバがセキュリティデバイスに接続されていることを示しています。
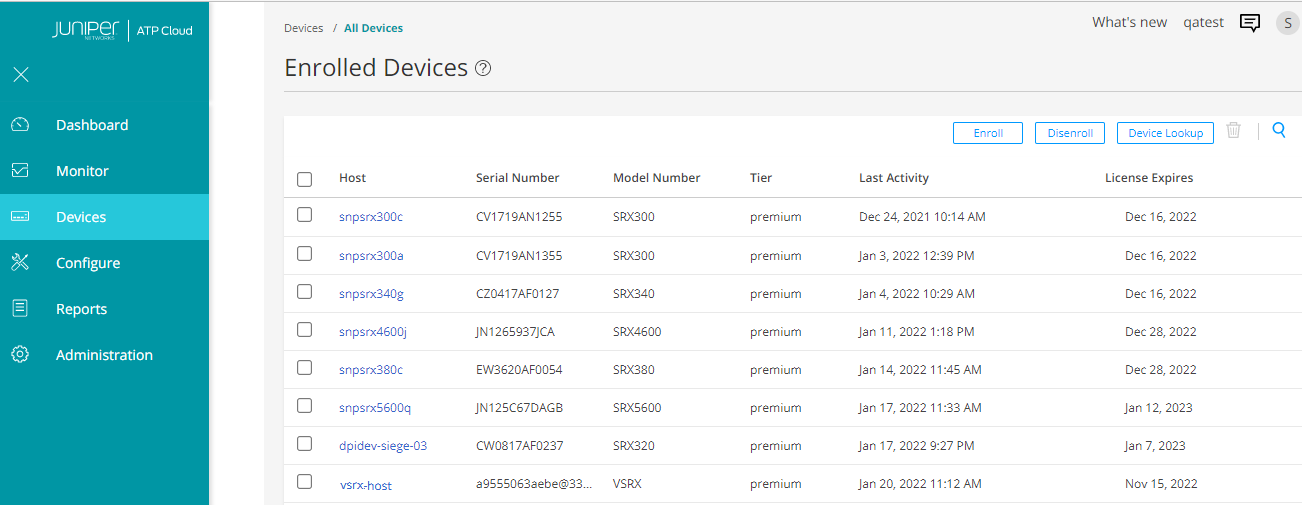
- また、Juniper ATP Cloudポータルで登録済みのデバイスを表示することもできます。 [デバイス] > [すべてのデバイス ] ページに移動します。このページには、登録されているすべてのデバイスが一覧表示されます。
IoT トラフィック ストリーミング設定の構成
この手順では、メタデータ ストリーミング ポリシーを作成し、セキュリティ デバイスでセキュリティ サービスを有効にします。
- クラウド接続の設定を完了します。
[edit]
user@host# set services security-intelligence url https://cloudfeeds.sky.junipersecurity.net/api/manifest.xml
user@host# set services security-intelligence authentication tls-profile aamw-ssl
-
セキュリティメタデータストリーミングポリシーを作成します。
[edit]
user@host# set services security-metadata-streaming policy p1 dynamic-filter
user@host# set services security-metadata-streaming policy p2 dynamic-filter
後で、これらのセキュリティ メタデータ ストリーミング ポリシーをセキュリティ ポリシーにアタッチして、セッションの IoT トラフィック ストリーミングを有効にします。
- アプリケーション追跡、アプリケーション識別、PKIなどのセキュリティサービスを有効にします。
[edit]
user@host# set services application-identification
user@host# set security pki
user@host# set security application-tracking
SRXシリーズファイアウォールを設定する
インターフェイス、ゾーン、ポリシーを設定し、セキュリティデバイスでIoTパケットフィルタリングとストリーミングサービスを有効にするには、次の手順を使用します。
-
インターフェイスを設定します。
[edit]
user@host# set interfaces ge-0/0/2 mtu 9092
user@host# set interfaces ge-0/0/2 unit 0 family inet address 10.60.60.1/24
user@host# set interfaces ge-0/0/3 mtu 9092
user@host# set interfaces ge-0/0/3 unit 0 family inet address 10.70.70.1/24
user@host# set interfaces ge-0/0/4 mtu 9092
user@host# set interfaces ge-0/0/4 unit 0 family inet address 10.80.80.1/24
-
セキュリティゾーンを設定し、設定された各ゾーンのアプリケーショントラフィックを有効にします。
[edit]
user@host# set security zones security-zone trust interfaces ge-0/0/2.0 host-inbound-traffic system-services all
user@host# set security zones security-zone trust interfaces ge-0/0/2.0 host-inbound-traffic protocols all
user@host# set security zones security-zone trust application-tracking
user@host# set security zones security-zone untrust interfaces ge-0/0/4.0 host-inbound-traffic system-services all
user@host# set security zones security-zone untrust interfaces ge-0/0/4.0 host-inbound-traffic protocols all
user@host# set security zones security-zone untrust interfaces ge-0/0/3.0 host-inbound-traffic system-services all
user@host# set security zones security-zone untrust interfaces ge-0/0/3.0 host-inbound-traffic protocols all
user@host# set security zones security-zone untrust application-tracking
user@host# set security zones security-zone cloud application-tracking
トポロジーに示されているように、untrust ゾーンは、ネットワーク内の IoT デバイスからトランジット トラフィックとホストバウンド トラフィックを受信します。クライアントデバイスはtrustゾーンにあり、Juniper ATP Cloudはクラウドゾーンにあります。
-
セキュリティポリシーP1を設定します。
[edit]
user@host# set security policies from-zone trust to-zone untrust policy P1 match source-address any
user@host# set security policies from-zone trust to-zone untrust policy P1 match destination-address any
user@host# set security policies from-zone trust to-zone untrust policy P1 match application any
user@host# set security policies from-zone trust to-zone untrust policy P1 then permit
この設定では、trustゾーンからuntrustゾーンへのトラフィックを許可します。
-
セキュリティポリシーP2を設定します。
[edit]
user@host# set security policies from-zone untrust to-zone trust policy P2 match source-address any
user@host# set security policies from-zone untrust to-zone trust policy P2 match destination-address any
user@host# set security policies from-zone untrust to-zone trust policy P2 match application any
user@host# set security policies from-zone untrust to-zone trust policy P2 then permit
user@host# set security policies from-zone untrust to-zone trust application-services security-metadata-streaming-policy p1
この構成では、untrust ゾーンから trust ゾーンへのトラフィックを許可し、セキュリティ メタデータ ストリーミング ポリシー p1 を適用して、セッションの IoT トラフィック ストリーミングを有効にします。
-
セキュリティポリシーP3を設定します。
[edit]
user@host# set security policies from-zone trust to-zone cloud policy P3 match source-address any
user@host# set security policies from-zone trust to-zone cloud policy P3 match destination-address any
user@host# set security policies from-zone trust to-zone cloud policy P3 match application any
user@host# set security policies from-zone trust to-zone cloud policy P3 then permit
user@host# set security policies from-zone trust to-zone cloud application-services security-metadata-streaming-policy p2
この設定では、trustゾーンからクラウドゾーンへのトラフィックを許可し、セキュリティメタデータストリーミングポリシーp2を適用して、セッションのIoTトラフィックストリーミングを有効にします。
- 設定をコミットします。
[edit]
user@host# commit
検出されたすべてのIoTデバイスをJuniper ATP Cloudポータルで確認しましょう。
ATP Cloudで検出されたIoTデバイスを表示する
検出された IoT デバイスをJuniper ATP Cloudポータルで表示するには、 Minotor > IoT デバイス ページに移動します。
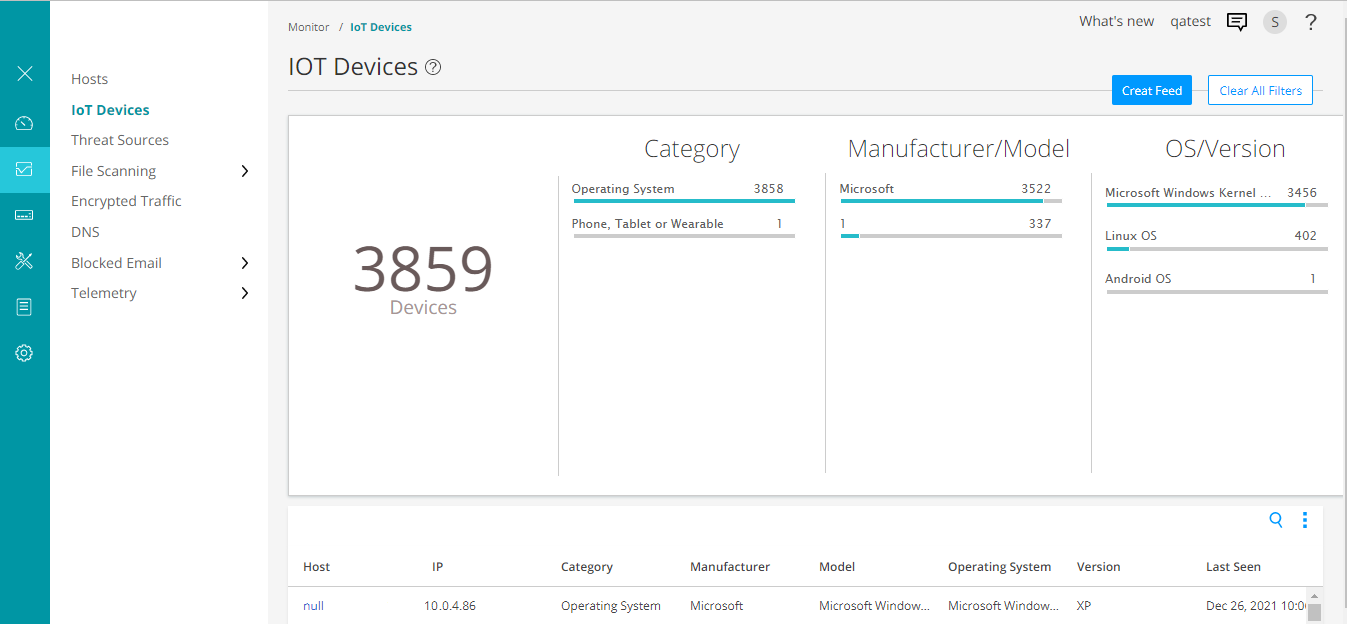
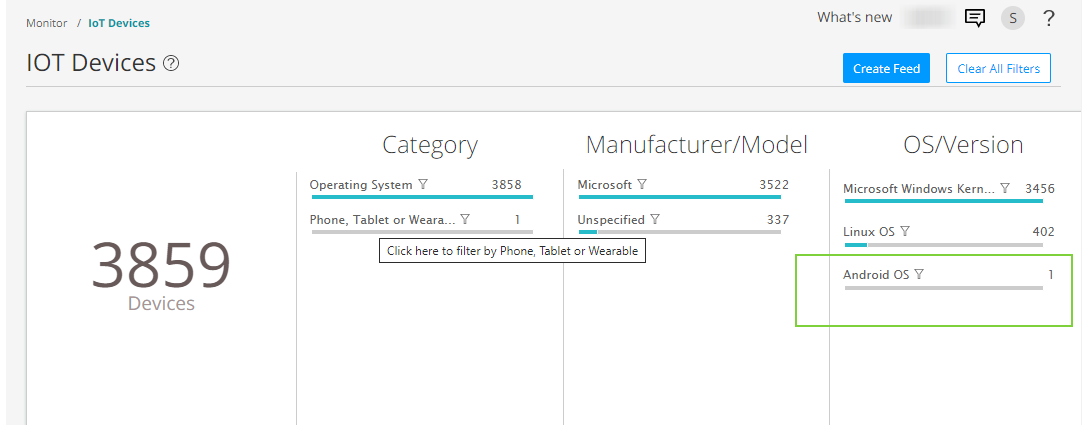
クリックして、デバイスのカテゴリ、製造元、オペレーティング システムの種類に基づいて IoT デバイスをフィルター処理できます。
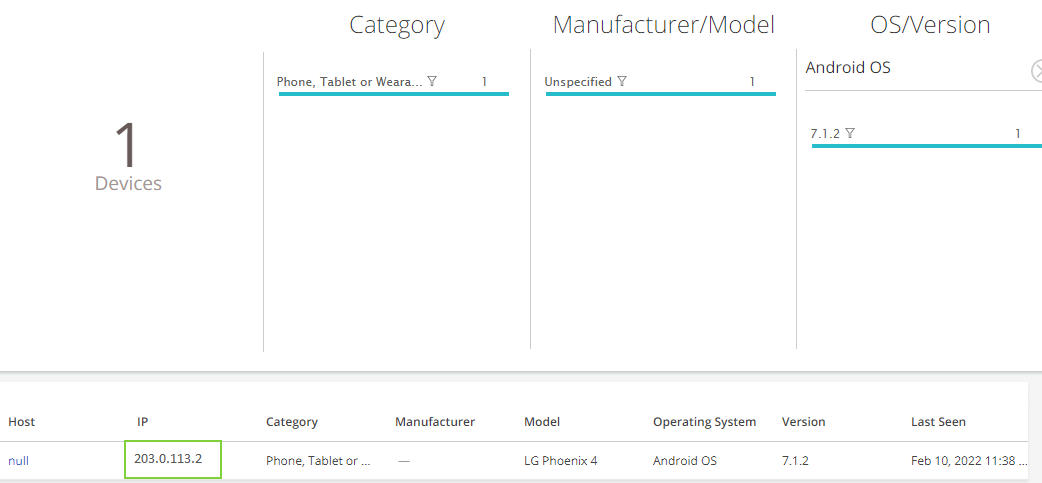
このページには、IP アドレス、タイプ、製造元、モデルなどの詳細を含む IoT デバイスが一覧表示されます。これらの詳細を使用して、脅威フィードを監視および作成し、セキュリティ ポリシーを適用できます。
脅威フィードの作成
Juniper ATP CloudがIoTデバイスを識別したら、脅威フィードを作成できます。セキュリティ デバイスが動的アドレス グループの形式で脅威フィードをダウンロードすると、フィードのセキュリティ ポリシーを使用して、これらの IoT デバイスの受信トラフィックと送信トラフィックに対して強制アクションを実行できます。
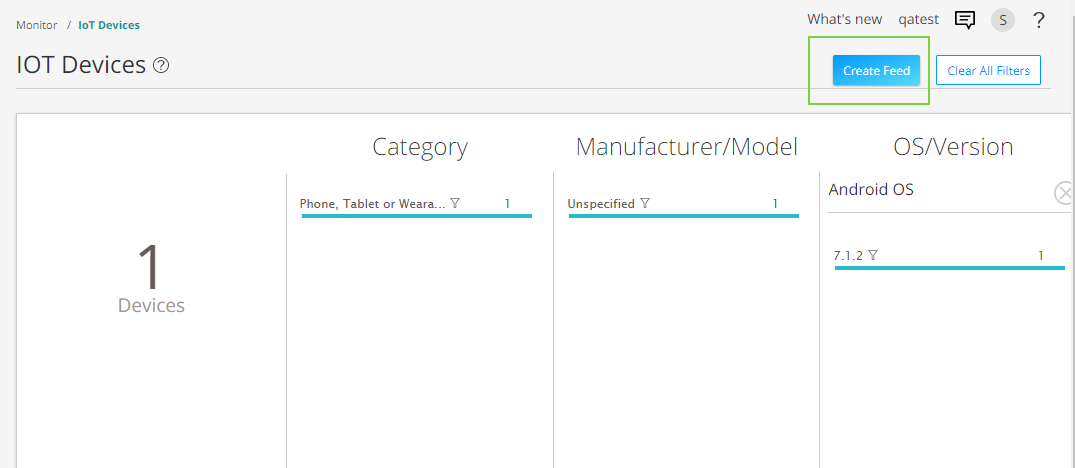
- [Minotor > IoT デバイス] ページに移動し、[フィードの作成] オプションをクリックします。
-
プラス記号 (+) をクリックします。[Add New Feed] ページが表示されます。
この例では、TTL(Time-to-live)が 7 日間のフィード名 android_phone_user を使用します。
次のフィールドの設定を完了します。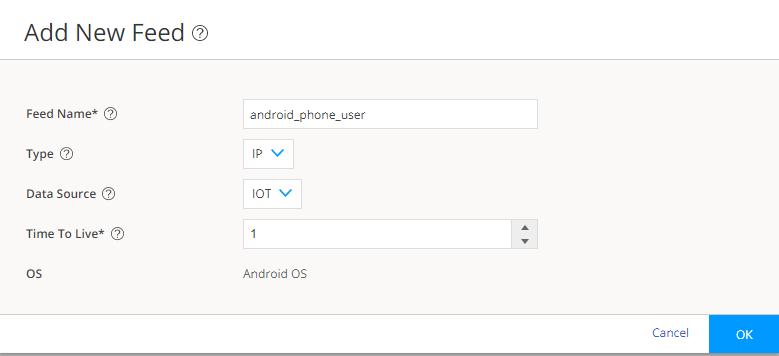
-
フィード名:
脅威フィードの一意の名前を入力します。フィード名は英数字で始める必要があり、文字、数字、アンダースコアを含めることができます。スペースは使用できません。長さは 8 から 63 文字です。
-
種類: フィードのコンテンツ タイプとして [IP] を選択します。
-
データソース:フィードを IOT として作成するデータソースを選択します。
-
存続時間:必要なフィードエントリをアクティブにする日数を入力します。フィードエントリが Time-to-live(TTL)値を超えると、フィードエントリは自動的に削除されます。使用可能な範囲は 1 日から 365 日です。
-
- [ OK ] をクリックして変更を保存します。
- 適応型脅威プロファイリングの設定>に移動します。このページには、作成されたすべての脅威フィードが表示されます。脅威フィードのandroid_phone_userがページに一覧表示されます。
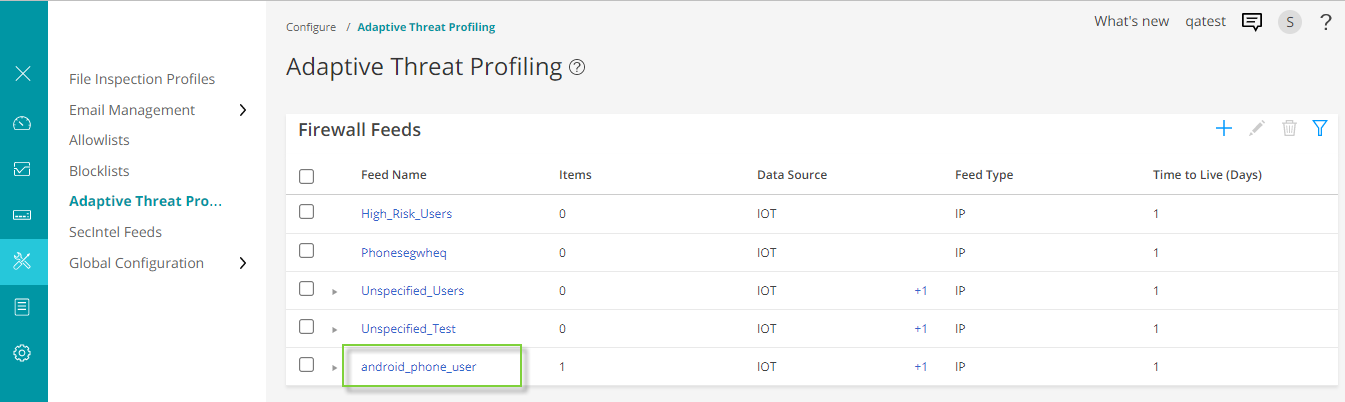
脅威フィードをクリックすると、脅威フィードに含まれる IP アドレスが表示されます。

- セキュリティ デバイスがフィードをダウンロードしていることを確認します。ダウンロードは一定の間隔で自動的に行われますが、数分かかる場合があります。
user@host> show services security-intelligence sec-profiling-feed status
Category name            :SecProfiling
  Feed name              :Android_Phone_User
    Feed type            :IP
    Last post time       :N/A
    Last post status code:N/A
    Last post status     :N/A
  Feed name              :IT_feed
    Feed type            :IP
    Last post time       :N/A
    Last post status code:N/A
    Last post status     :N/A
  Feed name              :High_Risk_Users
    Feed type            :IP
    Last post time       :N/A
    Last post status code:N/A
    Last post status     :N/A
次のコマンドを使用して、脅威フィードを手動でダウンロードできます。
request services security-intelligence download status ||match android_phone_user
では、ダウンロードした脅威フィードを使用してセキュリティポリシーを作成しましょう。
適応型脅威プロファイリングフィードを使用したセキュリティポリシーの作成
セキュリティ デバイスが脅威フィードをダウンロードすると、セキュリティ ポリシーで動的アドレス グループとして参照できます。動的アドレスとは、特定のドメインに属するIoTデバイスのIPアドレスの集まりです。
この例では、Android フォンからのトラフィックを検出し、トラフィックをブロックするポリシーを作成します。
- セキュリティ ポリシーの一致条件を定義します。
[edit]
user@host# set security policies global policy Block_Android_Traffic match source-address android_phone_user
user@host# set security policies global policy Block_Android_Traffic match destination-address any
user@host# set security policies global policy Block_Android_Traffic match application any
- セキュリティ ポリシー アクションを定義します。
[edit]
user@host# set security policies global policy Block_Android_Traffic then deny
この例では、設定をコミットすると、セキュリティ デバイスは特定のドメインに属する IoT デバイスの HTTP トラフィックをブロックします。
詳細については、 適応型脅威プロファイリングの構成を参照してください。
業績
設定モードから、コマンドを入力して設定を show security 確認します。出力結果に意図した設定内容が表示されない場合は、この例の設定手順を繰り返して設定を修正します。
               [edit]


               user@host# show security policies
from-zone trust to-zone untrust {
    policy P1 {
        match {
            source-address any;
            destination-address any;
            application any;
        }
        then {
            permit;
        }
    }
}
from-zone untrust to-zone trust {
    policy P2 {
        match {
            source-address any;
            destination-address any;
            application any;
        }
        then {
            permit;
        }
    }
    application-services {
        security-metadata-streaming-policy p1;
    }
}
from-zone trust to-zone cloud {
    policy P3 {
        match {
            source-address any;
            destination-address any;
            application any;
        }
        then {
            permit;
        }
    }
    application-services {
        security-metadata-streaming-policy p2;
    }
}
user@host# show security policies global
policy Block_Android_Traffic {
    match {
        source-address android_phone_user;
        destination-address any;
        application any;
    }
    then {
        deny;
    }
}
セキュリティ ゾーンを確認します。
               [edit]


               user@host# show security zones
security-zone trust {
    interfaces {
        ge-0/0/2.0 {
            host-inbound-traffic {
                system-services {
                    all;
                }
                protocols {
                    all;
                }
            }
        }
    }
    application-tracking;
}
security-zone untrust {
    interfaces {
        ge-0/0/4.0 {
            host-inbound-traffic {
                system-services {
                    all;
                }
                protocols {
                    all;
                }
            }
        }
        ge-0/0/3.0 {
            host-inbound-traffic {
                system-services {
                    all;
                }
                protocols {
                    all;
                }
            }
        }
    }
    application-tracking;
}
security-zone cloud {
    interfaces {
        ge-0/0/0.1 {
            host-inbound-traffic {
                system-services {
                    all;
                }
                protocols {
                    all;
                }
            }
        }
    }
    application-tracking;
}
サービスを表示
               [edit]


               user@host# show services
advanced-anti-malware {
    dynamic-filter {
        traceoptions {
            file dyn-filterd-log size 1g world-readable;
            level all;
            flag all;
        }
    }
    connection {
        url https://srxapi.us-west-2.sky.junipersecurity.net;
        authentication {
            tls-profile aamw-ssl;
        }
    }
}
ssl {
    initiation {
        profile aamw-ssl {
            trusted-ca [ aamw-secintel-ca aamw-cloud-ca ];
            client-certificate aamw-srx-cert;
            actions {
                crl {
                    disable;
                }
            }
        }
    }
}
security-metadata-streaming {
    policy p1 {
        dynamic-filter;
    }
    policy p2 {
        dynamic-filter;
    }
}
security-intelligence {
    url https://cloudfeeds.sky.junipersecurity.net/api/manifest.xml;
    authentication {
        tls-profile aamw-ssl;
    }
}
デバイスでの機能の設定が完了したら、設定モードから「commit」と入力します。
検証
フィードの概要とステータスを確認する
目的:セキュリティ デバイスが動的アドレス グループの形式で IP アドレス フィードを受信しているかどうかを確認します。
アクション:次のコマンドを実行します。
               user@host> show services advanced-anti-malware dynamic-filter status
Dynamic Filter Server Connection Status:
  Server Hostname: srxapi.us-west-2.sky.junipersecurity.net
  Server Port: 443
  Proxy Hostname: None
  Proxy Port: None
  Control Plane
    Connection Status: Connected
    Last Successful Connect: 2022-02-12 09:51:50 PST
    Pkts Sent: 3
    Pkts Received: 42
意味出力には、Juniper ATP Cloudサーバーの接続ステータスとその他の詳細が表示されます。