例:ルート フィルターを使用した MED の設定
この例では、ルート フィルターを使用して、BGP アップデート メッセージでアドバタイズするように複数出口識別子(MED)メトリックを変更するポリシーを設定する方法を示します。
要件
この例を構成する前に、デバイスの初期化以上の特別な構成は必要ありません。
概要
BGP アップデート メッセージ内のアドバタイズされた MED メトリックを変更するルート フィルター ポリシーを設定するには、ポリシー アクションに ステートメントを含め ます。metric
図 1 は、内部ピアセッションと隣接する自律システム(AS)への複数の出口点を持つ典型的なネットワークを示しています。
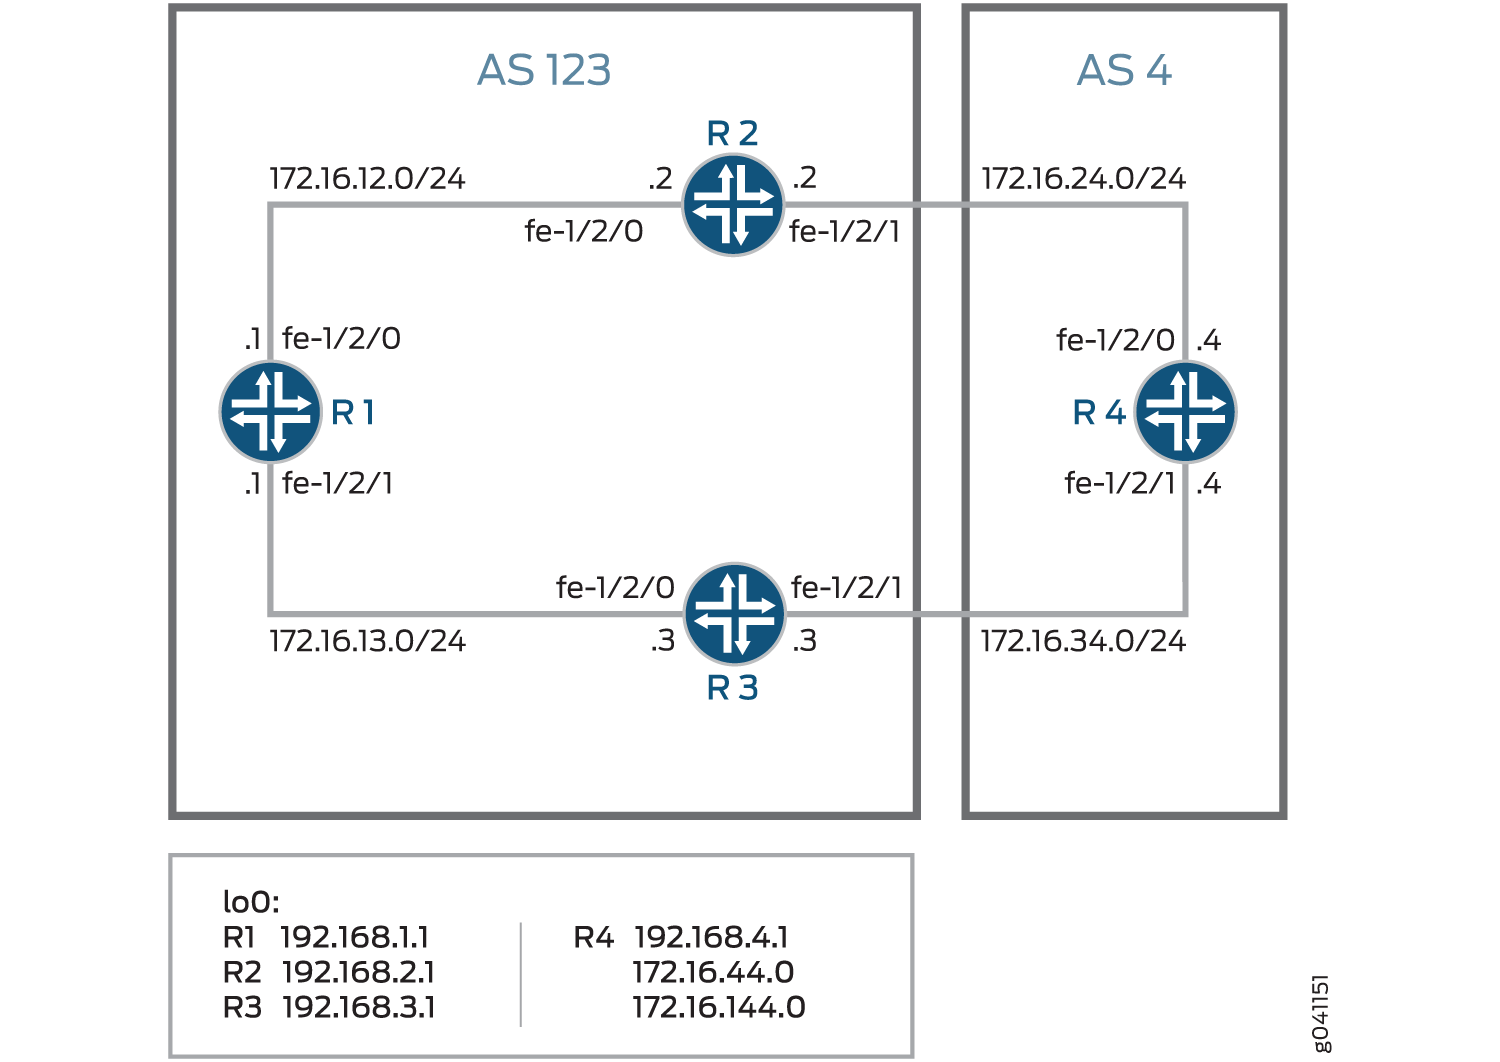
デバイスR4には、アドバタイズされたプレフィックスをシミュレートするように設定された複数のループバックインターフェイスがあります。追加のループバック インターフェイス アドレスは、172.16.44.0/32 および 172.16.144.0/32 です。この例では、172.16.144.0を除くすべてのルートに対して、デバイスR3にMED値30をアドバタイズするようにデバイスR4を設定する方法を示しています。172.16.144.0の場合、MED値10はデバイス3にアドバタイズされます。ルートプレフィックスに関係なく、MED値20がデバイスR2にアドバタイズされます。
設定
CLIクイック構成
この例をすばやく設定するには、次のコマンドをコピーしてテキストファイルに貼り付け、改行を削除して、ネットワーク構成に合わせて必要な詳細を変更し、[edit]階層レベルのCLIにコマンドをコピー&ペーストしてください。
デバイスR1
set interfaces fe-1/2/0 unit 1 family inet address 172.16.12.1/24
set interfaces fe-1/2/1 unit 2 family inet address 172.16.13.1/24
set interfaces lo0 unit 1 family inet address 192.168.1.1/32
set protocols bgp group internal type internal
set protocols bgp group internal local-address 192.168.1.1
set protocols bgp group internal export send-direct
set protocols bgp group internal neighbor 192.168.2.1
set protocols bgp group internal neighbor 192.168.3.1
set protocols ospf area 0.0.0.0 interface lo0.1 passive
set protocols ospf area 0.0.0.0 interface fe-1/2/0.1
set protocols ospf area 0.0.0.0 interface fe-1/2/1.2
set policy-options policy-statement send-direct term 1 from protocol direct
set policy-options policy-statement send-direct term 1 then accept
set routing-options autonomous-system 123
set routing-options router-id 192.168.1.1
デバイスR2
set interfaces fe-1/2/0 unit 3 family inet address 172.16.12.2/24
set interfaces fe-1/2/1 unit 4 family inet address 172.16.24.2/24
set interfaces lo0 unit 2 family inet address 192.168.2.1/32
set protocols bgp group internal type internal
set protocols bgp group internal local-address 192.168.2.1
set protocols bgp group internal export send-direct
set protocols bgp group internal neighbor 192.168.1.1
set protocols bgp group internal neighbor 192.168.3.1
set protocols bgp group external type external
set protocols bgp group external export send-direct
set protocols bgp group external peer-as 4
set protocols bgp group external neighbor 172.16.24.4
set protocols ospf area 0.0.0.0 interface lo0.2 passive
set protocols ospf area 0.0.0.0 interface fe-1/2/0.3
set protocols ospf area 0.0.0.0 interface fe-1/2/1.4
set policy-options policy-statement send-direct term 1 from protocol direct
set policy-options policy-statement send-direct term 1 then accept
set routing-options autonomous-system 123
set routing-options router-id 192.168.2.1
デバイスR3
set interfaces fe-1/2/0 unit 5 family inet address 172.16.13.3/24
set interfaces fe-1/2/1 unit 6 family inet address 172.16.34.3/24
set interfaces lo0 unit 3 family inet address 192.168.3.1/32
set protocols bgp group internal type internal
set protocols bgp group internal local-address 192.168.3.1
set protocols bgp group internal export send-direct
set protocols bgp group internal neighbor 192.168.1.1
set protocols bgp group internal neighbor 192.168.2.1
set protocols bgp group external type external
set protocols bgp group external export send-direct
set protocols bgp group external peer-as 4
set protocols bgp group external neighbor 172.16.34.4
set protocols ospf area 0.0.0.0 interface lo0.3 passive
set protocols ospf area 0.0.0.0 interface fe-1/2/0.5
set protocols ospf area 0.0.0.0 interface fe-1/2/1.6
set policy-options policy-statement send-direct term 1 from protocol direct
set policy-options policy-statement send-direct term 1 then accept
set routing-options autonomous-system 123
set routing-options router-id 192.168.3.1
デバイス R4
set interfaces fe-1/2/0 unit 7 family inet address 172.16.24.4/24
set interfaces fe-1/2/1 unit 8 family inet address 172.16.34.4/24
set interfaces lo0 unit 4 family inet address 192.168.4.1/32
set interfaces lo0 unit 4 family inet address 172.16.44.0/32
set interfaces lo0 unit 4 family inet address 172.16.144.0/32
set protocols bgp group external type external
set protocols bgp group external export send-direct
set protocols bgp group external peer-as 123
set protocols bgp group external neighbor 172.16.34.3 export med-10
set protocols bgp group external neighbor 172.16.34.3 export med-30
set protocols bgp group external neighbor 172.16.24.2 metric-out 20
set policy-options policy-statement med-10 from route-filter 172.16.144.0/32 exact
set policy-options policy-statement med-10 then metric 10
set policy-options policy-statement med-10 then accept
set policy-options policy-statement med-30 from route-filter 0.0.0.0/0 longer
set policy-options policy-statement med-30 then metric 30
set policy-options policy-statement med-30 then accept
set policy-options policy-statement send-direct term 1 from protocol direct
set policy-options policy-statement send-direct term 1 then accept
set routing-options autonomous-system 4
set routing-options router-id 192.168.4.1
デバイスR1の設定
ステップバイステップでの手順
次の例では、設定階層のいくつかのレベルに移動する必要があります。CLIのナビゲーションについては、Junos OS CLIユーザーガイドの 設定モードでCLIエディターを使用する を参照してください。
Device R1を設定するには:
デバイスインターフェイスを設定します。
[edit interfaces fe-1/2/0 unit 1]
user@R1# set family inet address 172.16.12.1/24
[edit interfaces fe-1/2/1 unit 2]
user@R1# set family inet address 172.16.13.1/24
[edit interfaces lo0 unit 1]
user@R1# set family inet address 192.168.1.1/32
BGP を設定します。
[edit protocols bgp group internal]
user@R1# set type internal
user@R1# set local-address 192.168.1.1
user@R1# set export send-direct
user@R1# set neighbor 192.168.2.1
user@R1# set neighbor 192.168.3.1
OSPFを設定します。
[edit protocols ospf area 0.0.0.0]
user@R1# set interface lo0.1 passive
user@R1# set interface fe-1/2/0.1
user@R1# set interface fe-1/2/1.2
直接ルートを受け入れるポリシーを設定します。
このシナリオの他の有用なオプションは、OSPF またはローカル ルートで学習したルートを受け入れることかもしれません。
[edit policy-options policy-statement send-direct term 1]
user@R1# set from protocol direct
user@R1# set then accept
ルーター ID と AS(自律システム)番号を設定します。
[edit routing-options]
user@R1# set autonomous-system 123
user@R1# set router-id 192.168.1.1
結果
設定モードから、show interfaces 、show protocols、show policy-options、およびshow routing-options のコマンドを入力して設定を確認します。出力結果に意図した設定内容が表示されない場合は、この例の手順を繰り返して設定を修正します。
user@R1# show interfaces
fe-1/2/0 {
    unit 1 {
        family inet {
            address 172.16.12.1/24;
        }
    }
}
fe-1/2/1 {
    unit 2 {
        family inet {
            address 172.16.13.1/24;
        }
    }
}
lo0 {
    unit 1 {
        family inet {
            address 192.168.1.1/32;
        }
    }
}
user@R1# show protocols
bgp {
    group internal {
        type internal;
        local-address 192.168.1.1;
        export send-direct;
        neighbor 192.168.2.1;
        neighbor 192.168.3.1;
    }
}
ospf {
    area 0.0.0.0 {
        interface lo0.1 {
            passive;
        }
        interface fe-1/2/0.1;
        interface fe-1/2/1.2;
    }
}
user@R1# show policy-options
policy-statement send-direct {
    term 1 {
        from protocol direct;
        then accept;
    }
}
user@R1# show routing-options
autonomous-system 123;
router-id 192.168.1.1;
デバイスの設定が完了したら、設定モードから commit を入力します。
デバイスR2の設定
ステップバイステップでの手順
次の例では、設定階層のいくつかのレベルに移動する必要があります。CLIのナビゲーションについては、Junos OS CLIユーザーガイドの 設定モードでCLIエディターを使用する を参照してください。
デバイスR2 を設定するには:
デバイスインターフェイスを設定します。
[edit interfaces fe-1/2/0 unit 3]
user@R2# set family inet address 172.16.12.21/24
[edit interfaces fe-1/2/1 unit 4]
user@R2# set family inet address 172.16.24.2/24
[edit interfaces lo0 unit 2]
user@R2# set family inet address 192.168.2.1/32
BGP を設定します。
[edit protocols bgp group internal]
user@R2# set type internal
user@R2# set local-address 192.168.2.1
user@R2# set export send-direct
user@R2# set neighbor 192.168.1.1
user@R2# set neighbor 192.168.3.1
[edit protocols bgp group external]
user@R2# set type external
user@R2# set export send-direct
user@R2# set peer-as 4
user@R2# set neighbor 172.16.24.4
OSPFを設定します。
[edit protocols ospf area 0.0.0.0]
user@R2# set interface lo0.2 passive
user@R2# set interface fe-1/2/0.3
user@R2# set interface fe-1/2/1.4
直接ルートを受け入れるポリシーを設定します。
このシナリオの他の有用なオプションは、OSPF またはローカル ルートで学習したルートを受け入れることかもしれません。
[edit policy-options policy-statement send-direct term 1]
user@R2# set from protocol direct
user@R2# set then accept
ルーター ID と AS(自律システム)番号を設定します。
[edit routing-options]
user@R2# set autonomous-system 123
user@R2# set router-id 192.168.2.1
結果
設定モードから、show interfaces 、show protocols、show policy-options、およびshow routing-options のコマンドを入力して設定を確認します。出力結果に意図した設定内容が表示されない場合は、この例の手順を繰り返して設定を修正します。
user@R2# show interfaces
fe-1/2/0 {
    unit 3 {
        family inet {
            address 172.16.12.2/24;
        }
    }
}
fe-1/2/1 {
    unit 4 {
        family inet {
            address 172.16.24.2/24;
        }
    }
}
lo0 {
    unit 2 {
        family inet {
            address 192.168.2.1/32;
        }
    }
}
user@R2# show protocols
bgp {
    group internal {
        type internal;
        local-address 192.168.2.1;
        export send-direct;
        neighbor 192.168.1.1;
        neighbor 192.168.3.1;
    }
    group external {
        type external;
        export send-direct;
        peer-as 4;
        neighbor 172.16.24.4;
    }
}
ospf {
    area 0.0.0.0 {
        interface lo0.2 {
            passive;
        }
        interface fe-1/2/0.3;
        interface fe-1/2/1.4;
    }
}
user@R2# show policy-options
policy-statement send-direct {
    term 1 {
        from protocol direct;
        then accept;
    }
}
user@R2# show routing-options
autonomous-system 123;
router-id 192.168.2.1;
デバイスの設定が完了したら、設定モードから commit を入力します。
デバイスR3の設定
ステップバイステップでの手順
次の例では、設定階層のいくつかのレベルに移動する必要があります。CLIのナビゲーションについては、Junos OS CLIユーザーガイドの 設定モードでCLIエディターを使用する を参照してください。
デバイス R3 を設定するには:
デバイスインターフェイスを設定します。
[edit interfaces fe-1/2/0 unit 5]
user@R3# set family inet address 172.16.13.3/24
[edit interfaces fe-1/2/1 unit 6]
user@R3# set family inet address 172.16.34.3/24
[edit interfaces lo0 unit 3]
user@R3# set family inet address 192.168.3.1/32
BGP を設定します。
[edit protocols bgp group internal]
user@R3# set type internal
user@R3# set local-address 192.168.3.1
user@R3# set export send-direct
user@R3# set neighbor 192.168.1.1
user@R3# set neighbor 192.168.2.1
[edit protocols bgp group external]
user@R3# set type external
user@R3# set export send-direct
user@R3# set peer-as 4
user@R3# set neighbor 172.16.34.4
OSPFを設定します。
[edit protocols ospf area 0.0.0.0]
user@R3# set interface lo0.3 passive
user@R3# set interface fe-1/2/0.5
user@R3# set interface fe-1/2/1.6
直接ルートを受け入れるポリシーを設定します。
このシナリオの他の有用なオプションは、OSPF またはローカル ルートで学習したルートを受け入れることかもしれません。
[edit policy-options policy-statement send-direct term 1]
user@R3# set from protocol direct
user@R3# set then accept
ルーター ID と AS(自律システム)番号を設定します。
[edit routing-options]
user@R3# set autonomous-system 123
user@R3# set router-id 192.168.3.1
結果
設定モードから、show interfaces 、show protocols、show policy-options、およびshow routing-options のコマンドを入力して設定を確認します。出力結果に意図した設定内容が表示されない場合は、この例の手順を繰り返して設定を修正します。
user@R3# show interfaces
fe-1/2/0 {
    unit 5 {
        family inet {
            address 172.16.13.3/24;
        }
    }
}
fe-1/2/1 {
    unit 6 {
        family inet {
            address 172.16.34.3/24;
        }
    }
}
lo0 {
    unit 3 {
        family inet {
            address 192.168.3.1/32;
        }
    }
}
user@R3# show protocols
bgp {
    group internal {
        type internal;
        local-address 192.168.3.1;
        export send-direct;
        neighbor 192.168.1.1;
        neighbor 192.168.2.1;
    }
    group external {
        type external;
        export send-direct;
        peer-as 4;
        neighbor 172.16.34.4;
    }
}
ospf {
    area 0.0.0.0 {
        interface lo0.3 {
            passive;
        }
        interface fe-1/2/0.5;
        interface fe-1/2/1.6;
    }
}
user@R3# show policy-options
policy-statement send-direct {
    term 1 {
        from protocol direct;
        then accept;
    }
}
user@R3# show routing-options
autonomous-system 123;
router-id 192.168.3.1;
デバイスの設定が完了したら、設定モードから commit を入力します。
デバイスR4の設定
ステップバイステップでの手順
次の例では、設定階層のいくつかのレベルに移動する必要があります。CLIのナビゲーションについては、Junos OS CLIユーザーガイドの 設定モードでCLIエディターを使用する を参照してください。
デバイスR4 を設定するには:
デバイスインターフェイスを設定します。
[edit interfaces fe-1/2/0 unit 7]
user@R4# set family inet address 172.16.24.4/24
[edit interfaces fe-1/2/1 unit 8]
user@R4# set family inet address 172.16.34.4/24
[edit interfaces lo0 unit 4]
user@R4# set family inet address 192.168.4.1/32
user@R4# set family inet address 172.16.44.0/32
user@R4# set family inet address 172.16.144.0/32
デバイスR4には、アドバタイズされたプレフィックスをシミュレートする複数のループバックインターフェイスアドレスがあります。
直接ルートを受け入れるポリシーを設定します。
このシナリオの他の有用なオプションは、OSPF またはローカル ルートで学習したルートを受け入れることかもしれません。
[edit policy-options policy-statement send-direct term 1]
user@R4# set from protocol direct
user@R4# set then accept
BGP を設定します。
[edit protocols bgp group external]
user@R4# set type external
user@R4# set export send-direct
user@R4# set peer-as 123
2つのMEDポリシーを設定します。
[edit policy-options]
set policy-statement med-10 from route-filter 172.16.144.0/32 exact
set policy-statement med-10 then metric 10
set policy-statement med-10 then accept
set policy-statement med-30 from route-filter 0.0.0.0/0 longer
set policy-statement med-30 then metric 30
set policy-statement med-30 then accept
2つのEBGPネイバーを設定し、2つのMEDポリシーをデバイスR3に適用し、MED値20をデバイスR2に適用します。
[edit protocols bgp group external]
user@R4# set neighbor 172.16.34.3 export med-10
user@R4# set neighbor 172.16.34.3 export med-30
user@R4# set neighbor 172.16.24.2 metric-out 20
ルーター ID と AS(自律システム)番号を設定します。
[edit routing-options]
user@R4# set autonomous-system 4
user@R4# set router-id 192.168.4.1
結果
設定モードから、show interfaces 、show protocols、show policy-options、およびshow routing-options のコマンドを入力して設定を確認します。出力結果に意図した設定内容が表示されない場合は、この例の手順を繰り返して設定を修正します。
user@R4# show interfaces
fe-1/2/0 {
    unit 7 {
        family inet {
            address 172.16.24.4/24;
        }
    }
}
fe-1/2/1 {
    unit 8 {
        family inet {
            address 172.16.34.4/24;
        }
    }
}
lo0 {
    unit 4 {
        family inet {
            address 192.168.4.1/32;
            address 172.16.44.0/32;
            address 172.16.144.0/32;
        }
    }
}
user@R4# show protocols
bgp {
    group external {
        type external;
        export send-direct;
        peer-as 123;
        neighbor 172.16.24.2 {
            metric-out 20;
        }
        neighbor 172.16.34.3 {
            export [ med-10 med-30 ];
        }
    }
}
user@R4# show policy-options
policy-statement med-10 {
    from {
        route-filter 172.16.144.0/32 exact;
    }
    then {
        metric 10;
        accept;
    }
}
policy-statement med-30 {
    from {
        route-filter 0.0.0.0/0 longer;
    }
    then {
        metric 30;
        accept;
    }
}
policy-statement send-direct {
    term 1 {
        from protocol direct;
        then accept;
    }
}
user@R4# show routing-options
autonomous-system 4;
router-id 192.168.4.1;
デバイスの設定が完了したら、設定モードから commit を入力します。
検証
設定が正常に機能していることを確認します。
デバイスR1からデバイスR4へのアクティブパスの確認
目的
アクティブパスがデバイスR2を通過することを確認します。
アクション
動作モードからshow route protocol bgpコマンドを入力します。
user@R1> show route protocol bgp
inet.0: 13 destinations, 19 routes (13 active, 0 holddown, 0 hidden)
+ = Active Route, - = Last Active, * = Both

172.16.12.0/24       [BGP/170] 4d 01:13:32, localpref 100, from 192.168.2.1
                      AS path: I
                    > to 172.16.12.2 via fe-1/2/0.1
172.16.13.0/24       [BGP/170] 3d 05:36:10, localpref 100, from 192.168.3.1
                      AS path: I
                    > to 172.16.13.3 via fe-1/2/1.2
172.16.24.0/24       [BGP/170] 4d 01:13:32, localpref 100, from 192.168.2.1
                      AS path: I
                    > to 172.16.12.2 via fe-1/2/0.1
172.16.34.0/24       [BGP/170] 3d 05:36:10, localpref 100, from 192.168.3.1
                      AS path: I
                    > to 172.16.13.3 via fe-1/2/1.2
172.16.44.0/32     *[BGP/170] 00:06:03, MED 20, localpref 100, from 192.168.2.1
                      AS path: 4 I
                    > to 172.16.12.2 via fe-1/2/0.1
172.16.144.0/32 *[BGP/170] 00:06:03, MED 10, localpref 100, from 192.168.3.1
                      AS path: 4 I
                    > to 172.16.13.3 via fe-1/2/1.2
192.168.2.1/32      [BGP/170] 4d 01:13:32, localpref 100, from 192.168.2.1
                      AS path: I
                    > to 172.16.12.2 via fe-1/2/0.1
192.168.3.1/32      [BGP/170] 3d 05:36:10, localpref 100, from 192.168.3.1
                      AS path: I
                    > to 172.16.13.3 via fe-1/2/1.2
192.168.4.1/32     *[BGP/170] 00:06:03, MED 20, localpref 100, from 192.168.2.1
                      AS path: 4 I
                    > to 172.16.12.2 via fe-1/2/0.1
意味
出力からは、デバイスR4がアドバタイズしたルートへの優先パスが、172.16.144.0/32を除くすべてのルートについてデバイスR2を経由することを示しています。172.16.144.0/32の場合、優先パスはデバイスR3を経由します。
デバイスR4がルートを正しく送信していることを確認する
目的
デバイスR4が、デバイスR2に値20、デバイスR3に値30の更新メッセージを送信していることを確認します。
アクション
動作モードからshow route advertising-protocol bgpコマンドを入力します。
user@R4> show route advertising-protocol bgp 172.16.24.2
inet.0: 11 destinations, 13 routes (11 active, 0 holddown, 0 hidden)
  Prefix                  Nexthop              MED     Lclpref    AS path
* 172.16.24.0/24           Self                 20                 I
* 172.16.34.0/24           Self                 20                 I
* 172.16.44.0/32          Self                 20                 I
* 172.16.144.0/32      Self                 20                 I
* 192.168.4.1/32          Self                 20                 I
user@R4> show route advertising-protocol bgp 172.16.34.3
inet.0: 11 destinations, 13 routes (11 active, 0 holddown, 0 hidden)
  Prefix                  Nexthop              MED     Lclpref    AS path
* 172.16.24.0/24           Self                 30                 I
* 172.16.34.0/24           Self                 30                 I
* 172.16.44.0/32          Self                 30                 I
* 172.16.144.0/32      Self                 10                 I
* 192.168.4.1/32          Self                 30                 I
意味
MED列は、デバイスR4が正しいMED値を2つのEBGPネイバーに送信していることを示しています。