例:IS-ISフラッドグループの設定
必要条件
この例では、以下のハードウェアおよびソフトウェアコンポーネントを使用しています。
ルーター x 4。
Junos OS
始める前に:
ルーターでIS-ISルーティングプロトコルを設定します。
特定のエリアIDを持つIS-ISインターフェイスを設定し、要件に応じてフラッド動作を変更します。
概要
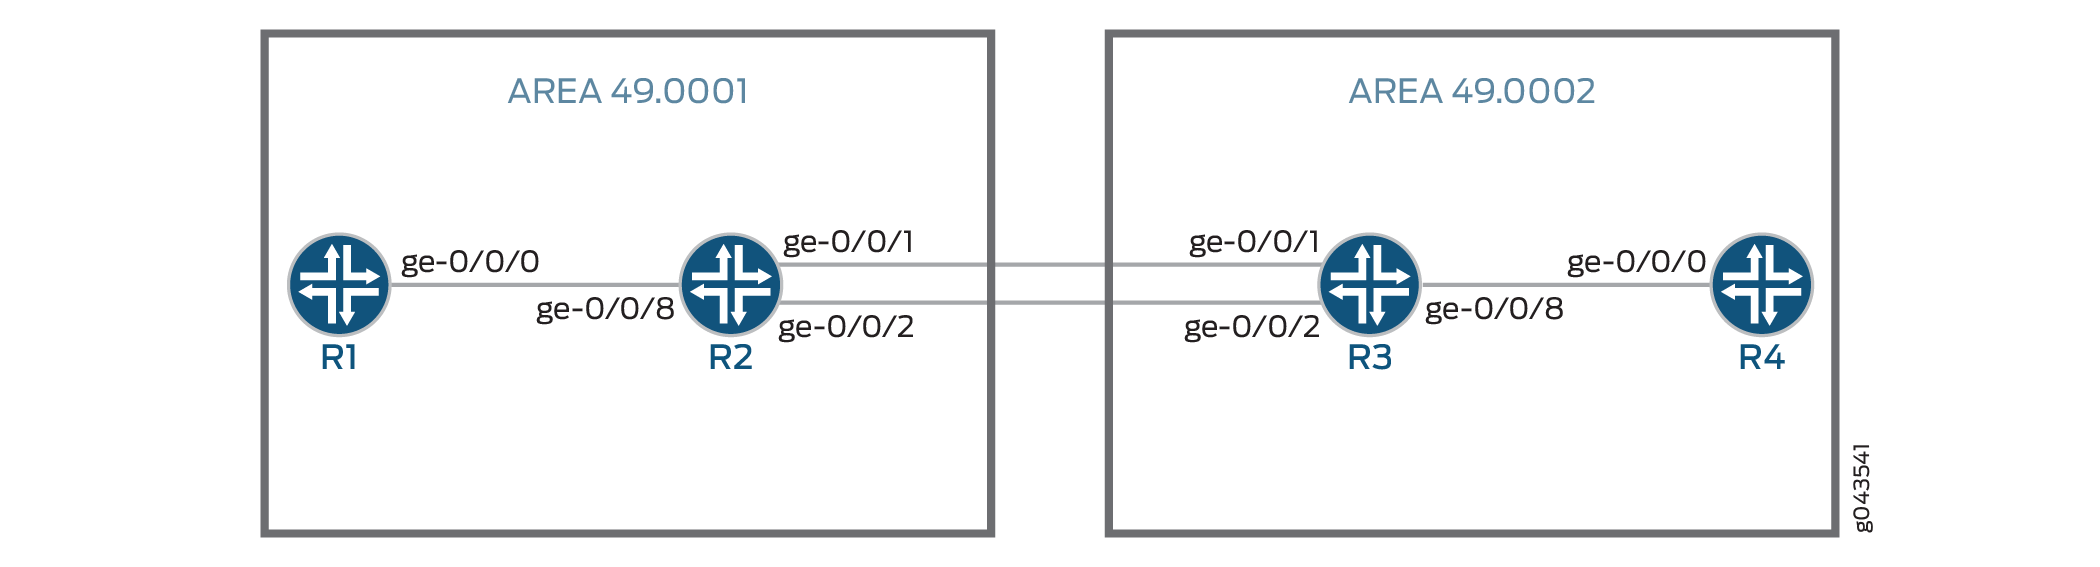
位相幾何学
このトポロジーでは、フラッドグループがルーターR2に設定されています。
構成
CLIクイックコンフィグレーション
この例をすばやく設定するには、以下のコマンドをコピーしてテキスト ファイルに貼り付け、改行を削除して、ネットワーク構成に合わせて必要な詳細を変更し、 [edit] 階層レベルのCLIにコマンドをコピー アンド ペーストします。
R1
set interfaces ge-0/0/0 description "Connected To R2"
set interfaces ge-0/0/0 unit 0 family inet address 81.1.3.3/24
set interfaces ge-0/0/0 unit 0 family iso
set interfaces lo0 unit 0 family inet address 81.3.3.3/32
set interfaces lo0 unit 0 family iso address 49.0001.0810.0300.3003.00
set protocols isis interface all
set protocols isis interface fxp0.0 disable
R2
set interfaces ge-0/0/1 description "Connected To R3"
set interfaces ge-0/0/1 unit 0 family inet address 30.1.1.1/32
set interfaces ge-0/0/1 unit 0 family iso
set interfaces ge-0/0/2 description "Connected To R3"
set interfaces ge-0/0/2 unit 0 family inet address 40.1.1.1/32
set interfaces ge-0/0/2 unit 0 family iso
set interfaces ge-0/0/8 description "Connected To R1"
set interfaces ge-0/0/8 unit 0 family inet address 81.1.3.1/24
set interfaces ge-0/0/8 unit 0 family iso
set interfaces lo0 unit 0 family inet address 81.1.1.1/32
set interfaces lo0 unit 0 family iso address 49.0001.0810.0100.1001.00
set protocols isis interface all
set protocols isis interface fxp0.0 disable
R3
set interfaces ge-0/0/1 description "Connected To R2"
set interfaces ge-0/0/1 unit 0 family inet address 30.1.1.2/32
set interfaces ge-0/0/1 unit 0 family iso
set interfaces ge-0/0/2 description "Connected To R2"
set interfaces ge-0/0/2 unit 0 family inet address 40.1.1.2/32
set interfaces ge-0/0/2 unit 0 family iso
set interfaces ge-0/0/8 description "Connected To R4"
set interfaces ge-0/0/8 unit 0 family inet address 81.2.4.2/24
set interfaces ge-0/0/8 unit 0 family iso
set interfaces lo0 unit 0 family inet address 81.2.2.2/32
set interfaces lo0 unit 0 family iso address 49.0002.0810.0200.2002.00
set protocols isis interface all
set protocols isis interface fxp0.0 disable
R4
set interfaces ge-0/0/0 description "Connected To R3"
set interfaces ge-0/0/0 unit 0 family inet address 81.2.4.4/24
set interfaces ge-0/0/0 unit 0 family iso
set interfaces lo0 unit 0 family inet address 81.4.4.4/32
set interfaces lo0 unit 0 family iso address 49.0002.0810.0400.4004.00
set protocols isis interface all
set protocols isis interface fxp0.0 disable
1. すべての設定後に commit します。
2. 以下は、R2 で flood-group を設定する前の出力です。R1、R2、R3、R4のリンクステートパケット(LSP)が表示されます。
動作モードから、ルーター R1で show isis database コマンドを実行します。
user@R1> show isis database

user@R1# run show isis database
IS-IS level 1 link-state database:
LSP ID                      Sequence Checksum Lifetime Attributes
R2.00-00                       0x3   0xea11     1175 L1 L2
R1.00-00                       0x5   0x34f8     1197 L1 L2
R1.02-00                       0x2        0        0 L1 L2
  3 LSPs

IS-IS level 2 link-state database:
LSP ID                      Sequence Checksum Lifetime Attributes
R2.00-00                      0x1b   0x2ccc     1175 L1 L2
R3.00-00                      0x21   0xb15e      865 L1 L2
R3.02-00                       0xb   0xdac3      839 L1 L2
R3.03-00                       0xc   0xd1ca      865 L1 L2
R3.04-00                       0x8   0x33ff      618 L1 L2
R1.00-00                       0xb   0x2cfa     1197 L1 L2
R1.02-00                       0x8        0        0 L1 L2
R4.00-00                       0xc   0x40c3      621 L1 L2
プロシージャ
手順
次の例では、設定階層内のさまざまなレベルに移動する必要があります。CLIのナビゲーションについては、『Junos OS CLIユーザーガイド』の「構成モードでのCLIエディターの使用」を参照してください。
フラッドグループの機能チェック:
ルーターR1およびR2のプロトコルIS-ISを無効にします
[edit protocols]
user@R1# deactivate protocols isis
user@R1# commit
[edit protocols]
user@R2# deactivate protocols isis
user@R2# commit
ルーターR2のインターフェイスにフラッドグループを設定します。
set protocol isis interface interface flood-groupflood-group-area-ID[edit protocols] user@R2# set protocols isis interface ge-0/0/8.0 flood-group 49.0001 user@R2# commit
ルーターR1とR2でプロトコルIS-ISを有効にし、隣接関係が立ち上がるまで待ちます。
[edit protocols]
user@R1# activate protocols isis
user@R1# commit
[edit protocols]
user@R2# activate protocols isis
user@R2# commit
検証
IS-ISデータベースの検証
目的
IS-ISデータベースを検証します。
アクション
以下は、R2で flood-group を設定した後の出力です。ルーター R1の show isis database は、ルーター R1およびルーター R2からのLSPのみを表示します。 flood-groupは、非自己起源のLSPにのみ適用できます。
動作モードから、ルーター R1で show isis database コマンドを実行します。
user@R1> show isis database

user@R1# run show isis database
IS-IS level 1 link-state database:
LSP ID                      Sequence Checksum Lifetime Attributes
R2.00-00                       0x2   0x43b9     1123 L1 L2
R1.00-00                       0x2   0x8e60     1125 L1 L2
R1.02-00                       0x1   0x88e9     1125 L1 L2
  3 LSPs

IS-IS level 2 link-state database:
LSP ID                      Sequence Checksum Lifetime Attributes
R2.00-00                      0x1a   0x7485     1148 L1 L2
R1.00-00                       0x9   0xddaf     1150 L1 L2
R1.02-00                       0x1   0x88e9     1150 L1 L2
  3 LSPs