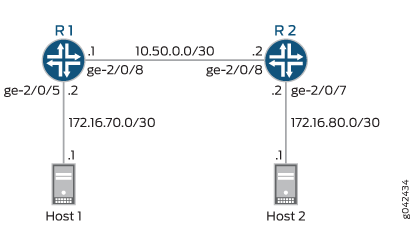
例:CoSのポートシェーピングを使用したインターフェイス上のエグレストラフィックの制限
この例では、ポートシェーピングをサービスクラス(CoS)の形式として使用することで、インターフェイス上のトラフィックを制限し、インターフェイスを通過するトラフィック量を制御する方法を示します。
要件
この手順を確認するために、この例ではトラフィック ジェネレータを使用します。トラフィック ジェネレータは、ハードウェアベースで実行することも、サーバーまたはホスト マシン上で実行するソフトウェアにすることもできます。
この手順の機能は、Junos OS を実行するデバイスで幅広くサポートされています。ここに示す例は、Junos OSリリース10.4を実行しているMXシリーズルーターでテストと検証を行いました。
概要
この例の目的は、ポートシェーピングにより、インターフェイスを通過するトラフィックを、そのインターフェイスのラインレート未満のレートにシェーピングする方法を示すことです。インターフェイス上でポートシェーピングを設定する場合、基本的にインターフェイスを通過できるトラフィックの最大量を示す値を指定します。この値は、そのインターフェイスの最大帯域幅よりも小さくなければなりません。ポートシェーピングを設定する場合、トラフィックがインターフェイスを通過できる最大レートまたはインターフェイスの帯域幅の割合を指定できます。
この例では、ポートシェーピングはデバイスR1で行われます。この例では、デバイスR2でポートシェーピングを実装するために必要な情報は含まれていません。ただし、デバイスR1のポートシェーピング情報を使用して(使用されるインターフェイスを変更する)、デバイスR2に適用して、デバイスR2のポートシェーピングを実現できます。
構成
手順
CLI クイックコンフィギュレーション
この例を迅速に設定するには、以下のコマンドをコピーしてテキスト ファイルに貼り付け、改行を削除し、ネットワーク設定に合わせて必要な詳細を変更してから、 階層レベルの CLI にコマンドを [edit] コピー アンド ペーストします。
サービス クラスのみを使用するデバイス R1
set interfaces ge-2/0/5 description to-Host
set interfaces ge-2/0/5 unit 0 family inet address 172.16.70.2/30
set interfaces ge-2/0/8 description to-R2
set interfaces ge-2/0/8 unit 0 family inet address 10.50.0.1/30
set interfaces lo0 unit 0 description looback-interface
set interfaces lo0 unit 0 family inet address 192.168.13.1/32
set class-of-service interfaces ge-2/0/8 shaping-rate 160k
set protocols ospf area 0.0.0.0 interface ge-2/0/5.0 passive
set protocols ospf area 0.0.0.0 interface lo0.0 passive
set protocols ospf area 0.0.0.0 interface ge-2/0/8.0
トラフィック制御プロファイルとサービス クラスを使用したデバイス R1
set interfaces ge-2/0/5 description to-Host
set interfaces ge-2/0/5 unit 0 family inet address 172.16.70.2/30
set interfaces ge-2/0/8 description to-R2
set interfaces ge-2/0/8 unit 0 family inet address 10.50.0.1/30
set interfaces lo0 unit 0 description looback-interface
set interfaces lo0 unit 0 family inet address 192.168.13.1/32
set class-of-service traffic-control-profiles output shaping-rate 160k
set class-of-service traffic-control-profiles output shaping-rate burst-size 30k
set class-of-service interfaces ge-2/0/8 output-traffic-control-profile output
set protocols ospf area 0.0.0.0 interface ge-2/0/5.0 passive
set protocols ospf area 0.0.0.0 interface lo0.0 passive
set protocols ospf area 0.0.0.0 interface ge-2/0/8.0
デバイスR2
set interfaces ge-2/0/7 description to-Host
set interfaces ge-2/0/7 unit 0 family inet address 172.16.80.2/30
set interfaces ge-2/0/8 description to-R1
set interfaces ge-2/0/8 unit 0 family inet address 10.50.0.2/30
set interfaces lo0 unit 0 description looback-interface
set interfaces lo0 unit 0 family inet address 192.168.14.1/32
set protocols ospf area 0.0.0.0 interface ge-2/0/7.0 passive
set protocols ospf area 0.0.0.0 interface lo0.0 passive
set protocols ospf area 0.0.0.0 interface ge-2/0/8.0
手順
次の例では、設定階層内のさまざまなレベルに移動する必要があります。その方法の詳細については、 Junos OS CLIユーザーガイドの 設定モードでのCLIエディターの使用を参照してください。
ネットワーク インターフェイス、集合型イーサネット インターフェイス(LAG(リンク アグリゲーション グループ)とも呼ばれる)、ループバック インターフェイスでポート シェーピングを設定できます。
デバイスR1を設定するには:
デバイス インターフェイスを設定します。
[edit]
user@R1# set interfaces ge-2/0/5 description to-Host
user@R1# set interfaces ge-2/0/5 unit 0 family inet address 172.16.70.2/30
user@R1# set interfaces ge-2/0/8 description to-R2
user@R1# set interfaces ge-2/0/8 unit 0 family inet address 10.50.0.1/30
user@R1# set interfaces lo0 unit 0 description looback-interface
user@R1# set interfaces lo0 unit 0 family inet address 192.168.13.1/32
サービス クラスのみを使用してポート シェーピングを設定します。
[edit]
user@R1# set class-of-service interfaces ge-2/0/8 shaping-rate 160k
トラフィック制御プロファイルとサービスクラスを使用して、ポートシェーピングを設定します。
メモ:固定シェーピング レートを設定した場合、オプションのバースト サイズ(バイト)を設定できます。シェーピングレートをパーセンテージとして設定した場合、
burst-sizeオプションは許可されません。[edit] user@R1# set class-of-service traffic-control-profiles output shaping-rate 160k user@R1# set class-of-service traffic-control-profiles output shaping-rate burst-size 30k user@R1# set class-of-service interfaces ge-2/0/8 output-traffic-control-profile output
OSPFを設定します。
[edit]
user@R1# set protocols ospf area 0.0.0.0 interface ge-2/0/5.0 passive
user@R1# set protocols ospf area 0.0.0.0 interface lo0.0 passive
user@R1# set protocols ospf area 0.0.0.0 interface ge-2/0/8.0
手順
デバイスR2を設定するには:
デバイス インターフェイスを設定します。
[edit interfaces]
set interfaces ge-2/0/7 description to-Host
set interfaces ge-2/0/7 unit 0 family inet address 172.16.80.2/30
set interfaces ge-2/0/8 description to-R1
set interfaces ge-2/0/8 unit 0 family inet address 10.50.0.2/30
set interfaces lo0 unit 0 description looback-interface
set interfaces lo0 unit 0 family inet address 192.168.14.1/32
OSPFを設定します。
[edit ]
user@R1# set protocols ospf area 0.0.0.0 interface ge-2/0/7.0 passive
user@R1# set protocols ospf area 0.0.0.0 interface lo0.0 passive
user@R1# set protocols ospf area 0.0.0.0 interface ge-2/0/8.0
結果
設定モードから、 、 、 show class-of-serviceコマンドを入力して設定をshow interfacesshow protocols ospf確認します。出力結果に意図した設定が表示されない場合は、この例の手順を繰り返して設定を修正します。
R1 の結果
user@R1# show interfaces
ge-2/0/5 {
    description to-Host;
    unit 0 {
        family inet {
            address 172.16.70.2/30;
        }
    }
}
ge-2/0/8 {
    description to-R2;
    unit 0 {
        family inet {
            address 10.50.0.1/30;
        }
    }
}
lo0 {
    unit 0 {
        description looback-interface;
        family inet {
            address 192.168.13.1/32;
        }
    }
}
サービスクラスのみを使用したポートシェーピングの設定
user@R1# show class-of-service
interfaces {
    ge-2/0/8 {
        shaping-rate 160k;
    }
}
トラフィック制御プロファイルとサービスクラスを使用したポートシェーピングの設定
user@R1# show class-of-service
traffic-control-profiles {
    output {
        shaping-rate 160k burst-size 30k;
    }
}
interfaces {
    ge-2/0/8 {
        output-traffic-control-profile output;
    }
}
user@R1# show protocols ospf
area 0.0.0.0 {
    interface ge-2/0/5.0 {
        passive;
    }
    interface lo0.0 {
        passive;
    }
    interface ge-2/0/8.0;
}
デバイスR1の設定が完了したら、設定モードから を入力します commit 。
R2 の結果
user@R2# show interfaces
ge-2/0/7 {
    description to-Host;
    unit 0 {
        family inet {
            address 172.16.80.2/30;
        }
    }
}
ge-2/0/8 {
    description to-R1;
    unit 0 {
        family inet {
            address 10.50.0.2/30;
        }
    }
}
lo0 {
    unit 0 {
        description looback-interface;
        family inet {
            address 192.168.14.1/32;
        }
    }
}
user@R2# show protocols ospf
area 0.0.0.0 {
    interface ge-2/0/7.0 {
        passive;
    }
    interface lo0.0 {
        passive;
    }
    interface ge-2/0/8.0;
}
デバイスR2の設定が完了したら、設定モードから を入力します commit 。
検証
設定が正しく機能していることを確認します。
カウンターのクリア
目的
インターフェイスカウンターがクリアされていることを確認します。
アクション
デバイスR1で、 コマンドを clear interfaces statistics ge-2/0/8 実行して、インターフェイス統計を0にリセットします。
user@R1> clear interfaces statistics ge-2/0/8
TCP トラフィックをネットワークに送信し、ポート シェーピングを監視する
目的
デバイスR1に接続されたホストを使用してネットワークにトラフィックを送信することで、デバイスR1の出力インターフェイス(ge-2/0/8)でトラフィックがレート制限されていることを確認します。
アクション
トラフィック ジェネレータを使用して、送信元ポートが 80 の TCP パケットの複数の連続ストリームを送信します。
s フラグは、送信元ポートを設定します。k フラグは、ソース ポートがインクリメントされるのではなく、80 で安定した状態を維持します。d フラグは、パケットサイズを設定します。c フラグは、送信されるパケット数を設定します。
宛先 IP アドレス 172.16.80.1 は、デバイス R2 のダウンストリームであるユーザーを表します。ユーザーがホスト(トラフィックジェネレータでエミュレートされたWebサーバー)からWebページを要求すると、その要求に応じてパケットが送信されます。
メモ:この例では、ポート シェーピングが 160 Kbps に設定されていることを忘れないでください。
[user@host]#  hping 172.16.80.1 -s 80 -k -d 1500 -c 20 &
 hping 172.16.80.1 -s 80 -k -d 1500 -c 20 &
.
.
.
デバイスR1で、 コマンドを使用してインターフェイスカウンターを
show interfaces extensive ge-2/0/8確認します。user@R1> show interfaces extensive ge-2/0/8 Queue counters: Queued packets Transmitted packets Dropped packets 0 17244 3741 13470 1 13 13 0 2 0 0 0 3 149363 149363 0 Queue number: Mapped forwarding classes 0 best-effort 1 expedited-forwarding 2 assured-forwarding 3 network-control
意味
出力では、13470パケットがドロップされたことがわかります。ge-2/0/8 で設定された 160 Kbps シェーピング レートを超えたパケットです。

