Kubernetes Basics
This chapter introduces Kubernetes, and the basic terminologies, key concepts, and most of the frequently referred components in Kubernetes architecture. This chapter also provides some examples in a Kubernetes cluster environment to demonstrate the key ideas about basic Kubernetes objects.
What is Kubernetes?
You can find the official definition of Kubernetes here (https://kubernetes.io/):
“Kubernetes (K8s) is an open-source system for automating deployment, scaling, and management of containerized applications. It groups containers that make up an application into logical units for easy management and discovery. Kubernetes builds upon 15 years of experience of running production workloads at Google, combined with best-of-breed ideas and practices from the community.”
Here are a few important facts about Kubernetes:
It’s an open-source project initiated by Google
It’s a mature and stable product
It’s an orchestration tool
It’s a platform dealing with containers at a higher level
Kubernetes was created by a group of engineers at Google in 2014, with a design and development model influenced by Google’s internal system, Borg. Kubernetes defines a set of building objects that collectively provide mechanisms that orchestrate containerized applications across a distributed cluster of nodes, based on system resources (CPU, memory, or other custom metrics). Kubernetes masks the complexity of managing a group of containers by providing REST APIs for the required functionalities.
In simple terms, container technologies like Docker provide you with the capability to package and distribute containerized applications, while an orchestration system like Kubernetes allows you to deploy and manage the containers at a relatively higher level and in a much easier way.
Many Kubernetes documents frequently abbreviate the technology as k8s (or K - eight characters - S), and the current major release (as of the writing of this book) is v1.14.
Chapter 1 stated that Docker is a prevailing and mature container technology, so why do you need Kubernetes? Technically speaking, Kubernetes works at a relatively higher level than Dockers, so what does that mean, exactly?
Well, when you compare Kubernetes with Docker, a helpful analogy is comparing Python with C language. C is powerful enough to build almost everything, including a whole bunch of fundamental OS components and APIs, but in practice you probably would prefer to write scripts to automate tasks in your workload, which means using Python much more than using C. With Python you only need to think of which existing module already provides the necessary functions, import it in your application, and then quickly focus on how to use the feature to accomplish what you need. You rarely need to worry about the low-level system API calls and hardware details.
A network analogy is the TCP/IP Internet protocols. When you develop a file transfer tool like FTP, naturally you prefer to start your work based on a TCP socket instead of a raw socket. With the TCP socket you are sitting on top of the TCP protocol, which provides a much more solid foundation that has all of the built-in reliability features like error detection, flow and congestion control, retransmission, and so on. What you need to consider is how to deliver the data from one end and receive it on the other end. With a raw socket you are working on the IP protocol and an even lower layer, so you have to consider and implement all of the reliability features before you can even start to work on the file transfer features of your tool.
So, back to Kubernetes. Assuming that you want to run multiple containers across multiple machines, you will have a lot of work to do if you interact with Docker directly. The following tasks should, at least minimally, be on your list of things to worry about:
Loging in on different machines, and spawning containers, across the network
Scaling up or down when demand changes by adding or removing containers
Keeping storage consistent with multiple instances of an application
Distributing load between the containers running in different nodes
Launching new containers on different machines if something fails
You will quickly find that doing all of these manually with Docker will be overwhelming. With the high level abstractions and the objects representing them in the Kubernetes API, all of these tasks become much easier.
Kubernetes is not the only tool of its kind, Docker has its own orchestration tool named Swarm. But that’s a discussion for another book. This book focuses on Kubernetes.
Kubernetes Architecture and Components
There are two type of nodes in a Kubernetes cluster, and each one runs a well-defined set of processes:
Head node: also called master, or master node, it is the head and brain that does all the thinking and makes all the decisions; all of the intelligence is located here.
Worker node: also called node, or minion, it’s the hands and feet that conducts the workforce.
The nodes are controlled by the master and in most cases, you only need to talk to the master.
One of the most common interfaces between you and the cluster is the command-line tool kubectl. It is installed as a client application, either in the same master node or in a separate machine, like in your PC. Regardless of where it is, it can talk to the master via the REST-API exposed by the master.
Later in this book you can see an example of using kubectl to create Kubernetes objects. But for now, just remember, whenever you work with the kubectl command, you’re communicating with the cluster’s master.
The term node may sound semantically ambiguous – it could mean two things in the context of this book. Usually a node refers to a logical unit in a cluster, like a server, which can be either be physical or virtual. In context of Kubernetes clusters, a node usually refers specifically to a worker node.
You rarely need to bypass the master and work with nodes, but you can log in to a node and run all Docker commands to check running status of the containers. An example of this appears later in this chapter.
Kubernetes Master
A Kubernetes master node, or master, is the brain. The cluster master provides the control plane that makes all of the global decisions about the cluster. For example, when you need the cluster to spawn a container, the master will decide which node to dispatch the task and spawn a new container. This procedure is called scheduling.
The master is responsible for maintaining the desired state for the cluster. When you give an order for this web server, make sure there are always two containers backing each other up! The master monitors the running status, and spawns a new container any time fewer than two web server containers are running due to any failures.
Typically you only need a single master node in the cluster, however, the master can also be replicated for higher availability and redundancy. The master’s functions are implemented by a collection of processes running in the master node:
kube-apiserver: Is the front-end of the control plane, and provides REST APIs.kube-scheduler: Does the scheduling and decides where to place the containers depending on system re- quirements (CPU, memory, storage, etc.) and other custom parameters or constraints (e.g., affinity specifications).kube-controller-manager: The single process that controls most of the different types of controllers, ensuring that the state of the system is what it should be. Controller examples might be:Replication Controller
ReplicaSet
Deployment
Service Controller
etcd: The database to store the state of the system.
For the sake of simplicity, some components are not listed (e.g., cloud-controller-manager, DNS server, kubelet). They are not trivial or negligible components, but skipping them for now helps us get past the Kubernetes basics.
Kubernetes Node
Kubernetes nodes in a cluster are the machines that run the user end applications. In production environments, there can be dozens or hundreds of nodes in one cluster, depending on the designed scales as they work under the hood provided by a cluster. Usually all of the containers and workloads are running on nodes. A node runs the following processes:
Kubelet: The Kubernetes agent process that runs on master and all the nodes. It interacts with master (through the kube-apiserver process) and manages the containers in the local host.
Kube-proxy: This process implements the Kubernetes service (introduced in Chapter 3) using Linux iptable in the node.
Container-runtime: Or the local container – mostly Docker in today’s market, holding all of the running Dockerized applications.
The term proxy may sound confusing for Kubernetes beginners since it’s not really a proxy in current Kubernetes architecture. Kube-proxy is a system that manipulates Linux IP tables in the node so the traffic between pods and nodes flows correctly.
Kubernetes Workflow
So far you’ve been reading about the master and node and the main processes running in each. Now it’s time to visualize how things work together, as shown in Figure 1.
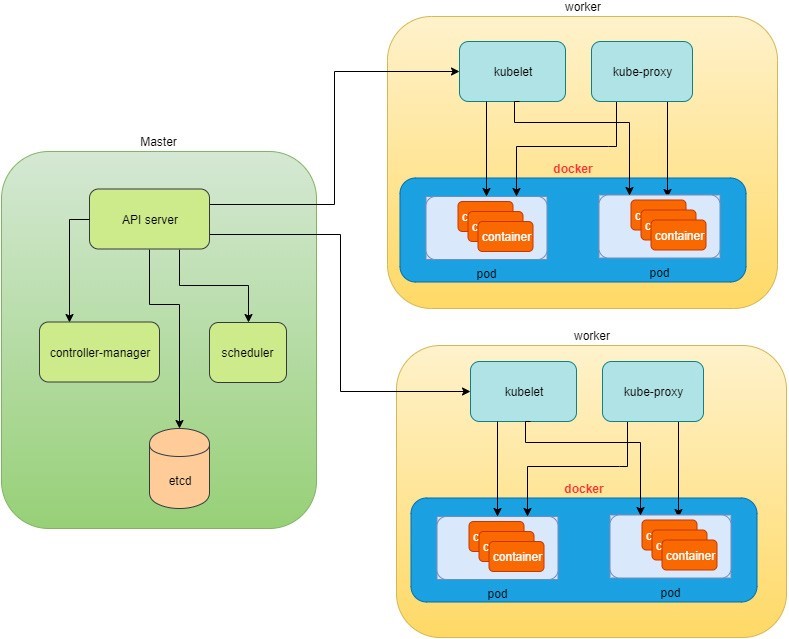
At the top of Figure 1, via kubectl commands, you talk
to the Kubernetes master, which manages the two node boxes on the
right. Kubectl interacts with the master process kube-apiserver via
its REST-API exposed to the user and other processes in the system.
Let’s send some kubectl commands – something like kubectl create x, to spawn a new container. You can
provide details about the container to be spawned along with its running
behaviors, and those specifications can be provided either as kubectl command line parameters, or options and values
defined in a configuration file (an example on this appears shortly).
The workflow would be:
The kubectlclient will first translate your CLI command to one more REST-API call(s) and send it to kube-apiserver.
After validating these REST-API calls, kube-apiserver understands the task and calls kube-scheduler process to select one node from the available ones to execute the job. This is the scheduling procedure.
Once kube-scheduler returns the target node, and kube-apiserver will dispatch the task with all of the details describing the task.
The kubelet process in the target node receives the task and talks to the container engine, for example, the Docker engine in Figure 1, to spawn a container with all provided parameters.
This job and its specification will be recorded in a centralized database etcd. Its job is to preserve and provide access to all data in the cluster.
Actually a master can also be a fully-featured node and
carry pods workforce just like a node does. Therefore, kubelet and
kube proxy components existing in node can also exist in the master.
In Figure 1, we
didn’t include these components in the master, in order to provide
a simplified conceptual separation of master and node. In your setup
you can use command kubectl get pods --all-namespaces
-o wide to list all pods with their location. Pods spawned
in the master are usually running as part of the Kubernetes system
itself – typically within kube-system namespace. The Kubernetes
namespace is discussed in Chapter 3.
Of course this is a simplified workflow, but you should get the basic idea. In fact, with the power of Kubernetes, you rarely need to work directly with containers. You work with higher level objects that tend to hide most of the low level operation details.
For example, in Figure 1 when you give the task to spawn containers, instead of saying: create two containers and make sure to spawn new ones if either one would fail, in practice you just say: create a RC object (replication controller) with replica two.
Once the two Docker containers are up and running, kubeapiserver will interact with kube-controller-manager to keep monitoring the job status and take all necessary actions to make sure the running status is what it was defined as. For example, if any of the Docker containers go down, a new container will automatically be spawned and the broken one will be removed.
The RC in this example is one of the objects that is provided by the Kubernetes kube-controller-manager process. Kubernetes objects provide an extra layer of abstraction that gets the same (and usually more) work done under the hood, in a simpler and cleaner way. And because you are working at a higher level and staying away from the low-level details, Kubernetes objects sharply reduce your overall deployment time, brain effort, and troubleshooting pains. Let’s examine.
Kubernetes Objects
Now that you understand the role of master and node in a Kubernetes cluster, and understand the workflow model in Kubernetes Architecture, let’s look at more objects in the Kubernetes architecture.
Kubernetes’s objects represent:
Deployed containerized applications and workloads
Their associated network and disk resources
Other information about what the cluster is doing.
The most frequently used objects are:
Pod
Service
Volume
Namespace
The higher-level objects (Controllers) are:
ReplicationController
ReplicaSet
Deployment
StatefulSet
DaemonSet
Job
High-level objects are built upon basic objects, providing additional functionality and convenience features.
On the front end, Kubernetes gets things done via a group of objects, so with Kubernetes you only need to think about how to describe your task in the configuration file of objects, you don’t have to worry about how it will be implemented in container level. Under the hood, Kubernetes interacts with the container engine to coordinate the scheduling and execution of containers on Kubelets. The container engine itself is responsible for running the actual container image (for example, by Docker build).
There are more examples about each object and its magic power in Chapter 3. First, let’s look at the most fundamental object: pod.
Building a Kubernetes Pod
Pod is the first Kubernetes object you will learn. The Kubernetes website describes a pod as:
A pod (as in a pod of whales or pea pod) is a group of one or more containers (such as Docker containers), with shared storage/network, and a specification for how to run the containers.
Meaning:
Pod is essentially a group of containers.
All containers in a pod share storage and network resources.
So what’s the benefit of using pod compared to the old way of dealing with each individual container? Let’s consider a simple use case: you are deploying a web service with Docker and you need not only the frontend service, for example an Apache server, but also some supporting services like a database server, a logging server, a monitoring server, and so forth. Each of these supporting services needs to be running in its own container. So essentially you find yourself always working with a group of docks whenever a web service container is needed. In production, the same scenario applies to most of the other services as well. Eventually you ask: is there a way to group a bunch of Docker containers in a higher-level unit, so you only need to worry once about the low-level inter-container interaction details?
Pod gives the exact higher-level abstraction you need by wrapping one or more containers into one object. If your web service becomes too popular and a single pod instance can’t carry the load, you can replicate and scale the same group of containers (now in the form of one pod object) up and down very easily with the help of other objects (RC, deployment) - normally in a few seconds. This sharply increases deployment and maintenance efficiency.
In addition, containers in the same pod share the same network space, so containers can easily communicate with other containers in the same pod as though they were on the same machine, while maintaining a degree of isolation from others. You can read more about these advantages later in this book.
Now, let’s get our feet wet and learn how to use a configuration file to launch a pod in a Kubernetes cluster.
YAML File for Kubernetes
Along with many other many ways of configuring Kubernetes, YAML is the standard format used in a Kubernetes configuration file. YAML is widely used, so mostly likely you are already familiar with it. If not, it’s not a big deal because YAML is a pretty easy language to learn. Each line of the YAML configuration of a pod is detailed and you should understand the YAML format as a byproduct of your pod learning process.
The pod configuration file in YAML format is:
YAML uses three basic data types:
Scalars (strings/numbers): atom data item, strings like pod-1, port number 80.
Mappings (hashes/dictionaries): key-value pairs, can be nested. apiVersion: v1 is a mapping. key apiVersion has a value of v1.
Sequences (arrays/lists): collection of ordered values, without a key. List items are indicated by a - sign. The value of key containers is a list including two containers.
In this example you are also seeing nested YAML data structure:
The mapping of a map: spec is the key of a map, where you define a pod’s specification. In this example you only define the behavior of the containers to be launched in the pod. The value is another map with the key being containers.
The mapping of a list. The values of the key containers are a list of two items: server and client container, each of which, again, are a mapping describing the individual container with a few attributes like name, image, and ports to be exposed.
Other characteristics you should know about YAML:
It is case sensitive
Elements in the same level share the same left indentation, the amount of indentation does not matter
Tab characters are not allowed to be used as indentation
Blank lines do not matter
Use # to comment a line
Use a single quote ' to escape the special meaning of any character
Before diving into more details about the YAML file, let’s finish the pod creation:
$ kubectl create -f pod-2containers-do-one.yaml
pod/pod-1 created

$ kubectl get pod -o wide
NAME READY STATUS 	RESTARTS AGE IP 	NODE NOMINATED NODE
pod-1 0/2 ContainerCreating 0 18s 10.47.255.237 cent333<none>

$ kubectl get pod -o wide
NAME READY STATUS RESTARTS AGE IP NODE NOMINATED NODE
pod-1 2/2 Running 0 18s 10.47.255.237 cent333 <none>
There. We have created our first Kubernetes object – a pod named pod-1. But where are the containers? The output offers the clues: a pod pod-1 (NAME), containing two containers (READY /2), has been launched in the Kubernetes worker node cent333 with an assigned IP address of 10.47.255.237. Both containers in the pod are up (READY 2/) and it has been in running STATUS for 27s without any RESTARTS. Here’s a brief line-by-line commentary about what the YAML configuration is doing:
Line 1: This is a comment line using # ahead of the text, you can put any comment in the YAML file. (Throughout this book we use this first line to give a filename to the YAML file. The filename is used later in the command when creating the object from the YAML file.)
Lines 2, 3, 4, 8: The four YAML mappings are the main components of the pod definition:
ApiVersion: There are different versions, for example, v2. Here specifically, it is version 1.
Kind: Remember there are different type of Kubernetes objects, and here we want Kubernetes to create a pod object. Later, you will see the Kind being ReplicationController, or Service, in our examples of other objects.
Metadata: To identify the created objects. Besides the name of the object to be created, another important meta data are labels. And you will read more about that in Chapter 3.
Spec: This gives the specification about pod behavior.
Lines 9-15: The pod specification here is just about the two containers. The system downloads the images, launches each container with a name, and exposes the specified ports, respectively.
Here’s what’s running inside of the pod:
$ kubectl describe pod pod-1 | grep -iC1 container
IP:	10.47.255.237
Containers:
server:
Container ID: docker://9f8032f4fbe2f0d5f161f76b6da6d7560bd3c65e0af5f6e8d3186c6520cb3b7d
Image:	contrailk8sdayone/contrail-webserver
--
client:
Container ID: docker://d9d7ffa2083f7baf0becc888797c71ddba78cd951f6724a10c7fec84aefce988
Image:	contrailk8sdayone/ubuntu
--
Ready	True
ContainersReady True
PodScheduled		True
--
Normal Pulled 3m2s kubelet, cent333 Successfully pulled image "contrailk8sdayone/contrail-webserver"
Normal Created 3m2s kubelet, cent333 Created container
Normal Started 3m2s kubelet, cent333 Started container
Normal Pulling 3m2s kubelet, cent333 pulling image "contrailk8sdayone/ubuntu"
Normal Pulled 3m1s kubelet, cent333 Successfully pulled image "contrailk8sdayone/ubuntu"
Normal Created 3m1s kubelet, cent333 Created container
Normal Started 3m1s kubelet, cent333 Started container
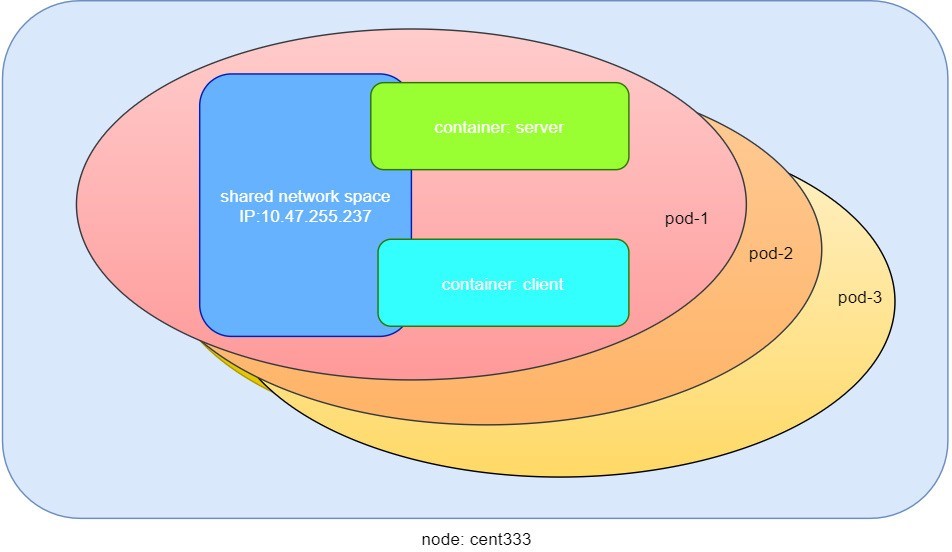
Not surprisingly, pod-1 is composed of two containers declared in the YAML file, server and client, respectively, with an IP address assigned by Kubernetes cluster and shared between all containers as shown in Figure 2:
Pause Container
If you log in to node cent333, you’ll see the Docker containers running inside of the pod:
$ docker ps | grep -E "ID|pod-1"
CONTAINER ID IMAGE		COMMAND		... PORTS NAMES
d9d7ffa2083f contrailk8sdayone/ubuntu		"/sbin/init"		...
k8s_client_pod-1_default_f8b42343-d87a-11e9-9a1e-0050569e6cfc_0
9f8032f4fbe2 contrailk8sdayone/contrail-webserver "python app-dayone.py" ...
k8s_server_pod-1_default_f8b42343-d87a-11e9-9a1e-0050569e6cfc_0
969ec6d93683 k8s.gcr.io/pause:3.1	"/pause"	...
k8s_POD_pod-1_default_f8b42343-d87a-11e9-9a1e-0050569e6cfc_0
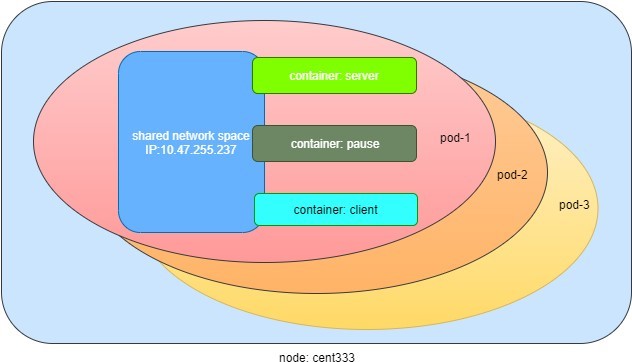
The third container with image name k8s.gcr.io/pause is a special container that was created for each pod by the Kubernetes system. The pause container is created to manage the network resources for the pod, which is shared by all the containers of that pod.
Figure 3 shows a pod including a few user containers and a pause container.
Intra-pod Communication
In the Kubernetes master, let’s log in to a container from the master:
#login to pod-1's container client
$ kubectl exec -it pod-1 -c client bash
root@pod-1:/#

#login to pod-1's container server
$ kubectl exec -it pod-1 -c server bash
root@pod-1:/app-dayone#
If you ever played with Docker you will immediately realize that this is pretty neat. Remember, the containers were launched at one of the nodes, so if you use Docker you will have to first log in to the correct remote node, and then use a similar docker exec command to log in to each container. Kubernetes hides these details. It allows you to do everything from one node – the master.
And now check processes running in the container:
Server Container
root@pod-1:/app-dayone# ps aux
USER	PID %CPU %MEM    VSZ  RSS TTY	STAT START TIME COMMAND
root	1  0.0  0.0  55912 17356 ?	Ss 12:18 0:00 python app-dayo
root	7  0.5  0.0 138504 17752 ?	Sl 12:18 0:05 /usr/bin/python
root	10 0.0 0.0 18232 1888 pts/0 Ss 12:34 0:00 bash
root	19 0.0 0.0 34412 1444 pts/0 R+ 12:35 0:00 ps aux

root@pod-1:/app-dayone# ss -ant
State		Recv-Q 	Send-Q 	Local Address:Port		Peer Address:Port
LISTEN		0		128		*:80		*:*
LISTEN		0		128		*:22		*:*
LISTEN		0		128		:::22		:::*

root@pod-1:/app-dayone# ip a
1: lo: <LOOPBACK,UP,LOWER_UP> mtu 65536 qdisc noqueue state UNKNOWN group default qlen 1000
link/loopback 00:00:00:00:00:00 brd 00:00:00:00:00:00
inet 127.0.0.1/8 scope host lo
valid_lft forever preferred_lft forever
116: eth0@if117: <BROADCAST,MULTICAST,UP,LOWER_UP> mtu 1500 qdisc noqueue state UP group default
link/ether 02:f8:e6:63:7e:d8 brd ff:ff:ff:ff:ff:ff link-netnsid 0
inet 10.47.255.237/12 scope global eth0
valid_lft forever preferred_lft forever
The Client Container
$ kubectl exec -it pod-1 -c client bash
root@pod-1:/# ps aux
USER	PID %CPU %MEM    VSZ  RSS TTY	STAT START TIME COMMAND
root		1  0.0  0.0  32716  2088 ?		Ss 12:18 0:00 /sbin/init
root		41  0.0  0.0  23648   888 ?		Ss 12:18 0:00 cron
root		47  0.0  0.0  61364  3064 ?		Ss 12:18 0:00 /usr/sbin/sshd
syslog     	111  0.0  0.0 116568 1172 ?		Ssl 12:18 0:00 rsyslogd
root		217 0.2 0.0 18168 1916 pts/0 Ss 12:45 0:00 bash
root		231 0.0 0.0 15560 1144 pts/0 R+ 12:45 0:00 ps aux

root@pod-1:/# ss -ant
State		Recv-Q 	Send-Q		Local Address:Port	Peer Address:Port
LISTEN		0		128		*:80		*:*
LISTEN		0		128		*:22		*:*
LISTEN		0		128		:::22		:::*


root@pod-1:/# ip a
1: lo: <LOOPBACK,UP,LOWER_UP> mtu 65536 qdisc noqueue state UNKNOWN group default qlen 1000
link/loopback 00:00:00:00:00:00 brd 00:00:00:00:00:00
inet 127.0.0.1/8 scope host lo
valid_lft forever preferred_lft forever
116: eth0@if117: <BROADCAST,MULTICAST,UP,LOWER_UP> mtu 1500 qdisc noqueue state UP group default
link/ether 02:f8:e6:63:7e:d8 brd ff:ff:ff:ff:ff:ff
inet 10.47.255.237/12 scope global eth0
valid_lft forever preferred_lft forever
This ps command output shows that each container is running its own process. However, the ss and ip command output indicate that both containers share the same exact network environment, so both see the port exposed by each other. Therefore, communication between containers in a pod can happen simply by using localhost. Let’s test this out by starting a TCP connection using the curl command.
Suppose from the client container, you want to get a web page from the server container. You can simply start curl using the localhost IP address:
root@pod-1:/# curl localhost

<html>
<style>
h1 {color:green}
h2 {color:red}
</style>
<div align="center">
<head>
<title>Contrail Pod</title>
</head>
<body>
<h1>Hello</h1><br><h2>This page is served by a <b>Contrail</b> pod</h2><br><h3>IP address = 10.47.255.237<br>Hostname = pod-1</h3>
<img src="/static/giphy.gif">
</body>
</div>
</html>
You can see that the connection is established, and the web page has downloaded successfully.
Now let’s monitor the TCP connection state: the connection was established successfully:
root@pod-1:/# ss -ant
State		Recv-Q 	Send-Q		Local Address:Port		Peer Address:Port
LISTEN     0		128			*:80	*:*
LISTEN     0		128			*:22	*:*
TIME-WAIT 	0		0				127.0.0.1:80						127.0.0.1:34176 #<---
LISTEN     0		128			:::22	:::*
And the same exact connection can be seen from the server container:
$ kubectl exec -it pod-1 -c server bash
root@pod-1:/app-dayone# ss -ant
State		Recv-Q 	Send-Q 	Local Address:Port			Peer Address:Port
LISTEN     0		128			*:80	*:*
LISTEN     0		128			*:22	*:*
TIME-WAIT 	0		0				127.0.0.1:80						127.0.0.1:34176 #<---
LISTEN     0		128			:::22	:::*
Kubectl Tool
So far you’ve seen the object created by the kubectl command. This command, just like the docker command in Docker world, is the interface in the Kubernetes world to talk to the cluster, or more precisely, the Kubernetes master, via Kubernetes API. It’s a versatile tool that provides options to fulfill all kinds of tasks you would need to deal with Kubernetes.
As a quick example, assuming you have enabled the auto-completion feature for kubectl, you can list all of the options supported in your current environment by logging into the master and typing kubectl, followed by two tab keystrokes:
root@test1:~# kubectl<TAB><TAB>
alpha			attach		completion	create			exec
logs		proxy		set		wait annotate auth
config			delete		explain			options		replace
taint		api-resources  autoscale			convert		describe
patch			rollout			top		api-versions certificate
drain			get		plugin		run		uncordon apply
cluster-info  	cp			edit	label			port-forward
scale			version			expose			cordon
To set up auto-completion for the kubectl command, follow the instruction from the help of completion option:
kubectl completion -h
Rest assured, you’ll see and learn some of these options in the remainder of this book.