NorthStar 与 HealthBot 集成
概述
NorthStar 控制器和 HealthBot 产品的集成是一项持续的开发工作,正在分阶段发布。本主题介绍 NorthStar 控制器 5.1.0 版与 HealthBot 2.1 版的集成状态。
在并排安装方案中,NorthStar 控制器可以使用 HealthBot 作为其分析收集器。您可以单独安装和管理 NorthStar 和 HealthBot,但在 NorthStar 中配置某些分析收集器功能由 HealthBot 而不是 Elasticsearch 处理。从 NorthStar 控制器 5.1.0 版开始,仅支持瞻博网络节点(与多供应商支持相反),并且 HealthBot 只能处理以下分析收集:
-
Junos 遥测接口 (JTI) LSP 统计信息
-
JTI 接口统计数据(逻辑和物理)
-
使用 RPM 探针的链路延迟统计
-
使用 LDP show 命令的 LDP 需求统计
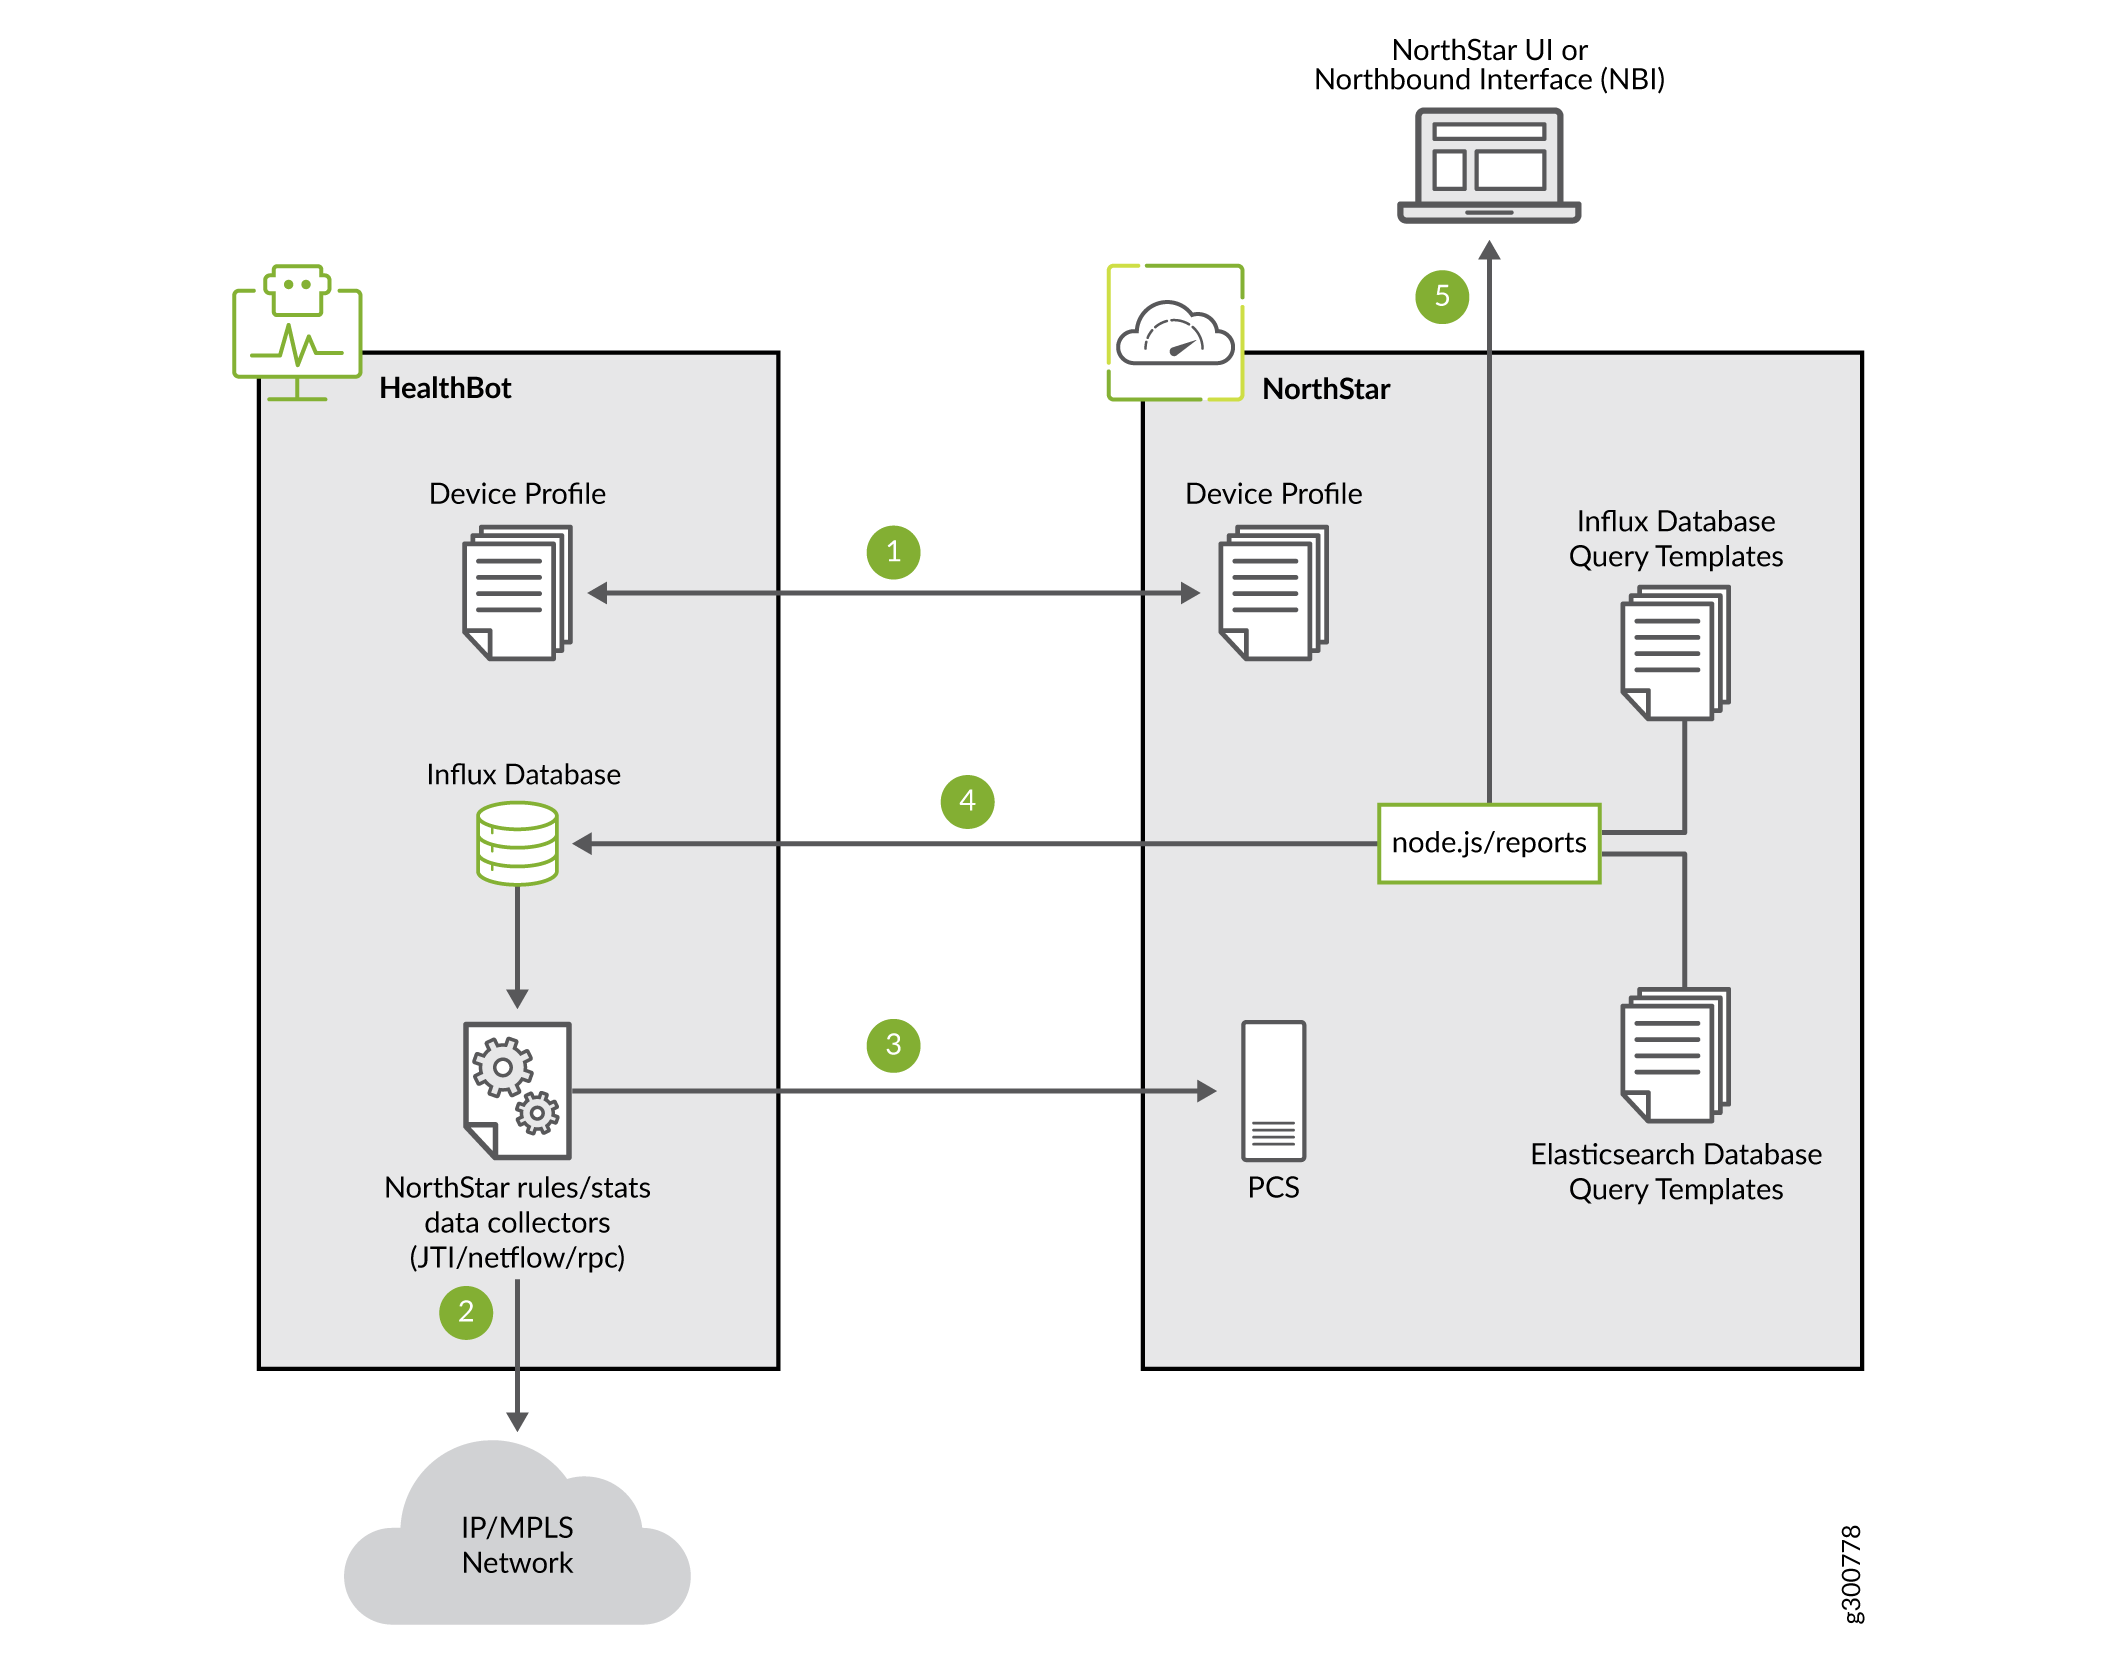
图 1 总结了 HealthBot 和 NorthStar 组件之间的关系。这些数字对应于以下过程:
-
NorthStar 会将设备列表和配置文件信息推送到 HealthBot。
-
NorthStar 向 HealthBot 提供了一组规则,用于从网络设备收集数据。
-
NorthStar 规则使 HealthBot 能够自动通知 NorthStar 有关通过 AMQP 收集实时样本数据的信息。
-
NorthStar node.js 和 NorthStar 报告生成器基于 jinja 模板查询 HealthBot 数据库。
-
来自 HealthBot 的统计信息和数据可在 NorthStar UI 或其他北向接口 (NBI) 中查看。
有关规则和 playbook 以及常规 HealthBot 操作的信息,请参阅您的 HealthBot 文档。我们提供以下基本 HealthBot 术语供参考。
| HealthBot 术语 |
描述 |
|---|---|
| 规则 |
从网络或 Junos 设备提取特定信息所需的组件包或块。规则遵循为分析应用程序量身定制的域特定语言 (DSL)。 |
| 剧本 |
用于解决特定用例的规则集合。 |
| Playbook 实例 |
通过设备或网络组应用的操作指南的特定实例。 |
| 用户定义函数 (UDF) |
用户定义的函数在规则内部使用。 |
使用 NorthStar 更新 HealthBot 数据收集规则和操作指南
要准备 HealthBot 向 NorthStar 提供收集数据,请执行以下步骤。
-
确认 HealthBot 服务已启动并正在运行。
-
在 HealthBot 服务器上安装 python3 模块请求和 pika。例如:
pip3 install requests; pip3 install pika
-
将 NorthStar 规则从 NorthStar 应用程序服务器复制到 HealthBot 服务器上的临时目录。
[root@northstar]# cp /opt/northstar/northstar_bundle_x.x.x/hb_config/hb-rules-config.tar.gz /var/tmp -
在 HealthBot 服务器上,解压缩规则文件。
[root@healthbot]# tar xvf hb-rules-config.tar.gz -
在 HealthBot 服务器上,运行脚本,将 NorthStar 规则和操作指南插入 HealthBot,使其在 HealthBot UI 中可见,并更新 NorthStar 的用户定义函数 (UDF)。此脚本还将获取 NorthStar 与 HealthBot 之间通信所需的凭据。
[root@healthbot]:~/ns/installation# ./install-ns-rules.sh该脚本将提示您输入:
-
NorthStar 服务器 IP 或 VIP 地址或主机名
-
NorthStar 管理员用户名和密码
-
HealthBot 应用服务器 IP 地址
-
HealthBot 管理员用户名和密码
您将看到脚本的进度:
 root@healthbot:~/ns/installation# ./install-ns-rules.sh
Copying config file /opt/northstar/data/northstar.cfg from Northstar APP server, Please enter below info
---------------------------------------------------------------------------------------------------------
Please enter Northstar application server IP/VIP address or host name: 10.53.64.97
Please enter Northstar Web Admin username: admin
Please enter Northstar Web Admin password:
Please enter HealtBot application server IP address: 10.53.64.96
Please enter HealthBot Web Admin username: admin
Please enter HealthBot Web Admin password:
retrieving config file from application server...

Saving to /root/ns/input/northstar.cfg

Copying NS input files to /var/local/healthbot/input

Starting Northstar rules and playbook upload/creation
Rule/yml file directory: /root/ns/rules
Successfully import the yml file: ns-ldp-demand-stats.yml
Successfully import the yml file: ns-rpm-probe-ifl.yml
Successfully import the rule file: ns-jti-logical-interface.rule
Successfully import the rule file: ns-jti-label-switched-path.rule
Successfully import the rule file: ns-ldp-demand-stats.rule
Successfully import the rule file: ns-jti-physical-interface.rule
Successfully import the rule file: ns-rpm-probe-ifl.rule
Successfully created the playbook: "northstar"

Updating UDF....
Running /root/ns/installation/udf-config.sh in iagent engine..
Success! See /tmp/.iagent_modification.log for logs
Running /root/ns/installation/udf-config.sh in jtimon engine..
Success! See /tmp/.jtimon_modification.log for logs
Running /root/ns/installation/udf-config.sh in fluentd engine..
Success! See /tmp/.fluentd_modification.log for logs
Running /root/ns/installation/udf-config.sh in telegraf engine..
Success! See /tmp/.telegraf_modification.log for logs
Running /root/ns/installation/udf-config.sh in itsdb engine..
Success! See /tmp/.itsdb_modification.log for logs
-
-
通过在 HealthBot 服务器上运行以下脚本,验证 HealthBot 和 NorthStar 之间的连接。
[root@healthbot]# /ns_config/installation/ns_setup.py -t
Test connectivity with input/northstar.cfg

#
mq_host=10.53.64.97
mq_port=5672
mq_username=northstar
mq_password_enc=eF0A0DhJ0GiKcHlAfEnFgMpB

Connected to rabbitmq on 10.53.64.97 successfully
成功完成脚本后,您应该能够在 HealthBot UI 中看到 NorthStar 规则,如 图 2 所示。
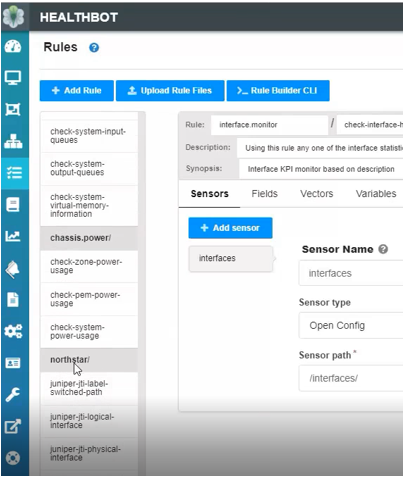 中的 NorthStar 规则
您还可以确认 NorthStar 操作指南可见,如 图 3 所示。
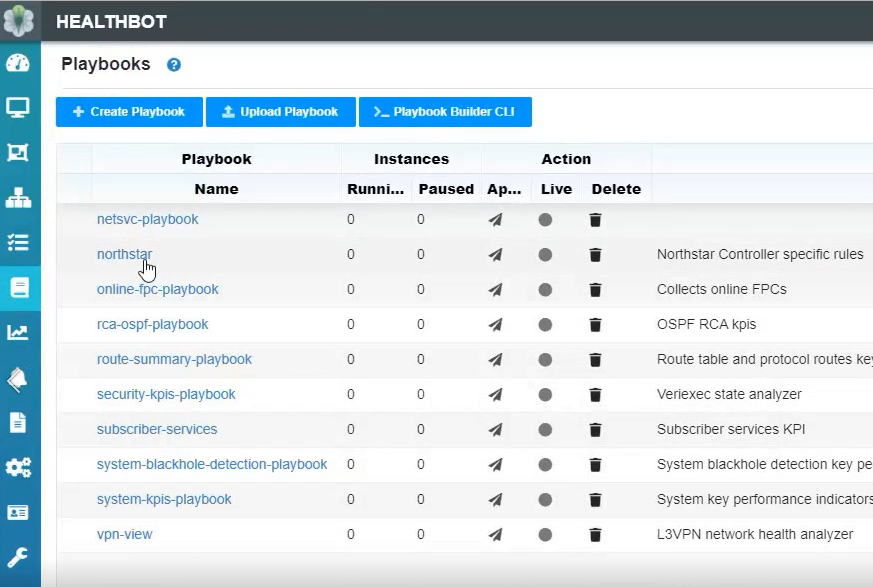 中的 NorthStar 操作指南
单击 NorthStar 操作指南,查看 NorthStar 规则是否与操作指南相关联,如 图 4 所示。如果需要,您可以从这里删除规则。
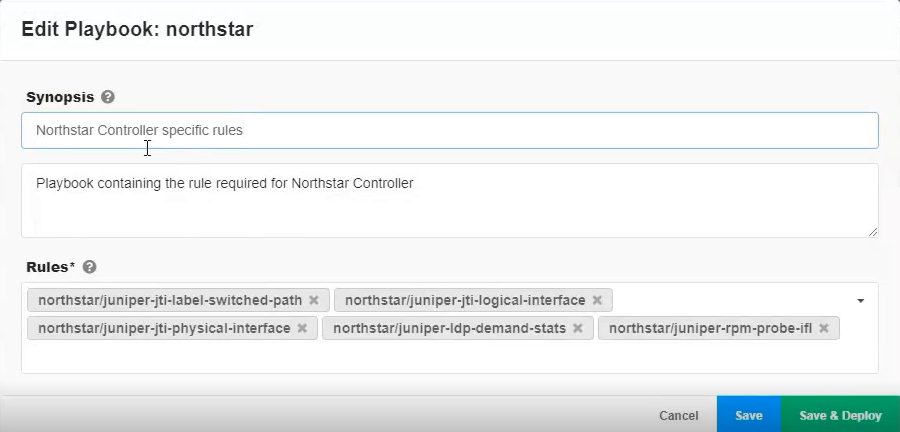 中的 NorthStar 规则
配置 NorthStar 端
要准备 NorthStar 以从 HealthBot 接收分析数据,请执行以下步骤。
-
通过运行带有 config-healthbot-collector 选项的 net_setup.py 脚本,将集合类型从默认 (Elasticsearch) 更改为 HealthBot。
[root@northstar]# /opt/northstar/utils/net_setup.py --config-healthbot-collector该脚本将提示您确认要进行更改,然后要求您提供以下信息:
-
HealthBot Web 服务器 IP 地址
-
HealthBot UI 用户名和密码
-
HealthBot 数据库 IP 地址(通常与 HealthBot Web 服务器 IP 地址相同)
然后,该脚本更新配置文件并重新启动 NorthStar Web 服务器。该过程完成后,将显示成功消息。
-
-
使用 NorthStar CLI 配置与 HealthBot 相关的参数:
[root@ns1 root]# /opt/northstar/utils/cmgd_cli
root@ns1> edit
Entering configuration mode

[edit]
root@ns1# set northstar analytics healthbot openconfig-port 32767

[edit]
root@ns1# set northstar analytics healthbot iagent-port 830

[edit]
root@ns1# set northstar analytics healthbot native-port 4000

[edit]
root@ns1# set northstar analytics healthbot device-group-name northstar

[edit]
root@ns1# set northstar analytics healthbot playbook-name northstar

[edit]
root@ns1# set northstar analytics healthbot playbook-instance ns

[edit]
root@ns1# set northstar analytics healthbot rules northstar/juniper-jti-label-
switched-path,northstar/juniper-jti-logical-interface,northstar/juniper-jti-
physical-interface,northstar/juniper-ldp-demand-stats,northstar/juniper-rpm-probe-ifl;

[edit]
root@ns1# commit
root@ns1# exit
Exiting configuration mode

root@ns1> show configuration northstar analytics healthbot
openconfig-port 32767;
iagent-port 830;
native-port 4000;
device-group-name northstar;
playbook-name northstar;
playbook-instance ns;
rules northstar/juniper-jti-label-switched-path,northstar/juniper-jti-logical-
interface,northstar/juniper-jti-physical-interface,northstar/juniper-ldp-demand-
stats,northstar/juniper-rpm-probe-ifl;
-
配置网络中的每个瞻博网络设备,以将 JTI 和 RPM 探测数据发送到 HealthBot 服务器。有关说明,请参阅 配置路由器以将 JTI 遥测数据和 RPM 统计信息发送到数据收集器 。
-
在 NorthStar UI 中,导航到 Administration > Device Profile 以将设备配置文件信息推送到 HealthBot 并应用 NorthStar 操作指南实例。
由于将集合类型设置为 HealthBot,因此 NorthStar UI 中的“设备配置文件”窗口包含一个按钮,用于将设备更新为 HealthBot,如 图 5 所示。
图 5:带有更新设备按钮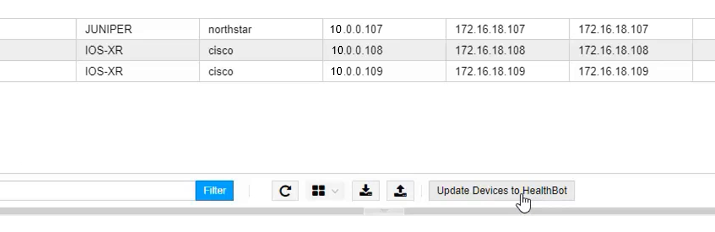 的设备配置文件窗口
在单击按钮之前,您不会选择设备 - 单击按钮会将 NorthStar 管理的所有瞻博网络设备的所有设备信息更新到 HealthBot。该过程完成后,您将看到一条成功消息。
您可以通过查看 HealthBot UI 仪表板(在“设备”下)验证设备信息是否已与 HealthBot 共享,如 图 6 所示。推送到 HealthBot 的所有瞻博网络设备都会在此处列出。单击任何一个设备名称以在弹出窗口中查看配置文件信息的详细信息。
图 6:HealthBot 仪表板 中的 NorthStar 设备
另请注意 ,在图 6 中,已创建了一个 NorthStar 设备组(最左侧)。单击组的名称以查看您将其信息推送到 HealthBot 的所有设备的列表。
在 HealthBot UI 的 Playbooks 下,可以确认已创建 NorthStar Playbook 实例,如 图 7 所示。显示器指示 playbook 的一个实例正在运行。
图 7:HealthBot UI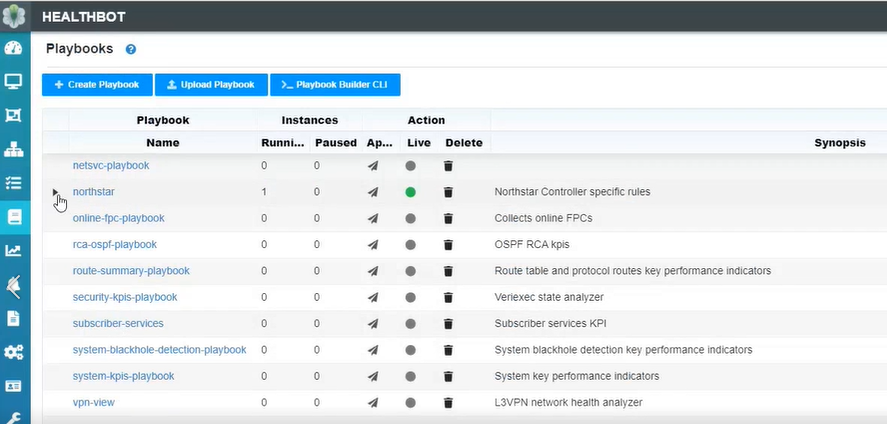 中的 NorthStar Playbook 实例
单击操作指南名称旁边的箭头可查看实例的详细信息,包括其设备组、设备和规则。
在 NorthStar UI 中查看数据
在 NorthStar UI 中查看收集的数据与 HealthBot 作为收集类型没有什么不同,只是在 NorthStar/HealthBot 集成的这一阶段存在一些限制。尚不支持以下内容:
-
LSP 总流量图表
-
LSP、节点、接口和接口延迟图表的顶级流量
-
Netflow 收集
-
SR 统计信息(SID 流量)
-
按需报告和需求组报告
注意:这些报告可使用 Elasticsearch 本机集合获得。