
Ubuntu KVM 和 libvirtd 服务器 BMS 环境
这些说明和建议适用于 Ubuntu 20.04.x 安装,也可能适用于 Ubuntu 22.04.x。众所周知,对于 LACP 桥接器支持,Ubuntu 16.04 不支持在 VM 创建更改后 Linux 桥接器和 VM 接口一章中使用的调整。
部署前的准备工作
可选:如果尚未安装 KVM/QEMU,请安装
以下命令显示如何安装 KVM 虚拟机管理程序并运行所需的检查。确保您使用的是根目录。
sudo -i
cd /root
lsb_release -a
No LSB modules are available.
Distributor ID: Ubuntu
Description:    Ubuntu 20.04.2 LTS
Release:        20.04
Codename:       focal
uname -a
Linux aide-glb-srv-2 5.4.0-88-generic #99-Ubuntu SMP Thu Sep 23 17:29:00 UTC 2021 x86_64 x86_64 x86_64 GNU/Linux
# MANDATORY CHECK FOR NEEDED CPU FLAGS
grep 'flags' /proc/cpuinfo | head -n1 | grep -E 'vmx|svm'
flags           : fpu vme de pse tsc msr pae mce cx8 apic sep mtrr pge mca cmov pat pse36 clflush dts acpi mmx fxsr sse sse2 ss ht tm pbe syscall nx pdpe1gb rdtscp lm constant_tsc arch_perfmon pebs bts rep_good nopl xtopology nonstop_tsc cpuid aperfmperf pni pclmulqdq dtes64 monitor ds_cpl vmx smx est tm2 ssse3 sdbg fma cx16 xtpr pdcm pcid dca sse4_1 sse4_2 x2apic movbe popcnt tsc_deadline_timer aes xsave avx f16c rdrand lahf_lm abm 3dnowprefetch cpuid_fault epb cat_l3 cdp_l3 invpcid_single pti intel_ppin ssbd ibrs ibpb stibp tpr_shadow vnmi flexpriority ept vpid ept_ad fsgsbase tsc_adjust bmi1 hle avx2 smep bmi2 erms invpcid rtm cqm rdt_a rdseed adx smap intel_pt xsaveopt cqm_llc cqm_occup_llc cqm_mbm_total cqm_mbm_local dtherm ida arat pln pts md_clear flush_l1d
apt-get update
apt-get -y upgrade
apt-get install -y qemu-kvm libvirt-daemon-system libvirt-clients net-tools bridge-utils virtinst virt-top genisoimage
usermod -aG libvirt $USER
usermod -aG kvm $USER
#chown libvirt-qemu /var/lib/libvirt/images
# MANDATORY CHECK
kvm-ok
INFO: /dev/kvm exists
KVM acceleration can be used
可选:使用 DHCP 服务器创建 br0-bridge
安装后,虚拟机管理程序会自动在 192.168.122.0/24 前缀中创建默认 virbr0 Linux 网桥。此网桥将为其余网络接口提供 NAT 源并管理 DHCP 服务器租期。您可以连接 vJunos-switch VM fxp0 接口进行 OOB 管理。此默认 virbr0 Linux 网桥的一个限制是 DHCP 租约讲义是随机且不可预测的。
对于实验室服务器,建议创建额外的 br0 Linux 网桥。此 Linux 网桥必须对外部接口进行 NAT 处理,才能使用 192.168.10.0/24 前缀进行复制。
cat <<EOF >br0network.xml
<network>
  <name>br0network</name>
  <forward mode='nat'/>
  <bridge name='br0' stp='off' delay='0'/>
  <ip address='192.168.10.1' netmask='255.255.255.0'/>
</network>
EOF
virsh net-destroy br0network
virsh net-undefine br0network
virsh net-define --file /root/br0network.xml
virsh net-autostart br0network
virsh net-start br0network
virsh net-list
 Name         State    Autostart   Persistent
-----------------------------------------------
 br0network   active   yes         yes
 default      active   yes         yes
brctl show
bridge name     bridge id               STP enabled     interfaces
br0             8000.5254001a8a15       no              br0-nic
virbr0          8000.52540018df7d       yes             virbr0-nic
您已使用 DHCP 为 fxp0 上的 vEX 交换机分配了一个固定 IP,以便通过 SSH 连接到交换机。标准 virbr0-bridge 分配一个范围为 192.168.122.0/24 的随机 IP 地址。相反,您可以创建一个简单的 DHCP 服务器,以便为 br0 Linux 网桥上范围为 192.168.10.0/24 的已知 MAC 地址提供静态租约。然后,使用第一个接口上的某个 MAC 地址启动 vJunos-switch 虚拟机,以便为 fxp0 接口分配一个预定义的 IP 地址。
cat <<EOF > /root/br0-dnsmasq.conf
strict-order
user=root
pid-file=/tmp/br0-dnsmasq.pid
except-interface=lo
bind-dynamic
interface=br0
dhcp-range=192.168.10.150,192.168.10.250,255.255.255.0
dhcp-no-override
dhcp-authoritative
dhcp-option=3,192.168.10.1
dhcp-option=6,8.8.8.8
dhcp-host=52:54:00:6c:3c:00,aos-server,192.168.10.200
dhcp-host=52:54:00:6c:3c:01,sw-1,192.168.10.201
dhcp-host=52:54:00:6c:3c:02,sw-2,192.168.10.202
dhcp-host=52:54:00:6c:3c:03,sw-3,192.168.10.203
dhcp-host=52:54:00:6c:3c:04,sw-4,192.168.10.204
dhcp-host=52:54:00:6c:3c:05,sw-5,192.168.10.205
dhcp-host=52:54:00:6c:3c:06,sw-6,192.168.10.206
dhcp-host=52:54:00:6c:3c:07,sw-7,192.168.10.207
dhcp-host=52:54:00:6c:3c:08,sw-8,192.168.10.208
dhcp-host=52:54:00:6c:3c:09,sw-9,192.168.10.209
dhcp-host=52:54:00:6c:3c:0a,sw-10,192.168.10.210
dhcp-host=52:54:00:6c:3c:0b,sw-11,192.168.10.211
dhcp-host=52:54:00:6c:3c:0c,sw-12,192.168.10.212
dhcp-host=52:54:00:6c:3c:0d,sw-13,192.168.10.213
dhcp-host=52:54:00:6c:3c:0e,sw-14,192.168.10.214
dhcp-host=52:54:00:6c:3c:0f,sw-15,192.168.10.215
dhcp-host=52:54:00:6c:3c:10,sw-16,192.168.10.216
dhcp-host=52:54:00:6c:3c:99,wan-router,192.168.10.99
EOF
dnsmasq --conf-file=/root/br0-dnsmasq.conf
创建 Linux 网桥以模拟虚拟机之间的网络链接
连接 vJunos 交换机虚拟机的 fxp0 接口时,请使用默认 virbr0 或新的 br0 Linux 网桥。由于所有其他链路都需要新的网桥,因此请在设备之间创建虚拟链路。在此示例中,网桥名称会尝试复制 Junos OS 接口命名约定。
ip link add name ge000 type bridge
ip link set ge000 up
ip link add name ge001 type bridge
ip link set ge001 up
ip link add name ge002 type bridge
ip link set ge002 up
ip link add name ge003 type bridge
ip link set ge003 up
# OPTIONAL: check your Linux-bridges
brctl show
bridge name     bridge id               STP enabled     interfaces
br0             8000.525400938f81       no              br0-nic
                                                        vnet0
ge000           8000.000000000000       no
ge001           8000.000000000000       no
ge002           8000.000000000000       no
ge003           8000.000000000000       no
virbr0          8000.525400ffc947       yes             virbr0-nic
vJunos-switch 的默认 Junos OS 配置
出于以下主要原因,您可能需要包括在启动 vJunos-switch 虚拟机时执行的自定义 Junos OS 配置:
- 使用已知密码为管理系统(如 Juniper Apstra)创建 root/主管帐户,以便登录。这样无需本地 DHCP 服务器即可推送自定义配置,并支持 SSH 登录以更好地进行调试。
- 为 Mist 云应用 adopt 配置,以便新交换机显示在清单中。
- 在开始新实验室时加载上一个实验室的现有有效配置。
自定义出厂默认配置
以下是使用以下配置创建文件 juniper.conf 时加载的最小 Junos OS 配置示例:
- 用户名=
root - 密码=
ABC123 - 预计将从 fxp.0 获得 DHCP 租约
- 在所有接口
cat <<EOF >juniper.conf
system {
    host-name spine1;
    root-authentication {
        encrypted-password "\$6\$DOvFAxW9\$HpxgOaGEe5L6MtDJqbWepS5NT6EW23rCuu69gwwGVFr7BpzY2MHS34mPrR0LKRqoGI19tRgpz3vFJkEueW9mQ1"; ## SECRET-DATA
    }
    services {
        ssh {
            root-login allow;
            protocol-version v2;
        }
    }
    name-server {
        8.8.8.8;
        9.9.9.9;
    }
    arp {
        aging-timer 5;
    }
    syslog {
        file interactive-commands {
            interactive-commands any;
        }
        file messages {
            any notice;
            authorization info;
        }
    }
}
interfaces {
    fxp0 {
        unit 0 {
            family inet {
                dhcp force-discover;
            }
        }
    }
}
protocols {
    lldp {
        interface all;
    }
    lldp-med {
        interface all;
    }
}
EOF
可选:添加 Junos OS 配置以应用于 Mist 云
在此步骤中,您将添加 Junos OS 配置,以使交换机自动显示在 Mist 云中。
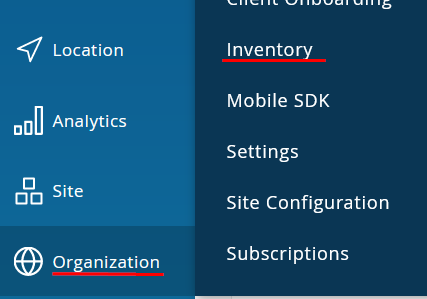
- 转到 组织 -> 清单。
- 选择 交换机 ,然后单击 采用交换机。

- 单击 “复制到剪贴板”。
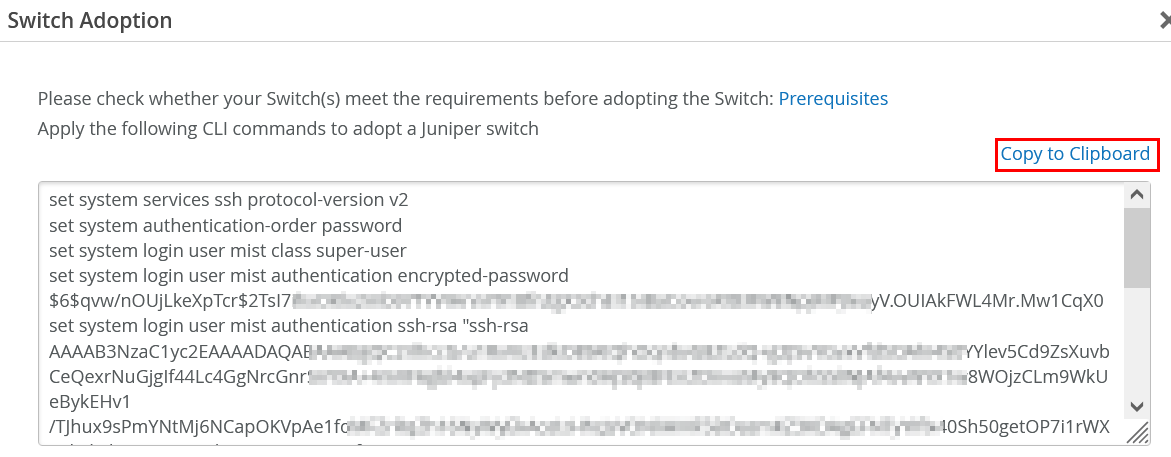
- 从您首选的编辑器中打开一个文件
adopt-template.txt,然后将收集的信息粘贴到该文件中。然后,保存并关闭文件。vi adopt-template.txt
注意:您可以使用相同的 Mist 云采用代码来加载同一组织中的所有交换机。
- 使用模板转换信息,以将其更改为不同的 Junos OS 配置格式。首先,您必须使用 bash shell 命令从文件
adopt-template.txt中提取五个变量。MISTVAR1=`cat adopt-template.txt | sed 's/\"//g' | grep "set system login user mist authentication encrypted-password" | awk '{print $8}'` MISTVAR2=`cat adopt-template.txt | sed 's/\"//g' | grep "set system login user mist authentication ssh-rsa" | awk '{print $8 " " $9}'` MISTVAR3=`cat adopt-template.txt | sed 's/\"//g' | grep "set system services outbound-ssh client mist secret" | awk '{print $8}'` MISTVAR4=`cat adopt-template.txt | sed 's/\"//g' | grep "set system services outbound-ssh client mist" | grep "port" | awk '{print $7}'` MISTVAR5=`cat adopt-template.txt | sed 's/\"//g' | grep "set system services outbound-ssh client mist" | grep "device-id" | awk '{print $8}'`
在此步骤中,您将添加回不依赖于 set 命令的 Junos OS 配置。
cat <<EOF >>juniper.conf
system {
    login {
        user mist {
            class super-user;
            authentication {
                encrypted-password "$MISTVAR1";
                ssh-rsa "$MISTVAR2";
            }
        }
    }
    services {
        outbound-ssh {
            client mist {
                device-id "$MISTVAR5";
                secret "$MISTVAR3";
                keep-alive {
                    retry 12;
                    timeout 5;
                }
                services netconf;
                $MISTVAR4 {
                    port 2200;
                    retry 1000;
                    timeout 60;
                }
            }
        }
    }
}
EOF
# review the final config
cat juniper.conf
使用 Junos OS 虚拟机配置创建虚拟磁盘
- 创建高清映像,以使用 vJunos-switch 支持站点中的原始 bash 脚本
make-config.sh加载自定义配置。.png)
- 通过链接下载图像。例如: https://webdownload.juniper.net/swdl/dl/anon/site/1/record/168885.html。
如果找不到图片,请使用下面的副本。
#!/bin/bash # # make-config.sh # # Copyright (c) 2023, Juniper Networks, Inc. # All rights reserved. # # Create a config metadisk from a supplied juniper.conf to attach # to a vJunos VM instance # usage() { echo "Usage : make-config.sh <juniper-config> <config-disk>" exit 0; } cleanup () { echo "Cleaning up..." umount -f -q $MNTDIR losetup -d $LOOPDEV rm -rfv $STAGING rm -rfv $MNTDIR } cleanup_failed () { cleanup; rm -rfv $2 exit 1 } if [ $# != 2 ]; then usage; fi STAGING=`mktemp -d -p /var/tmp` MNTDIR=`mktemp -d -p /var/tmp` mkdir $STAGING/config cp -v $1 $STAGING/config qemu-img create -f raw $2 1M LOOPDEV=`losetup --show -f $2` if [ $? != 0 ]; then cleanup_failed; fi mkfs.vfat -v -n "vmm-data" $LOOPDEV if [ $? != 0 ]; then echo "Failed to format disk $LOOPDEV; exiting" cleanup_failed; fi mount -t vfat $LOOPDEV $MNTDIR if [ $? != 0 ]; then echo "Failed to mount metadisk $LOOPDEV; exiting" cleanup_failed; fi echo "Copying file(s) to config disk $2" (cd $STAGING; tar cvzf $MNTDIR/vmm-config.tgz .) cleanup echo "Config disk $2 created" exit 0 - 使用 创建包含自定义配置
make-config.sh的 qcow2 映像。./make-config.sh juniper.conf myconfig.qcow2 'juniper.conf' -> '/var/tmp/tmp.S9uwgranof/config/juniper.conf' Formatting 'myconfig.qcow2', fmt=raw size=1048576 mkfs.fat 4.1 (2017-01-24) mkfs.fat: warning - lowercase labels might not work properly with DOS or Windows /dev/loop7 has 64 heads and 32 sectors per track, hidden sectors 0x0000; logical sector size is 512, using 0xf8 media descriptor, with 2048 sectors; drive number 0x80; filesystem has 2 12-bit FATs and 4 sectors per cluster. FAT size is 2 sectors, and provides 502 clusters. There is 1 reserved sector. Root directory contains 512 slots and uses 32 sectors. Volume ID is 9136e65a, volume label vmm-data . Copying file(s) to config disk myconfig.qcow2 ./ ./config/ ./config/juniper.conf Cleaning up... removed '/var/tmp/tmp.S9uwgranof/config/juniper.conf' removed directory '/var/tmp/tmp.S9uwgranof/config' removed directory '/var/tmp/tmp.S9uwgranof' removed directory '/var/tmp/tmp.iz7I2RJJAI' Config disk myconfig.qcow2 created ls -l myconfig.qcow2 -rw-r--r-- 1 root root 1048576 Apr 19 19:46 myconfig.qcow2
- 将配置映像复制到 KVM 虚拟机的最终目标。
cp myconfig.qcow2 /var/lib/libvirt/images/spine1-config.qcow2
- 创建新的 vJunos-switch 虚拟机时,如下所示将粗体行插入虚拟机 virt-install 配置。 Proxmox 虚拟环境一章描述了一个示例。
.
--disk path=/var/lib/libvirt/images/spine1.qcow2,cache=writeback,bus=virtio \
--disk path=/var/lib/libvirt/images/spine1-config.qcow2 \
--import \
.
使用 virt-install CLI 部署 vJunos 交换机虚拟机
对于每个 vJunos-switch 虚拟机,您需要一个基本映像的单独副本,以便系统写入其中。下面的配置使用 KVM 备份文件方法创建一个映像,其中包含从原始映像中所做的更改和读取。此方法可加快虚拟机启动速度并节省存储空间。您可能需要修改文件 /etc/libvirt/qemu.conf 才能将自己添加为用户和组。然后,运行 sudo systemctl restart libvirtd 以使用此功能。
qemu-img create -b vjunos-switch-23.1R1.8.qcow2 -f qcow2 /var/lib/libvirt/images/spine1.qcow2
备份文件必须始终允许您为每个虚拟机复制映像。
cp vjunos-switch-23.1R1.8.qcow2 /var/lib/libvirt/images/spine1.qcow2
最后,您可以在以下配置中成功启动 vJunos-switch 虚拟机,而无需更改粗体参数。虚拟机的第一个以太网接口始终为 fxp0。设置 MAC 地址并将 DHCP 服务器配置为将 192.168.10.201 分配为静态 DHCP 租约后,您可以稍后直接启动远程 shell。
virt-install -n spine1 -r 5120 --vcpus=4 \
--sysinfo smbios,system.product=VM-VEX \
--hvm --cpu IvyBridge,require=vmx \
--disk path=/var/lib/libvirt/images/spine1.qcow2,cache=writeback,bus=virtio \
--import \
-w bridge=br0,model=virtio,mac="52:54:00:6c:3c:01" \
-w bridge=ge000,model=virtio \
-w bridge=ge001,model=virtio \
-w bridge=ge002,model=virtio \
-w bridge=ge003,model=virtio \
--nographics --noautoconsole
Starting install...
Domain creation completed.
virsh domiflist spine1
 Interface   Type     Source   Model    MAC
-----------------------------------------------------------
 vnet1       bridge   br0      virtio   52:54:00:6c:3c:01
 vnet2       bridge   ge000    virtio   52:54:00:ac:2f:63
 vnet3       bridge   ge001    virtio   52:54:00:90:ea:79
 vnet4       bridge   ge002    virtio   52:54:00:24:0f:1d
 vnet5       bridge   ge003    virtio   52:54:00:11:45:56
brctl show
bridge name     bridge id               STP enabled     interfaces
br0             8000.525400938f81       no              br0-nic
                                                        vnet0
                                                        vnet1
brtest          8000.000000000000       no
ge000           8000.fe5400ac2f63       no              vnet2
ge001           8000.fe540090ea79       no              vnet3
ge002           8000.fe5400240f1d       no              vnet4
ge003           8000.fe5400114556       no              vnet5
virbr0          8000.525400ffc947       yes             virbr0-nic
# OPTIONAL: check the xml config create with the official documentation
virsh dumpxml spine1
# OPTIONAL: open a console to the VM to see what it does
virsh console --force spine1
使用 virt-manager GUI 部署 vJunos-switch 虚拟机
要通过 virt-manager GUI 安装 vJunos-switch,您必须手动更改一些基于 XML 的配置文件。因此,GUI 不会为此虚拟机提供任何好处。
- 获取基本 VM 的副本到 libvirtd 映像目录,如图所示。
cp vjunos-switch-23.1R1.2.qcow2 /var/lib/libvirt/images/spine1.qcow2

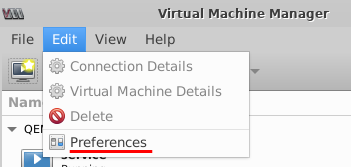
- 单击 “编辑”->“首选项 ”,为此虚拟机启用 XML 编辑。
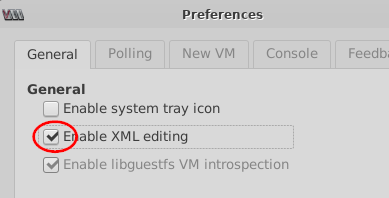
- 选择 “启用 XML 编辑”。
- 选择 文件 -> 新建虚拟机。
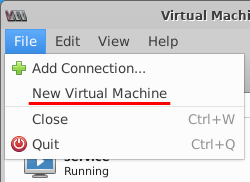
- 选择 导入现有磁盘映像进行 安装。
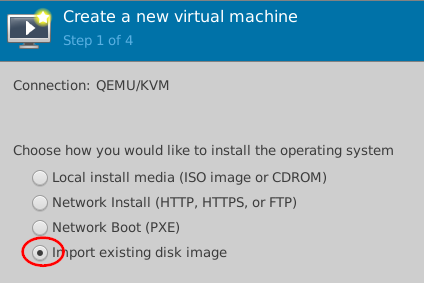
- 单击浏览。
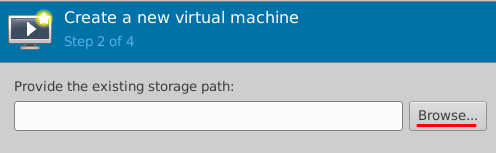
- 选择您复制的图像,然后单击 “选择卷”。
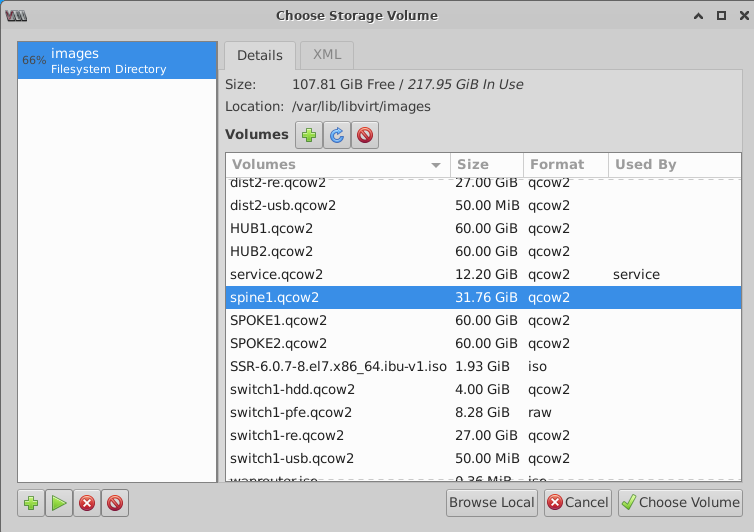
- 选择 OS 的 通用默认值 ,然后单击 转发。
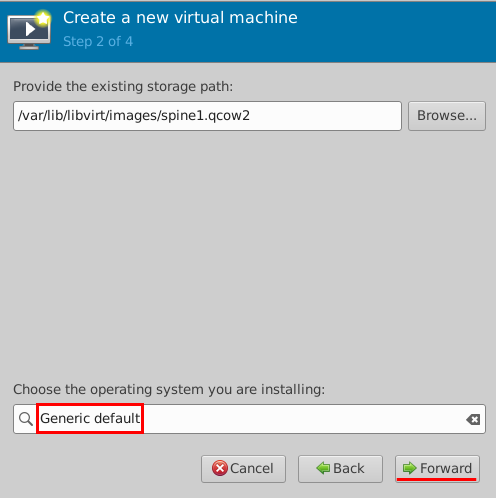
- 单击 + 进行配置:
- 内存=
5120 - CPU=
4
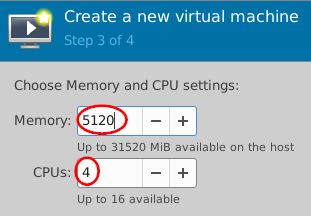
- 内存=
- 然后,配置:
- 姓名=
spine1 - 选择 “安装前自定义配置”。
- 暂时选择 “虚拟网络”br0network“:NAT。 第一个接口 (fxp0) 的网络选择必须是 NAT 网络。
- 单击 “完成”。
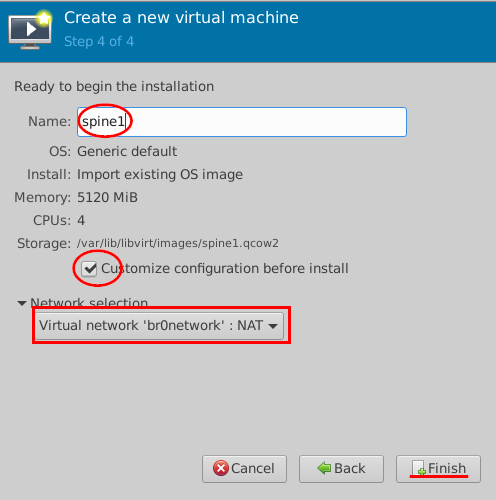
- 姓名=
- 单击 CPU。
主机 CPU 配置完成。您可以单击 XML 以稍后更改配置,因为不需要其他选项。
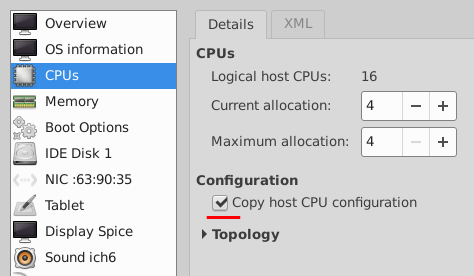
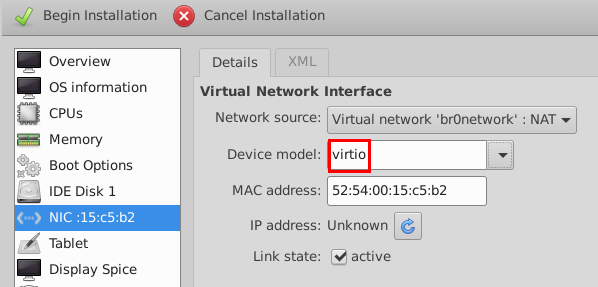
- 将第一个接口的 Device model 更改为 virtio 。
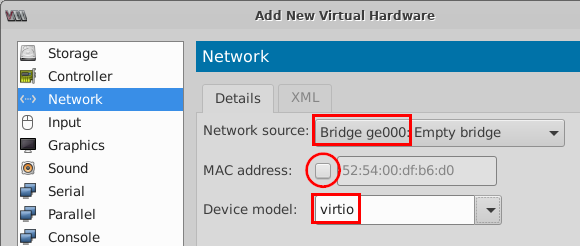
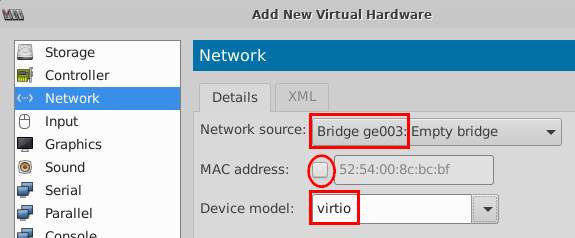
- 使用接口的 add 函数添加新的网络接口并配置:
- 网络来源=
Bridge ge000 - 取消选中=
MAC address - 设备型号=
virtio
- 网络来源=
- 重复步骤 13 以添加网络源
Bridge ge001, Bridge ge002和Bridge ge003.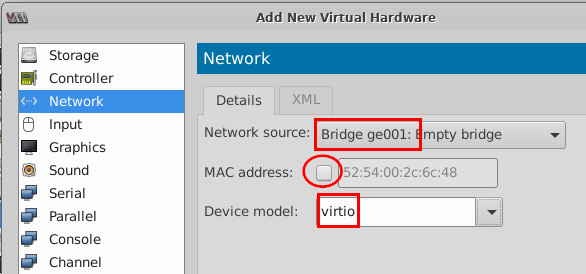
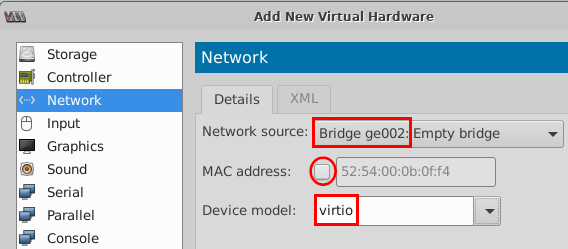
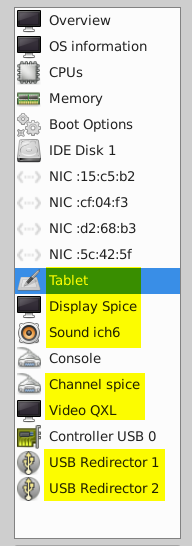
- 或者,您可以移除下图中以黄色突出显示的默认接口和选项,因为这些接口和选项对于 vJunos 交换机虚拟机不是必需的。
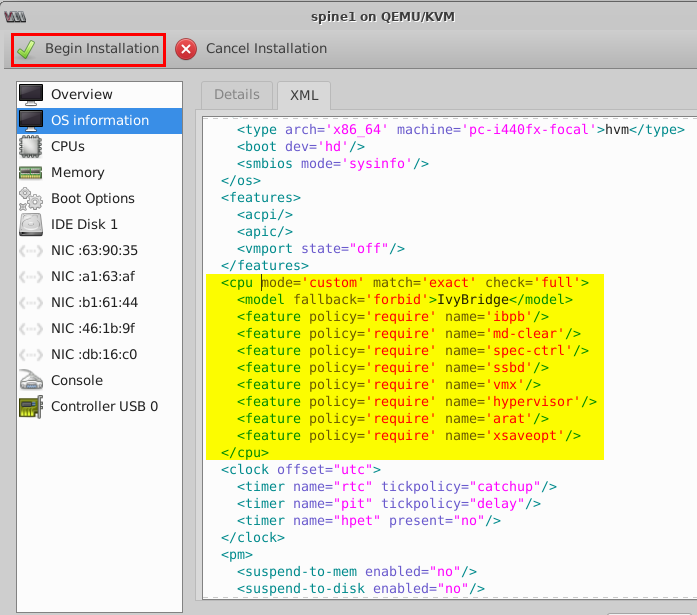
- 选择“操作系统信息”,然后选择“XML 进行编辑”。删除 和
</os>之间的<os>所有内容并将其替换为突出显示的行,如下所示。替换后的配置会指示特殊的 BIOS 命令,以确保虚拟机充当 vEX9214,而非 vMX。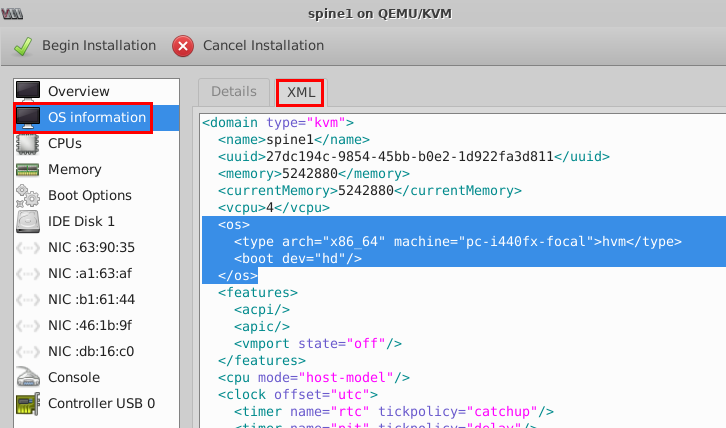
- 插入以下配置,如下所示:
  <sysinfo type='smbios'>
    <system>
      <entry name='product'>VM-VEX</entry>
    </system>
  </sysinfo>
  <os>
    <type arch='x86_64' machine='pc-i440fx-focal'>hvm</type>
    <boot dev='hd'/>
    <smbios mode='sysinfo'/>
  </os>
替换后的配置如下图中黄色突出显示所示。
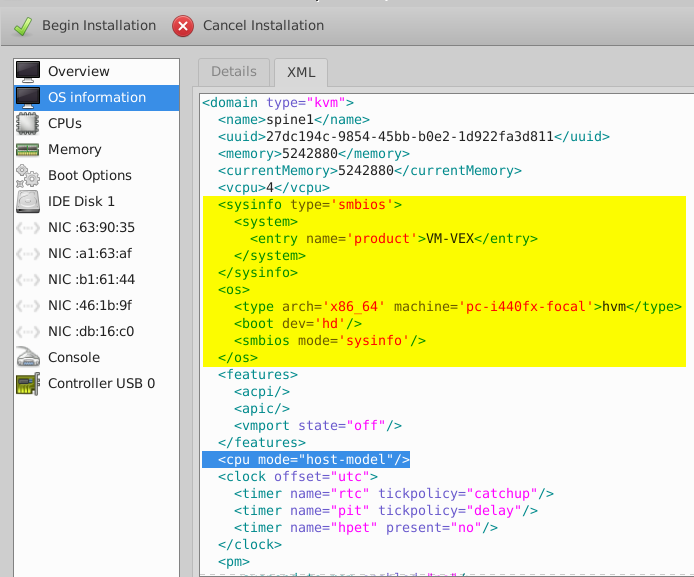
- 如上图所示插入以下配置
<cpu。<cpu mode='custom' match='exact' check='full'> <model fallback='forbid'>IvyBridge</model> <feature policy='require' name='ibpb'/> <feature policy='require' name='md-clear'/> <feature policy='require' name='spec-ctrl'/> <feature policy='require' name='ssbd'/> <feature policy='require' name='vmx'/> <feature policy='require' name='hypervisor'/> <feature policy='require' name='arat'/> <feature policy='require' name='xsaveopt'/> </cpu>替换后的配置如下图中黄色突出显示所示。
- 插入以下配置,如下所示:
- 单击 应用 并 开始安装。
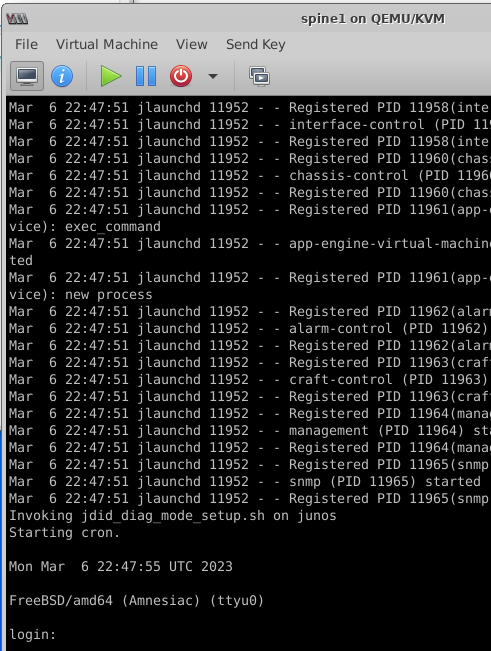
安装过程可能需要三分钟,系统会提示你登录 VM。
Linux 网桥和虚拟机接口 虚拟机创建后的更改
启动虚拟机后,必须更改接口和 Linux 网桥配置。您在 部署前的准备工作一章中使用默认配置创建的网桥适用于 EVPN VXLAN 交换矩阵。
默认的 Linux 网桥不支持:
- LLDP 消息传输,这意味着您看不到任何链路邻接方。
- LACP 802.3ad 消息传输,可防止您构建 LAG。
- MTU 大,会导致 VXLAN 消息分段。使用 VXLAN 时,交换矩阵的 MTU 必须至少比连接的客户端大 50 个字节。对连接的桌面虚拟机和具有相同默认 MTU (1500) 的交换矩阵链路进行映像,其中传输链路始终会额外增加 50 个字节。ICMP Ping等小数据包工作正常,但当客户端使用1500字节的完整MTU时,效果不佳。
- 802.1X 有线客户端身份验证被阻止。
因此,您需要在创建 VM 后更改虚拟接口和 Linux 网桥以支持这些功能。此更改可确保您顺利构建虚拟 EVPN VXLAN 交换矩阵。
- 使用以下命令创建 bash 脚本以执行所有必需的功能。
rm -f vm-bridge-update.sh
touch vm-bridge-update.sh
chmod 777 vm-bridge-update.sh
vi vm-bridge-update.sh
- 将以下配置复制并粘贴到编辑器中。然后,保存并关闭。
#!/bin/bash virsh domiflist $1 | tail -n +4 > /tmp/vmbridgelist.txt sed -i '/^$/d' /tmp/vmbridgelist.txt # cat /tmp/vmbridgelist.txt while IFS= read -r line do INTERFACE=`echo $line | awk '{ print $1 }'` NTYPE=`echo $line | awk '{ print $2 }'` BRIDGE=`echo $line | awk '{ print $3 }'` if [ "$NTYPE" == "bridge" ]; then # change MTU to higher value RUNME="ip link set dev "$INTERFACE" mtu 9200" echo $RUNME eval $RUNME # enable LLDP and 802.1x on bridge RUNME="echo 65528 > /sys/class/net/"$BRIDGE"/bridge/group_fwd_mask" echo $RUNME eval $RUNME # enable LACP on link RUNME="echo 16388 > /sys/class/net/"$INTERFACE"/brport/group_fwd_mask" echo $RUNME eval $RUNME fi done < /tmp/vmbridgelist.txt num=0 while IFS= read -r line do INTERFACE=`echo $line | awk '{ print $1 }'` NTYPE=`echo $line | awk '{ print $2 }'` BRIDGE=`echo $line | awk '{ print $3 }'` if [ "$NTYPE" == "bridge" ]; then MTU=`cat /sys/class/net/$BRIDGE/mtu` if [ "$MTU" != "9200" ]; then echo 'Warning! Bridge:'$BRIDGE' did not follow new MTU setting of interface:'$INTERFACE' check other interfaces attached to same bridge and correct please!' num=1 fi fi done < /tmp/vmbridgelist.txt exit $num - 在演示 VM 上运行此脚本,您可以在其中监视应用更改所需的命令。
./vm-bridge-update.sh core1
ip link set dev vnet4 mtu 9200
echo 65528 > /sys/class/net/exfabric1/bridge/group_fwd_mask
echo 16388 > /sys/class/net/vnet4/brport/group_fwd_mask
ip link set dev vnet5 mtu 9200
echo 65528 > /sys/class/net/uplink1/bridge/group_fwd_mask
echo 16388 > /sys/class/net/vnet5/brport/group_fwd_mask
ip link set dev vnet6 mtu 9200
echo 65528 > /sys/class/net/fabric1/bridge/group_fwd_mask
echo 16388 > /sys/class/net/vnet6/brport/group_fwd_mask
ip link set dev vnet7 mtu 9200
echo 65528 > /sys/class/net/fabric2/bridge/group_fwd_mask
echo 16388 > /sys/class/net/vnet7/brport/group_fwd_mask
Warning! Bridge:uplink1 did not follow new MTU setting of interface:vnet5 check other interfaces attached to same bridge and correct please!
您有意在某个接口上针对未升级的 MTU 发出警告。此警告意味着 Linux 网桥始终具有任何连接的网络接口中最低的 MTU。因此,请确保升级连接到单个网桥的所有接口。否则,您的 MTU 更改将不会实施。
该脚本有意不升级虚拟机的第一个接口(通常是 fxp0)。如果要包含此接口,请将第二行更改为“virsh domiflist $1 |尾部 -n +3 > /tmp/vmbridgelist.txt“。
调整 Linux 桥仅适用于 Ubuntu 20.04 或更高版本。
可选:优化您的 KVM 服务器
Ultra 内核 Samepage 合并内核
在启动多个 vJunos 交换机虚拟机时,与标准 KSM 支持相比,使用支持 Ultra 内核 Samepage 合并的内核可以节省 30% - 40% 的内存。这对于实验室和 EVE-NG 等系统来说是有益的,EVE-NG 默认包含此内核。如果系统在不支持更高内核的 Ubuntu 20.04.x 上运行,您可以使用以下配置从官方 GitHub 存储库构建这样的内核。
确保您已在 BIOS 中禁用安全启动。如果没有,则不会加载未签名的内核。
lsb_release -a
No LSB modules are available.
Distributor ID: Ubuntu
Description:    Ubuntu 20.04.5 LTS
Release:        20.04
Codename:       focal

uname -r
5.4.0-135-generic

sudo apt-get install -y build-essential flex bison git libssl-dev libncurses-dev libelf-dev zstd
git clone https://github.com/dolohow/uksm.git
- 在浏览器中输入 https://git.launchpad.net/~ubuntu-kernel/ubuntu/+source/linux/+git/focal/refs/ 。
如果您的服务器上安装了普通
5.4.x内核,请运行以下命令:rm -rf focal git clone --depth 1 --single-branch --branch Ubuntu-5.4.0-135.152 https://git.launchpad.net/\~ubuntu-kernel/ubuntu/+source/linux/+git/focal cd focal patch -p1 < ~/uksm/v5.x/uksm-5.4.patch
- 如果您的服务器上安装了较新的内核,例如支持硬件支持堆栈 (HWE) 的内核,
5.15.x请运行以下命令:rm -rf focal git clone --depth 1 --single-branch --branch Ubuntu-hwe-5.15-5.15.0-57.63_20.04.1 https://git.launchpad.net/\~ubuntu-kernel/ubuntu/+source/linux/+git/focal cd focal patch -p1 < ~/uksm/v5.x/uksm-5.15.patch
- 无论您的内核版本如何,请继续执行以下配置以构建和安装 USKM 内核。
make oldconfig Enable KSM for page merging (KSM) [Y/n/?] y Choose UKSM/KSM strategy > 1. Ultra-KSM for page merging (UKSM) (NEW) 2. Legacy KSM implementation (KSM_LEGACY) (NEW) choice[1-2?]: 1 # patches for this kernel to compile scripts/config --disable DEBUG_INFO sed -i 's/CONFIG_SYSTEM_TRUSTED_KEYS="debian/canonical-certs.pem"/CONFIG_SYSTEM_TRUSTED_KEYS=""/g' .config sed -i 's/CONFIG_SYSTEM_REVOCATION_KEYS="debian/canonical-revoked-certs.pem"/CONFIG_SYSTEM_REVOCATION_KEYS=""/g' .config cat .config | grep _KEYS # The below command is slower but maybe used for debugging when building the kernel fails # make deb-pkg LOCALVERSION=-uksm make -j$(nproc) deb-pkg LOCALVERSION=-uksm ls -la ../*deb -rw-r--r-- 1 root root 11650688 Jan 7 13:11 ../linux-headers-5.4.212-uksm_5.4.212-uksm-1_amd64.deb -rw-r--r-- 1 root root 62563988 Jan 7 13:12 ../linux-image-5.4.212-uksm_5.4.212-uksm-1_amd64.deb -rw-r--r-- 1 root root 1072104 Jan 7 13:11 ../linux-libc-dev_5.4.212-uksm-1_amd64.deb cd .. sudo dpkg -i linux-headers-5.4.212-uksm_5.4.212-uksm-1_amd64.deb sudo dpkg -i linux-image-5.4.212-uksm_5.4.212-uksm-1_amd64.deb sudo update-grub sudo reboot - 服务器再次启动后,检查您是否在新内核上运行。
uname -r
5.4.212-uksm
关闭安全性缓解措施
如果您的服务器处于生产阶段或可通过 Internet 访问,请避免使用这些说明。您可以修改安全检查以提高实验室的 CPU 性能。你被警告了。
为避免 20% 的 CPU 性能损失,您需要禁用针对崩溃/幽灵漏洞的所有缓解措施。此服务器不托管来自不同用户的虚拟机。由于你管理实验室中的所有 VM,而且它不是公开提供的生产级系统,因此你将性能置于安全性之上。
#we ARE already a VM so to have most speed turn off security patches
#add mitigations=off to your kernel parameters like below
sudo vi /etc/default/grub
.
.
GRUB_CMDLINE_LINUX_DEFAULT=""
GRUB_CMDLINE_LINUX="mitigations=off"
# Uncomment to enable BadRAM filtering, modify to suit your needs
# This works with Linux (no patch required) and with any kernel that obtains
.
.
sudo update-grub
# make latest kernel >=5.4 active through reboot of VM
sudo reboot
# you should see the below now with disabled security tweaks
grep . /sys/devices/system/cpu/vulnerabilities/* | egrep -i 'meltdown|spectre'
/sys/devices/system/cpu/vulnerabilities/meltdown:Vulnerable
/sys/devices/system/cpu/vulnerabilities/spectre_v1:Vulnerable: __user pointer sanitization and usercopy barriers only; no swapgs barriers
/sys/devices/system/cpu/vulnerabilities/spectre_v2:Vulnerable, IBPB: disabled, STIBP: disabled