示例:如何在 KVM 服务器上使用 Ubuntu 在 vSRX 3.0 上设置 SR-IOV 10GbE 高可用性
此示例说明如何在 vSRX 3.0 实例上设置 SR-IOV 10GbE 高可用性部署。
要求
此示例使用以下硬件、软件组件和操作系统:
装置
vSRX 3.0
软件
Junos OS 20.4R1 版
硬件
网卡:英特尔公司以太网控制器 X710/X520/82599
驱动程序:i40e版本:2.1.14-k或ixgbe版本:5.1.0-k
CPU: 英特尔 (R) 至强 (R) 金牌 5120 CPU @ 2.20 GHz
56 个中央处理器
0- 55 个在线 CPU 列表
每个内核 2 个线程
每个插槽 14 个内核
2 个插座
2 个非一致性内存访问 (NUMA) 节点
有关 SR-IOV 支持的 NIC、虚拟机管理程序和端口的详细信息,请参阅 硬件规格。
操作系统
KVM 操作系统和网络适配器 |
支持 |
|---|---|
英特尔 82599/X520/X540(基于 82599 ixgb 驱动程序) |
是的 |
英特尔 X710/XL710/XXV710/X722(基于 i40e 驱动程序) |
是的 |
Mellanox ConnectX-4/ConnectX-4 Lx |
不 |
Ubuntu 18.04 (kernel:4.15.0 + libvirt:4.0.0) 和 20.04 (kernel:5.4.0 + libvirt:6.0.0) LTS |
是的 |
Redhat 8.2 (kernel:4.18.0 + libvirt:4.5.0) |
是的 |
此示例中使用的操作系统包括:
KVM 服务器上的 Ubuntu 18.04.3 LTS
内核:4.15.0-64 通用
内核:4.18.0-193.1.2.el8_2.x86_64
红帽 RHEL 8.2
概述
此示例演示如何:
设置 10 千兆高可用性部署
在 NIC 接口上构建 VF 总线信息并更改 XML 模板
配置基本 vSRX 3.0 实例
在高可用性环境中,控制链路和结构数据链路是确保机箱群集稳定性的关键通信通道。这两个链路都是同一 Linux 网桥的一部分。主机操作系统 (Ubuntu) 共享分配给 vSRX 3.0 控制平面的 CPU,用于执行日常任务,并与其中一个 vSRX 3.0 PFE 数据平面线程共享用于数据包处理。这种资源争用,加上缺少用于控制链路的专用 VLAN 或 NIC,可能会导致检测信号未命中。
使用命令时 use-actual-mac-on-physical-interfaces ,不支持通过 SR-IOV 的结构链路。
此外,主机上的中断处理也会影响性能。当数据包到达网卡时,硬件中断指示和服务 vSRX 3.0 控制平面的 CPU 核心必须停止并为中断提供服务。来自网卡的大量数据包可能会导致更多的硬件中断和更少的 CPU 资源来为 vSRX 3.0 控制平面提供服务。
为了克服设计约束和 CPU 资源争用,我们建议进行以下更改:
为每个 vSRX 3.0 控制平面、vSRX 3.0 数据平面和主机操作系统分配专用 CPU。
在主机上分配所需的内存。
在高可用性部署中将 SR-IOV 用于交换矩阵接口。
删除用于控制链路通信的 GRE,并在高可用性部署中使用组播。
启用 IRQ 关联以避免 CPU 为 vSRX 3.0 控制平面和数据平面处理中断。
将物理网卡描述符从 512 字节扩大到 4096 字节。
我们建议您将 vSRX 3.0 的所有收入端口均配置为 SR-IOV。此外,在 KVM 上,您可以在管理端口 -fxp0/ 控制端口 - em0 / 结构端口 ge-0/0/* 上配置 SR-IOV 高可用性。
不支持 SR-IOV 高可用性第 2 层功能。此外,VMware 和 Mellanox NIC 不支持 SR-IOV 高可用性功能。
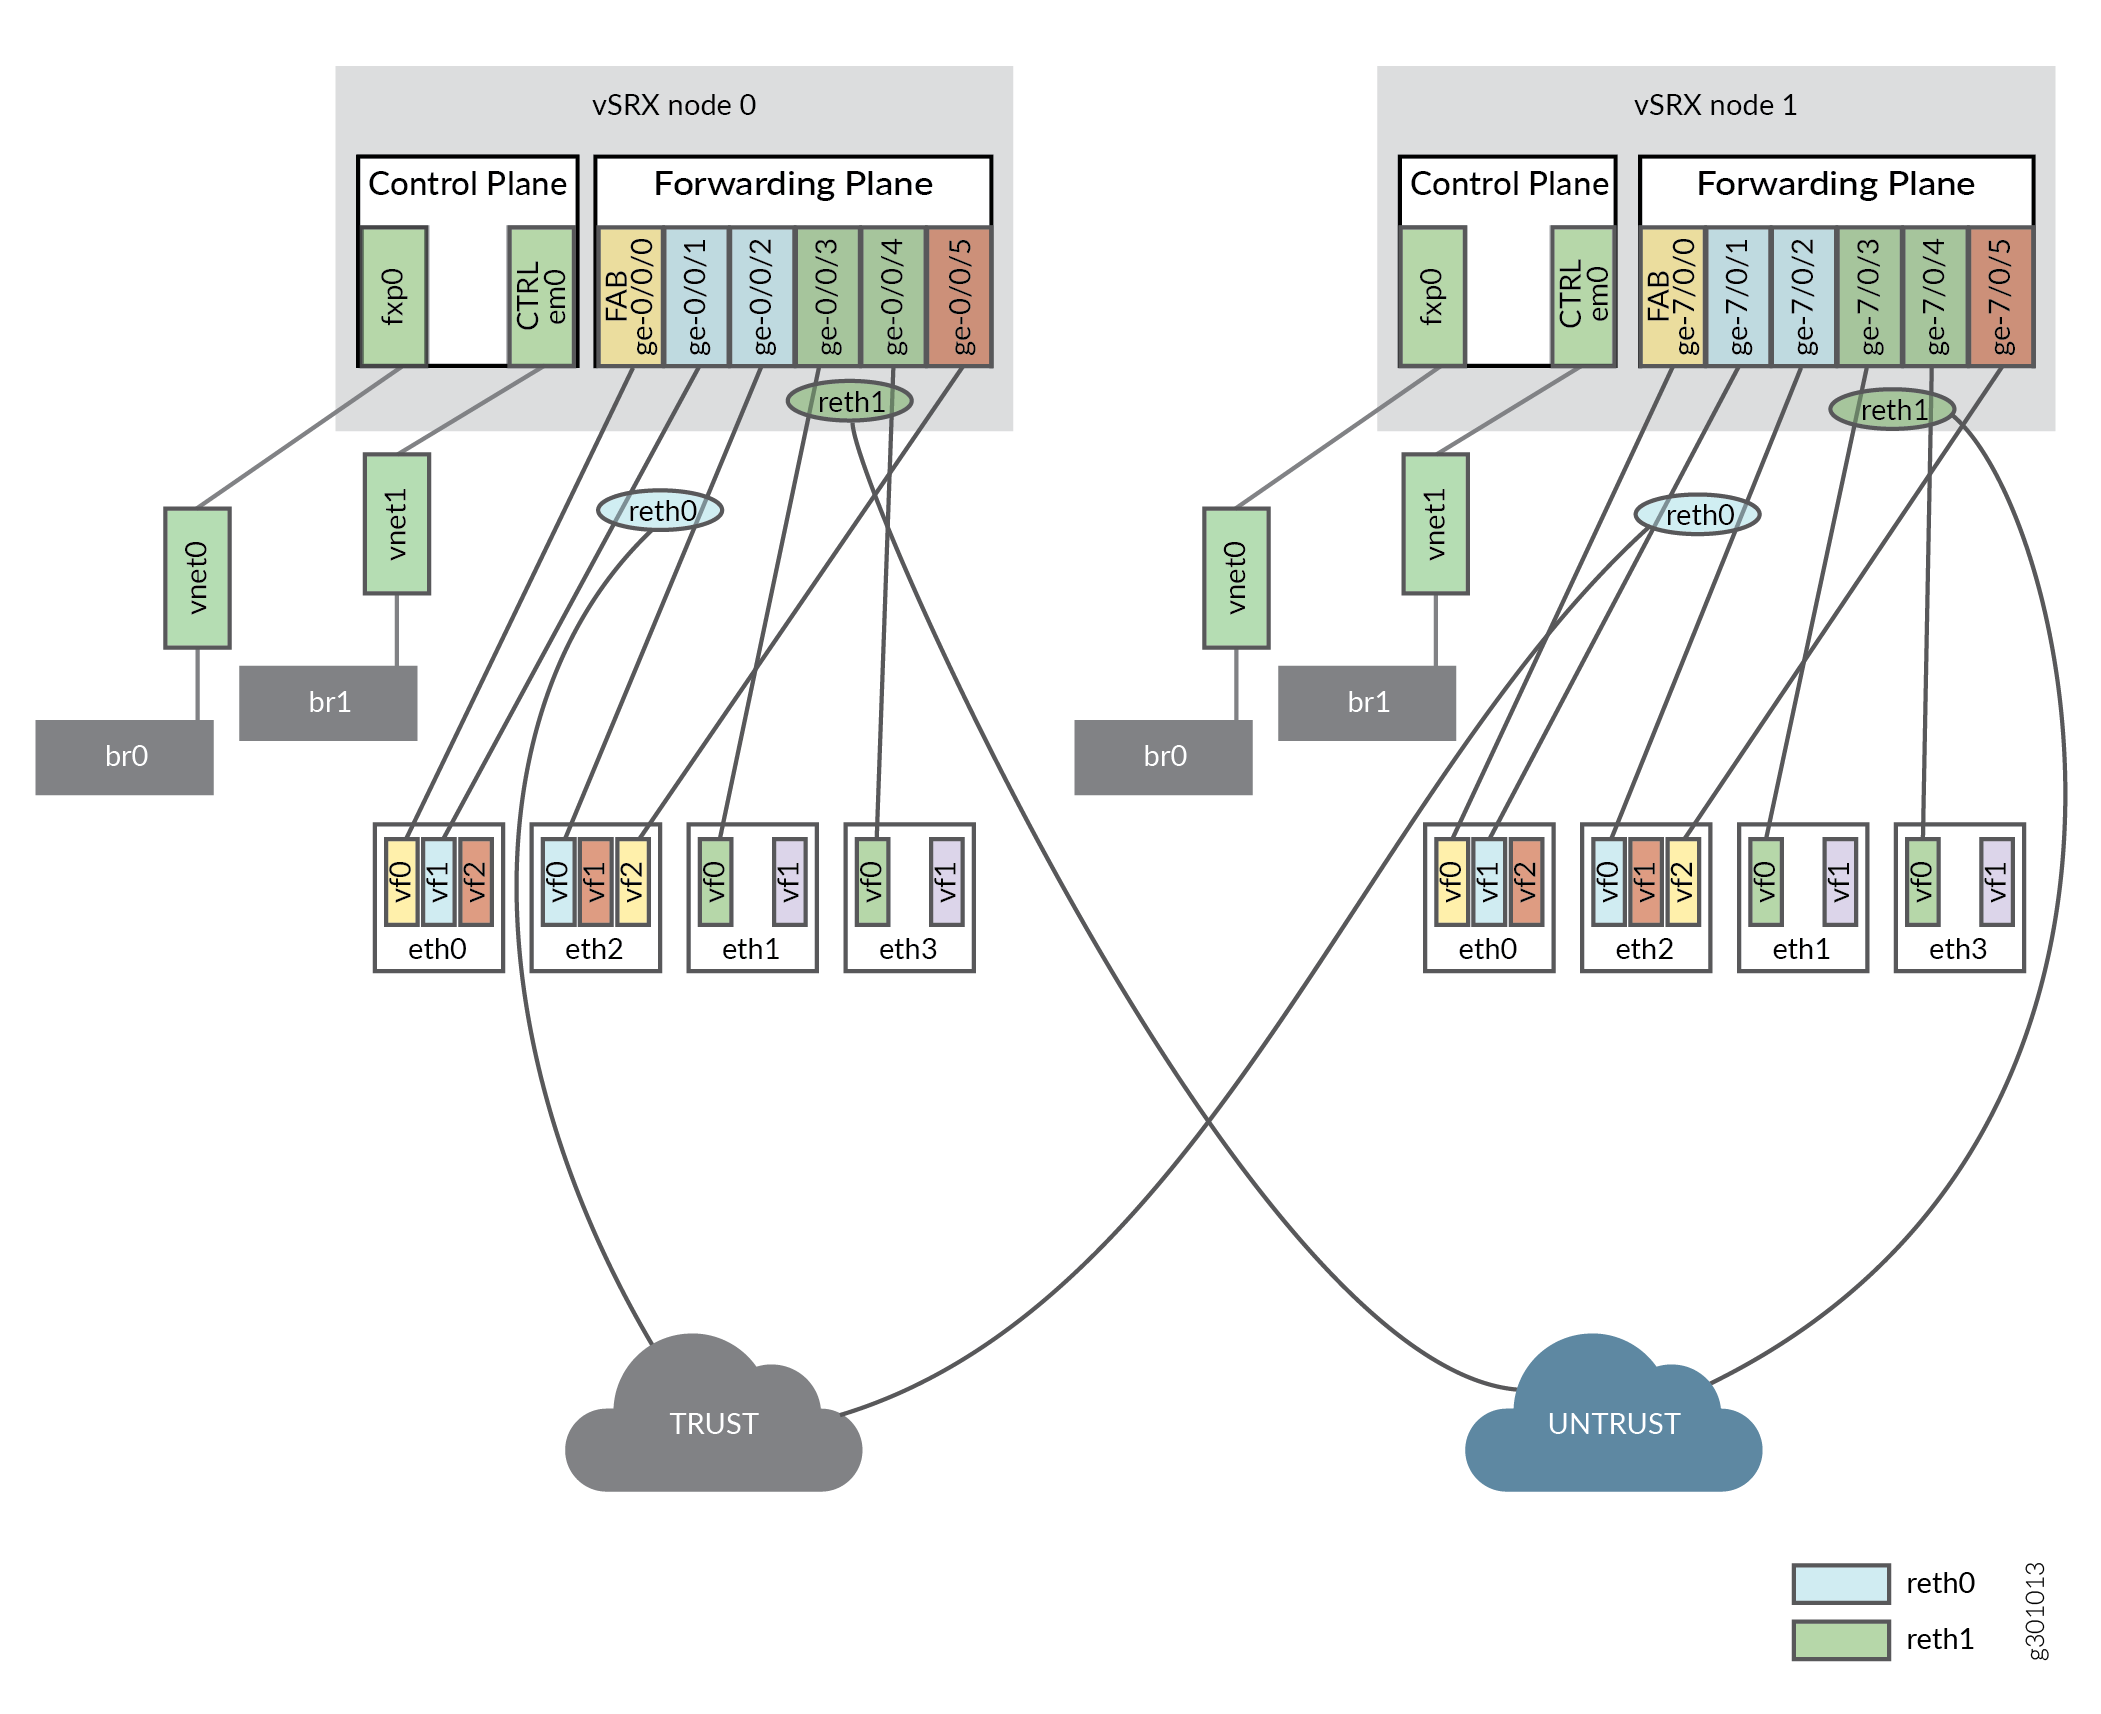
图 1 显示了此示例中使用的拓扑。
配置
SR-IOV 高可用性部署
分步过程
要配置 SR-IOV 高可用性部署,请执行以下操作:
启用 SR-IOV 端口。
#modprobe i40en max_vfs=8,8
or
echo 8 > /sys/class/net/ETH-X/device/sriov_numvfs
 echo 8 > /sys/class/net/ETH-Y/device/sriov_numvfs
输入可用端口所需的输入。
8 = means set sriov_numvfs as 8 vfs
0 = For disable SRIOV port
在以下位置可用的默认 grub 文件中进行以下更改:
GRUB_CMDLINE_LINUX_DEFAULT="default_hugepagesz=1G hugepagesz=1G hugepages=18 iommu=pt intel_iommu=on isolcpus=4-55 transparent_hugepage=never"
执行升级蛴螬。
update-grub
重新引导主机以使更改生效。
reboot
(可选)核心 0-3 切换到中断上下文 - 中断服务例程 (ISR) 来处理即将到来的中断。NUMA 0 上的核心 4-13 用于 vSRX。运行以下脚本:
cat irq.sh
#!/bin/bash
# Disable IRQ and set IRQ SMP affinity to core 0
disable_irq_balance_and_set_irq_affinity_core_0()
{
   echo f >  /proc/irq/default_smp_affinity
    #Disable_IRQ_Balance
    if [ -f /etc/init.d/irqbalance ]; then
        /etc/init.d/irqbalance stop
    fi
    #set_irq_affinity_core_0
    #for IRQ in `seq 0 512`;
    for IRQDIR in `ls -d /proc/irq/*`;
    do
        if [ -d $IRQDIR ]; then
            echo f > $IRQDIR/smp_affinity 2>/dev/null
            cat $IRQDIR/smp_affinity
        fi
    done
}
将所有 NIC 上的 tx 和 rx 缓冲区大小增加到 4096。
ethtool -G <ethx> rx 4096
      ethtool -G <ethx> tx 4096
关闭流控制。
ethtool -A <ethx> autoneg off rx off tx off
检查服务器在重新启动后是否持续存在。
cat /etc/rc.local
#!/bin/bash

echo 7 > /sys/class/net/eth0/device/sriov_numvfs
echo 7 > /sys/class/net/eth1/device/sriov_numvfs
echo 7 > /sys/class/net/eth2/device/sriov_numvfs
echo 7 > /sys/class/net/eth3/device/sriov_numvfs

/bin/irq.sh
将 SR-IOV VF 信任模式设置为打开并关闭欺骗检查。
# The Linux setting for SR-IOV VF Trust Mode:    --ip link set dev [PF] vf [VF_index] trust off/on
 # The setting for SR-IOV VF spoof checking:    --ip link set dev [PF] vf [VF_index] spoof checking on/off
或者,您也可以将以下命令添加到 rc.local 脚本中:
nic=eth0;for i in $(seq 0 15);do ip link set $nic vf $i spoofchk off trust on promisc on mtu 9000;done
nic=eth1;for i in $(seq 0 15);do ip link set $nic vf $i spoofchk off trust on promisc on mtu 9000;done
nic=eth2;for i in $(seq 0 15);do ip link set $nic vf $i spoofchk off trust on promisc on mtu 9000;done
nic=eth3;for i in $(seq 0 15);do ip link set $nic vf $i spoofchk off trust on promisc on mtu 9000;done
在网卡上构建虚拟功能的总线信息
分步过程
要在网卡上构建 VF 的总线信息,请执行以下操作:
现在我们知道了备份接口,我们需要识别每个 NIC 上所有 VF 的总线信息。
对于信任网络中的备份接口,我们需要前三个 VF 的总线信息。
# ls -l /sys/class/net/eth0/device/virtfn*

/sys/class/net/eth0/device/virtfn0 ->../0000:18:02.0
/sys/class/net/eth0/device/virtfn1 -> ../0000:18:02.1
/sys/class/net/eth0/device/virtfn2 -> ../0000:18:02.2
# ls -l /sys/class/net/eth2/device/virtfn*

/sys/class/net/eth2/device/virtfn0 ->../0000:18:0a.0
/sys/class/net/eth2/device/virtfn1 -> ../0000:18:0a.1
/sys/class/net/eth2/device/virtfn2 -> ../0000:18:0a.2
对于不信任网络中的备份接口,我们需要前两个 VF 上的总线信息。
# ls -l /sys/class/net/eth1/device/virtfn*

/sys/class/net/eth1/device/virtfn0 ->../0000:18:06.0
/sys/class/net/eth1/device/virtfn1 -> ../0000:18:06.1
# ls -l /sys/class/net/eth1/device/virtfn*

/sys/class/net/eth3/device/virtfn0 ->../0000:18:0e.0
/sys/class/net/eth3/device/virtfn1 -> ../0000:18:0e.1
表 2 说明了构建模板所需的 XML 到 Junos 接口映射。
表 2:XML 到 Junos 接口的映射 网卡
Vf
巴士信息
接口
XML 位置
FXP0
FXP0
1
em0
em0
2
eth0
0
0000:18:02.0
ge-0/0/0 晶圆厂0
GE-7/0/0 晶圆厂1
3
1
0000:18:02.1
ge-0/0/1
GE-7/0/1
4
2
0000:18:02.2
ge-0/0/5
GE-7/0/5
8
乙醚1
0
0000:18:06.0
ge-0/0/3
GE-7/0/3
6
乙醚2
0
0000:18:0a.0
ge-0/0/2
GE-7/0/2
5
eth3
0
0000:18:0e.0
ge-0/0/4
GE-7/0/4
7
XML 到 Junos 的配置是顺序的。第一个接口分配给 fxp0,第二个接口分配给 em0,最后一个接口分配给 ge-0/0/9,如 表 3 所示。
-
表 3:Junos 接口和总线信息 XML 位置
巴士信息
Junos 接口
1
BR0
FXP0
2
BR1
em0
3
0000:18:02.0
ge-0/0/0
4
0000:18:02.1
ge-0/0/1
5
0000:18:0a.0
ge-0/0/2
6
0000:18:06.0
ge-0/0/3
7
0000:18:0e.0
ge-0/0/4
8
0000:18:02.2
ge-0/0/5
-
按照 表 3 修改以下 XML 模板中的接口第 2、3、4、8 和 12 节。
<domain type='kvm'>
  <name>vm-name</name>
  <uuid>f5679184-a066-446b-a812-4fda2e9278dd</uuid>
  <memory unit='KiB'>8388608</memory>
  <currentMemory unit='KiB'>8388608</currentMemory>
  <memoryBacking>
    <hugepages/>
    <locked/>
  </memoryBacking>
  <vcpu placement='static' cpuset='4-9'>6</vcpu>
  <cputune>
    <vcpupin vcpu='0' cpuset='4'/>
    <vcpupin vcpu='1' cpuset='5'/>
    <vcpupin vcpu='2' cpuset='6'/>
    <vcpupin vcpu='3' cpuset='7'/>
    <vcpupin vcpu='4' cpuset='8'/>
    <vcpupin vcpu='5' cpuset='9'/>
  </cputune>
  <numatune>
    <memory mode='strict' nodeset='0'/>
  </numatune>
  <resource>
    <partition>/machine</partition>
  </resource>
  <os>
    <type arch='x86_64' machine='pc-i440fx-xenial'>hvm</type>
    <boot dev='hd'/>
  </os>
  <features>
    <acpi/>
    <apic/>
  </features>
  <cpu mode='host-passthrough' check='none'>
    <feature policy='require' name='pbe'/>
    <feature policy='require' name='tm2'/>
    <feature policy='require' name='est'/>
    <feature policy='require' name='vmx'/>
    <feature policy='require' name='aes'/>
    <feature policy='require' name='osxsave'/>
    <feature policy='require' name='smx'/>
    <feature policy='require' name='ss'/>
    <feature policy='require' name='ds'/>
    <feature policy='require' name='vme'/>
    <feature policy='require' name='dtes64'/>
    <feature policy='require' name='monitor'/>
    <feature policy='require' name='ht'/>
    <feature policy='force' name='dca'/>
    <feature policy='require' name='pcid'/>
    <feature policy='require' name='tm'/>
    <feature policy='require' name='pdcm'/>
    <feature policy='require' name='pdpe1gb'/>
    <feature policy='require' name='ds_cpl'/>
    <feature policy='require' name='xtpr'/>
    <feature policy='require' name='acpi'/>
    <feature policy='disable' name='invtsc'/>
  </cpu>
  <clock offset='utc'>
    <timer name='rtc' tickpolicy='catchup'/>
    <timer name='pit' tickpolicy='delay'/>
    <timer name='hpet' present='no'/>
  </clock>
  <on_poweroff>destroy</on_poweroff>
  <on_reboot>restart</on_reboot>
  <on_crash>restart</on_crash>
  <pm>
    <suspend-to-mem enabled='no'/>
    <suspend-to-disk enabled='no'/>
  </pm>
  <devices>
    <emulator>/usr/bin/kvm-spice</emulator>
    <disk type='file' device='disk'>
      <driver name='qemu' type='qcow2'/>
      <source file='/var/lib/libvirt/images/sriovvsrx/vSRX_Image.qcow2'/>
      <target dev='hda' bus='ide'/>
      <address type='drive' controller='0' bus='0' target='0' unit='0'/>
    </disk>
    <controller type='usb' index='0' model='ich9-ehci1'>
      <address type='pci' domain='0x0000' bus='0x00' slot='0x0c' function='0x7'/>
    </controller>
    <controller type='usb' index='0' model='ich9-uhci1'>
      <master startport='0'/>
      <address type='pci' domain='0x0000' bus='0x00' slot='0x0c' function='0x0' multifunction='on'/>
    </controller>
    <controller type='usb' index='0' model='ich9-uhci2'>
      <master startport='2'/>
      <address type='pci' domain='0x0000' bus='0x00' slot='0x0c' function='0x1'/>
    </controller>
    <controller type='usb' index='0' model='ich9-uhci3'>
      <master startport='4'/>
      <address type='pci' domain='0x0000' bus='0x00' slot='0x0c' function='0x2'/>
    </controller>
    <controller type='pci' index='0' model='pci-root'/>
    <controller type='ide' index='0'>
      <address type='pci' domain='0x0000' bus='0x00' slot='0x01' function='0x1'/>
    </controller>
    <controller type='virtio-serial' index='0'>
      <address type='pci' domain='0x0000' bus='0x00' slot='0x0b' function='0x0'/>
    </controller>
    <interface type='bridge'>
      <mac address='2001:db8:00:46:05:b6'/>
      <source bridge='br0'/>
      <model type='virtio'/>
      <mtu size='9100'/>

<address type='pci' domain='0x0000' bus='0x00' slot='0x03' function='0x0'/>
      <driver queues='8'/> # delete from existing templates
    </interface>
    <interface type='bridge'>
      <mac address='2001:db8:00:5e:c9:06'/>
      <source bridge='br1'/>
      <model type='virtio'/>
      <mtu size='9100'/>
<address type='pci' domain='0x0000' bus='0x00' slot='0x04' function='0x0'/>
    </interface>
   <interface type='hostdev' managed='yes'>
      <mac address='2001:db8:00:4e:f6:89'/>
      <driver name='vfio'/>
      <source>
        <address type='pci' domain='0x0000' bus='0x18' slot='0x02' function='0x0'/>
      </source>
<vlan>
<tag id='3681'/>
</vlan>
<address type='pci' domain='0x0000' bus='0x00' slot='0x05' function='0x0'/>
    </interface>
    <interface type='hostdev' managed='yes'>
      <mac address='2001:db8:00:4e:f5:f9'/>
      <driver name='vfio'/>
      <source>
        <address type='pci' domain='0x0000' bus='0x18' slot='0x02' function='0x1'/>
      </source>

<address type='pci' domain='0x0000' bus='0x18' slot='0x06' function='0x0'/>
    </interface>
    <interface type='hostdev' managed='yes'>
      <mac address='2001:db8:00:fa:b0:04'/>
      <driver name='vfio'/>
      <source>
        <address type='pci' domain='0x0000' bus='0x18' slot='0x0a' function='0x0'/>
      </source>

<address type='pci' domain='0x0000' bus='0x00' slot='0x07' function='0x0'/>
    </interface>
    <interface type='hostdev' managed='yes'>
      <mac address='2001:db8:00:da:87:b6'/>
      <driver name='vfio'/>
      <source>
        <address type='pci' domain='0x0000' bus='0x18' slot='0x06' function='0x0'/>
      </source>

<address type='pci' domain='0x0000' bus='0x00' slot='0x08' function='0x0'/>
    </interface>
    <interface type='hostdev' managed='yes'>
      <mac address='2001:db8:00:2e:e8:88'/>
      <driver name='vfio'/>
      <source>
        <address type='pci' domain='0x0000' bus='0x18' slot='0x0e' function='0x0'/>
      </source>

<address type='pci' domain='0x0000' bus='0x00' slot='0x09' function='0x0'/>
    </interface>
    <interface type='hostdev' managed='yes'>
      <mac address='2001:db8:00:6a:3c:f2'/>
      <driver name='vfio'/>
      <source>
        <address type='pci' domain='0x0000' bus='0x18' slot='0x02' function='0x2'/>
      </source>

<address type='pci' domain='0x0000' bus='0x00' slot='0x0a' function='0x0'/>
        <serial type='tcp'>
      <source mode='bind' host='192.0.2.1' service='8636' tls='no'/>
      <protocol type='telnet'/>
      <target type='isa-serial' port='0'>
        <model name='isa-serial'/>
      </target>
    </serial>
    <console type='tcp'>
      <source mode='bind' host='192.0.2.1' service='8636' tls='no'/>
      <protocol type='telnet'/>
      <target type='serial' port='0'/>
    </console>
    <channel type='spicevmc'>
      <target type='virtio' name='com.redhat.spice.0'/>
      <address type='virtio-serial' controller='0' bus='0' port='1'/>
    </channel>
    <input type='mouse' bus='ps2'/>
    <input type='keyboard' bus='ps2'/>
    <graphics type='spice' autoport='yes' listen='192.0.2.1'>
      <listen type='address' address='192.0.2.1'/>
      <image compression='off'/>
    </graphics>
    <sound model='ich6'>
      <address type='pci' domain='0x0000' bus='0x00' slot='0x0a' function='0x0'/>
    </sound>
    <video>
      <model type='qxl' ram='65536' vram='65536' vgamem='16384' heads='1' primary='yes'/>
      <address type='pci' domain='0x0000' bus='0x00' slot='0x02' function='0x0'/>
    </video>
    <redirdev bus='usb' type='spicevmc'>
      <address type='usb' bus='0' port='1'/>
    </redirdev>
    <redirdev bus='usb' type='spicevmc'>
      <address type='usb' bus='0' port='2'/>
    </redirdev>
    <memballoon model='virtio'>
      <address type='pci' domain='0x0000' bus='0x00' slot='0x0d' function='0x0'/>
    </memballoon>
  </devices>
  <seclabel type='dynamic' model='apparmor' relabel='yes'/>
  <seclabel type='dynamic' model='dac' relabel='yes'/>
</domain>
配置 vSRX 3.0
CLI 快速配置
要快速配置此示例,请复制以下命令,将其粘贴到文本文件中,删除所有换行符,更改与您的网络配置匹配所需的任何详细信息,将命令复制并粘贴到层次结构级别的 CLI [edit] 中,然后从配置模式进入 commit 。
此配置中不使用 ge-0/0/3、ge-0/0/4、ge-7/0/3、ge-7/0/4。
set groups node0 system host-name host-name-node0set groups node0 system backup-router 198.51.100.254set groups node0 system backup-router destination 0.0.0.0/0set groups node0 interfaces fxp0 unit 0 family inet address 198.51.100.248/20set groups node1 system host-name host-name-node1set groups node1 system backup-router 198.51.100.254set groups node1 system backup-router destination 0.0.0.0/0set groups node1 interfaces fxp0 unit 0 family inet address 198.51.100.249/20set apply-groups "${node}"set chassis cluster reth-count 2set chassis cluster redundancy-group 0 node 0 priority 100set chassis cluster redundancy-group 0 node 1 priority 1set chassis cluster redundancy-group 1 node 0 priority 100set chassis cluster redundancy-group 1 node 1 priority 1set chassis cluster redundancy-group 2 node 0 priority 100set chassis cluster redundancy-group 2 node 1 priority 1set interfaces ge-0/0/1 gigether-options redundant-parent reth0set interfaces ge-0/0/2 gigether-options redundant-parent reth1set interfaces ge-7/0/1 gigether-options redundant-parent reth0set interfaces ge-7/0/2 gigether-options redundant-parent reth1set interfaces fab0 fabric-options member-interfaces ge-0/0/0set interfaces fab1 fabric-options member-interfaces ge-7/0/0set interfaces fab0 fabric-options member-interfaces ge-0/0/5set interfaces fab1 fabric-options member-interfaces ge-7/0/5set interfaces reth0 redundant-ether-options redundancy-group 1set interfaces reth0 unit 0 family inet address 192.168.10.1/24set interfaces reth1 redundant-ether-options redundancy-group 2set interfaces reth1 unit 0 family inet address 192.168.11.1/24set interfaces reth0 vlan-taggingset interfaces reth0 unit 0 vlan-id 3601set interfaces reth1 vlan-taggingset interfaces reth1 unit 0 vlan-id 3602set security zones security-zone TRUST host-inbound-traffic system-services allset security zones security-zone TRUST host-inbound-traffic protocols allset security zones security-zone TRUST interfaces reth0.0set security zones security-zone UNTRUST host-inbound-traffic system-services allset security zones security-zone UNTRUST host-inbound-traffic protocols allset security zones security-zone UNTRUST interfaces reth1.0
验证
确认配置工作正常。
验证机箱群集状态
目的
验证机箱群集状态、统计信息和冗余组信息。
行动
在操作模式下,输入以下命令。
{primary:node0}
user@host> show chassis cluster interfaces

Control link status: Up

Control interfaces:
    Index   Interface   Monitored-Status   Internal-SA   Security
    0       em0         Up                 Disabled      Disabled

Fabric link status: Up

Fabric interfaces:
    Name    Child-interface    Status                    Security
                               (Physical/Monitored)
     fab0      ge-0/0/0           Up / Up                 Disabled
 fab0      ge-0/0/5           Up / Up                 Disabled
 fab1      ge-7/0/0           Up / Up                 Disabled
 fab1      ge-7/0/5           Up / Up                 Disabled
Redundant-ethernet Information:
    Name         Status      Redundancy-group
    reth0        Down        Not configured
    reth1        Up          1
    reth2        Up          2

Redundant-pseudo-interface Information:
    Name         Status      Redundancy-group
    lo0          Up          0
{primary:node0}
user@host> show chassis cluster statistics

Control link statistics:
    Control link 0:
        Heartbeat packets sent: 1797825
        Heartbeat packets received: 1797280
        Heartbeat packet errors: 0
Fabric link statistics:
    Child link 0
        Probes sent: 1329328
        Probes received: 1328840
    Child link 1
        Probes sent: 0
        Probes received: 0
Services Synchronized:
    Service name                              RTOs sent    RTOs received
    Translation context                       0            0
    Incoming NAT                              0            0
    Resource manager                          0            0
    DS-LITE create                            0            0
    Session create                            0            0
    IPv6 session create                       0            0
    Session close                             0            0
    IPv6 session close                        0            0
    Session change                            0            0
    IPv6 session change                       0            0
    ALG Support Library                       0            0
    Gate create                               0            0
    Session ageout refresh requests           0            0
    IPv6 session ageout refresh requests      0            0
    Session ageout refresh replies            0            0
    IPv6 session ageout refresh replies       0            0
    IPSec VPN                                 0            0
    Firewall user authentication              0            0
    MGCP ALG                                  0            0
    H323 ALG                                  0            0
    SIP ALG                                   0            0
    SCCP ALG                                  0            0
    PPTP ALG                                  0            0
    JSF PPTP ALG                              0            0
    RPC ALG                                   0            0
    RTSP ALG                                  0            0
    RAS ALG                                   0            0
    MAC address learning                      0            0
    GPRS GTP                                  0            0
    GPRS SCTP                                 0            0
    GPRS FRAMEWORK                            0            0
    JSF RTSP ALG                              0            0
    JSF SUNRPC MAP                            0            0
    JSF MSRPC MAP                             0            0
    DS-LITE delete                            0            0
    JSF SLB                                   0            0
    APPID                                     0            0
    JSF MGCP MAP                              0            0
    JSF H323 ALG                              0            0
    JSF RAS ALG                               0            0
    JSF SCCP MAP                              0            0
    JSF SIP MAP                               0            0
    PST_NAT_CREATE                            0            0
    PST_NAT_CLOSE                             0            0
    PST_NAT_UPDATE                            0            0
    JSF TCP STACK                             0            0
    JSF IKE ALG                               0            0
{primary:node0}
user@host> show chassis cluster control-plane statistics
Control link statistics:
    Control link 0:
        Heartbeat packets sent: 1797861
        Heartbeat packets received: 1797316
        Heartbeat packet errors: 0
Fabric link statistics:
    Child link 0
        Probes sent: 1329400
        Probes received: 1328912
    Child link 1
        Probes sent: 0
        Probes received: 0
{primary:node0}
user@host> show chassis cluster data-plane statistics
Services Synchronized:
    Service name                              RTOs sent    RTOs received
    Translation context                       0            0
    Incoming NAT                              0            0
    Resource manager                          0            0
    DS-LITE create                            0            0
    Session create                            0            0
    IPv6 session create                       0            0
    Session close                             0            0
    IPv6 session close                        0            0
    Session change                            0            0
    IPv6 session change                       0            0
    ALG Support Library                       0            0
    Gate create                               0            0
    Session ageout refresh requests           0            0
    IPv6 session ageout refresh requests      0            0
    Session ageout refresh replies            0            0
    IPv6 session ageout refresh replies       0            0
    IPSec VPN                                 0            0
    Firewall user authentication              0            0
    MGCP ALG                                  0            0
    H323 ALG                                  0            0
    SIP ALG                                   0            0
    SCCP ALG                                  0            0
    PPTP ALG                                  0            0
    JSF PPTP ALG                              0            0
    RPC ALG                                   0            0
    RTSP ALG                                  0            0
    RAS ALG                                   0            0
    MAC address learning                      0            0
    GPRS GTP                                  0            0
    GPRS SCTP                                 0            0
    GPRS FRAMEWORK                            0            0
    JSF RTSP ALG                              0            0
    JSF SUNRPC MAP                            0            0
    JSF MSRPC MAP                             0            0
    DS-LITE delete                            0            0
    JSF SLB                                   0            0
    APPID                                     0            0
    JSF MGCP MAP                              0            0
    JSF H323 ALG                              0            0
    JSF RAS ALG                               0            0
    JSF SCCP MAP                              0            0
    JSF SIP MAP                               0            0
    PST_NAT_CREATE                            0            0
    PST_NAT_CLOSE                             0            0
    PST_NAT_UPDATE                            0            0
    JSF TCP STACK                             0            0
    JSF IKE ALG                               0            0
{primary:node0}
user@host> show chassis cluster status redundancy-group 1
Monitor Failure codes:
    CS  Cold Sync monitoring        FL  Fabric Connection monitoring
    GR  GRES monitoring             HW  Hardware monitoring
    IF  Interface monitoring        IP  IP monitoring
    LB  Loopback monitoring         MB  Mbuf monitoring
    NH  Nexthop monitoring          NP  NPC monitoring
    SP  SPU monitoring              SM  Schedule monitoring
    CF  Config Sync monitoring      RE  Relinquish monitoring
    IS  IRQ storm

Cluster ID: 1
Node   Priority Status               Preempt Manual   Monitor-failures

Redundancy group: 1 , Failover count: 1
node0  200      primary              no      no       None
node1  1        secondary            no      no       None
验证部署结果
[user@host-kvm126 libvirt]#  virsh domiflist vm-name
Interface  Type       Source     Model       MAC
-------------------------------------------------------
vnet0    bridge      bro virtio 52:54:00:a5:6a:59
vnet1    bridge      br1 virtio 52:54:00:34:03:53
-        hostdev      -    -    52:54:00:ef:43:b6
-        hostdev      -    -    52:54:00:83:5f:e2
-        hostdev      -    -    52:54:00:99:85:ac
-        hostdev      -    -    52:54:00:f5:6b:30
-        hostdev      -    -    52:54:00:67:83:5f
-        hostdev      -    -    52:54:00:78:db:79
[user@host-kvm126 libvirt]# ip -d link show dev p2p2 |grep "vf 1 "
vf 1     link/ether 52:54:00:ef:43:b6 brd ff:ff:ff:ff:ff:ff, vlan 3681, spoof checking off, link-state auto, trust on
[root@cnrd-kvm126 libvirt]# ip -d link show dev p2p3 |grep "vf 2 "
    vf 2     link/ether 52:54:00:83:5f:e2 brd ff:ff:ff:ff:ff:ff, spoof checking off, link-state auto, trust on
[root@cnrd-kvm126 libvirt]# ip -d link show dev p2p3 |grep "vf 3 "
    vf 3     link/ether 52:54:00:99:85:ac brd ff:ff:ff:ff:ff:ff, spoof checking off, link-state auto, trust on
[root@cnrd-kvm126 libvirt]#
意义
示例输出显示机箱群集状态中没有手动故障切换,并为您提供欺骗检查状态和 SR-IOV VF 信任模式状态。
结果
在配置模式下,输入 show security zones和 show chassis 命令确认您的配置。如果输出未显示预期的配置,请重复此示例中的说明以更正配置。
[edit]
user@host# show security zones
security-zone TRUST {
    host-inbound-traffic {
        system-services {
            all;
        }
        protocols {
            all;
        }
    }
    interfaces {
        reth0.0;
    }
}
security-zone UNTRUST {
    host-inbound-traffic {
        system-services {
            all;
        }
        protocols {
            all;
        }
    }
    interfaces {
        reth1.0;
    }
}
[edit]
user@host# show chassis
cluster {
    reth-count 3;
    redundancy-group 0 {
        node 0 priority 200;
        node 1 priority 1;
    }
    redundancy-group 1 {
        node 0 priority 200;
        node 1 priority 1;
    }
    redundancy-group 2 {
        node 0 priority 200;
        node 1 priority 1;
    }
}