Help us improve your experience.

Let us know what you think.

Do you have time for a two-minute survey?


使用 Marvis 客户端应用通过 NAC 门户客户端接入客户端

使用 NAC 载入门户通过 Marvis 客户端应用提供的 Wi-Fi 客户端证书,将您的设备安全地接入瞻博网络 Mist Access Assurance 网络。

通过网络访问控制 (NAC) 门户入网设备后,即可通过 Marvis 客户端应用配置 Wi-Fi 客户端证书。载入过程使用载入 Mist 证书颁发机构,该颁发机构允许向设备颁发 EAP-TLS 客户端证书。客户端使用这些证书使用 EAP-TLS(可扩展身份验证协议 - 传输层安全性)向瞻博网络 Mist Access Assurance 网络进行身份验证。

Marvis 客户端应用可以预安装在设备上,也可以直接从 NAC 载入门户下载。最终用户需要使用其 SSO 凭据(Azure AD、Okta)向 NAC 载入门户进行身份验证。

身份验证成功后,NAC 门户(与企业 IdP 集成)会调配设备绑定的 X.509 客户端证书,并提供预配置的 Wi-Fi 网络配置文件,该配置文件应安装在 Marvis 客户端应用中。安装配置文件后,该应用程序使设备能够使用 EAP-TLS 无缝连接到指定的安全 SSID。

此载入流程消除了手册 PKI 分发和 SSID 配置,同时对 BYOD 环境中的非托管设备执行企业网络访问策略。

通过 NAC 门户接入客户端的优势

使用 Marvis 客户端应用通过 NAC 门户载入客户端,可确保组织的 Wi-Fi 网络能够安全、无缝且无密码地访问。使用用户名和密码的传统 Wi-Fi 连接容易出现滥用、泄露和手册错误。NAC 载入门户使用基于证书的身份验证,仅在通过组织的单点登录 (SSO) 系统验证您的身份后颁发,从而消除这些风险。

除了易用性之外,入网还为 BYOD(自带设备)、访客和承包商提供企业级安全性,无需对每个连接进行 IT 干预。

使用 Marvis 客户端应用将设备载入 NAC 门户可提供以下优势:

  • 与您的身份和设备绑定的唯一数字证书。

  • 自动安装安全的 Wi-Fi 配置文件,无需手册设置。

  • 访问由瞻博网络 Mist 云中定义的零信任网络策略控制。

您可以载入 Android、Windows、macOS 和 iOS 设备。在运行以下设备的设备上支持载入:

  • Windows - 版本 10 或 11

  • macOS - Sonoma(版本 14)和更高版本

  • Android—Android 12+

  • iOS - 16 及更高版本

开始之前

在继续上线设备之前,请确保

  • 获取并激活瞻博网络 Mist™ Access Assurance 订阅。有关订阅管理的信息,请参阅 瞻博网络 Mist 管理指南。

  • 启用载入:

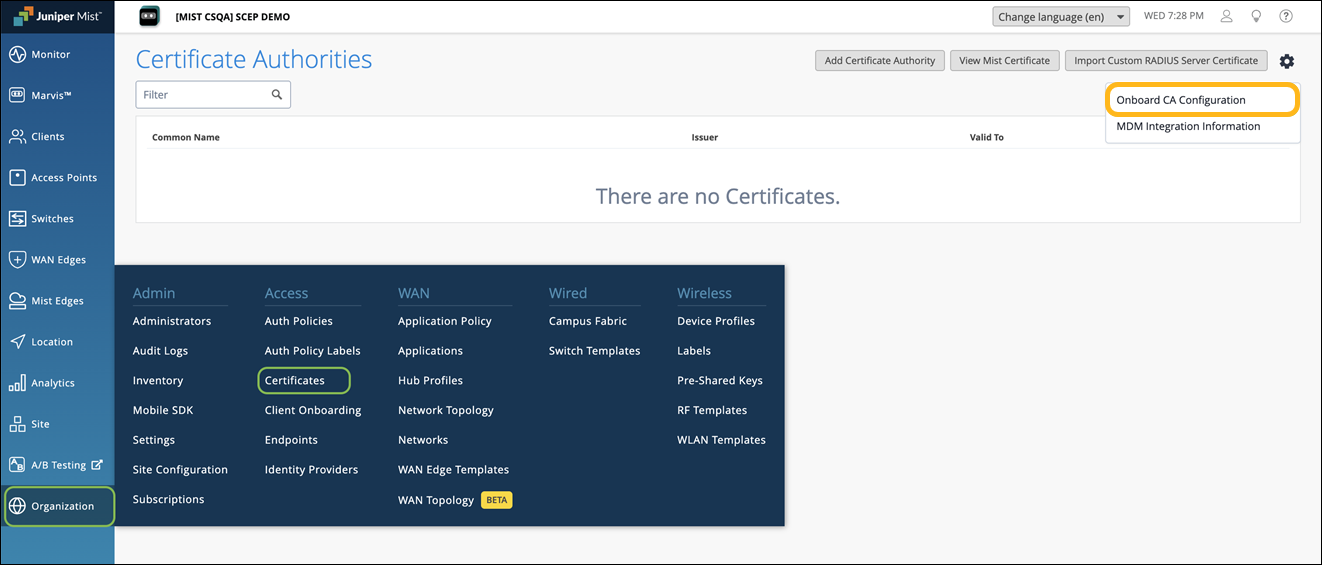
    1. 从 瞻博网络 Mist 门户的左侧菜单中,选择 “组织 >访问>证书”。

      此时将显示“证书颁发机构”页面。

    2. 单击页面右上角的设置图标,然后选择载 入证书颁发机构配置。

      Juniper Mist dashboard showing the Certificate Authorities section with no certificates listed, action buttons for adding or importing certificates, and highlighted Onboard CA Configuration and Certificates menu options.

    3. 在“载入证书颁发机构配置”对话框中,选择 “活动” ,然后单击“ 确定 ”以使内置证书颁发机构能够颁发客户端证书。
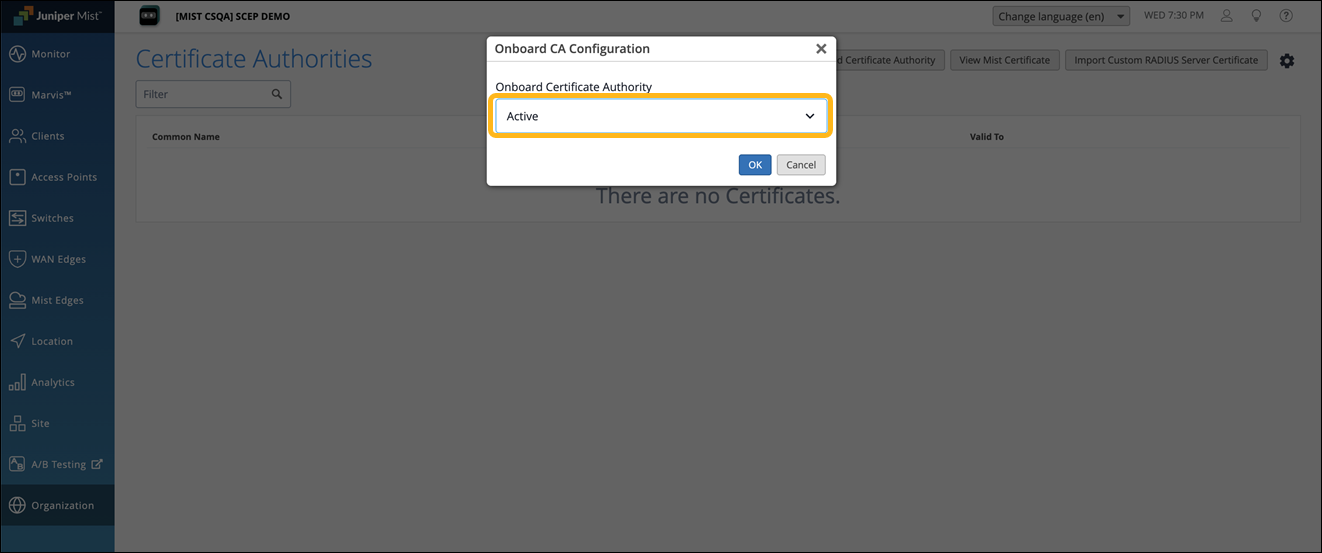
      Onboard CA Configuration pop-up in Juniper Mist platform set to Active, showing no certificates listed in the Certificate Authorities section with navigation menu on the left.

      激活载入证书颁发机构配置后,您将看到显示以下选项卡:

      • 外部 - 显示外部 CA 的详细信息。

      • 内部 - 显示内置证书颁发机构通过 NAC 门户或 MDM 颁发的客户端证书的详细信息。
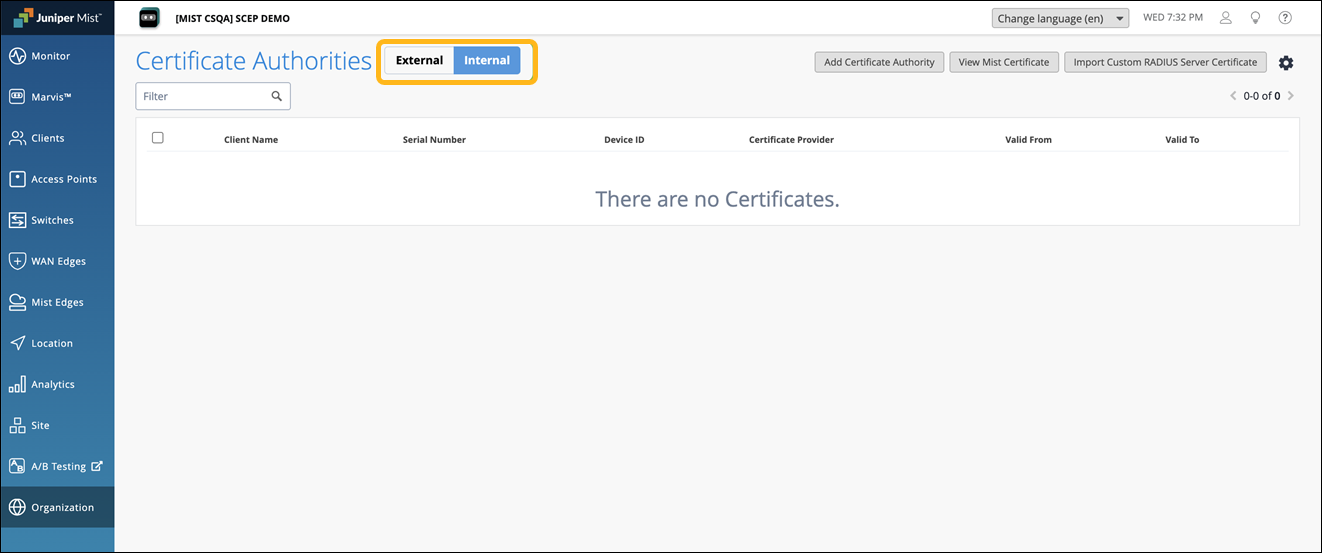
        Certificate Authorities section of Juniper Mist dashboard showing management options with tabs for External and Internal authorities, empty table stating there are no Certificates, and buttons for adding or importing certificates. Navigation menu on the left includes Monitor, Clients, Access Points, Switches, WAN Edges, Mist Edges, Location, Analytics, Site, A/B Testing, and Organization.

  • 确保您拥有具有应用集成功能的 IdP 帐户。您的 IdP 可以是支持 SAML 2.0 集成的任何提供商。例如,Azure、Google 和 Okta。

在本主题中,我们将向您展示如何创建 NAC 门户并将其与 Microsoft Azure 和 Okta 集成。

如何设置 NAC 门户并将其与 Microsoft Azure 集成

设置 NAC 载入门户并将其与 Azure 集成涉及以下步骤:

创建 NAC 门户并将其与 Azure 集成

确保在“证书”页面上启用了载入证书颁发机构配置。在 开始之前查看。

  1. 创建 NAC 门户。创建门户时,将生成一个 NAC 门户 URL,供用户使用 SSO 访问。

    1. 从 瞻博网络 Mist 门户的左侧菜单中,选择 “组织>客户端载入”,然后选择“ NAC ”选项卡。

    2. 单击客户端载入页面右上角的添加 NAC 载入门户 。

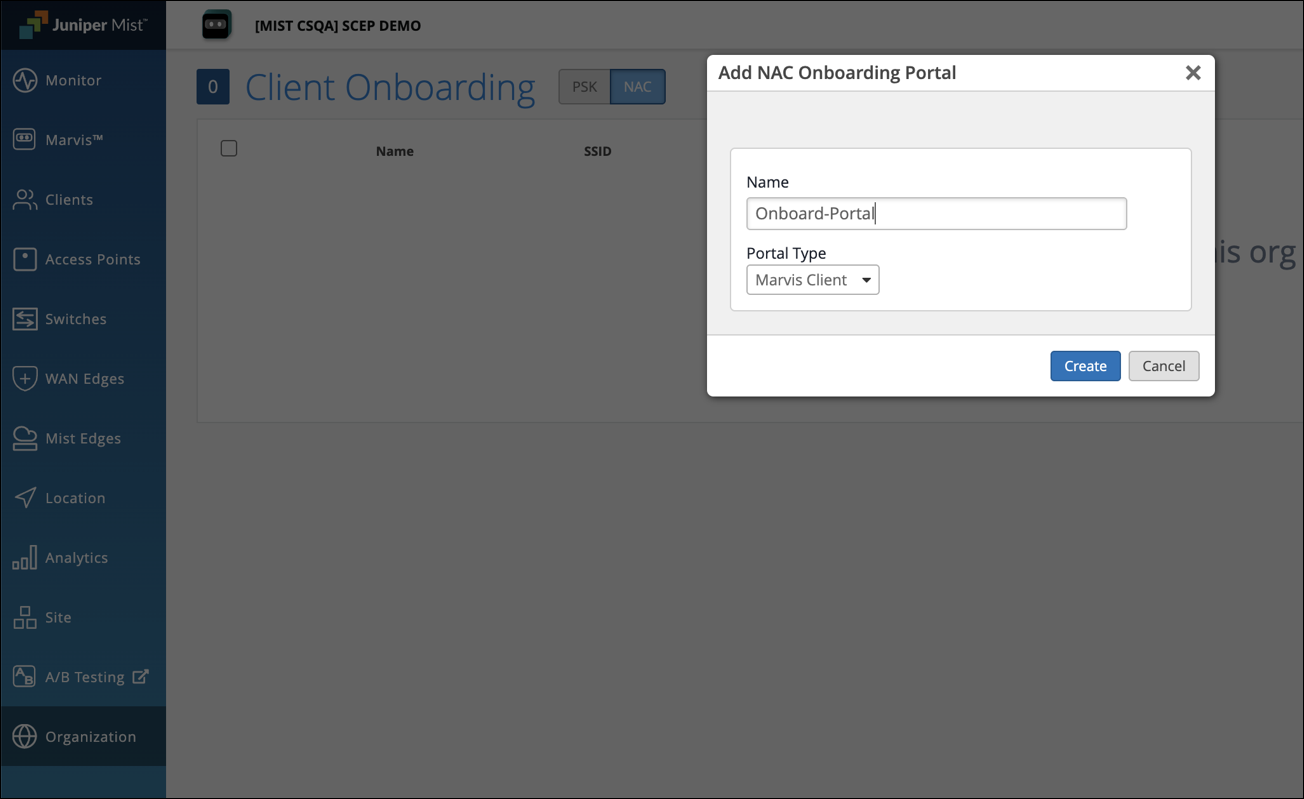
    3. 在“添加 NAC 载入门户”页面中,提供名称并单击 “创建”。

      Add NAC Onboarding Portal pop-up in Juniper Mist platform with fields for Name set to Onboard-Portal and Portal Type set to Marvis Client. Create and Cancel buttons visible.

      此时将显示“编辑 NAC 载入门户”页面。

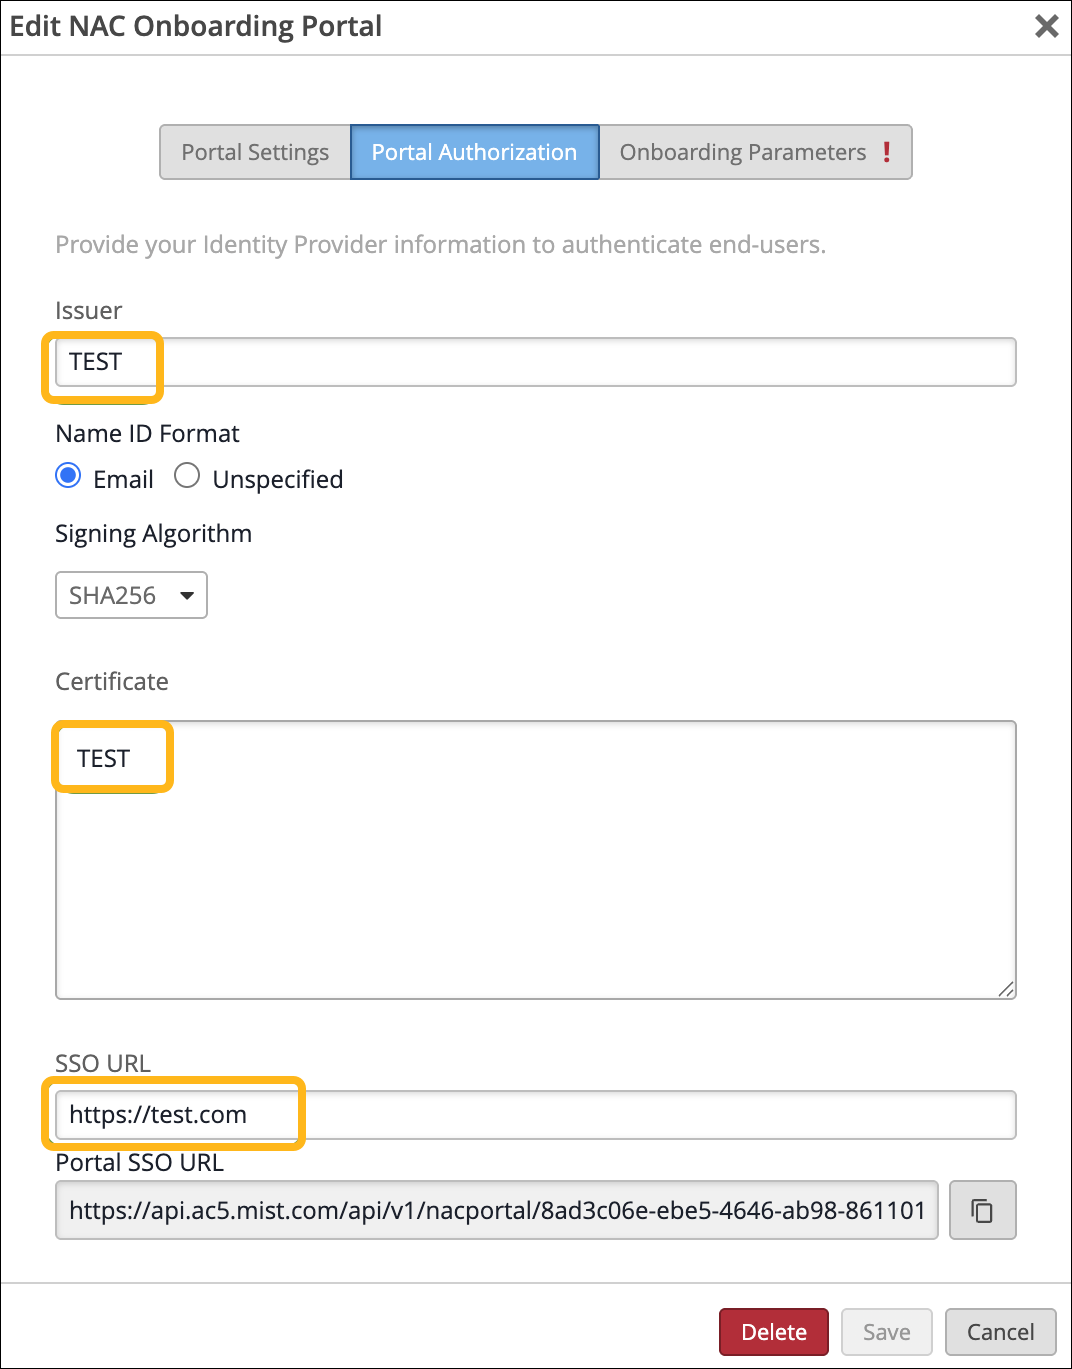
    4. 选择“ 门户授权” 选项卡:

      1. 输入 “颁发者”、“ 证书”和“ SSO 网址)的占位符值。这些值稍后将替换为 IdP 中的实际值。

      2. 复制 SSO 门户 URL 以供以后使用。

        Configuration interface for editing NAC Onboarding Portal with Portal Authorization tab selected. Key fields include Issuer set to TEST, Name ID Format set to Email, Signing Algorithm set to SHA256, Certificate containing TEST, SSO URL set to https://test.com, and Portal SSO URL starting with https://api.ac5.mist.com/api/v1/nacportal/. Buttons at the bottom are Delete in red, Save, and Cancel.

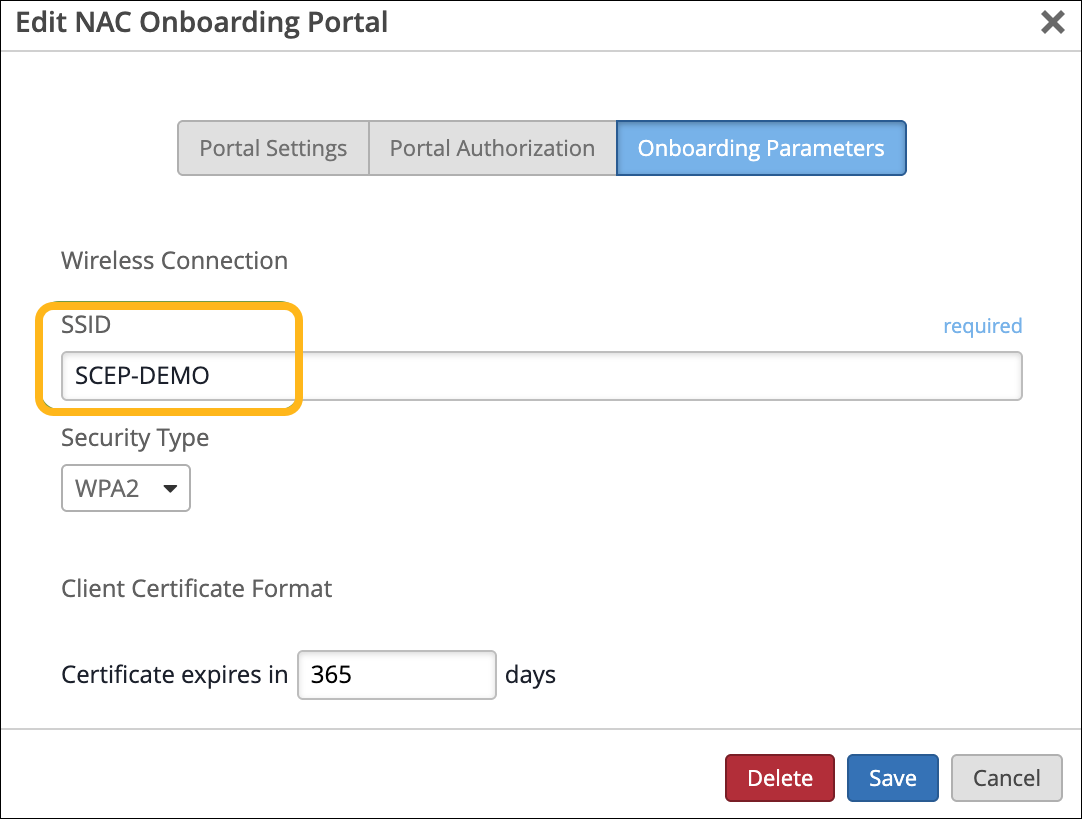
    5. 选择 载入参数选项卡 并配置以下内容:

      1. 输入要调配的 SSID 名称。

      2. 选择“安全性类型”WPA2“或”WPA3 企业“。

      3. 设置客户端证书过期的天数。该值的范围是 1-1825 天(最长 5 年)。

        Configuration interface for editing NAC Onboarding Portal on Onboarding Parameters tab. Wireless Connection SSID set to SCEP-DEMO and Security Type set to WPA2. Client Certificate expires in 365 days. Buttons: Delete red, Save blue, Cancel gray.

  2. 配置 SSO 并将 NAC 门户与 Microsoft Azure 集成:

    1. 登录到 Azure 门户。导航到 “企业应用程序” ,然后单击 “新建应用程序”。

    2. 在浏览 Microsoft Entra 库部分,在搜索框中键入 Mist 云管理员 SSO 。

    3. 从结果面板中选择 Mist 云管理员 SSO 。提供应用程序的名称,然后单击 创建。
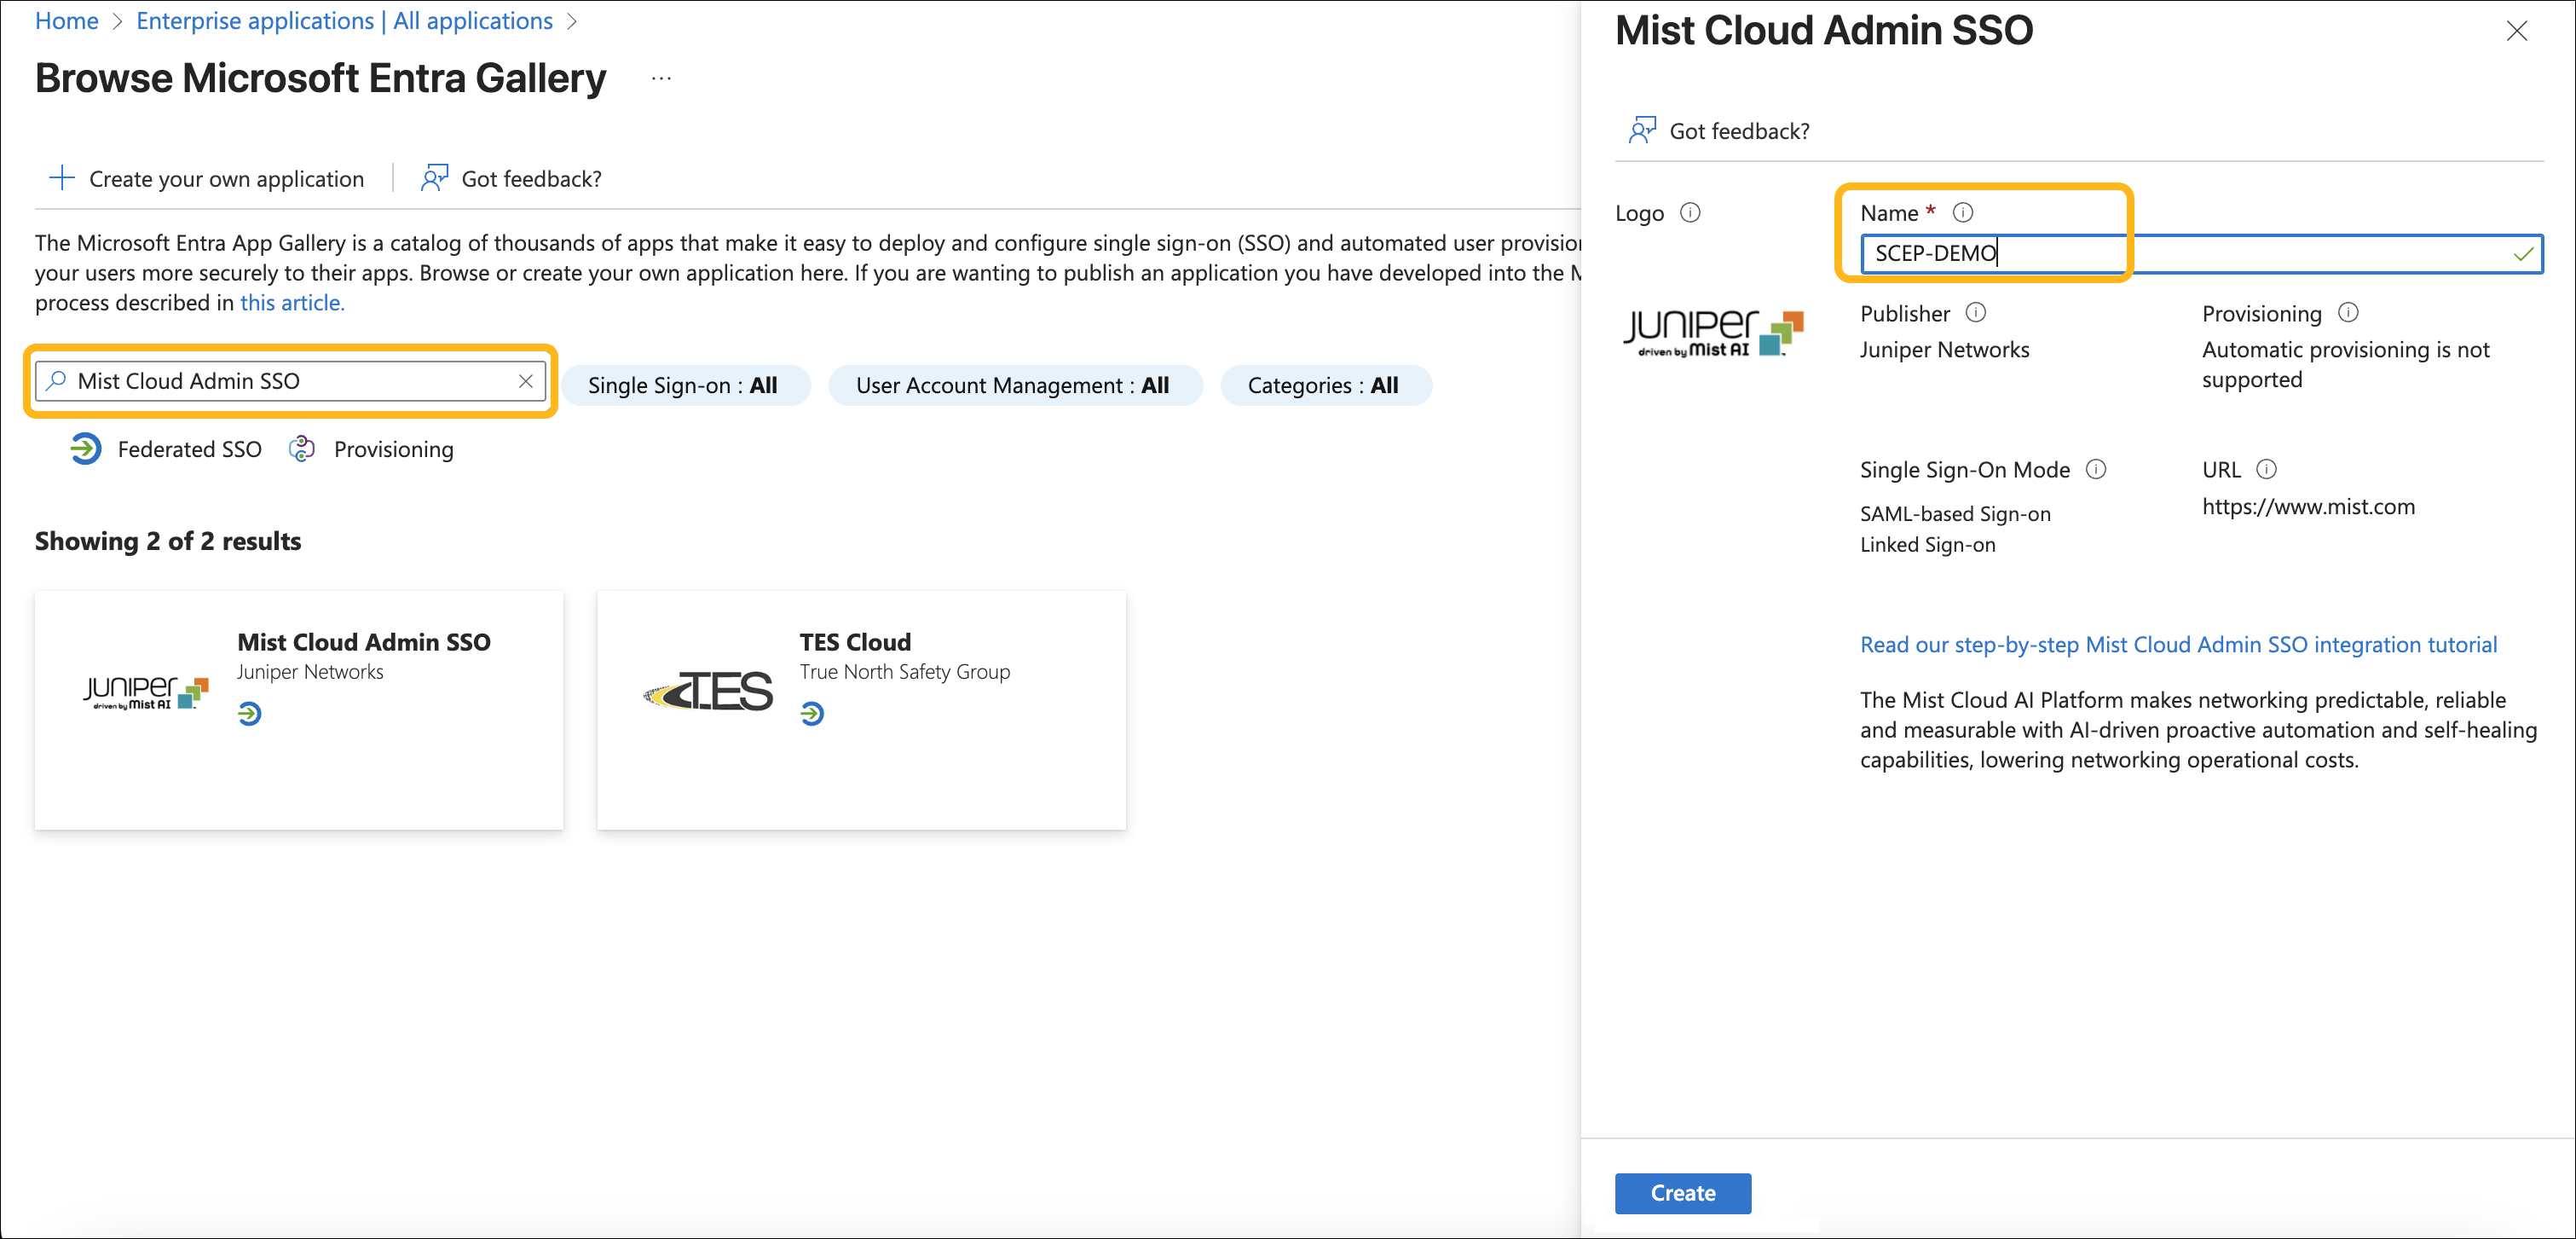
      Microsoft Entra Gallery search for Mist Cloud Admin SSO results in two applications; detailed view of Mist Cloud Admin SSO by Juniper Networks showing key details.

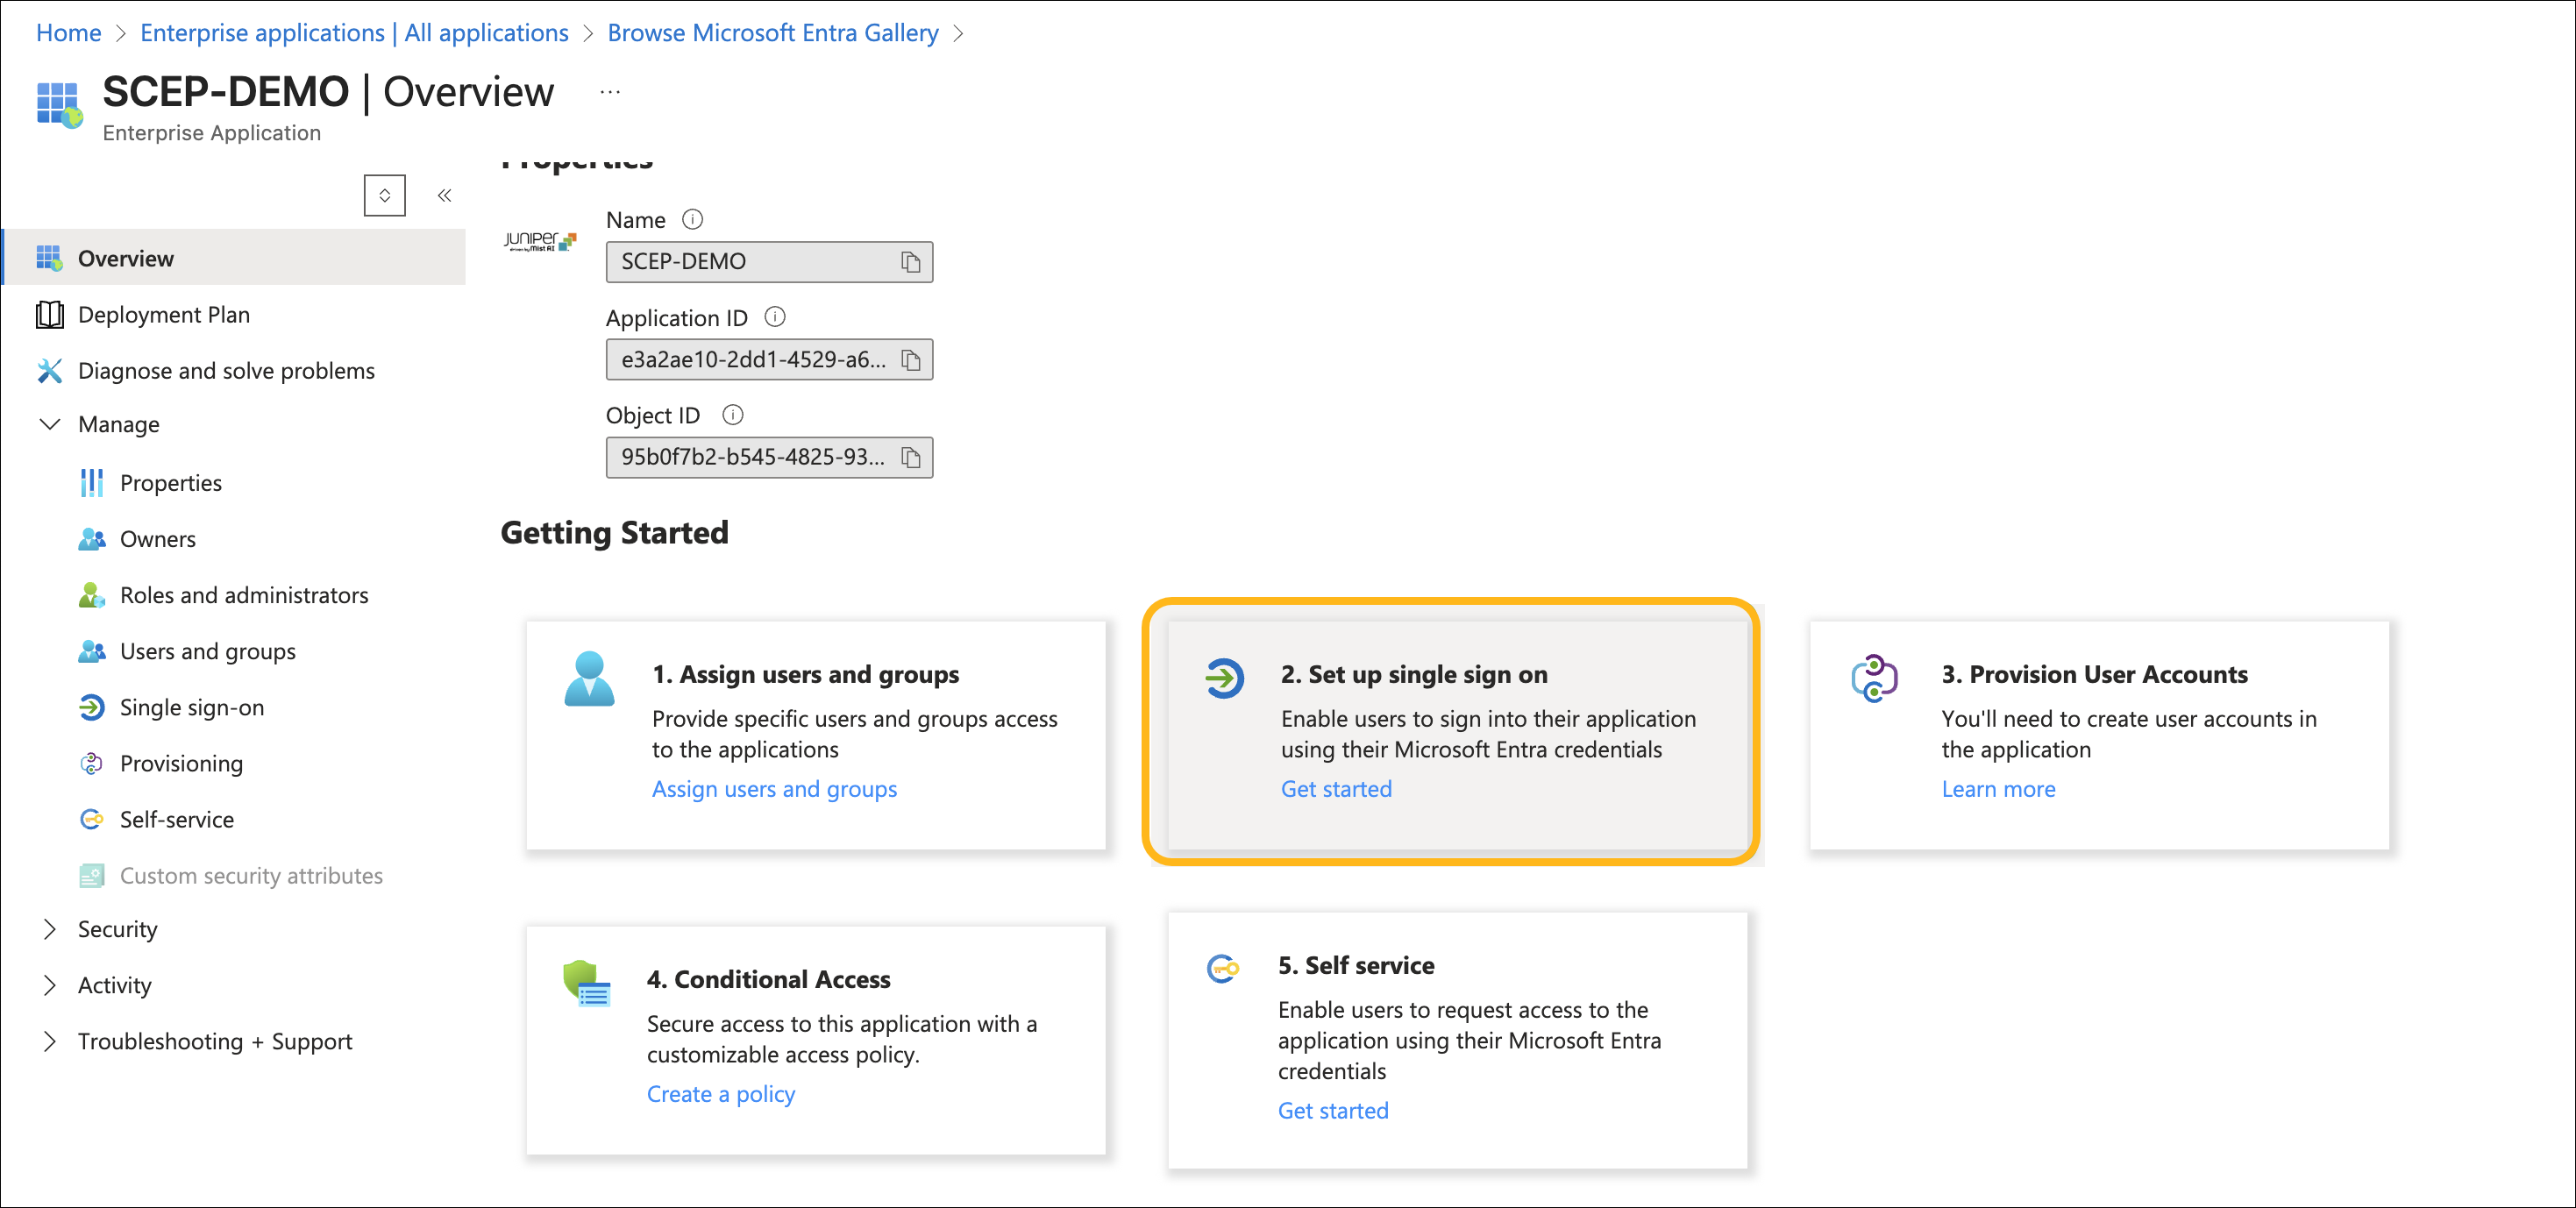
    4. 打开应用程序并单击 设置单点登录。

      Enterprise application overview page in Microsoft Entra admin center for SCEP-DEMO, showing application details, navigation menu, and highlighted single sign-on setup step in Getting Started section.

    5. 选择 SAML 作为 SSO 方法。

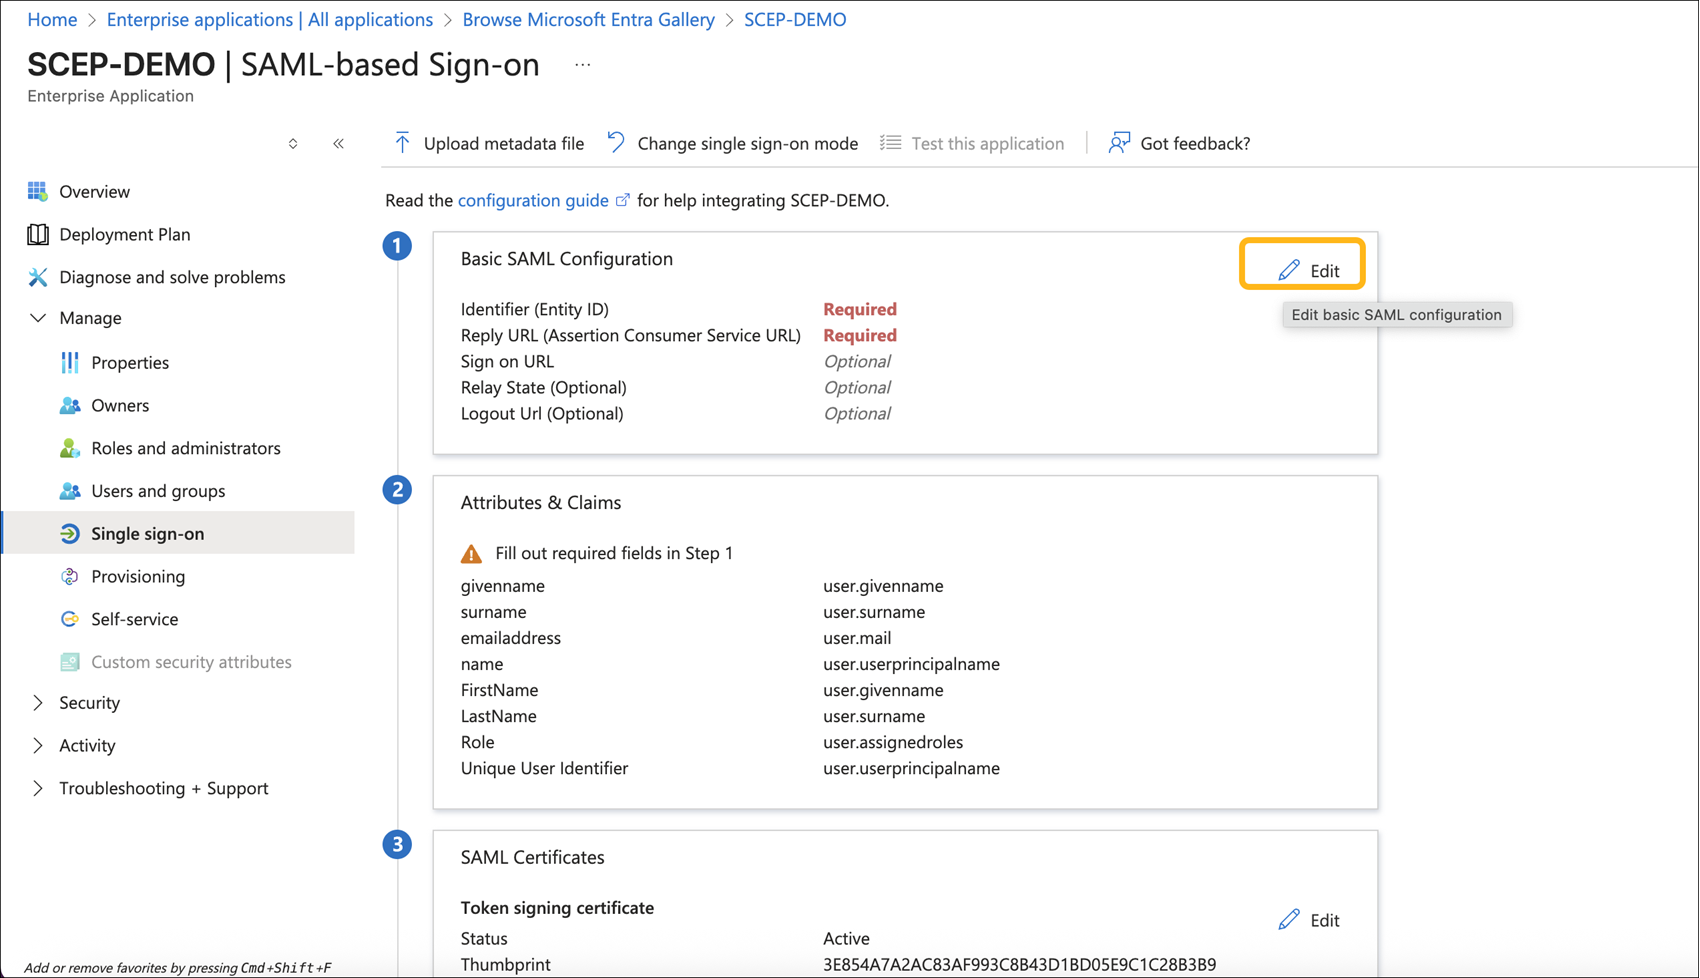
    6. 单击 编辑基本 SAML 配置。

      Configuration page for SAML-based single sign-on setup in Microsoft Entra for the application SCEP-DEMO. Sections include Basic SAML Configuration, Attributes and Claims, SAML Certificates, and a navigation panel.

    7. 在 SAML 配置页面中,将标识符和回复 URL 设置为之前从 NAC 载入门户复制的门户 SSO URL。点击 保存。
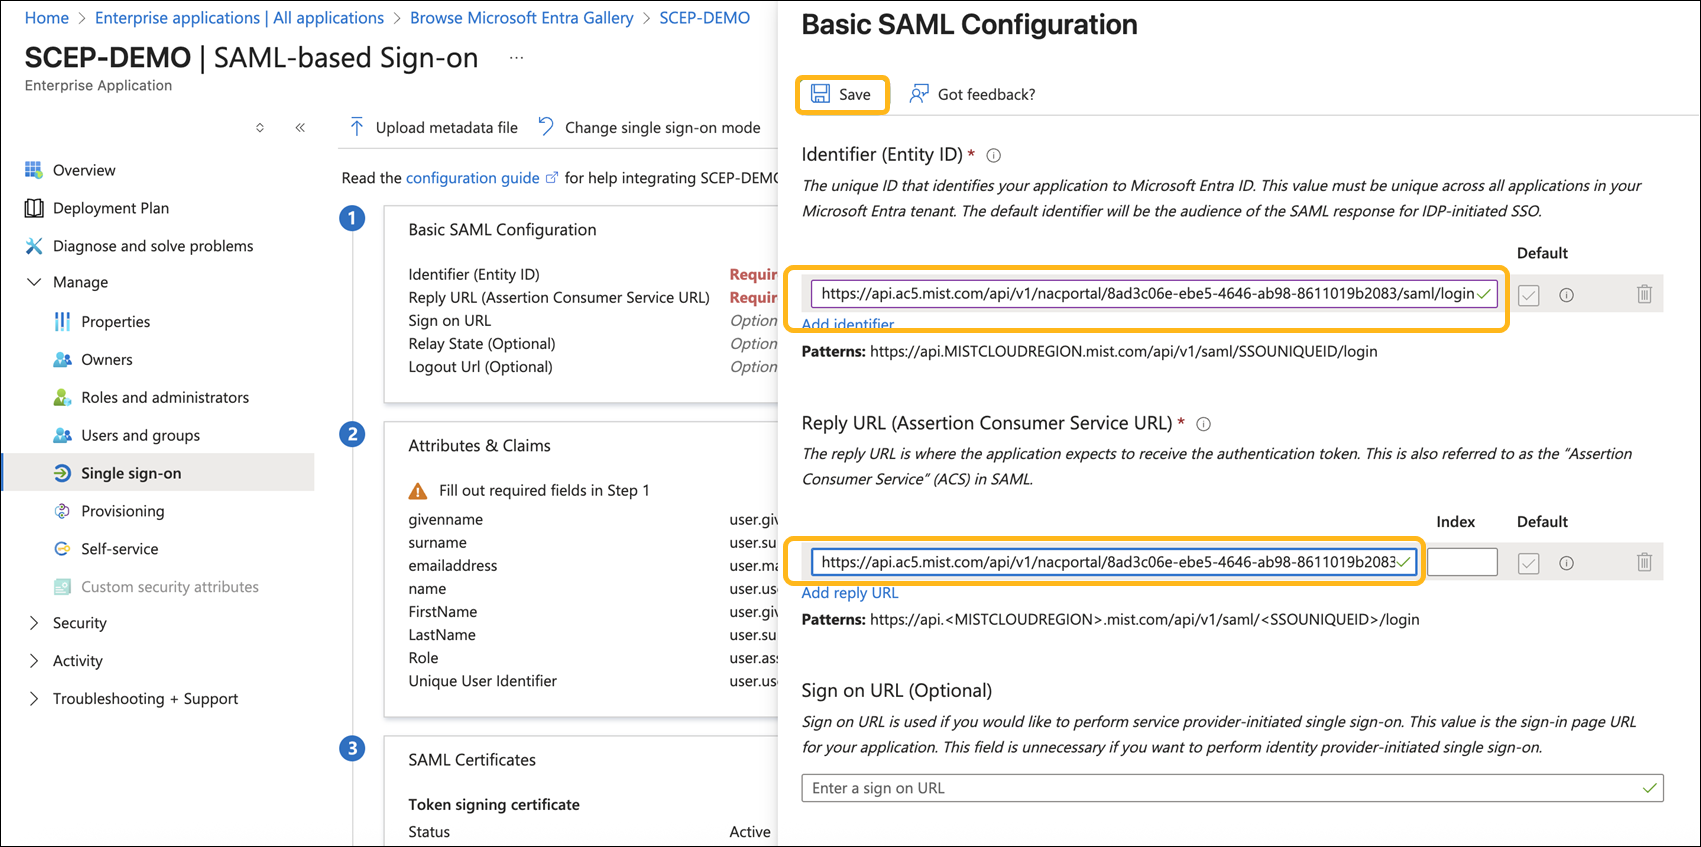
      Configuration screen for setting up SAML-based Single Sign-On in Microsoft Entra for the SCEP-DEMO app, showing fields for Identifier, Reply URL, user attributes, token signing certificate, and Save button.

    8. 下载证书 (Base64) 并复制登录 URL 和 Microsoft Entra 标识符。
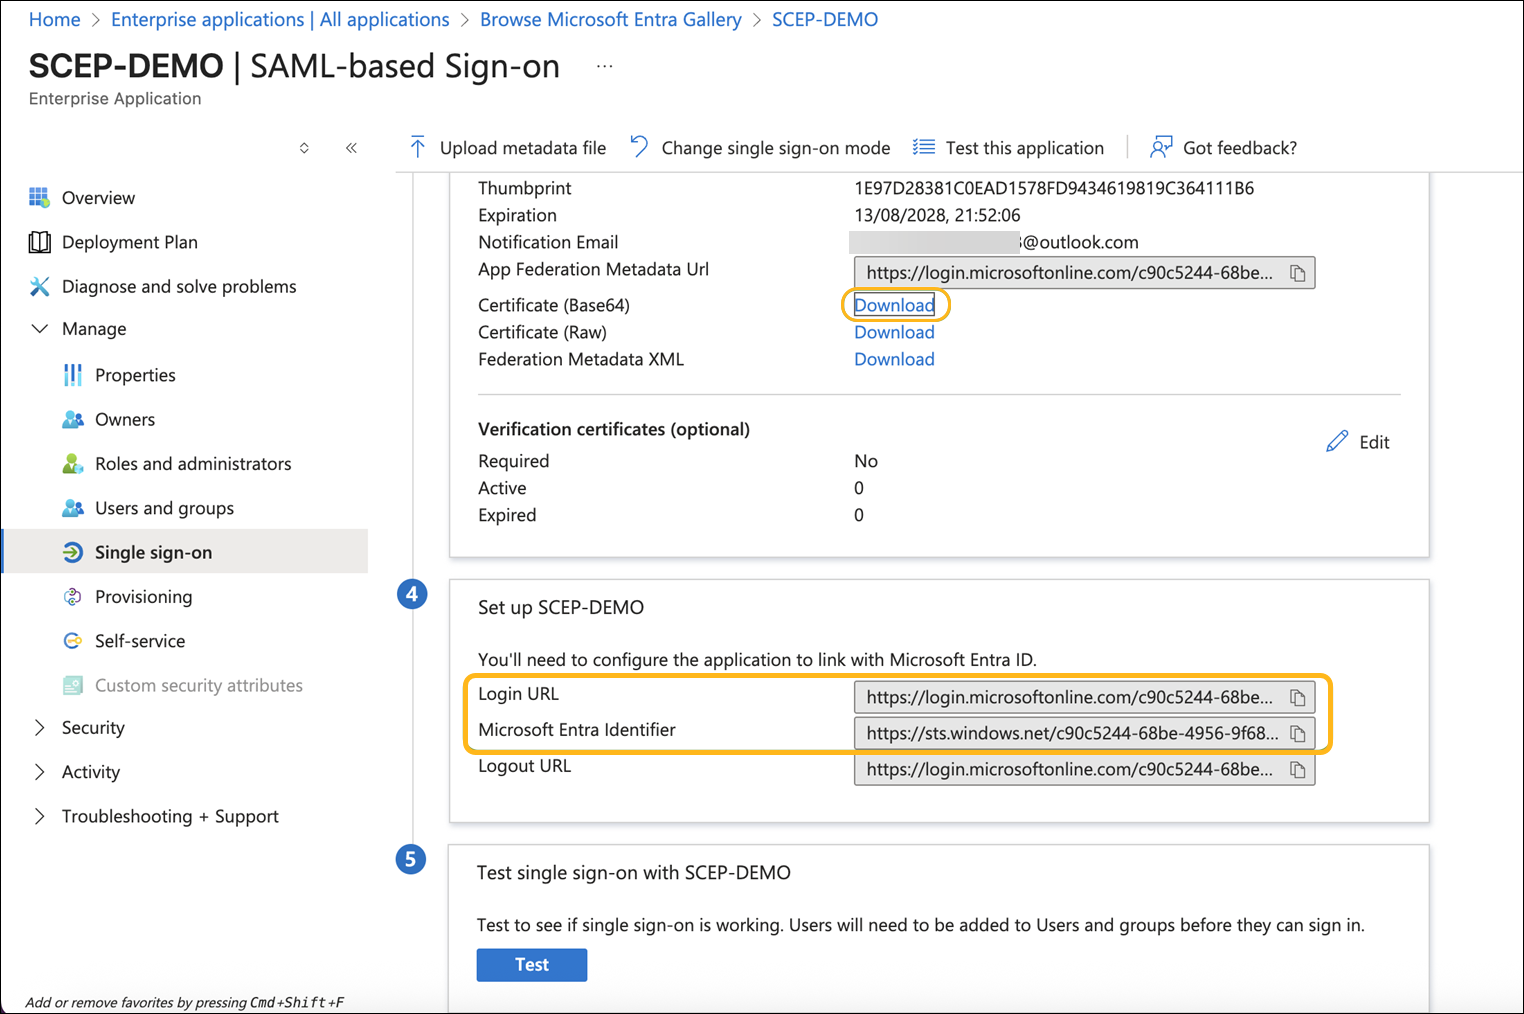
      Configuration page for SAML-based single sign-on in Microsoft Entra for the SCEP-DEMO application. Includes certificate details, setup URLs, verification certificates, and test single sign-on options. Highlighted elements emphasize download links and login identifiers.

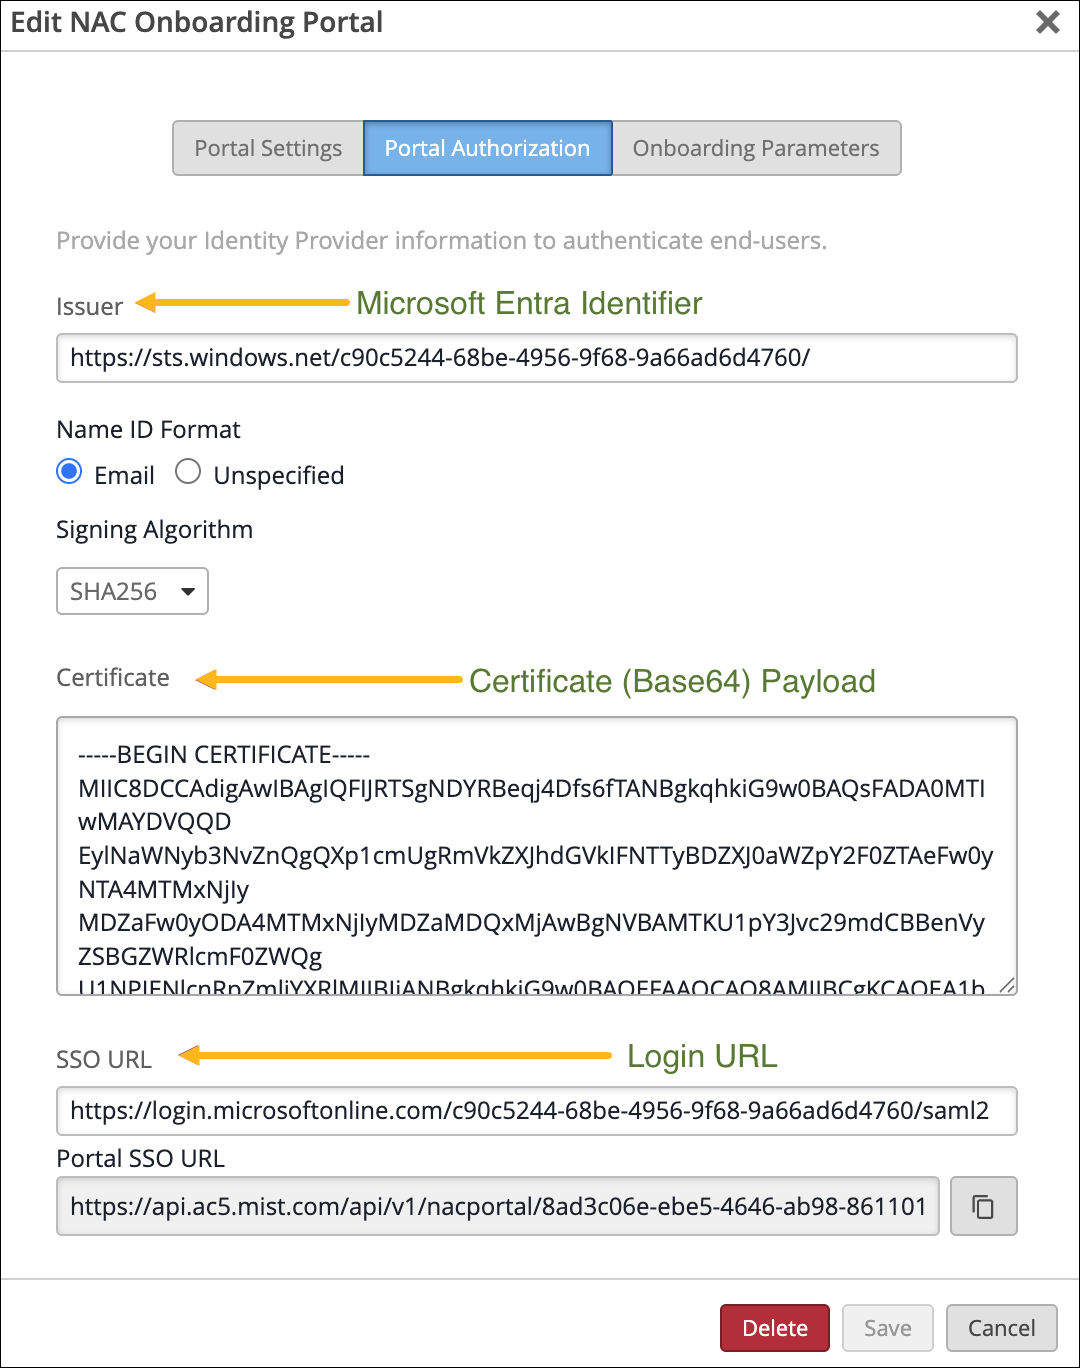
    9. 在瞻博网络 Mist 门户中,转到 NAC 载入门户的门户授权选项卡:

      • 将“颁发者”替换为 Microsoft Entra 标识符。

      • 将证书替换为下载的 Base64 证书中的有效负载。

      • 将 SSO URL 替换为“登录 URL”。

        NAC Onboarding Portal configuration interface on Portal Authorization tab showing identity provider setup. Issuer URL, Name ID Format set to Email, SHA256 Signing Algorithm, Base64 certificate payload, Microsoft Online SSO URL, and NAC portal API endpoint are displayed. Save, Delete, and Cancel options are at the bottom.

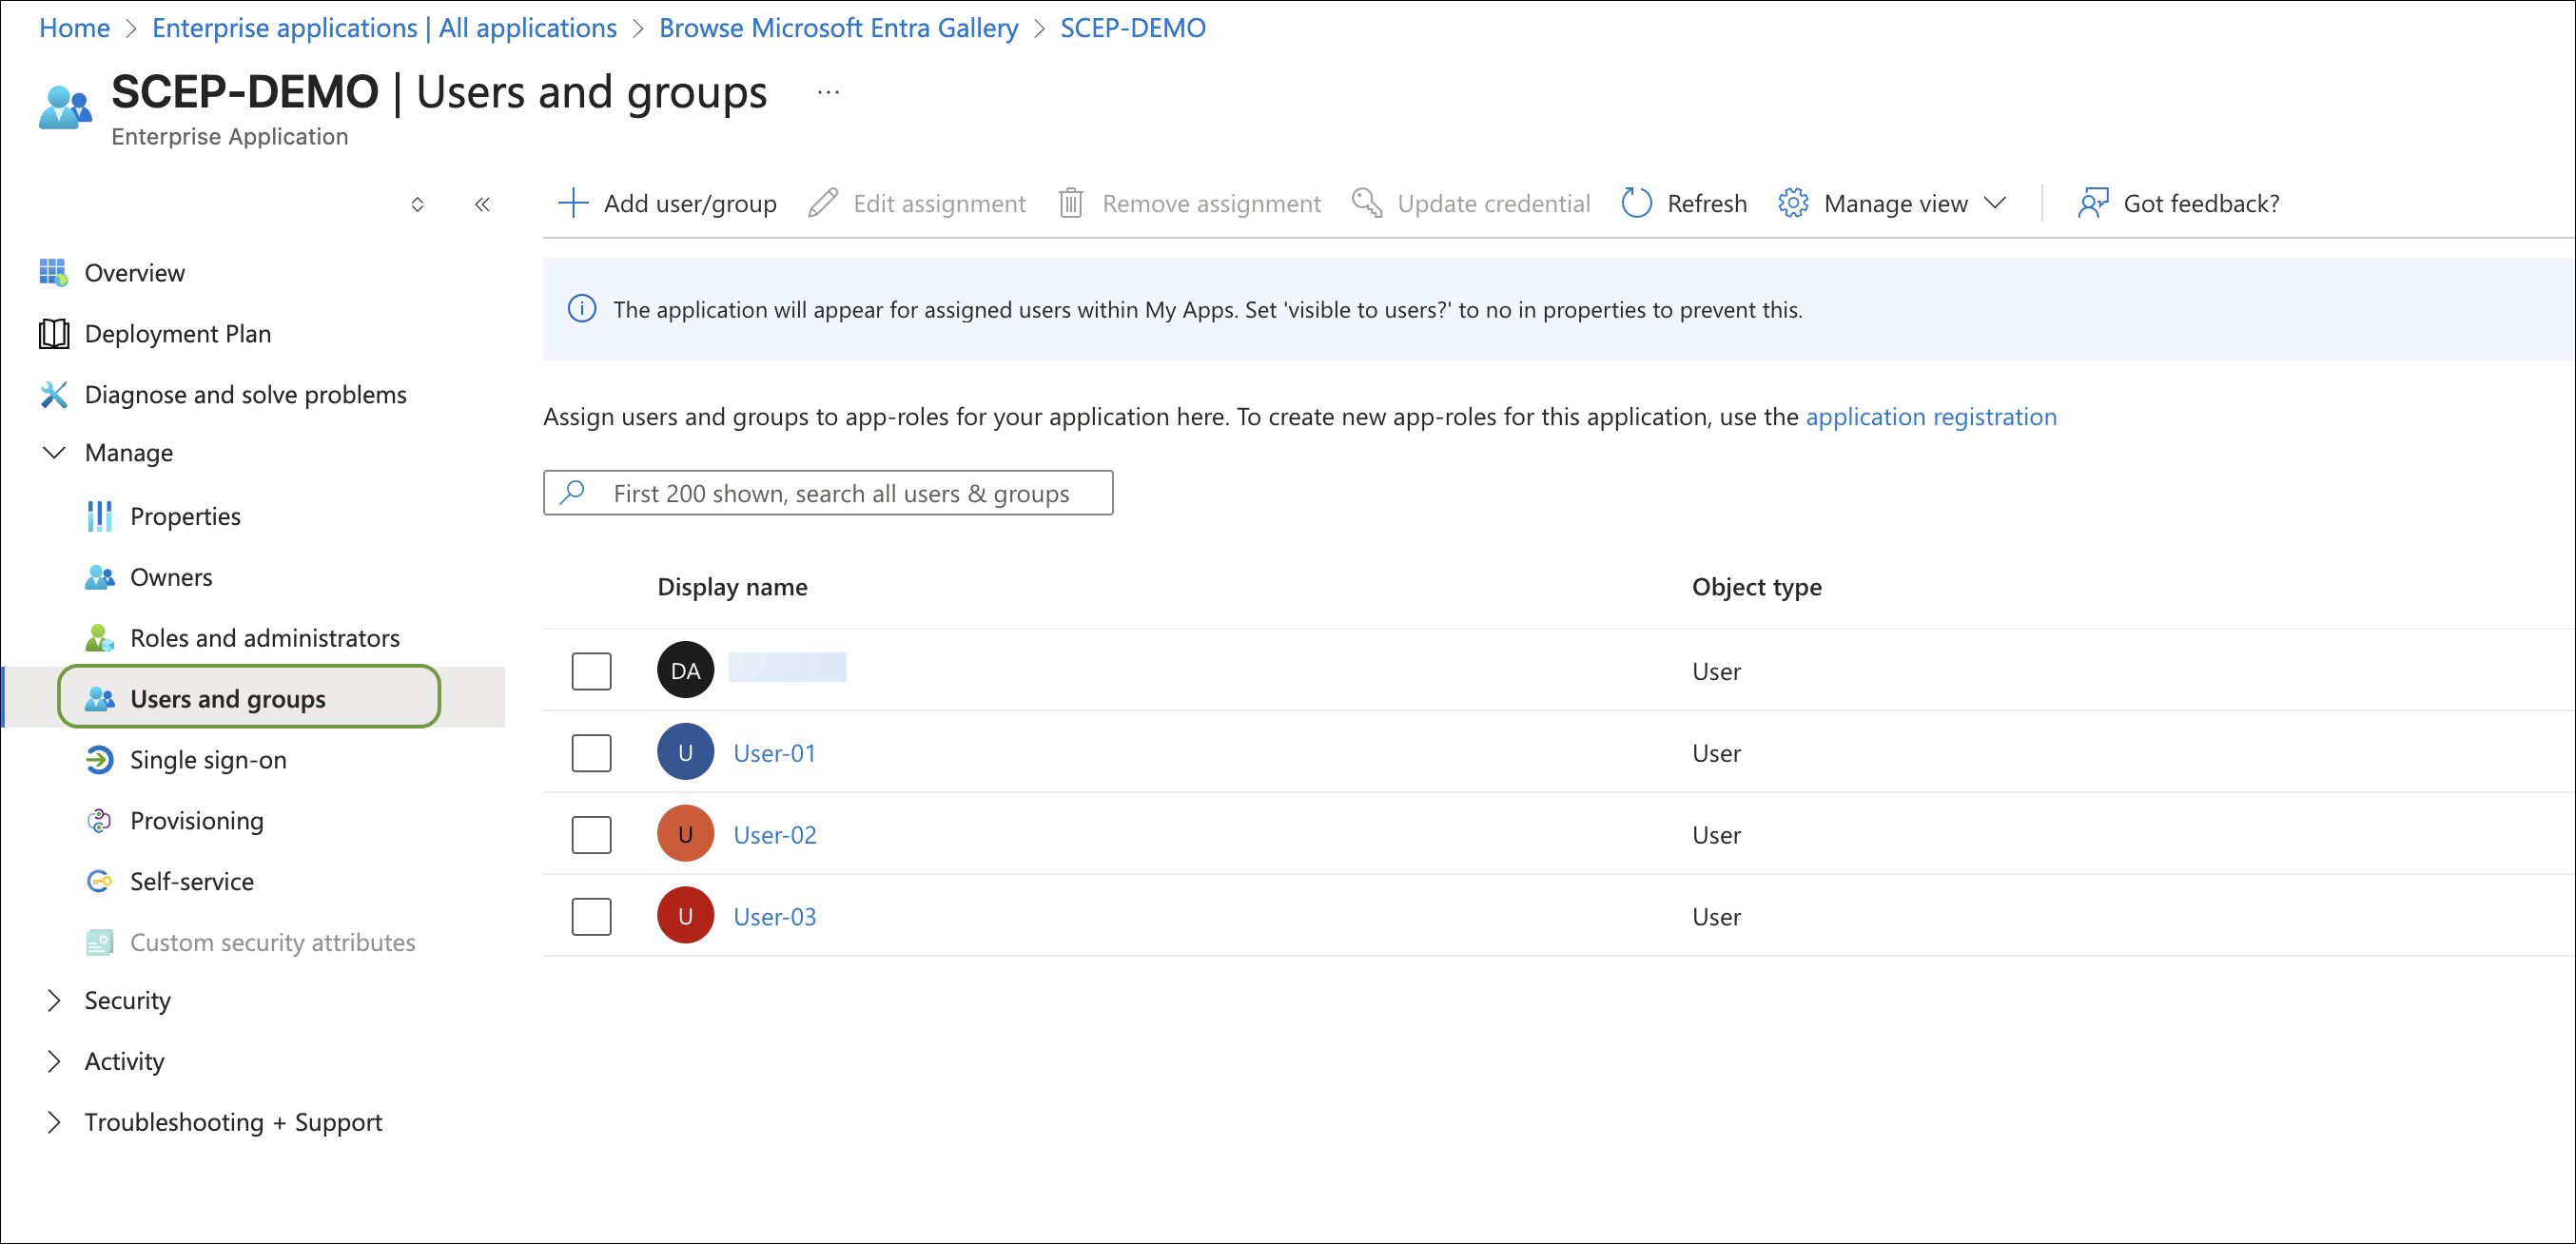
  3. 将用户和组分配给 Azure 应用程序,使他们能够访问门户。

下载 Marvis 客户端应用和 Wi-Fi 配置文件

配置 NAC 门户并将其与 Azure 集成后,用户可以使用 Azure SSO 登录 NAC 门户,并通过 Marvis 客户端应用安装 Wi-Fi 配置文件。我们在这里以 macOS 设备为例。

  1. 在 macOS 设备上,使用 NAC 载入门户的“ 门户设置 ”选项卡下列出的 URL 访问 NAC 门户,并使用 Azure SSO 凭据登录。

    身份验证成功后,将显示以下页面。

    Juniper Mist webpage showing macOS download prompt with buttons for app installation and links to terms, alongside a group discussion on a wooden deck with greenery.

  2. 单击 下载并安装应用程序以 安装 Marvis 客户端应用程序。

    如果您的设备运行的是 Windows 或 macOS,则会自动下载该应用,您可以在下载过程完成后安装该应用。

    对于 Android 和 iOS,您将被重定向到 Google 或 Apple Play 商店以下载该应用程序。

  3. 安装 Marvis 客户端应用后(或者如果您已经安装了该应用),请切换到 NAC 门户页面,然后单击 已经安装该应用? 以安装配置文件。

    系统会将您重定向至 Marvis 客户端应用以安装 Wi-Fi 配置文件。

  4. 单击 “安装”,然后导航到设备上的 “设置”>“常规 ”> “设备管理 ”,并完成配置文件安装。
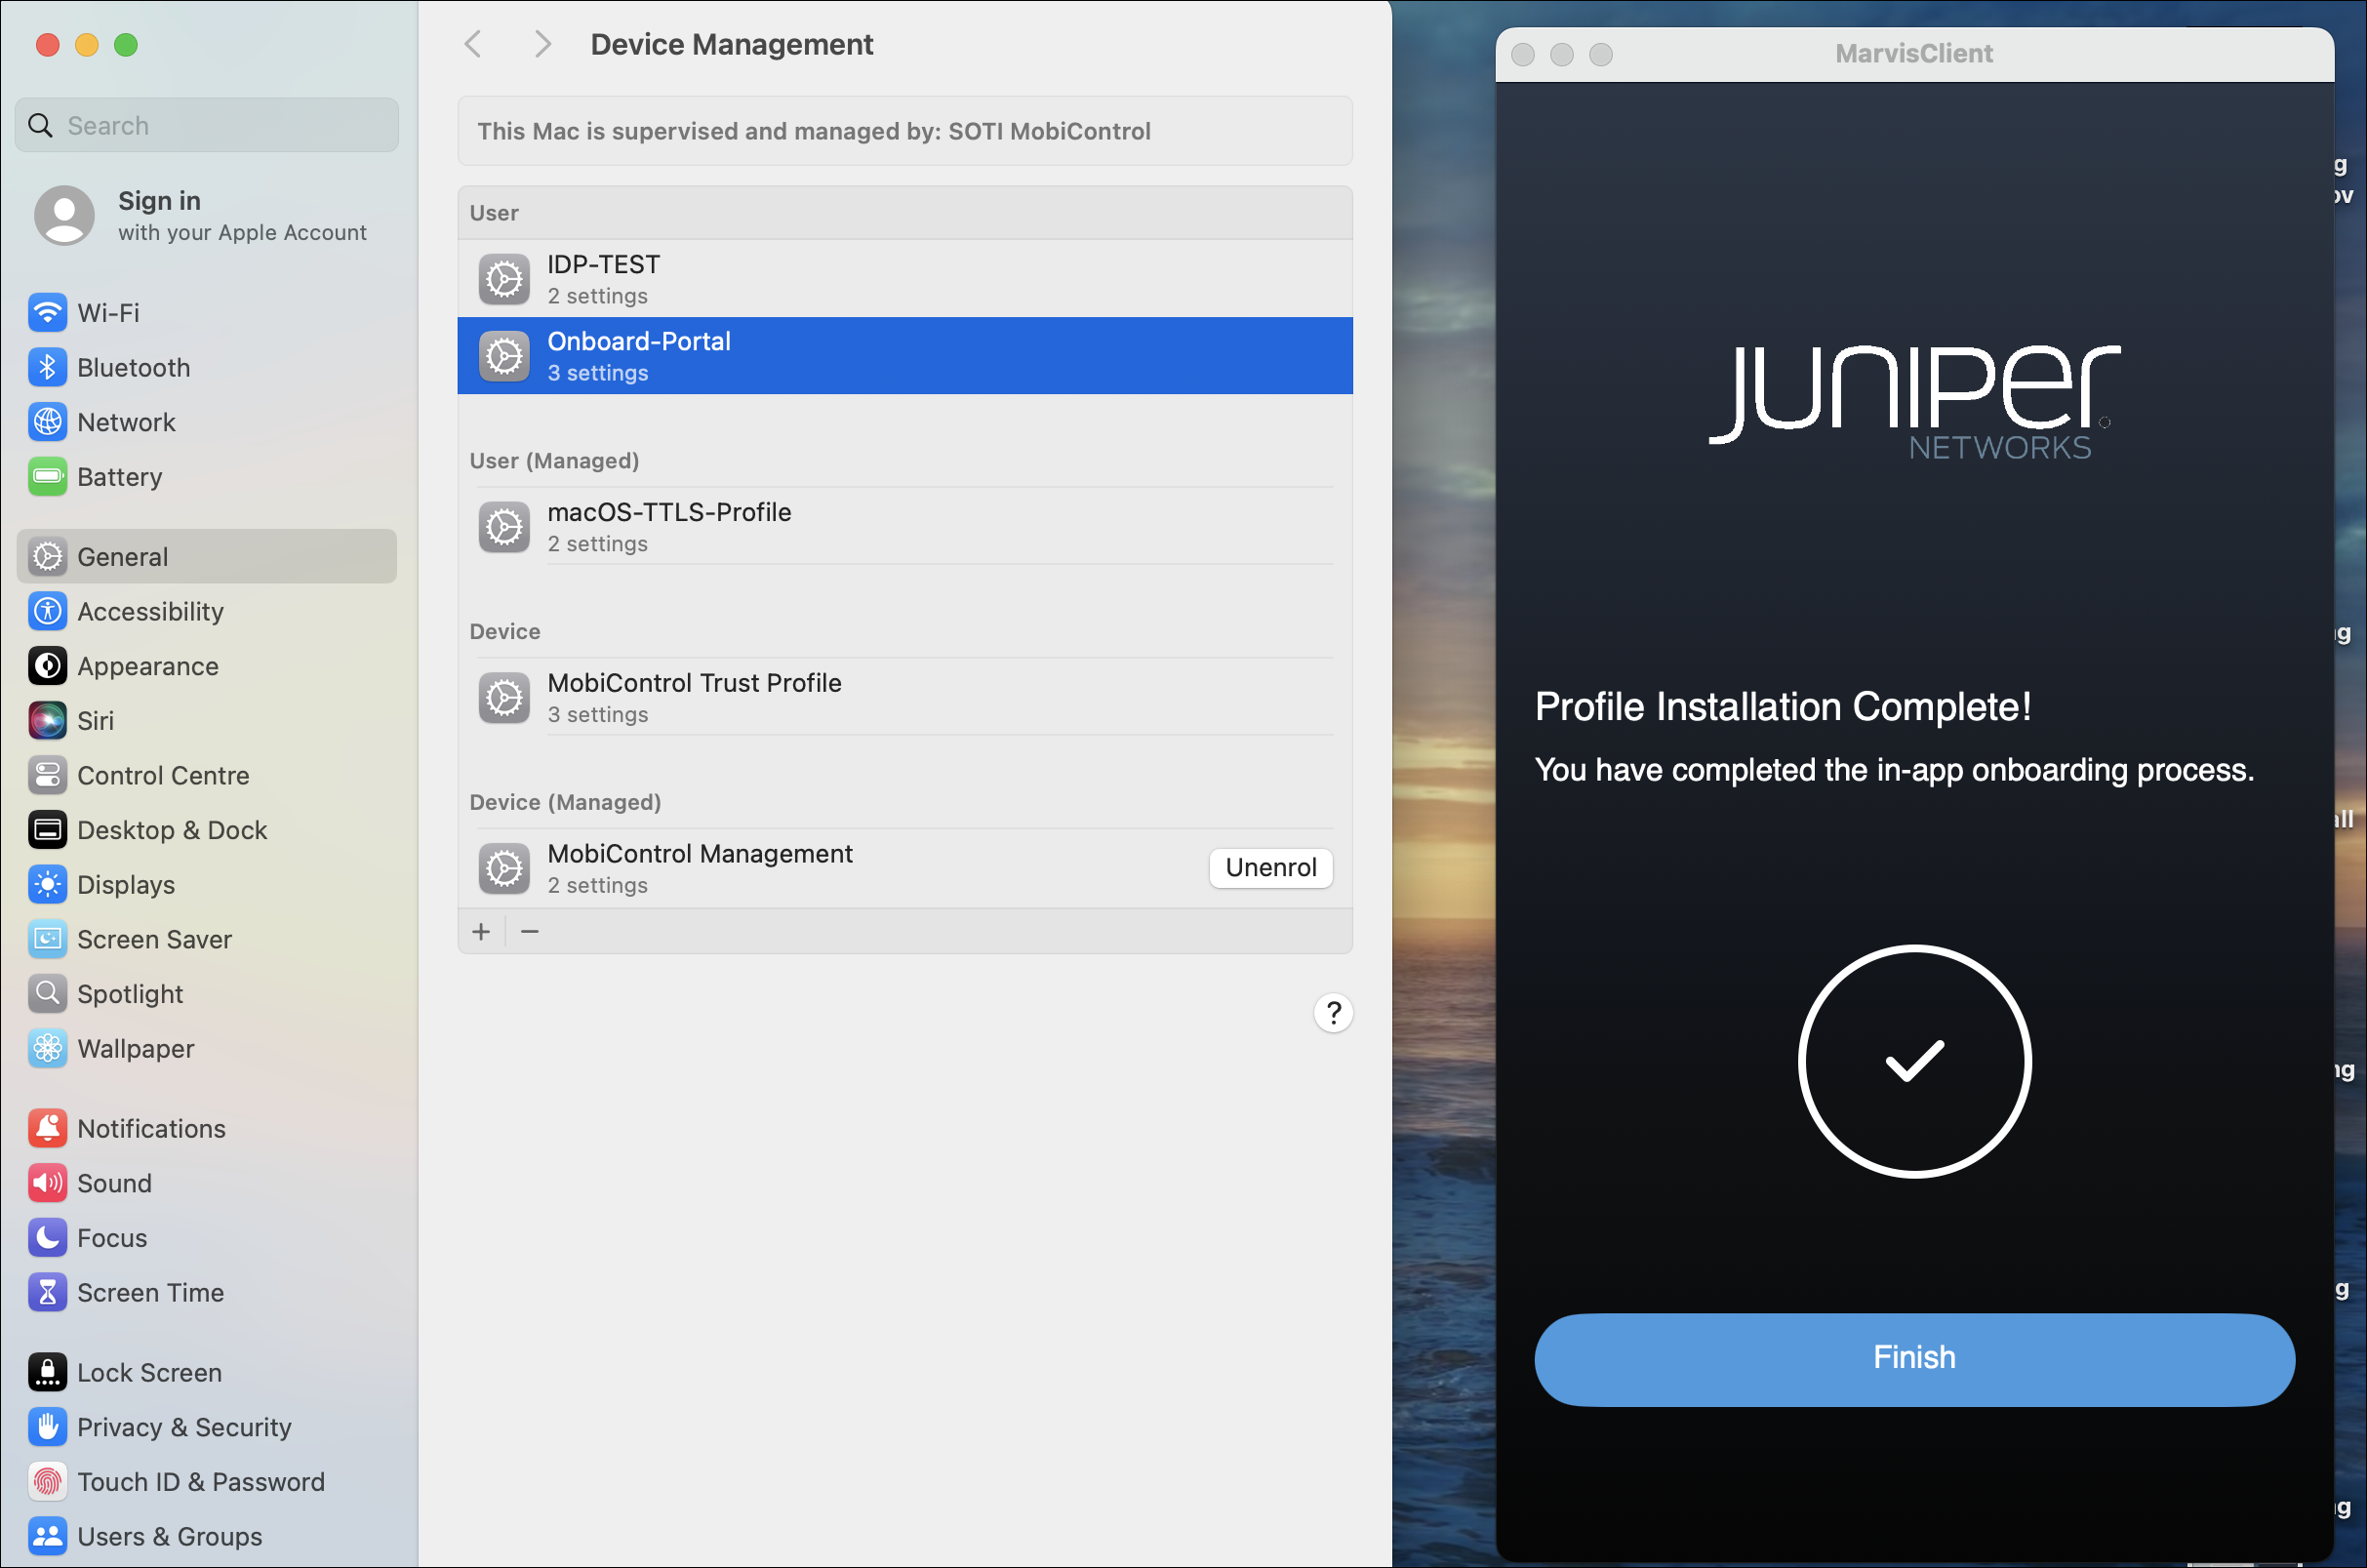
    Device Management window shows macOS system preferences with General selected and managed profiles listed including IDP-TEST, Onboard-Portal highlighted, macOS-TTLS-Profile, MobiControl Trust Profile, and MobiControl Management with unenroll option. MarvisClient window displays Juniper Networks message confirming profile installation completion with Finish button.

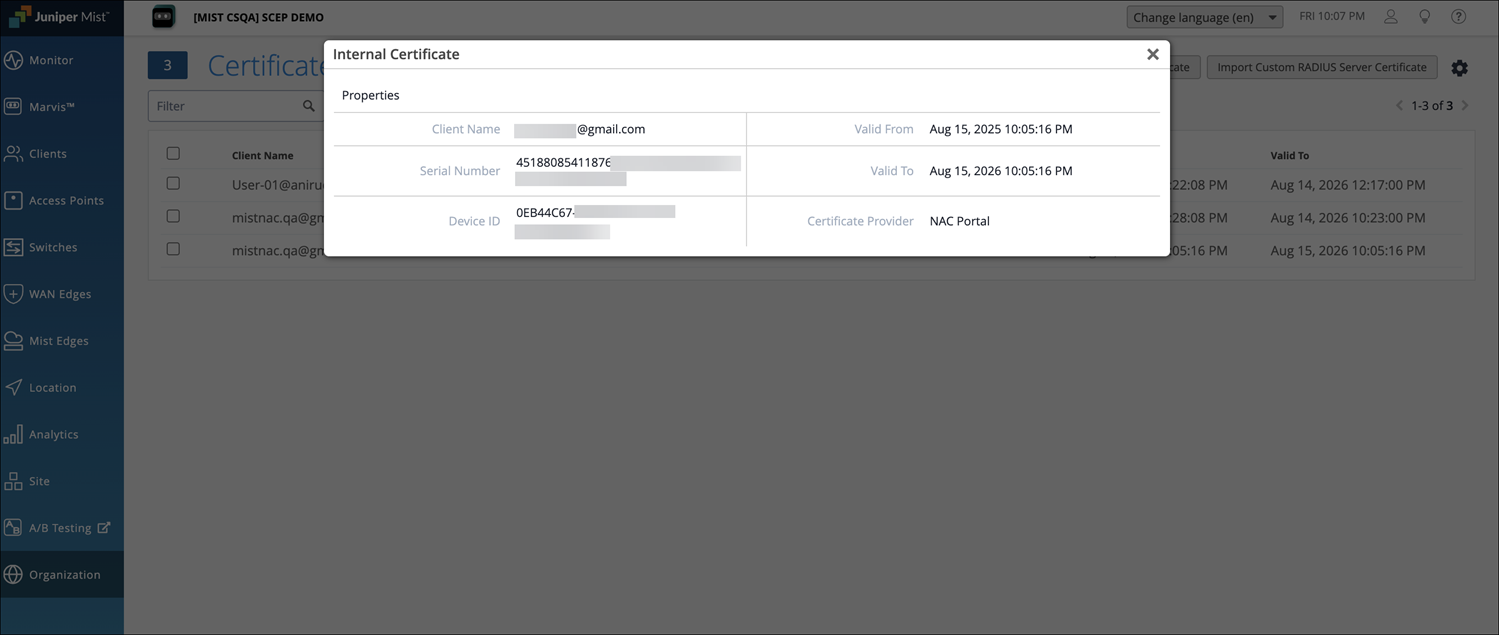
  5. 在瞻博网络 Mist 门户上,打开证书页面,并在内部部分下验证客户端颁发的证书详细信息。
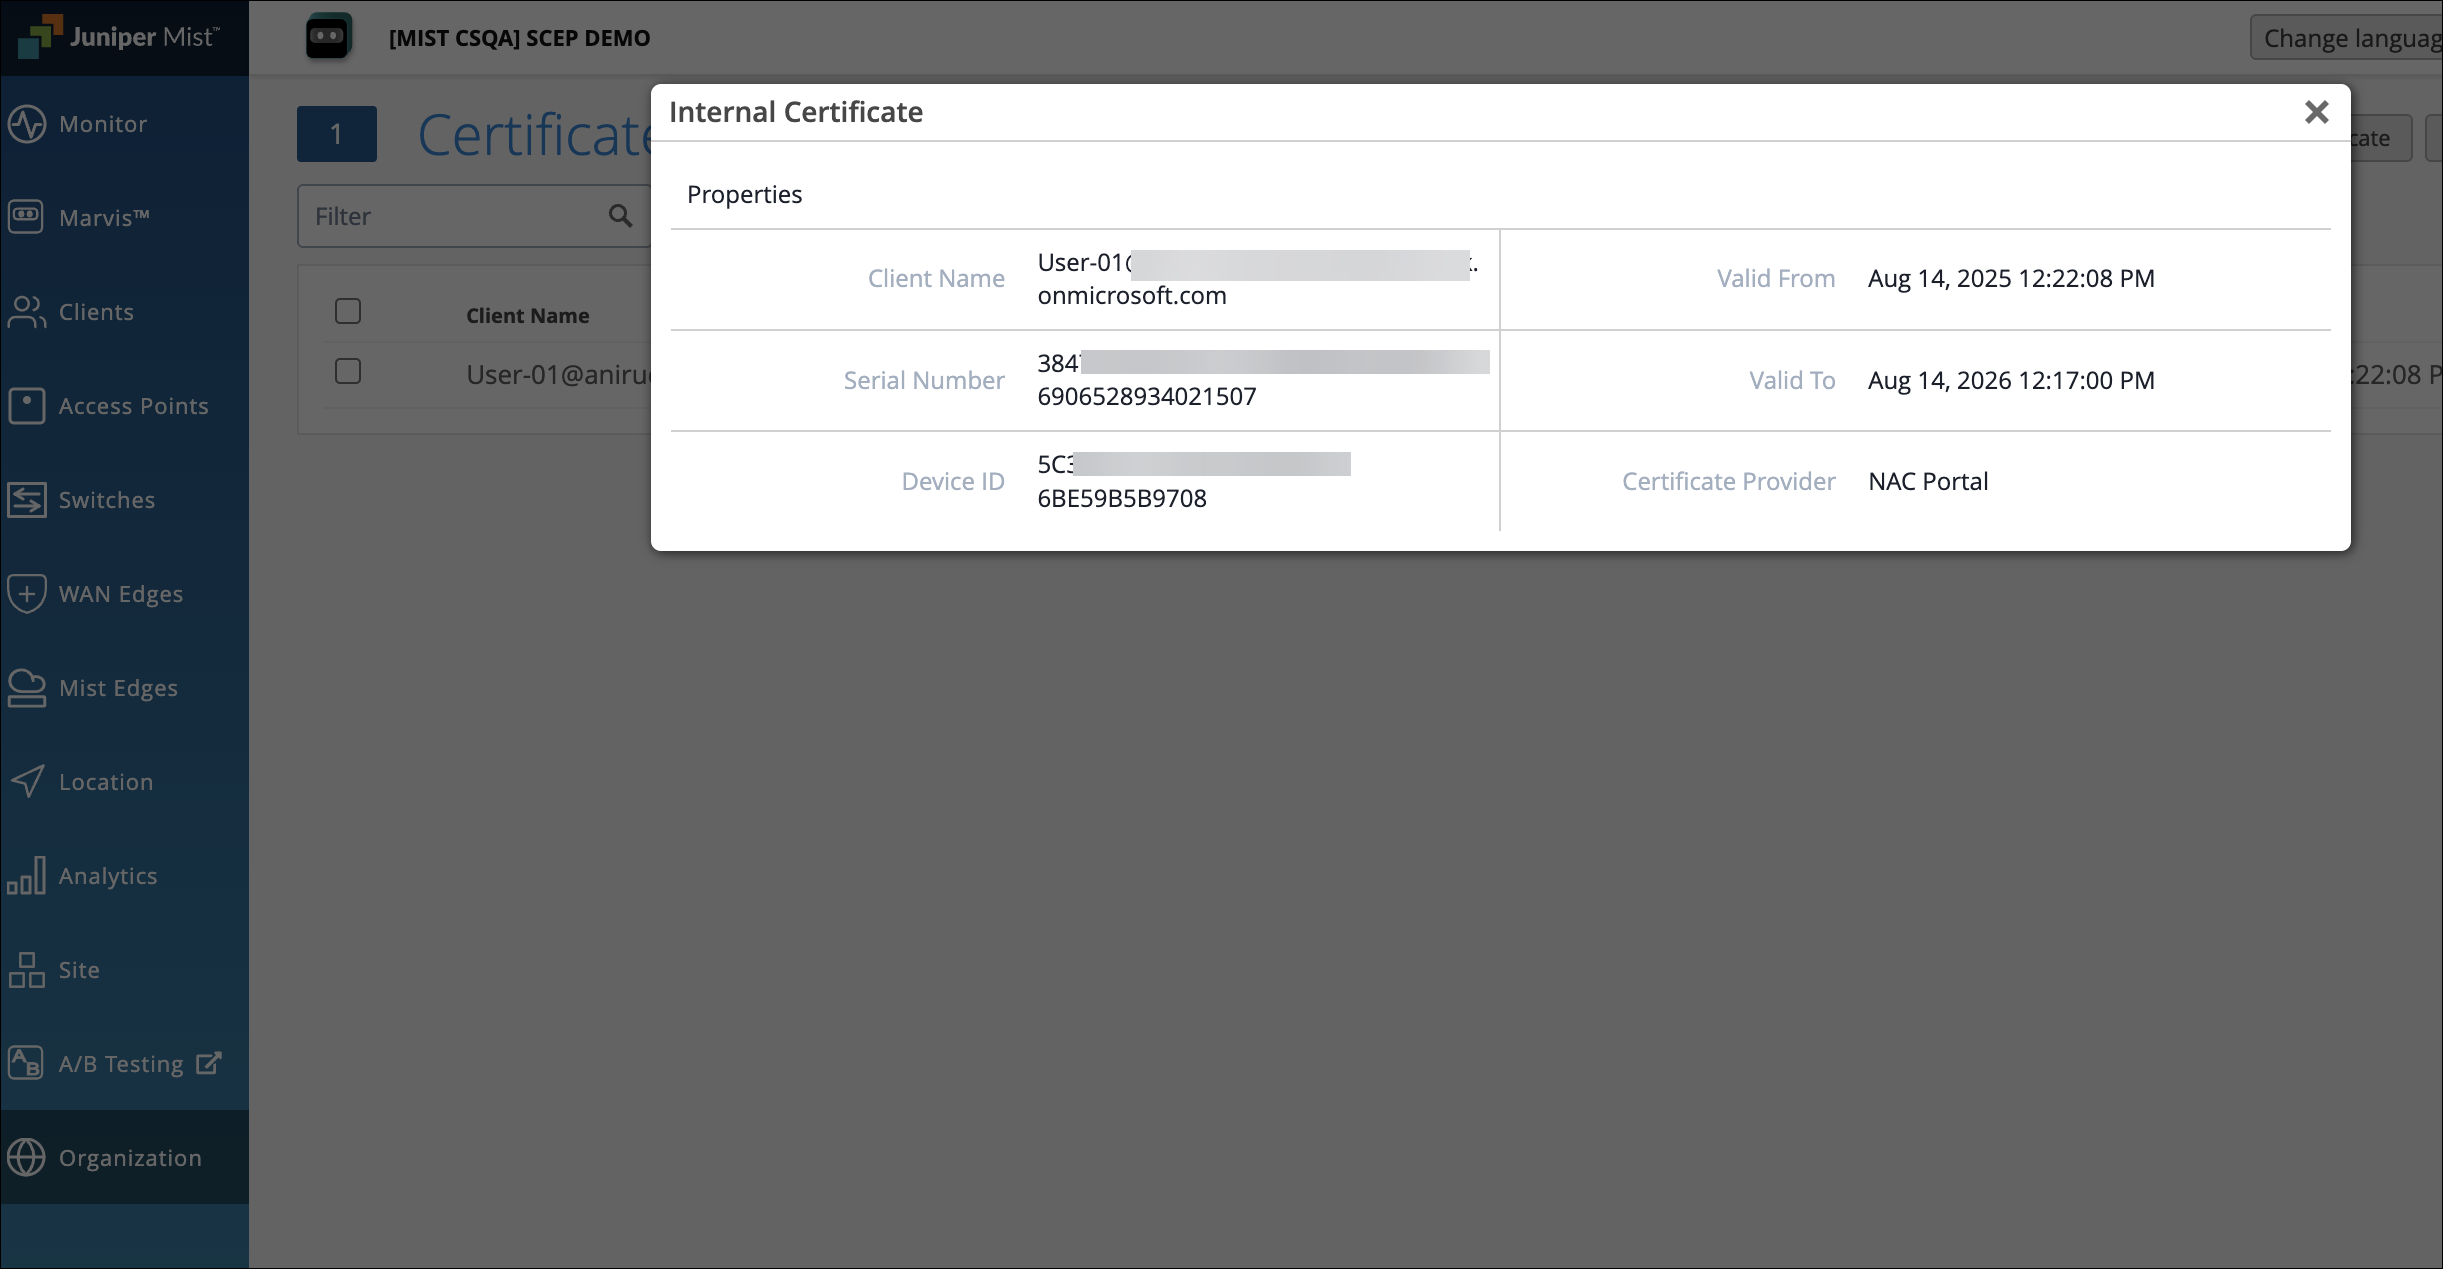
    Screenshot of Juniper Mist interface showing internal certificate details including client name, serial number, device ID, validity dates, and certificate provider NAC Portal, with navigation menu on the left.

验证客户端与网络的连接

验证设备是否通过通过 Marvis 客户端应用配置的客户端证书连接到 Access Assurance 网络。

  1. 从 瞻博网络 Mist 门户的左侧菜单中,选择 组织> 访问>身份验证策略, 然后为设备配置所需的身份验证策略规则。
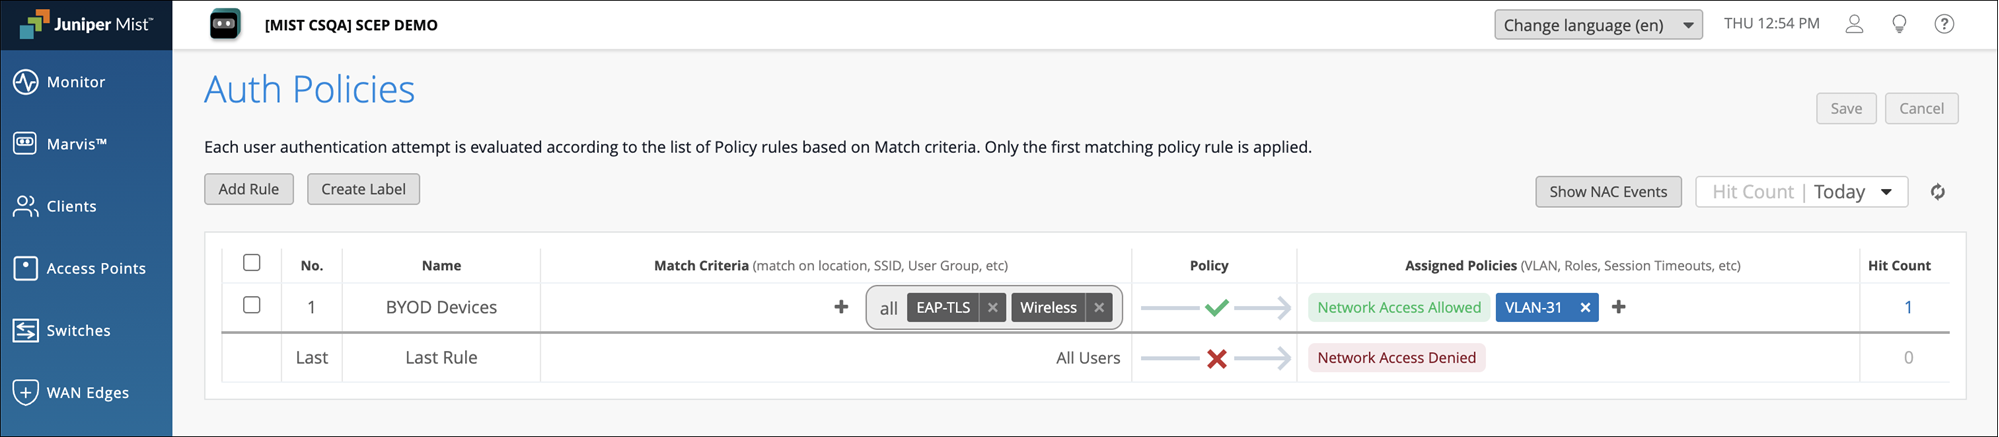
    Auth Policies page in Juniper Mist dashboard for managing user authentication policies with options to add rules, create labels, and view policy details in a table format including rule number, name, match criteria, access policy, assigned policies, and hit count. Includes navigation sidebar and save or cancel buttons.

  2. 将设备连接到网络并确认身份验证成功。

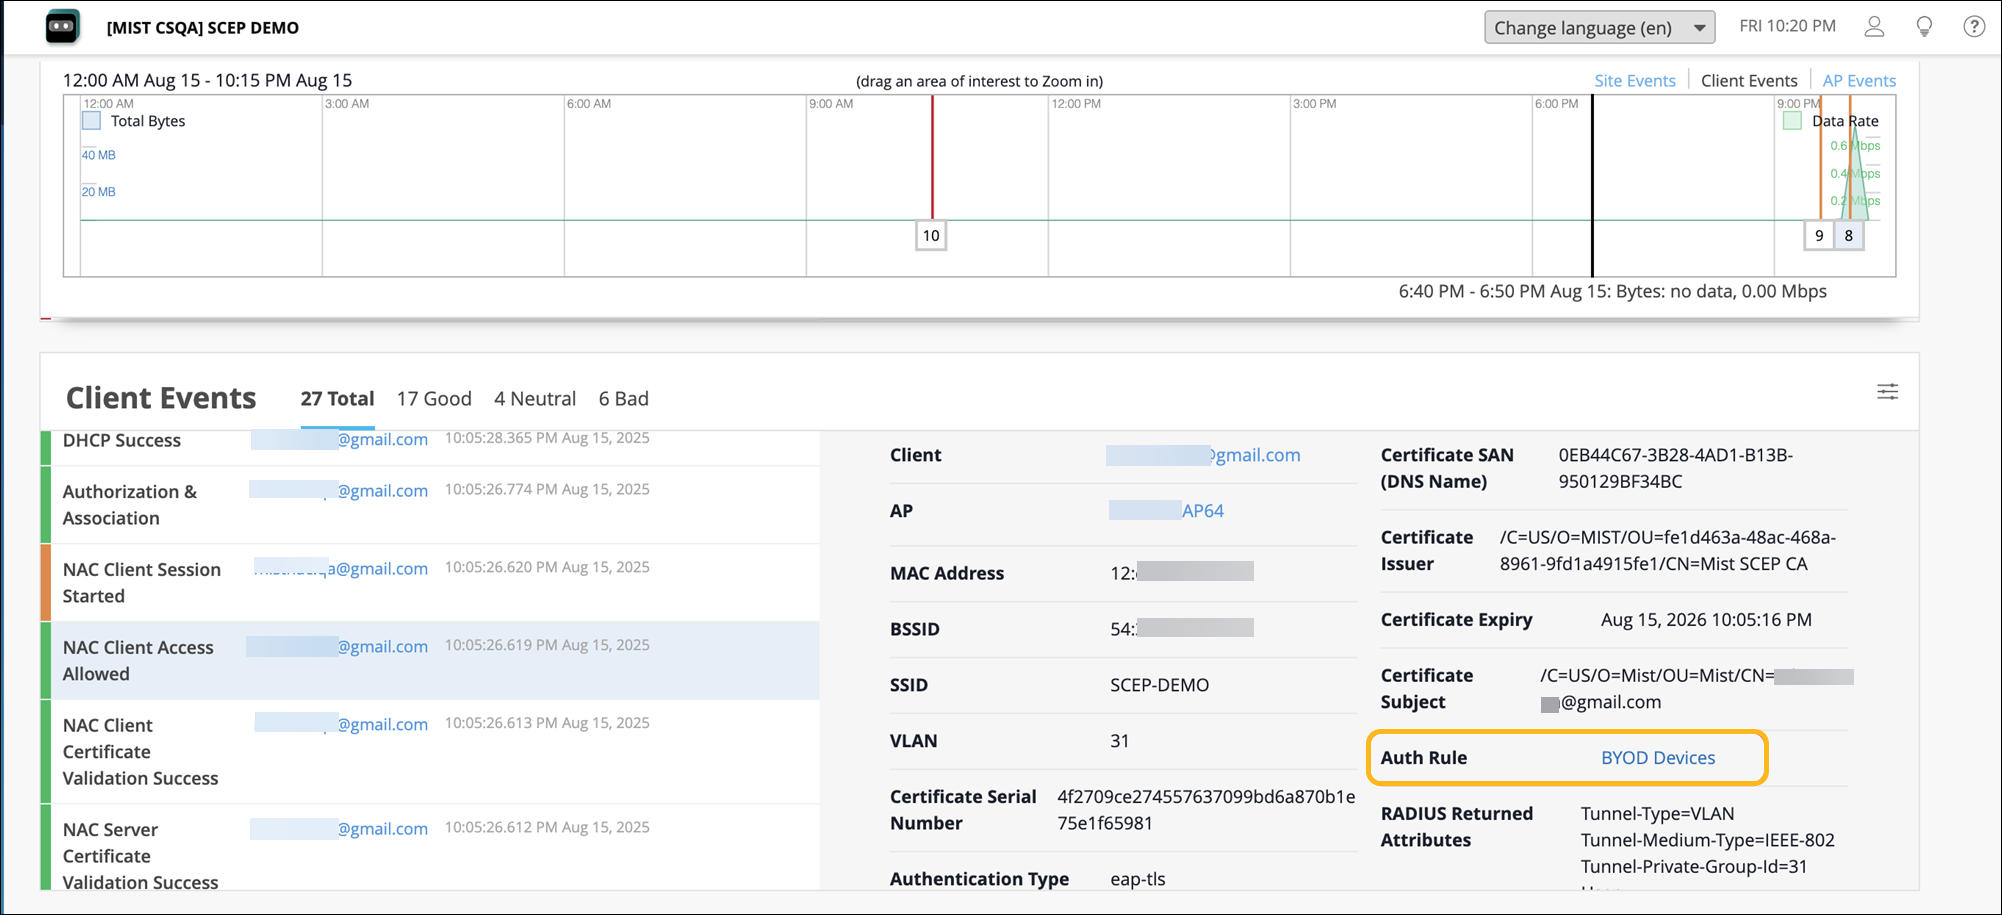
  3. 导航到 “监控>服务级别>见解 ”页面,然后转到“客户端事件”部分。验证 NAC 客户端身份验证事件。
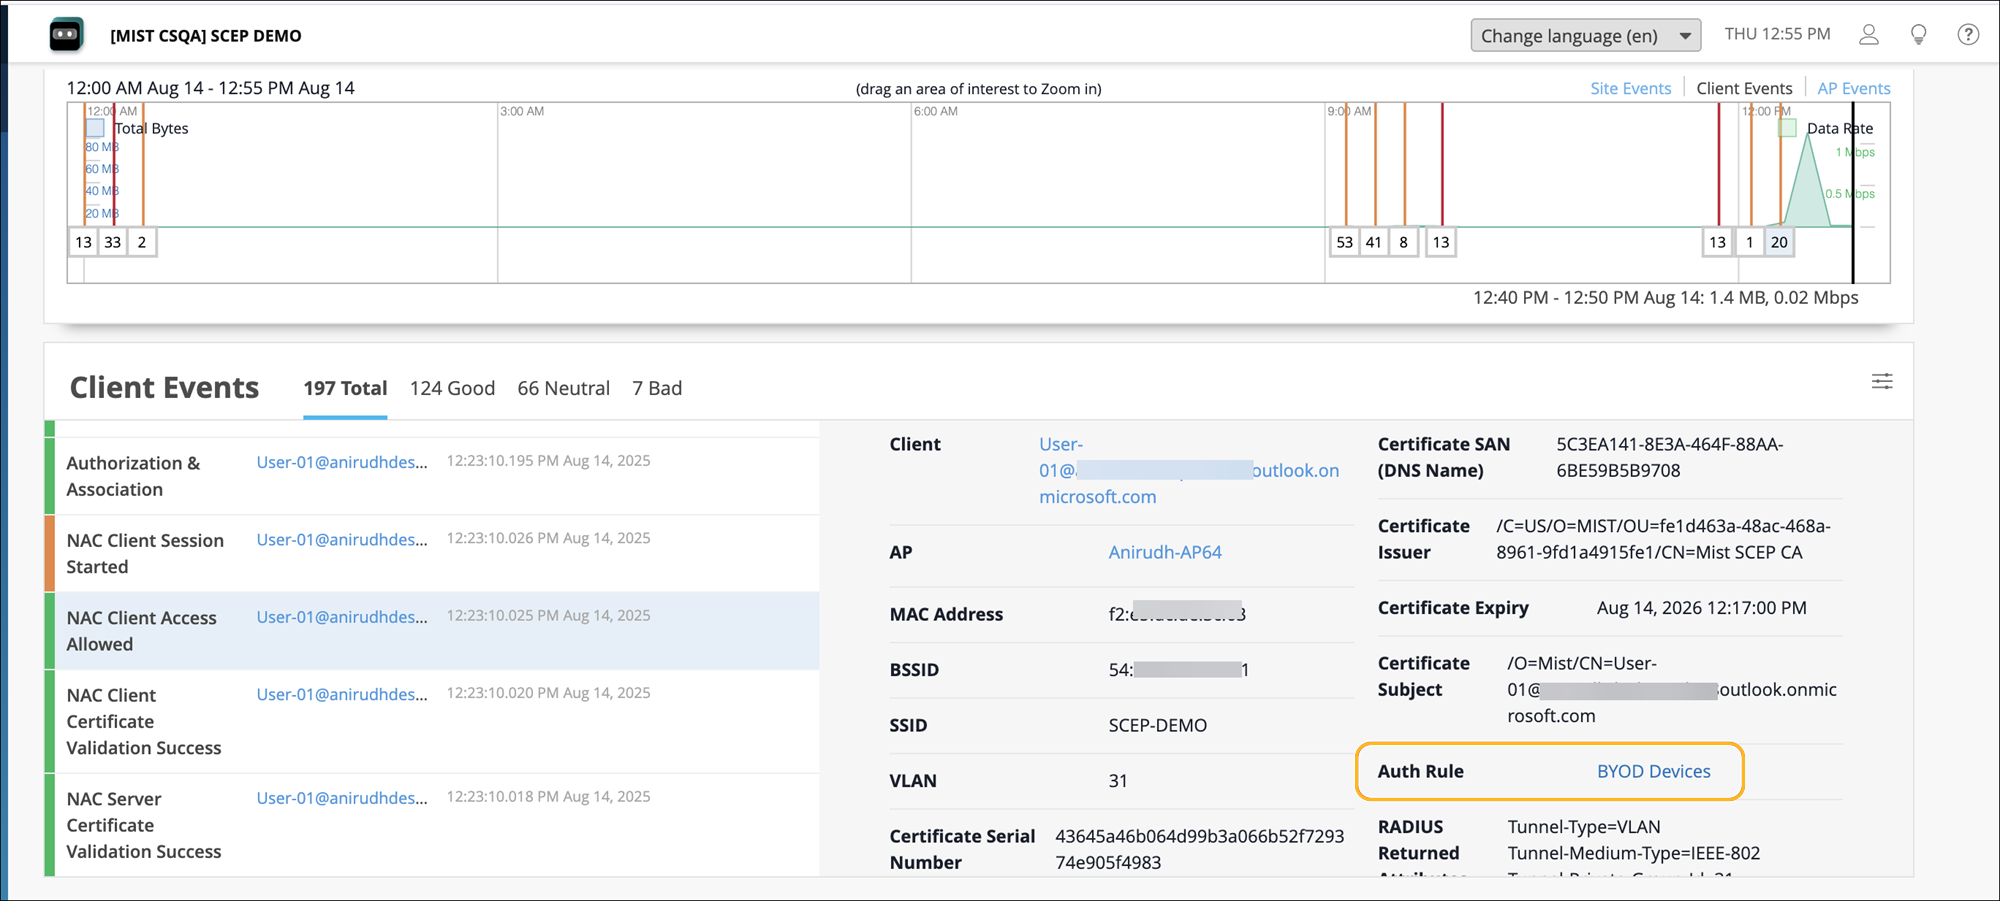
    Network monitoring dashboard displaying client events and activity. Includes a graph of network activity over time, 197 client events categorized as good, neutral, and bad, timestamps, and detailed client information such as username, access point, MAC address, SSID, VLAN, certificate details, and authentication rules.

如何设置 NAC 门户并将其与 Okta 集成

设置 NAC 入门门户并将其与 Okta 集成包括以下步骤:

创建 NAC 门户并将其与 Okta 集成

确保在“证书”页面上启用了载入证书颁发机构配置。在 开始之前查看。

  1. 创建 NAC 门户。创建门户时,将生成一个 NAC 门户 URL,供用户使用 SSO 访问。

    1. 从 瞻博网络 Mist 门户的左侧菜单中,选择 “组织>客户端载入”,然后选择“ NAC ”选项卡。

    2. 单击客户端载入页面右上角的添加 NAC 载入门户 。

    3. 在“添加 NAC 载入门户”页面中,提供名称并单击 “创建”。

    4. 选择“ 门户授权” 选项卡:

      1. 输入 “颁发者”、“ 证书”和“ SSO 网址)的占位符值。这些值稍后将替换为 IdP 中的实际值。

      2. 复制 SSO 门户 URL 以供以后使用。

        Configuration interface for editing NAC Onboarding Portal with Portal Authorization tab selected. Key fields include Issuer set to TEST, Name ID Format set to Email, Signing Algorithm set to SHA256, Certificate containing TEST, SSO URL set to https://test.com, and Portal SSO URL starting with https://api.ac5.mist.com/api/v1/nacportal/. Buttons at the bottom are Delete in red, Save, and Cancel.

    5. 选择 载入参数选项卡 并配置以下内容:

      1. 输入要调配的 SSID 名称。

      2. 选择“安全性类型”WPA2“或”WPA3 企业“。

      3. 设置客户端证书过期的天数。该值的范围是 1-1825 天(最长 5 年)。

        Configuration interface for editing NAC Onboarding Portal on Onboarding Parameters tab. Wireless Connection SSID set to SCEP-DEMO and Security Type set to WPA2. Client Certificate expires in 365 days. Buttons: Delete red, Save blue, Cancel gray.

  2. 配置 SSO 并将 NAC 门户与 Okta 集成:

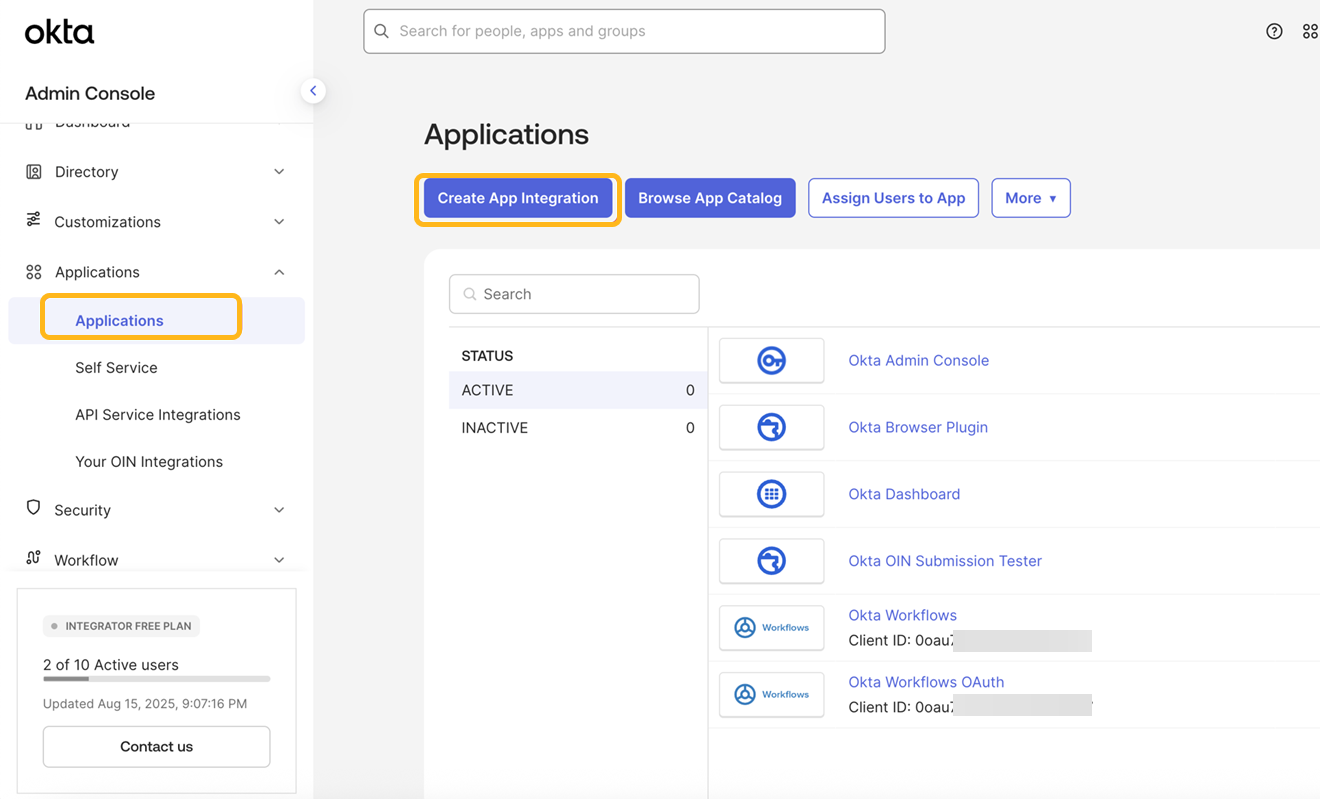
    1. 登录 Okta 管理控制台并导航到 Applications 页面。

    2. 单击创建应用集成。

      Okta Admin Console Applications section showing navigation menu, highlighted Applications tab, action buttons, search bar, app list with statuses, and account info.

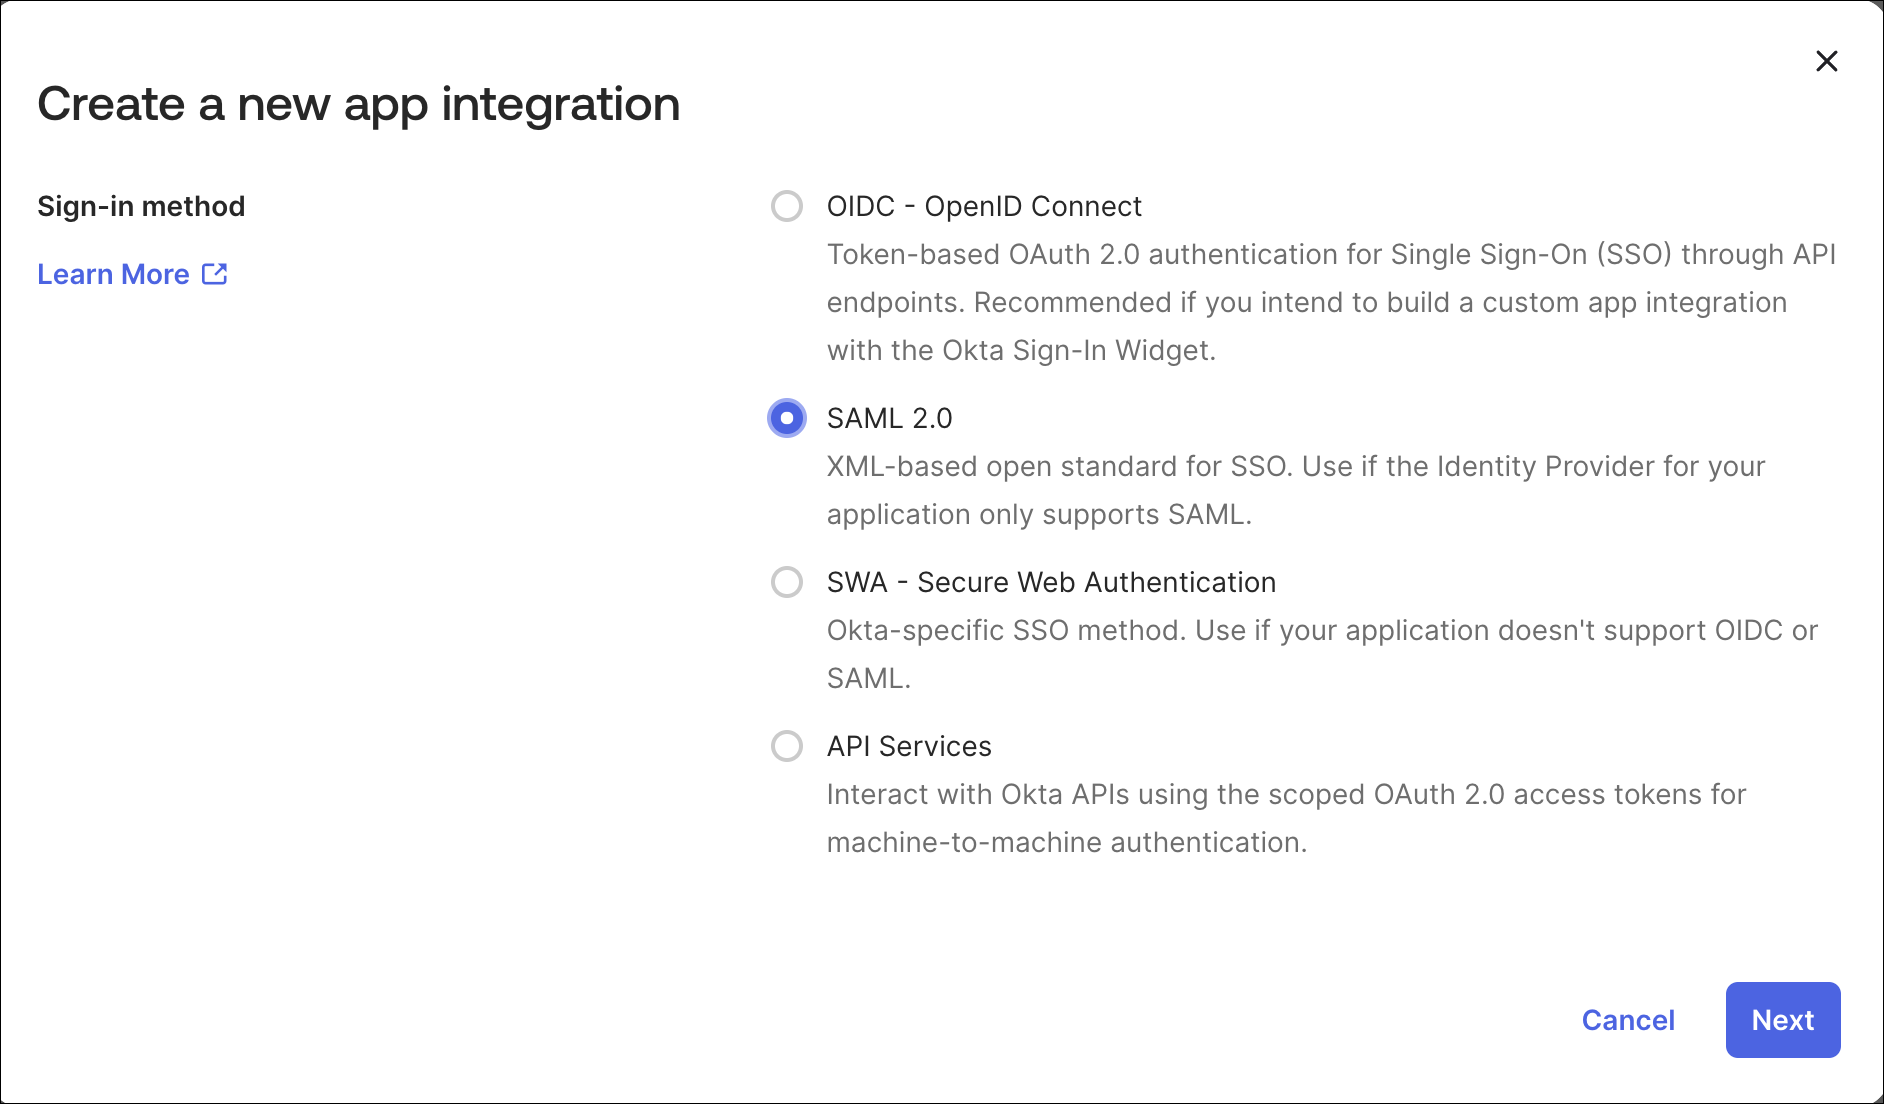
    3. 选择“ SAML 2.0 ”作为“登录方法”,然后单击 “下一步”。

      User interface for app integration creation with sign-in options: OIDC, SAML 2.0 (selected), SWA, and API Services. Cancel and Next buttons, Learn More link.

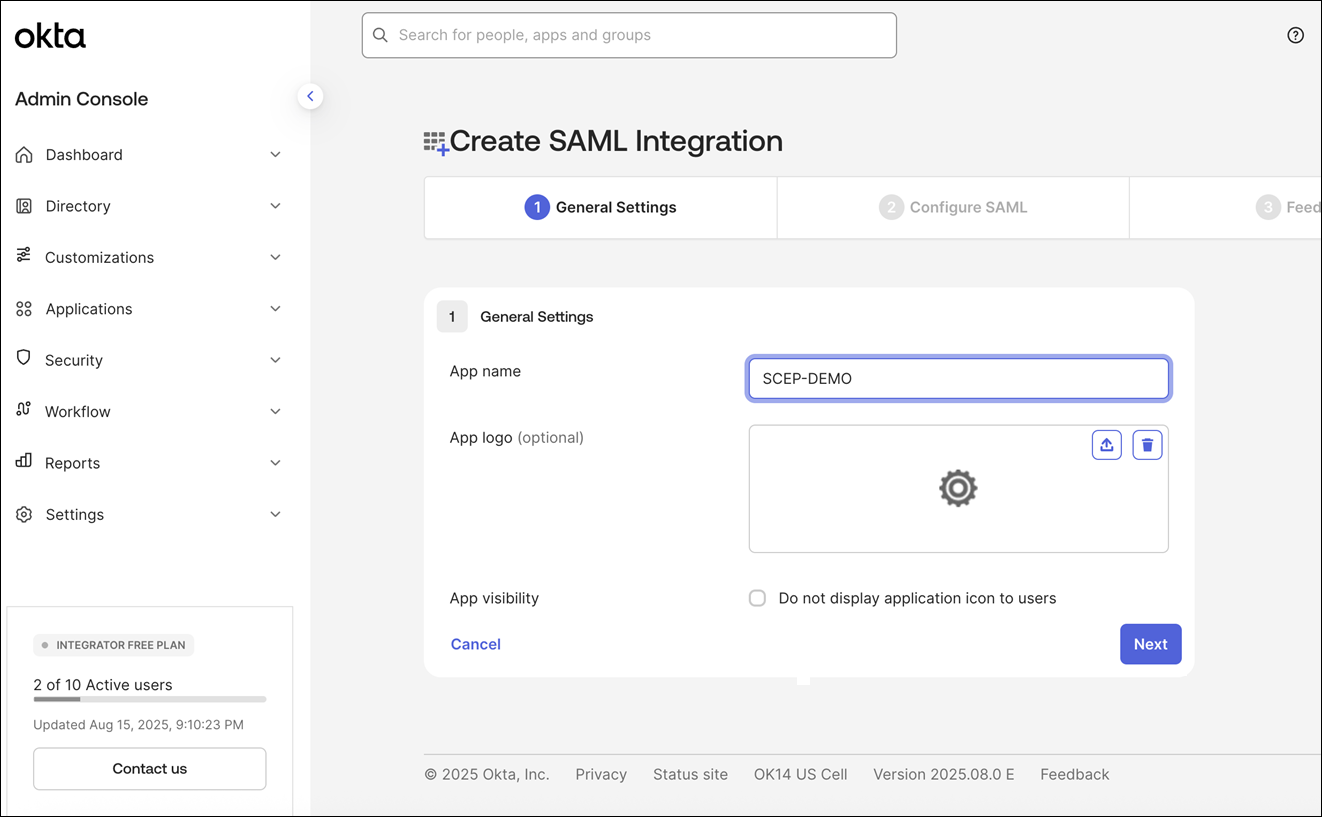
    4. 输入应用名称,然后单击 下一步。

      Okta Admin Console Create SAML Integration page in General Settings step with fields like App Name set to SCEP-DEMO and App Logo.

    5. 将之前复制的门户 SSO URL 粘贴到 SAML 设置下的单 点登录 URL 和 受众 URL 字段。将“名称 ID 格式”设置为“电子邮件地址”,单击“ 下一步”,然后单击 “完成”。
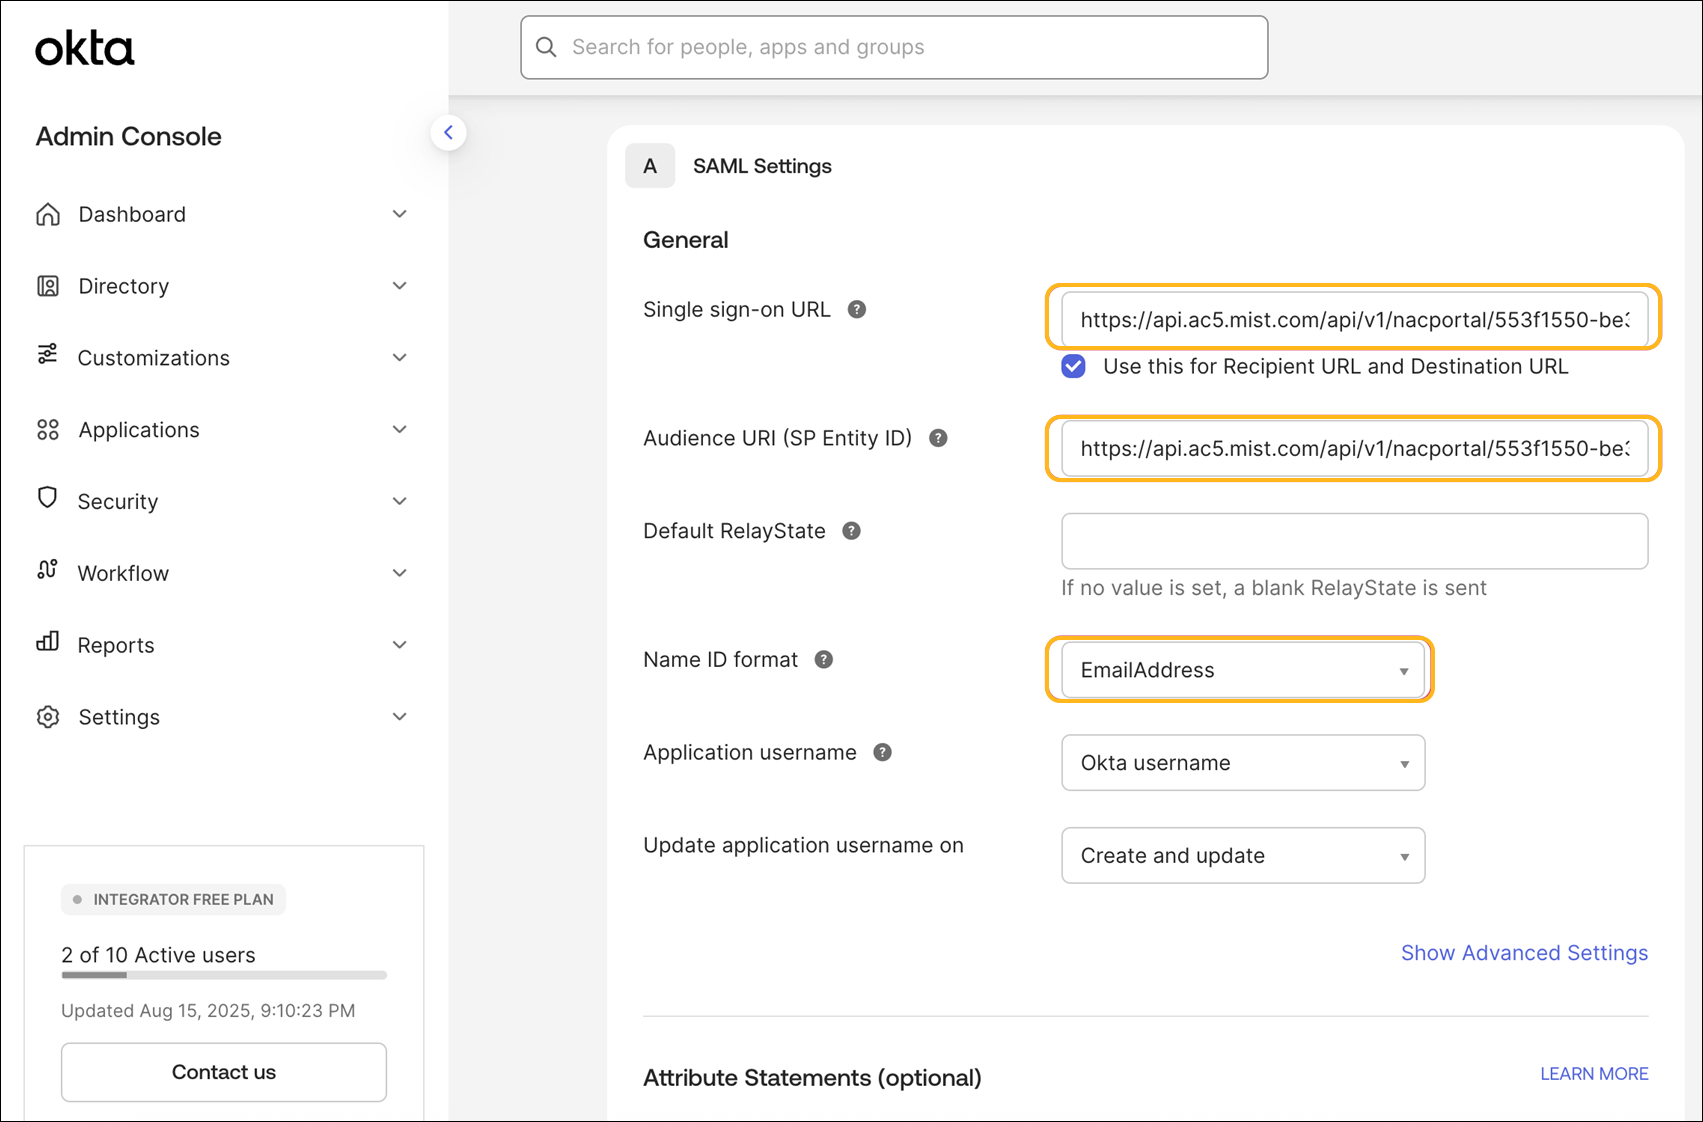
      SAML Settings configuration page in Okta Admin Console showing fields for Single sign-on URL, Audience URI, Default RelayState, Name ID format set to EmailAddress, Application username set to Okta username, and update application username on Create and update. Left-hand menu includes navigation options like Dashboard, Directory, Applications, and Security.

      您将被重定向到编辑模式下的应用程序。

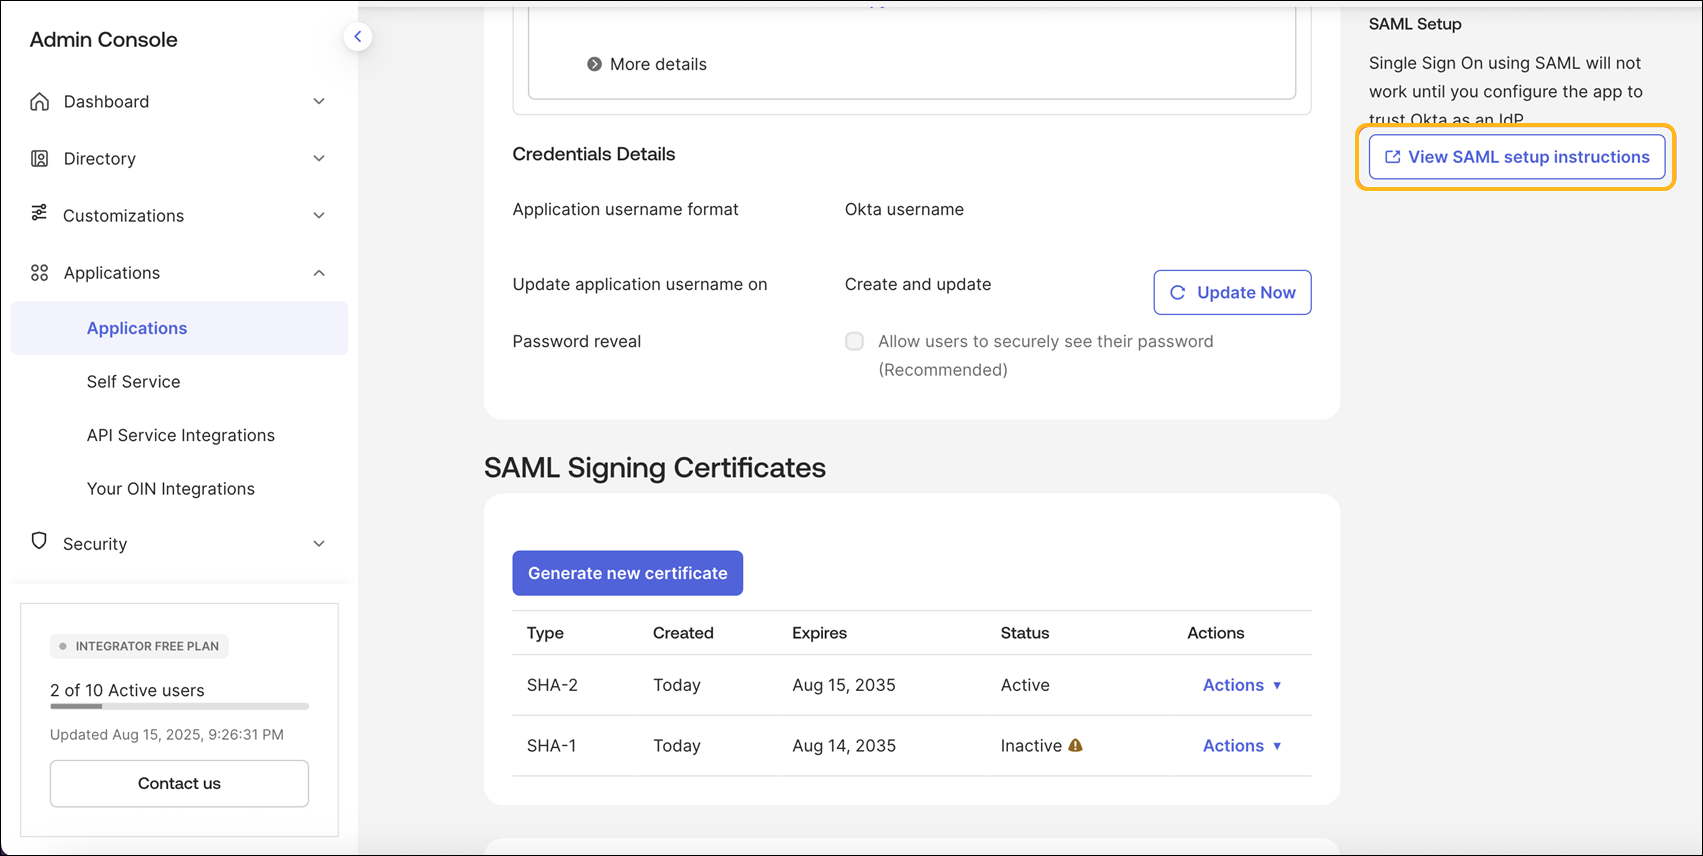
    6. 向下滚动并点击查看 SAML 设置说明。

      Admin Console interface showing Applications section highlighted in the sidebar, SAML setup details, certificate management options, and plan type with user and update info.

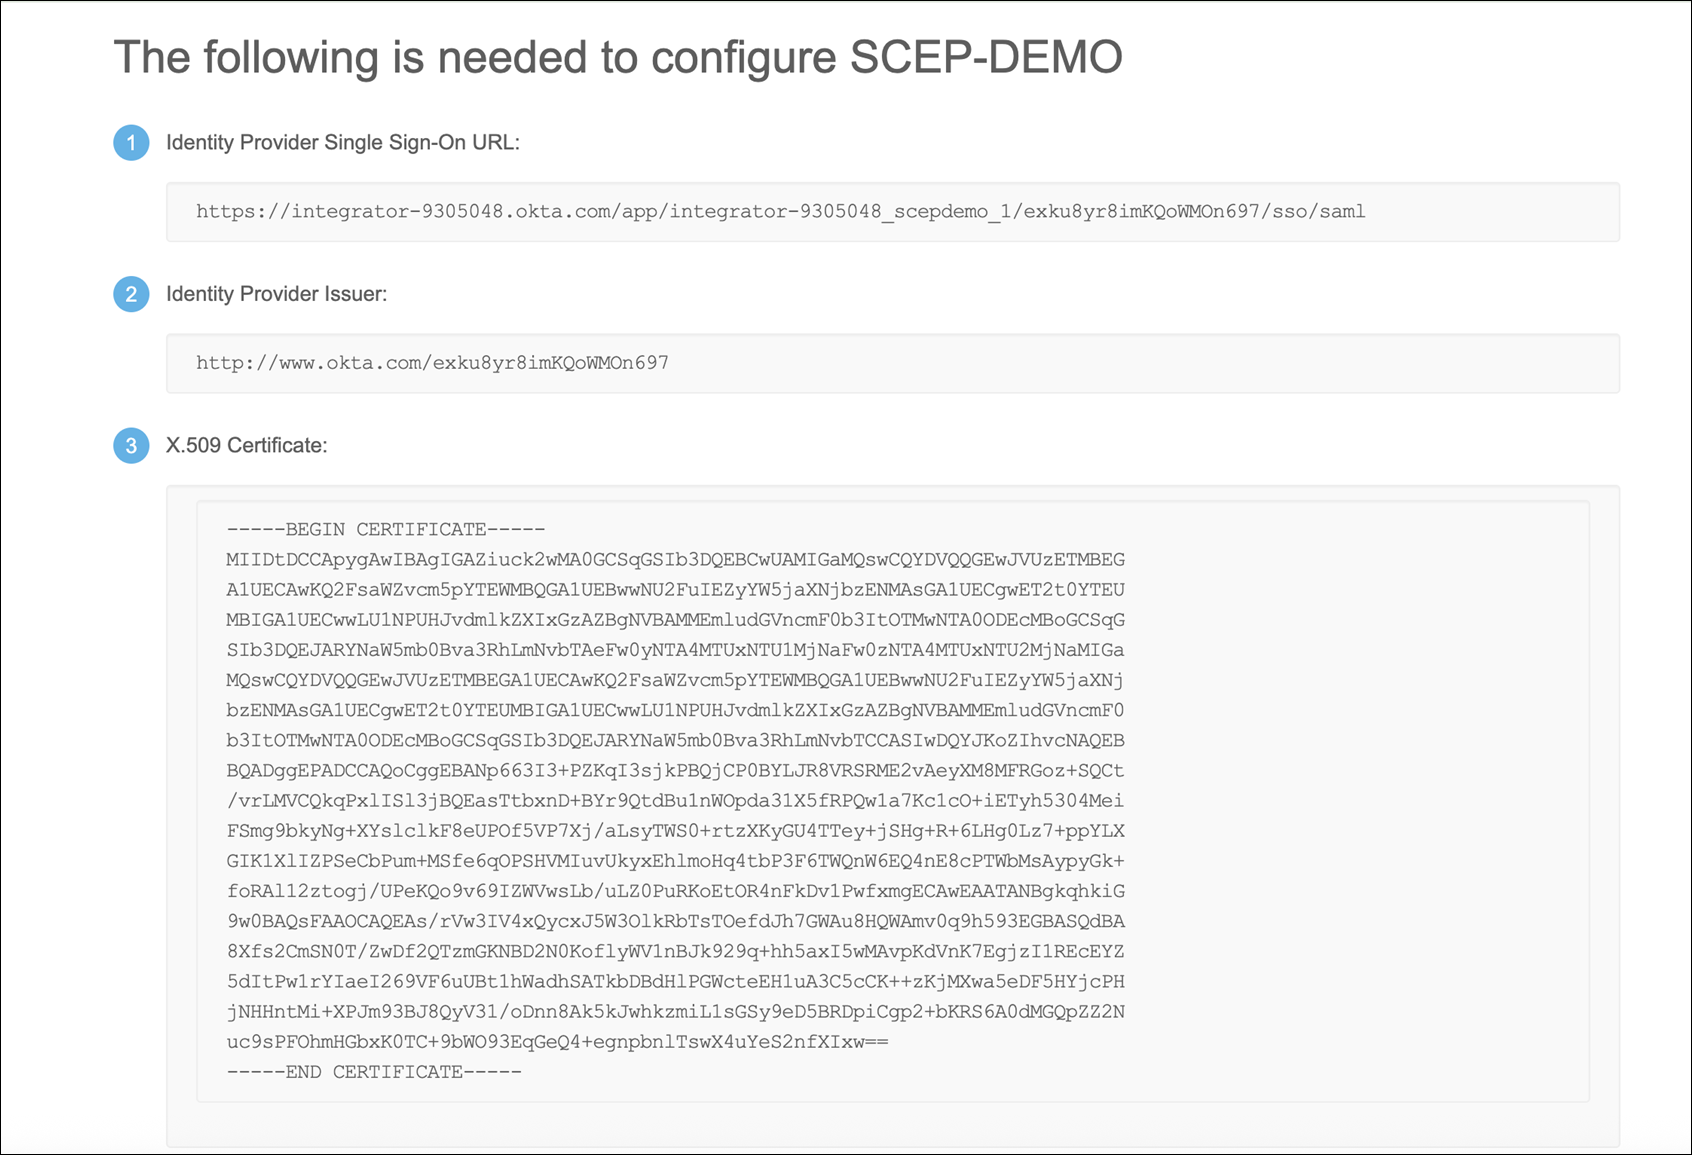
    7. 复制标识提供者单点登录 URL、标识提供者颁发者和 X.509 证书。

      Configuration page for SCEP-DEMO with fields for Single Sign-On URL, Identity Provider Issuer URL, and X.509 Certificate in PEM format.

    8. 切换到瞻博网络 Mist 门户,然后转至“编辑 NAC 载入门户”页面的“ 门户授权设置 ”选项卡。将您在上一步中复制的信息粘贴到以下字段中:

      颁发者 — 身份提供商颁发者

      SSO URL — 身份提供商单点登录 URL

      证书 — X.509 证书
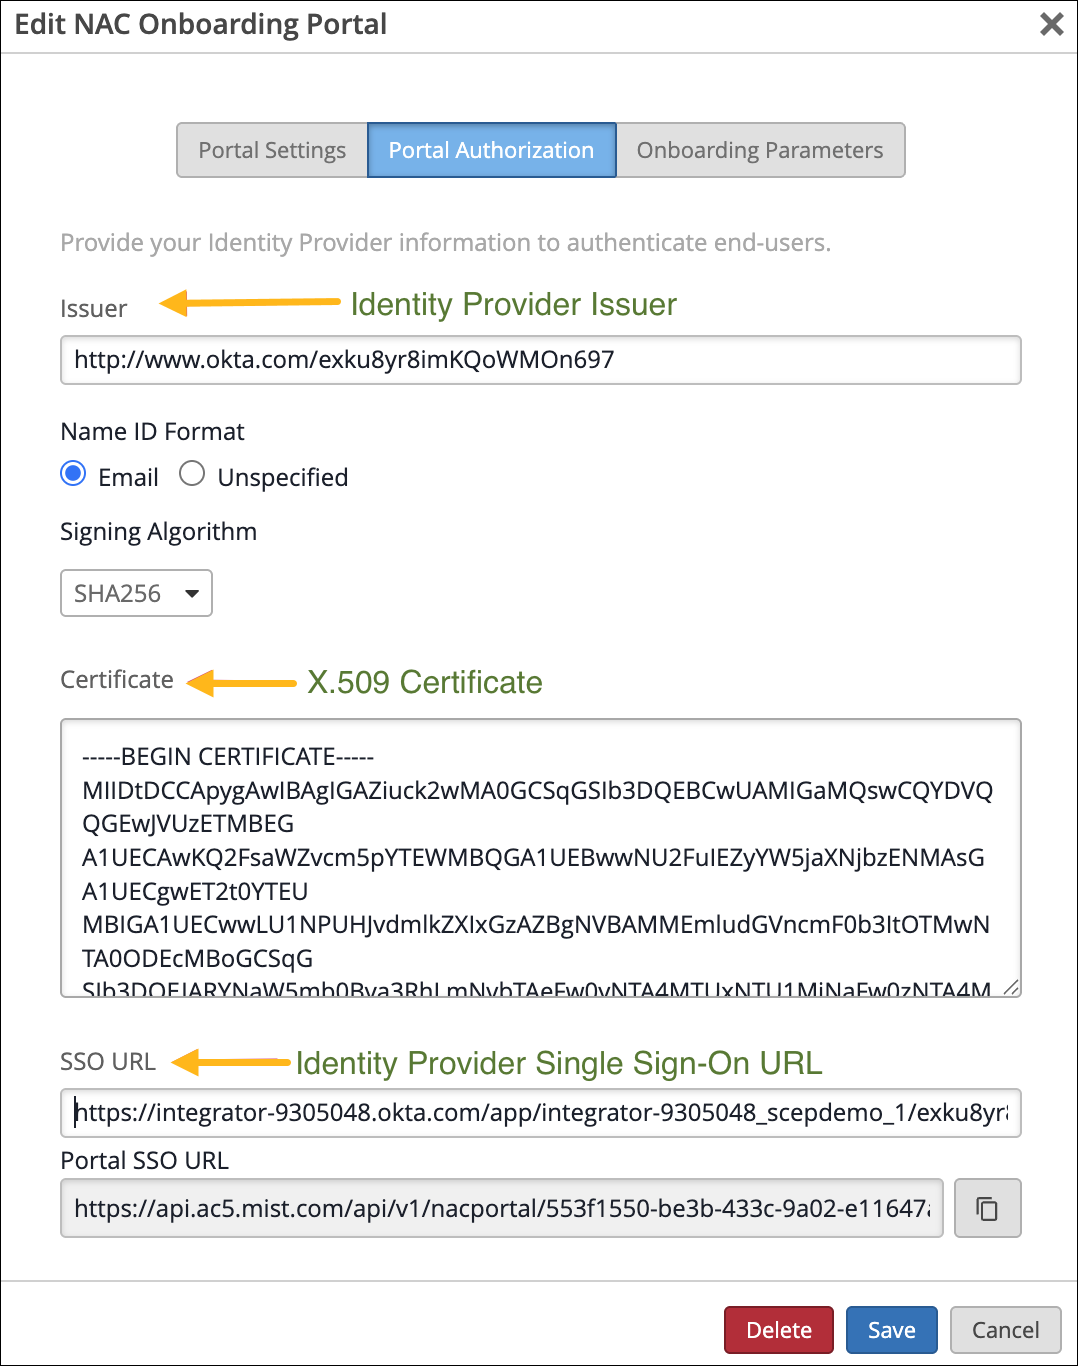
      Editing screen for configuring NAC Onboarding Portal under Portal Authorization tab, with fields for IdP issuer, Name ID format, signing algorithm, X.509 certificate, SSO URL, portal SSO URL, and buttons to delete, save, or cancel.

      点击 保存。

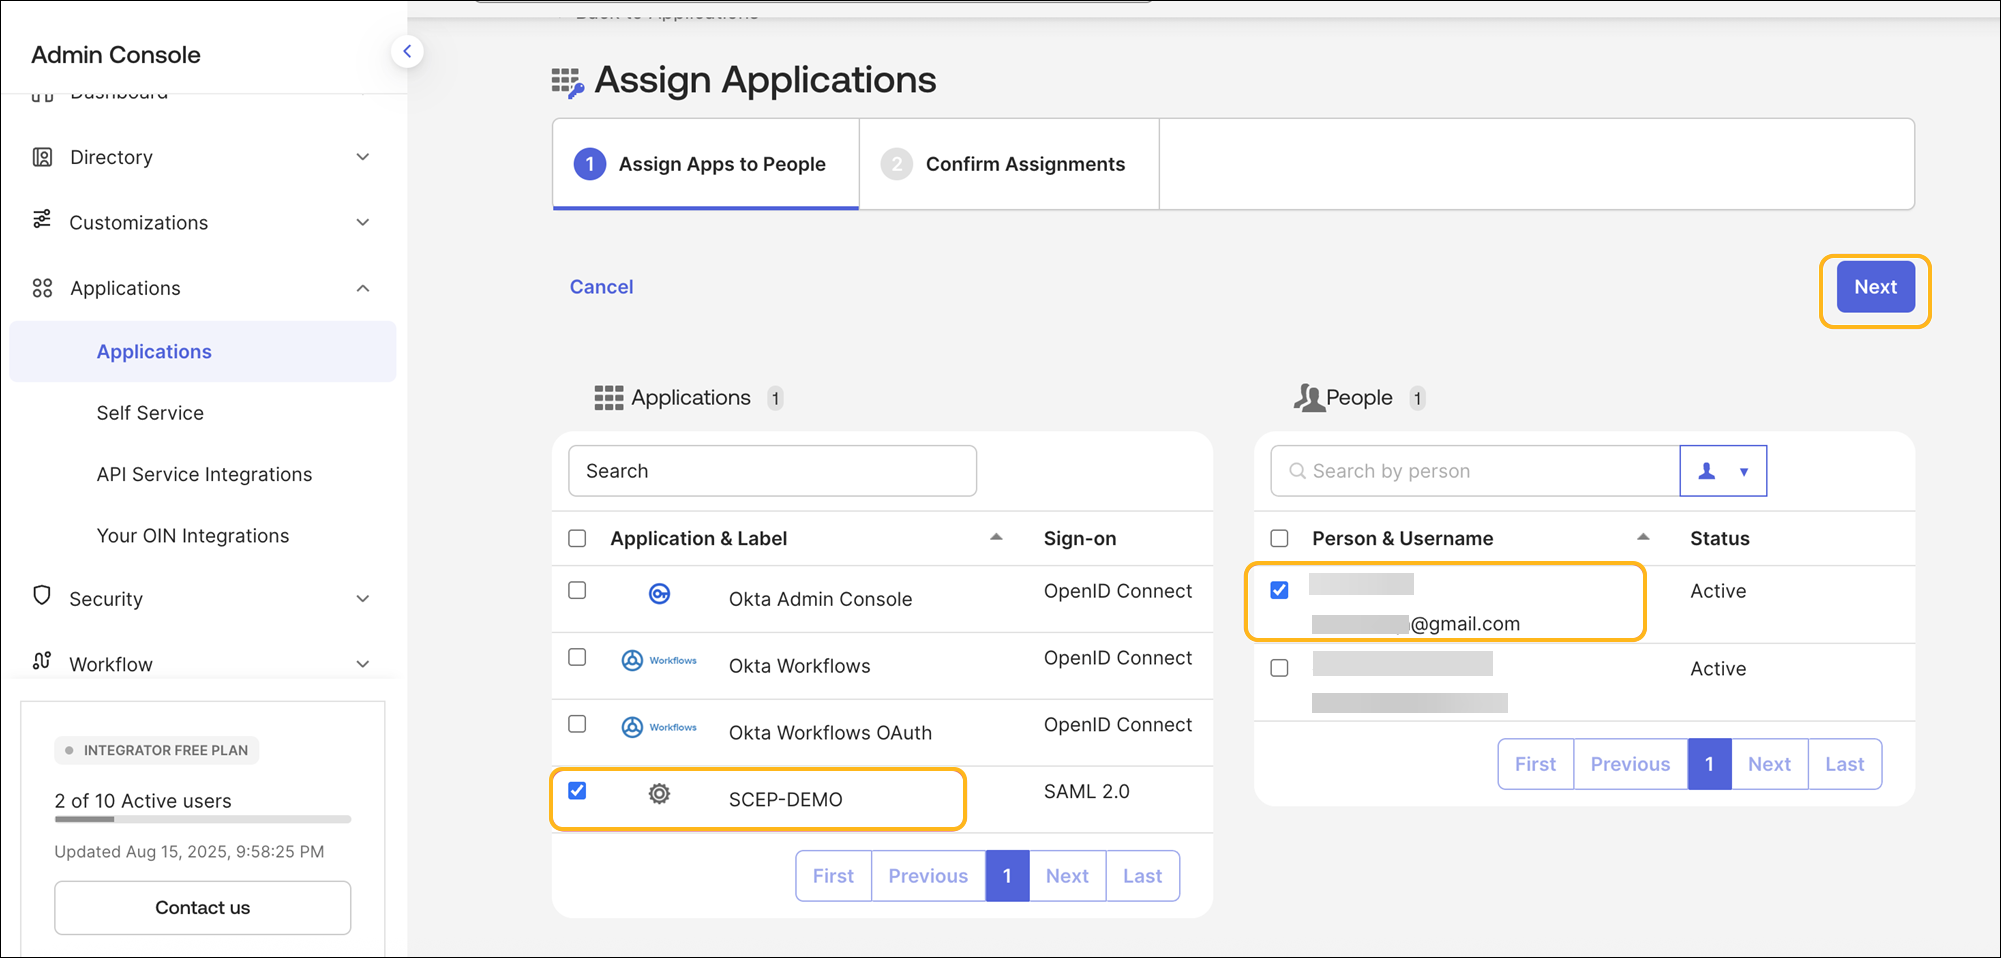
    9. 转到 应用程序>将用户分配给应用程序 并分配用户。

      Okta Admin Console interface showing Assign Applications screen with navigation sidebar and main section displaying apps and users for assignment.

    10. 选择用户和应用程序,然后单击 下一步。

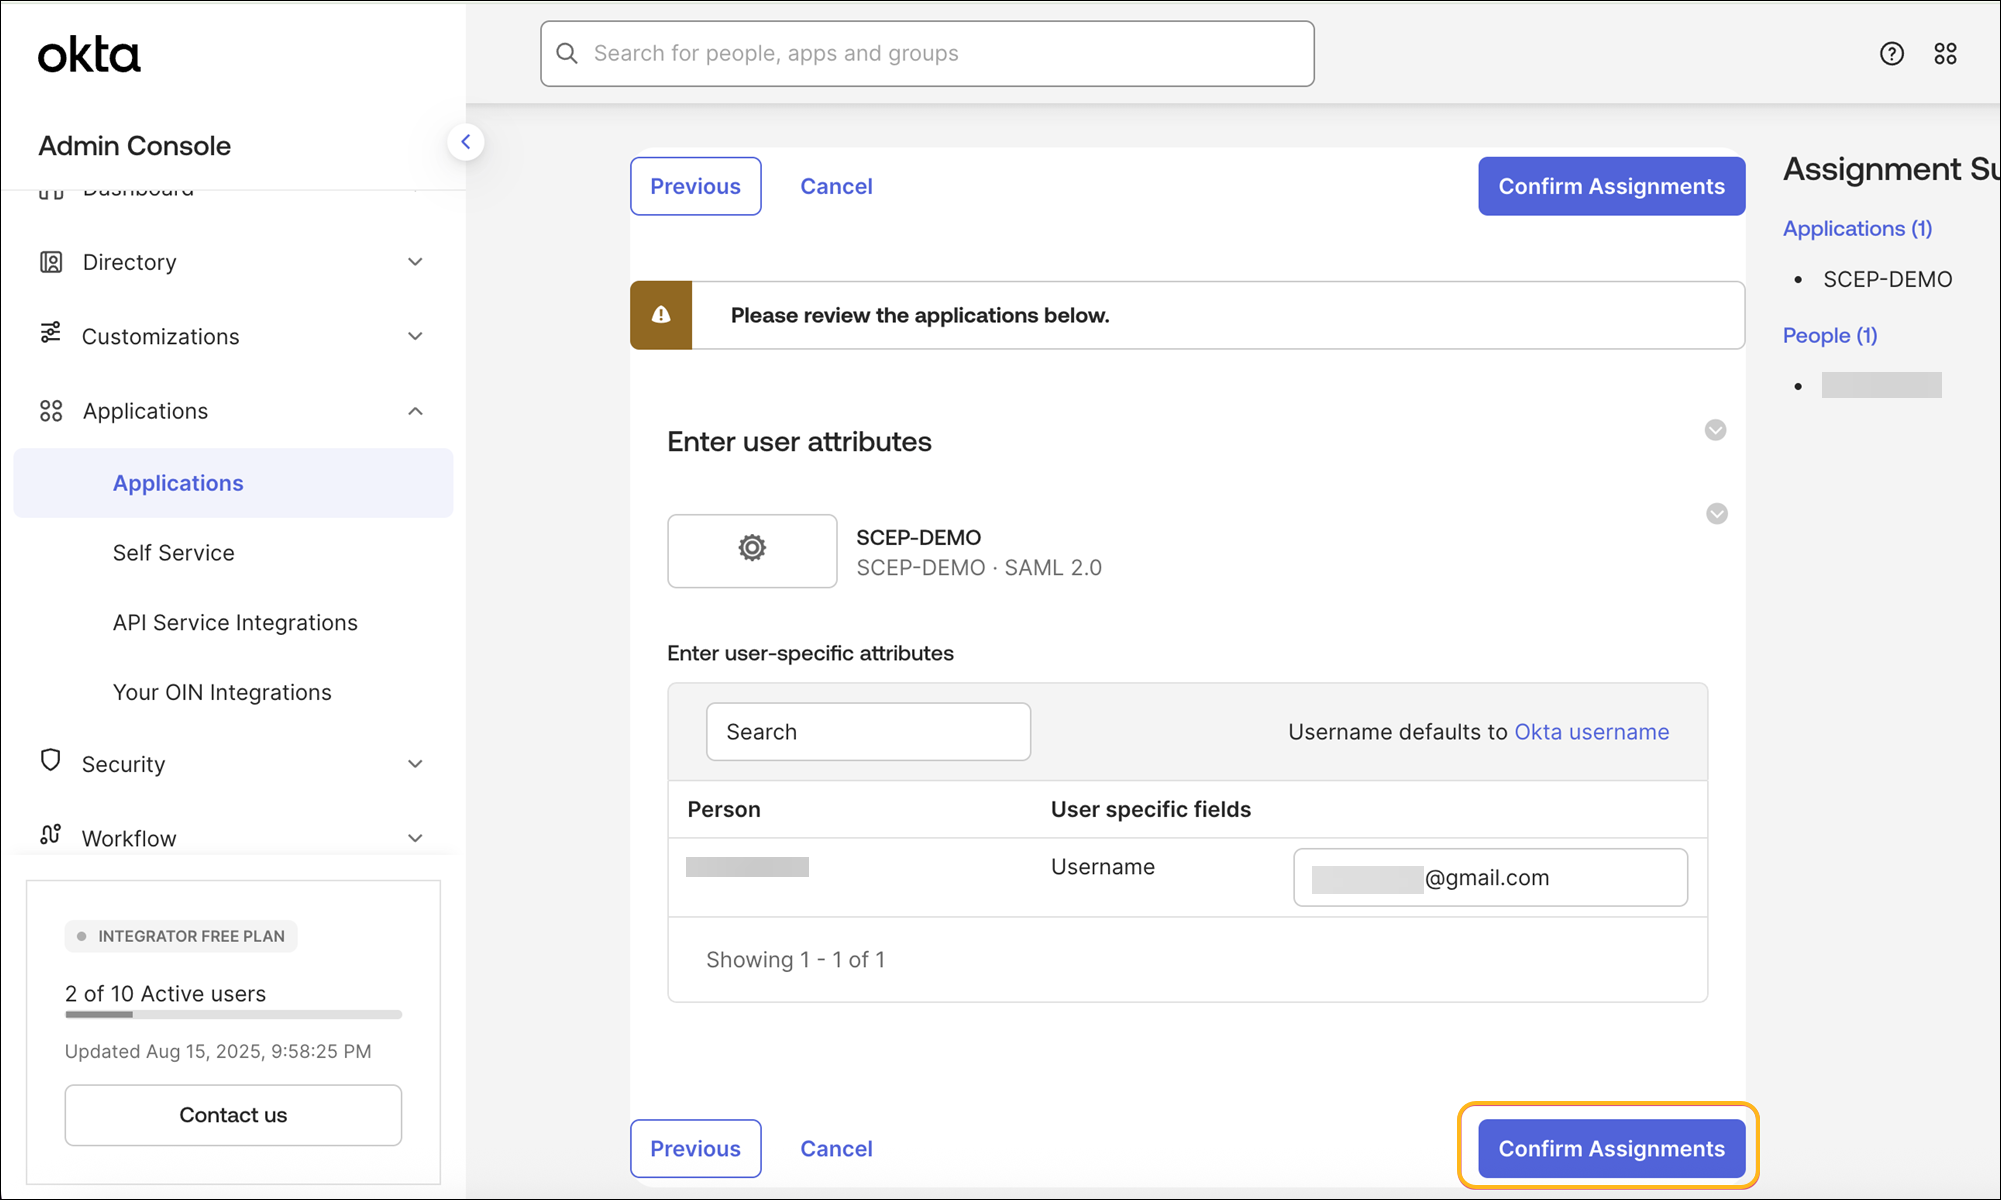
    11. 单击 确认分配。

下载 Marvis 客户端应用和 Wi-Fi 配置文件

配置 NAC 门户并将其与 Okta 集成后,用户可以使用 Okta SSO 登录 NAC 门户,并通过 Marvis 客户端应用安装 Wi-Fi 配置文件。我们在这里以 iOS 设备为例。

  1. 在您的 iOS 设备上,访问“编辑 NAC 载入门户”页面的“ 门户设置 ”选项卡下列出的 NAC 门户 URL,并使用您的 Okta SSO 凭据登录。
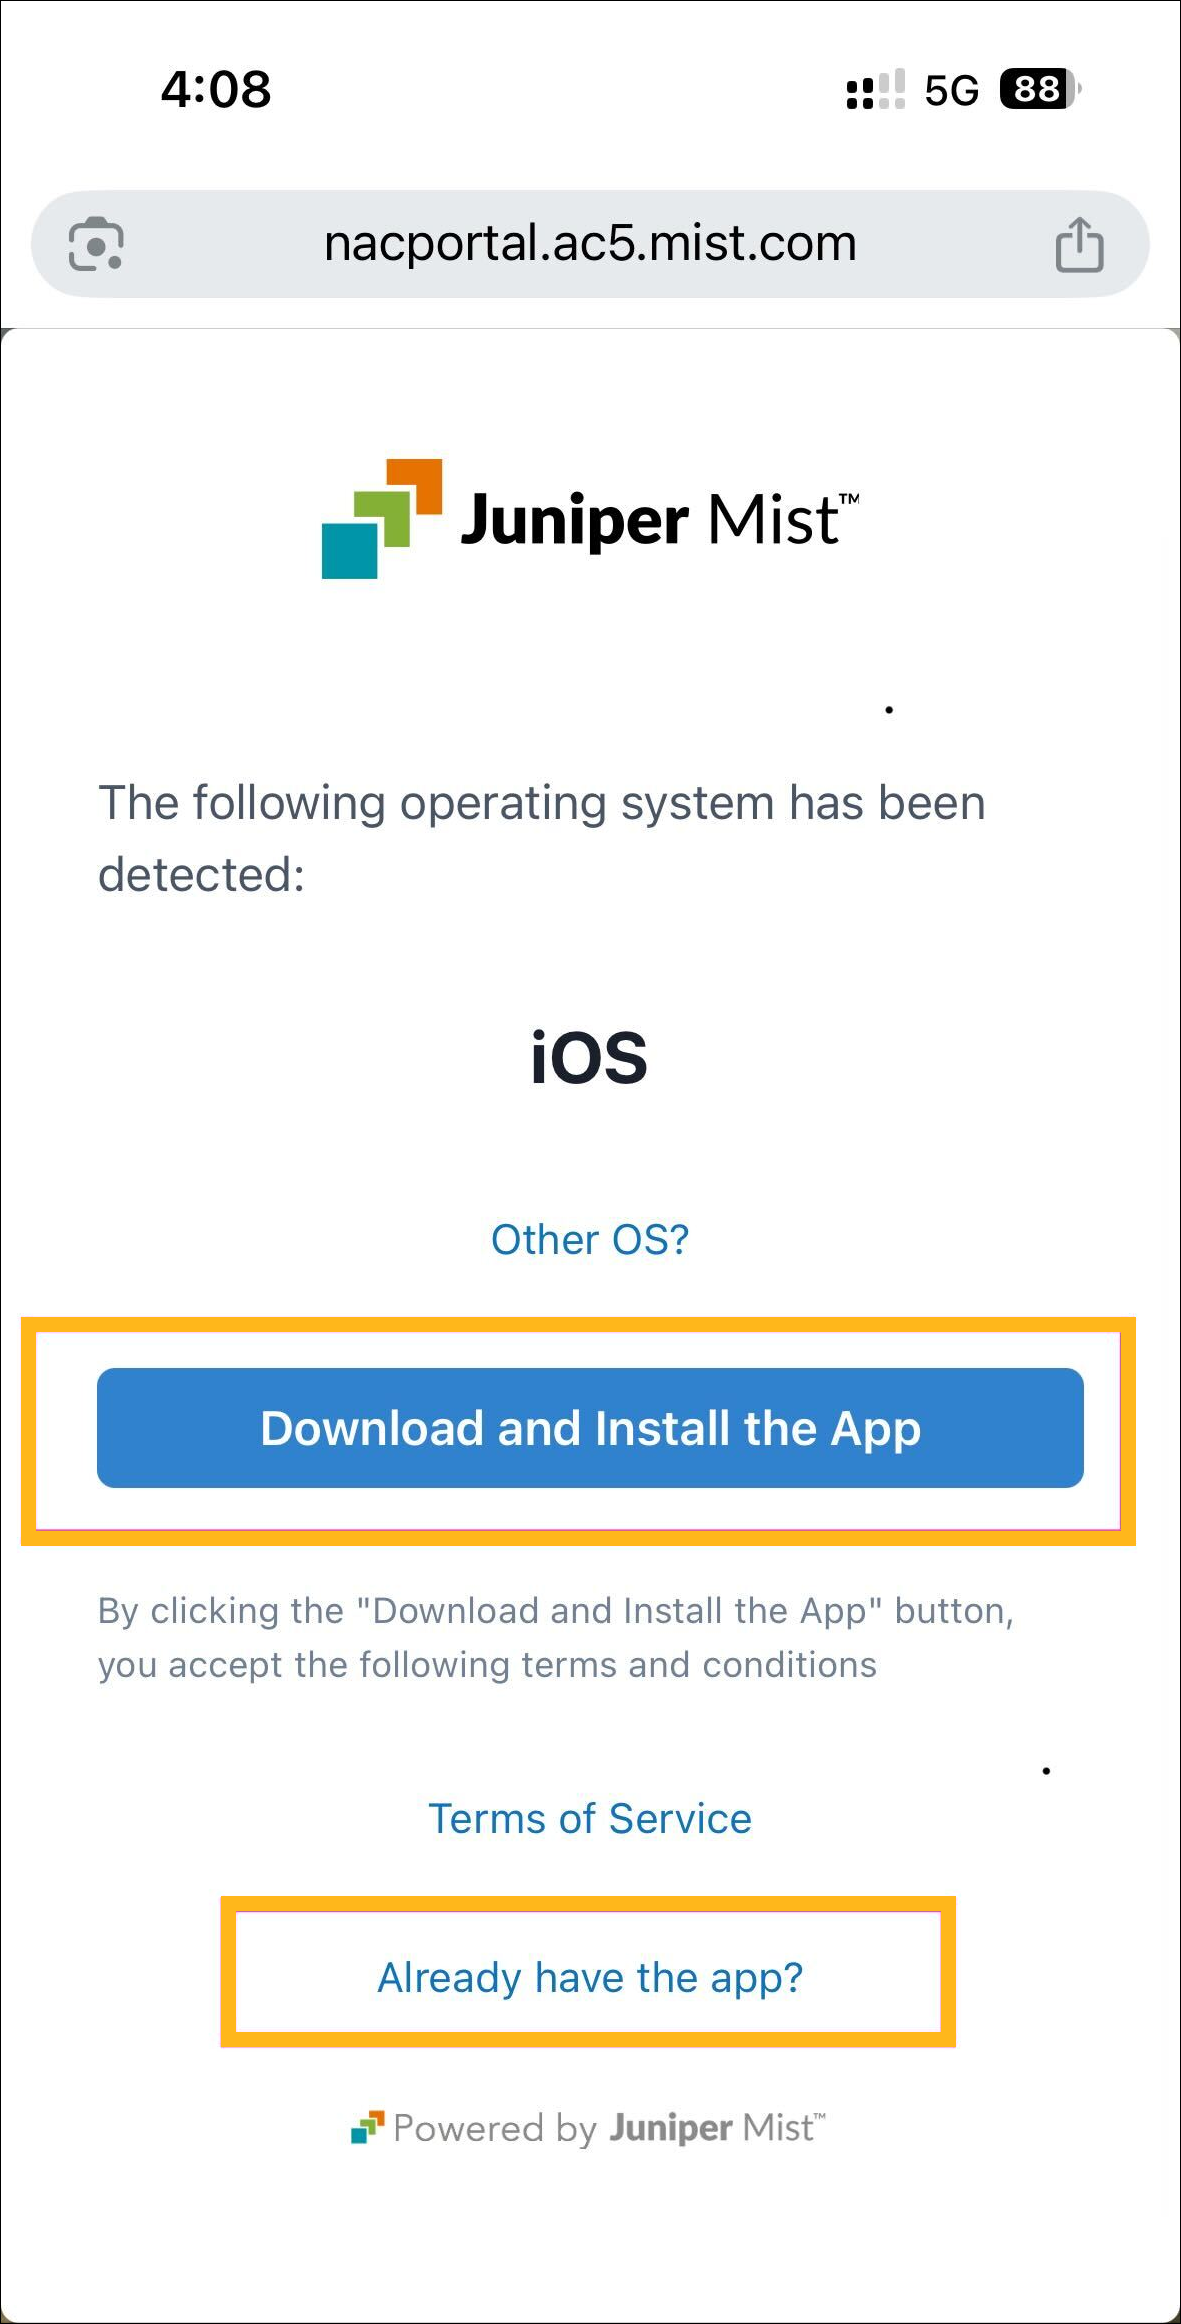
  2. 单击 下载并安装应用程序以 安装 Marvis 客户端应用程序。

    如果您的设备运行的是 Windows 或 macOS,则会自动下载该应用,您可以在下载过程完成后安装该应用。

    对于 Android 和 iOS,您将被重定向到 Google 或 Apple Play 商店以下载该应用程序。

  3. 安装 Marvis 客户端应用后(或者如果您已经安装了该应用),请切换到 NAC 门户页面,然后单击 已经安装该应用? 以安装配置文件。

    系统会将您重定向至 Marvis 客户端应用以安装 Wi-Fi 配置文件。

  4. 单击 安装。

  5. 在瞻博网络 Mist 门户上,打开证书页面,并在内部部分下验证客户端颁发的证书详细信息。
验证客户端与网络的连接

验证设备是否通过通过 Marvis 客户端应用配置的客户端证书连接到 Access Assurance 网络。

  1. 从 瞻博网络 Mist 门户的左侧菜单中,选择 组织> 访问>身份验证策略, 然后为设备配置所需的身份验证策略规则。

    Auth Policies page in Juniper Mist dashboard for managing user authentication policies with options to add rules, create labels, and view policy details in a table format including rule number, name, match criteria, access policy, assigned policies, and hit count. Includes navigation sidebar and save or cancel buttons.

  2. 将设备连接到网络并确认身份验证成功。

  3. 导航到 “监控>服务级别>见解 ”页面,然后转到“客户端事件”部分。验证 NAC 客户端身份验证事件。