附录:IP Clos 交换矩阵中的 DHCP 中继示例
下面是一个实验室设计示例,用于使用以下配置在 IP Clos 任播交换矩阵中测试 DHCP 中继:
- 交换矩阵类型 = IP Clos
- 配置的叠加环路池 = 172.16.192.0/19
- WAN 路由器集成 = 与交换矩阵的 eBGP 对等互连
- DHCP 服务器位置 = 交换矩阵外部
- DHCP 服务器可达性 = 通过 WAN 路由器访问所有 VLAN 和 VRF
- 使用的第三方 DHCP 服务器 = 基于 Linux 的 KEA V2.0.2 作为虚拟机
.png)
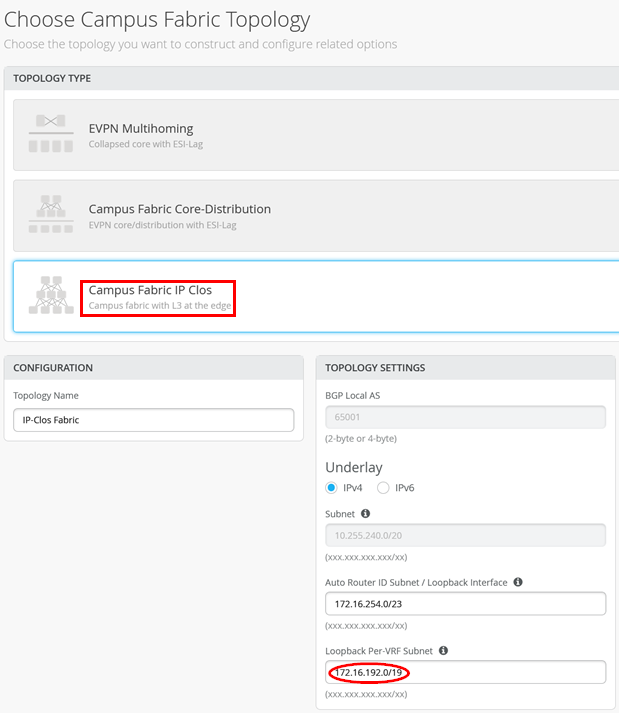
园区交换矩阵对话配置
在园区交换矩阵对话配置中,务必配置以下内容:
- 正确的交换矩阵类型 = IP Clos
- 叠加环回池 = 172.16.192.0/19(正如我们预期的那样,未来会有所增长)
然后,在“网络”交换矩阵对话框中,配置以下内容:
- DHCP 中继 = 已启用
- VLAN1033:
- 网络 = vlan1033
- DHCP 服务器 = 192.168.122.12
- VLAN1088:
- 网络 = vlan1088
- DHCP 服务器 = 192.168.122.12
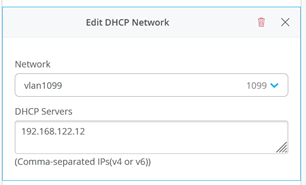
- VLAN1099:
- 网络 = vlan1099
- DHCP 服务器 = 192.168.122.12
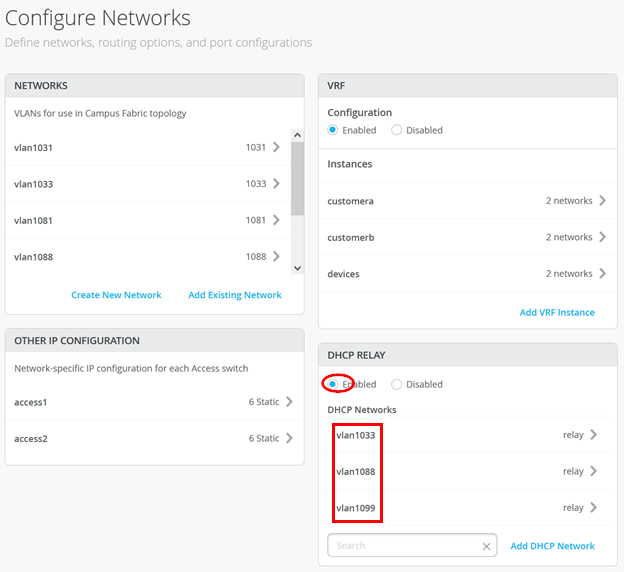
确保始终使用此对话框在所有园区交换矩阵设计中配置 DHCP 中继。
接入交换机配置
我们的 Desktop1 客户端通过以下端口配置连接到 Access1 交换机上的 ge-0/0/3 接口:
.png)
基于此配置,Juniper Mist云会在交换机上进行以下配置:
set groups top routing-instances customera instance-type vrf
set groups top routing-instances customera interface irb.1091
set groups top routing-instances customera interface irb.1099
set groups top routing-instances customera forwarding-options dhcp-relay server-group vlan1099 192.168.122.12
              set groups top routing-instances customera forwarding-options dhcp-relay group vlan1099 interface irb.1099
              set groups top routing-instances customera forwarding-options dhcp-relay group vlan1099 active-server-group vlan1099
              set groups top routing-instances customera forwarding-options dhcp-relay group vlan1099 relay-option-82 circuit-id vlan-id-only
              set groups top routing-instances customera forwarding-options dhcp-relay group vlan1099 relay-option-82 server-id-override
              set groups top routing-instances customera forwarding-options dhcp-relay group vlan1099 route-suppression destination
              set groups top routing-instances customera forwarding-options dhcp-relay group vlan1099 overrides relay-source lo0.1
              set groups top routing-instances customera forwarding-options dhcp-relay forward-only
set groups top routing-instances customera route-distinguisher 172.16.254.8:101
set groups top routing-instances customera vrf-target target:65000:101
set groups top routing-instances customera vrf-table-label
set groups top routing-instances customera routing-options auto-export
set groups top routing-instances customera routing-options multipath
set groups top routing-instances customera protocols evpn ip-prefix-routes advertise direct-nexthop
set groups top routing-instances customera protocols evpn ip-prefix-routes encapsulation vxlan
set groups top routing-instances customera protocols evpn ip-prefix-routes vni 11299807
set groups top routing-instances customera protocols evpn ip-prefix-routes export evpn_export_type5
              set groups top routing-instances customera interface lo0.1
.
set interfaces irb unit 1099 family inet address 10.99.99.1/24
set interfaces irb unit 1099 family inet mtu 9000
set interfaces irb unit 1099 description vlan1099
set interfaces irb unit 1099 no-dhcp-flood
set interfaces irb unit 1099 mac 00:00:5e:e4:31:57
.
set groups top interfaces lo0 unit 1 family inet address 172.16.192.1/32
.
set groups top policy-options policy-statement evpn_export_type5 term 01_ipv4 from protocol evpn
set groups top policy-options policy-statement evpn_export_type5 term 01_ipv4 from route-filter 0.0.0.0/0 prefix-length-range /32-/32
set groups top policy-options policy-statement evpn_export_type5 term 01_ipv4 then accept
set groups top policy-options policy-statement evpn_export_type5 term 02_direct from protocol direct
set groups top policy-options policy-statement evpn_export_type5 term 02_direct then accept
接入交换机上需要验证的重要事项是为每个本地 VRF 分配了哪些叠加环路 IP 地址(第 3 层位于 IP Clos 中的接入交换机上):
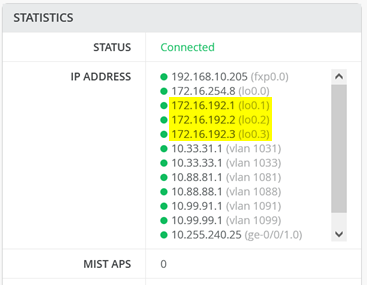
您必须确保将这些本地叠加环路 IP 地址作为主机路由与 WAN 路由器交换。
服务块交换机上的 WAN 路由器集成
现在,检查两个服务块交换机上的 BGP 配置。在这里,请务必检查导出过滤器(在我们的案例中共享):
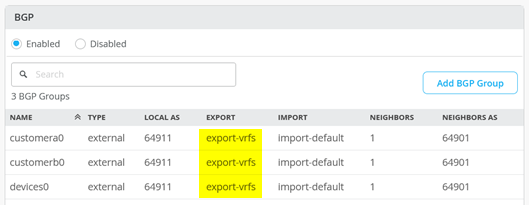
此外,导出叠加环路 IP 地址范围以及交换矩阵的常用 VLAN 也很重要。
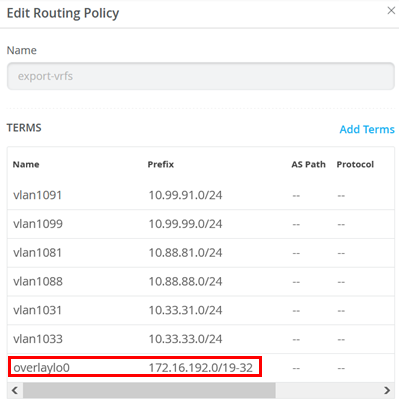
您必须确保将“-32”附加到在园区交换矩阵对话框中定义的 IP 前缀。否则,WAN 路由器无法识别分布在 VRF 中的各个主机路由。
WAN 路由器集成检查
接下来,登录到 WAN 路由器并验证收到的叠加环路 IP 地址。首先,检查建立的 BGP 对等互连:
root@wanrouter> show bgp summary
Threading mode: BGP I/O
Default eBGP mode: advertise - accept, receive - accept
Groups: 3 Peers: 6 Down peers: 0
Peer                     AS      InPkt     OutPkt    OutQ   Flaps Last Up/Dwn State|#Active/Received/Accepted/Damped...
10.255.224.1          64911       5685       5650       0       0 1d 19:02:18 Establ
  public-int.inet.0: 5/6/6/0
10.255.224.3          64911       5680       5649       0       0 1d 19:02:12 Establ
  public-int.inet.0: 5/6/6/0
10.255.224.5          64911       5685       5649       0       0 1d 19:02:16 Establ
  public-int.inet.0: 5/6/6/0
10.255.226.1          64911       5686       5648       0       0 1d 19:02:14 Establ
  public-int.inet.0: 5/6/6/0
10.255.226.3          64911       5683       5649       0       0 1d 19:02:19 Establ
  public-int.inet.0: 5/6/6/0
10.255.226.5          64911       5686       5649       0       0 1d 19:02:22 Establ
  public-int.inet.0: 5/6/6/0
然后,检查路由表中是否有我们在上述本地交换机上验证的三个 IP 地址 (172.16.192.1-3):
root@wanrouter> show route table public-int.inet.0
public-int.inet.0: 35 destinations, 53 routes (35 active, 0 holddown, 0 hidden)
+ = Active Route, - = Last Active, * = Both
0.0.0.0/0          *[Static/5] 1d 18:59:15
                    >  to 192.168.10.1 via ge-0/0/6.0
.
10.99.99.0/24      *[BGP/170] 00:50:33, localpref 100
                      AS path: 64911 65002 65004 65006 65007 I, validation-state: unverified
                       to 10.255.224.1 via ge-0/0/4.1091
                    >  to 10.255.226.1 via ge-0/0/5.1091
                    [BGP/170] 00:50:32, localpref 100
                      AS path: 64911 65001 65004 65006 65007 I, validation-state: unverified
                    >  to 10.255.224.1 via ge-0/0/4.1091
.
172.16.192.1/32    *[BGP/170] 00:50:36, localpref 100
                      AS path: 64911 65002 65004 65005 65008 I, validation-state: unverified
                       to 10.255.224.1 via ge-0/0/4.1091
                    >  to 10.255.226.1 via ge-0/0/5.1091
                    [BGP/170] 00:50:36, localpref 100
                      AS path: 64911 65001 65004 65005 65008 I, validation-state: unverified
                    >  to 10.255.224.1 via ge-0/0/4.1091
172.16.192.2/32    *[BGP/170] 00:50:36, localpref 100
                      AS path: 64911 65002 65004 65005 65008 I, validation-state: unverified
                       to 10.255.224.3 via ge-0/0/4.1081
                    >  to 10.255.226.3 via ge-0/0/5.1081
                    [BGP/170] 00:50:36, localpref 100
                      AS path: 64911 65001 65004 65005 65008 I, validation-state: unverified
                    >  to 10.255.224.3 via ge-0/0/4.1081
172.16.192.3/32    *[BGP/170] 00:50:36, localpref 100
                      AS path: 64911 65002 65004 65005 65008 I, validation-state: unverified
                       to 10.255.224.5 via ge-0/0/4.1031
                    >  to 10.255.226.5 via ge-0/0/5.1031
                    [BGP/170] 00:50:36, localpref 100
                      AS path: 64911 65001 65004 65005 65008 I, validation-state: unverified
                    >  to 10.255.224.5 via ge-0/0/4.1031
.
192.168.10.0/24    *[Direct/0] 1d 18:59:15
                    >  via ge-0/0/6.0
192.168.10.59/32   *[Local/0] 1d 18:59:15
                       Local via ge-0/0/6.0
192.168.122.0/24   *[Direct/0] 1d 18:59:15
                    >  via ge-0/0/3.0
192.168.122.23/32  *[Local/0] 1d 18:59:15
                       Local via ge-0/0/3.0
DHCP 服务器检查
接下来,检查 DHCP 服务器本身:
root@kea1:~# ip a
1: lo: <LOOPBACK,UP,LOWER_UP> mtu 65536 qdisc noqueue state UNKNOWN group default qlen 1000
    link/loopback 00:00:00:00:00:00 brd 00:00:00:00:00:00
    inet 127.0.0.1/8 scope host lo
       valid_lft forever preferred_lft forever
    inet6 ::1/128 scope host
       valid_lft forever preferred_lft forever
2: ens3: <BROADCAST,MULTICAST,UP,LOWER_UP> mtu 1500 qdisc fq_codel state UP group default qlen 1000
    link/ether 52:54:00:18:ee:80 brd ff:ff:ff:ff:ff:ff
    altname enp0s3
    inet 192.168.122.12/24 brd 192.168.122.255 scope global ens3
       valid_lft forever preferred_lft forever
    inet6 fe80::5054:ff:fe18:ee80/64 scope link
       valid_lft forever preferred_lft forever
root@kea1:~# ip r
default via 192.168.122.1 dev ens3 proto static
10.0.0.0/8 via 192.168.122.23 dev ens3 proto static
172.16.192.0/19 via 192.168.122.23 dev ens3 proto static
192.168.122.0/24 dev ens3 proto kernel scope link src 192.168.122.12
root@kea1:~# netstat -tunap | grep 67
udp        0      0 192.168.122.12:67       0.0.0.0:*                           747/kea-dhcp4
root@kea1:~# systemctl status kea-dhcp4-server.service
* kea-dhcp4-server.service - Kea IPv4 DHCP daemon
     Loaded: loaded (/lib/systemd/system/kea-dhcp4-server.service; enabled; ven>
     Active: active (running) since Mon 2024-06-24 15:52:41 UTC; 1 day 19h ago
       Docs: man:kea-dhcp4(8)
   Main PID: 747 (kea-dhcp4)
      Tasks: 5 (limit: 1012)
     Memory: 13.6M
        CPU: 8.078s
     CGroup: /system.slice/kea-dhcp4-server.service
             └─747 /usr/sbin/kea-dhcp4 -c /etc/kea/kea-dhcp4.conf
使用有线客户端进行的最终测试
要完成安装,请使用有线客户端执行最终测试。我们客户端的初始状态是它分配了一个静态 IP 地址,并且可以与 Internet 通信:
root@lab2-desktop1:~# ifconfig ens5
ens5: flags=4163<UP,BROADCAST,RUNNING,MULTICAST>  mtu 1500
        inet 10.99.99.99  netmask 255.255.255.0  broadcast 10.99.99.255
        inet6 fe80::5054:ff:fe0a:fac7  prefixlen 64  scopeid 0x20<link>
        ether 52:54:00:0a:fa:c7  txqueuelen 1000  (Ethernet)
        RX packets 23  bytes 11662 (11.6 KB)
        RX errors 0  dropped 0  overruns 0  frame 0
        TX packets 65  bytes 7564 (7.5 KB)
        TX errors 0  dropped 0 overruns 0  carrier 0  collisions 0
root@lab2-desktop1:~# ping -c3 8.8.8.8
PING 8.8.8.8 (8.8.8.8) 56(84) bytes of data.
64 bytes from 8.8.8.8: icmp_seq=1 ttl=55 time=26.0 ms
64 bytes from 8.8.8.8: icmp_seq=2 ttl=55 time=36.5 ms
64 bytes from 8.8.8.8: icmp_seq=3 ttl=55 time=39.6 ms
--- 8.8.8.8 ping statistics ---
3 packets transmitted, 3 received, 0% packet loss, time 2004ms
rtt min/avg/max/mdev = 26.044/34.028/39.584/5.788 ms
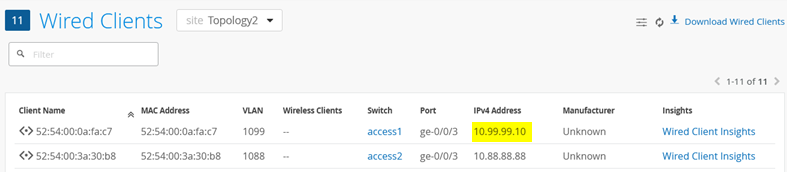
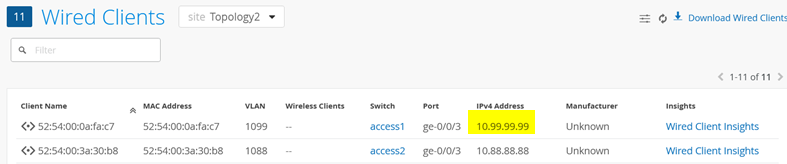
我们可以在 Juniper Mist 门户的有线客户端概述中看到此客户端及其 IP 地址:
接下来,我们取消配置静态 IP 地址,并尝试获取 DHCP 租约。下面的附加配置可确保客户端丢失静态配置以及有关 DHCP 租期的任何先验知识。然后,我们在前台启动 DHCP 客户端,查看更多调试消息:
root@lab2-desktop1:~# ip link set ens5 up
root@lab2-desktop1:~# ip addr del 10.99.99.99 dev ens5
root@lab2-desktop1:~# pkill dhclient
root@lab2-desktop1:~# rm -f /var/lib/dhcp/*.leases
root@lab2-desktop1:~# dhclient -v ens5
Internet Systems Consortium DHCP Client 4.4.1
Copyright 2004-2018 Internet Systems Consortium.
All rights reserved.
For info, please visit https://www.isc.org/software/dhcp/
Listening on LPF/ens5/52:54:00:0a:fa:c7
Sending on   LPF/ens5/52:54:00:0a:fa:c7
Sending on   Socket/fallback
DHCPDISCOVER on ens5 to 255.255.255.255 port 67 interval 3 (xid=0x9778d1e)
DHCPOFFER of 10.99.99.10 from 172.16.192.1
DHCPREQUEST for 10.99.99.10 on ens5 to 255.255.255.255 port 67 (xid=0x1e8d7709)
DHCPACK of 10.99.99.10 from 172.16.192.1 (xid=0x9778d1e)
bound to 10.99.99.10 -- renewal in 747 seconds.
一段时间后(取决于本地 ARP 老化),此更改将在 Wired Client 概述中可见: