示例:在 EX 系列交换机上通过 MPLS CCC 配置 MACsec
此示例说明如何启用 MACsec,以保护通过基本 MPLS CCC 从一个站点的用户传输到另一个站点的用户的敏感流量。
要求
此示例使用以下硬件和软件组件:
-
三台 EX4550 交换机用作 MPLS 网络中的 PE 和提供商交换机
-
一台 EX4550 交换机用作将站点 A 连接到 MPLS 网络的 CE 交换机
-
一台 EX4200 交换机,安装了 SFP+ MACsec 上行链路模块,用作将站点 B 连接至 MPLS 网络的 CE 交换机
-
在 MPLS 网络中的所有 EX4550 交换机(PE1、PE2 或提供商交换机)上运行的 Junos OS 12.2R1 或更高版本
-
在站点 A 的 CE 交换机和站点 B 的 CE 交换机上运行的 Junos OS 13.2X50-D15 版本(受控版本)或更高版本
注意:必须下载受控版本的瞻博网络 Junos作系统 (Junos OS) 软件才能启用 MACsec。默认情况下,Junos OS 软件的国内版本不支持 MACsec 软件。Junos OS 软件的受控版本包括 Junos OS 国内版本中提供的所有特性和功能,同时还支持 MACsec。有关 MACsec 软件要求的更多信息,请参阅了解媒体访问控制安全性 (MACsec)。
-
安装在站点 A 的 CE 交换机和站点 B 的 CE 交换机上的 MACsec 功能许可证
注意:要购买 MACsec 软件许可证,请联系瞻博网络销售代表 (https://www.juniper.net/us/en/contact-us/sales-offices)。瞻博网络销售代表将向您提供功能许可证文件和许可证密钥。您将需要提供交换机的机箱序列号;可以通过运行
show virtual-chassis或show chassis hardware命令来获取序列号。
概述和拓扑
在此示例中,财务敏感的公司数据通常在站点 A 的用户和站点 B 的用户之间发送。该公司希望确保从站点 A 上的用户传输到站点 B 上的用户的所有网络流量都是高度安全的,并且不会受到攻击者的查看或破坏。该公司正在使用 MACsec 提供的行业标准2 层安全,该安全性提供加密以确保攻击者无法查看数据,并提供完整性检查以确保传输的数据不会损坏,以保护通过连接站点的 MPLS 云在 CCC 上传输的所有流量。两个站点均配置了 VLAN,以确保在两个用户之间传输的流量通过受 MACsec 保护的 CCC 遍历站点。
此示例中的 MPLS 网络包括两台提供商边缘 (PE) 交换机(PE1 和 PE2)和一台提供商(传输)交换机。PE1 将站点 A 的客户边缘 (CE) 交换机连接到 MPLS 网络,PE2 将站点 B 的 CE 交换机连接到 MPLS 网络。在连接站点 A 和站点 B 的 CE 交换机的 CCC 上启用 MACsec,以保护通过 CCC 在站点之间传输的流量。一个 VLAN,其中包括将用户连接到 CE 交换机的接口、站点 A 中路交换机上的接口 ge-0/0/0 和站点 B 中 CE 交换机上的接口 ge-0/0/2,以及将 CE 交换机连接到 MPLS 云的接口(站点 A CE 交换机上的 ge-0/0/0 和站点 B CE 交换机上的 xe-0/1/0), 用于将用户之间的所有流量定向到 MACsec 保护的 CCC。
图 1 显示了此示例中使用的拓扑。图中标MACsec CCC注了MACsec安全的CCC流量。
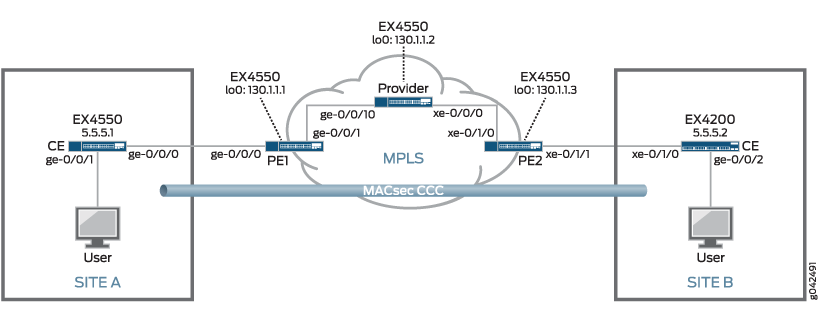
表 1 汇总了此拓扑中的 MPLS 网络组件。
表 2 汇总了此拓扑中使用的 MACsec 连接关联。通过在链路两端的接口上创建连接关联来启用 MACsec。当链路两端的接换预共享密钥(预共享密钥在连接关联中定义)以保护 MACsec 的链路时,将启用 MACsec。
表 3 汇总了此拓扑中使用的 VLAN。此拓扑中使用 VLAN 将从站点 A 上的用户到站点 B 上的用户的所有通信引导到受 MACsec 保护的 CCC。
| 组件 | 说明 |
|---|---|
| PE1型 |
PE 开关。 lo0:
ge-0/0/0:
ge-0/0/1:
|
| 供应商 |
提供商交换机。 lo0:
ge-0/0/10:
xe-0/0/0:
|
| PE2 |
PE 开关。 lo0:
xe-0/1/0
XE-0/1/1
|
| lsp_to_pe2_xe1标签交换路径 |
从 PE1 到 PE2 的标签交换路径。 |
| lsp_to_pe1_ge0标签交换路径 |
从 PE2 到 PE1 的标签交换路径。 |
| 连接关联 | 说明 |
|---|---|
| CCC-MACsec |
在将站点 A 连接到站点 B 的 CCC 上启用 MACsec 的连接关联。 连接关联在以下接口上启用:
|
| VLAN | 说明 |
|---|---|
| MACsec |
VLAN,将站点 A 的用户和站点 B 的用户之间的流量引导到 MACsec 保护的 CCC。 VLAN 包括以下接口:
|
配置 MPLS
本节介绍如何在 MPLS 网络中的每台交换机上配置 MPLS。
它包括以下部分:
在交换机 PE1 上配置 MPLS
CLI 快速配置
要在 PE1 交换机上快速配置 MPLS 配置,请使用以下命令:
[edit]
set protocols ospf traffic-engineering


                  set protocols ospf area 0.0.0.0 interface lo0.0


                  set protocols ospf area 0.0.0.0 interface ge-0/0/1.0


                  set protocols mpls label-switched-path lsp_to_pe2_xe1 to 130.1.1.3


                  set protocols mpls interface ge-0/0/1.0


                  set protocols rsvp interface lo0.0


                  set protocols rsvp interface ge-0/0/1.0


                  set interfaces lo0 unit 0 family inet address 130.1.1.1/32


                  set interfaces ge-0/0/1 unit 0 family inet address 10.1.5.2/24


                  set interfaces ge-0/0/1 unit 0 family mpls


                  set interfaces ge-0/0/0 unit 0 family ccc


                  set protocols connections remote-interface-switch ge-1-to-pe2 interface ge-0/0/0.0


                  set protocols connections remote-interface-switch ge-1-to-pe2 transmit-lsp lsp_to_pe2_xe1


                  set protocols connections remote-interface-switch ge-1-to-pe2 receive-lsp lsp_to_pe1_ge0
分步过程
要在交换机 PE1 上配置 MPLS,请执行以下作:
-
在启用流量工程的情况下配置 OSPF:
[edit protocols] user@switch-PE1# set ospf traffic-engineering -
在环路地址和核心接口上配置 OSPF:
[edit protocols] user@switch-PE1# set ospf area 0.0.0.0 interface lo0.0 user@switch-PE1# set ospf area 0.0.0.0 interface ge-0/0/1.0 -
在此交换机 PE1 上配置 MPLS,并使用 PE2 交换机的 LSP:
[edit protocols] user@switch-PE1# set mpls label-switched-path lsp_to_pe2_xe1 to 130.1.1.3 -
在核心接口上配置 MPLS:
[edit protocols] user@switch-PE1# set mpls interface ge-0/0/1.0 -
在环路接口和核心接口上配置 RSVP:
[edit protocols] user@switch-PE1# set rsvp interface lo0.0 user@switch-PE1# set rsvp interface ge-0/0/1.0 -
配置环路接口和核心接口的 IP 地址:
[edit] user@switch-PE1# set interfaces lo0 unit 0 family inet address 130.1.1.1/32 user@switch-PE1# set interfaces ge-0/0/1 unit 0 family inet address 10.1.5.2/24 -
在核心接口地址的逻辑单元上配置
family mpls:[edit] user@switch-PE1# set interfaces ge-0/0/1 unit 0 family mpls -
将客户边缘接口的逻辑单元配置为 CCC:
[edit interfaces ge-0/0/0 unit 0] user@PE-1# set family ccc -
配置从 PE1 到 PE2 的基于接口的 CCC:
[edit protocols]
user@PE-1# set connections remote-interface-switch ge-1-to-pe2 interface ge-0/0/0.0
user@PE-1# set connections remote-interface-switch ge-1-to-pe2 transmit-lsp lsp_to_pe2_xe1
user@PE-1# set connections remote-interface-switch ge-1-to-pe2 receive-lsp lsp_to_pe1_ge0
结果
显示配置结果:
user@PE-1> show configuration
interfaces {
    ge-0/0/0 {
        unit 0 {
            family ccc;
        }
    }
    ge-0/0/1{
        unit 0 {
            family inet {
                address 130.1.5.2/24;
            }
            family mpls;
        }
    }
    lo0 {
        unit 0 {
            family inet {
                address 130.1.1.1/32;
            }
        }
    }
}
protocols {
    rsvp {
        interface lo0.0;
        interface ge-0/0/1.0;
    }
    mpls {
        label-switched-path lsp_to_pe2_xe1 {
            to 130.1.1.3;
        }
        interface ge-0/0/1.0;
    }
    ospf {
        traffic-engineering;
        area 0.0.0.0 {
            interface lo0.0;
            interface ge-0/0/1.0;
        }
    }
    connections {
        remote-interface-switch ge-1-to-pe2 {
            interface ge-0/0/0.0;
            transmit-lsp lsp_to_pe2_xe1;
            receive-lsp lsp_to_pe1_ge0;
        }
    }
}
在提供商交换机上配置 MPLS
CLI 快速配置
要在提供商交换机上快速配置 MPLS 配置,请使用以下命令:
[edit]
set protocols ospf traffic-engineering


                  set protocols ospf area 0.0.0.0 interface lo0.0


                  set protocols ospf area 0.0.0.0 interface ge-0/0/10.0


                  set protocols ospf area 0.0.0.0 interface xe-0/0/0.0


                  set protocols mpls interface ge-0/0/10.0


                  set protocols mpls interface xe-0/0/0.0


                  set protocols mpls label-switched-path lsp_to_pe2_xe1 to 130.1.1.3


                  set protocols rsvp interface lo0.0


                  set protocols rsvp interface ge-0/0/10.0


                  set protocols rsvp interface xe-0/0/0.0


                  set interfaces lo0 unit 0 family inet address 130.1.1.2/32


                  set interfaces ge-0/0/10 unit 0 family inet address 10.1.5.1/24


                  set interfaces ge-0/0/10 unit 0 family mpls


                  set interfaces xe-0/0/0 unit 0 family inet address 10.1.9.1/24


                  set interfaces xe-0/0/0 unit 0 family mpls
分步过程
要配置提供商交换机,请执行以下作:
-
在启用流量工程的情况下配置 OSPF:
[edit protocols] user@switch-P# set ospf traffic-engineering -
在环路接口和核心接口上配置 OSPF:
[edit protocols] user@switch-P# set ospf area 0.0.0.0 interface lo0.0 user@switch-P# set ospf area 0.0.0.0 interface ge-0/0/10.0 user@switch-P# set ospf area 0.0.0.0 interface xe-0/0/0.0 -
在交换机上的核心接口上配置 MPLS:
[edit protocols] user@switch-P# set mpls interface ge-0/0/10.0 user@switch-P# set mpls interface xe-0/0/0.0 -
在环路接口和核心接口上配置 RSVP:
[edit protocols] user@switch-P# set rsvp interface lo0.0 user@switch-P# set rsvp interface ge-0/0/10.0 user@switch-P# set rsvp interface xe-0/0/0.0 -
配置环路接口和核心接口的 IP 地址:
[edit] user@switch-P# set interfaces lo0 unit 0 family inet address 130.1.1.2/32 user@switch-P# set interfaces ge-0/0/10 unit 0 family inet address 10.1.5.1/24 user@switch-P# set interfaces xe-0/0/0 unit 0 family inet address 10.1.9.1/24 -
在核心接口地址的逻辑单元上配置
family mpls:[edit] user@switch-P# set interfaces ge-0/0/10 unit 0 family mpls user@switch-P# set interfaces xe-0/0/0 unit 0 family mpls -
配置 PE2 交换机的 LSP:
[edit]
user@switch-P# set protocols mpls label-switched-path lsp_to_pe2_xe1 to 130.1.1.3
结果
显示配置结果:
user@switch-P> show configuration
interfaces {
    ge-0/0/10 {
        unit 0 {
            family inet {
                address 10.1.5.1/24;
            }
            family mpls;
        }
    }
    xe-0/0/0 {
        unit 0 {
            family inet {
                address 10.1.9.1/24;
            }
            family mpls;
        }
    }
    lo0 {
        unit 0 {
            family inet {
                address 130.1.1.2/32;
            }
        }
    }
}
protocols {
    rsvp {
        interface lo0.0;
        interface ge-0/0/10.0;
        interface xe-0/0/0.0;
    }
    mpls {
        label-switched-path lsp_to_pe2_xe1 {
            to 130.1.1.3;
        }
        interface ge-0/0/10.0;
        interface xe-0/0/0.0;
    }
    ospf {
        traffic-engineering;
        area 0.0.0.0 {
            interface lo0.0;
            interface ge-0/0/10.0;
            interface xe-0/0/0.0;
        }
    }
}
在交换机 PE2 上配置 MPLS
CLI 快速配置
要在交换机 PE2 上快速配置 MPLS 配置,请使用以下命令:
[edit]
set protocols ospf traffic-engineering


                  set protocols ospf area 0.0.0.0 interface lo0.0


                  set protocols ospf area 0.0.0.0 interface xe-0/1/0.0


                  set protocols mpls label-switched-path lsp_to_pe1_ge0 to 130.1.1.1


                  set protocols mpls interface xe-0/1/0.0


                  set protocols rsvp interface lo0.0


                  set protocols rsvp interface xe-0/1/0.0


                  set interfaces lo0 unit 0 family inet address 130.1.1.3/32


                  set interfaces xe-0/1/0 unit 0 family inet address 10.1.9.2/24


                  set interfaces xe-0/1/0 unit 0 family mpls


                  set interfaces xe-0/1/1 unit 0 family ccc


                  set protocols connections remote-interface-switch xe-1-to-pe1 interface xe-0/1/1.0


                  set protocols connections remote-interface-switch xe-1-to-pe1 transmit-lsp lsp_to_pe1_ge0


                  set protocols connections remote-interface-switch xe-1-to-pe1 receive-lsp lsp_to_pe2_xe1
分步过程
要配置交换机 PE2,请执行以下作:
-
在启用流量工程的情况下配置 OSPF:
[edit protocols] user@switch-PE2# set ospf traffic-engineering -
在环路接口和核心接口上配置 OSPF:
[edit protocols] user@switch-PE2# set ospf area 0.0.0.0 interface lo0.0 user@switch-PE2# set ospf area 0.0.0.0 interface xe-0/1/0.0 -
使用到另一台 PE 交换机 (PE1) 的标签交换路径 (LSP) 在此交换机 (PE2) 上配置 MPLS:
[edit protocols] user@switch-PE2# set mpls label-switched-path lsp_to_pe1_ge0 to 130.1.1.1 -
在核心接口上配置 MPLS:
[edit protocols] user@switch-PE2# set mpls interface xe-0/1/0.0 -
在环路接口和核心接口上配置 RSVP:
[edit protocols] user@switch-PE2# set rsvp interface lo0.0 user@switch-PE2# set rsvp interface xe-0/1/0.0 -
配置环路接口和核心接口的 IP 地址:
[edit] user@switch-PE2# set interfaces lo0 unit 0 family inet address 130.1.1.3/32 user@switch-PE2# set interfaces xe-0/1/0 unit 0 family inet address 10.1.9.2/24 -
在核心接口的逻辑单元上配置
family mpls:[edit] user@switch-PE2# set interfaces xe-0/1/0 unit 0 family mpls -
将客户边缘接口的逻辑单元配置为 CCC:
[edit interfaces xe-0/1/1 unit 0] user@switch-PE2# set family ccc -
在主边缘交换机之间配置基于接口的 CCC:
[edit protocols]
user@switch-PE2# set connections remote-interface-switch xe-1-to-pe1 interface xe-0/1/1.0
user@switch-PE2# set connections remote-interface-switch xe-1-to-pe1 transmit-lsp lsp_to_pe1_ge0
user@switch-PE2# set connections remote-interface-switch xe-1-to-pe1 receive-lsp lsp_to_pe2_xe1
结果
显示配置结果:
user@switch-PE2> show configuration
interfaces {
    xe-0/1/0 {
        unit 0 {
            family inet {
                address 10.1.9.2/24;
            }
            family mpls;
        }
    }
    xe-0/1/1 {
        unit 0 {
            family ccc;
        }
    }
    lo0 {
        unit 0 {
            family inet {
                address 130.1.1.3/32;
            }
        }
    }
}
protocols {
    rsvp {
        interface lo0.0;
        interface xe-0/1/0.0;
    }
    mpls {
        label-switched-path lsp_to_pe1_ge0 {
            to 130.1.1.1;
        }
        interface xe-0/1/0.0;
    }
    ospf {
        traffic-engineering;
        area 0.0.0.0 {
            interface lo0.0;
            interface xe-0/1/0.0;
        }
    }
    connections {
        remote-interface-switch xe-1-to-pe1 {
            interface xe-0/1/1.0;
            transmit-lsp lsp_to_pe1_ge0;
            receive-lsp lsp_to_pe2_xe1;
        }
    }
}
配置 MACsec
本节介绍如何在拓扑中的每台交换机上配置 MACsec。
它包括以下部分:
在站点 A CE 交换机上配置 MACsec,以保护流向站点 B 的流量
CLI 快速配置
[edit]
set security macsec connectivity-association ccc-macsec security-mode static-cak


                  set security macsec connectivity-association ccc-macsec pre-shared-key ckn 37c9c2c45ddd012aa5bc8ef284aa23ff6729ee2e4acb66e91fe34ba2cd9fe311


                  set security macsec connectivity-association ccc-macsec pre-shared-key cak 228ef255aa23ff6729ee664acb66e91f


                  set security macsec interfaces ge-0/0/0 connectivity-association ccc-macsec
分步过程
在此示例中,经常交换金融敏感数据的用户之间的流量通过 MPLS 云在 CCC 上的站点之间发送。通过在连接到 MPLS PE 交换机的站点 A 和站点 B CE 交换机上的接口上配置 MACsec 连接关联,可以在 CCC 上启用 MACsec。连接关联必须具有匹配的连接关联名称(在本例中为 ccc-macsec)、匹配的 CKN(在本例中为 37c9c2c45ddd012aa5bc8ef284aa23ff6729ee2e4acb66e91fe34ba2cd9fe311)和 CAK(在本例中为 228ef255aa23ff6729ee664acb66e91f),以便建立 MACsec 安全连接。
要在连接站点 A 到站点 B 的 CCC 上启用 MACsec,请在站点 A CE 交换机上执行以下步骤:
-
创建名为 ccc-macsec的连接关联,并将 MACsec 安全模式配置为
static-cak:[edit security macsec] user@switch-CE-A# set connectivity-association ccc-macsec security-mode static-cak -
通过配置 CKN 和 CAK 创建预共享密钥:
[edit security macsec] user@switch-CE-A# set connectivity-association ccc-macsec pre-shared-key ckn 37c9c2c45ddd012aa5bc8ef284aa23ff6729ee2e4acb66e91fe34ba2cd9fe311 user@switch-CE-A# set connectivity-association ccc-macsec pre-shared-key cak 228ef255aa23ff6729ee664acb66e91f -
将连接关联分配给连接到 PE1 交换机的接口:
[edit security macsec]
user@switch-CE-A# set interfaces ge-0/0/0 connectivity-association ccc-macsec
这将完成在 CCC 的一端配置连接关联的步骤。只有在链路的另一端(此情况下为 CCC 的站点 B CE 交换机上的接口)启用与匹配预共享密钥的连接关联后,才会启用 MACsec。以下部分介绍了在站点 B CE 交换机上配置连接关联的过程。
结果
显示配置结果:
user@switch-CE-A> show configuration
security {
    macsec {
        connectivity-association {
            ccc-macsec {
                pre-shared-key {
                    cak "$9$rJ-lWLxNdw24Xxik.PQzreK"; ## SECRET-DATA
                    ckn 37c9c2c45ddd012aa5bc8ef284aa23ff6729ee2e4acb66e91fe34ba2cd9fe311;
                }
                security-mode {
                    static-cak;
                }
            }
        }
        interfaces {
            ge-0/0/0 {
                connectivity-association {
                    ccc-macsec;
                }
            }
        }
    }
}
在站点 B CE 交换机上配置 MACsec,以保护流向站点 A 的流量
CLI 快速配置
[edit]
set security macsec connectivity-association ccc-macsec security-mode static-cak


                  set security macsec connectivity-association ccc-macsec pre-shared-key ckn 37c9c2c45ddd012aa5bc8ef284aa23ff6729ee2e4acb66e91fe34ba2cd9fe311


                  set security macsec connectivity-association ccc-macsec pre-shared-key cak 228ef255aa23ff6729ee664acb66e91f


                  set security macsec interfaces xe-0/1/0 connectivity-association ccc-macsec
分步过程
流量使用 CCC 通过 MPLS 网络从站点 B 传输到站点 A。通过在连接到 MPLS PE 交换机的站点 A 和站点 B CE 交换机上的接口上配置 MACsec 连接关联,可以在 CCC 上启用 MACsec。连接关联必须具有匹配的连接关联名称(在本例中为 ccc-macsec)、匹配的 CKN (37c9c2c45ddd012aa5bc8ef284aa23ff6729ee2e4acb66e91fe34ba2cd9fe311) 和匹配的 CAK (228ef255aa23ff6729ee664acb66e91f),才能建立 MACsec 安全连接。
要在连接站点 B 到站点 A 的 CCC 上启用 MACsec,请在站点 B CE 交换机上执行以下步骤:
-
创建名为 ccc-macsec的连接关联,并将 MACsec 安全模式配置为
static-cak:[edit security macsec] user@switch-CE-B# set connectivity-association ccc-macsec security-mode static-cak -
通过配置 CKN 和 CAK 创建预共享密钥:
[edit security macsec] user@switch-CE-B# set connectivity-association ccc-macsec pre-shared-key ckn 37c9c2c45ddd012aa5bc8ef284aa23ff6729ee2e4acb66e91fe34ba2cd9fe311 user@switch-CE-B# set connectivity-association ccc-macsec pre-shared-key cak 228ef255aa23ff6729ee664acb66e91f -
将连接关联分配给连接到交换机 PE2 的接口:
[edit security macsec]
user@switch-CE-B# set interfaces xe-0/1/0 connectivity-association ccc-macsec
交换预共享密钥后(此过程完成后不久),将为 CCC 启用 MACsec。
结果
显示配置结果:
user@switch-CE-B> show configuration
security {
    macsec {
        connectivity-association {
            ccc-macsec {
                security-mode {
                    static-cak;
                }
                pre-shared-key {
                    cak "$9$rJ-lWLxNdw24Xxik.PQzreK"; ## SECRET-DATA
                    ckn 37c9c2c45ddd012aa5bc8ef284aa23ff6729ee2e4acb66e91fe34ba2cd9fe311;
                }
            }
        }
        interfaces {
            xe-0/1/0 {
                connectivity-association {
                    ccc-macsec;
                }
            }
        }
    }
}
配置 VLAN 以将流量定向到 MACsec 安全 CCC 上
本节介绍如何在站点 A 和站点 B CE 交换机上配置 VLAN。VLAN 的作用是将要受 MACsec 保护的流量引导至受 MACsec 保护的 CCC。
配置 VLAN 以将流量定向到站点上的 MACsec CCC CE 交换机
CLI 快速配置
[edit]
set interfaces ge-0/0/0 unit 0 family ethernet-switching vlan members macsec


                  set interfaces ge-0/0/2 unit 0 family ethernet-switching vlan members macsec


                  set interfaces vlan unit 50 family inet address 5.5.5.1/24


                  set vlans macsec vlan-id 50


                  set vlans macsec l3-interface vlan.50
分步过程
要创建来自站点 A 上的用户的流量引导到 MACsec 安全 CCC 的 VLAN(VLAN ID 50):
-
将 ge-0/0/0 接口配置到 macsec VLAN 中:
[edit interfaces ge-0/0/0 unit 0] user@switch-CE-A# set family ethernet-switching vlan members macsec -
将 ge-0/0/2 接口配置到 macsec VLAN 中:
[edit interfaces ge-0/0/2 unit 0] user@switch-CE-A# set family ethernet-switching vlan members macsec -
创建 macsec VLAN 广播域的 IP 地址:
[edit interfaces] user@switch-CE-A# set vlan unit 50 family inet address 5.5.5.1/24 -
将 MACsec VLAN 的 VLAN 标记 ID 配置为 50:
[edit vlans] user@switch-CE-A# set macsec vlan-id 50 -
将第 3 层接口与 MACsec VLAN 进行关联:
[edit vlans]
user@switch-CE-A# set macsec l3-interface vlan.50
结果
显示配置结果:
user@switch-CE-A> show configuration
interfaces {
    ge-0/0/0 {
        unit 0 {
            family ethernet-switching {
                vlan members macsec;
            }
        }
    }
    ge-0/0/2 {
        unit 0 {
            family ethernet-switching {
                vlan members macsec;
            }
        }
    }
    vlan {
        unit 50 {
            family inet address 5.5.5.1/24;
        }
    }
}
vlans {
    macsec {
        l3-interface vlan.50;
        vlan-id 50;
    }
}
配置 VLAN 以将流量定向到站点 B CE 交换机上的 MACsec CCC
CLI 快速配置
[edit]
set interfaces ge-0/0/2 unit 0 family ethernet-switching vlan members macsec


                  set interfaces xe-0/1/0 unit 0 family ethernet-switching vlan members macsec


                  set interfaces vlan unit 50 family inet address 5.5.5.2/24


                  set vlans macsec vlan-id 50


                  set vlans macsec l3-interface vlan.50
分步过程
要创建 VLAN(VLAN ID 50),以便将站点 B 上的用户的流量引导到 MACsec 保护的 CCC,请执行以下作:
-
将 ge-0/0/2 接口配置到 macsec VLAN 中:
[edit interfaces ge-0/0/2 unit 0] user@switch-CE-B# set family ethernet-switching vlan members macsec -
将 xe-0/1/0 接口配置到 macsec VLAN 中:
[edit interfaces xe-0/1/0 unit 0] user@switch-CE-B# set family ethernet-switching vlan members macsec -
创建 macsec VLAN 广播域的 IP 地址:
[edit interfaces] user@switch-CE-B# set vlan unit 50 family inet address 5.5.5.2/24 -
将 MACsec VLAN 的 VLAN 标记 ID 配置为 50:
[edit vlans] user@switch-CE-B# set macsec vlan-id 50 -
将第 3 层接口与 MACsec VLAN 进行关联:
[edit vlans]
user@switch-CE-B# set macsec l3-interface vlan.50
结果
显示配置结果:
user@switch-CE-B> show configuration
interfaces {
    ge-0/0/2 {
        unit 0 {
            family ethernet-switching {
                vlan members macsec;
            }
        }
    }
    xe-0/1/0 {
        unit 0 {
            family ethernet-switching {
                vlan members macsec;
            }
        }
    }
    vlan {
        unit 50 {
            family inet address 5.5.5.2/24;
        }
    }
}
vlans {
    macsec {
        l3-interface vlan.50;
        vlan-id 50;
    }
}
验证
要确认配置工作正常,请执行以下任务:
- 验证 MACsec 连接
- 验证 MACsec 保护的流量是否正在遍历 CCC
- 验证是否在提供商边缘和提供商交换机接口上启用了 MPLS 和 CCC 协议
- 验证 MPLS 标签作
- 验证 MPLS CCC 的状态
- 验证 OSPF作
- 验证 RSVP 会话的状态
验证 MACsec 连接
目的
验证 MACsec 是否在 CCC 上运行。
行动
在一台或两台客户边缘 (CE) 交换机上输入 show security macsec connections 命令。
user@switch-CE-A> show security macsec connections
Interface name: ge-0/0/0
        CA name: ccc-macsec
        Cipher suite: GCM-AES-128   Encryption: on
        Key server offset: 0        Include SCI: no
        Replay protect: off         Replay window: 0
          Outbound secure channels
            SC Id: 00:19:E2:53:CD:F3/1
            Outgoing packet number: 9785
            Secure associations
            AN: 0 Status: inuse Create time: 2d 20:47:54
          Inbound secure channels
            SC Id: 00:23:9C:0A:53:33/1
            Secure associations
            AN: 0 Status: inuse Create time: 2d 20:47:54
意义
Interface name:和 CA name: 输出显示 ccc-macsec 连接关联在接口 ge-0/0/0 上运行。当连接关联在接口上不起作用时,不会显示输出。
如需进一步验证 MACsec 是否可在 CCC 上运行,您还可以在另一台 CE 交换机上输入 show security macsec connections 命令。
验证 MACsec 保护的流量是否正在遍历 CCC
目的
验证通过 CCC 的流量是否受 MACsec 保护。
行动
在一台或两台 CE 交换机上输入 show security macsec statistics 命令。
user@switch-CE-A> show security macsec statistics
Interface name: ge-0/0/0
    Secure Channel transmitted
        Encrypted packets: 9784
        Encrypted bytes:   2821527
        Protected packets: 0
        Protected bytes:   0
    Secure Association transmitted
        Encrypted packets: 9784
        Protected packets: 0
    Secure Channel received
        Accepted packets:  9791
        Validated bytes:   0
        Decrypted bytes:   2823555
    Secure Association received
        Accepted packets:  9791
        Validated bytes:   0
        Decrypted bytes:   2823555
意义
Encrypted packets每次从受 MACsec 保护和加密的接口发送数据包时,Secure Channel transmitted输出下的行都会递增。Encrypted packets输出显示已从接口 ge-0/0/0 传输了 9784 个加密和安全的数据包。因此,MACsec 安全流量在接口 ge-0/0/0 上发送。
Accepted packets每次在接口上收到通过 MACsec 完整性检查的数据包时,Secure Association received输出下的行都会递增。Decrypted bytes每次接收和解密加密数据包时,Secure Association received输出下的行都会递增。输出显示,在接口 ge-0/0/0 上已接收到 9791 个 MACsec 安全数据包,并且这些数据包中的 2823555 个字节已成功解密。因此,在接口 ge-0/0/0 上接收受 MACsec 保护的流量。
如需进一步验证,还可以在另一台 CE 交换机上输入 show security macsec statistics 命令。
验证是否在提供商边缘和提供商交换机接口上启用了 MPLS 和 CCC 协议
目的
验证是否在正确的 PE 和提供商交换机接口上启用了 MPLS。
行动
在 PE 交换机和提供商交换机上输入 show interfaces terse 命令:
user@switch-PE1> show interfaces terse

Interface               Admin Link Proto    Local                 Remote
ge-0/0/0                up    up
ge-0/0/0.0              up    up   ccc
ge-0/0/1                up    up
ge-0/0/1.0              up    up   inet     10.1.5.2/24
                                   mpls
<some output removed for brevity>
user@switch-P> show interfaces terse

Interface               Admin Link Proto    Local                 Remote
xe-0/0/0                up    up
xe-0/0/0.0              up    up   inet     10.1.9.1/24
                                   mpls
ge-0/0/10               up    up
ge-0/0/10.0             up    up   inet     10.1.5.1/24
                                   mpls
<some output removed for brevity>
user@switch-PE2> show interfaces terse

Interface               Admin Link Proto    Local                 Remote
xe-0/1/0                up    up
xe-0/1/0.0              up    up   inet     10.1.9.2/24
                                   mpls
xe-0/1/1                up    up
xe-0/1/1.0              up    up   ccc
<some output removed for brevity>
意义
输出确认,对于传递 MPLS 流量的提供商交换机接口(xe-0/0/0 和 ge-0/0/10)以及传递 MPLS 流量的 PE 交换机接口(即 PE1 交换机上的接口 ge-0/0/1 和 PE2 交换机上的接口 xe-0/1/0),MPLS 协议已启动。
输出还会确认在面向 CE 交换机的 PE 交换机接口上启用了 CCC,这些接口是 PE1 交换机上的接口 ge-0/0/0 和 PE2 交换机上的接口 xe-0/1/1。
验证 MPLS 标签作
目的
验证哪个接口被用作 CCC 的开头,以及哪个接口用于将 MPLS 数据包推送到下一跃点。
行动
在一台或两台 PE 交换机上输入。show route forwarding-table family mpls
user@switch-PE1> show route forwarding-table family mpls

Routing table: default.mpls
MPLS:
Destination        Type RtRef Next hop           Type Index NhRef Netif
default            perm     0                    dscd    50     1
0                  user     0                    recv    49     4
1                  user     0                    recv    49     4
2                  user     0                    recv    49     4
13                 user     0                    recv    49     4
299856             user     0                   Pop    1327     2 ge-0/0/0.0
ge-0/0/0.0  (CCC)  user     0 10.1.5.1          Push 299952  1328     2 ge-0/0/1.0
意义
此输出确认 CCC 配置在接口 ge-0/0/0.0 上。交换机在 ge-0/0/1.0 上接收入口流量,并将标签299952推送到数据包上,数据包通过接口 ge-0/0/1.0 离开交换机。输出还显示,当交换机收到带有标签299856的 MPLS 数据包时,它会弹出标签并通过接口 ge-0/0/0.0 发出数据包
如需进一步验证 MPLS 标签作,请在另一台 PE 交换机上输入。show route forwarding-table family mpls
验证 MPLS CCC 的状态
目的
验证 MPLS CCC 是否正在运行。
行动
在 PE 交换机上输入 show connections 命令。
user@switch-PE1> show connections
CCC and TCC connections [Link Monitoring On]
Legend for status (St):             Legend for connection types:
 UN -- uninitialized                 if-sw:  interface switching
 NP -- not present                   rmt-if: remote interface switching
 WE -- wrong encapsulation           lsp-sw: LSP switching
 DS -- disabled                      tx-p2mp-sw: transmit P2MP switching
 Dn -- down                          rx-p2mp-sw: receive P2MP switching
 -> -- only outbound conn is up     Legend for circuit types:
 <- -- only inbound  conn is up      intf -- interface
 Up -- operational                   oif  -- outgoing interface
 RmtDn -- remote CCC down            tlsp -- transmit LSP
 Restart -- restarting               rlsp -- receive LSP


Connection/Circuit                Type        St      Time last up     # Up trans
ge-1-to-pe2                       rmt-if      Up      May 30 19:01:45         1
  ge-0/0/0.0                        intf      Up
  lsp_to_pe2_xe1                    tlsp      Up
  lsp_to_pe1_ge0                    rlsp      Up
user@switch-PE2> show connections

CCC and TCC connections [Link Monitoring On]
Legend for status (St):             Legend for connection types:
 UN -- uninitialized                 if-sw:  interface switching
 NP -- not present                   rmt-if: remote interface switching
 WE -- wrong encapsulation           lsp-sw: LSP switching
 DS -- disabled                      tx-p2mp-sw: transmit P2MP switching
 Dn -- down                          rx-p2mp-sw: receive P2MP switching
 -> -- only outbound conn is up     Legend for circuit types:
 <- -- only inbound  conn is up      intf -- interface
 Up -- operational                   oif  -- outgoing interface
 RmtDn -- remote CCC down            tlsp -- transmit LSP
 Restart -- restarting               rlsp -- receive LSP


Connection/Circuit                Type        St      Time last up     # Up trans
xe-1-to-pe1                       rmt-if      Up      May 30 09:39:15         1
  xe-0/1/1.0                        intf      Up
  lsp_to_pe1_ge0                    tlsp      Up
  lsp_to_pe2_xe1                    rlsp      Up
命令 show connections 显示 CCC 连接的状态。此输出验证 CCC 接口及其关联的传输和接收 LSP 是否在 Up 两个 PE 交换机上。
验证 OSPF作
目的
验证 OSPF 是否正在运行。
行动
show ospf neighbor输入命令 the provider or the PE switches,然后检查State输出。
user@switch-P> show ospf neighbor

Address          Interface              State     ID               Pri  Dead
10.1.5.2         ge-0/0/10.0            Full      130.1.1.1        128    33
10.1.9.2         xe-0/0/0.0             Full      130.1.1.3        128    38
意义
State输出在所有Full使用 OSPF 的接口上,因此 OSPF 正在运行。
要进一步验证 OSPF,请在 PE 交换机和提供商交换机上输入 show ospf neighbor 命令。
验证 RSVP 会话的状态
目的
验证 RSVP 会话的状态。
行动
输入 show rsvp session 命令,并验证每个 RSVP 会话的状态是否为启动。
user@switch-P> show rsvp session

Ingress RSVP: 0 sessions
Total 0 displayed, Up 0, Down 0

Egress RSVP: 0 sessions
Total 0 displayed, Up 0, Down 0

Transit RSVP: 2 sessions
To              From            State   Rt Style Labelin Labelout LSPname
130.1.1.1       130.1.1.3       Up       0  1 FF  299936   299856 lsp_to_pe1_ge0
130.1.1.3       130.1.1.1       Up       0  1 FF  299952   299840 lsp_to_pe2_xe1
Total 2 displayed, Up 2, Down 0
意义
适用于StateUp所有连接,因此 RSVP 运行正常。
如需进一步验证, show rsvp session 请在 PE 交换机上输入 除了提供商交换机之外。