示例:将数据包转发到丢弃接口
此示例说明如何使用丢弃路由来缓解拒绝服务 (DoS) 攻击,保护重要的网络资源免受外部攻击,为客户提供保护服务以便每个客户都可以启动自己的保护,以及记录和跟踪 DoS 尝试。
要求
配置此示例之前,不需要除设备初始化之外的特殊配置。
概述
在丢弃路由中,路由器配置了不允许在短时间内将数百万个请求发送到同一地址的规则。如果在短时间内收到太多请求,路由器只需丢弃请求而不转发它们。请求将发送到不转发数据包的路由器。有问题的路由有时称为丢弃路由或黑洞路由。应丢弃的路由类型被标识为来自对等方或其他客户的对客户攻击、从客户对等方或其他客户的攻击、攻击控制器(即提供攻击指令的主机)和未分配的地址空间(称为 bogons 或无效 IP 地址)。
识别攻击尝试后,操作员可以进行配置以减轻攻击。在 Junos OS 中配置丢弃路由的一种方法是为用于丢弃路由的每个下一跃点创建一个丢弃静态路由。丢弃静态路由使用该 discard 选项。
例如:
user@host# show routing-options
static {
    route 192.0.2.101/32 discard;
    route 192.0.2.103/32 discard;
    route 192.0.2.105/32 discard;
}
user@host> show route protocol static terse
inet.0: 3 destinations, 3 routes (3 active, 0 holddown, 0 hidden)
+ = Active Route, - = Last Active, * = Both

A V Destination        P Prf   Metric 1   Metric 2  Next hop        AS path
* ? 192.0.2.101/32     S   5                        Discard
* ? 192.0.2.103/32     S   5                        Discard
* ? 192.0.2.105/32     S   5                        Discard
另一个策略(也是此示例的主要焦点)是使用路由策略和丢弃接口。在此方法中,丢弃接口包含要分配给空路由路由的下一跃点。丢弃接口只能有一个逻辑单元(单元 0),但您可以在单元 0 上配置多个 IP 地址。
例如:
user@host# show interfaces dsc
unit 0 {
    family inet {
        address 192.0.2.102/32 {
            destination 192.0.2.101;
        }
        address 192.0.2.104/32 {
            destination 192.0.2.103;
        }
        address 192.0.2.106/32 {
            destination 192.0.2.105;
        }
    }
}
user@host> show interfaces terse dsc
b
Interface               Admin Link Proto    Local                 Remote
dsc                     up    up
dsc.0                   up    up   inet     192.0.2.102         --> 192.0.2.101
                                            192.0.2.104         --> 192.0.2.103
                                            192.0.2.106         --> 192.0.2.105
使用丢弃接口而不是使用丢弃静态路由的优势在于,丢弃接口允许您配置过滤器并将其分配给接口,以便对流量进行计数、日志记录和采样。此示例对此进行了演示。
要实际丢弃数据包,需要附加到 BGP 会话的路由策略。要查找符合丢弃条件的路由,可以使用路由过滤器、访问列表或 BGP 社区值。
例如,以下是如何使用路由筛选器:
路由过滤器
protocols {
    bgp {
        import blackhole-by-route;
    }
}
policy-options {
    policy-statement blackhole-by-route {
        term specific-routes {
            from {
                route-filter 10.10.10.1/32 exact;
                route-filter 10.20.20.2/32 exact;
                route-filter 10.30.30.3/32 exact;
                route-filter 10.40.40.4/32 exact;
            }
            then {
                next-hop 192.0.2.101
            }
        }
    }
}
图 1 显示了示例网络。
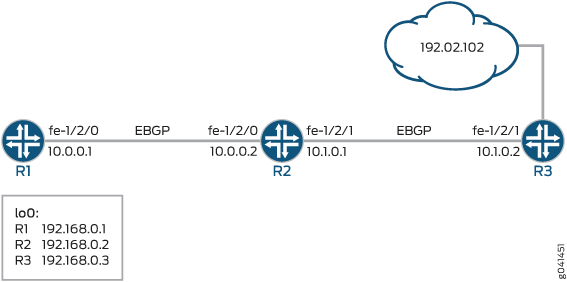
该示例包括三个已建立外部 BGP (EBGP) 会话的路由器。
设备 R1 表示攻击设备。设备 R3 表示离受攻击设备最近的路由器。设备 R2 通过将数据包转发到丢弃接口来缓解攻击。
该示例显示了应用于丢弃接口的出站筛选器。
使用单个空路由筛选器的一个问题是可见性。所有丢弃的数据包递增相同的计数器。要查看要丢弃哪些类别的数据包,请使用目标类用法 (DCU),并将用户定义的类与每个空路由社区相关联。然后在防火墙过滤器中引用 DCU 类。有关相关示例,请参见 示例:将源前缀和目标前缀分组为转发类 和 示例:基于目标类配置速率限制过滤器。
与使用路由过滤器和访问列表相比,使用社区值是管理难度最低且最具可扩展性的方法。因此,这是此示例中显示的方法。
默认情况下,下一跃点必须等于外部 BGP (EBGP) 对等地址。更改空路由服务的下一跃点需要在 EBGP 会话上配置多跃点功能。
#configuration756__policy-discard-st本节介绍设备 R2 上的步骤。
配置
程序
CLI 快速配置
要快速配置此示例,请复制以下命令,将其粘贴到文本文件中,删除所有换行符,更改与您的网络配置匹配所需的任何详细信息,然后将命令复制并粘贴到层次结构级别的 CLI [edit] 中。
设备 R1
set interfaces fe-1/2/0 unit 0 family inet address 10.0.0.1/30
set interfaces lo0 unit 0 family inet address 192.168.0.1/32
set protocols bgp group ext type external
set protocols bgp group ext peer-as 200
set protocols bgp group ext neighbor 10.0.0.2
set routing-options autonomous-system 100
设备 R2
set interfaces fe-1/2/0 unit 0 family inet address 10.0.0.2/30
set interfaces fe-1/2/1 unit 0 family inet address 10.1.0.1/30
set interfaces dsc unit 0 family inet filter output log-discard
set interfaces dsc unit 0 family inet address 192.0.2.102/32 destination 192.0.2.101
set interfaces lo0 unit 0 family inet address 192.168.0.2/32
set protocols bgp import blackhole-policy
set protocols bgp group ext type external
set protocols bgp group ext multihop
set protocols bgp group ext export dsc-export
set protocols bgp group ext neighbor 10.0.0.1 peer-as 100
set protocols bgp group ext neighbor 10.1.0.2 peer-as 300
set policy-options policy-statement blackhole-policy term blackhole-communities from community blackhole-all-routers
set policy-options policy-statement blackhole-policy term blackhole-communities then next-hop 192.0.2.101
set policy-options policy-statement dsc-export from route-filter 192.0.2.101/32 exact
set policy-options policy-statement dsc-export from route-filter 192.0.2.102/32 exact
set policy-options policy-statement dsc-export then community set blackhole-all-routers
set policy-options policy-statement dsc-export then accept
set policy-options community blackhole-all-routers members 100:5555
set routing-options static route 192.0.2.102/32 next-hop 192.0.2.101
set routing-options autonomous-system 200
set firewall filter log-discard term one then count counter
set firewall filter log-discard term one then log
设备 R3
set interfaces fe-1/2/1 unit 0 family inet address 10.1.0.2/30
set interfaces lo0 unit 0 family inet address 192.168.0.3/32
set interfaces lo0 unit 0 family inet address 192.0.2.102/32
set protocols bgp group ext type external
set protocols bgp group ext peer-as 200
set protocols bgp group ext neighbor 10.1.0.1
set routing-options autonomous-system 300
分步过程
下面的示例要求您在各个配置层级中进行导航。有关如何执行此操作的说明,请参阅 在配置模式下使用 CLI 编辑器Junos OS CLI 用户指南。
要配置设备 R2:
创建路由器接口。
[edit interfaces]
user@R2# set fe-1/2/0 unit 0 family inet address 10.0.0.2/30
user@R2# set fe-1/2/1 unit 0 family inet address 10.1.0.1/30
user@R2# set lo0 unit 0 family inet address 192.168.0.2/32
配置匹配所有数据包并计数和记录数据包的防火墙过滤器。
[edit firewall filter log-discard term one]
user@R2# set then count counter
user@R2# set then log
创建丢弃接口并应用输出防火墙过滤器。
输入防火墙过滤器在此上下文中没有影响。
[edit interfaces dsc unit 0 family inet]
user@R2# set filter output log-discard
user@R2# set address 192.0.2.102/32 destination 192.0.2.101
配置静态路由,将下一跃点发送到丢弃接口中指定的目标地址。
[edit routing-options static]
user@R2# set route 192.0.2.102/32 next-hop 192.0.2.101
配置 BGP 对等互连。
[edit protocols bgp ]
user@R2# set group ext type external
user@R2# set group ext multihop
user@R2# set group ext neighbor 10.0.0.1 peer-as 100
user@R2# set group ext neighbor 10.1.0.2 peer-as 300
配置路由策略。
[edit policy-options policy-statement blackhole-policy term blackhole-communities]
user@R2# set from community blackhole-all-routers
user@R2# set then next-hop 192.0.2.101
[edit policy-options policy-statement dsc-export]
user@R2# set from route-filter 192.0.2.101/32 exact
user@R2# set from route-filter 192.0.2.102/32 exact
user@R2# set then community set blackhole-all-routers
user@R2# set then accept
[edit policy-options community blackhole-all-routers]
user@R2# set members 100:5555
应用路由策略。
[edit protocols bgp ]
user@R2# set import blackhole-policy
user@R2# set group ext export dsc-export
配置自治系统 (AS) 编号。
[edit routing-options]
user@R2# set autonomous-system 200
结果
在配置模式下,通过发出 show interfaces、 show protocols 、 show routing-optionsshow policy-options和 show firewall 命令来确认您的配置。如果输出未显示预期的配置,请重复此示例中的说明,以便进行更正。
[edit]
user@R2# show interfaces
fe-1/2/0 {
    unit 0 {
        family inet {
            address 10.0.0.2/30;
        }
    }
}
fe-1/2/1 {
    unit 0 {
        family inet {
            address 10.1.0.1/30;
        }
    }
}
dsc {
    unit 0 {
        family inet {
            filter {
                output log-discard;
            }
            address 192.0.2.102/32 {
                destination 192.0.2.101;
            }
        }
    }
}
lo0 {
    unit 0 {
        family inet {
            address 192.168.0.2/32;
        }
    }
}
user@R2# show protocols
bgp {
    import blackhole-policy;
    group ext {
        type external;
        multihop;
        export dsc-export;
        neighbor 10.0.0.1 {
            peer-as 100;
        }
        neighbor 10.1.0.2 {
            peer-as 300;
        }
    }
}
user@R2# show policy-options
policy-statement blackhole-policy {
    term blackhole-communities {
        from community blackhole-all-routers;
        then {
            next-hop 192.0.2.101;
        }
    }
}
policy-statement dsc-export {
    from {
        route-filter 192.0.2.101/32 exact;
        route-filter 192.0.2.102/32 exact;
    }
    then {
        community set blackhole-all-routers;
        accept;
    }
}
community blackhole-all-routers members 100:5555;
user@R2# show routing-options
static {
    route 192.0.2.102/32 next-hop 192.0.2.101;
}
autonomous-system 200;
user@R2# show firewall
filter log-discard {
    term one {
        then {
            count counter;
            log;
        }
    }
}
如果完成设备配置,请从配置模式输入 commit。
验证
确认配置工作正常。
清除防火墙计数器
目的
清除计数器以确保从已知的零 (0) 状态开始。
操作
从设备 R2
clear firewall运行命令。user@R2> clear firewall filter log-discard
从设备 R2
show firewall运行命令。user@R2> show firewall filter log-discard Filter: /log-discard Counters: Name Bytes Packets counter 0 0
对 192.0.2.101 地址执行 ping 操作
目的
将数据包发送到目标地址。
操作
在设备 R1 中,运行 ping 命令。
user@R1> ping 192.0.2.101
PING 192.0.2.101 (192.0.2.101): 56 data bytes
^C
--- 192.0.2.101 ping statistics ---
4 packets transmitted, 0 packets received, 100% packet loss
意义
正如预期的那样,ping 请求失败,并且没有发送任何响应。数据包将被丢弃。
检查输出过滤器
目的
验证设备 R2 的防火墙过滤器是否正常工作。
操作
从设备 R2 中,输入 show firewall filter log-discard 命令。
user@R2> show firewall filter log-discard
Filter: log-discard
Counters:
Name                                                Bytes              Packets
counter                                               336                    4
意义
正如预期的那样,计数器正在递增。
ping 数据包额外携带 20 字节的 IP 开销以及 8 字节的 ICMP 标头。
检查社区属性
目的
验证路由是否使用社区属性进行标记。
操作
在设备 R1 中,输入命令,使用 show route extensive 设备 R2 的邻居地址 192.0.2.101。
user@R1> show route 192.0.2.101 extensive

inet.0: 4 destinations, 4 routes (4 active, 0 holddown, 0 hidden)
192.0.2.101/32 (1 entry, 1 announced)
TSI:
KRT in-kernel 192.0.2.101/32 -> {10.0.0.2}
        *BGP    Preference: 170/-101
                Next hop type: Router, Next hop index: 684
                Address: 0x94141d8
                Next-hop reference count: 2
                Source: 10.0.0.2
                Next hop: 10.0.0.2 via fe-1/2/0.0, selected
                Session Id: 0x8000a
                State: <Active Ext>
                Local AS:   100 Peer AS:   200
                Age: 53:03
                Validation State: unverified
                Task: BGP_200.10.0.0.2+63097
                Announcement bits (1): 2-KRT
                AS path: 200 I
                Communities: 100:5555
                Accepted
                Localpref: 100
                Router ID: 192.168.0.2
意义
正如预期的那样,当设备 R2 将 192.0.2.101 路由播发到设备 R1 时,设备 R2 会添加 100:5555 社区标记。