为多个目标配置端口镜像
了解使用下一跃点组将第 2 层端口镜像到多个目标
在 MX 系列路由器和 EX 系列交换机上,通过在应用于隧道接口的第 2 层端口镜像防火墙过滤器中配置下一跃点组,可以将流量镜像到多个目标。将数据包镜像到多个目标也称为 多数据包端口镜像,
Junos OS 9.5 版引入了对使用 MX 系列路由器上的下一跃点组进行第 2 层 端口镜像 的支持,但需要安装隧道 PIC。从 Junos OS 9.6 版开始,在 MX 系列路由器上使用下一跃点组进行第 2 层端口镜像不需要隧道 PIC。
在 MX 系列路由器和 EX 系列交换机上,您可以定义 防火墙过滤器 ,用于将数据包镜像到下一跃点组。下一跃点组可以包含第 2 层成员、第 3 层成员和子组,这些子组可以是单元列表(将数据包镜像到每个接口)或负载平衡(将数据包镜像到多个接口之一)。MX 系列路由器和 EX 系列交换机最多支持 30 个下一跃点组。每个下一跃点组最多支持 16 个下一跃点地址。每个下一跃点组必须至少指定两个地址。
要启用到下一跃点组成员的端口镜像,请将下一跃点组指定为防火墙过滤器的过滤器操作,然后将防火墙过滤器应用于 MX 系列路由器或 EX 系列交换机上的逻辑隧道接口 (lt-) 或虚拟隧道接口 (vt-)。
不支持使用子组对镜像流量进行负载均衡。
在 MX 系列路由器上定义用于端口镜像的下一跃点组
从版本 14.2 开始,在包含互联网处理器 II 专用集成电路 (ASIC) 或 T 系列互联网处理器的路由器上,您可以将 IP 版本 4 (IPv4) 或 IP 版本 6 (IPv6) 数据包的副本从路由器发送到外部主机地址或数据包分析器进行分析。这称为 端口镜像。
端口镜像不同于流量采样。在流量采样中,基于 IPv4 标头的采样密钥将发送到路由引擎。在那里,可以将密钥放在文件中,或者基于密钥的 cflowd 数据包可以发送到 cflowd 服务器。在端口镜像中,复制整个数据包并通过下一跃点接口发出。
您可以配置同时使用采样和端口镜像,并为端口镜像数据包设置独立的采样率和运行长度。但是,如果为采样和端口镜像选择了数据包,则只能执行一个操作,并且端口镜像优先。例如,如果将接口配置为对接口的每个数据包输入进行采样,并且过滤器还选择要将端口镜像到另一个接口的数据包,则只有端口镜像才会生效。所有其他与显式过滤器端口镜像条件不匹配的数据包在转发到其最终目标时将继续采样。
下一跃点组允许您在多个接口上包括端口镜像。
在 MX 系列路由器上,您可以将隧道接口输入流量镜像到多个目标。对于这种形式的多数据包端口镜像,您可以在下一跃点组中指定两个或多个目标,定义一个引用下一跃点组作为过滤器操作的防火墙过滤器,然后将过滤器应用于逻辑隧道接口 lt-) 或虚拟隧道接口(vt- 在 MX 系列路由器上)。
要为第 2 层端口镜像防火墙过滤器操作定义下一跃点组,请执行以下操作:
示例:使用 M、MX 和 T 系列路由器上的下一跃点组配置多端口镜像
当您需要分析包含多个数据包类型的流量,或者希望对单一类型的流量执行多种类型的分析时,可以实现多个端口镜像和下一跃点组。每个组最多可以创建 16 个流量副本,并将流量发送给下一跃点组成员。在任何给定时间,路由器上最多可以配置 30 个组。端口镜像流量可以发送到任何接口,聚合 SONET/SDH、聚合以太网、环路 (lo0) 或管理 (fxp0) 接口除外。要将端口镜像流量发送到多个流服务器或数据包分析器,可以在层次结构级别使用该next-hop-group[edit forwarding-options]语句。
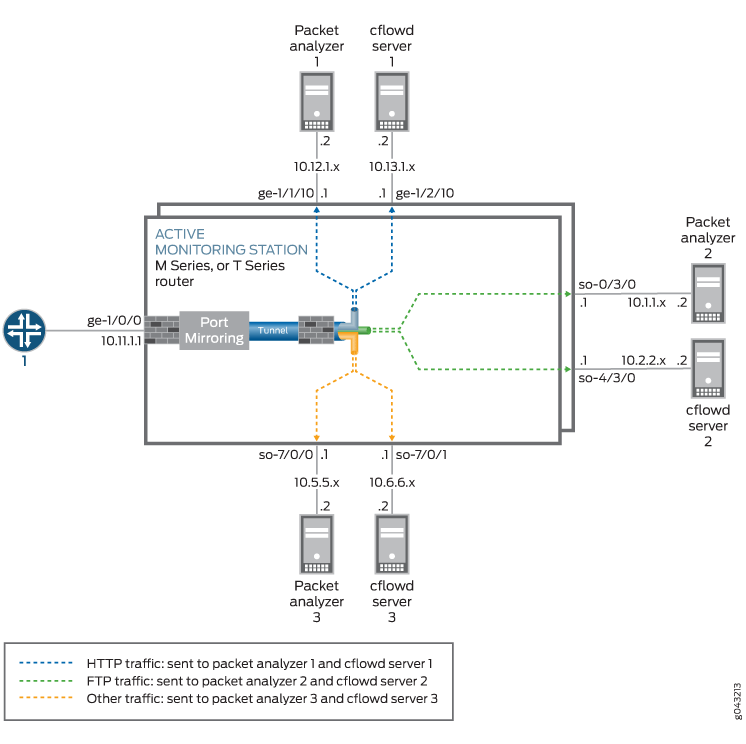
图 1 显示了如何使用下一跃点组配置多端口镜像的示例。所有流量都通过接口 ge-1/0/0 进入监控路由器。防火墙过滤器对所有传入数据包进行计数,并将端口镜像到隧道服务 PIC。第二个过滤器应用于隧道接口,并将流量分为三类:HTTP 流量、FTP 流量和所有其他流量。这三种类型的流量被分配到三个单独的下一跃点组。每个下一跃点组都包含一对唯一的出口接口,这些接口可通往不同的数据包分析器和流服务器组。
能够将数据包从同一 PFE 镜像到不同目标的实例也对每个实例使用不同的采样参数。当我们使用全局端口镜像和基于实例的端口镜像配置第 2 层端口镜像时,PIC 级别实例将覆盖 FPC 级别,FPC 级别将覆盖全局实例。
[edit]
interfaces {
                   ge-1/0/0 { # This is the input interface where packets enter the router.
        unit 0 {
            family inet {
                filter {
                                         input mirror_pkts; # Here is where you apply the first filter.
                }
                address 10.11.1.1/24;
            }
        }
    }
                   ge-1/1/0 { # This is an exit interface for HTTP packets.
        unit 0 {
            family inet {
                address 10.12.1.1/24;
            }
        }
    }
                   ge-1/2/0 { # This is an exit interface for HTTP packets.
        unit 0 {
            family inet {
                address 10.13.1.1/24;
            }
        }
    }
                   so-0/3/0 { # This is an exit interface for FTP packets.
        unit 0 {
            family inet {
                address 10.1.1.1/30;
            }
        }
    }
                   so-4/3/0 { # This is an exit interface for FTP packets.
        unit 0 {
            family inet {
                address 10.2.2.1/30;
            }
        }
    }
                   so-7/0/0 { # This is an exit interface for all remaining packets.
        unit 0 {
            family inet {
                address 10.5.5.1/30;
            }
        }
    }
                   so-7/0/1 { # This is an exit interface for all remaining packets.
        unit 0 {
            family inet {
                address 10.6.6.1/30;
            }
        }
    }
                   vt-3/3/0 { # The tunnel interface is where you send the port-mirrored traffic.
        unit 0 {
            family inet;
        }
        unit 1 {
            family inet {
                filter {
                                         input collect_pkts;  # This is where you apply the second firewall filter.
                }
            }
        }
    }
}
forwarding-options {
                   port-mirroring { # This is required when you configure next-hop groups.
        family inet {
            input {
                                   rate 1; # This port-mirrors all packets (one copy for every packet received).
            }
                               output { # Sends traffic to a tunnel interface to enable multiport mirroring.
                interface vt-3/3/0.1;
                no-filter-check;
            }
        }
    }
    next-hop-group ftp-traffic { # Point-to-point interfaces require you to specify the
        interface so-4/3/0.0; # interface name.
        interface so-0/3/0.0;
    }
    next-hop-group http-traffic { # Configure a next hop for all multipoint interfaces.
        interface ge-1/1/0.0 {
            next-hop 10.12.1.2;
        }
        interface ge-1/2/0.0 {
            next-hop 10.13.1.2;
        }
    }
    next-hop-group default-collect {
        interface so-7/0/0.0;
        interface so-7/0/1.0;
    }
}
firewall {
    family inet {
                         filter mirror_pkts { # Apply this filter to the input interface.
            term catch_all {
                then {
                    count input_mirror_pkts;
                                         port-mirror; # This action sends traffic to be copied and port-mirrored.
                }
            }
        }
                         filter collect_pkts { # Apply this filter to the tunnel interface.
                               term ftp-term { # This term sends FTP traffic to an FTP next-hop group.
                from {
                    protocol ftp;
                }
                                   then next-hop-group ftp-traffic;
            }
                               term http-term { # This term sends HTTP traffic to an HTTP next-hop group.
                from {
                    protocol http;
                }
                                   then next-hop-group http-traffic;
            }
                               term default { # This sends all remaining traffic to a final next-hop group.
                                   then next-hop-group default-collectors;
            }
        }
    }
}
示例:第 2 层端口镜像到多个目标
在 MX 系列路由器上,通过在应用于隧道接口的第 2 层端口镜像防火墙过滤器中配置下一跃点组,可以将流量镜像到多个目标。
配置机箱以支持 FPC 2 上 PIC 0 处的隧道服务。此配置包括 FPC 2、PIC 0、端口 10 上的两个逻辑隧道接口。
[edit]
chassis {
    fpc 2 {
        pic 0 {
            tunnel-services {
                bandwidth 1g;
            }
        }
    }
}
为三个桥接域和一个第 2 层 VPN CCC 配置物理和逻辑接口:
桥接域 bd 将跨越逻辑接口 ge-2/0/1.0 和 ge-2/0/1.1.
桥接域 bd_next_hop_group 将跨越逻辑接口 ge-2/2/9.0 和 ge-2/0/2.0.
桥接域 bd_port_mirror 将使用逻辑隧道接口 lt-2/0/10.2。
第 2 层 VPN CCC if_switch 将连接逻辑接口 ge-2/0/1.2 和 lt-2/0/10.1.
[edit]
interfaces {
    ge-2/0/1 {
        flexible-vlan-tagging;
        encapsulation flexible-ethernet-services;
        unit 0 { # An interface on bridge domain ’bd’.
            encapsulation vlan-bridge;
            vlan-id 200;
            family bridge {
                filter {
                    input pm_bridge;
                }
            }
        }
        unit 1 { # An interface on bridge domain ’bd’.
            encapsulation vlan-bridge;
            vlan-id 201;
            family bridge {
                filter {
                    input pm_bridge;
                }
            }
        }
        unit 2 {
            encapsulation vlan-ccc;
            vlan-id 1000;
        }
    }
    ge-2/0/2 { # For ’bd_next_hop_group’
        encapsulation ethernet-bridge;
        unit 0 {
            family bridge;
        }
    }
    lt-2/0/10 {
        unit 1 {
            encapsulation ethernet-ccc;
            peer-unit 2;
        }
        unit 2 {
            encapsulation ethernet-bridge;
            peer-unit 1;
            family bridge {
                filter {
                    output redirect_to_nhg;
                }
            }
        }
    }
    ge-2/2/9 {
        encapsulation ethernet-bridge;
        unit 0 { # For ’bd_next_hop_group’
            family bridge;
        }
    }
}
配置三个桥接域和第 2 层 VPN 交换 CCC:
桥接域 bd 跨越逻辑接口 ge-2/0/1.0 和 ge-2/0/1.1.
桥接域 bd_next_hop_group 跨越逻辑接口 ge-2/2/9.0 和 ge-2/0/2.0.
桥接域 bd_port_mirror 使用逻辑隧道接口 lt-2/0/10.2。
第 2 层 VPN CCC if_switch 连接接口 ge-2/0/1.2 和 lt-2/0/10.1.
[edit]
bridge-domains {
    bd {
        interface ge-2/0/1.0;
        interface ge-2/0/1.1;
    }
    bd_next_hop_group {
        interface ge-2/2/9.0;
        interface ge-2/0/2.0;
    }
    bd_port_mirror {
        interface lt-2/0/10.2;
    }
}
protocols {
    mpls {
        interface all;
    }
    connections {
        interface-switch if_switch {
            interface ge-2/0/1.2;
            interface lt-2/0/10.1;
        }
    }
}
有关为第 2 层交换交叉连接配置 CCC 连接的详细信息,请参阅 MPLS 应用程序用户指南。
配置转发选项:
配置全局端口镜像属性以将流量镜像 family vpls 到桥接域 bd_port_mirror上的接口。
配置下一跃点组 nhg_mirror_to_bd 以将第 2 层流量转发到网桥域 bd_next_hop_group。
端口镜像防火墙过滤器将引用这两个转发选项:
[edit]
forwarding-options {
    port-mirroring { # Global port mirroring properties.
        input {
            rate 1;
        }
        family vpls {
            output {
                interface lt-2/0/10.2; # Interface on ’bd_port_mirror’ bridge domain.
                no-filter-check;
            }
        }
    }
    next-hop-group nhg_mirror_to_bd { # Configure a next-hop group.
        group-type layer-2; # Specify ’layer-2’ for Layer 2; default ’inet’ is for Layer 3.
        interface ge-2/0/2.0; # Interface on ’bd_next_hop_group’ bridge domain.
        interface ge-2/2/9.0; # Interface on ’bd_next_hop_group’ bridge domain.
    }
}
为流量配置 family bridge 两个第 2 层端口镜像防火墙过滤器:
filter_pm_bridge— 将所有流量发送到 family bridge 全局端口镜像目标。
filter_redirect_to_nhg— 将所有流量发送到 family bridge 最终的下一跃点组 nhg_mirror_to_bd。
第 family bridge 2 层端口镜像防火墙流量过滤器适用于配置了封装 ethernet-bridge的物理接口上的流量。
[edit]
firewall {
    family bridge {
        filter filter_pm_bridge {
            term term_port_mirror {
                then port-mirror;
            }
        }
        filter filter_redirect_to_nhg {
            term term_nhg {
                then next-hop-group nhg_mirror_to_bd;
            }
        }
    }
}
变更历史表
是否支持某项功能取决于您使用的平台和版本。 使用 Feature Explorer 查看您使用的平台是否支持某项功能。