Help us improve your experience.

Let us know what you think.

Do you have time for a two-minute survey?


Implantando o Apstra Virtual Appliance na Nutanix

Este guia explica como implantar a imagem KVM da imagem de VM do Apstra para Linux e instalá-la na Nutanix.

Baixe a imagem

  1. Baixe a imagem de VM do Apstra 6.0 para Linux KVM (QCOW2) na página Downloads de software .

  2. Selecione a versão 6.0 na VERSION janela suspensa.

    Um exemplo de nome de arquivo para a versão 6.0 é aos_server_6.0.0-189.qcow2.gz.

  3. Extraia a imagem de disco e mova-a para o local onde deseja instalá-la.

Carregue a imagem

  1. Faça login no Nutanix Prism Central console.

  2. Navegue até a Image Configuration tela ou tela semelhante, dependendo da sua versão do Nutanix.

  3. Especifique o nome da imagem.

  4. Selecione o tipo de imagem como DISK.

  5. Selecione SelfServiceContainer na Storage Container janela suspensa.

  6. Selecione Upload a file e clique para Choose File carregar o qcow2 arquivo que você extraiu do .gz arquivo.
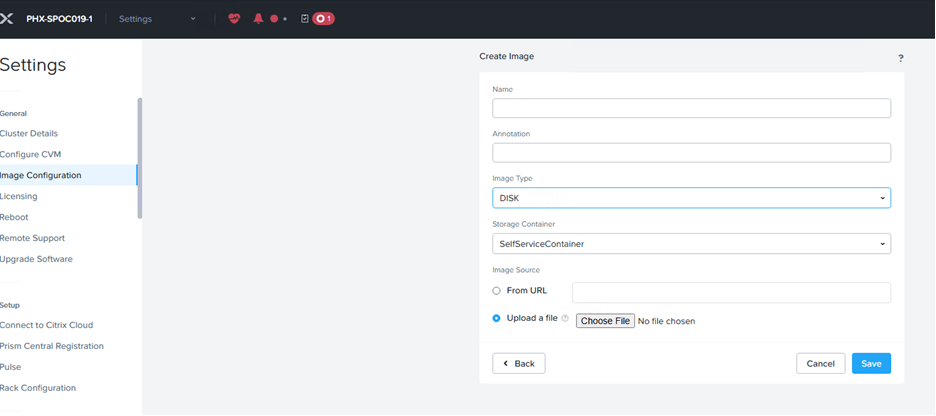
    User interface for creating an image in a system configuration panel with fields for name, annotation, image type set to DISK, storage container set to SelfServiceContainer, and image source set to upload a file. Navigation menu on the left with Image Configuration selected and buttons for Cancel, Back, and Save at the bottom.

Implantar a VM

  1. Prism Central No console, navegue até a VM seção.
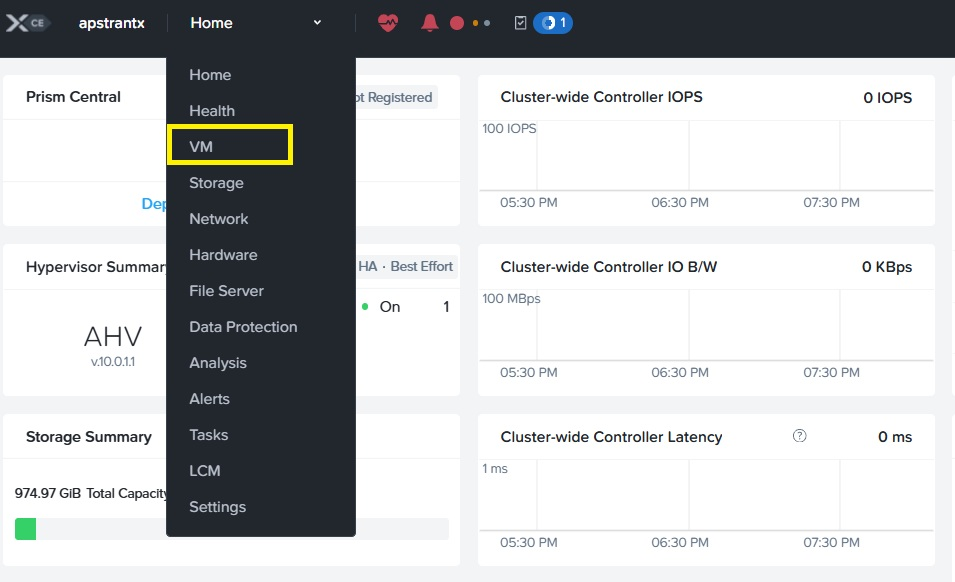
    Nutanix Prism interface showing VM option selected in dropdown menu, with metrics for IOPS, IO Bandwidth, Latency, storage, and hypervisor summaries.
  2. Clique em Table e selecione Create VM para iniciar o assistente.
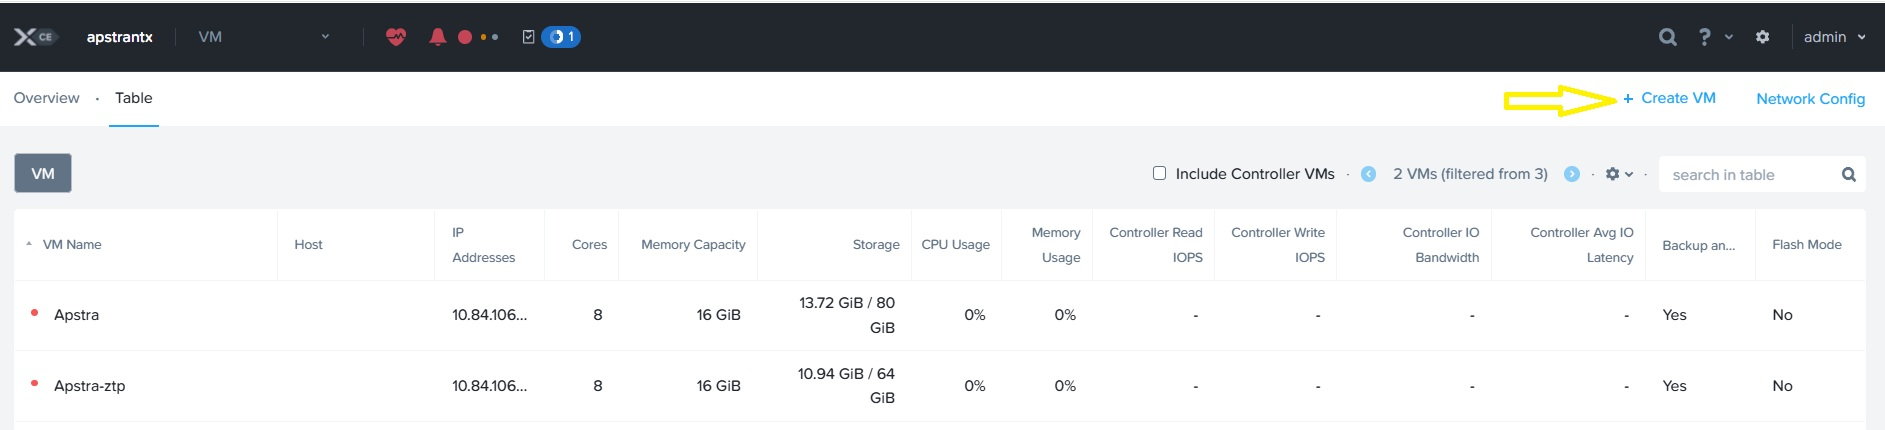
    Virtual machine management interface showing a table with details like VM names Apstra and Apstra-ztp, IP addresses, performance metrics, and a Create VM button highlighted with a yellow arrow.
  3. Insira o nome da VM na Name caixa de edição.
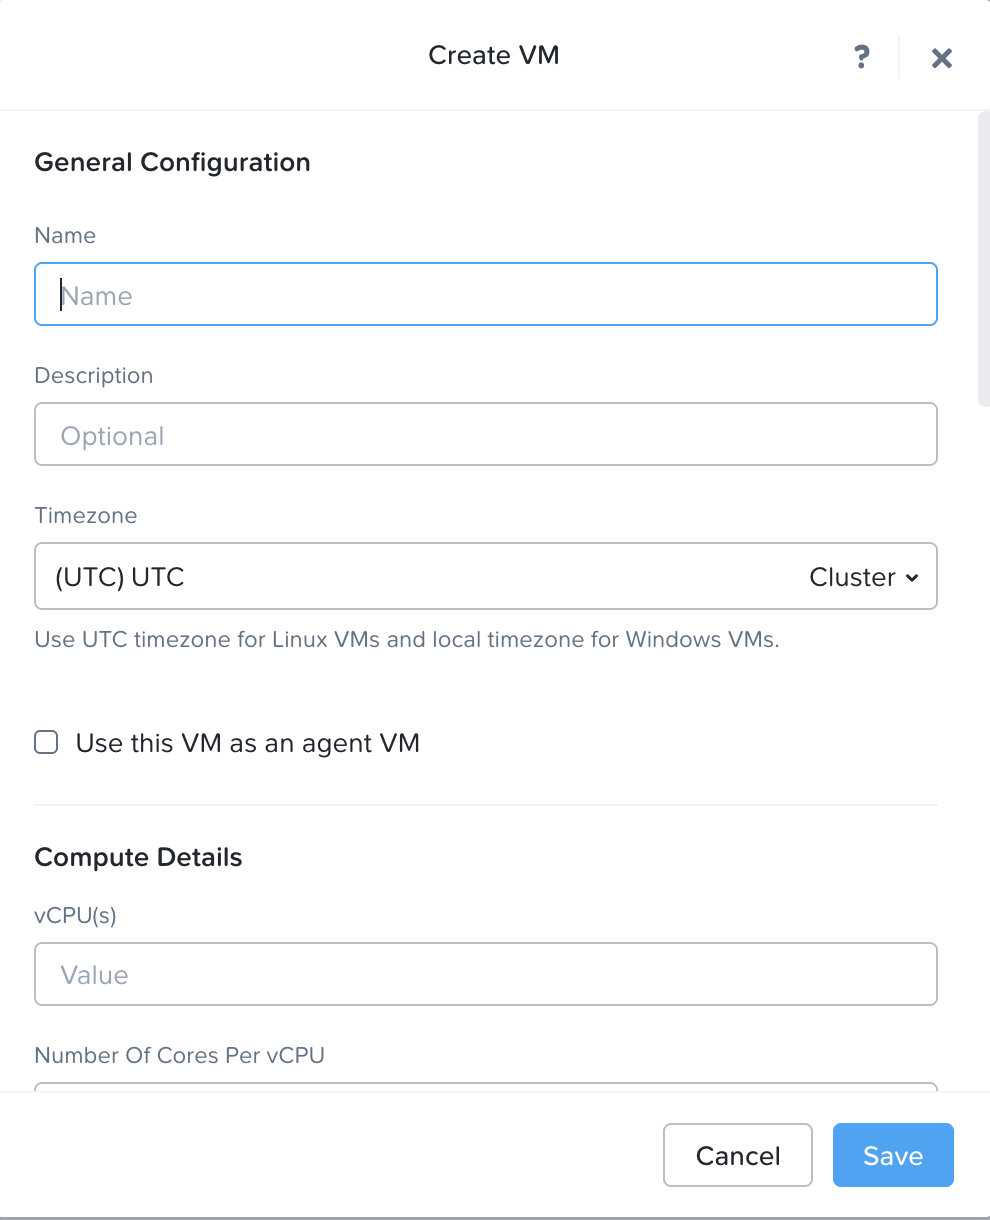
    User interface for creating a virtual machine with fields for name, description, timezone, agent VM checkbox, vCPUs, cores per vCPU, and Cancel and Save buttons.
  4. Selecione Legacy BIOS na Boot Configuration seção.
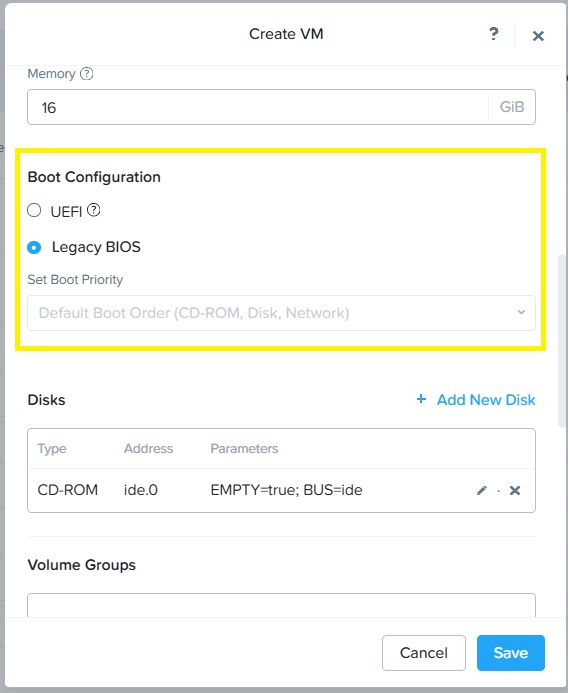
    Create VM configuration window with 16 GiB memory, Legacy BIOS boot selected, empty CD-ROM on IDE bus, and options to add disk, save, or cancel.
  5. Especifique o número de vCPUs e núcleos por vCPU e detalhes de memória.
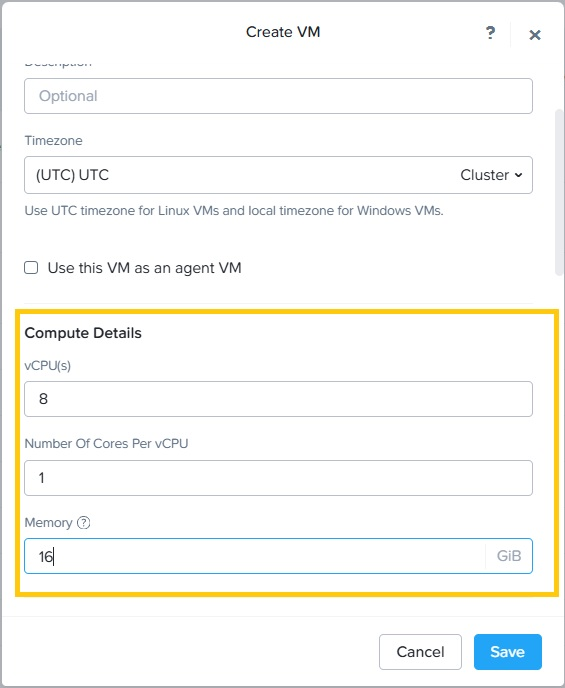
    User interface for creating a virtual machine with fields for description, timezone selection, agent VM checkbox, compute details for vCPUs set to 8, cores per vCPU set to 1, memory set to 16 GiB, and buttons for cancel or save configuration.
  6. Adicione um disco à VM:

    1. Selecione DISK na Type janela suspensa.

    2. Selecione Clone em Serviço de imagem na Operation janela suspensa.

    3. Selecione SCSI na Bus janela suspensa Tipo.

    4. Selecione qcow2-apstra na Add Diskjanela suspensa.

    5. Selecione Next Available na Index janela suspensa e clique em Add.
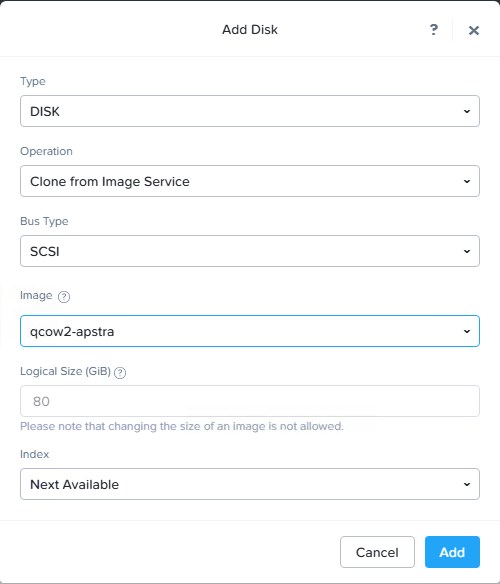
      User interface form for adding a virtual disk with fields set to Disk type, Clone from Image Service operation, SCSI bus type, qcow2-apstra image, 80 GiB logical size, and Next Available index. Cancel and Add buttons included.
  7. Clique Add New NIC na Network Adapters (NIC) seção para adicionar uma NIC.
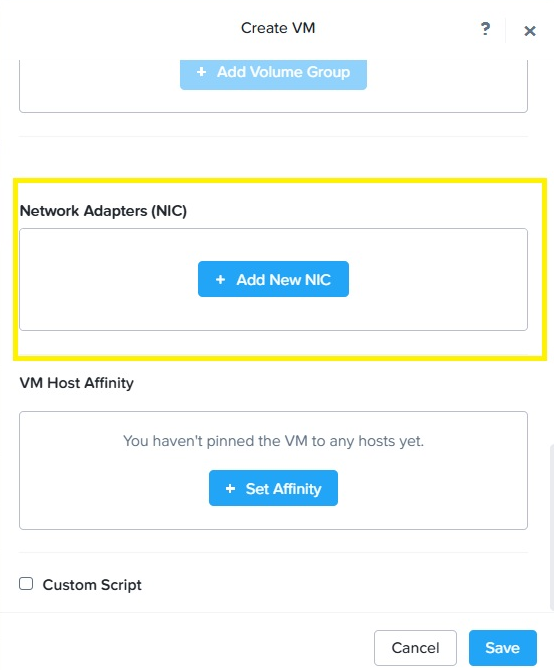
    Configure Network Adapters with Add New NIC button and VM Host Affinity rules options for virtual machine setup.
  8. Selecione o nome da sub-rede disponível na janela suspensa.
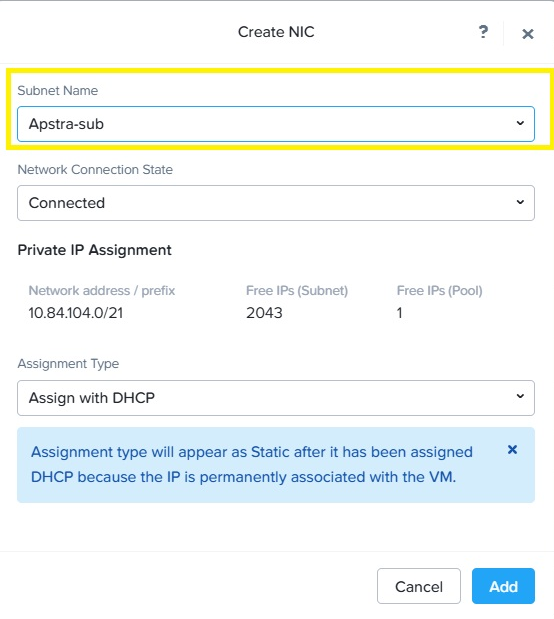
    Create NIC configuration window showing subnet name Apstra-sub highlighted in yellow, connected state, subnet 10.84.104.0/21 with 2043 free IPs, pool with 1 free IP, DHCP assignment type, and Add and Cancel buttons.
  9. Salve as configurações da VM e clique com o botão direito do mouse na VM para ligá-la.
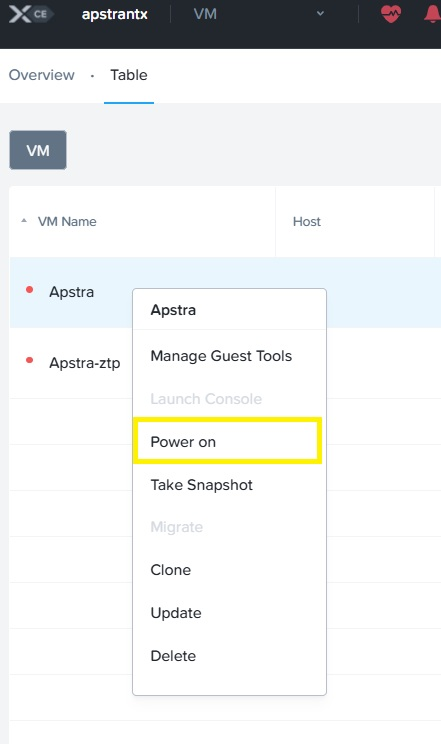
    VM management interface showing a context menu for the Apstra VM with options including Manage Guest Tools, Power on highlighted in yellow, Take Snapshot, Migrate, Clone, Update, and Delete. The VM is currently powered off.
  10. Clique com o botão direito do VMmouse em e selecione Launch Console para acesso.
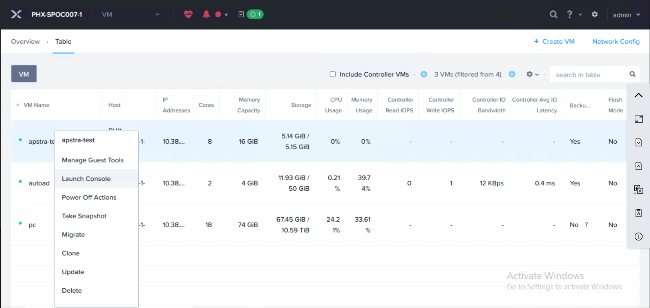
    User interface for managing virtual machines, displaying VM details like name, host, IP addresses, CPU cores, memory, storage, usage metrics, and management options such as manage tools, launch console, power off, snapshot, migrate, clone, update, and delete.